Japanese Cuisine
Hiyashi Chuka (Cold Ramen)
Brace yourself for a culinary adventure as you explore the world of hiyashi chuka, a refreshing chilled ramen dish that effortlessly blends Japanese and Chinese flavors.
When the mercury rises and you crave something refreshing, you can't go wrong with hiyashi chuka. This chilled ramen dish combines the best of Japanese and Chinese cuisines, offering a burst of flavors and textures that'll tantalize your taste buds. Though it may seem simple, the careful balance of savory, sweet, and tart elements is what makes hiyashi chuka a summertime standout. Intrigued? Let's dive deeper into the history and preparation of this versatile dish – you might just discover your new favorite way to beat the heat.
Key Takeaways
- Hiyashi Chuka is a Japanese summer dish featuring cold ramen noodles, fresh vegetables, and various proteins, often seasoned with a soy-based dressing.
- The dish emerged in Japan in the 1950s, reflecting a blend of Chinese culinary roots and distinctly Japanese flavors like soy sauce and sesame oil.
- The key components of Hiyashi Chuka include a base of chilled ramen noodles, fresh vegetables like cucumber and carrots, and proteins such as chicken, shrimp, or boiled eggs.
- Preparation involves cooking the ramen, draining and rinsing it under cold water, tossing it with a soy-based dressing, and garnishing with various toppings.
- Hiyashi Chuka is a refreshing, customizable dish that is typically enjoyed during the hot summer months in Japan.
History
Although the origins of hiyashi chuka are unclear, it's believed to have emerged as a summertime dish in Japan during the 1950s. As the weather grew warmer, people sought refreshing meals that could be served chilled. Hiyashi chuka, with its cold noodles and crisp vegetables, fit the bill perfectly.
The dish's name translates to "cold Chinese-style," reflecting its roots in Chinese cuisine. However, hiyashi chuka quickly evolved to feature distinctly Japanese flavors, such as soy sauce, rice vinegar, and sesame oil.
Over time, it became a beloved seasonal favorite, enjoyed as a light and satisfying meal during the hottest months.
Today, hiyashi chuka remains a summertime staple, with variations that include different proteins, vegetables, and dipping sauces. Whether you're cooling off on a sweltering day or simply craving a refreshing noodle dish, hiyashi chuka is the perfect choice to savor the flavors of the season.
Recipe
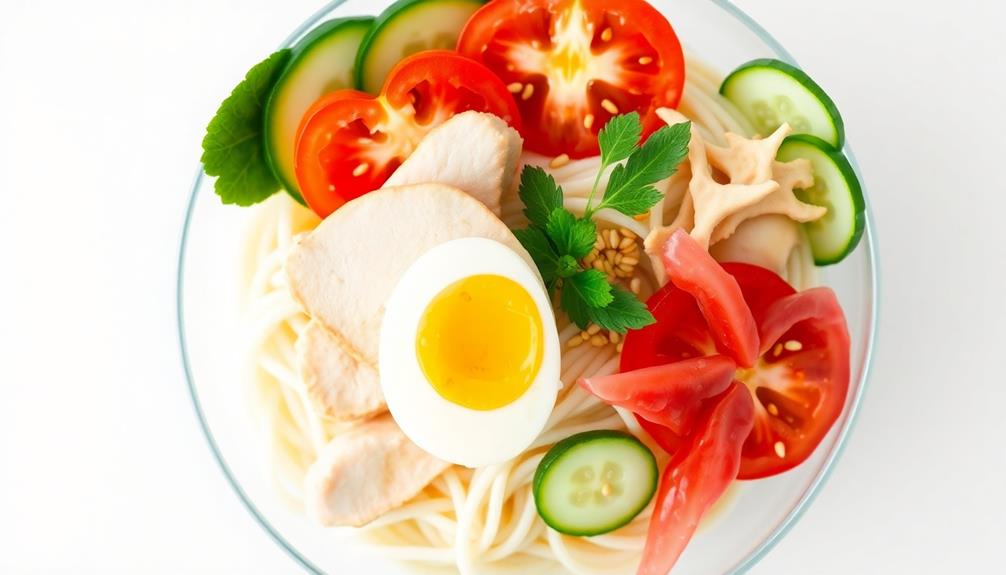
Hiyashi Chuka is a refreshing Japanese cold noodle dish that's perfect for hot summer days. The dish features chilled ramen noodles topped with a variety of colorful and flavorful ingredients, creating a visually appealing and delicious meal.
Originating in Japan, Hiyashi Chuka has become a popular summertime staple, offering a cool and satisfying alternative to hot noodle dishes. The combination of the chilled noodles, crisp vegetables, and savory dressing makes for a truly harmonious and refreshing dining experience.
- Ramen noodles
- Cucumber
- Cooked chicken or shrimp
- Tomatoes
- Boiled egg
- Pickled ginger
- Sesame seeds
- Soy sauce
- Rice vinegar
- Sesame oil
- Sugar
- Salt and pepper
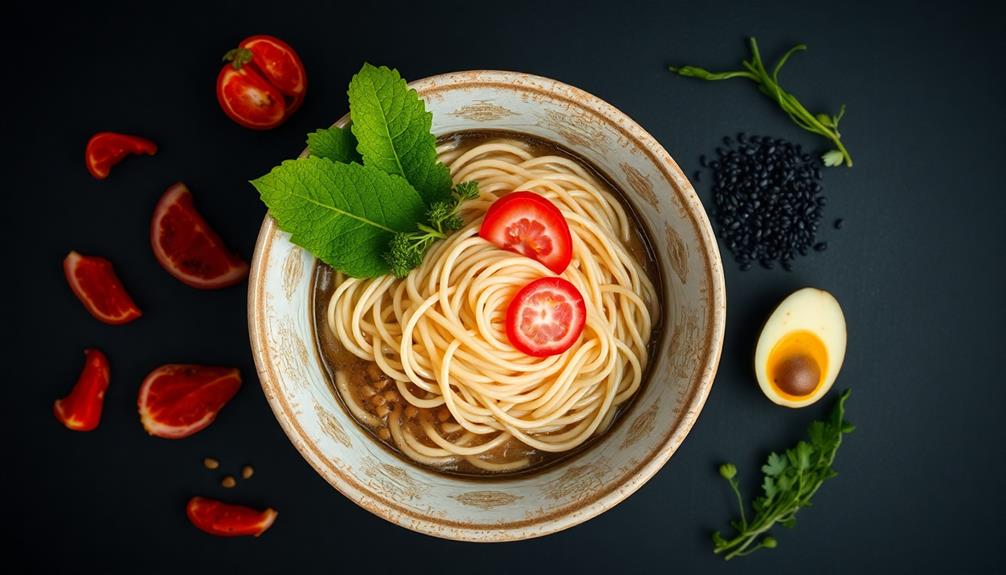
To prepare the dish, cook the ramen noodles according to the package instructions, then rinse them under cold water until they're completely chilled. Arrange the noodles in a serving bowl and top with the sliced cucumber, cooked protein (chicken or shrimp), halved tomatoes, and boiled egg. To finish off the dish, drizzle with the prepared dressing and sprinkle with sesame seeds and green onions for added flavor. Enjoy this refreshing and satisfying meal on a hot summer day! The history of ramen can be traced back to China, where it was originally called “shina soba,” meaning Chinese noodles. It wasn’t until the 19th century that ramen made its way to Japan and evolved into the iconic dish we know and love today.
Whisk together the dressing ingredients (soy sauce, rice vinegar, sesame oil, sugar, salt, and pepper) and drizzle it over the noodles and toppings. Garnish with pickled ginger and sesame seeds.
For best results, allow the Hiyashi Chuka to chill in the refrigerator for at least 30 minutes before serving to allow the flavors to meld together. The key to a successful Hiyashi Chuka is to use high-quality, fresh ingredients and to maintain the perfect balance of flavors and textures.
Enjoy this refreshing and delightful dish on a warm summer day.
Cooking Steps
First, cook the ramen noodles according to the package instructions.
Drain and rinse the noodles with cold water to cool them down.
Then, toss the noodles with the dressing, making sure they're evenly coated.
Lastly, garnish the dish with your desired assortment of toppings and serve it chilled.
Step 1. Cook Ramen Noodles According to Package
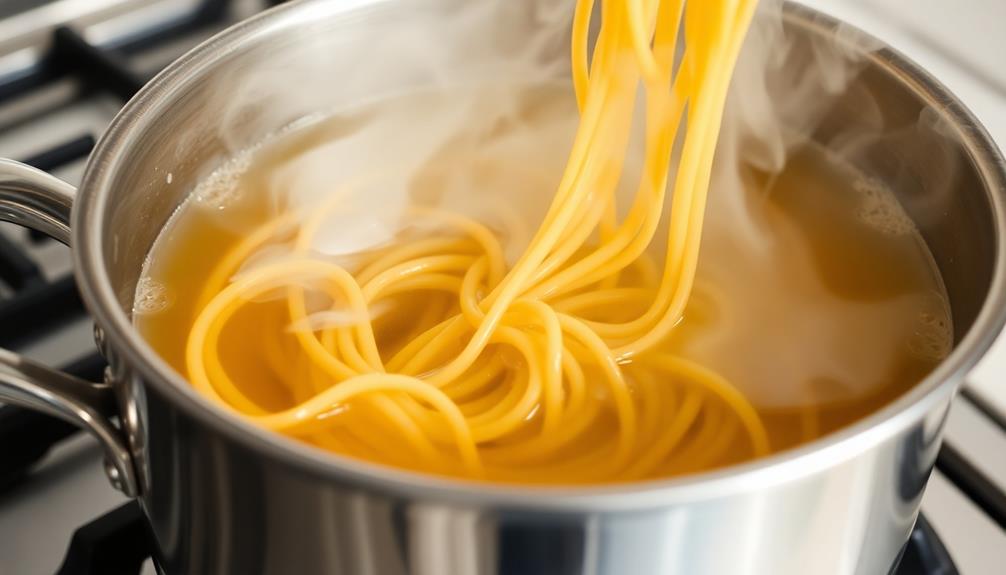
To begin, bring a pot of water to a boil according to the package instructions. Once the water is boiling, add the ramen noodles and cook for the time specified on the package, usually 2-3 minutes.
Don't overcook them – you want them to be tender but still have a bit of bite. Drain the noodles in a colander, then rinse them under cold running water to stop the cooking process and cool them down. This will also help remove any excess starch.
Gently shake the colander to remove any excess water. Your perfectly cooked ramen noodles are now ready to be dressed and served chilled for the Hiyashi Chuka dish.
Be sure to follow the package instructions carefully, as cooking times can vary between brands. With a bit of care, you'll have perfectly al dente noodles to work with in the next step.
Step 2. Drain and Rinse Noodles With Cold Water
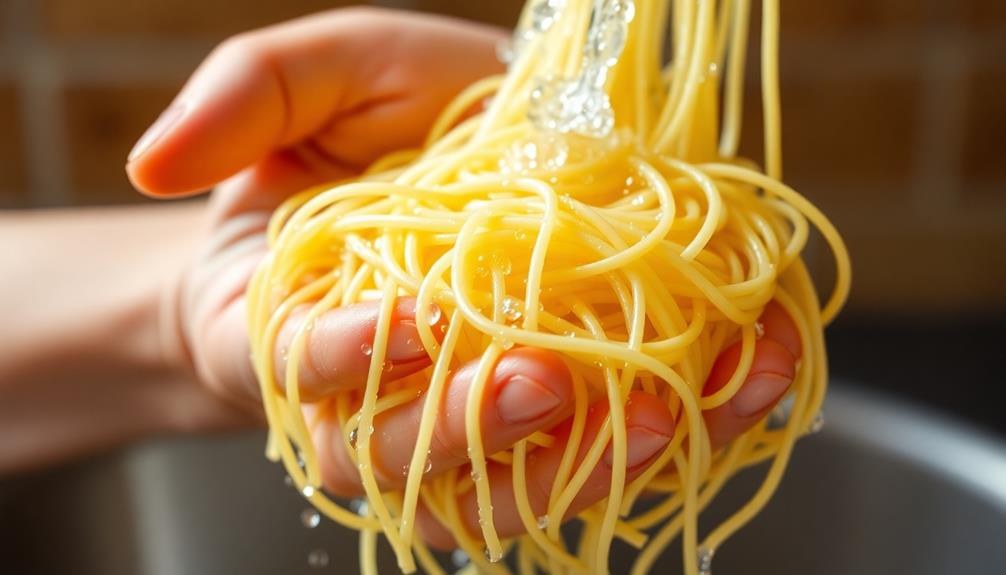
Once the ramen noodles have finished cooking, you'll need to drain and rinse them with cold water. This step is crucial to stop the cooking process and prevent the noodles from becoming mushy or sticking together.
Grab a colander or fine-mesh strainer and carefully pour the hot noodles into it, allowing the steaming hot water to drain away. Don't let the noodles sit in the hot water, or they'll continue cooking.
Next, turn on the cold water tap and thoroughly rinse the noodles. Use your hands to gently separate any clumps, ensuring each strand is evenly coated in the refreshing cold water. This quick chill helps the noodles achieve the perfect chewy texture for your Hiyashi Chuka dish.
Once the noodles are fully rinsed, give them a gentle shake to remove any excess water.
You're now ready to dress the noodles and assemble your delicious cold ramen masterpiece!
Step 3. Toss Noodles With Dressing
With the noodles chilled and drained, you can now toss them with the flavorful dressing. In a large bowl, combine the chilled noodles, soy sauce, rice vinegar, sesame oil, and a pinch of sugar. Gently toss the ingredients together until the noodles are evenly coated.
Next, add the julienned cucumber, shredded carrots, and sliced scallions. Toss everything together once more, ensuring the vegetables are distributed throughout the noodles. The cool, crisp veggies will provide a refreshing contrast to the savory-sweet dressing.
For an extra burst of flavor, top the noodles with a sprinkle of toasted sesame seeds and a drizzle of chili oil, if desired. The sesame seeds will add a nutty crunch, while the chili oil brings a touch of heat and richness to the dish.
Toss the noodles gently but thoroughly, ensuring every strand is evenly coated and the flavors are well-combined. Serve the Hiyashi Chuka immediately, while the noodles are still chilled and the vegetables are crisp.
Step 4. Garnish With Assorted Toppings
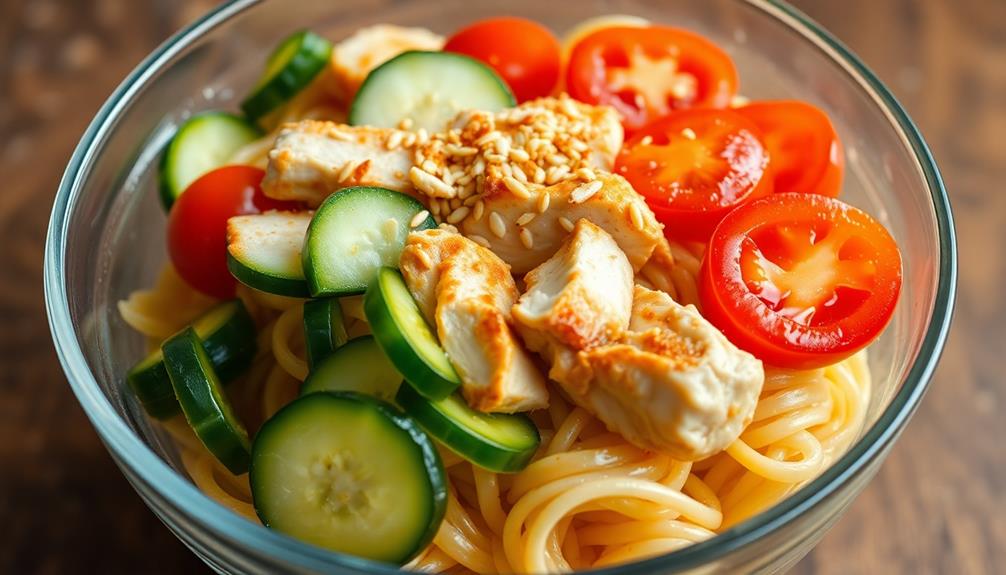
After tossing the noodles and vegetables with the flavorful dressing, it's time to start adding the finishing touches. Gather an assortment of fresh, vibrant toppings to elevate your Hiyashi Chuka dish.
Start by slicing some crisp, juicy cucumbers into thin rounds, then arrange them artfully around the edge of your serving bowl. Next, add a few perfectly cooked shrimp, their pink curves adding a delightful contrast.
Carefully place halves of hard-boiled eggs, their golden yolks glistening. Sprinkle on some finely chopped scallions, their green hues popping against the noodles.
For a touch of crunch, top with a handful of toasted sesame seeds. Finally, finish with a few delicate slices of roasted pork or ham, their savory flavors complementing the overall dish.
Take a step back and admire your masterpiece – the Hiyashi Chuka is now complete, ready to be enjoyed with its harmonious blend of textures and flavors.
Step 5. Serve Chilled
Chill the prepared Hiyashi Chuka for at least 30 minutes before serving. This allows the flavors to meld and the dish to become refreshingly cool.
Once it's had time to chill, you can portion it out into individual bowls. Be sure to include all the tasty toppings – the crunchy vegetables, the juicy chicken, and the soft-boiled egg.
Drizzle the tangy sauce over the top, making sure each bite gets a little bit of that delicious dressing. The cold noodles and crisp veggies are a perfect contrast to the warm, savory toppings.
Garnish with a sprinkle of toasted sesame seeds or chopped scallions for a pop of color and flavor.
Serve the Hiyashi Chuka immediately, while it's still nice and chilled. This dish is best enjoyed cold, so don't let it sit out too long.
Slurp up those noodles and enjoy the refreshing, summery flavors of this Japanese classic!
Final Thoughts
Hiyashi Chuka, the refreshing chilled Chinese-inspired noodle dish, is a summertime delight that offers a delightful blend of flavors and textures. Slurping down these cold noodles is a joyful experience, cooling you off on the hottest of days. The combination of crisp vegetables, savory protein, and the tangy dressing creates a harmonious balance that tantalizes the taste buds.
While Hiyashi Chuka may seem like a simple dish, there's an art to assembling it just right. Carefully arranging the ingredients in an eye-catching presentation is key to elevating the dish.
Don't be afraid to get creative with your toppings, as the possibilities are endless. From vibrant julienned carrots to tender slices of char siu, each addition contributes to the overall symphony of flavors and textures.
Whether you're hosting a summer gathering or seeking a refreshing meal for yourself, Hiyashi Chuka is sure to become a new favorite in your culinary repertoire. Embrace the joy of this chilled noodle dish and savor the flavors of summer.
Takumi is a master of Japanese cuisine with an eye for detail and precision. His sushi platters, ramen bowls, and kaiseki experiences are culinary works of art. Takumi’s recipes bring the delicate flavors and Zen-like presentation of Japanese food to your kitchen, offering both simplicity and elegance in every bite.
Japanese Cuisine
Kabocha Salad: The Sweet and Nutty Japanese Pumpkin Dish
Mouthwatering and nutritious, this Japanese pumpkin salad boasts a perfect balance of sweet and nutty flavors, inviting you to uncover its delightful secrets.
Kabocha salad – the sweet and nutty Japanese pumpkin dish! You'll love how this winter squash melts in your mouth. First, peel and chop the kabocha into bite-sized pieces, then roast it to perfection. Whisk up a mouthwatering sesame dressing and toss it with the kabocha. For added crunch and flavor, fold in roasted chestnuts and toasted sesame seeds. The combination of soft, sweet kabocha and crunchy, nutty toppings creates a harmonious medley. This healthy, versatile dish works wonderfully as a side or main course. And there's more to discover about this beloved Japanese ingredient…
Key Takeaways
- Kabocha is a winter squash integral to Japanese cuisine for centuries, with a rich history dating back to the 16th century.
- Kabocha's versatility in Japanese culinary practices includes roasting, steaming, and stir-frying, making it a popular ingredient in various dishes.
- The salad features roasted kabocha cubes, a sesame-based dressing, and crunchy roasted chestnuts, creating a harmonious blend of sweet and nutty flavors.
- Toasted sesame seeds provide an earthy crunch and visual appeal, complementing the soft texture of the roasted kabocha.
- Kabocha salad is a healthy and versatile dish that can be served as a side, main course, or topping, appealing to a wide range of cuisines.
History
Kabocha, a type of winter squash, has been a staple in Japanese cuisine for centuries. This vibrant, rounded gourd has a dark green exterior and a bright orange flesh that's sweet and nutty.
In fact, the word "kabocha" comes from the Portuguese "cambodja," which means "Cambodia." The Portuguese first encountered this squash variety in Southeast Asia and brought it back to Japan in the 16th century.
Over time, Japanese chefs and home cooks discovered all the incredible ways to prepare kabocha. They roasted, steamed, and stir-fried it, adding it to soups, curries, and even desserts.
Kabocha's versatility and delicious flavor made it a beloved ingredient throughout the country. Today, you'll find kabocha in markets and grocery stores, ready to star in all kinds of tasty dishes – including the classic Japanese kabocha salad you're about to learn how to make!
Cooking Steps
Preparing the kabocha squash is the first step in the salad-making process. Start by grabbing a sharp knife and carefully slice the squash in half. Scoop out the seeds and stringy bits from the center using a spoon.
Next, place the squash halves cut-side down on a baking sheet and roast them in the oven until they're nice and tender, about 30 minutes.
Once the kabocha is all roasted and cooled, it's time to dice it into bite-sized pieces. Toss the cubed squash into a big salad bowl.
Now, let's add some crunchy nuts like toasted almonds or cashews. Sprinkle them over the top.
Finally, whisk together a simple dressing of olive oil, rice vinegar, a touch of honey, and a pinch of salt and pepper. Drizzle the dressing over the salad and gently toss everything together.
Voila! Your kabocha salad is ready to be enjoyed.
Step 1. Peel and Chop Kabocha Squash
Start by grabbing a sturdy knife and cutting board. You'll need to peel the thick, dark green skin off the kabocha squash.
Take it slow and be careful – those skins can be tough! Once the skin is removed, slice the squash in half. Scoop out the seeds and stringy insides, then cut the flesh into 1-inch cubes.
The key is to chop the kabocha into even, bite-sized pieces. This will help them cook evenly and make the salad easy to eat. As you work, try to keep the cubes as uniform as possible.
Don't worry if they're not perfect – a little variation adds character!
Once all the squash is chopped, you're ready for the next step. Gather your other salad ingredients and let's start assembling this delicious kabocha creation.
The sweet, nutty flavor of the kabocha is about to shine!
Step 2. Roast Kabocha With Olive Oil
Preheat your oven to 400°F (200°C). Grab your peeled and chopped kabocha squash from the previous step. Drizzle the chunks with olive oil, making sure they're evenly coated.
Season with a pinch of salt and pepper, then toss to combine.
Arrange the seasoned kabocha pieces in a single layer on a baking sheet. Slide the sheet into the preheated oven and let the squash roast for 20-25 minutes. Give it a gentle stir halfway through to ensure even browning.
You'll know the kabocha is done when it's tender and caramelized around the edges.
Once roasted, remove the baking sheet from the oven and let the kabocha cool slightly. The roasting process will bring out the natural sweetness and nutty flavor of this Japanese pumpkin.
Now you're ready to assemble your delicious kabocha salad!
Step 3. Dress With Sesame Dressing
How do you dress the roasted kabocha to create the perfect kabocha salad? It's all about the sesame dressing!
First, whisk together the nutty sesame oil, tangy rice vinegar, and a touch of soy sauce. This creates a savory-sweet elixir that will make your taste buds dance.
Next, add a sprinkle of sugar and a pinch of salt to balance the flavors. Don't be shy – you want the dressing to really sing! Grate in a bit of fresh ginger for a zing of warmth and brightness.
Now, drizzle the sesame dressing over the roasted kabocha cubes. Use your hands to gently toss everything together, making sure each piece is evenly coated. The sweet pumpkin will soak up all that delicious dressing, creating a harmony of flavors in every bite.
Step 4. Toss With Roasted Chestnuts
To elevate the kabocha salad even further, toss in some roasted chestnuts. The nutty, toasted flavor of the chestnuts complements the sweetness of the kabocha perfectly.
Simply roast the chestnuts in the oven until they're golden brown and tender, then roughly chop them into bite-sized pieces. Gently fold the roasted chestnuts into the salad, making sure they're evenly distributed.
The contrast of the soft, creamy kabocha and the crunchy, earthy chestnuts creates a delightful textural experience in every bite. Plus, the chestnuts add a touch of elegance and sophistication to the dish.
The roasted chestnuts not only enhance the overall flavor but also provide a satisfying crunch that takes the kabocha salad to the next level. This simple addition turns the salad into a truly special and memorable dish.
Step 5. Garnish With Toasted Sesame Seeds
Toasty sesame seeds lend a delightful crunch and nutty aroma that elevates the kabocha salad. Simply toast the sesame seeds in a dry skillet over medium heat, stirring frequently, until they're golden brown and fragrant. This takes just a few minutes, so keep a close eye on them to prevent burning.
Sprinkle the toasted sesame seeds over the top of the salad, letting them scatter across the surface. Their earthy, rich flavor perfectly complements the sweet pumpkin and roasted chestnuts.
The crunchy texture also adds a satisfying contrast to the soft, tender kabocha cubes. Feel free to use a combination of black and white sesame seeds for a visually stunning presentation.
The dark and light colors create an eye-catching garnish that makes the salad even more appetizing. Finish it off by giving the salad a final toss, ensuring the sesame seeds are evenly distributed throughout.
Final Thoughts
Ultimately, what makes this kabocha salad a delightful dish is its harmonious blend of flavors and textures. The sweet and nutty kabocha pumpkin is the star, complemented by the crunchy toasted sesame seeds and the tangy dressing.
The salad's vibrant colors and presentation are also a delight for the senses, making it a feast for the eyes as well as the palate.
One of the best things about this recipe is its versatility. You can enjoy it as a side dish, a light main course, or even as a topping for grilled meats or roasted vegetables.
The flavors work beautifully with a wide range of cuisines, from Japanese to Mediterranean to American. Plus, it's a healthy and satisfying option that's sure to please everyone at the table.
Frequently Asked Questions
What Is the Nutritional Value of Kabocha Pumpkin?
You'll find that kabocha pumpkin is packed with nutrients. It's high in vitamin A, vitamin C, and fiber, making it a healthy and versatile ingredient in your diet. Plus, it has a delightfully sweet and nutty flavor.
How Long Can Kabocha Pumpkin Be Stored?
You can store kabocha pumpkin for up to 3 months if you keep it in a cool, dry place. Its thick skin helps preserve its freshness, making it a versatile and long-lasting vegetable for your kitchen.
Can Kabocha Be Substituted for Other Types of Pumpkin?
Yes, you can substitute kabocha for other types of pumpkin. Kabocha has a similar texture and sweetness, making it a suitable replacement in most recipes that call for pumpkin. Just keep in mind the flavor may be a bit nuttier.
Is Kabocha Pumpkin Suitable for Vegetarians and Vegans?
Yes, kabocha pumpkin is suitable for vegetarians and vegans. As a versatile squash, it's an excellent plant-based ingredient that can be prepared in various ways to fit a vegetarian or vegan diet.
What Are the Health Benefits of Eating Kabocha?
Eating kabocha provides numerous health benefits. It's rich in vitamins A and C, which support immune function and eye health. The high fiber content aids digestion, while the antioxidants may help reduce inflammation and lower disease risk.
Nadia brings the warmth and depth of Lebanese cuisine to Cook if Ya. From classic mezze spreads like hummus and tabbouleh to rich, flavorful mains like shawarma and kibbeh, her recipes offer a delicious journey through the flavors of Lebanon, emphasizing fresh herbs, spices, and aromatic ingredients.
Japanese Cuisine
Soboro Bun: The Sweet and Savory Japanese Treat
Discover the enchanting fusion of sweet and savory in the beloved Japanese treat, Soboro Bun, where a crumbly pork-based topping meets a fluffy dough. Learn more.
Soboro bun is a beloved Japanese treat that'll tantalize your taste buds! This delightful pastry emerged during the Meiji period, offering a unique fusion of sweet and savory flavors. The key is the crumbly "soboro" topping – made from ground pork, soy sauce, and sugar. You'll find these comforting buns in bakeries across Japan, enjoyed by locals and visitors alike. Making them at home is a breeze too – just mix the dough, knead, proof, divide, and shape into fluffy buns. And the best part? You can experiment with all sorts of tasty fillings and toppings. Intrigued? Keep reading to uncover the mouthwatering secrets of this Japanese delight.
Key Takeaways
- Soboro bun is a beloved Japanese comfort food that emerged during the Meiji period, featuring a unique fusion of sweet and savory flavors.
- The "soboro" topping is made from ground pork, soy sauce, and sugar, creating a crumbly, flavorful texture.
- Soboro buns are enjoyed in bakeries and cafes across Japan, offering a variety of fillings and toppings to appeal to diverse preferences.
- The preparation process involves mixing, kneading, proofing, and shaping the dough to achieve a fluffy, steamed bun texture.
- Soboro buns present an opportunity to experiment with different ingredients and flavors, making them a versatile and satisfying culinary experience.
History
Although the exact origins of the soboro bun are unclear, it's believed to have emerged as a regional delicacy in Japan during the Meiji period (1868-1912).
This fluffy, pillowy treat is a unique fusion of sweet and savory flavors, making it a true delight for the senses.
The name "soboro" actually refers to the crumbly, ground meat topping that adorns these buns. This savory component is often made from a mixture of ground pork, soy sauce, and sugar, creating a delightful contrast to the soft, sweet bread.
Over time, the soboro bun has become a beloved comfort food, with variations that include different fillings and toppings to suit diverse tastes.
Today, these charming buns can be found in bakeries and cafes across Japan, captivating both locals and visitors alike with their irresistible combination of flavors.
Whether you're looking for a quick snack or a satisfying breakfast, the soboro bun is sure to leave you craving more of this delectable Japanese specialty.
Cooking Steps
Gather the necessary ingredients and let's begin the cooking process. First, you'll want to cook the ground meat in a skillet over medium-high heat until it's crumbly and cooked through. Drain any excess fat.
To enhance your culinary experience, consider the importance of color accuracy in your home kitchen setup. Next, add the soy sauce, mirin, and sugar to the pan. Stir everything together and let it simmer for 5-7 minutes, until the sauce has thickened nicely.
Now it's time to assemble the buns. Take your fluffy steamed buns and gently pull them apart. Spoon a generous amount of the savory soboro filling into each one. Be sure to evenly distribute the mixture.
Step 1. Mix Flour and Water
To begin the soboro bun-making process, mix the all-purpose flour and water in a large bowl.
You'll want to start with a gentle hand, using a wooden spoon to gently incorporate the ingredients. Don't overmix – you're aiming for a slightly shaggy dough that comes together easily.
Next, turn the dough out onto a lightly floured surface and knead it for a couple of minutes.
This helps develop the gluten, giving the buns a soft, fluffy texture. Once the dough is smooth and elastic, form it into a ball, place it in a greased bowl, and cover it with a damp towel.
Let the dough rest for about 30 minutes, allowing the gluten to relax.
With the dough rested and ready, you can now move on to the next step: dividing and shaping the soboro buns.
Remember to handle the dough gently to preserve those all-important air pockets that will make your buns light and fluffy.
Stay tuned for the next section to learn how to shape these delightful Japanese treats!
Step 2. Knead the Dough Thoroughly
Thorough kneading is the secret to achieving a soft, supple dough for your soboro buns. Start by lightly dusting your work surface with flour.
Then, use the palms of your hands to push and fold the dough, rotating it as you go. This helps develop the gluten, giving the dough its elastic texture. Don't be afraid to really dig in and give it a good workout – the more you knead, the better the results!
As you knead, you'll feel the dough transform from rough and shaggy to smooth and silky. Keep at it for about 10 minutes, until the dough passes the "windowpane test."
Gently stretch a small piece – if it forms a thin, translucent sheet without tearing, you're good to go! With your dough now perfectly kneaded, you're one step closer to fluffy, irresistible soboro buns.
Get ready for the next step: shaping the dough into individual portions.
Step 3. Proof the Dough for One Hour
After kneading the dough, it's time to let it proof for an hour. This crucial step allows the yeast to work its magic, making the dough rise and become light and fluffy.
Find a warm, draft-free spot in your kitchen and place the dough in a lightly greased bowl, covered with a damp towel or plastic wrap. As the dough proofs, the yeast will produce carbon dioxide, causing the dough to expand and double in size.
Be patient and resist the urge to peek – opening the oven or bowl can release the precious heat and air, slowing the proofing process.
After an hour, the dough should be soft, pillowy, and ready for the next step. Gently punch down the dough to release any air bubbles, then shape it into your desired bun form.
With the dough perfectly proofed, you're one step closer to sinking your teeth into those delectable Soboro Buns!
Step 4. Divide Dough Into Small Balls
Once the dough has finished proofing, gently punch it down to release any air bubbles. This will help create a smooth, even texture as you divide the dough.
Next, grab a handful of the dough and roll it into a small ball, about the size of a golf ball. Be gentle and try not to overwork the dough. You'll want to make around 12-15 balls, depending on how large you want your Soboro buns to be.
As you roll the dough, make sure each ball is smooth and uniform. Place the dough balls on a lightly floured surface, spacing them out a bit so they don't stick together.
Once all the dough is divided, cover the balls with a clean kitchen towel and let them rest for 10-15 minutes. This will help the gluten relax, making the dough easier to work with as you shape the buns.
After the resting period, you'll be ready to start shaping your Soboro buns!
Step 5. Shape Into Small Buns
To shape the Soboro buns, gently flatten each dough ball into a round disc using the palms of your hands.
Don't worry if they're not perfect – the rustic look is part of the charm! Next, use your fingers to pinch the dough around the edges, creating a small, fluffy bun.
Be careful not to overwork the dough, as this could make the buns tough.
Once you've shaped all the buns, it's time to let them rise. Cover the buns with a clean, damp towel and set them aside in a warm place for 15-20 minutes.
During this time, the dough will puff up and become nice and light.
Now you're ready to bake! Arrange the buns on a parchment-lined baking sheet, making sure to leave a little space between each one.
Pop them in the oven and get ready for the wonderful aroma to fill your kitchen.
In just 15-18 minutes, your Soboro buns will be golden brown and ready to enjoy!
Final Thoughts
Ultimately, the soboro bun is a delightful Japanese treat that seamlessly blends sweet and savory flavors.
Whether you prefer the tender, fluffy bread or the savory, seasoned ground meat topping, there's something to delight every palate.
The versatility of this dish is truly impressive – you can enjoy it as a snack, a side, or even a main course.
And the best part? It's surprisingly easy to make at home, allowing you to savor the authentic taste of Japan in your own kitchen.
So why not give it a try? Experiment with different toppings and fillings to find your perfect combination.
Who knows, you might just discover a new favorite treat that will transport you straight to the streets of Tokyo.
The soboro bun is a delightful reminder that the simplest pleasures in life can be the most satisfying.
Frequently Asked Questions
How Long Does It Take to Prepare Soboro Bun?
Preparing the soboro bun doesn't take long – you can whip it up in about 30 minutes. The key is cooking the ground meat topping quickly and assembling the buns effortlessly for a delightful homemade treat.
What Is the Shelf Life of Freshly Baked Soboro Bun?
Freshly baked soboro bun has a relatively short shelf life. It's best enjoyed within 2-3 days when stored at room temperature in an airtight container. After that, the texture and flavor may start to deteriorate.
Can Soboro Bun Be Frozen and Reheated Later?
Yes, you can freeze soboro bun and reheat it later. Just wrap it tightly in plastic or aluminum foil before freezing. When ready to enjoy, simply reheat in the oven or microwave until warmed through.
How Do I Store Leftover Soboro Bun?
You can store leftover soboro bun in an airtight container in the fridge for up to 3 days. To reheat, simply place the bun in a toaster oven or oven until heated through.
Is Soboro Bun Gluten-Free or Suitable for Dietary Restrictions?
Unfortunately, soboro bun is not gluten-free. It's made with wheat flour, which contains gluten. If you have dietary restrictions, you'll need to find a gluten-free alternative recipe or substitute the flour to make it suitable for your needs.
Nadia brings the warmth and depth of Lebanese cuisine to Cook if Ya. From classic mezze spreads like hummus and tabbouleh to rich, flavorful mains like shawarma and kibbeh, her recipes offer a delicious journey through the flavors of Lebanon, emphasizing fresh herbs, spices, and aromatic ingredients.
Japanese Cuisine
Japanese Takoyaki: Octopus Ball Snacks
Highly addictive and crowd-pleasing, Japanese takoyaki are the savory octopus-filled balls that will leave you craving for more.
Takoyaki are the mouthwatering Japanese octopus ball snacks you've got to try! These crispy, golden-brown bites originated in 1930s Osaka, where a street vendor named Tomekichi Endo first experimented with tasty fillings. Today, takoyaki are a beloved part of Japanese culture, featuring a fluffy wheat flour batter, tender octopus pieces, and mouthwatering toppings like savory sauce, creamy mayo, and crunchy bonito flakes. Making takoyaki is an interactive, social experience, and you can find these delightful snacks at bustling festivals, cozy restaurants, and casual street stalls across Japan. Ready to explore the irresistible world of takoyaki? Let's dive in!
Key Takeaways
- Takoyaki is a popular Japanese street food made of bite-sized fried balls filled with octopus, tempura scraps, green onions, and other savory ingredients.
- Takoyaki originated in Osaka, Japan during the 1930s and has since become a staple snack enjoyed nationwide, often served at festivals and casual dining spots.
- The key ingredients in takoyaki include a wheat flour-based batter, diced octopus, and toppings such as takoyaki sauce, Japanese mayonnaise, bonito flakes, and aonori (seaweed).
- Preparing takoyaki involves carefully pouring the batter into a specialized pan, adding the fillings, and continuously rotating the balls to achieve a crispy exterior and soft, gooey interior.
- Takoyaki is known for its unique sensory experience and is considered a symbolic dish that represents the fusion of traditional and modern Japanese cuisine.
History
Where did the takoyaki snack originate from? You'll be delighted to know that this tasty treat has its roots in the vibrant city of Osaka, Japan!
Back in the 1930s, a savvy street vendor named Tomekichi Endo started experimenting with different fillings, eventually landing on the perfect combination – juicy octopus pieces nestled in a fluffy, golden-brown batter.
The name "takoyaki" comes from the Japanese words for "octopus" (tako) and "fried" (yaki), perfectly describing this beloved snack.
As word of Endo's creation spread, takoyaki shops began popping up all over Osaka, each with its own unique spin on the classic recipe.
Today, you can find these delightful octopus balls in every corner of Japan, enjoyed by people of all ages.
Whether you're strolling through a bustling festival or relaxing at a cozy izakaya, the aroma of sizzling takoyaki is sure to make your mouth water!
Recipe
Takoyaki, a beloved Japanese street food, is a delightful bite-sized treat that combines the savory flavors of octopus, dashi broth, and a variety of seasonings. These spherical snacks are a must-try for anyone looking to explore the rich culinary traditions of Japan.
At the heart of takoyaki lies a batter made from wheat flour, dashi stock, and eggs, which creates a light and fluffy interior. The real magic, however, lies in the fillings – tender pieces of octopus, aonori (dried green seaweed), pickled ginger, and crispy tempura scraps that add a delightful crunch.
- Batter: 1 cup all-purpose flour, 1 cup dashi stock, 2 eggs, 1 tablespoon soy sauce, 1 teaspoon sugar
- Fillings: 1 cup chopped cooked octopus, 2 tablespoons aonori (dried green seaweed), 2 tablespoons pickled ginger, 2 tablespoons tempura scraps
- Toppings: Takoyaki sauce, Japanese mayonnaise, bonito flakes, chopped green onions
To prepare the takoyaki, heat a specialized takoyaki pan or a regular non-stick pan with round indentations. Ladle the batter into the hot pan, filling each well about three-quarters full.
Quickly add a piece of octopus, a sprinkle of aonori, pickled ginger, and tempura scraps to the center of each ball. Cook, turning the balls frequently with chopsticks or a skewer, until golden brown and cooked through, approximately 8-10 minutes.
Remember to have all your ingredients prepped and ready to go, as the cooking process moves quickly. Serve the takoyaki hot, drizzled with takoyaki sauce, Japanese mayonnaise, bonito flakes, and chopped green onions.
Enjoy the delightful burst of flavor in every bite!
Cooking Steps
Let's get cooking!
First, you'll whip up a tasty takoyaki batter mixture.
Next, pour that batter into the special takoyaki pan, add your octopus pieces, and cook until everything's nice and browned.
Step 1. Make Takoyaki Batter Mixture
To make the takoyaki batter mixture, you'll need to whisk together the flour, egg, and dashi stock in a large bowl until the batter is smooth and free of lumps. The flour creates the perfect fluffy texture, while the egg adds richness and the dashi stock provides savory umami flavor.
Once the batter is ready, you can start preparing the other ingredients. Chop the green onions, pickled ginger, and octopus into small, bite-sized pieces. These colorful toppings will add wonderful pops of flavor and texture to your takoyaki.
Next, heat up your takoyaki pan and grease the wells. Using a small ladle or pitcher, carefully pour the batter into each well, filling them about three-quarters full.
Top each one with a few pieces of the octopus, green onions, and ginger. As the takoyaki cook, use your skewers to gently turn them, creating their signature round shape.
In no time, you'll have a delightful batch of piping hot, golden-brown takoyaki ready to enjoy!
Step 2. Pour Batter Into Takoyaki Pan
With your batter ready, it's time to start cooking! Grab your trusty takoyaki pan and get ready for some delicious octopus ball action. Carefully pour a small amount of batter into each of the round wells, filling them about three-quarters full.
Be sure to work quickly, as the batter will start to set right away.
Now, it's time to add your fillings! Drop a small cube of octopus into the center of each ball, followed by a sprinkle of green onions and pickled ginger.
Don't be afraid to get creative – you can also try adding cheese, shrimp, or even bacon bits!
As the takoyaki cook, use your special takoyaki tools to turn and rotate the balls, ensuring they cook evenly on all sides.
Listen for that satisfying sizzle and keep an eye on them, adjusting the heat as needed.
Once they're golden brown and fluffy, it's time to transfer them to a plate and get ready to enjoy your homemade Japanese treat!
Step 3. Add Octopus Pieces
Once the batter is poured, it's time to add the star of the show – the octopus pieces.
You'll want to get your hands on some fresh, tender octopus, cut into bite-sized chunks. Carefully drop a few pieces into each well of the hot takoyaki pan. The octopus will start to sizzle and curl up as it cooks, filling the air with a delightful savory aroma.
Be sure to distribute the octopus evenly, so each takoyaki ball gets a tasty morsel. As the batter cooks around the octopus, you'll see the edges start to turn golden brown.
Use your takoyaki turner to gently rotate the balls, ensuring they cook evenly on all sides. The octopus should become tender and infuse the batter with its incredible flavor.
Get ready for an explosion of umami goodness in every bite!
Step 4. Cook Until Browned
As the takoyaki batter sizzles around the octopus morsels, it's time to start rotating and browning the balls. Using your trusty takoyaki pan, gently turn each ball a quarter turn every 30 seconds or so. This ensures even cooking and that lovely golden-brown crust forms all around.
You'll know they're ready when the outsides are nicely browned and the insides are cooked through.
Don't be afraid to get in there with your pick or skewer, carefully rotating each ball as it cooks. The key is to keep them moving, so the batter cooks up crisp and the octopus pieces warm up perfectly.
Listen for that satisfying sizzle as you turn them, and catch a whiff of the savory aroma filling the air. Before you know it, you'll have a pan full of piping hot, beautifully browned takoyaki, ready to enjoy.
Step 5. Flip and Cook Until Crispy
Carefully flipping the takoyaki, you'll want to cook them until they develop a delightfully crisp exterior. Use a pair of chopsticks or a small spatula to gently turn each ball, making sure to get an even golden-brown color all around.
As the takoyaki sizzle and dance in the pan, you'll start to smell the savory aroma of the cooked batter and fillings.
Keep a close eye on them, flipping and rotating the balls as needed to ensure they cook evenly. You'll know they're ready when the outside is crispy and the inside is hot and fluffy.
Don't be afraid to let them get a little charred in spots – that's where all the delicious, caramelized flavor comes from!
Once they're perfectly crispy, carefully transfer the takoyaki to a serving plate. Get ready to enjoy these warm, bite-sized morsels of Japanese street food perfection!
Final Thoughts
Enjoying the delightful takoyaki snacks is a delightful way to indulge in Japanese cuisine. These little octopus-filled balls are a true delight for the senses, with their crispy exteriors and savory, chewy interiors.
The combination of flavors, from the tender octopus to the tangy sauces, creates a truly unique and satisfying experience. Whether you're exploring the vibrant street food scene in Japan or recreating the experience at home, takoyaki are sure to leave a lasting impression.
The joy of watching the takoyaki sizzle and flip as they cook, followed by the first satisfying bite, is an experience that can be shared and enjoyed by people of all ages.
Frequently Asked Questions
What Is the Origin of the Name "Takoyaki"?
The name "takoyaki" comes from the Japanese words "tako" meaning octopus and "yaki" meaning grilled or baked. So, the name literally translates to "octopus grilled/baked ball," reflecting the dish's main ingredient.
How Long Does It Take to Cook Takoyaki?
Typically, it takes around 12-15 minutes to cook takoyaki. The balls need to be constantly rotated and cooked until they're golden brown and crispy on the outside while tender and gooey on the inside.
Can Takoyaki Be Made Without an Octopus Filling?
Sure, you can make takoyaki without octopus filling. Instead, you can use other ingredients like cheese, seafood, or even vegetables. The base batter is the same, so you can get creative with the fillings to suit your tastes.
Are There Any Health Benefits to Eating Takoyaki?
While takoyaki may not be the healthiest snack, it can provide some benefits. The batter contains carbohydrates for energy, and the fillings may offer vitamins and minerals. However, it's best enjoyed in moderation as part of a balanced diet. Additionally, those looking for low-carb options might want to explore alternatives to traditional takoyaki, such as using keto-friendly ingredients. For individuals following a ketogenic diet, keto fat bomb recipes can be a great way to enjoy flavorful snacks without the high carb content. Ultimately, it’s important to find a balance that works with your personal health goals.
Where Can I Find the Best Takoyaki in Japan?
You'll find the best takoyaki in Japan's bustling food markets and street vendor stalls, where seasoned chefs have perfected the art of these savory, bite-sized delights. Look for long lines of locals – that's a sure sign of exceptional takoyaki.
Takumi is a master of Japanese cuisine with an eye for detail and precision. His sushi platters, ramen bowls, and kaiseki experiences are culinary works of art. Takumi’s recipes bring the delicate flavors and Zen-like presentation of Japanese food to your kitchen, offering both simplicity and elegance in every bite.
-
Brazilian Cuisine3 months ago
Tacacá
-
Polish Comfort Food3 months ago
Krupnik (Barley Soup)
-
Brazilian Cuisine3 months ago
Caldeirada
-
Brazilian Cuisine3 months ago
Chicken in Brown Sauce
-
Southern Comfort Food3 months ago
Cheese Straws
-
African Cuisine3 months ago
Kedjenou (Ivory Coast)
-
Polish Comfort Food3 months ago
Vegetable Salad
-
American Diner Classics3 months ago
The Maillard Reaction: Understanding the Chemistry of Browning {Food Science and Cooking}