Arancini, those delicious golden rice balls from Sicily, are a treat you'll love! They're crispy on the outside and creamy on the inside, often filled with meat, cheese, or veggies. You start by making risotto, then shape it into balls, stuff them with yummy fillings, and coat them in breadcrumbs. After that, you fry them until they're golden brown and irresistible! These little "oranges" (that's what arancini means in Italian) are perfect for parties, family dinners, or anytime you want to impress your guests. There's so much more to discover about these tasty bites!
Key Takeaways
- Arancini are Sicilian rice balls stuffed with meat, cheese, or vegetables, coated in breadcrumbs and deep-fried.
- Originating in 10th-century Sicily, arancini's name means "little oranges" due to their shape and color.
- Key ingredients include Arborio rice, chicken broth, white wine, Parmesan cheese, and various fillings like ragù or mozzarella.
- The cooking process involves making risotto, shaping it into balls, stuffing with fillings, coating with breadcrumbs, and frying until golden.
- Arancini are versatile, served as appetizers or main dishes, and are popular for special occasions and gatherings.
Top picks for "arancini"
Open Amazon search results for this keyword.
As an affiliate, we earn on qualifying purchases.
History
Countless food historians trace the origins of arancini back to 10th-century Sicily during Arab rule. You'll find that these delicious rice balls have a rich history spanning over a thousand years! The name "arancini" comes from the Italian word for "little oranges," which describes their shape and golden color.
During medieval times, arancini became a popular way to use leftover rice. People would mix the rice with tasty ingredients and form it into balls.
Here's how they made them special:
- They'd add meat, vegetables, or cheese inside
- They'd coat the balls in breadcrumbs
- They'd fry them until crispy and golden
Arancini quickly became a favorite food for special occasions and festivals. You might've enjoyed them at: – a wedding reception or anniversary party. These delicious fried rice balls are also popular at Italian food festivals and can be found at many upscale Italian restaurants. Arancini are made by forming risotto into balls, then stuffing them with a savory filling before frying. The arak production process is a key element in creating the perfect texture and flavor for these delectable treats.
- Saint Lucia's Day celebrations
- Christmas feasts
- Family gatherings
As time went on, arancini spread from Sicily to other parts of Italy and beyond. Today, you can find these yummy treats all over the world! People love to eat them as snacks, appetizers, or even main dishes.
Isn't it amazing how a simple rice ball has become such a beloved food?
Recipe
Arancini, also known as rice balls, are a beloved Sicilian dish that combines creamy risotto with a crispy, golden exterior. These savory treats are typically filled with ragù, mozzarella, and peas, making them a hearty and satisfying snack or appetizer.
To create authentic arancini, it's essential to start with a well-prepared risotto base. The rice should be cooked to a creamy consistency and allowed to cool completely before shaping. This ensures that the arancini hold their shape during the frying process and maintain a perfect balance of textures.
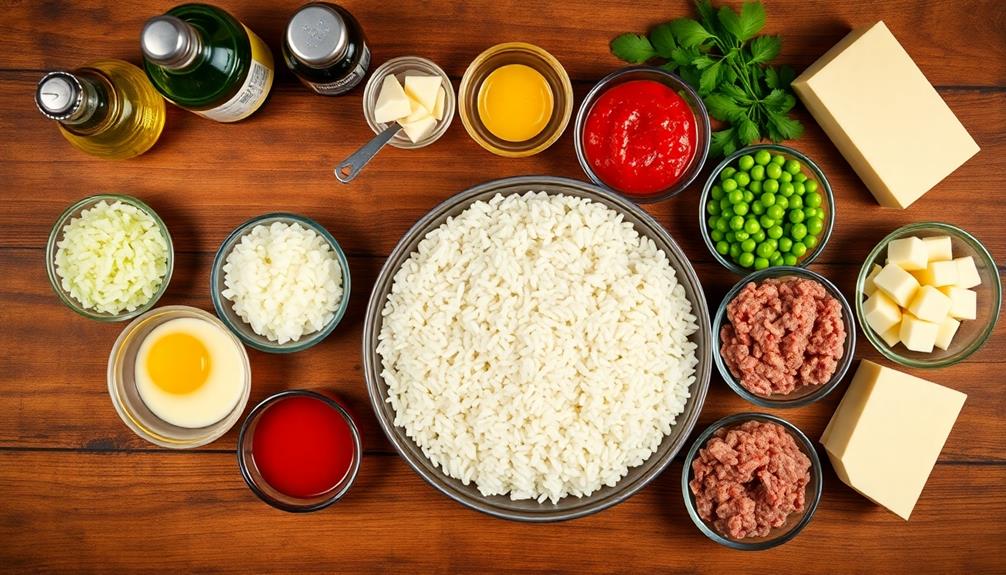
Ingredients:
- 2 cups Arborio rice
- 4 cups chicken broth
- 1/2 cup white wine
- 1 onion, finely chopped
- 2 tablespoons olive oil
- 1/2 cup grated Parmesan cheese
- 2 eggs, beaten
- 1 cup cooked ground beef or pork
- 1/2 cup tomato sauce
- 1/2 cup frozen peas
- 4 oz mozzarella cheese, cubed
- 2 cups breadcrumbs
- Vegetable oil for frying
- Salt and pepper to taste
To prepare arancini, start by making the risotto base. Sauté the onion in olive oil, add the rice, and toast it briefly. Gradually add the wine and broth, stirring constantly until the rice is creamy and cooked. Mix in the Parmesan cheese and let it cool.
In a separate pan, prepare the filling by combining the ground meat, tomato sauce, and peas. Once the risotto has cooled, form small balls, inserting a cube of mozzarella and some of the meat mixture into the center. Roll the balls in beaten egg and breadcrumbs, then deep-fry in hot oil until golden brown.
For best results, ensure that the oil is at the correct temperature (around 350°F or 175°C) before frying. This will help achieve a crispy exterior without overcooking the inside. Allow the arancini to cool slightly before serving, as the filling can be extremely hot.
These rice balls can be prepared in advance and reheated in the oven, making them an excellent option for parties or gatherings.
Cooking Steps
Let's get cooking!
You'll start by making a creamy risotto, then shape it into balls and stuff them with cheese and meat.
Next, you'll coat these yummy balls in breadcrumbs and fry them until they're golden brown and crispy.
These steps will give you perfect arancini that your family will love!
Step 1. Cook Risotto Until Creamy
To make perfect arancini, you'll need to start by cooking a creamy risotto. Don't worry, it's easier than you think! Here's how to do it:
- Heat some broth in a pot and keep it warm.
- In another pot, sauté onions in butter until they're soft.
- Add Arborio rice and stir it around to coat it with butter.
- Pour in some white wine and let it bubble away.
Now comes the fun part! You'll add the warm broth to the rice, one ladleful at a time. Keep stirring and let each scoop of broth get soaked up before adding more. This process takes about 18-20 minutes.
As you stir, you'll see the rice getting creamier. It's like magic! The starch from the rice makes everything thick and yummy.
Keep tasting the rice – you want it to be soft but still have a tiny bit of bite.
When the rice is just right, stir in some butter and grated cheese. Your risotto should be creamy and dreamy, ready to become delicious arancini!
Step 2. Shape Risotto Into Balls

Once your risotto has cooled completely, it's time to shape it into balls. This is the fun part where you get to use your hands! Here's how to do it:
- Scoop about 2 tablespoons of risotto into your palm
- Roll it gently between your hands to form a ball
- Make sure it's packed tightly so it doesn't fall apart
For extra yummy arancini, try these tricks:
- Press a small cube of mozzarella into the center of each ball
- Roll the balls in breadcrumbs for a crispy outside
Remember, you're aiming for balls that are about the size of a golf ball. Don't worry if they're not perfect – each one will be unique and delicious!
If you're making these for a party, get the whole family involved. Kids love helping out in the kitchen, and shaping the balls is a great task for little hands. Just make sure everyone washes up first!
Once you've shaped all your risotto into balls, you're ready for the next step: frying or baking them to golden perfection.
Step 3. Stuff With Cheese and Meat

Inside each arancini ball lies a delicious surprise. Now it's time to add that special filling that'll make your taste buds dance! Here's how to stuff your arancini with cheese and meat:
- Make a small indent in each risotto ball with your thumb.
- Place a cube of mozzarella cheese in the center.
- Add a spoonful of cooked ground beef or pork.
- Gently reshape the ball, making sure the filling is fully enclosed.
Remember, you can get creative with your fillings! Try these fun combinations:
- Ham and provolone cheese
- Spinach and ricotta
- Mushrooms and fontina
As you stuff each ball, imagine the smiles on your family's faces when they bite into these tasty treats. It's like hiding a treasure inside each arancini! You can also customize the fillings to suit everyone’s preferences – maybe a spicy meatball for the meat lovers, or a gooey cheese and spinach combo for the vegetarians. And don’t forget to end the meal with a classic recipe for tiramisu, because nothing says “Italian feast” like layers of coffee-soaked ladyfingers and creamy mascarpone. Cooking for your loved ones is an act of love, and these arancini and tiramisu are sure to show just how much you care.
Pro tip: Don't overfill your balls, or they might burst while cooking. A little goes a long way!
Once you've stuffed all your arancini, you're ready for the next exciting step. Get ready to turn these rice balls into golden, crispy delights that'll have everyone asking for seconds!
Step 4. Coat With Breadcrumbs

The final step before frying your arancini involves coating them in crispy breadcrumbs. This process is fun and easy, perfect for getting the whole family involved in the kitchen!
Here's what you'll need:
- A shallow bowl of beaten eggs
- A plate of breadcrumbs
- Your stuffed rice balls
Follow these simple steps:
- Roll each rice ball in the beaten eggs, making sure it's fully coated.
- Next, roll the egg-covered ball in the breadcrumbs.
- Gently press the breadcrumbs onto the surface to help them stick.
- Place the coated arancini on a clean plate.
Tips for success:
- Use one hand for the egg and the other for breadcrumbs to avoid messy fingers.
- If you want extra-crispy arancini, you can double-coat them.
- For a fun twist, try flavored breadcrumbs like Italian-seasoned or garlic-parmesan.
Once you've coated all your arancini, they're ready for frying!
The golden, crunchy exterior will be the perfect contrast to the gooey, cheesy inside. Get ready for a taste sensation that'll have everyone asking for seconds!
Step 5. Fry Until Golden Brown

Anticipation builds as you prepare to fry your perfectly coated arancini. It's time to transform these little rice balls into golden, crispy delights!
Here's what you'll need to do:
- Heat vegetable oil in a deep pot or fryer to 350°F (175°C).
- Carefully lower 2-3 arancini into the hot oil using a slotted spoon.
- Fry for about 2-3 minutes, turning them gently to ensure even cooking.
- Watch as they turn a beautiful golden-brown color.
- Remove the arancini when they're evenly browned and crispy.
- Place them on a paper towel-lined plate to drain excess oil.
Remember, patience is key! Don't overcrowd the pot, as this can lower the oil temperature and make your arancini greasy. Fry in small batches for the best results.
As the aroma of fried arancini fills your kitchen, you'll feel a sense of pride and excitement.
These crispy, golden orbs are perfect for parties, family gatherings, or a special treat. Get ready to impress everyone with your homemade arancini – they're sure to be a hit!
Final Thoughts
Mastery of arancini preparation offers a delightful culinary adventure.
You'll find that these golden, crispy rice balls are perfect for:
- Family gatherings
- Festive celebrations
- Casual dinner parties
As you become more comfortable with the process, don't be afraid to experiment with flavors.
Try adding:
- Different cheeses
- Herbs like basil or oregano
- Various meats or vegetables
Remember, practice makes perfect! Each time you make arancini, you'll discover new tricks to improve your technique.
The joy of sharing these tasty treats with loved ones is truly special.
Arancini aren't just delicious; they're also a great way to use leftover risotto.
Frequently Asked Questions
Can Arancini Be Made Ahead of Time and Reheated?
Yes, you can make them ahead of time and reheat them. You'll want to store them in the refrigerator and then reheat in the oven for best results. They'll maintain their crispy exterior and warm, gooey interior.
Are There Vegetarian or Vegan Versions of Arancini?
Yes, you can make vegetarian or vegan arancini! Try using risotto made with vegetable broth, and swap cheese for vegan alternatives. Fill them with veggies like mushrooms or peas. You'll still get that crispy, delicious bite you crave.
What Are Common Dipping Sauces Served With Arancini?
You'll often find marinara sauce as the classic dip for these delicious rice balls. Other popular options include garlic aioli, pesto, or spicy arrabiata. Don't hesitate to try creamy herb sauces or tangy balsamic reductions too.
How Long Do Arancini Stay Fresh When Stored Properly?
You'll find they stay fresh for 3-5 days when refrigerated properly. Store them in an airtight container and reheat before serving. For longer storage, you can freeze them for up to 3 months.
Can Arancini Be Frozen for Later Consumption?
Yes, you can freeze them for later enjoyment. Simply wrap them individually in plastic wrap, place in an airtight container, and freeze for up to 3 months. When ready to eat, thaw and reheat thoroughly.