Farm-to-Table Cooking
Heritage Pork Chop
Mouthwatering heritage pork chops offer unparalleled flavor, but cooking them perfectly requires a special technique that many don’t know.
Heritage pork chops offer a delicious twist on traditional pork. They come from older pig breeds raised outdoors, resulting in meat that's more flavorful and juicy than conventional pork. To cook them, start by seasoning with salt, pepper, and herbs. Sear the chops in a hot skillet for 3-4 minutes per side, then finish in a 400°F oven until they reach 145°F internally. Let them rest for 5 minutes before serving. Remember to use a meat thermometer for perfect doneness. You'll love the rich taste and tender texture of these ethically-raised chops. There's so much more to discover about this premium cut of pork.
Key Takeaways
- Heritage pork chops come from traditional pig breeds and offer richer flavor and more marbling than conventional pork.
- Cooking methods for heritage pork chops typically involve pan-searing and oven-roasting to achieve a crispy exterior and juicy interior.
- Heritage pigs are raised outdoors with ample space, emphasizing animal welfare and sustainable farming practices.
- Ideal internal temperature for cooked heritage pork chops is 145°F (63°C), followed by a 5-minute rest for optimal juiciness.
- Heritage pork chops are versatile and can be seasoned with various herbs and spices, making them suitable for special dinners or elevated weeknight meals.
History
Pork chops have been a staple in American cuisine for generations, but the concept of "heritage pork" is a relatively recent development. You might be wondering what sets heritage pork apart from the pork you're used to buying at the grocery store. Well, it's all about the pig breeds and how they're raised.
In the mid-20th century, most pork production shifted to focus on lean meat, which led to the use of modern pig breeds. These pigs grow quickly and produce leaner meat, but some say they lack flavor. That's where heritage pork comes in. It's from older, traditional pig breeds that were common before industrial farming took over.
You'll find that heritage pork has a richer flavor and more marbling. These pigs are often raised outdoors and given more space to roam. They're also allowed to grow more slowly, which contributes to their unique taste.
While heritage pork wasn't widely available for many years, it's now making a comeback as people seek out more flavorful and ethically raised meat options.
Recipe
Heritage pork chops are a culinary delight, known for their superior flavor and tenderness compared to conventional pork. These chops come from heritage breed pigs, which are raised using traditional farming methods that prioritize animal welfare and sustainable practices. The result is a more flavorful and juicy cut of meat that deserves special attention in the kitchen.
Coffee enthusiasts can also appreciate the unique flavors found in various coffee varieties, enhancing their overall dining experience.
This recipe for heritage pork chops showcases the natural flavors of the meat while adding a complementary blend of herbs and spices. The cooking method involves a combination of pan-searing and oven-roasting to achieve a perfect balance of crispy exterior and juicy interior. This dish is perfect for a special dinner or when you want to elevate your weeknight meal.
- 2 heritage pork chops (1-inch thick)
- 2 tablespoons olive oil
- 2 cloves garlic, minced
- 1 tablespoon fresh rosemary, chopped
- 1 tablespoon fresh thyme, chopped
- 1 teaspoon sea salt
- 1/2 teaspoon freshly ground black pepper
- 1 tablespoon unsalted butter
Preheat the oven to 400°F (200°C). Pat the pork chops dry with paper towels and season both sides with salt and pepper. Heat olive oil in an oven-safe skillet over medium-high heat. Add the pork chops and sear for 3-4 minutes on each side until golden brown.
Add minced garlic, rosemary, and thyme to the skillet, then transfer it to the preheated oven. Roast for 6-8 minutes or until the internal temperature reaches 145°F (63°C). Remove from the oven, add butter to the skillet, and baste the pork chops with the melted butter and herb mixture. Let the chops rest for 5 minutes before serving.
For best results, bring the pork chops to room temperature before cooking. This ensures even cooking throughout the meat. Avoid overcooking, as heritage pork is leaner and can dry out quickly. Use a meat thermometer to check for doneness, and remember that the temperature will continue to rise slightly during the resting period.
Experiment with different herbs and spices to create your own flavor combinations that complement the rich taste of heritage pork.
Cooking Steps
To cook your heritage pork chop, you'll start by preheating your oven to 400°F and seasoning the chops generously.
Next, you'll sear the chops in a hot skillet to develop a flavorful crust before transferring the skillet to the oven.
Once cooked through, you'll let the chops rest briefly before serving, ensuring they're juicy and delicious.
Step 1. Preheat Oven to 400°F
Before you begin preparing your heritage pork chop, it's crucial to preheat your oven to 400°F. This step ensures your oven is at the right temperature when you're ready to cook.
Turn on your oven and set it to 400°F, then give it time to heat up fully. This usually takes about 15 to 20 minutes, depending on your oven.
While you wait, you can start getting your other ingredients and tools ready. It's a good idea to use this time to season your pork chop or prepare any side dishes.
The preheating process is important because it helps your pork chop cook evenly and develop a nice crust on the outside while staying juicy on the inside.
If your oven has a preheat indicator, wait for it to signal that it's ready. If not, you can use an oven thermometer to check the temperature.
Once your oven reaches 400°F, you're all set to start cooking your heritage pork chop. Remember, starting with a properly preheated oven is key to achieving the best results with your dish.
Step 2. Season Pork Chops Generously
With your oven preheating, it's time to focus on seasoning your heritage pork chops. Take the chops out of the refrigerator and pat them dry with paper towels. This step helps the seasoning stick better and promotes a nice crust when cooking.
Now, grab your favorite seasonings. Salt and black pepper are must-haves, but don't be afraid to get creative. You can add garlic powder, dried herbs like thyme or rosemary, or even a pinch of smoked paprika for extra flavor. Sprinkle the seasonings generously on both sides of the pork chops, gently pressing them into the meat.
Don't hold back on the salt – it's key to bringing out the pork's natural flavors. A good rule of thumb is about 1/2 teaspoon of salt per pound of meat. Make sure you season the sides of the chops too, not just the flat surfaces.
If you're using thick-cut chops, you might want to use a bit more seasoning to ensure every bite is flavorful. Let the seasoned chops rest at room temperature for about 15 minutes before cooking. This allows the flavors to penetrate the meat and helps it cook more evenly.
Step 3. Sear Chops in Hot Skillet
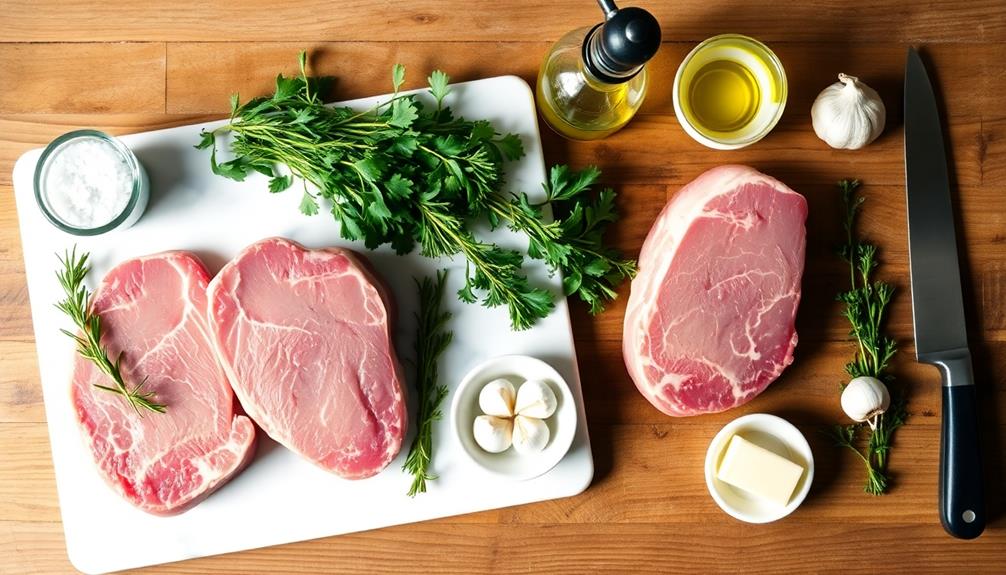
Once your seasoned pork chops have rested, it's time to sear them in a hot skillet.
Heat a large, heavy-bottomed skillet over medium-high heat. Add a tablespoon of oil with a high smoke point, like vegetable or grapeseed oil. When the oil starts to shimmer, it's ready for the chops.
Carefully place the pork chops in the hot skillet. You'll hear a sizzle as they hit the pan. Don't overcrowd the pan; work in batches if needed.
Let the chops cook undisturbed for about 3-4 minutes. This allows a nice golden-brown crust to form. Using tongs, flip the chops and sear the other side for another 3-4 minutes.
If your chops are thick, you might need to finish cooking them in the oven. For thinner chops, they may be done after searing. Use a meat thermometer to check the internal temperature. It should reach 145°F (63°C) for medium-rare.
Step 4. Transfer Skillet to Oven

After searing your pork chops, you may need to finish cooking them in the oven, especially if they're thicker cuts. This method ensures they're cooked through without burning the outside.
First, make sure your skillet is oven-safe. If it's not, transfer the chops to a baking dish. Preheat your oven to 375°F (190°C) while you're searing the chops.
Once you've seared both sides, carefully move the skillet to the preheated oven. Use oven mitts, as the handle will be very hot. Cook the chops for about 5-10 minutes, depending on their thickness. For a 1-inch thick chop, aim for about 7 minutes.
To check if they're done, use a meat thermometer. It should read 145°F (63°C) when inserted into the thickest part of the chop. If you don't have a thermometer, cut into the center. The meat should be slightly pink but not raw.
Step 5. Rest and Serve Chops

The sizzling pork chops are ready to rest after their journey through skillet and oven. Carefully remove the skillet from the oven using thick oven mitts. Place the chops on a clean plate or cutting board, and let them rest for about 5 minutes.
This resting time is crucial as it allows the juices to redistribute throughout the meat, ensuring each bite is moist and flavorful.
While the chops rest, you can prepare your side dishes or set the table. Once the resting time is up, it's time to serve your perfectly cooked heritage pork chops. Use a sharp knife to cut into the thickest part of a chop. You'll see it's cooked through but still juicy.
If you've used a bone-in chop, the meat near the bone might be slightly pink, which is normal and safe to eat.
Plate your pork chops with your chosen sides. You can garnish with fresh herbs like parsley or thyme for extra flavor and a pop of color.
Don't forget to drizzle any pan juices over the meat for added taste. Serve immediately and enjoy your delicious, home-cooked meal!
Final Thoughts
Savoring a perfectly cooked heritage pork chop is an experience that'll linger in your memory.
You've now learned the art of preparing this delicious cut of meat, from selecting the right chop to resting and serving it.
Remember, the key to success lies in the details: choosing a quality heritage pork chop, brining it for enhanced flavor and tenderness, and cooking it to the right internal temperature.
Don't be afraid to experiment with different seasonings or marinades to suit your taste.
As you become more comfortable with the process, you'll find your own preferred methods and flavors.
Always prioritize food safety by using a meat thermometer and handling raw pork properly.
Cooking heritage pork chops isn't just about following a recipe; it's about understanding the meat and respecting its quality.
With practice, you'll develop an intuition for cooking times and temperatures.
Share your newfound skills with friends and family, and enjoy the satisfaction of serving a restaurant-quality meal right from your own kitchen.
Happy cooking!
Frequently Asked Questions
What Breeds of Pigs Are Considered Heritage for Pork Chops?
You'll find several heritage pig breeds for pork chops. These include Berkshire, Duroc, Tamworth, and Gloucestershire Old Spots. They're known for their superior flavor and marbling. Consider trying these breeds for a truly exceptional pork experience.
How Does Heritage Pork Taste Compared to Conventional Pork?
You'll notice heritage pork has a richer, more complex flavor than conventional pork. It's often described as juicier and more tender, with a better fat-to-meat ratio. You'll likely taste subtle nuances that aren't present in standard pork.
Where Can I Purchase Heritage Pork Chops?
You can find heritage pork chops at specialty butcher shops, farmers' markets, and high-end grocery stores. Try online retailers specializing in artisanal meats or directly from heritage breed farms. Some restaurants also offer heritage pork dishes you can sample.
Are Heritage Pork Chops More Expensive Than Regular Pork Chops?
You'll typically find heritage pork chops are pricier than regular ones. They're known for superior flavor and quality, which drives up the cost. However, prices can vary, so it's worth comparing at different retailers.
What Are the Nutritional Differences Between Heritage and Conventional Pork Chops?
You'll find heritage pork chops generally have a higher fat content and more marbling than conventional ones. They're often richer in omega-3 fatty acids and contain slightly more protein. However, specific nutritional differences can vary between breeds and farming practices.
Ethan’s passion for farm-to-table cooking comes through in every dish he creates. He focuses on fresh, organic, and locally sourced ingredients, crafting seasonal recipes that celebrate the natural flavors of the earth. Based in California, Ethan’s modern approach to cooking is all about sustainability and simplicity.
Farm-to-Table Cooking
Foraged Wild Garlic Pesto
Harnessing the bold, garlicky essence of wild plants, this vibrant pesto offers a delightful springtime treat with impressive nutritional benefits.
Foraged wild garlic pesto is a delightful springtime condiment that captures the bold, garlicky essence of this wild plant. You'll love its vibrant, mild flavor – far more delicate than cultivated garlic. Sustainably harvested from woodlands, wild garlic leaves, flowers, and stems come together with toasted pine nuts, Parmesan, and olive oil for a versatile pesto you can enjoy on pasta, drizzle over grilled meats, or use as a spread. Beyond its culinary appeal, this pesto offers impressive nutritional benefits too. Get ready to discover more about this flavorful, seasonal delight. As a bonus, wild garlic pesto also pairs beautifully with a variety of dishes, such as roasted vegetables or as a dip for crusty bread. Its savory, earthy notes complement a wide range of flavors, making it a versatile addition to your culinary repertoire. For a truly unforgettable springtime meal, try using wild garlic pesto in a foraged mushroom risotto recipe for a dish that truly celebrates the season’s bountiful flavors.
Key Takeaways
- Wild garlic, also known as ramsons or bear's garlic, is a foraged ingredient with a distinctive garlicky flavor prevalent in European cuisine.
- Sustainable harvesting of wild garlic in spring ensures optimal flavor while preserving the ecosystem.
- Foraged wild garlic pesto combines the leaves and flowers with nuts, cheese, and olive oil for a vibrant, versatile condiment.
- Wild garlic pesto offers nutritional benefits, including vitamins, antioxidants, and antimicrobial properties from the garlic compounds.
- This seasonal pesto celebrates the tradition of foraging and promotes awareness of local, sustainable food sources.
History
Wild garlic, also known as ramsons or bear's garlic, has long been a part of traditional foraging practices throughout Europe. For centuries, people have sought out the plant's distinctive, garlicky flavor, using it in various dishes and remedies. In many regions, wild garlic has been a springtime staple, signaling the arrival of the growing season.
Historically, wild garlic was particularly valued for its medicinal properties. Ancient civilizations like the Greeks and Romans recognized its potential to treat a range of ailments, from respiratory issues to digestive problems.
During the Middle Ages, wild garlic was often used to ward off illness and plague, thanks to its antimicrobial and antiseptic qualities.
Today, the practice of foraging for wild garlic continues, with enthusiasts relishing the opportunity to connect with nature and rediscover the flavors of the past. As interest in sustainable, locally-sourced ingredients grows, this versatile wild plant has experienced a resurgence in popularity, making it a treasured ingredient in modern culinary creations.
Recipe
Wild garlic, also known as ramsons, is a delightful spring-time ingredient that can be foraged and used to create a vibrant and flavorful pesto. This recipe showcases the unique taste of wild garlic, which has a milder and sweeter flavor compared to its cultivated cousin, regular garlic.
Foraging for wild garlic is a rewarding experience, as it allows you to connect with the natural world and incorporate fresh, locally-sourced ingredients into your cooking. When preparing this pesto, be mindful of using the entire wild garlic plant, including the leaves and flowers, to capture the full depth of flavor.
- 2 cups (packed) wild garlic leaves and flowers
- 1/2 cup pine nuts or walnuts
- 1/2 cup grated Parmesan cheese
- 1/2 cup extra-virgin olive oil
- Juice of 1 lemon
- Salt and freshly ground black pepper to taste
In a food processor, combine the wild garlic leaves and flowers, nuts, Parmesan cheese, olive oil, and lemon juice. Pulse until a coarse pesto-like consistency is achieved, being careful not to overmix. Season with salt and pepper to taste.
This wild garlic pesto can be used in a variety of ways, such as tossed with pasta, spread on toast or crostini, or used as a dip for fresh vegetables.
The pesto can be stored in an airtight container in the refrigerator for up to 1 week, or frozen for longer-term storage. When ready to use, allow the pesto to come to room temperature before serving.
Cooking Steps
First, rinse and trim the wild garlic leaves.
Next, toast the pine nuts in a dry pan until fragrant.
Then, blend the garlic, nuts, olive oil, and seasoning in a food processor, before stirring in the Parmesan cheese and transferring the pesto to a jar.
Step 1. Rinse and Trim Wild Garlic
Begin by gently rinsing the foraged wild garlic under cool running water. This will remove any dirt or debris that may have clung to the leaves during the foraging process.
Carefully examine each leaf, looking for any damaged or discolored areas, and trim them away using a sharp knife or kitchen shears. You don't want to include any imperfect leaves in your pesto, as they can impart a bitter or off-flavor.
Once the leaves are clean and trimmed, pat them dry with a clean kitchen towel or paper towels. This step is crucial, as you don't want any excess moisture in the pesto, which could dilute the flavor and texture.
With your wild garlic prepped and ready, you can now move on to the next step of the pesto-making process, which involves combining the leaves with the other key ingredients.
Step 2. Toast Pine Nuts
With your wild garlic prepped and ready, let's move on to toasting the pine nuts.
Grab a small skillet and place it over medium heat. Once the pan is hot, add the pine nuts in a single layer. Keep a close eye on them, stirring frequently, as pine nuts can burn quickly.
You'll know they're ready when they're lightly golden and fragrant, which should take about 2-3 minutes. Be careful not to let them get too dark, as that can make them taste bitter.
Once they're perfectly toasted, transfer the pine nuts to a plate or bowl to stop the cooking. This step adds a lovely, nutty flavor to the pesto.
Next, we'll add the toasted pine nuts to the food processor along with the other pesto ingredients. The pine nuts will help create a creamy, textured pesto that's bursting with the fresh, garlicky flavor of the wild greens you foraged.
Step 3. Blend Ingredients in Food Processor
With the toasted pine nuts ready, add them to your food processor along with the wild garlic leaves, Parmesan cheese, olive oil, and a pinch of salt and pepper.
Pulse the ingredients a few times to begin the blending process. Scrape down the sides of the food processor as needed to ensure even mixing.
Continue blending until the mixture forms a smooth, creamy pesto. You may need to add a bit more olive oil if the pesto seems too thick.
Taste the pesto and adjust the seasoning with additional salt and pepper if desired. The final texture should be spreadable yet retain some coarse texture from the pine nuts.
Blend for a minute or two more if you'd like the pesto to be silkier in consistency.
Once you're satisfied with the flavor and texture, transfer the wild garlic pesto to an airtight container until ready to use.
Step 4. Add Parmesan Cheese
Next, add the grated Parmesan cheese to the food processor. The amount of cheese you use will depend on your personal taste preferences, but we recommend starting with 1/2 cup of freshly grated Parmesan.
Pulsing the food processor, incorporate the cheese until it's fully blended into the mixture. The Parmesan will add a salty, savory flavor that balances the pungency of the wild garlic.
Feel free to add more cheese if you prefer a richer, more pronounced cheese flavor. Just be sure not to overdo it, as you don't want the Parmesan to overpower the delicate notes of the wild garlic.
Once the cheese is fully incorporated, give the pesto a taste and adjust the seasoning as needed, adding more salt or pepper to suit your palate.
With the Parmesan cheese blended in, your wild garlic pesto is now ready to use in your favorite pasta dishes, spread on bread, or tossed with roasted vegetables.
Step 5. Transfer to Jar
Once the wild garlic pesto is blended to your desired consistency, transfer it to a clean, airtight jar. This will help preserve the vibrant color and fresh flavor of the pesto.
Gently spoon or pour the pesto into the jar, filling it almost to the top. Be sure to leave a small amount of headspace to allow for expansion. Secure the lid tightly, ensuring there are no gaps that could allow air to enter.
For optimal freshness, store the jar in the refrigerator. The pesto will keep for up to a week this way.
When you're ready to use it, simply scoop out what you need and enjoy it on pasta, bread, or as a flavorful dip. The pesto's bright, garlicky notes will elevate any dish.
Final Thoughts
Ultimately, the vibrant and versatile wild garlic pesto you've crafted showcases the abundance of nature's bounty.
You've harnessed the bold, garlicky flavor of foraged wild garlic, blended it with the richness of pine nuts and the fruity notes of olive oil, creating a versatile condiment that can elevate a variety of dishes.
Whether you dollop it onto roasted vegetables, toss it with pasta, or use it as a spread for crusty bread, this pesto is a testament to the power of seasonal, locally-sourced ingredients.
It's a simple yet satisfying way to bring the flavors of the great outdoors into your kitchen.
As you savor each bite, you'll be reminded of the joy of foraging and the deep connection to the natural world that comes from preparing your own wild foods.
Enjoy this pesto as a celebration of the bountiful season and the nourishment that can be found in the wilds around us.
Frequently Asked Questions
Where Can I Find Wild Garlic in My Area?
You can find wild garlic in damp, shaded areas like woodland edges and riverbanks. Look for the distinctive broad leaves and pungent garlic aroma, and be sure to properly identify it before foraging.
How Do I Identify Wild Garlic From Other Plants?
To identify wild garlic, look for its broad, flat leaves and distinctive garlic smell. The leaves grow in clusters near the base of the plant, and the flowers are small and white.
Can I Use Wild Garlic Instead of Regular Garlic?
You can absolutely use wild garlic instead of regular garlic. The flavors are similar, and wild garlic can make a great substitute in many recipes. Just be sure to identify it correctly to avoid any potential hazards.
How Long Does Homemade Wild Garlic Pesto Last?
Homemade wild garlic pesto can last 5-7 days in the fridge when stored in an airtight container. The fresher the ingredients, the longer it'll stay fresh. Just be sure to give it a sniff before using it.
Is Wild Garlic Pesto Suitable for Vegetarian or Vegan Diets?
Yes, wild garlic pesto is suitable for vegetarian or vegan diets. It's typically made with just a few simple ingredients like wild garlic, nuts, oil, and seasoning, without any animal products.
Ethan’s passion for farm-to-table cooking comes through in every dish he creates. He focuses on fresh, organic, and locally sourced ingredients, crafting seasonal recipes that celebrate the natural flavors of the earth. Based in California, Ethan’s modern approach to cooking is all about sustainability and simplicity.
Farm-to-Table Cooking
Nettle Soup: Spring’s Wild Bounty
Years of foraging for the vibrant, nutrient-dense nettle have culminated in this delectable spring soup, inviting you to discover its earthy, creamy goodness.
Nettle soup celebrates the wild, nutritious greens foraged across continents for centuries. You'll find these vibrant greens packed with vitamins, minerals, and antioxidants – perfect for spring menus. Carefully harvest the leaves, tame their bite through blanching, then simmer in a rich stock for a hearty, earthy flavor. Enhance the creaminess with milk or cream, seasoning to your taste. Garnish with sour cream or yogurt for contrast. Whether locally foraged or market-sourced, nettle soup offers a delightful taste of the season's wild bounty. Discover more about this versatile ingredient and its culinary exploration.
Key Takeaways
- Nettles have been consumed as food across Europe, Asia, and North America for centuries, with a rich cultural and historical significance.
- Nettle soup offers a nutritional bounty, being rich in vitamins, minerals, and antioxidants while low in calories.
- Nettle soup can be made using fresh nettle leaves, stock, cream or milk, and simple seasonings, with careful handling required to avoid stings.
- The cooking process, including blanching and simmering, helps tame the bitterness and sting of nettles, resulting in a uniquely flavored soup.
- Nettle soup celebrates the flavors of spring, encourages foraging and sustainable practices, and offers an opportunity for culinary exploration and creativity.
History
Dating back centuries, the use of nettles in culinary traditions has a rich and diverse history.
You'll find that nettles have been consumed as a food source across Europe, Asia, and North America for hundreds, if not thousands, of years. In ancient Greece, nettles were cultivated and used in a variety of dishes. Roman soldiers even carried nettles with them on campaigns, using them to stimulate circulation and provide a nutritional boost.
Throughout the Middle Ages, nettles remained a common ingredient in European soups and stews. Meanwhile, in traditional Chinese medicine, nettles were prized for their purported medicinal properties. Native American tribes, too, incorporated nettles into their diets, often harvesting and preparing them in unique ways.
Today, the humble nettle persists as a versatile and underappreciated wild edible, with chefs and home cooks rediscovering its culinary potential.
Recipe
Nettle soup is a delightfully earthy and nutritious dish that has been enjoyed for centuries. The vibrant green color and robust flavor of nettles make this soup a true culinary delight. Nettles are a powerhouse of nutrients, packed with vitamins, minerals, and antioxidants, making them a healthy and sustainable ingredient.
Foraging for fresh nettles can be an enjoyable outdoor activity, but be sure to wear gloves to avoid the plant's stinging properties. Once harvested, the nettles undergo a simple transformation, becoming a silky, flavorful soup that's sure to impress.
Ingredients:
- 1 pound fresh nettle leaves, washed and trimmed
- 1 onion, diced
- 2 cloves garlic, minced
- 4 cups vegetable or chicken stock
- 1 cup heavy cream or milk
- Salt and pepper to taste
- Sour cream or yogurt (for serving, optional)
Instructions:
In a large pot, sauté the onion and garlic in a bit of olive oil until translucent. Add the washed and trimmed nettle leaves and sauté for a few minutes until wilted.
Pour in the stock and bring to a boil. Reduce heat and simmer for 15-20 minutes, or until the nettles are very soft. Carefully transfer the soup to a blender and puree until smooth.
Return the soup to the pot, stir in the heavy cream or milk, and season with salt and pepper to taste.
When serving, consider garnishing the soup with a dollop of sour cream or yogurt for a creamy and tangy contrast. Nettle soup is best enjoyed immediately, but leftovers can be stored in the refrigerator for up to 3 days. This soup can also be frozen for longer-term storage.
Cooking Steps
First, you'll need to harvest the nettle leaves carefully, as they can sting if not handled properly.
Once you've gathered the leaves, be sure to wash them thoroughly to remove any dirt or debris.
Next, briefly blanch the leaves in boiling water to tame their bitterness, then add cream and let the flavors simmer until they've blended together nicely.
Step 1. Harvest Nettle Leaves Carefully
Donning a pair of thick gloves, you carefully grasp the tender nettle leaves, mindful of their stinging nature.
These wild plants may look harmless, but the tiny needle-like hairs on their stems and leaves can deliver a painful prick if handled carelessly.
Avoiding direct contact, you gently pinch the top four to six leaves, taking care not to disturb the plant's roots.
Nettles grow in dense clusters, so you can efficiently harvest a large quantity in a short time.
Be sure to collect the leaves before the plant flowers, as the older leaves may become coarse and fibrous.
With your haul secured, you're one step closer to creating a delightful nettle soup, a true celebration of spring's vibrant, nourishing bounty.
Step 2. Wash Nettle Leaves Thoroughly
After carefully harvesting the nettle leaves, you'll want to thoroughly wash them to remove any dirt or debris.
Run the nettle leaves under cool, running water, gently rubbing them between your fingers to dislodge any grit or particles. Avoid letting the leaves soak, as this can cause them to lose their vibrant green color and nutrients.
Once washed, pat the leaves dry with a clean towel or paper towels. It's important to ensure they're completely dry before proceeding to the next step, as any residual moisture can lead to spoilage during cooking.
Damaged or discolored leaves should be discarded, as they may impart undesirable flavors to the final soup.
With your clean, dry nettle leaves, you're now ready to begin preparing the nettle soup. The next step will involve blanching the leaves to help tame their potent sting before incorporating them into the soup base.
Step 3. Blanch Nettle Leaves Briefly
With your clean, dry nettle leaves, it's time to blanch them briefly. This step helps to eliminate any remaining dirt or debris, and it also softens the leaves slightly.
Start by bringing a pot of water to a rapid boil. Gently add the nettle leaves, being careful not to overcrowd the pot. Blanch the leaves for just 30-60 seconds, then immediately remove them with a slotted spoon and transfer them to an ice bath. This quick blanching process helps to preserve the vibrant green color and tender texture of the nettles.
Once the leaves have cooled in the ice bath, drain them thoroughly. Gently squeeze out any excess water, being careful not to bruise or damage the delicate leaves.
Now, your nettles are ready to be incorporated into your soup or used in other recipes. The blanching step ensures your nettles are clean, tender, and flavorful, setting the stage for a delicious nettle-based dish.
Step 4. Add Cream
To create a rich and creamy nettle soup, add a touch of heavy cream. This simple addition will lend a luxurious mouthfeel and balance the earthy, grassy flavors of the nettles.
The soothing aroma of the soup can also enhance the overall experience, similar to how aromatherapy can trigger the release of neurotransmitters that promote relaxation. Start by pouring in about 1/2 cup of cream per 4 cups of nettle broth.
Gently heat the soup, stirring constantly, until the cream is fully incorporated. Avoid letting the soup come to a boil, as this can cause the cream to curdle.
The cream will also lighten the color of the soup, giving it a vibrant green hue. Taste the soup and adjust the seasoning if needed, adding a pinch of salt or a squeeze of lemon to brighten the flavors.
For an extra velvety texture, you can blend a portion of the soup before stirring in the cream. Serve the creamy nettle soup warm, garnished with a swirl of cream, a sprinkle of freshly ground black pepper, or a handful of toasted nuts or seeds.
Step 5. Simmer Until Flavors Blend
Once you have added the cream, gently simmer the nettle soup, stirring occasionally, until the flavors have fully blended, about 10-15 minutes.
This gentle simmering allows the cream to seamlessly integrate with the vibrant, herbal notes of the nettles. The heat will mellow the soup's slight bitterness, creating a smooth, harmonious taste.
Periodically stir the mixture to ensure even cooking and prevent scorching on the bottom of the pot. As the soup simmers, you'll notice the color deepen and the textures meld together.
Keep a close eye, as you don't want to overcook the delicate nettles. After 10-15 minutes, the soup should be ready.
The flavors will be well-incorporated, with the cream adding a silky richness to complement the wild, grassy essence of the nettles.
Now it's time to ladle the soup into bowls and garnish as desired, allowing your guests to savor spring's fleeting, flavorful bounty.
Final Thoughts
Ultimately, nettle soup can be a rewarding and nourishing experience for the adventurous home cook. The earthy, grassy flavors of the nettles pair beautifully with the richness of the stock and the brightness of the lemon.
Don't be deterred by the initial sting of handling the nettles – with proper precautions, you can easily transform these wild greens into a delicious and nutritious soup.
The final step is to taste and adjust the seasoning as needed. Add a splash of vinegar or lemon juice to brighten the flavors, and don't be afraid to experiment with different herbs and spices.
Serve the soup hot, garnished with a swirl of yogurt or a handful of toasted nuts for added texture and flavor. Whether you're foraging for nettles or sourcing them from a local market, this simple yet satisfying soup is a wonderful way to celebrate the flavors of spring. For a heartier meal, consider pairing this nettle soup with a side of crusty bread or a fresh salad. And if you’re looking for more seasonal recipes to enjoy, you might also want to try our heirloom bean stew recipe, which features a vibrant combination of heirloom beans, seasonal vegetables, and aromatic herbs. Both dishes are perfect for embracing the abundance of spring produce and nourishing your body with wholesome, flavorful ingredients.
Embrace the wild and reap the nourishing rewards of nettle soup.
Frequently Asked Questions
Are Nettle Leaves Safe to Consume?
Yes, nettle leaves are generally safe to consume. Just be sure to wear gloves when handling them, as the leaves have tiny stinging hairs that can cause an unpleasant rash. With proper preparation, nettles make a nutritious and flavorful addition to your spring meals.
Can I Use Nettle Leaves Instead of Spinach?
You can certainly use nettle leaves instead of spinach. Nettles have a similar taste and texture, and they're packed with nutrients. Just be sure to properly clean and prepare the nettles before using them in your recipes.
How Do I Identify Wild Nettle Plants?
To identify wild nettle plants, look for leaves that are deep green, oblong-shaped, and have serrated edges. You'll also notice they have tiny stinging hairs that can irritate your skin, so be cautious when handling them.
What Are the Health Benefits of Nettle Soup?
Nettle soup is packed with vitamins and minerals that can boost your immune system, reduce inflammation, and provide a natural energy boost. Its rich, earthy flavor makes it a delightful springtime treat.
Can I Freeze Leftover Nettle Soup?
Yes, you can freeze leftover nettle soup. It'll retain its nutritional value, and you can enjoy it later when you need a quick, healthy meal. Just make sure to store it properly in an airtight container.
Ethan’s passion for farm-to-table cooking comes through in every dish he creates. He focuses on fresh, organic, and locally sourced ingredients, crafting seasonal recipes that celebrate the natural flavors of the earth. Based in California, Ethan’s modern approach to cooking is all about sustainability and simplicity.
Farm-to-Table Cooking
Dandelion Greens Salad
Flawlessly blending bitterness and sweetness, this dandelion greens salad promises a delightful culinary experience, leaving you craving more. Discover the recipe now.
Dandelion greens have long been a culinary treasure, valued by ancient civilizations for their nutritional density and unique taste. Once considered mere weeds, these robust leaves are making a comeback, prized by chefs and home cooks alike. Crafting a delightful salad is simple – tear the greens, whisk together a vibrant vinaigrette, and top with crunchy nuts. The resulting dish offers a delicate balance of bitterness, sweetness, and texture. Whether you're seeking a light meal or a versatile side, this dandelion greens salad is sure to delight. To uncover more ways to enjoy this nutritional powerhouse, keep reading.
Key Takeaways
- Dandelion greens are a nutrient-dense ingredient with a slightly bitter flavor, often used in salads for their versatility and health benefits.
- The salad can be customized with a variety of fresh vegetables, nuts, and a bright vinaigrette dressing to complement the greens.
- Dandelion greens have been utilized in various cuisines for centuries and are making a resurgence in popularity among chefs and home cooks.
- Proper storage and handling of the greens are important to maintain freshness and maximize their nutritional value.
- Dandelion greens pair well with sweet fruits, savory cheeses, and crunchy nuts to create a balanced and flavorful salad.
History
For centuries, dandelion greens have been a staple in various cuisines worldwide. These resilient, nutrient-dense leaves were prized by ancient civilizations, from the Greeks and Romans to traditional Chinese and Middle Eastern cultures. They utilized dandelion greens in salads, stir-fries, and even as a medicinal herb.
In Europe, the plant was a common sight in cottage gardens, with the leaves and roots finding their way into peasant dishes. As waves of immigrants brought their culinary traditions to North America, dandelion greens became a familiar sight in many ethnic communities.
Though often considered a weed, these greens have a long and storied history of nourishing people across the globe. Today, the humble dandelion has experienced a resurgence in popularity, with chefs and home cooks rediscovering its versatility and health benefits.
From rural farms to urban gardens, the dandelion's enduring presence in our culinary landscape is a testament to its resilience and the ingenuity of those who've embraced it over the centuries.
Recipe
Dandelion greens are a nutrient-dense and often overlooked green that can make a delightful salad. Their slightly bitter flavor pairs well with a variety of ingredients, creating a balanced and satisfying dish. This recipe showcases the versatility of dandelion greens and provides an easy way to incorporate them into your meals.
The combination of the peppery dandelion greens, crunchy vegetables, and a bright vinaigrette dressing makes for a refreshing and flavorful salad. With just a few simple ingredients, you can enjoy the health benefits and unique taste of dandelion greens.
- 4 cups freshly harvested dandelion greens, washed and chopped
- 1 cup cherry tomatoes, halved
- 1/2 cup sliced cucumber
- 1/4 cup thinly sliced red onion
- 2 tablespoons toasted sunflower seeds
For the Vinaigrette:
- 2 tablespoons extra-virgin olive oil
- 1 tablespoon white wine vinegar
- 1 teaspoon Dijon mustard
- 1 teaspoon honey
- Salt and freshly ground black pepper to taste
In a large salad bowl, combine the chopped dandelion greens, cherry tomatoes, cucumber, and red onion. Then, in a separate small bowl, whisk together olive oil, red wine vinegar, salt, and pepper to create a simple vinaigrette. Pour the vinaigrette over the salad, and toss everything together until well combined. For an extra kick of flavor, consider adding pickled vegetables recipe from your favorite cookbook or online source. The tangy and briny taste of pickled vegetables will add an extra level of depth to the salad. Enjoy!
In a small bowl, whisk together the olive oil, white wine vinegar, Dijon mustard, and honey. Season the vinaigrette with salt and pepper to taste. Pour the vinaigrette over the salad and toss gently to coat. Sprinkle the toasted sunflower seeds on top.
When choosing dandelion greens, look for ones that are fresh, vibrant, and free of blemishes. The younger, smaller leaves tend to be less bitter and more tender.
If the greens are particularly bitter, you can soak them in cold water for 30 minutes to an hour to help remove some of the bitterness. Enjoy this nutrient-packed dandelion greens salad as a light and refreshing meal or side dish.
Cooking Steps
First, wash the dandelion greens thoroughly to remove any dirt or debris.
Next, tear the greens into bite-sized pieces for easy eating.
Step 1. Wash Greens Thoroughly
Before handling the greens, it's crucial to wash them thoroughly. Dandelion greens can harbor dirt, bugs, and other debris, so you'll want to ensure they're clean before assembling your salad.
Fill a large bowl with cold water and gently submerge the greens, swishing them around to dislodge any unwanted particles. Lift the greens out of the water, letting the dirt and debris sink to the bottom. Repeat this process until the water remains clear, typically 2-3 times.
Once the greens are clean, use your hands or a salad spinner to remove excess moisture. Dry the greens thoroughly, as any remaining water can dilute the dressing. If you're short on time, pat the greens dry with paper towels or a clean kitchen towel.
Properly washing and drying the dandelion greens is an essential step to ensure your salad is crisp, fresh, and free from contaminants. With the greens prepped, you can now move on to assembling the rest of your delicious dandelion greens salad.
Step 2. Tear Greens Into Bite-Sized Pieces
After thoroughly washing the greens, tear the dandelion leaves into bite-sized pieces. This will ensure that each forkful of the salad contains a manageable amount of the flavorful greens.
Rip the larger leaves into halves or quarters, depending on their size. For the smaller, more delicate leaves, use your fingers to gently tear them into smaller sections. Be careful not to bruise or damage the leaves, as this can cause them to wilt prematurely.
Once all the greens are torn, give them a gentle toss to distribute the pieces evenly. This step helps to create a salad with a consistent texture and flavor in every bite.
Tearing the greens also exposes more surface area, which allows the dressing to cling to the leaves more effectively. With the greens now ready, you can proceed to the next step of assembling the complete dandelion greens salad.
Step 3. Dress With Vinaigrette
With the greens now torn into bite-sized pieces, you can begin dressing the salad.
In a small bowl, whisk together 2 tablespoons of apple cider vinegar, 1 tablespoon of Dijon mustard, and 3 tablespoons of extra-virgin olive oil.
Season the vinaigrette with a pinch of salt and a grind of black pepper. Drizzle the vinaigrette over the dandelion greens and toss gently to coat.
You want the leaves to be evenly dressed, but not drowning in the vinaigrette. If the salad seems a bit dry, add another tablespoon of olive oil.
Taste and adjust the seasoning if needed, adding more vinegar for a tangier dressing or a touch of honey for sweetness.
The key is to balance the bitterness of the dandelion greens with the right amount of acid and fat in the vinaigrette.
Toss the salad one more time before serving to ensure everything is well-combined.
Step 4. Garnish With Toasted Nuts
To add a nice crunch and nutty flavor to the dandelion greens salad, you'll want to toast some nuts.
Grab a small skillet and heat it over medium heat. Once it's hot, add your choice of nuts, such as sliced almonds, chopped walnuts, or pine nuts.
Spread them out in a single layer and let them toast, stirring occasionally, until they're fragrant and lightly browned, about 3-5 minutes. Be careful not to let them burn.
Once they're toasted, transfer the nuts to a plate or bowl to cool. You can use the toasted nuts to sprinkle over the top of the dressed dandelion greens.
The nutty crunch will provide a delightful contrast to the bitter greens and tangy vinaigrette. Feel free to add as much or as little as you'd like to personalize the salad to your taste.
Step 5. Serve Immediately for Maximum Freshness
Once you've assembled the salad, go ahead and serve it right away. Dandelion greens are delicate, and their crisp texture and bold flavor won't last long once they're dressed.
As soon as you've tossed the salad with the vinaigrette, get it on the table. This'll ensure your guests can enjoy the salad at its peak freshness, with the greens still vibrant and the nuts retaining their crunch.
Don't let the salad sit around, as the greens will start to wilt and the flavors will meld together, losing their individual character.
Serve the salad immediately, so everyone can savor the interplay of the bitter dandelion greens, the tangy vinaigrette, and the toasted nuts. This way, you'll capture the salad's optimal texture and taste.
Your guests will appreciate the care you've taken to present them with a truly exceptional dandelion greens salad.
Final Thoughts
Dandelion greens are a versatile and underappreciated ingredient that deserve more attention. With their bold, slightly bitter flavor and impressive nutritional profile, these greens can elevate any salad.
Don't let their humble appearance fool you – dandelion greens are packed with vitamins, minerals, and antioxidants that can provide a range of health benefits.
When purchasing dandelion greens, look for vibrant, crisp leaves and avoid any that appear wilted or discolored.
Store them properly, and you'll be able to enjoy their freshness for several days.
Experimentation is key – try pairing the greens with a variety of ingredients, from sweet fruits to savory cheeses, to find your perfect flavor combination.
Frequently Asked Questions
What Are the Health Benefits of Dandelion Greens?
Dandelion greens are packed with beneficial nutrients like vitamins A, C, and K, as well as antioxidants. They can help support liver health, boost your immune system, and even aid in digestion. Incorporating them into your diet is a great way to boost your overall health.
How Can I Preserve Leftover Dandelion Greens?
To preserve leftover dandelion greens, you can store them in the refrigerator in a sealed container or plastic bag for up to 5 days. You can also freeze them for longer-term storage to enjoy their nutrients later.
Are There Any Substitutes for Dandelion Greens?
You can substitute dandelion greens with other bitter greens like arugula, kale, or endives. They may have a slightly different flavor, but they'll provide a similar texture and nutritional profile to your dish.
Can I Use Dandelion Greens in Other Recipes?
Absolutely! Dandelion greens are incredibly versatile. You can use them in stir-fries, soups, pesto, or even as a substitution for spinach or kale in your favorite recipes. Their slightly bitter flavor adds a unique depth to any dish.
How Do I Identify Edible Dandelion Greens?
You can identify edible dandelion greens by their distinctive jagged, toothed leaves. They'll have a slightly bitter, peppery taste. Look for them in fields or your own backyard, but avoid areas that may have been sprayed with pesticides.
Ethan’s passion for farm-to-table cooking comes through in every dish he creates. He focuses on fresh, organic, and locally sourced ingredients, crafting seasonal recipes that celebrate the natural flavors of the earth. Based in California, Ethan’s modern approach to cooking is all about sustainability and simplicity.
-
Southern Comfort Food1 month ago
Cheese Straws
-
Brazilian Cuisine1 month ago
Caldeirada
-
Southern Comfort Food1 month ago
Creamed Corn
-
Brazilian Cuisine1 month ago
Chicken in Brown Sauce
-
Brazilian Cuisine1 month ago
Tacacá
-
Southern Comfort Food1 month ago
Squash Casserole
-
Southern Comfort Food1 month ago
Chocolate Gravy
-
Polish Comfort Food1 month ago
Krupnik (Barley Soup)