
Roasted beet hummus is a vibrant and flavorful twist on the classic Middle Eastern dip. It blends the natural sweetness of roasted beets with the creamy richness of chickpeas, tahini, and aromatic spices. The result is a nutritious and visually appealing snack or appetizer you'll love. Roast the beets, blend the ingredients, and season with spices for a balanced flavor profile. Serve it with fresh veggies or pita for dipping, or use it as a spread on sandwiches. The earthy, slightly sweet taste complements a variety of dishes. Discover the unique flavor combinations that make this hummus a standout option.
Key Takeaways
- Roasted beet hummus is a unique variation of the traditional Middle Eastern chickpea-based dip, featuring the addition of sweet and vibrant roasted beets.
- The combination of beets, chickpeas, tahini, lemon juice, and spices creates a flavorful and nutritious dip that can be served with pita bread, vegetables, or crackers.
- Roasting the beets enhances their natural sweetness and adds a distinct color to the hummus, making it visually appealing.
- Blending the ingredients in a food processor results in a smooth, creamy texture, and the chilling process helps the flavors meld together.
- Roasted beet hummus is a versatile snack or appetizer that can be customized with various spices, herbs, and toppings to suit individual preferences.

Cosori 9-in-1 TurboBlaze Air Fryer 6 Qt, Smart Control, 90°–450°F, Shake Reminders, Precise Heating for Even Results, Air Fry, Roast, Bake, Broil, Dry, Frozen, Proof, Reheat, Keep Warm, 120V, Cream
- TurboBlaze Technology: Powerful 3600 rpm fan and high temperatures
- Even Heating System: 5-fan system with precise temperature control
- Smartphone Control: Remote access to guides, videos, and recipes
As an affiliate, we earn on qualifying purchases.
History
Hummus, a beloved Middle Eastern dip and spread, has a rich history dating back centuries. This creamy, protein-packed snack originated in the Levant region, where chickpeas have been a dietary staple for millennia. Over time, the basic hummus recipe evolved, with the addition of tahini, lemon juice, and garlic – creating the signature flavor we know and love today.
Traditionally, hummus was prepared using a mortar and pestle, allowing the chickpeas to be carefully mashed and blended with the other ingredients. This time-honored method helped develop the smooth, velvety texture that distinguishes quality hummus.
As hummus gained popularity worldwide, modern food processors made the process easier, but the traditional techniques still yield the most authentic results.
Whether enjoyed as a dip with pita bread or used as a spread on sandwiches, hummus has become a beloved global snack, showcasing the rich culinary heritage of the Middle East.
Recipe
Roasted beets add a delightful sweetness and vibrant color to this homemade hummus. The combination of earthy beets, nutty tahini, and aromatic spices creates a unique and flavorful dip that's sure to impress.
Preparing this roasted beet hummus is a simple process that yields a creamy and smooth texture. The key is to properly roast the beets to bring out their natural sugars and enhance their flavor.
Ingredients:
- 2 medium-sized beets, roasted and peeled
- 1 15-ounce can of chickpeas, drained and rinsed
- 1/4 cup tahini
- 2 tablespoons freshly squeezed lemon juice
- 2 cloves of garlic, minced
- 1 teaspoon ground cumin
- 1/2 teaspoon ground coriander
- 1/4 teaspoon cayenne pepper
- Salt and pepper to taste
- 2-3 tablespoons of water or olive oil, as needed for desired consistency
In a food processor, combine the roasted and peeled beets, chickpeas, tahini, lemon juice, garlic, cumin, coriander, and cayenne pepper. Blend the mixture until smooth and creamy, adding water or olive oil as needed to achieve the desired consistency. Finally, season the beet and chickpea hummus with salt and pepper to taste. Serve the creamy dip with pita bread, crackers, or fresh veggies for a delightful and healthy snack. You can also use the hummus as a spread for sandwiches or as a topping for a delicious beet and goat cheese salad.
Season with salt and pepper to taste. For best results, allow the roasted beet hummus to chill in the refrigerator for at least 30 minutes before serving to allow the flavors to meld.
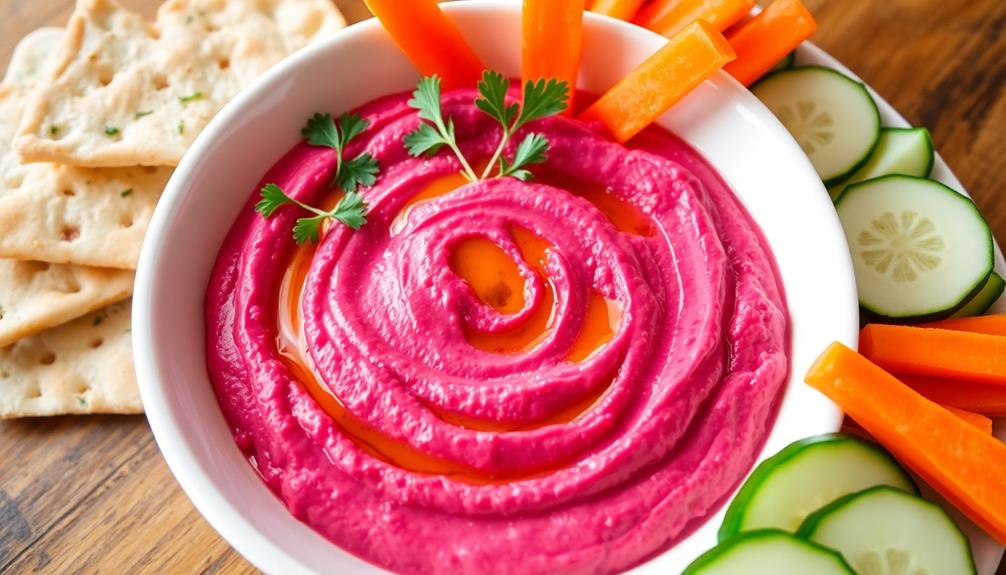
Serve with pita bread, fresh vegetables, or your favorite crackers. Enjoy this vibrant and flavorful dip!
Cooking Steps
Peel and chop those earthy beets, then toss them into your blender along with the chickpeas and creamy tahini.
Season the mix with your favorite spices, and you're ready to transfer the hummus to a serving bowl.
Garnish it with a sprinkle of freshly chopped parsley for a vibrant finish.
Step 1. Peel and Chop Beets
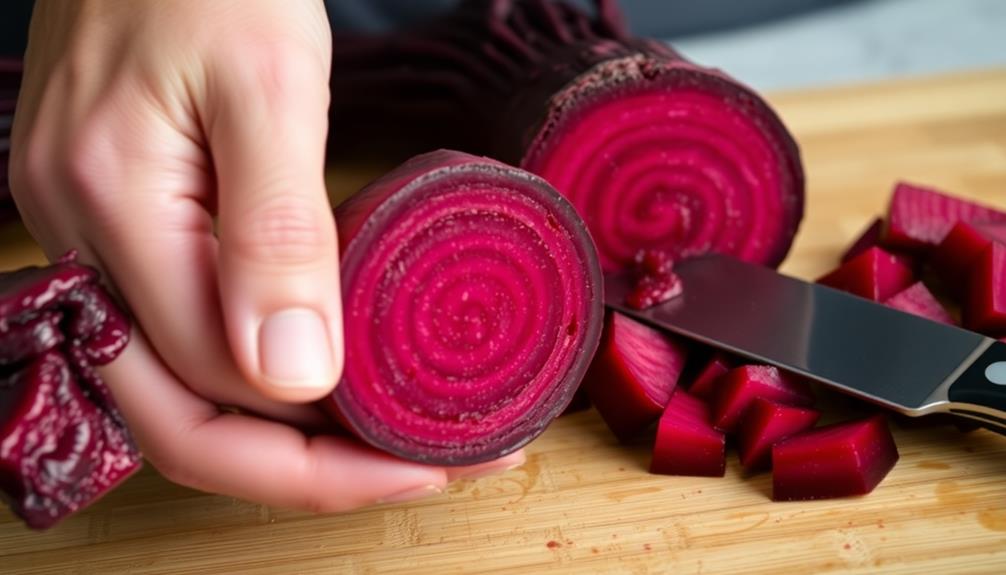
To prepare the beets, begin by rinsing them thoroughly under cool running water. This will help remove any dirt or debris that may be clinging to the skins.
Next, use a sharp knife or vegetable peeler to carefully remove the tough outer skins. Be sure to peel away all the colored parts, leaving only the bright, fleshy insides.
With the beets peeled, place them on a clean cutting board. Using a sharp knife, carefully slice the beets into 1-inch cubes. Try to cut them into evenly-sized pieces so they'll roast at the same rate.
If any beets are particularly large, you may want to quarter them to ensure they cook through properly. Once all the beets are chopped, they're ready to be roasted and incorporated into the hummus.
Just be sure to handle the beets carefully, as their deep, vibrant color can stain your hands and cutting board.
Step 2. Blend Beets, Chickpeas, and Tahini
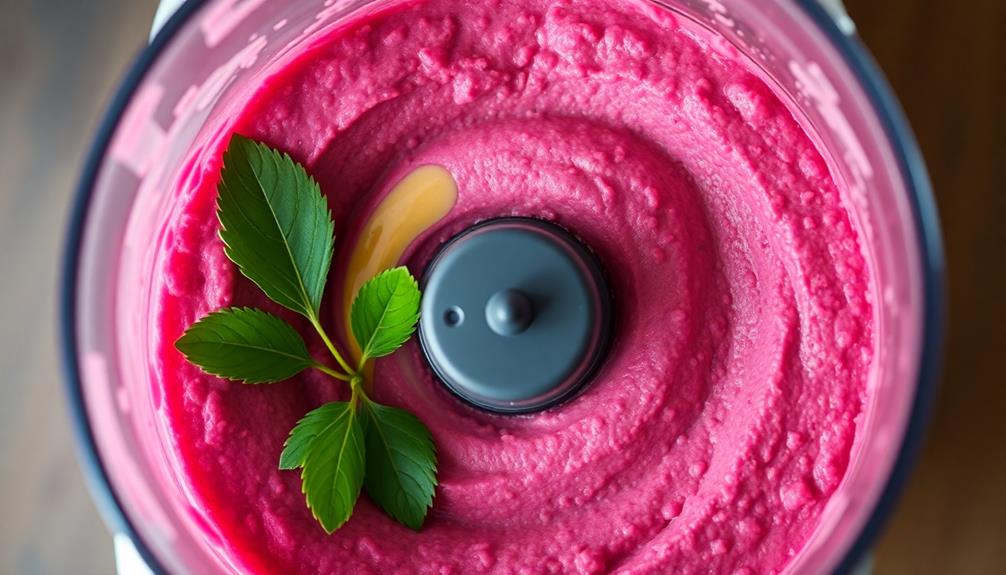
Next, take the roasted beets and add them to a food processor along with the canned chickpeas, tahini, olive oil, lemon juice, garlic, and a pinch of salt and pepper. The vibrant purple-red color of the beets will shine through, creating a beautiful and nutrient-dense hummus.
Additionally, incorporating essential oils like lavender can enhance the cooking experience by promoting a calming atmosphere, which is beneficial in the kitchen for creativity and focus. Aromatherapy can stimulate the limbic system and impact emotions, making your cooking session more enjoyable.
Once it's all blended together, give it a taste and adjust the seasonings as desired. You might want a bit more lemon juice for brightness or a touch more salt to balance the flavors. Blend again until everything is well incorporated. The tahini adds a rich, nutty element that complements the earthy beets perfectly.
Now your homemade roasted beet hummus is ready to enjoy! Serve it up with fresh veggies, pita bread, or your favorite crackers for a healthy and flavorful snack or appetizer. This vibrant dip is sure to impress your friends and family.
Step 3. Season With Spices

Sprinkle a blend of aromatic spices over the blended hummus to elevate its flavor profile. The warmth of ground cumin and the earthy notes of paprika will complement the natural sweetness of the roasted beets.
Don't forget a pinch of garlic powder and a dash of cayenne pepper to add a subtle kick. Gently stir the spices into the hummus until they're evenly distributed, ensuring each bite bursts with vibrant flavor.
For an extra layer of complexity, consider adding a teaspoon of za'atar, a Middle Eastern spice blend featuring thyme, sesame seeds, and sumac. The tangy, herbaceous za'atar will lend a unique depth to your homemade hummus.
Finish with a sprinkle of fresh parsley or cilantro for a pop of color and fresh herbal notes. Taste and adjust the seasoning as needed, adding more of your favorite spices until the flavors are perfectly balanced to your liking.
Step 4. Transfer to Serving Bowl
With the spices now evenly distributed throughout the hummus, you can transfer the vibrant mixture to a serving bowl.
Scoop up the richly-colored hummus with a sturdy spatula, making sure to get every last bit from the food processor. Gently guide the hummus into the serving bowl, aiming to maintain its smooth, creamy texture.
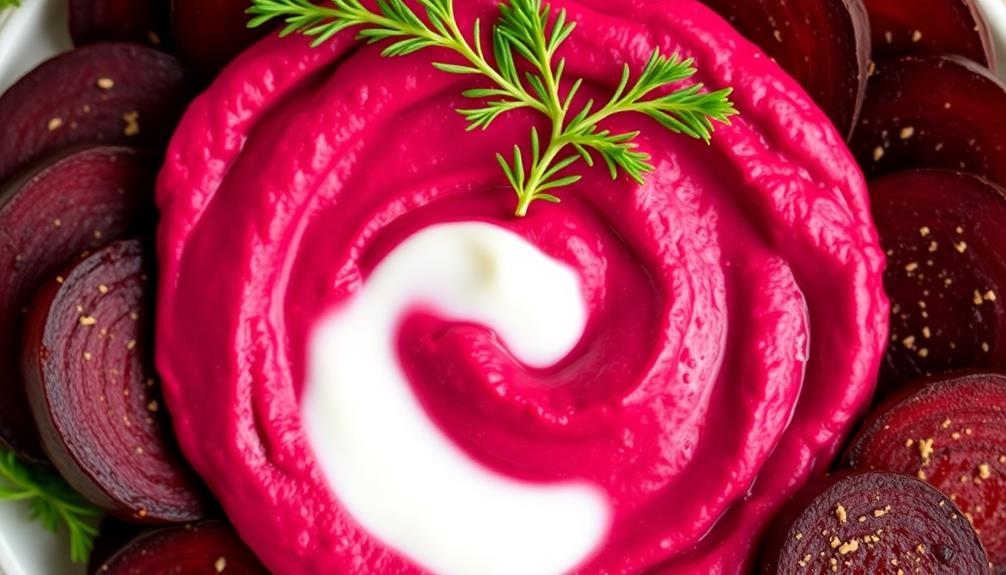
Once the hummus is neatly arranged in the bowl, you can take a step back and admire its beautiful hue. The deep pink and purple tones from the roasted beets create a hummus that's as eye-catching as it's delicious.
Garnish the top with a drizzle of olive oil, a sprinkle of paprika, or some chopped parsley, if desired. Your roasted beet hummus is now ready to be served with crisp pita chips, crunchy veggies, or your favorite dippers.
Invite your guests to dive right in and enjoy this vibrant and flavorful homemade treat.
Step 5. Garnish With Chopped Parsley

A final flourish of freshness can be added to your roasted beet hummus by garnishing it with some finely chopped parsley.
Simply take a small bunch of fresh parsley, rinse it under cool water, and pat it dry with a paper towel. Gather the parsley leaves and give them a quick, rough chop until you have a nice pile of bright green, fragrant bits.
Sprinkle this vibrant garnish over the top of your hummus, letting the parsley's flavor and color contrast beautifully with the deep burgundy of the roasted beets. The parsley's herbal notes will also complement the earthy, sweet flavors of the hummus.
Feel free to be generous with the parsley – a little goes a long way in adding that final touch of freshness. Your guests will appreciate the added visual appeal and delightful flavors that the chopped parsley brings to your homemade roasted beet hummus.
Final Thoughts
This roasted beet hummus is a versatile and flavorful dip that can elevate your snacking experience. The vibrant color and earthy, sweet flavor of the roasted beets make this hummus a unique and visually appealing addition to your appetizer spread.
Once you've tried it, you'll find yourself reaching for it again and again. The combination of the roasted beets, chickpeas, and tahini creates a creamy and nutrient-dense dip that's perfect for dipping veggies, pita bread, or even as a spread on sandwiches.
Don't be afraid to get creative – this hummus pairs beautifully with a variety of toppings, from chopped nuts and seeds to fresh herbs and a drizzle of olive oil.
Whether you're hosting a gathering or simply looking for a healthy snack, this roasted beet hummus is sure to impress. Whip up a batch and enjoy the vibrant flavors and textures it brings to the table.
Frequently Asked Questions
How Long Does Roasted Beet Hummus Last in the Fridge?
Roasted beet hummus typically lasts 3-5 days in the fridge. Keep it stored in an airtight container, and you'll enjoy its vibrant color and flavor for several days. Consume it within that timeframe for the best quality.
Can I Substitute Canned Beets for Roasted Beets?
You can substitute canned beets for roasted beets in your recipe. The flavor and texture may be slightly different, but canned beets can work as a convenient alternative. Just be sure to drain and rinse them thoroughly before using.
Is Roasted Beet Hummus Gluten-Free?
Roasted beet hummus is typically gluten-free, as the main ingredients are chickpeas, roasted beets, tahini, and seasonings. However, you'll want to check the specific recipe or brand to ensure there are no gluten-containing ingredients added.
How Many Servings Does This Recipe Make?
The recipe typically yields 4-6 servings, depending on the size of the portions. The exact number of servings can vary based on how you choose to portion out the hummus.
Can I Freeze Roasted Beet Hummus?
Yes, you can freeze roasted beet hummus. It'll keep for several months in the freezer, so you can enjoy it later. Just be sure to let it thaw completely before serving.