Connect with us

American Diner Classics

Tuna Melt

Melting tuna, melty cheese, and toasty bread – this classic American sandwich is a must-try for any lover of comfort food.

Published

on

cheesy tuna sandwich delight

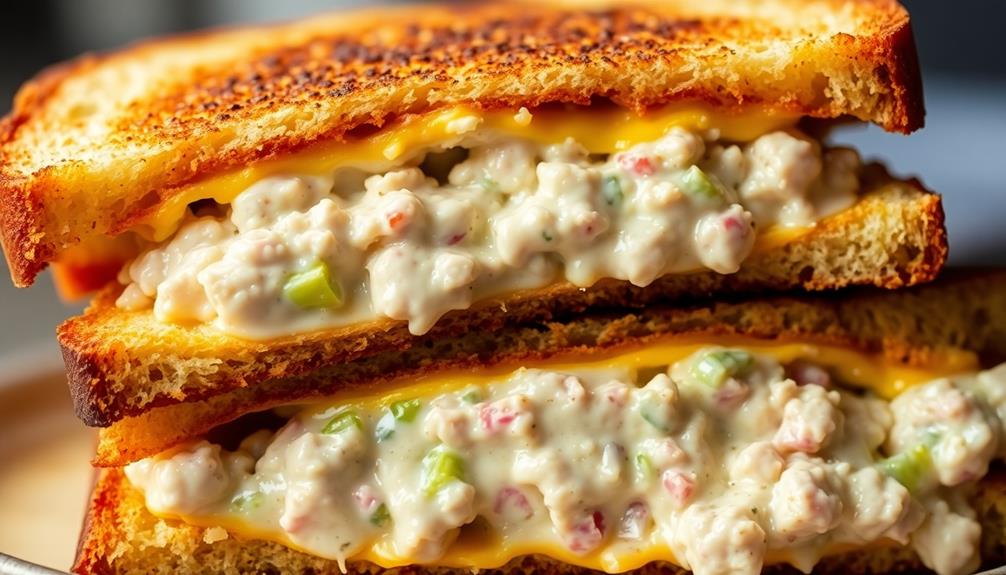
The tuna melt is a classic American sandwich that's been delighting taste buds for generations. It all started in the mid-20th century, when folks began experimenting with tuna fish in sandwiches. The winning combo? Flaky tuna, melted cheese, and toasted bread. Today, you can find all sorts of variations, from bacon to tomatoes, but the key is perfectly melty cheese and a crunchy exterior. To make one, you'll toast the bread, spread on the tuna mixture, add cheese, then broil until the cheese is golden and bubbly. Serve it hot for a comforting, flavor-packed lunch that's sure to brighten your day. And there's more to discover about this beloved sandwich…

Key Takeaways

  • Tuna melt is a mid-20th century comfort food that combines flaky tuna, melted cheese, and toasted bread.
  • The dish gained popularity as Americans experimented with tuna sandwiches and introduced unique variations like bacon and tomatoes.
  • To make a tuna melt, toast the bread, mix tuna with mayonnaise and seasonings, spread the mixture on one slice, and top with cheese.
  • The sandwich is then baked or broiled until the cheese is melted and bubbly, creating a contrast of warm cheese and cool tuna.
  • Tuna melt remains a classic household favorite, offering a satisfying and flavorful lunch or snack option.

History

The tuna melt, a beloved sandwich that has graced menus for decades, can be traced back to the mid-20th century.

It's believed the tuna melt first emerged in the 1930s or 1940s, when Americans started experimenting with tuna fish as a sandwich filling. The combination of flaky tuna, melted cheese, and toasted bread quickly became a lunchtime favorite.

As the tuna melt's popularity grew, restaurants and diners across the country began offering their own unique variations. Some added crisp bacon or juicy tomatoes, while others experimented with different cheese types.

The simple yet satisfying flavors made the tuna melt a staple on diner menus and in home kitchens alike.

Today, the tuna melt remains a classic comfort food, satisfying cravings with its gooey, savory goodness.

Advertisement

Whether enjoyed as a quick lunch or a cozy dinner, this timeless sandwich continues to delight generations of tuna enthusiasts.

Cooking Steps

Gather your ingredients and preheat the oven to 400°F.

First, toast your bread slices until they're golden brown. This will give the tuna melt a nice, crunchy exterior.

Next, mix the tuna, mayonnaise, and any additional seasonings in a bowl until well combined.

Spread the tuna mixture evenly over one slice of toast.

Advertisement

Top it with slices of your favorite cheese, like cheddar or Swiss.

Place the sandwich on a baking sheet and pop it in the oven.

Bake for about 10 minutes, or until the cheese is melted and bubbly.

Keep an eye on it to ensure the bread doesn't get too dark.

Once it's ready, remove the tuna melt from the oven and let it cool for a minute or two.

Advertisement

The cheese should be perfectly melted and gooey.

Enjoy your warm, delicious tuna melt!

Step 1. Toast Bread

toast the bread first

Begin by preheating your oven to 350°F (175°C). This is the perfect temperature to toast the bread for your delicious tuna melt.

Use two slices of your favorite bread, like sourdough or rye. Place them on a baking sheet and pop them in the oven.

Keep a close eye on the bread as it toasts. It should turn a lovely golden-brown, usually taking around 5-7 minutes.

Once the bread is nicely toasted, remove the baking sheet from the oven. Be careful, as the bread will be hot!

Advertisement

Now you're ready to assemble your tuna melt. Top one slice of toast with the tuna mixture, then add a slice of cheese.

Place the sandwich back in the oven for a few minutes until the cheese is melted and bubbly.

Step 2. Spread Tuna Mixture on Bread

spread tuna on bread

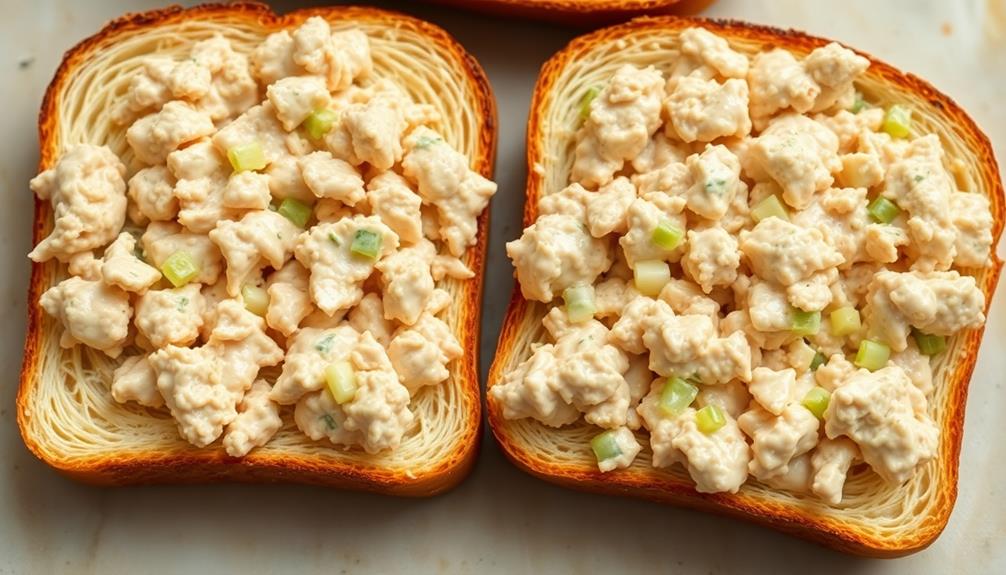
To assemble your tuna melt, start by spreading the tuna mixture over one of the toasted bread slices. Use a spoon or your fingers to gently press the tuna into an even layer, covering the entire surface of the bread.

Don't be shy – you want the tuna to reach all the way to the edges! Once the tuna is in place, it's time to add the cheese. Grab a few slices of your favorite cheese and place them on top of the tuna, overlapping them slightly to ensure complete coverage.

With the tuna and cheese in place, your tuna melt is almost ready. Carefully transfer the prepared slice to a hot skillet or griddle. Cook for a few minutes, until the cheese starts to melt and the bread turns golden brown.

Then, top with the remaining slice of toasted bread to complete your delicious tuna melt.

Advertisement

Step 3. Add Cheese

incorporate cheese ingredient

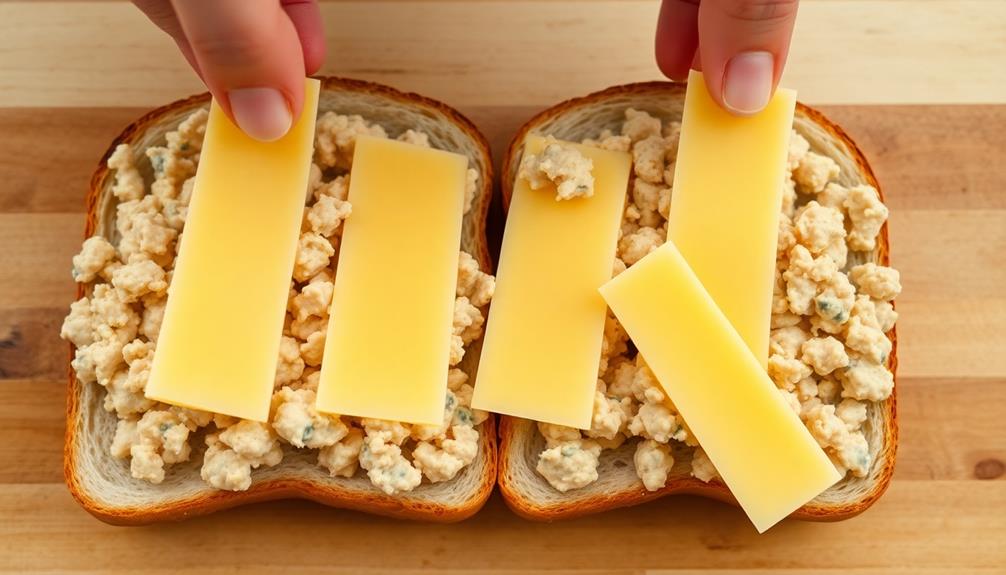
With the tuna now in place, it's time to add the cheese. This is where the tuna melt really starts to come together. Grab your favorite slices of cheese – cheddar, swiss, or even pepper jack would work great.

Gently place them over the tuna, making sure to cover the entire surface. You want the cheese to melt evenly and create a nice, gooey layer.

Once the cheese is in place, it's time to pop your sandwich into the oven or under the broiler. Keep a close eye on it, as the cheese will start to melt and bubble quickly.

You'll know it's ready when the cheese is completely melted and has a beautiful golden-brown color.

Be careful when you take your tuna melt out of the oven – the cheese will be hot! Slice your sandwich in half and get ready to enjoy the perfect balance of flavorful tuna and melty, irresistible cheese.

Step 4. Broil Until Cheese Melts

broil until cheese melts

Once the cheese is in place, pop your sandwich into the oven or under the broiler.

You'll want to keep a close eye on it as the cheese melts and gets all bubbly and golden. The key is to broil it just until the cheese is perfectly melted – not too long, or it will get tough and burn.

Advertisement

As the cheese starts to melt, you'll see it slowly spreading out and covering the tuna.

The heat will make the cheese irresistibly gooey. Keep an eye on it, and as soon as the cheese is completely melted and looking deliciously melty, take the sandwich out.

Be careful, as the dish will be hot!

Now you can dig in and enjoy your gooey, cheesy tuna melt.

The contrast between the warm, melted cheese and the cool tuna is simply divine.

Advertisement

Mmm, doesn't that sound amazing? Get ready for a flavor explosion in your mouth!

Step 5. Serve Immediately While Hot

serve hot immediately now

Now that the cheese is perfectly melted, it's time to serve your tuna melt immediately while it's hot. The aroma alone will have your mouth watering in anticipation!

Carefully slide the toasted sandwich from the broiler, being cautious of any hot drippings. Use a spatula to transfer the tuna melt to a plate, making sure to keep it level so the melted cheese doesn't spill out.

Serve the tuna melt right away, as the golden-brown bread and gooey cheese are best enjoyed when piping hot. The combination of the warm, flaky tuna salad and the melted, gooey cheese is simply irresistible.

Take a big bite and savor the flavors – the creamy tuna, the sharp cheddar, and the toasted bread all come together in perfect harmony.

Don't let the tuna melt sit for too long, or the cheese will start to harden. Dig in and enjoy every delicious bite while it's at its peak temperature and texture!

Advertisement

Final Thoughts

The tuna melt is a classic sandwich that can satisfy any craving for a comforting, flavor-packed lunch. To create a delicious tuna melt, start with high-quality tuna mixed with a creamy mayonnaise and some diced celery for added crunch. Pile the mixture onto thick slices of bread, top with melted cheese, and then toast until golden brown. This dish is a twist on the classic patty melt recipe, and is perfect for a quick and satisfying meal.

Now that you've mastered the art of making the perfect tuna melt, it's time to sit back, relax, and enjoy the fruits of your labor. The combination of the warm, melty cheese, the flavorful tuna salad, and the crisp toasted bread is sure to leave you feeling satisfied and content.

As you take that first bite, let the flavors dance on your tongue, and savor the moment.

The tuna melt is a simple yet delightful dish that can brighten up any day. Whether you're enjoying it for a quick lunch or a cozy dinner, it's a recipe that's sure to become a household favorite.

Frequently Asked Questions

What Is the Best Type of Bread for a Tuna Melt?

When it comes to the best type of bread for a tuna melt, you've got tons of options!

Advertisement

You could go for a classic sandwich bread like sourdough or rye – they're sturdy enough to hold up to the warm, melty tuna mixture.

Or, if you're feeling a little fancier, you could try a crusty baguette or even an English muffin.

The key is finding a bread that can stand up to the gooey, delicious tuna without getting soggy.

No matter what you choose, your taste buds are in for a real treat!

Can I Use Canned Salmon Instead of Tuna?

Absolutely! You can definitely use canned salmon instead of tuna for your tuna melt.

Advertisement

Salmon has a similar texture and flavor, and it's just as delicious when melted with cheese between two slices of bread.

The best part? Salmon is packed with healthy omega-3 fatty acids, so you'll be getting an extra nutritional boost.

Give it a try – I bet you'll love the salmon melt just as much as the classic tuna version!

How Long Should I Toast the Sandwich?

Toasting your sandwich is an important step!

You'll want to toast it for around 2-3 minutes on each side, or until the bread is nice and golden brown. This helps the cheese melt perfectly and gives the sandwich a crispy, delicious texture.

Advertisement

Be sure to keep an eye on it, as you don't want it to burn.

With the right toasting time, you'll have a mouthwatering sandwich that's sure to hit the spot!

Can I Add Other Ingredients Like Onions or Pickles?

Absolutely! You can totally add other tasty ingredients to your sandwich.

Onions and pickles would be a great addition, adding some extra crunch and tanginess. Just be sure to slice them thinly so they don't overpower the tuna.

You could also try adding some sliced tomatoes or a sprinkle of fresh herbs like parsley or dill.

Advertisement

The key is to find a balance of flavors that complements the tuna and melted cheese.

Get creative and have fun with it!

How Do I Prevent the Cheese From Getting Too Melty?

To prevent the cheese from getting too melty, start by shredding or slicing the cheese into smaller pieces. This helps it melt more evenly and avoid those pesky, oozy puddles.

You can also try using a lower-fat cheese, which won't get as gooey.

And be sure not to overheat your dish – keep an eye on it and take it out of the oven or off the stove as soon as the cheese is just melted and bubbly.

Advertisement

With a little finesse, you'll have perfectly melted cheese every time!

Advertisement

American Diner Classics

The Quintessential Club Sandwich: Layers of Diner History

Dive into the rich history and evolution of the iconic American club sandwich, a beloved diner classic that has stood the test of time.

Published

on

layers of diner history

The club sandwich is an iconic American diner classic that has evolved over generations. It all started in the late 1800s when the sandwich was created to satisfy busy, affluent patrons who craved a substantial, portable meal. Today, this layered delight features toasted bread, savory bacon, turkey or chicken, crisp lettuce, juicy tomatoes, and creamy mayonnaise – a harmonious balance of flavors and textures that keeps diners coming back for more. The club sandwich remains a beloved symbol of comfort, nostalgia, and culinary tradition in American dining culture. There's so much more to discover about this quintessential diner staple.

Key Takeaways

  1. The club sandwich emerged in the late 19th century in elite social clubs and upscale hotels to satisfy busy, affluent patrons seeking a substantial, portable meal.
  2. The club sandwich has remained a staple, symbolizing American dining culture and culinary evolution, reflecting changing tastes and preferences over time.
  3. The quintessential club sandwich consists of three slices of toasted bread, layered with bacon, turkey or chicken, lettuce, tomato, and mayonnaise.
  4. The layered construction and balancing of flavors and textures in the club sandwich contribute to its iconic status and enduring popularity as a comfort food.
  5. The club sandwich's versatility in preparation and ingredient choices allows for customization, accommodating diverse dietary preferences and culinary experimentation.

History

The origins of the club sandwich can be traced back to the late 19th century, when the dish first emerged as a popular menu item in elite social clubs and upscale hotels.

It's believed that the club sandwich was created to satisfy the cravings of busy, well-to-do patrons who wanted a substantial, yet portable meal. The classic combination of toasted bread, crispy bacon, juicy slices of turkey or chicken, fresh lettuce, and tangy condiments quickly became a favorite among the upper class.

Over the decades, the club sandwich evolved, with different variations popping up in diners and restaurants across the country.

Some added avocado or tomato, while others experimented with different meats or sauces. No matter the twist, the club sandwich remained a beloved classic, representing the rich history and flavors of American dining culture.

Today, it continues to be a staple on menus, satisfying taste buds and reminding us of the simple pleasures of a well-crafted sandwich.

Advertisement

Recipe

The club sandwich is a classic and beloved creation that has graced the menus of diners, cafes, and restaurants around the world. This layered sandwich is a testament to the ingenuity of culinary enthusiasts who sought to combine a variety of flavors and textures into a single, satisfying dish. The use of fresh, seasonal ingredients can elevate the flavors, similar to how a fermented vegetable plate enhances nutritional value and probiotics.

At its core, the club sandwich is a masterfully constructed assemblage of toasted bread, crisp bacon, juicy turkey or chicken, fresh lettuce, ripe tomatoes, and a creamy mayonnaise or other spread. The interplay of these ingredients creates a harmonious balance of flavors and a delightful contrast of textures that has made the club sandwich a timeless favorite.

Ingredients:

  • 3 slices of toasted bread (such as white, wheat, or sourdough)
  • 2-3 slices of cooked bacon
  • 2-3 slices of roasted turkey or grilled chicken
  • 1-2 leaves of fresh lettuce
  • 1-2 slices of ripe tomato
  • 2-3 tablespoons of mayonnaise or other preferred spread

Instructions:

Layer the toasted bread slices with the cooked bacon, turkey or chicken, lettuce, and tomato slices. Spread the mayonnaise or preferred spread between the layers, and on the top and bottom slices of bread. Secure the sandwich with toothpicks or skewers, if desired, and serve immediately.

When preparing the club sandwich, it's important to use high-quality, fresh ingredients to ensure the best flavor and texture. Additionally, toasting the bread helps to create a sturdy foundation for the layered components, preventing the sandwich from becoming soggy.

Advertisement

Feel free to experiment with different protein options, such as roast beef or grilled seafood, to customize the club sandwich to your personal taste preferences.

Cooking Steps

Alright, let's get started on those cooking steps! First, you'll want to toast up some bread to get it nice and crispy.

A clean kitchen supports a healthier lifestyle by promoting cleanliness and hygiene, which is essential while preparing food.

Next, spread a generous layer of creamy mayonnaise on each slice. Then, add some delicious sliced turkey and top it off with melty cheese slices and juicy tomato slices.

Can't wait to see how your club sandwich turns out!

Advertisement

Step 1. Toast Bread

toast the bread first

After selecting the perfect bread for your club sandwich, it's time to toast the slices. Toasting the bread is a crucial step that adds a delightful crunch and enhances the overall flavor of your sandwich.

First, preheat your toaster or toaster oven to the desired setting. You want the bread to be golden brown, not too dark or burnt. Carefully place the bread slices into the toaster, making sure they don't overlap. Listen for the satisfying crackle as the bread begins to toast.

Once the toasting is complete, remove the bread slices with care. They'll be hot, so use tongs or a fork to handle them. Inspect each slice, ensuring it's evenly toasted on both sides. If any spots seem undercooked, you can always pop them back in for a quick touch-up.

With your perfectly toasted bread ready, you can now move on to the next step in assembling your delicious club sandwich. Get ready to layer on the tasty ingredients!

Step 2. Add Mayonnaise to Bread Slices

spread mayonnaise on bread

With your toast perfectly crisped, it's time to spread a layer of mayonnaise on each slice. Mayonnaise is the perfect condiment to add a creamy, tangy flavor and help the other ingredients stick together.

Grab your favorite brand of mayonnaise and use a butter knife to evenly coat the surface of the toast. Don't be shy – you want a nice, thick layer that will soak into the bread and provide a delicious base for the rest of your club sandwich.

Once both slices are coated, you're ready to start building your masterpiece. The mayonnaise will act as a glue, holding the layers of meat, cheese, and vegetables in place.

Advertisement

Feel free to get a little messy – the key is to make sure every bite is packed with flavor. Take your time and enjoy the process of assembling your club sandwich. With the mayonnaise as your foundation, you're on your way to creating a true diner classic.

Step 3. Add Sliced Turkey

incorporate sliced turkey

Next, place 2-3 slices of high-quality sliced turkey onto the mayonnaise-coated bread. The turkey adds a savory element, complimenting the other flavors.

Be sure to arrange the slices in an overlapping pattern to cover the bread completely. The turkey should hang off the edges slightly, creating a generous and visually appealing layer.

This step is crucial, as the turkey is one of the main components that defines the classic club sandwich. Feel free to add an extra slice or two if you want a heartier, more substantial filling.

The key is to achieve the perfect balance of flavors and textures, with the turkey playing a starring role. With the turkey in place, you're one step closer to assembling the ultimate club sandwich.

Step 4. Add Cheese Slices

add cheese slices now

Atop the savory turkey, add a layer of your preferred cheese slices. Whether you fancy cheddar, Swiss, or provolone, the cheese will melt beautifully, creating a harmonious blend of flavors. The gooey, melted cheese contrasts wonderfully with the crisp, toasted bread, making each bite a delightful experience.

When selecting your cheese, consider the overall flavor profile you're aiming for. A sharp cheddar will provide a bold, tangy note, while Swiss cheese offers a milder, nutty taste. Provolone, on the other hand, has a slightly sweet and creamy texture that complements the other ingredients perfectly.

Advertisement

Arrange the cheese slices evenly across the turkey, ensuring each layer is well-covered. As the sandwich toasts, the cheese will melt, seeping into the other fillings and creating a cohesive, mouthwatering combination.

The cheese adds a satisfying richness that elevates the club sandwich to new heights of deliciousness.

Step 5. Add Tomato Slices

add tomato slices now

Slice the juicy tomatoes into even rounds, ensuring each slice is approximately the same thickness. Lay the tomato slices atop the cheese, creating another layer of flavor and texture.

The vibrant red color of the tomatoes provides a stunning visual contrast, making the sandwich even more appetizing. Carefully place the tomato slices, overlapping them slightly to cover the entire surface area. This step adds a burst of freshness and acidity, balancing the richness of the other ingredients.

The juicy tomatoes also help to keep the sandwich moist and prevent it from becoming dry. With each layer, the club sandwich becomes more complete, building towards a delightful and satisfying dining experience.

The addition of the tomato slices is a crucial step in creating the perfect club sandwich, elevating the dish to new heights of flavor and presentation.

Advertisement

Final Thoughts

Although the history of the club sandwich provides insight into the evolution of American cuisine, its lasting popularity ultimately speaks to its enduring appeal as a satisfying and versatile meal option.

The club sandwich has been a beloved classic for generations, gracing the menus of diners, cafes, and homes alike. Its iconic layered construction, with crisp bacon, juicy tomatoes, and tender turkey or chicken, creates a harmonious balance of flavors and textures that never fails to satisfy.

Just like other diner classics such as corned beef hash and pancakes with maple syrup, the club sandwich embodies the comforting qualities that draw people to American diners.

What's more, the club sandwich's versatility allows for endless variations, making it a canvas for culinary creativity. Whether you prefer it toasted or untoasted, with or without mayonnaise, the club sandwich remains a timeless comfort food that brings people together.

As you savor each bite, you can't help but appreciate the rich history and enduring appeal of this truly iconic American dish.

Advertisement

Frequently Asked Questions

What Are the Health Benefits of the Club Sandwich?

While the club sandwich may seem indulgent, it can provide some health benefits. The combination of lean protein, vegetables, and whole grains can offer a balanced nutritional profile if consumed in moderation as part of an overall healthy diet.

Can I Make a Vegetarian Version of the Club Sandwich?

Sure, you can make a delicious vegetarian version of the club sandwich. Replace the meat with grilled or roasted veggies, sliced avocado, and use a variety of fresh, crisp greens. Get creative with the fillings to make it your own!

How Long Does It Take to Assemble a Club Sandwich?

Assembling a club sandwich can take around 5-10 minutes, depending on your familiarity with the process. You'll need to layer the bread, fillings, and toppings carefully to create the signature triple-decker sandwich.

What Are the Best Side Dishes to Serve With a Club Sandwich?

When serving a club sandwich, pair it with classic diner-style sides like crispy fries, creamy coleslaw, or a simple green salad. These complementary dishes enhance the sandwich's flavors and provide a balanced, satisfying meal.

Can I Freeze the Club Sandwich for Later Consumption?

You can definitely freeze a club sandwich for later enjoyment. Just wrap it tightly in plastic wrap or aluminum foil before freezing. When you're ready to eat it, let it thaw in the fridge overnight for best results.

Advertisement

Continue Reading

American Diner Classics

Pie À La Mode: the Timeless Diner Dessert Combo

Craving a sweet and irresistible dessert experience? Discover the captivating history and mouthwatering combination of Pie à la Mode, the classic American diner treat.

Published

on

classic pie with ice cream

Get ready for the ultimate diner dessert experience – Pie à la Mode! This classic American treat has delighted taste buds for over a century. It all starts with a flaky, homemade pie crust, filled with sweet, fruity goodness. Top it off with a scoop of creamy, vanilla ice cream, and you've got a heavenly combination that brings back fond memories of family gatherings and cozy diners. Whether you prefer classic apple or adventurous new flavors, Pie à la Mode promises a delightful contrast of warm and cool, rich and refreshing. Keep reading to discover the captivating story behind this timeless dessert.

Key Takeaways

  • Pie à la mode originated in the late 19th century in the United States and became a beloved diner staple.
  • The term "à la mode" referred to the fashionable practice of serving ice cream with desserts.
  • Pie à la mode represents a fusion of baked goods and frozen treats, creating a delightful contrast of temperatures and textures.
  • Pie à la mode evokes feelings of nostalgia and comfort, contributing to its enduring popularity across generations.
  • Pie à la mode encourages experimentation with various pie and ice cream flavors, inspiring new creative dessert combinations.

History

Pie à la mode has a long and storied history, dating back to the late 19th century. This classic dessert combo first gained popularity in the United States, where it quickly became a beloved diner staple.

The origins of pie à la mode can be traced to the late 1800s, when the term "à la mode" was used to describe the fashionable practice of serving ice cream alongside other desserts. As the tradition of serving pie with ice cream grew, the two components became inseparable, creating the iconic pie à la mode we know and love today.

Over the years, pie à la mode has evolved, with bakers and diners experimenting with different pie and ice cream pairings. From classic apple pie to decadent chocolate cream, the possibilities are endless.

Yet, no matter the flavor, the combination of warm, flaky pie and cool, creamy ice cream remains a timeless treat.

Recipe

Pie À La Mode is a classic American dessert that combines the rich, flaky crust of a pie with the creamy, indulgent topping of ice cream. This dish is the perfect balance of sweet and satisfying, making it a beloved treat for all ages.

Advertisement

The key to a successful Pie À La Mode is using high-quality ingredients and paying attention to the details. The combination of a perfectly baked pie and a scoop of your favorite ice cream creates a symphony of flavors and textures that's sure to delight your taste buds.

Ingredients:

  • 1 pre-made or homemade pie crust
  • 3 cups of your preferred fruit (such as apples, berries, or pumpkin)
  • 1 cup of sugar
  • 1/4 cup of all-purpose flour
  • 1/2 teaspoon of ground cinnamon
  • 1/4 teaspoon of ground nutmeg
  • 1/4 cup of unsalted butter, cubed
  • Vanilla ice cream

Instructions:

Preheat your oven to 375°F (190°C). In a large bowl, combine the fruit, sugar, flour, cinnamon, and nutmeg. Mix well until the fruit is evenly coated.

Pour the fruit mixture into the pie crust and dot the top with the cubed butter. Bake the pie for 45-55 minutes, or until the crust is golden brown and the filling is bubbly. Allow the pie to cool completely before serving.

When ready to serve, scoop a generous portion of vanilla ice cream onto each slice of pie. The contrast between the warm, fragrant pie and the cold, creamy ice cream is simply divine.

Advertisement

Enjoy this Pie À La Mode as a perfect ending to a meal or as a special treat any time of day.

Cooking Steps

First, prepare the pie crust according to the recipe. A flaky pie crust is essential for the perfect dessert experience, much like the comforting qualities of corned beef hash that diners are famous for.

Next, get ready the ice cream you'll be serving alongside the pie. Then, assemble the pie and the ice cream – you're almost there!

Bake the pie crust until it's a lovely golden brown, and you're ready to serve up a delicious Pie à la Mode, warm and inviting.

Step 1. Prepare Pie Crust According to Recipe

prepare pie crust recipe

To prepare the pie crust, you'll need to follow the recipe closely. First, gather all your ingredients – flour, salt, butter, and ice water.

In a large bowl, combine the flour and salt. Then, use a pastry cutter or your fingers to work the cold butter into the flour until it resembles coarse crumbs.

Advertisement

Slowly add the ice water, a tablespoon at a time, mixing gently until the dough just begins to come together. Be careful not to overmix.

Once the dough forms a ball, divide it in half, shape each half into a disk, wrap in plastic, and refrigerate for at least 30 minutes. This resting period allows the gluten to relax, making the dough easier to roll out.

When ready to use, lightly flour your work surface and roll out the dough into a circle, large enough to fit your pie pan.

Gently transfer the crust to the pan, crimp the edges, and you're ready to fill and bake your delicious pie!

Step 2. Prepare Ice Cream

prepare ice cream mixture

Preparing the ice cream is the next step in creating the perfect pie à la mode. First, gather your ingredients – heavy cream, sugar, and vanilla extract.

In a large bowl, use a hand mixer to whip the heavy cream until it forms stiff peaks. Slowly add the sugar, a little at a time, while continuing to mix. Once the sugar is fully incorporated, stir in the vanilla extract.

Advertisement

Next, transfer the whipped cream to a freezer-safe container and place it in the freezer. Every 30 minutes, take the container out and use a fork to stir the mixture, breaking up any ice crystals that form. This helps create a smooth, creamy texture. Freeze for 2-3 hours, or until the ice cream reaches your desired consistency.

Once the ice cream is ready, scoop it onto your freshly baked pie crust, creating the classic pie à la mode. Enjoy this timeless diner dessert combo!

Step 3. Assemble Pie and Ice Cream

assemble pie with ice cream

With the ice cream chilled and ready, it's time to assemble the pie à la mode.

First, grab your freshly baked pie and let it cool completely. Once it's at room temperature, it's time to scoop and serve!

Place a generous slice of the warm, fragrant pie onto a plate. Top it with a scoop or two of the cold, creamy ice cream. The contrast of the hot and cold, the sweet and rich, is simply divine.

Drizzle a bit of chocolate or caramel sauce over the top, if desired. The gooey, decadent topping takes this classic dessert to new heights.

Advertisement

Finally, sprinkle on a few toasted nuts or a dollop of whipped cream for the finishing touch.

Serve your pie à la mode immediately, while the ice cream is still frozen and the pie is at its warmest.

This timeless combination is sure to delight and satisfy any sweet tooth. Enjoy every bite of this beloved diner classic!

Step 4. Bake Pie Crust Until Golden Brown

bake crust until golden

Once your pie has cooled completely, it's time to bake the crust until it's a beautiful golden brown. Preheat your oven to 400°F (200°C).

Carefully place the filled pie on a baking sheet to catch any drips. This will help keep your oven clean.

Bake the pie for 20-25 minutes, or until the crust is a rich, golden color. Keep a close eye on it, as the crust can go from perfectly baked to burnt in a matter of minutes.

Advertisement

You'll know it's ready when the crust is crisp and has a lovely shine.

Once the crust is baked, let the pie cool on a wire rack for at least 30 minutes before serving. This allows the filling to set and the flavors to meld together.

Now you're ready to top your warm, flaky pie with a scoop of cold, creamy ice cream. Enjoy the perfect combination of textures and temperatures in every bite!

Step 5. Serve Pie À La Mode Warm

serve warm pie la mode

A delightful way to serve your freshly baked pie is à la mode. The warm, flaky crust paired with a scoop of cool, creamy vanilla ice cream creates a heavenly contrast that tantalizes the taste buds.

As you spoon into the dessert, the ice cream melts into the pie, creating a rich, indulgent experience. Serve the pie à la mode straight from the oven, allowing the warmth to gently melt the ice cream.

The combination of the two temperatures and textures is simply divine. Encourage your guests to dig in and savor each bite, savoring the way the flavors and sensations dance on their tongues.

Advertisement

For an extra special touch, consider drizzling the pie with a touch of caramel or chocolate sauce. The sweet, gooey toppings complement the buttery crust and smooth ice cream beautifully.

Enjoy this timeless diner classic in all its glory, and indulge in the pure joy of pie à la mode.

Final Thoughts

As you've savored the delightful flavors of pie à la mode, it's time to reflect on your culinary journey. This timeless diner dessert combo has charmed generations of sweet tooth enthusiasts, and for good reason. The contrast of warm, flaky pie and cold, creamy ice cream creates a symphony of textures and temperatures that dance on your tongue.

Whether you've indulged in a classic apple pie or ventured into more adventurous flavors, the experience has been nothing short of delightful. The combination of the pie's rich, fruity filling and the ice cream's refreshing coolness is a true delight.

As you savor the last bite, you can't help but feel a sense of nostalgia and appreciation for this timeless dessert.

Advertisement

As you embark on your next culinary adventure, remember the joy and satisfaction that pie à la mode has brought you. It's a timeless classic that will continue to bring smiles to the faces of dessert lovers everywhere.

Frequently Asked Questions

Can Pie À La Mode Be Served Warm or Cold?

You can serve pie à la mode either warm or cold, depending on your preference. The warm option highlights the contrast between the hot pie and the cold ice cream, while the cold version creates a more refreshing dessert experience.

What Are Some Popular Variations of Pie À La Mode?

Some popular variations of pie à la mode include apple pie à la mode, pecan pie à la mode, and cherry pie à la mode. You can also find seasonal variations like pumpkin pie à la mode or berry pie à la mode.

How Long Can Leftover Pie À La Mode Be Stored?

Leftover pie à la mode can generally be stored in the refrigerator for 3-5 days. Make sure to keep the pie and ice cream separate, and reheat the pie gently before serving. Enjoy your treat while it's fresh!

Can the Ice Cream Be Substituted With Other Frozen Desserts?

Certainly, you can substitute the ice cream with other frozen desserts in your pie à la mode. Feel free to experiment with sorbet, gelato, or even frozen yogurt – the possibilities are endless to customize this classic treat.

Advertisement

What Is the Recommended Ratio of Pie to Ice Cream?

The recommended ratio of pie to ice cream is typically around 1:1. You'll want enough ice cream to complement the pie, but not so much that it overwhelms the flavors. Play with the portions to find your perfect balance.

Continue Reading

American Diner Classics

Chicken Fried Steak: the Southern Comfort Dish With a Crispy Twist

Tapping into the rich culinary heritage of the South, this iconic dish blends European and Native American influences to create a crispy, tender, and irresistible meal.

Published

on

crispy southern chicken fried

Chicken fried steak is a beloved Southern comfort dish that features a crispy, golden exterior and tender, flavorful beef. Originating in the late 1800s, this iconic meal blends European and Native American culinary influences, creating a cherished symbol of Southern hospitality. To make it, you'll start by tenderizing the beef in buttermilk, then dredge it in a seasoned flour mixture before frying until perfectly crisp. Serve it up with a rich, creamy gravy, and you've got a hearty, satisfying dish that's sure to delight. If you're curious to learn more about the history and preparation of this Southern classic, keep reading.

Key Takeaways

  • Chicken fried steak is a classic Southern comfort food featuring a crispy breading and tender beef.
  • The dish has its origins in the American South, influenced by European and Native American cooking traditions.
  • The key to a successful chicken fried steak is mastering the breading and frying technique to achieve the perfect texture.
  • Serving chicken fried steak with creamy gravy and comfort food sides, such as mashed potatoes, enhances the overall dining experience.
  • Chicken fried steak remains a cherished symbol of Southern cuisine, representing hospitality and nostalgia for generations.

History

The origins of chicken fried steak can be traced back to the American South, where it emerged as a beloved regional dish in the late 19th century.

The dish's history is closely tied to the traditions and culinary influences of the area, blending European and Native American cooking techniques. Settlers from Germany and Austria brought their love of breaded and fried meats, which they combined with the readily available beef found in the South.

Meanwhile, Native American tribes, such as the Choctaw and Creek, had been frying meat in animal fat for centuries. This fusion of culinary traditions gave birth to the iconic chicken fried steak – a tender cut of beef, breaded and fried to crispy perfection.

Over time, the dish became a staple on Southern menus, served with creamy gravy, mashed potatoes, and other comfort food classics.

Today, chicken fried steak remains a beloved symbol of Southern cuisine, cherished for its satisfying, homestyle flavors and the memories it evokes of family gatherings and good old-fashioned hospitality.

Advertisement

Recipe

Chicken fried steak is a classic Southern comfort food dish that combines tender beef, a crispy breading, and a rich, creamy gravy. This dish is a beloved staple in many households and can be enjoyed for a hearty meal any time of the day.

The key to a delicious chicken fried steak is in the preparation. By tenderizing the beef, creating a flavorful breading, and mastering the gravy, you can elevate this dish to new heights of culinary delight.

  • 1 lb tenderized beef cube steak, cut into 4 pieces
  • 1 cup all-purpose flour
  • 1 teaspoon salt
  • 1/2 teaspoon black pepper
  • 1/2 teaspoon garlic powder
  • 1/2 teaspoon paprika
  • 2 eggs, beaten
  • 1 cup milk
  • Vegetable oil for frying

To cook the chicken fried steak, first, season the beef cubes with salt and pepper. In a shallow dish, combine the flour, garlic powder, and paprika. Dip the beef cubes in the beaten eggs, then coat them thoroughly in the seasoned flour mixture.

Heat 1/4 inch of vegetable oil in a large skillet over medium-high heat. Fry the breaded beef cubes for 3-4 minutes per side, or until golden brown and crispy. Transfer the fried steaks to a paper towel-lined plate.

For the gravy, pour off all but 2 tablespoons of the oil from the skillet. Whisk in 2 tablespoons of the seasoned flour, and cook for 1 minute. Gradually whisk in the milk, and bring the mixture to a simmer, stirring constantly until the gravy thickens, about 5 minutes.

Season the gravy with additional salt and pepper to taste. Serve the chicken fried steak hot, smothered in the creamy gravy.

Advertisement

Cooking Steps

Let's get started on cooking up some delicious chicken fried steak!

First, you'll want to soak the meat in a tangy buttermilk mixture.

Then, dredge the meat in a savory seasoned flour mixture.

Next, carefully fry the coated meat until it's golden brown.

Once it's cooked, let the meat rest a bit before serving.

Advertisement

And don't forget to make a creamy, flavorful gravy to drizzle over the top!

Step 1. Soak Meat in Buttermilk Mixture

soak meat in buttermilk

After seasoning the meat, it's time to soak the chicken-fried steak in a buttermilk mixture. This essential step tenderizes the steak and helps the crispy coating stick better.

Grab a large, shallow dish and pour in some tangy buttermilk. Gently lower the seasoned steak into the mixture, making sure it's fully submerged. Cover the dish and pop it in the fridge for at least 30 minutes, or up to 2 hours. The longer you let it soak, the more flavorful and tender the steak will become.

While the steak soaks, prepare the breading station. You'll need some all-purpose flour, salt, pepper, and other seasonings of your choice.

When the steak is ready, remove it from the buttermilk one piece at a time, letting any excess drip off. Dredge it through the seasoned flour, coating all sides evenly.

Now your steak is ready for the next step – frying to golden, crispy perfection!

Advertisement

Step 2. Dredge in Seasoned Flour Mixture

coat with seasoned flour

With the steak now soaked in the tangy buttermilk, it's time to prepare the breading.

First, grab a shallow bowl and mix together the all-purpose flour, garlic powder, onion powder, paprika, and a pinch of salt and pepper. This seasoned flour mixture will give your chicken fried steak that irresistible crunch.

Next, take the steak and dredge it through the flour mixture, making sure to coat both sides evenly. Gently shake off any excess flour – you don't want a thick, heavy crust. The key is to have a light, crispy coating that will sizzle when it hits the hot oil.

Once the steak is fully coated, you're ready to fry it up to golden-brown perfection. Get your oil nice and hot, then carefully add the coated steak.

Let it cook until the crust is crispy and the meat is tender. Flip it over and repeat on the other side. With just a few simple steps, you'll have a homemade chicken fried steak that's sure to satisfy.

Step 3. Fry the Coated Meat

fry the coated meat

Once the steak is fully coated, you're ready to fry it up to golden-brown perfection.

Heat a large skillet over medium-high heat and add enough oil to come about 1/4 inch up the sides. You want the oil to be hot, but not smoking.

Advertisement

Carefully lower the coated steak into the oil and let it sizzle. Fry the steak for 3 to 4 minutes per side, or until it's a beautiful golden-brown color. Be gentle when flipping the steak to maintain the crispy coating.

When the steak is done, transfer it to a paper towel-lined plate to drain any excess oil. The outside should be wonderfully crispy, while the inside remains tender and juicy.

Now you can serve your homemade chicken fried steak piping hot, with your favorite sides like mashed potatoes and gravy. Get ready for the ultimate Southern comfort food experience!

Step 4. Let Meat Rest Before Serving

rest meat before serving

Let the fried steak rest for 5 to 10 minutes before serving. This resting period is crucial, as it allows the juices to redistribute throughout the meat.

While it's tempting to dig in right away, letting the steak rest ensures the meat stays moist and flavorful. During this time, the steak will continue to cook slightly, reaching its optimal doneness.

The crispy breading will also have a chance to set, creating that satisfying crunch you crave. Resist the urge to slice into the steak immediately – you'll be rewarded with a perfectly cooked, juicy interior.

Advertisement

Once the resting time is up, you're ready to serve your delicious chicken fried steak. Pair it with your favorite sides, like creamy mashed potatoes or a fresh salad, for a complete and satisfying meal.

Enjoy the comforting flavors and textures of this Southern classic!

Step 5. Make Creamy Gravy

prepare creamy gravy mix

Making the creamy gravy is the next important step. To start, you'll want to scoop up any browned bits left in the pan from cooking the steak. These bits are packed with flavor, so you don't want to miss them!

Next, whisk in some all-purpose flour to create a roux. Cook the roux for a minute or two, stirring constantly, until it turns a light golden color. Slowly pour in some milk, continuing to whisk as you go. This will help the gravy thicken up nicely.

Season the gravy with a bit of salt and pepper to taste. Let it simmer, stirring occasionally, until it reaches your desired consistency. The creamy gravy should coat the back of a spoon.

Serve the gravy warm over the crispy chicken fried steak. The savory, velvety gravy is the perfect complement to the crunchy exterior and tender interior of the steak. Get ready for an incredibly satisfying meal!

Advertisement

Final Thoughts

Though chicken fried steak may seem like a simple dish, it requires careful attention to detail to achieve the perfect crispy exterior and tender interior. When done right, the combination of a crispy, golden crust and the juicy, well-seasoned meat is simply irresistible.

The creamy, peppery gravy ties the whole dish together, making it a true Southern comfort food classic. As you've learned, the keys to success are using high-quality ingredients, properly breading the meat, and mastering the frying technique.

With a little practice, you'll be whipping up chicken fried steak that rivals the best diners and home cooks in the South. Serve it up hot, with a side of mashed potatoes or biscuits, and enjoy the comforting flavors that have made this dish a beloved staple for generations.

Whether you're a longtime fan or trying it for the first time, chicken fried steak is sure to become a new favorite in your household.

Frequently Asked Questions

Is Chicken Fried Steak the Same as Country-Fried Steak?

Yes, chicken-fried steak and country-fried steak are the same dish. They both refer to a tenderized beef steak that's coated in a seasoned batter, then fried until crispy and golden brown.

Advertisement

How Do I Keep the Breading From Falling Off?

To keep the breading from falling off your chicken fried steak, you should first dredge the meat in flour, then dip it in beaten eggs, and finally coat it with breadcrumbs or panko. This triple-dip method helps the breading adhere better.

Can I Make Chicken Fried Steak Ahead of Time?

You can make chicken fried steak ahead of time, but it's best to reheat it in the oven or air fryer to keep the breading crispy. Frying it fresh yields the optimal texture and flavor.

What Sides Pair Best With Chicken Fried Steak?

When pairing sides with chicken fried steak, you'll want to choose complementary flavors like mashed potatoes, creamy gravy, buttered corn, or a fresh green salad. These classic Southern sides will balance the richness of the steak perfectly.

Is Chicken Fried Steak Gluten-Free or Low-Carb?

Unfortunately, chicken fried steak isn't typically gluten-free or low-carb. The breading and frying process usually includes wheat flour, which is high in carbs. You'd need to find a recipe that uses gluten-free alternatives to enjoy this dish while following a restricted diet.

Advertisement

Continue Reading

Affiliate Disclaimer
As an affiliate, we may earn a commission from qualifying purchases. We get commissions for purchases made through links on this website from Amazon and other third parties.

Advertisement

Vetted

top local car washes top local car washes
Vetted2 months ago

14 Best Car Washes Near You for a Sparkling Clean Ride

I discovered the 14 best car washes near you that promise a sparkling clean ride, and you won't want to...

top mops for 2024 top mops for 2024
Vetted2 months ago

The 15 Best Mops of 2025 – Your Ultimate Guide to a Spotless Home

Find the perfect mop for your cleaning needs in 2025, and discover how these top choices can revolutionize your home...

top women s fragrances 2024 top women s fragrances 2024
Vetted2 months ago

15 Best Perfumes for Women in 2025 – A Fragrance Guide You Can’t Miss

Keen to discover the top 15 perfumes for women in 2025? Uncover unique scents that will elevate your fragrance game!

top local bars guide top local bars guide
Vetted2 months ago

14 Best Bars Near You for an Unforgettable Night Out

Looking for the perfect bar to elevate your night out? Discover the 14 best spots that promise unforgettable experiences!

luxurious beard oil selection luxurious beard oil selection
Vetted2 months ago

15 Best Beard Oils for a Luxurious Grooming Experience in 2025

Shop the 15 best beard oils for a luxurious grooming experience in 2025 and discover which ones will elevate your...

top college laptops 2024 top college laptops 2024
Vetted2 months ago

15 Best College Laptops of 2025: The Ultimate Guide for Students

With our guide to the 15 best college laptops of 2025, discover which powerful models will elevate your academic experience...

waterproof mascaras for tears waterproof mascaras for tears
Vetted2 months ago

15 Best Waterproof Mascaras That Will Survive Any Tear-Jerker

Outstanding waterproof mascaras await to keep your lashes flawless through any emotional moment; discover which ones made the top 15...

top flavorful disposable vapes top flavorful disposable vapes
Vetted2 months ago

15 Best Disposable Vapes of 2025: Top Picks for Flavor and Convenience

Prepare to discover the 15 best disposable vapes of 2025 that blend exceptional flavor and convenience, but which ones truly...

refreshing lunch salad ideas refreshing lunch salad ideas
Vetted2 months ago

15 Best Salads Near You That Will Freshen Up Your Lunch Routine

Transform your lunch with the 15 best salads nearby that will tantalize your taste buds and leave you craving more...

top convertible car seats top convertible car seats
Vetted2 months ago

15 Best Convertible Car Seats of 2025 – Safety and Comfort for Your Little One

Get ready to discover the top 15 convertible car seats of 2025 that blend safety and comfort—find out which models...

delicious fast food breakfast delicious fast food breakfast
Vetted2 months ago

15 Best Fast Food Breakfast Options That Will Make Your Mornings Delicious

Uncover the 15 best fast food breakfast options that will transform your mornings into a delicious experience you won't want...

stylish contacts for vision stylish contacts for vision
Vetted2 months ago

14 Best America’s Contacts for Clear Vision and Style

Browse through the 14 best contact lenses in America for clear vision and style, and discover which one perfectly complements...

Trending