
Get ready to dive into the ultimate grilled cheese experience! This classic comfort food has evolved from ancient toasted cheese sandwiches to a beloved lunchtime staple, and now it's time to take it to new heights. With the right ingredients and cooking techniques, you'll be whipping up melty, golden-brown perfection in no time. Experiment with different breads and cheeses to find your signature combo, then let your creativity shine by adding tasty toppings. Remember, patience is key for achieving that perfect melt – and the end result is pure bliss. Discover how to elevate this simple sandwich and truly make it your own.
Key Takeaways
- Utilize diverse bread and cheese combinations to create unique flavor profiles and textures for the ultimate grilled cheese experience.
- Incorporate gourmet ingredients and cooking techniques, such as garlic-infused butter and pan-frying, to elevate the classic grilled cheese sandwich.
- Prioritize patience and attention to detail during the cooking process to achieve the perfect melt and golden-brown crust.
- Recognize the cultural significance and nostalgic appeal of grilled cheese as a beloved comfort food that can be shared and enjoyed with loved ones.
- Embrace the versatility of grilled cheese by exploring seasonal ingredients and global influences to continuously expand the possibilities of this classic dish.

Gourmet Kitchn Grilled Cheese- Lily's Toaster Grills Grilled American Cheese Sandwich 8 per box, 2 boxes, 16 total grilled cheese 2 Pack
As an affiliate, we earn on qualifying purchases.
As an affiliate, we earn on qualifying purchases.
History
The humble grilled cheese sandwich has a rich history, dating back to ancient times. In fact, the concept of combining bread and cheese can be traced all the way back to ancient Greece and Rome, where people enjoyed simple toasted cheese sandwiches.
Over the centuries, the grilled cheese has evolved, with different cultures and regions putting their own unique spin on the classic dish.
During the 1920s, the grilled cheese sandwich as we know it today began to take shape in the United States. Sliced bread and processed cheese, like American cheese, made it easier to create the gooey, melty sandwiches we love.
As the decades passed, the grilled cheese became a lunchtime staple, beloved by both children and adults alike.
Nowadays, the grilled cheese has experienced a resurgence in popularity, with chefs and home cooks experimenting with various cheese combinations, bread types, and creative fillings.
From classic cheddar to artisanal blends, the grilled cheese sandwich continues to be a beloved comfort food, enjoyed by people all over the world.
Recipe
Grilled cheese sandwiches are a classic comfort food, beloved for their simple yet delicious combination of melty cheese between toasted bread. This recipe offers a timeless approach to creating the perfect grilled cheese, with a few tips to help you achieve that golden, crispy exterior and gooey, satisfying interior.
The key to a great grilled cheese lies in the quality of the ingredients. Use a sturdy, sliced bread that can withstand the heat without falling apart, and select a cheese that melts easily and has a bold flavor profile. The type of cheese you choose can greatly influence the overall taste, so feel free to experiment with different varieties to find your personal favorite.
Ingredients:
- 4 slices of bread
- 2-3 slices of cheese (such as cheddar, Swiss, or American)
- 2 tablespoons of butter or mayonnaise (for spreading on the bread)
To cook:
Preheat a skillet or griddle over medium heat. Spread the butter or mayonnaise on one side of each slice of bread. Place two slices of bread, butter/mayonnaise side down, in the preheated skillet. Top each slice with cheese, then place the remaining two slices of bread on top, butter/mayonnaise side up.
Cook the sandwiches for 2-3 minutes per side, or until the bread is golden brown and the cheese is melted. When making grilled cheese, remember to keep a close eye on the sandwich to prevent burning. Adjust the heat as needed to achieve the perfect balance of crispy exterior and gooey interior.
Serve the grilled cheese hot, with any desired accompaniments such as tomato soup or a side salad.
Cooking Steps
Start by slicing your bread to the thickness you prefer.
Next, evenly butter the exterior of the bread so it gets perfectly golden-brown as you cook.
Finally, assemble your sandwich with the cheeses you love most and cook it up on the stovetop until it's melty and delicious.
Slice it diagonally for a professional presentation before diving in!
Step 1. Slice Bread to Desired Thickness

Slice the bread to your desired thickness, typically around 1/2 inch. You want the slices to be sturdy enough to hold all the gooey goodness, but not so thick that they become unwieldy.
Use a sharp knife or a bread slicer if you have one handy. Go slow and steady, taking care not to squish the bread. The perfect grilled cheese starts with the perfect bread!
Once you've got your slices, it's time to get them ready for the griddle. Butter the outsides of the bread – this will help create that golden-brown crust we all love.
Don't be shy with the butter; a nice even coating will ensure maximum crispiness. If you're feeling fancy, you can even try brushing the bread with a bit of garlic-infused butter for an extra flavor boost.
Now that your bread is prepped, it's time to start building that grilled cheese masterpiece. Get your skillet heated up and let's get cooking!
Step 2. Butter Bread Exterior Evenly
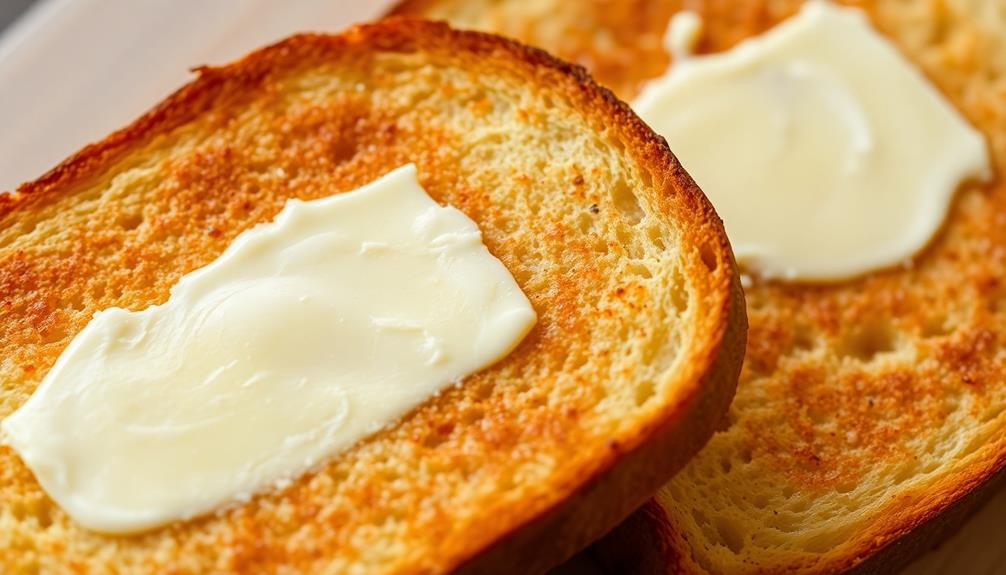
With your bread slices ready, it's time to coat the outsides with butter. The creamy texture of butter, influenced by its emulsification during churning, will help create that perfect golden-brown crust on your grilled cheese.
You'll want to do this evenly, ensuring the entire surface of each slice is covered. This will help create that perfect golden-brown crust on your grilled cheese.
Grab a small pat of butter and run it across one side of a bread slice. Use the back of a spoon or your fingertips to gently spread the butter, making sure it reaches all the edges. Flip the slice over and repeat on the other side. Do the same with the remaining slices, coating them thoroughly.
The key is to use just enough butter – not too much, or it may become greasy, but not too little, or your sandwich won't get that beautifully crisp exterior.
Take your time and be methodical. Butter enhances flavor and moisture in baked goods, making it a staple in pastry recipes.
With the bread now buttered, you're ready to start assembling your grilled cheese!
Step 3. Assemble Sandwich With Desired Cheeses

Now that your bread slices are evenly coated in butter, it's time to assemble your grilled cheese sandwich.
Start by choosing your favorite cheeses – maybe a classic cheddar or a blend of sharp and creamy varieties. Grate the cheese or slice it into thin, even pieces so it melts easily.
Place one slice of bread, buttered side down, on your work surface. Arrange the cheese slices evenly over the bread, making sure to cover the entire surface.
If you're feeling adventurous, you can add a few extra toppings like sliced tomatoes, crispy bacon, or sautéed onions. Just be careful not to overload the sandwich, as too many fillings can make it tricky to flip and cook evenly.
Step 4. Cook Sandwich on Stovetop
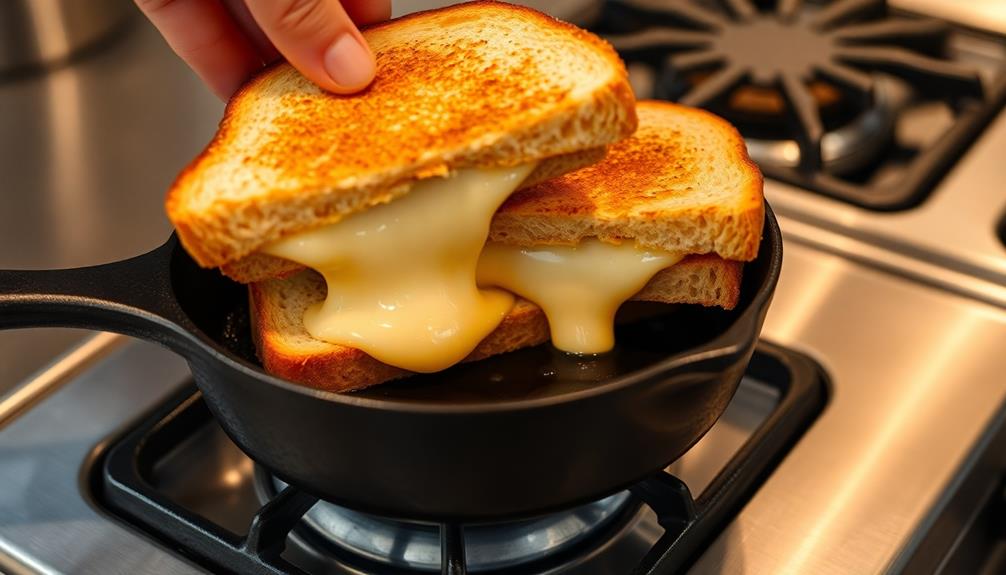
Heat a large skillet or griddle over medium heat.
Once it's nice and hot, place your assembled sandwich in the pan. You'll hear that satisfying sizzle as the bread hits the surface! Gently press down on the sandwich with a spatula to help the cheese start to melt.
Let it cook for 2-3 minutes, or until the bottom slice of bread is golden brown.
Flip the sandwich over and cook for another 2-3 minutes on the other side. Keep an eye on it, adjusting the heat as needed to prevent burning.
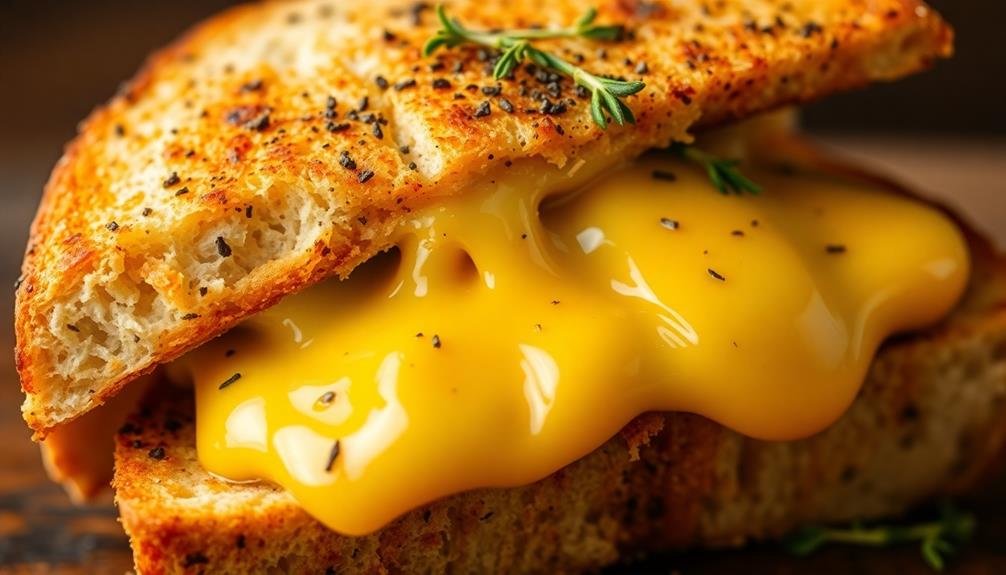
The cheese should be perfectly melted when it's ready.
Slide your grilled cheese onto a plate and get ready to dig in! The crispy, crunchy outside and gooey, melty center are an unbeatable combo.
Serve it up warm and enjoy every bite of your homemade masterpiece.
Step 5. Slice Diagonally for Presentation

Once your grilled cheese sandwich has finished cooking, use a sharp knife to slice it diagonally into two triangular halves. This diagonal cut not only looks impressive, but it also helps to showcase the melty, gooey goodness inside.
As you carefully guide the blade through the crisp, golden-brown exterior, you'll reveal the tantalizing layers of cheese and buttery bread.
Slicing the sandwich diagonally creates a visually appealing presentation. The two triangles can be arranged on a plate in a slightly overlapping pattern, allowing your guests to admire the sandwich's delectable filling.
This simple yet elegant technique elevates the humble grilled cheese, transforming it into a dish that's worthy of a gourmet café.
Remember to use a sharp, serrated knife for the cleanest, most uniform cut. Gently saw back and forth to slice through the sandwich without squeezing out the melted cheese.
Take your time and enjoy the satisfying sensation of creating the perfect grilled cheese masterpiece.
Final Thoughts
Grilled cheese sandwiches hold a special place in the hearts and stomachs of many.
They're the ultimate comfort food, a beloved classic that can bring a smile to your face with every bite. As you've learned, there are many ways to elevate this simple sandwich and make it truly extraordinary.
Whether you prefer your grilled cheese crispy on the outside and gooey on the inside, or with a mix of cheeses for added flavor, the possibilities are endless.
Don't be afraid to experiment and find the perfect combination that suits your tastes.
Remember, the key to a great grilled cheese is patience and attention to detail.
Take your time, follow the steps, and savor every moment.
Grilled cheese isn't just a meal – it's an experience to be enjoyed and shared with loved ones.
Frequently Asked Questions
What Is the Best Type of Cheese for a Grilled Cheese Sandwich?
The best type of cheese for a grilled cheese sandwich is a blend of firm, melty cheeses like cheddar, Gruyère, and Swiss. This combination creates a perfect balance of flavor and texture that'll make your grilled cheese truly delightful.
How Do I Prevent My Grilled Cheese From Becoming Soggy?
To prevent your grilled cheese from becoming soggy, use high-quality, firm slices of cheese, butter the outside of the bread, and cook over medium heat until the bread is crispy and golden-brown. Avoid overcrowding the pan and allow the sandwich to rest before serving.
Can I Make a Grilled Cheese Sandwich in the Oven?
Yes, you can definitely make a grilled cheese sandwich in the oven. Just place the assembled sandwich on a baking sheet and bake at 400°F until the bread is golden brown and the cheese is melted, about 10-15 minutes.
What's the Secret to Achieving the Perfect Crispy Exterior?
To achieve a crispy exterior on your grilled cheese, you'll need to buttery your bread slices generously. Then, cook the sandwich in a skillet over medium heat, flipping occasionally, until the bread is golden brown and the cheese is melted.
Can I Use Different Types of Bread for a Grilled Cheese Sandwich?
You can absolutely use different types of bread for a grilled cheese sandwich. From hearty sourdough to buttery brioche, the bread you choose can enhance the flavors and textures of this classic comfort food.