Nem Chua is an exciting Vietnamese snack made from fermented pork, garlic, and spices. You'll find it wrapped in banana leaves, which helps preserve its yummy flavors! This tasty treat comes from northern Vietnam, where people have enjoyed it for generations. It has a savory, tangy flavor that's both chewy and tender. Often served cold with fresh herbs, it's perfect for sharing at gatherings. You'd be surprised to know that Vietnam sells around 32 million servings of it each year! If you'd like to discover how to make this delicious snack at home, there's so much more to learn ahead!
Key Takeaways
- Nem Chua is a traditional Vietnamese fermented pork snack, originating from northern Vietnam and deeply rooted in culinary culture.
- It is made from minced pork shoulder, garlic, spices, and fermented using specific bacteria and yeast for unique flavors.
- The preparation involves wrapping the mixture in banana leaves, allowing it to ferment at room temperature for 24 to 48 hours.
- Known for its savory, tangy, and slightly sweet flavor profile, it is often enjoyed with fresh herbs and rice crackers.
- Nutritionally, Nem Chua is high in protein, contains beneficial probiotics, and is low in carbohydrates, making it a satisfying snack option.
History
The history of nem chua traces back centuries in Vietnam, where it's been a beloved delicacy cherished for its unique flavor and texture. This tasty treat is made from fermented pork, and it's not just food; it's a part of Vietnamese culture.
You might be surprised to learn that nem chua originated in the northern regions, where families would create this dish as a way to preserve meat. By fermenting the pork with spices and garlic, they found a way to make it last longer and taste delicious!
As word spread, different areas of Vietnam added their own twists to this delightful snack. People began using various spices and seasonings, making each version unique. Many families still pass down their special recipes through generations, showing just how much love and care go into making nem chua.
Whenever you enjoy this treat, you're not just tasting something yummy; you're also savoring a piece of history that connects you to Vietnam and its rich culinary traditions.
Recipe for Nem Chua: Vietnamese Fermented Pork Snack
Nem Chua is a beloved traditional Vietnamese delicacy that offers a unique combination of savory, tangy, and slightly sweet flavors. This fermented pork snack is typically made from minced pork, garlic, and spices, then wrapped in banana leaves and left to ferment for several days. The result is a flavorful and aromatic treat that can be enjoyed on its own or as part of a larger meal, alongside fresh herbs and dipping sauces.
Making Nem Chua at home can be rewarding, allowing you to adjust the flavors and spice levels to your preference. The fermentation process is crucial to achieving the authentic taste of Nem Chua. The key is to use quality ingredients and maintain the right environmental conditions for fermentation. While it may take a few days to achieve the perfect result, the end product is worth the wait.
Follow this recipe to create your own delicious Nem Chua that captures the essence of Vietnamese cuisine.
Ingredients
- 500g pork shoulder (finely minced)
- 100g pork fat (finely minced)
- 2 tablespoons salt
- 1 tablespoon sugar
- 1 tablespoon fish sauce
- 2 cloves garlic (minced)
- 1 teaspoon freshly ground black pepper
- 1 tablespoon crushed chili (optional)
- Banana leaves (for wrapping)
- 25g cooked, crushed roasted rice (for texture)
- 1 tablespoon distilled white vinegar (optional, for tanginess)
Cooking Instructions
In a large mixing bowl, combine the minced pork shoulder, pork fat, salt, sugar, fish sauce, minced garlic, black pepper, and crushed chili (if using). Mix thoroughly until the ingredients are well incorporated.
Once mixed, sprinkle in the crushed roasted rice and continue to blend the mixture to achieve a sticky consistency. Next, take small portions of the mixture and mold them into rectangular shapes, approximately the size of a small bar.
Wrap each piece tightly in banana leaves, ensuring they're sealed completely to facilitate the fermentation process. Place the wrapped pieces in a container, cover them with a weight, and leave them in a cool place for 3 to 5 days to ferment.
Extra Tips
When preparing Nem Chua, it's essential to ensure cleanliness throughout the process to prevent unwanted bacteria from spoiling your dish. Use sanitized utensils and containers for mixing and wrapping.
If you're new to fermentation, check the wrapped Nem Chua daily for any off-putting smells; a slight tang is expected, but anything overly pungent may indicate spoilage.
Lastly, feel free to adjust the spice levels according to your taste—adding more chili can give it a delightful kick, while reducing it will make it more approachable for those sensitive to heat.
Enjoy your homemade Nem Chua with fresh herbs and dipping sauces for an authentic Vietnamese experience!
Cooking Steps
Begin by preparing your workspace and ingredients for making nem chua. Gather fresh pork, pork fat, garlic, and some special spices. You'll also need banana leaves, a mixing bowl, and some cling wrap.
Next, chop the pork and fat into small pieces, then mix them in your bowl. Add minced garlic and spices, then knead everything together. This part's fun, and you can really get your hands in there!
Once it's mixed well, you'll want to shape the mixture into small, cylindrical logs.
Now, take your banana leaves and cut them into squares. Wrap each log tightly in the leaves, making sure they're secure. This helps keep the delicious flavors inside!
After wrapping, use the cling wrap to seal them even more, so nothing leaks out.
Place your wrapped nem chua in a cool place for about three to five days. During this time, the magic happens—fermentation!
When they're ready, you can slice them up and enjoy your homemade nem chua. It's a tasty treat that'll impress your friends and family. Happy cooking!
Step 1. Prepare Pork Shoulder Meat
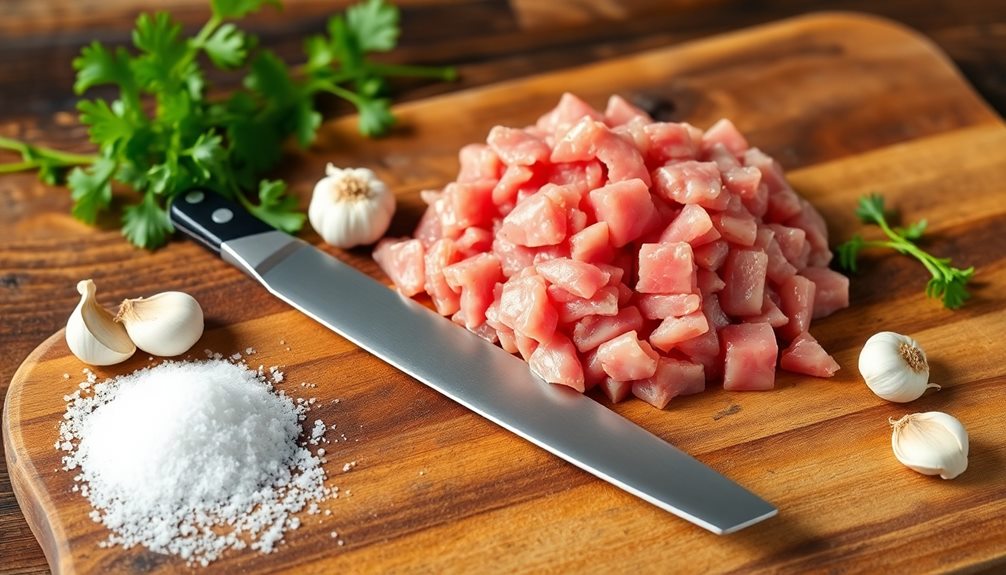
To prepare pork shoulder meat for nem chua, start by selecting a fresh cut that has a good balance of meat and fat, which enhances the flavor and texture of the final product. You'll want about two pounds of pork shoulder.
Once you've got your meat, wash it thoroughly under cold water to remove any impurities. This step is super important because it helps ensure your nem chua tastes fresh and delicious.
Next, pat the meat dry with paper towels. This helps with the seasoning later on.
Now, trim away any excess fat or sinew. You want to keep some fat for flavor, but too much can make the final product greasy.
Once you've trimmed the meat, you'll want to cut it into smaller pieces. Aim for cubes of about one inch. This makes it easier to grind later.
If you have a meat grinder, you can use that for a finer texture, or you can chop it very finely with a sharp knife.
And there you have it! Your pork shoulder is now ready for the next exciting stage in making your tasty nem chua. Enjoy the process!
Step 2. Mix With Garlic and Spices

Now that you've prepared your pork shoulder, it's time to infuse it with flavor by mixing in garlic and spices. Start by taking a few cloves of fresh garlic and mincing them into tiny pieces. The smell will be amazing!
Next, grab your favorite spices. You can use black pepper, chili powder, and even a bit of sugar to balance the flavors. Don't forget some fish sauce, which adds a special kick that makes the pork taste delicious!
In a large bowl, combine the minced garlic, spices, and fish sauce with the pork. Make sure to mix everything together really well. You want every piece of meat to soak up those yummy flavors! Use your hands to knead the mix, but don't forget to wash them first. It's a bit messy, but that's part of the fun.
Once everything's mixed, you'll notice the pork turning a lovely color. This is a sign that the flavors are blending together nicely! Take a moment to admire your hard work. You're one step closer to making that tasty nem chua! Get ready for the next exciting part!
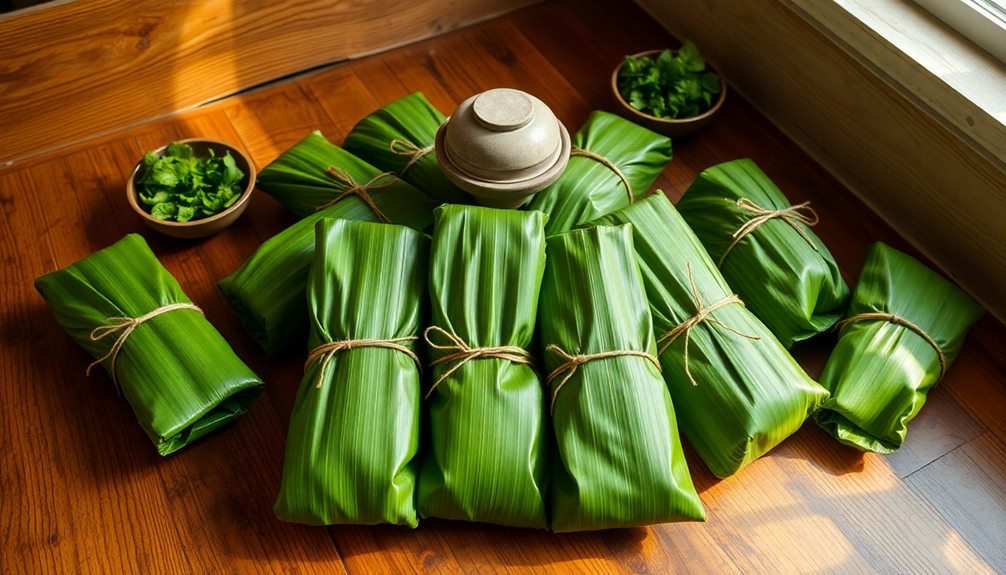
Step 3. Pack Into Banana Leaves

With your flavorful pork mixture ready, it's time to pack it into banana leaves.
First, grab a banana leaf and cut it into rectangles—about the size of your hand. This will make it easier to wrap your delicious filling.
Next, lay a piece of leaf flat on the table, and scoop a generous amount of your pork mixture onto the center.
Now, fold the sides of the leaf over the filling, making sure to cover it completely. Don't worry if it seems tricky at first; you'll get the hang of it!
Once you've folded the sides, roll the banana leaf tightly from the bottom to the top. This will create a neat little package.
To keep everything secure, you can tie it up with some kitchen twine or use a toothpick to hold it together.
Repeat this process until you've wrapped all your mixture. Just imagine how tasty these little bundles will be once they ferment!
Packing them in banana leaves not only keeps the pork safe but also adds a lovely aroma as they ferment.
You're one step closer to enjoying your homemade nem chua!
Step 4. Ferment at Room Temperature
How long should you let your nem chua ferment at room temperature? This step is super important, and you'll want to get it just right!
After you've packed your pork mixture into banana leaves, find a warm spot in your kitchen. Ideally, you should let your nem chua ferment for about 24 to 48 hours.
During this time, the magic happens! The mixture will develop its unique flavors and that delightful tang you love.
Keep an eye on the temperature, too. If it's too cold, the fermentation might take longer, and if it's too hot, it could spoil.
After about a day, you can peek at your nem chua. You should notice a slight change in color and a lovely smell.
It's like a little science experiment happening right in your kitchen! Once the time's up, you'll be so excited to see how your hard work has paid off.
Step 5. Slice and Serve Chilled
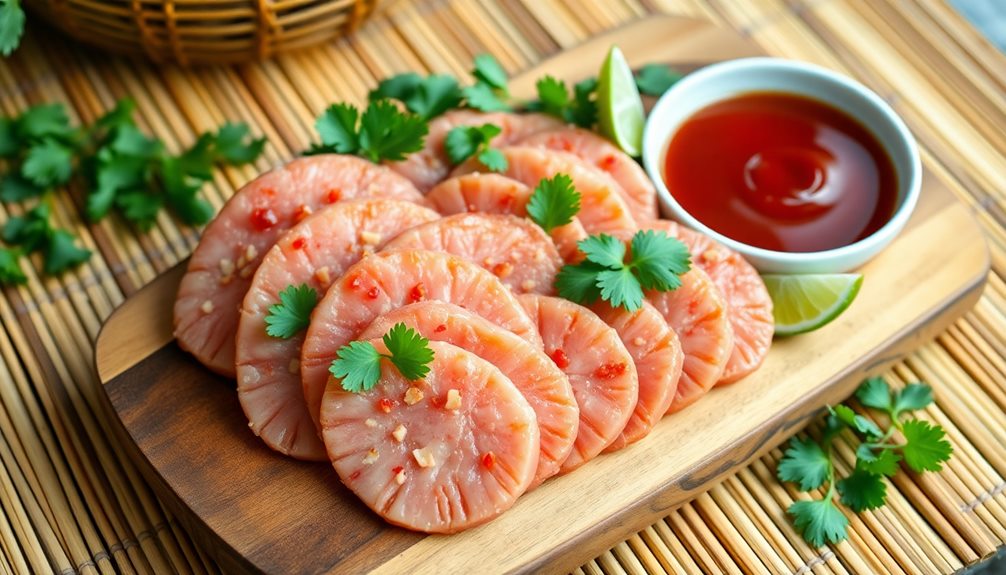
After fermentation, it's time to slice and serve your nem chua chilled for the best flavor experience. First, grab a sharp knife and carefully remove the nem chua from its wrapping. You'll want to make sure it's nice and firm, so it holds together while slicing.
Next, place the nem chua on a cutting board. Slice it into thin pieces—about a quarter-inch thick. This way, each bite will be packed with flavor! As you slice, you might notice the beautiful colors and textures; it's almost like art!
Once you've finished slicing, it's best to chill the pieces in the fridge for a little while. This keeps the flavors fresh and makes the nem chua even tastier. After about 30 minutes, take them out and get ready to enjoy!
You can serve your chilled nem chua with some fresh herbs, like mint or cilantro, and maybe a side of rice crackers. It's a delightful snack that's sure to impress your friends and family.
Final Thoughts
Ultimately, trying nem chua can be a delightful adventure for your taste buds. This unique Vietnamese snack offers a taste experience unlike any other. With its tangy flavor and chewy texture, it's sure to surprise and excite you. You might find yourself enjoying the combination of spices and garlic that make each bite special.
When you share nem chua with friends or family, it becomes more than just a snack; it's a chance to explore a new culture together. You can serve it with fresh herbs, dipping sauces, or even crunchy vegetables to create a fun tasting platter. Just imagine the joy of trying something new and delicious together!
Don't forget, the best part of tasting nem chua is how it connects you to Vietnam's rich culinary traditions. Each piece has a story, and every bite reveals layers of flavor crafted over time.
Frequently Asked Questions
Is Nem Chua Safe for Pregnant Women to Eat?
Eating certain fermented foods during pregnancy can pose risks due to potential bacteria. You should consult your healthcare provider before consuming any unfamiliar products, ensuring both your health and your baby's safety remain a priority.
How Long Can Nem Chua Be Stored?
You can typically store nem chua in the refrigerator for about one to two weeks. If you freeze it, it can last up to three months, but the texture may change upon thawing.
Can Nem Chua Be Made With Other Meats?
Absolutely! You can experiment with different meats like chicken, beef, or even fish. Just ensure you adjust the seasoning and fermentation process to suit the meat's characteristics, and you'll create something uniquely delicious.
What Are the Optimal Serving Suggestions for Nem Chua?
When serving, slice it thinly and pair it with fresh herbs, crunchy vegetables, and dipping sauces. You'll enhance the flavors and create a well-rounded experience that's sure to impress your guests. Enjoy!
Is There a Vegetarian Version of Nem Chua?
You won't find a traditional vegetarian version of nem chua, but you can experiment with plant-based ingredients like fermented tofu or tempeh. These alternatives can mimic the texture and flavor profile you're looking for.