Street Food Around the World
Falafel: The Middle Eastern Fritter Taking Over Street Corners
Hailed as a global culinary sensation, falafel’s crispy, savory perfection has made it a must-try street food, offering a delectable vegetarian delight.
Falafel, the iconic Middle Eastern fritter, has become a global sensation! This savory and crispy delight originated centuries ago in the bustling markets of the Middle East. Today, you'll find these golden-brown bites at vibrant street corners worldwide, offering a delicious vegetarian option. The key to authentic falafel lies in the careful preparation – soaking and blending chickpeas, then shaping and frying them to perfection. Serve falafel in a warm pita with fresh veggies and a creamy tahini sauce for a truly satisfying experience. Discover the enduring appeal of this beloved street food and explore the rich cultural traditions it represents.
Key Takeaways
- Falafel is a traditional Middle Eastern street food with origins dating back to ancient Egypt, representing the enduring appeal of authentic regional cuisine.
- Falafel has become a global phenomenon, with falafel shops and food trucks found in many cities worldwide, highlighting its widespread cultural significance.
- The recipe for falafel involves a time-honored process of soaking, blending, and frying chickpeas into crispy, golden-brown fritters that can be enjoyed in various preparations.
- The key to authentic falafel lies in the careful selection and combination of spices, herbs, and other ingredients, which contribute to its vibrant and distinctive flavor profile.
- Falafel's versatility, plant-based nature, and ability to be customized with different toppings and accompaniments make it a popular and sustainable food choice globally.
History
Originating as a traditional street food in the Middle East, the history of falafel dates back centuries. This beloved deep-fried chickpea fritter has been a staple of the region for generations.
In fact, the earliest known records of falafel date back to ancient Egypt, where it was enjoyed as a nutritious vegetarian option. Over time, the recipe and preparation methods spread throughout the Middle East, evolving slightly in each country.
Today, falafel is a beloved comfort food, found in bustling city markets and family-owned restaurants alike. Whether served in a warm pita with fresh veggies and tangy sauces, or simply on its own, this crispy, flavor-packed snack has become a global phenomenon.
From its humble beginnings to its current international popularity, the history of falafel is a testament to the enduring appeal of authentic, delicious street food.
Recipe
Falafel is a beloved Middle Eastern dish that has captured the hearts and taste buds of people around the world. These crispy, golden-brown fritters made from chickpeas aren't only delicious but also a versatile and nutritious addition to any meal.
Whether served as a snack, stuffed into a pita, or added to a salad, falafel is a true culinary delight. Additionally, the preparation of falafel can be seen as a sustainable choice, much like wood as a renewable resource, as it utilizes plant-based ingredients that have a lower environmental impact compared to meat.
The key to making authentic and flavorful falafel lies in the careful selection and preparation of the ingredients. By following a time-honored recipe and incorporating the right spices and techniques, you can create a dish that transports you to the bustling streets of the Middle East.
- 2 cups (400g) dried chickpeas, soaked overnight and drained
- 1 onion, finely chopped
- 3 cloves garlic, minced
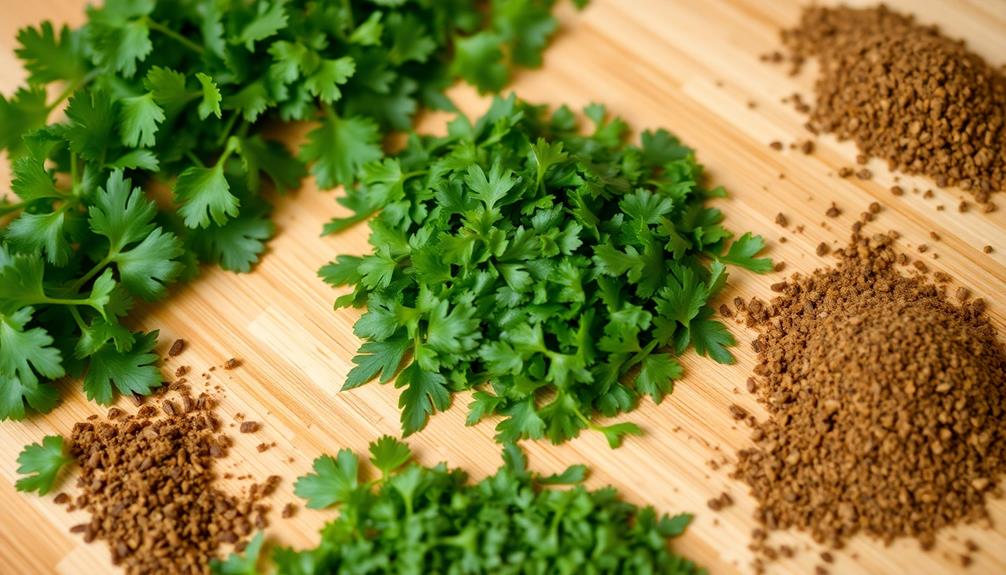
- 1 cup (15g) fresh parsley, chopped
- 1 cup (15g) fresh cilantro, chopped
- 1 teaspoon ground cumin
- 1 teaspoon ground coriander
- 1 teaspoon baking soda
- 1/2 teaspoon cayenne pepper
- Salt and pepper to taste
- Vegetable oil for frying
In a food processor, combine the soaked and drained chickpeas, onion, garlic, parsley, cilantro, cumin, coriander, baking soda, cayenne, salt, and pepper. Pulse the mixture until it forms a coarse paste, being careful not to overprocess it.
Refrigerate the falafel mixture for at least 30 minutes to allow the flavors to meld.
Using a small cookie scoop or your hands, form the mixture into small, round balls, approximately 1-inch in size. Heat the vegetable oil in a deep fryer or heavy-bottomed pan to 350°F (175°C). Carefully drop the falafel balls into the hot oil and fry for 2-3 minutes, or until golden brown and crispy. Drain the cooked falafel on a paper towel-lined plate.
When cooking falafel, it's important to use dried, uncooked chickpeas rather than canned or cooked ones. This ensures the proper texture and flavor.
Additionally, be sure to refrigerate the falafel mixture for at least 30 minutes before frying, as this helps the balls hold their shape better during the cooking process.
Cooking Steps
Soak those chickpeas overnight, then drain and rinse them.
Next, you'll grind the soaked chickpeas in a food processor.
Step 1. Soak Chickpeas Overnight
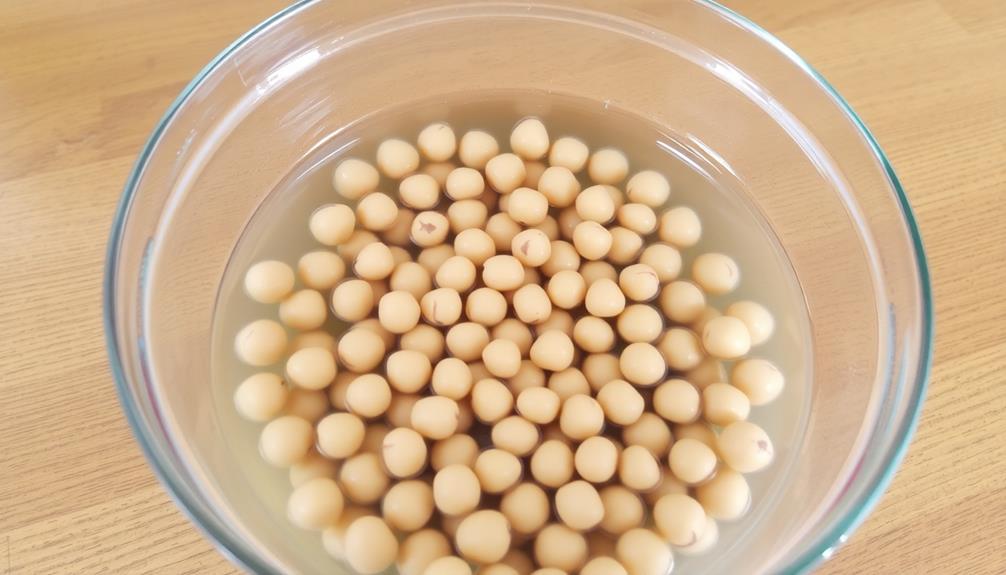
Before you can prepare the perfect falafel, you'll need to soak the chickpeas overnight. This essential step allows the chickpeas to absorb water, which makes them softer and easier to work with when it's time to blend them into the falafel mixture.
Simply place the dried chickpeas in a large bowl, then cover them with several inches of water. Let them soak for at least 8 hours, or overnight. This gives the chickpeas ample time to fully hydrate, so they'll be ready to transform into delicious, crispy falafel.
Once the soaking time is up, drain and rinse the chickpeas well. They should now have a soft, plump texture, perfect for the next steps of the falafel-making process.
With the chickpeas soaked and ready, you can move on to blending the falafel ingredients together into a flavorful paste. Get excited, because you're on your way to creating authentic Middle Eastern falafel at home!
Step 2. Drain and Rinse Soaked Chickpeas
Once the soaking time is up, drain and rinse the chickpeas well. This crucial step helps remove any excess water and prepares the chickpeas for the next stage of the falafel-making process.
Simply place a colander in the sink and pour the soaked chickpeas into it. Give them a good rinse under running water, gently stirring the chickpeas to ensure they're all thoroughly cleaned.
With the chickpeas drained and rinsed, they're now ready to be transformed into delicious, crispy falafel.
The next step is to pat them dry with a clean kitchen towel or paper towels. You want to remove as much moisture as possible, as this will help the falafel hold their shape when frying.
Once the chickpeas are nice and dry, you can move on to the next step of the recipe – chopping and blending the ingredients to create the perfect falafel mixture.
Get ready for amazing Middle Eastern flavors!
Step 3. Grind Soaked Chickpeas in Food Processor
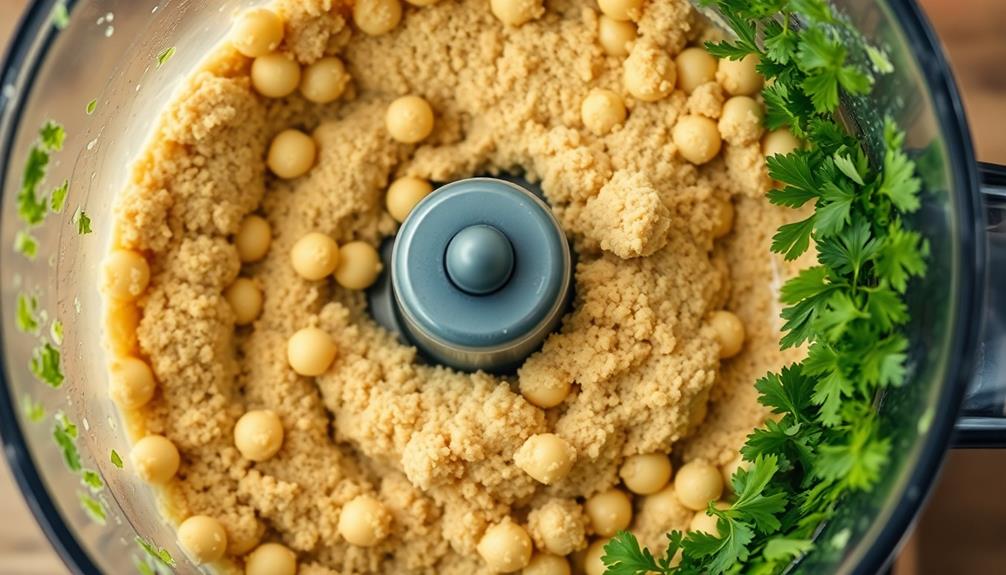
With the chickpeas now drained and dried, you'll want to transfer them to a food processor. This is where the magic happens! Start by pulsing the chickpeas a few times to break them down.
Don't worry if they're not completely smooth – a little texture is perfect for falafel. Next, add in the garlic, onion, parsley, cilantro, cumin, coriander, and salt. Give it another good pulse until everything is combined and the mixture has a coarse, grainy texture.
Be careful not to overmix, or your falafel will become dense and heavy. Once you're happy with the consistency, you're ready to start shaping the falafel.
Scoop out a handful of the mixture and gently form it into a small, round patty. Repeat this process until you've used up all the chickpea mixture.
Now you're one step closer to enjoying those crispy, flavor-packed falafel!
Step 4. Add Herbs and Spices
After transferring the drained and dried chickpeas to the food processor, you'll want to add the garlic, onion, parsley, cilantro, cumin, coriander, and salt. These herbs and spices will infuse your falafel with an aromatic and flavorful blend. Not only do these ingredients enhance the taste, but they also offer various health benefits that can be part of a balanced diet, such as anti-inflammatory properties found in natural remedies alongside conventional medications.
The garlic and onion provide a savory base, while the parsley and cilantro lend a fresh, herbaceous note. Cumin and coriander, classic Middle Eastern spices, contribute an earthy, slightly nutty flavor that complements the chickpeas wonderfully.
As you pulse the mixture in the food processor, the herbs and spices will become evenly distributed throughout the falafel batter. You'll want to stop processing once the mixture forms a coarse, grainy texture – not too smooth, as you still want some texture in the final product.
Be sure to taste and adjust the seasoning as needed, adding more salt or spices to suit your personal preference. With the aromatic blend of ingredients, your falafel is well on its way to becoming a delicious Middle Eastern treat.
Step 5. Form Into Balls and Fry
Next, you'll want to form the chickpea mixture into small, evenly-sized balls. Use your hands to scoop up a bit of the mixture and gently roll it between your palms to create a smooth, round shape.
Be sure not to pack the balls too tightly – you want them to stay light and airy. As you form each one, place it on a clean surface, like a plate or baking sheet.
Once you've shaped all the falafel, it's time to fry them up. In a large skillet or Dutch oven, heat about 2 inches of oil over medium-high heat.
When the oil is hot, gently add the falafel balls, a few at a time, and fry for 2-3 minutes per side, until they're golden brown and crispy.
Use a slotted spoon to transfer the cooked falafel to a paper towel-lined plate to drain off any excess oil.
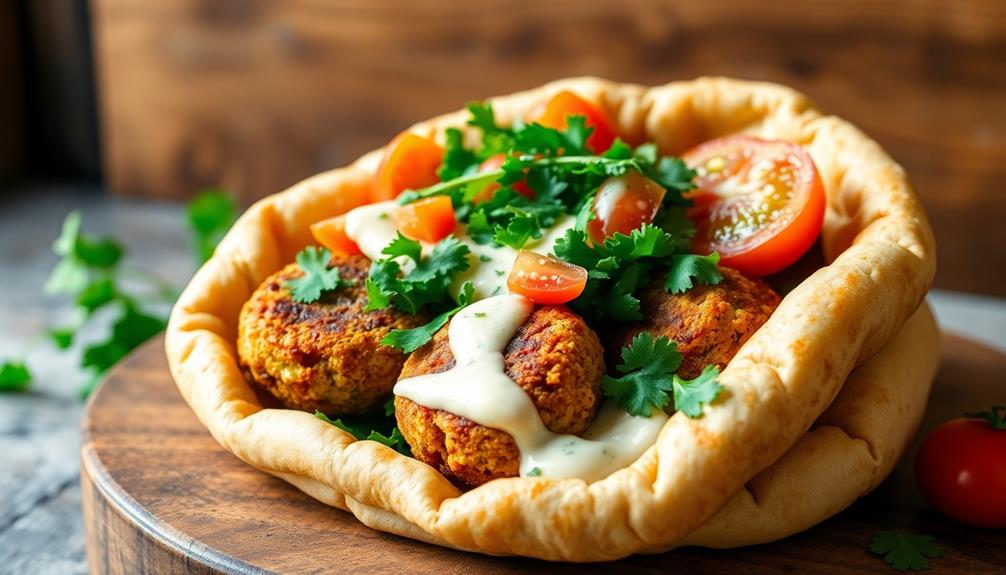
Serve the hot, freshly fried falafel with your favorite toppings, like chopped veggies, creamy tahini sauce, or warm pita bread.
Enjoy this delicious Middle Eastern treat!
Final Thoughts
Falafel, the beloved Middle Eastern fritter, has captured the hearts and taste buds of people worldwide. As you've learned, this delightful dish is easy to make at home, and the possibilities for enjoying it are endless.
Whether you prefer yours stuffed in a pita, served with creamy tahini sauce, or simply on its own, falafel is a versatile treat that's sure to delight.
Beyond its delicious flavor, falafel also offers a delightful cultural experience. Originating in the Middle East, this deep-fried chickpea delight has become a global phenomenon, with falafel shops and food trucks popping up in cities around the world.
Indulging in a fresh, hot falafel is a wonderful way to explore the vibrant flavors and traditions of the region.
Frequently Asked Questions
What Makes Falafel a Popular Vegetarian Street Food?
You love falafel because it's a delicious, portable, and filling vegetarian snack. The crispy exterior and flavorful interior make it a satisfying and versatile option for street food. Plus, it's easy to eat on the go.
How Can I Ensure My Falafel Is Crispy on the Outside?
To ensure your falafel is crispy on the outside, try frying it at a higher temperature and making sure the oil is hot enough before adding the falafel. Avoid overcrowding the pan, and pat the falafel dry before frying for maximum crispiness.
Can Falafel Be Made Ahead of Time and Reheated?
Yes, you can make falafel ahead of time and reheat it. Just be sure to store the uncooked falafel in the fridge and reheat it in the oven or air fryer to maintain its crispy exterior.
What Are Some Common Serving Suggestions for Falafel?
You can serve falafel in a variety of ways. Stuff it in a pita with veggies and tahini sauce, or serve it over a salad with hummus and fresh herbs. You can even dip it in a yogurt-based sauce for extra flavor.
How Can I Adapt Falafel to Suit Different Dietary Preferences?
You can adapt falafel to suit different dietary preferences by making them vegan, gluten-free, or using alternative protein sources like chickpeas, lentils, or quinoa. Explore seasonings and sauces to create unique flavor profiles tailored to your preferences.
Street Food Around the World
Jerk Chicken: Jamaica’s Fiery Street Food Delight
You’ll be transported to the vibrant markets of Jamaica with the bold, fiery flavors of jerk chicken, a cultural ambassador showcasing the island’s resilience and creativity.
Jerk chicken, Jamaica's iconic street food delight, will transport you to the vibrant markets of the island with its bold, fiery flavors. This beloved dish's origins trace back to the indigenous Taíno people, who used pimento wood and leaves for smoking meats. Later, African slaves contributed their spice blends, evolving the signature jerk seasoning that now features an irresistible balance of sweet, savory, and sizzling heat. Jerk chicken is a true cultural ambassador, showcasing Jamaica's resilience and creativity through its unique cooking methods and flavor profile. Take a culinary journey to the heart of Jamaican cuisine and discover why this dish is so revered.
Key Takeaways
- Jerk chicken is a beloved Jamaican dish with roots tracing back to the indigenous Taíno people and African slaves, showcasing the island's rich culinary heritage.
- The unique flavor profile of jerk chicken, featuring a blend of spices like allspice, thyme, and Scotch bonnet peppers, creates a zesty and bold taste experience.
- Traditional jerk cooking methods, such as using pimento wood and leaves for smoking, contribute to the dish's signature smoky char and enhance the overall flavor complexity.
- Jerk chicken is often enjoyed as a street food, with vendors serving it alongside sides like rice and peas or festival, creating a vibrant and communal dining experience.
- The enduring legacy of jerk chicken has led to its global popularity, as the dish continues to influence culinary trends and serve as a cultural ambassador for Jamaican cuisine.
History
Originating in the hills of Jamaica, jerk chicken's history can be traced back to the island's indigenous Taíno people. These early inhabitants used pimento wood and leaves to slowly smoke and season meats, creating a bold, spicy flavor.
Over time, the technique evolved as African slaves brought their own spices and cooking methods to the island. The name "jerk" likely comes from the Quechua word "charqui," meaning dried, salted meat.
As Jamaican cuisine grew, jerk chicken became a beloved staple, often sold by street vendors. The spicy, aromatic dish quickly gained popularity, and today it's considered a national treasure.
From humble beginnings to global fame, jerk chicken's history is a flavorful tale of Jamaica's rich culinary traditions. Whether savored on the streets or in your own kitchen, this fiery delight captures the spirit of the island.
Recipe
Jerk chicken is a beloved dish that originates from the vibrant streets of Jamaica. The term "jerk" refers to the unique spice blend that imbues the meat with a captivating blend of sweet, savory, and fiery flavors. This recipe captures the essence of authentic Jamaican jerk chicken, perfect for bringing a taste of the islands to your own kitchen.
The key to exceptional jerk chicken lies in the marinade. A combination of aromatic spices, herbs, and a touch of sweetness creates a flavor profile that's truly addictive. The chicken is then slow-cooked, allowing the spices to permeate the meat, resulting in a tender, juicy, and intensely flavored dish.
Ingredients:
- 2 lbs chicken thighs or drumsticks
- 2 tablespoons jerk seasoning
- 1 onion, diced
- 3 cloves garlic, minced
- 1 scotch bonnet or habanero pepper, seeded and diced
- 1 tablespoon brown sugar
- 2 tablespoons soy sauce
- 1 tablespoon lime juice
- 1 teaspoon thyme
- Salt and black pepper to taste
Instructions:
In a large bowl, combine the jerk seasoning, onion, garlic, scotch bonnet pepper, brown sugar, soy sauce, lime juice, and thyme. Add the chicken and toss to coat evenly. Cover and marinate in the refrigerator for at least 30 minutes, or up to 24 hours for maximum flavor.
Preheat your grill or oven to 375°F (190°C). If grilling, arrange the chicken on the grates and cook for 20-25 minutes per side, or until the internal temperature reaches 165°F (75°C). If baking, place the chicken in a baking dish and roast for 35-40 minutes, turning halfway, until fully cooked.
When cooking jerk chicken, it's crucial to keep a close eye on the heat level. The scotch bonnet or habanero pepper adds a fiery kick, so adjust the amount to suit your spice tolerance.
Serve the jerk chicken with your choice of sides, such as rice and peas, plantains, or a refreshing Caribbean slaw, to balance the heat and complete the authentic Jamaican experience.
Cooking Steps
First, you'll want to marinate the chicken in a blend of spices overnight.
Then, grill the chicken over pimento wood to get that authentic Jamaican flavor.
Don't forget to baste the chicken with pimento oil as it cooks.
Serve the jerk chicken with a side of fragrant rice and peas, and garnish with freshly chopped scallions for a vibrant finishing touch.
Step 1. Marinate Chicken in Spices Overnight
After you've gathered all the necessary ingredients, it's time to prepare the jerk marinade. In a large bowl, combine the allspice, thyme, garlic, brown sugar, and a generous pinch of salt. Give it a good stir to blend the flavors.
Next, add the soy sauce, lime juice, and a few tablespoons of water. Whisk everything together until the marinade is smooth and well-incorporated.
Now it's time for the star of the show – the chicken! Place the chicken pieces in the bowl and use your hands to massage the marinade all over the meat. Make sure every nook and cranny is coated.
Once the chicken is fully covered, cover the bowl with plastic wrap and pop it in the fridge. Let the chicken marinate for at least 8 hours, or even better, overnight. This allows the flavors to really sink in and infuse the chicken with that signature Jamaican jerk taste.
Step 2. Grill Chicken Over Pimento Wood
Once the chicken has marinated to perfection, it's time to bring that authentic Jamaican flavor to life on the grill. You'll need some pimento wood, which is also known as allspice wood. This wood is the secret ingredient that gives jerk chicken its signature smoky aroma and taste.
Carefully place the marinated chicken pieces directly over the pimento wood coals, allowing the smoke to infuse the meat.
Keep a close eye on the chicken, turning it occasionally to ensure even cooking. The high heat will create a beautiful char on the outside, locking in all those delicious juices. As the chicken sizzles, the pimento wood smoke will waft through the air, filling your senses with the tantalizing scents of the islands.
Once the chicken is cooked through, with an internal temperature of 165°F, remove it from the grill. Get ready to savor the bold, spicy, and smoky flavors that define authentic Jamaican jerk chicken.
Step 3. Baste Chicken With Pimento Oil
As the chicken sizzles over the pimento wood coals, baste it generously with pimento oil. The warm, aromatic oil will soak into the meat, infusing it with the unique flavor of Jamaica's famous allspice.
Dip a brush into the oil and sweep it across the chicken's skin, ensuring every inch is coated. Watch as the oil glistens on the surface, creating a shiny, golden-brown crust.
Don't be shy with the basting – keep reapplying the oil throughout the cooking process. The more you baste, the more intense the pimento flavor will be. The oil's heat will also help caramelize the chicken, adding a delightful crunch to the outside while keeping the interior juicy and tender.
Be mindful not to over-baste, as too much oil can lead to flare-ups. A light, even coating is all you need to achieve the perfect jerk chicken.
With each brushstroke, you're bringing the vibrant tastes of Jamaica right to your plate.
Step 4. Serve Chicken With Rice and Peas
With the jerk chicken perfectly grilled and basted, it's time to round out the meal with a classic Jamaican accompaniment – rice and peas. This simple yet satisfying side dish is the perfect complement to the bold, spicy flavors of the chicken.
First, you'll need to cook the rice. Follow the package instructions, adding in the peas towards the end of the cooking time. The peas will become tender and infuse the rice with their earthy sweetness.
Be sure to fluff the rice with a fork when it's done, allowing the grains to separate and create a light, fluffy texture.
Now, it's time to serve. Scoop the fragrant rice and peas onto a plate, then top it with a generous portion of the juicy, seasoned jerk chicken.
The contrast of the tender meat, the fluffy rice, and the pop of the peas creates a harmonious blend of flavors and textures that will have your taste buds dancing. Savor every bite and let the bold Jamaican flavors transport you to the vibrant streets of the island.
Step 5. Garnish With Chopped Scallions
Finally, give the dish an extra pop of color and freshness by sprinkling chopped scallions over the top.
These green onions add a delightful crunch and a hint of onion flavor that perfectly complements the bold, spicy jerk seasoning. Be generous with the scallions, allowing them to cover the chicken in a vibrant green garnish.
The contrast of the soft, tender chicken and the crisp, fresh scallions creates a delightful texture and flavor combination. Plus, the scallions add a beautiful visual appeal, making the dish look even more appetizing.
Don't be shy – pile on those scallions! Their bright, zesty taste will liven up every bite, adding a refreshing touch to balance the heat of the jerk seasoning.
With the scallions in place, your authentic Jamaican jerk chicken is ready to be savored and enjoyed to the fullest.
Final Thoughts
Jerk chicken's enduring popularity is a testament to its irresistible flavor profile and the cultural significance it holds in Jamaica's vibrant food landscape.
As you've discovered, the unique blend of spices, the slow-cooking method, and the smoky char create a truly unforgettable dining experience. Whether you've savored it straight from a roadside stall or recreated it in your own kitchen, jerk chicken's ability to transport you to the heart of Jamaican culture is undeniable.
As you bid farewell to this delectable journey, remember that the essence of jerk chicken extends far beyond the plate. It's a reflection of the island's resilience, creativity, and deep-rooted culinary traditions.
The next time you indulge in a flavorful bite, let it be a reminder of the vibrant spirit and rich history that make Jamaica such a captivating destination. Embrace the fiery flavors, the lively atmosphere, and the endless possibilities that jerk chicken holds for culinary exploration.
Frequently Asked Questions
What Are the Health Benefits of Eating Jerk Chicken?
Eating jerk chicken can provide you with a healthy dose of protein, which is essential for building and repairing tissues in your body. The spices used in the marinade may also offer anti-inflammatory benefits and boost your metabolism.
How Long Can Jerk Chicken Be Stored After Cooking?
After cooking, jerk chicken can be stored for up to 4 days in the refrigerator or 3 months in the freezer. Make sure to let it cool completely before storing and reheat thoroughly before serving.
Can Jerk Chicken Be Made in a Slow Cooker?
You can absolutely make jerk chicken in a slow cooker. The slow cooking method helps the flavors meld and tenderizes the meat, resulting in a delicious and authentic Jamaican-style dish you can enjoy at home.
What Are the Best Side Dishes to Serve With Jerk Chicken?
When serving jerk chicken, you'll want to pair it with tasty side dishes that complement the bold, spicy flavors. Consider sides like rice and peas, roasted sweet potatoes, coleslaw, and plantains to balance out the heat of the jerk seasoning.
How Spicy Is Authentic Jerk Chicken Compared to Other Cuisines?
Authentic jerk chicken is quite spicy, even more so than many other cuisines. You'll likely find it to be hotter than typical Mexican or Indian dishes, with a bold, complex blend of spices that pack a punch.
Street Food Around the World
Gelato vs. Ice Cream: Italy’s Frozen Treat Revolution
Forgo the typical ice cream and dive into the creamy, dense world of gelato – Italy’s frozen treat revolution that’s about to transport you to a realm of cool bliss.
Gelato and ice cream may seem similar, but they're a frozen treat revolution in Italy! Gelato has a creamy, dense texture and bold flavors, while ice cream is light and fluffy. Gelato's got less fat and sugar, but both are made with milk, cream, and sugar. The key difference is in how they're churned – gelato's churned slower to keep it dense. Sounds delicious, right? Whether you prefer the rich and indulgent taste of gelato or the classic creamy goodness of ice cream, there's a frozen delight waiting to transport you to a realm of cool bliss. To learn more about the fascinating history and cultural significance of these frozen treats, keep reading!
Key Takeaways
- Gelato originated in 16th century Italy, while ice cream's history dates back to ancient Asian civilizations and was later introduced to Europe in the 17th century.
- Gelato has a higher milk-to-cream ratio, resulting in a denser texture and more intense flavor, while ice cream has a higher sugar content and lighter, fluffier texture.
- The preparation methods differ, with gelato being churned slower to incorporate less air, and ice cream being churned faster to achieve a lighter texture.
- Gelato typically contains less fat than ice cream, influencing consumer choices based on nutritional awareness and preferences.
- The competition between gelato and ice cream continues to grow in the dessert market, reflecting evolving consumer preferences and the rise in popularity of artisan gelato shops worldwide.
History
Although gelato and ice cream have long been enjoyed around the world, their histories diverge significantly.
Gelato's origins can be traced back to 16th century Italy, where Florentine architect Bernardo Buontalenti is credited with creating the first true gelato recipe. He served his frozen dessert to the powerful Medici family, who were instantly captivated by its rich, creamy texture.
Meanwhile, ice cream's history can be traced to ancient civilizations in Asia, where they used snow and ice to create frozen treats. It wasn't until the 17th century that ice cream made its way to Europe, where it quickly became a beloved delicacy among the aristocracy.
As time passed, both gelato and ice cream evolved, with each region developing its own unique styles and flavors.
Today, these frozen treats continue to delight taste buds around the globe, each with its own distinct heritage and cultural significance.
Recipe
Gelato and ice cream are both frozen dairy desserts, but they differ in their ingredients, preparation, and texture. Gelato typically has a higher proportion of milk to cream compared to ice cream, resulting in a denser and silkier texture. Additionally, gelato often contains less fat and air than ice cream, making it richer and more intense in flavor.
The process of making gelato also differs from that of ice cream. Gelato is typically churned at a slower speed, which incorporates less air and results in a dense, creamy texture. Ice cream, on the other hand, is churned at a higher speed, incorporating more air and resulting in a lighter, fluffier texture.
Ingredients:
- 2 cups whole milk
- 1 cup heavy cream
- 3/4 cup granulated sugar
- 1 teaspoon vanilla extract
Instructions:
In a medium saucepan, combine the milk, cream, and sugar. Heat the mixture over medium heat, stirring frequently, until the sugar has dissolved and the mixture is hot but not boiling.
Remove the pan from the heat and stir in the vanilla extract. Allow the mixture to cool to room temperature, then cover and refrigerate for at least 2 hours, or until completely chilled.
Once chilled, pour the mixture into an ice cream maker and churn according to the manufacturer's instructions, usually for 20-30 minutes. Transfer the gelato to a freezer-safe container and freeze for at least 2 hours before serving.
Tips:
For a richer, creamier gelato, you can use an additional 1/2 cup of heavy cream and reduce the milk by 1/2 cup. You can also experiment with adding different flavors, such as chocolate, coffee, or fruit purees, to the base recipe.
When serving, let the gelato sit at room temperature for a few minutes to soften slightly before scooping for the best texture.
Cooking Steps
Now it's time to start churning that frozen dairy mixture!
Slowly add in the cream and fold in the flavorful ingredients.
Step 1. Churn the Frozen Dairy Mixture
Once the ice cream or gelato base has been prepared, it's time to churn the frozen dairy mixture. This is a crucial step in the process, as churning introduces air into the mixture, creating that luscious, creamy texture we all love.
You'll want to use an ice cream maker for this part. As the machine spins, it will gradually freeze the base while simultaneously whipping air into it. This whipping action incorporates tiny air pockets, which give ice cream and gelato their soft, smooth consistency.
The churning usually takes around 20-30 minutes, depending on your machine. You'll know it's done when the mixture has increased in volume and reached a soft, creamy texture.
Once it's reached the desired consistency, you can stop the machine and transfer the frozen dairy treat to a container for further freezing.
Step 2. Add Cream Slowly
After churning the frozen dairy mixture, you'll want to add the cream slowly. This is a crucial step that helps create the signature silky-smooth texture of gelato. Unlike ice cream, gelato has a higher ratio of milk to cream, which gives it a denser, richer flavor.
As you gently pour in the cream, be sure to incorporate it thoroughly into the mixture. Stir with a wooden spoon or spatula, taking care not to overwork the ingredients. The slow addition of cream helps the gelato develop its luxurious mouthfeel.
Once the cream is fully incorporated, you can continue the freezing process. This gradual approach ensures the gelato maintains its creamy consistency, without becoming overly dense or icy.
The result is a luscious, intensely flavorful frozen treat that melts deliciously on your tongue. With patience and care, you're well on your way to creating an authentic Italian-style gelato.
Step 3. Fold in the Flavoring Ingredients
Next, you'll want to fold in any flavoring ingredients. This is the fun part where you get to add delicious extras to your gelato or ice cream.
Carefully mix in your chosen ingredients, like chocolate chips, nuts, fruit purees, or extracts. You'll need to gently fold them in to avoid over-mixing and deflating the airy texture you've worked so hard to achieve.
Take your time and be gentle, folding the mixture with a spatula in a figure-eight motion. This helps incorporate the flavors without causing the air bubbles to collapse.
Once the mix-ins are evenly distributed, your gelato or ice cream is ready for the freezer. The flavors will continue to develop as it firms up.
Just be sure not to overfill your container, as the mixture will expand during freezing. Now you can dive in and enjoy your homemade frozen treat!
Step 4. Flavor With Desired Ingredients
Fold in your desired ingredients with a gentle touch to avoid deflating the airy texture you've worked so hard to create.
Whether you're craving a classic vanilla or a daring chocolate-raspberry swirl, the flavors are entirely up to you. Gently fold in your extracts, purees, or crushed nuts until they're evenly dispersed. Be careful not to overmix, as that can lead to an icy, dense texture.
Once your base is perfectly flavored, it's time to freeze. Pour the gelato mixture into your prepared container and place it in the freezer. Stir the mixture every 30 minutes as it freezes to incorporate air and prevent ice crystals from forming. This step is crucial for achieving that signature smooth, creamy texture.
Keep a close eye on the gelato as it freezes, tasting it periodically to ensure the flavor is just right.
When it reaches your desired consistency, transfer the gelato to an airtight container and enjoy your homemade frozen delight!
Step 5. Freeze Until Desired Consistency
Once your base is perfectly flavored, it's time to freeze. Gelato and ice cream start the same way – with a creamy, custard-like mixture.
But the freezing process is where they really differ. Gelato is churned at a slower speed, incorporating less air, resulting in a denser, silkier texture. On the other hand, ice cream is churned faster, whipping in more air, making it fluffier and lighter.
During freezing, the mixture is constantly stirred to prevent large ice crystals from forming. This gentle churning keeps the texture smooth and creamy.
As the temperature drops, the mixture thickens and transforms into the luscious, frozen treat you know and love. The slower churning of gelato results in a dense, intense flavor, while the quicker churning of ice cream produces a light, airy texture.
Just a few minutes of patience, and your frozen delight is ready to enjoy!
Final Thoughts
In the end, the choice between gelato and ice cream ultimately comes down to personal preference.
Both are delightful frozen treats, but with distinct characteristics that may appeal to different tastes. Gelato is typically richer, denser, and more intensely flavored, while ice cream is lighter and creamier. The key difference lies in the preparation process, as gelato uses less fat and air, resulting in a more concentrated flavor.
Whether you prefer the luxurious mouthfeel of gelato or the classic, indulgent taste of ice cream, there's no wrong answer.
The beauty of these frozen delights is that they can both bring joy and satisfaction, transporting you to a world of cool, creamy bliss.
Frequently Asked Questions
What Is the Difference Between Gelato and Ice Cream in Texture?
You'll notice that gelato has a smoother, silkier texture than ice cream. It's denser and less airy, with less fat and air incorporated into the mixture, creating a richer, more intense flavor.
How Do the Flavors of Gelato and Ice Cream Differ?
You'll find that gelato typically has a more intense and concentrated flavor compared to ice cream. While ice cream can have a richer, creamier taste, gelato often showcases bold, vibrant flavors that truly pop.
Is Gelato a Healthier Option Compared to Ice Cream?
Yes, gelato can be a healthier option compared to ice cream. It typically contains less fat, fewer calories, and often uses natural ingredients. However, both treats should be enjoyed in moderation as part of a balanced diet.
How Does the Serving Size of Gelato Differ From Ice Cream?
You'll typically find that a serving of gelato is smaller than a serving of ice cream. Gelato tends to be denser and richer, so a little goes a long way compared to the lighter, airier consistency of ice cream.
What Are the Popular Gelato Flavors in Italy?
You'll find classic Italian gelato flavors like creamy vanilla, rich chocolate, and fruity favorites like stracciatella, pistachio, and lemon throughout Italy. Artisanal shops often offer unique and seasonal options to tempt your taste buds.
Street Food Around the World
Exploring the Vibrant World of Mexican Tacos Al Pastor
Wandering the vibrant streets of Mexico, uncover the captivating story and mouthwatering flavors of the beloved taco al pastor, a fusion of Middle Eastern and Mexican culinary traditions.
Get ready to embark on a mouthwatering adventure through the vibrant world of Mexican tacos al pastor! These divine creations are a delightful fusion of Middle Eastern and Mexican culinary traditions, with tender, marinated pork, sweet pineapple, and zesty toppings coming together in every bite. You'll be captivated by the story behind this beloved street food and how it's prepared with care, using a unique vertical spit cooking method that infuses the meat with irresistible flavors. Discover the rich cultural significance and the steps to recreate this taste sensation in your own kitchen. Prepare to be swept away by the incredible depth of flavor in these tacos al pastor!
Key Takeaways
Key Points:
- Tacos al pastor originated from Lebanese immigrants in Mexico, blending Middle Eastern and Mexican culinary traditions to create a unique flavor profile.
- The dish features marinated pork, grilled on a vertical spit, combined with sweet pineapple, fresh cilantro, and onions for a savory and refreshing experience.
- The slow-roasting cooking technique on the vertical spit ensures even heat distribution and moisture retention, resulting in tender and flavorful pork.
- The marinade, made with achiote paste, guajillo chiles, garlic, and spices, infuses the pork with a complex blend of earthy, spicy, and savory notes.
- Tacos al pastor are deeply rooted in Mexican culture, often enjoyed during celebrations and social gatherings, representing the diverse heritage of Mexican gastronomy.
History
The origins of tacos al pastor can be traced back to Lebanese immigrants who settled in Mexico in the late 19th century. These immigrants brought with them a technique for cooking meat on a vertical spit, known as shawarma.
Mexican cooks adapted this method, using pork instead of lamb, and adding a blend of spices and pineapple to create the unique flavor profile of tacos al pastor.
As the dish gained popularity, street vendors and taqueria owners began perfecting their own versions, experimenting with different marinades and toppings.
Today, tacos al pastor are a beloved staple across Mexico, with each region and even individual establishments putting their own spin on the classic recipe.
The combination of tender, flavorful pork, tangy pineapple, and fresh toppings like onions, cilantro, and lime makes tacos al pastor a true culinary delight that has captured the hearts and taste buds of both locals and visitors alike.
Recipe
Tacos al pastor, a beloved Mexican street food, are a fusion of Middle Eastern and Mexican flavors. The dish originated in central Mexico, where Lebanese immigrants introduced the concept of spit-roasted meat. Over time, the recipe was adapted to use pork and incorporate traditional Mexican spices and ingredients.
At the heart of tacos al pastor are thin slices of marinated pork that are stacked on a vertical spit and slowly cooked, allowing the fat to render and the meat to caramelize. The pork is then shaved off the spit, chopped, and served in warm tortillas, often topped with diced pineapple, onion, and cilantro.
- 2 lbs boneless pork shoulder, cut into thin strips
- 1 pineapple, peeled, cored, and cut into rings
- 1 white onion, diced
- 1 bunch of cilantro, chopped
- 12-16 small corn tortillas
- Marinade:
- 4 guajillo chiles, seeded and stems removed
- 4 achiote (annatto) seeds
- 4 garlic cloves
- 1 tbsp ground cumin
- 1 tsp dried oregano
- 1 tsp black pepper
- 1/4 cup pineapple juice
- 2 tbsp apple cider vinegar
- 1 tbsp olive oil
- 1 tsp salt
Begin by making the marinade. In a blender, puree the guajillo chiles, achiote seeds, garlic, cumin, oregano, black pepper, pineapple juice, vinegar, and olive oil until smooth. Add salt and mix well.
Place the pork strips in a large resealable bag or bowl, pour the marinade over the pork, and marinate for at least 2 hours, or up to 24 hours in the refrigerator.
When ready to cook, preheat a grill or grill pan to medium-high heat. Grill the pineapple rings until lightly charred on both sides, about 3-4 minutes per side. Remove from heat and dice the pineapple.
Grill the marinated pork in batches until cooked through and slightly charred, about 5-7 minutes per batch. Chop the grilled pork into small pieces.
To serve, warm the tortillas and top with the chopped pork, diced pineapple, onion, and cilantro. Enjoy these authentic and flavorful tacos al pastor.
Cooking Steps
First, you'll marinate the pork in a blend of spices overnight to infuse it with bold flavor.
Next, stack the pork slices vertically on a spit, then carefully slice the meat into thin strips.
Lastly, slowly cook the meat on the vertical spit, topping it off with fresh pineapple and fragrant cilantro.
Step 1. Marinate Pork With Spices Overnight
To begin, marinate the pork in the spice mixture overnight.
You'll need a large resealable bag or a shallow dish. In the bag or dish, combine the pork, achiote paste, garlic, oregano, cumin, cloves, cinnamon, and a pinch of salt and pepper.
Seal the bag or cover the dish, then pop it in the fridge for at least 6 hours, or up to 24 hours.
The longer the pork marinates, the more flavorful it'll be. The spices will infuse the meat, giving it that classic al pastor taste.
Just make sure to give the bag or dish a gentle shake or stir occasionally, so the pork absorbs all the tasty seasonings.
When you're ready to cook, remove the marinated pork from the fridge.
It's now bursting with Mexican flavors, ready to be grilled or roasted to perfection.
Get excited – the tacos are just a few steps away!
Step 2. Stack Pork Slices Vertically
With the pork marinated and ready to go, it's time to stack the slices vertically. You'll need a vertical spit or rotisserie to create the authentic al pastor look and flavor.
Carefully arrange the pork slices, stacking them one on top of the other, making sure to pack them tightly together. This vertical stack will allow the meat to cook evenly and develop that signature cone-like shape.
As the pork cooks, the fat will render and drip down, basting the layers below. This self-basting process infuses the meat with irresistible flavors.
Don't forget to add the pineapple wedges to the top of the stack – they'll caramelize and add a delightful sweetness that complements the savory pork.
With the pork sizzling away, you'll soon have an impressive, towering creation that's ready to be sliced into those perfect little al pastor tacos.
Get ready for the mouthwatering aroma to fill your kitchen!
Step 3. Slice Pork Into Thin Strips
After the pork has roasted to perfection on the vertical spit, it's time to start slicing it into the thin strips that are characteristic of al pastor tacos.
Use a sharp knife to carefully slice the pork into long, thin strips. You'll want to slice it against the grain, which means cutting perpendicular to the muscle fibers. This will create tender, juicy strips that are perfect for your tacos.
As you slice, pay close attention to the thickness – you're aiming for pieces that are just a few millimeters wide. This will ensure that the pork cooks quickly and absorbs all the wonderful flavors from the marinade.
Once you've sliced the entire slab of pork, you can transfer the strips to a clean bowl or platter, ready to be added to your tacos.
Get excited, because these flavorful pork strips are going to take your al pastor tacos to the next level!
Step 4. Slowly Cook Meat on Vertical Spit
Carefully lower the prepared pork slab onto the vertical spit. This unique cooking method is what makes tacos al pastor so special. As the spit slowly rotates, the meat cooks evenly, developing a crispy outer layer and juicy interior. The process takes time, but the results are worth it.
Keep a close eye as the pork sizzles and caramelizes. Occasionally, use a long fork to gently baste the meat with the flavorful drippings. This bastes the pork, ensuring it stays moist and infuses the meat with the blend of seasonings.
As the hours pass, the exterior takes on a deep reddish-brown hue, signaling the pork is ready.
Using a sharp carving knife, carefully shave thin slices directly off the rotating spit. The tender pork is now perfectly cooked and bursting with the signature flavors of tacos al pastor.
Step 5. Garnish With Pineapple and Cilantro
Top the warm taco filling with fresh pineapple chunks. Their sweet, juicy flavor pairs perfectly with the savory meat and spices. Gently press the pineapple pieces into the filling, allowing them to soak up all the delicious flavors.
Next, sprinkle on a generous amount of chopped cilantro. Its bright, herbal notes cut through the richness of the dish, creating a wonderful balance of tastes.
The pineapple and cilantro garnish doesn't just look amazing – it also adds a fantastic textural element. The soft, tender pineapple contrasts with the crisp taco shell, while the fresh cilantro leaves provide a satisfying crunch in every bite.
Be sure to top each taco with a good amount of the garnishes. The pineapple and cilantro should be an integral part of the dish, not just an afterthought.
Take a moment to admire the vibrant colors and mouthwatering aromas before taking your first delicious bite.
Final Thoughts
Ultimately, tacos al pastor are a beloved Mexican dish that encapsulate the vibrant flavors and rich cultural heritage of the region. The combination of tender, marinated pork, fragrant spices, and the sweet touch of pineapple creates a harmonious blend that tantalizes the taste buds.
What truly sets these tacos apart is the unique cooking method, where the meat is slow-roasted on a vertical spit, known as a trompo, allowing the flavors to meld together in a mesmerizing dance.
As you savor each bite, you're transported to the lively streets of Mexico, where the sizzle of the trompo and the laughter of the locals create a sense of community and culinary tradition.
Tacos al pastor aren't just a meal; they're a cultural experience, a testament to the ingenuity and passion of Mexican cuisine. Whether you're enjoying them on a bustling city street or in the comfort of your own home, these tacos will undoubtedly leave a lasting impression, inviting you to explore the vibrant world of Mexican gastronomy time and time again.
Frequently Asked Questions
What Is the Significance of the Pineapple in Tacos Al Pastor?
The pineapple in tacos al pastor adds a sweet and tangy contrast to the savory marinated pork. It's an essential element, providing a delightful balance of flavors that makes this Mexican dish so mouthwatering and unique.
Can Vegetarians Enjoy Tacos Al Pastor?
As a vegetarian, you can't traditionally enjoy tacos al pastor since they're made with marinated pork. However, you can find veggie-friendly versions that substitute the pork with soy, mushrooms, or other plant-based proteins to satisfy your taco cravings.
How Do I Find the Best Tacos Al Pastor in Mexico City?
To find the best tacos al pastor in Mexico City, ask locals for recommendations, look for places with a spit of marinated pork, and be open to trying different spots until you discover your favorite.
Can I Make Tacos Al Pastor at Home Without a Rotisserie?
You can definitely make tasty tacos al pastor at home without a rotisserie. Use thin pork slices, marinate them in a flavorful achiote-based sauce, and pan-fry or broil the meat. Get creative with toppings for an authentic homemade taco experience.
What Drinks Pair Well With Tacos Al Pastor?
You can't go wrong with a cold beer or a refreshing margarita when enjoying tacos al pastor. The sweetness and spiciness of the dish pairs perfectly with the acidity and bite of these classic Mexican drinks.
-
Brazilian Cuisine3 months ago
Tacacá
-
Brazilian Cuisine3 months ago
Caldeirada
-
Polish Comfort Food3 months ago
Krupnik (Barley Soup)
-
Brazilian Cuisine3 months ago
Chicken in Brown Sauce
-
Southern Comfort Food3 months ago
Cheese Straws
-
African Cuisine3 months ago
Kedjenou (Ivory Coast)
-
Polish Comfort Food3 months ago
Vegetable Salad
-
American Diner Classics3 months ago
The Maillard Reaction: Understanding the Chemistry of Browning {Food Science and Cooking}