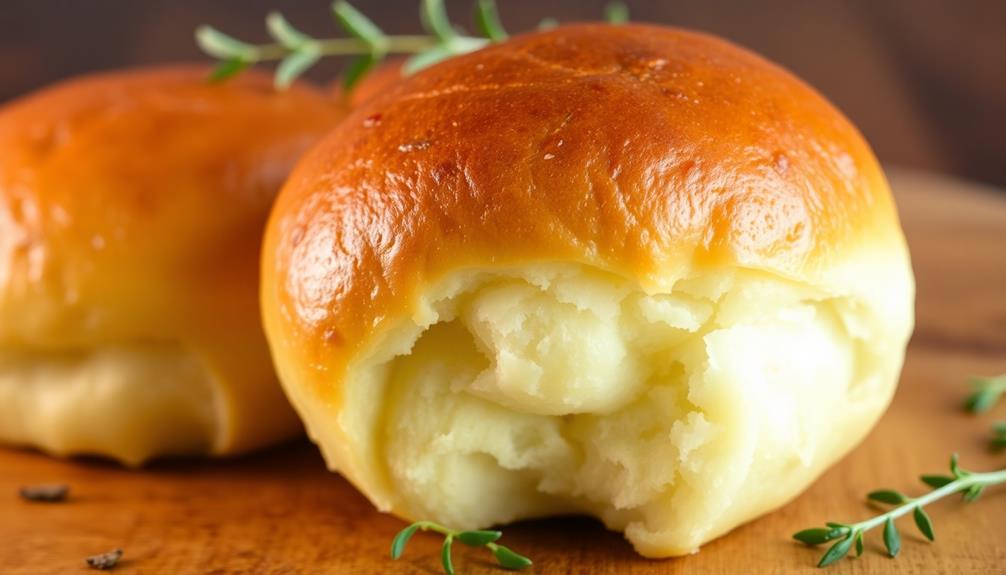

As a beloved Boston tradition dating back to the 1800s, Parker House rolls are a must-try for home bakers. These buttery, pillowy soft dinner rolls originated at the iconic Parker House Hotel, becoming a symbol of the city's rich culinary heritage. To make them, you'll need just a few simple ingredients like yeast, milk, and butter. The key is properly kneading and shaping the dough to achieve that signature tender texture. Bake them to golden brown perfection, then serve warm for a comforting, nostalgic experience – they're perfect for elevating any meal, from casual dinners to festive gatherings. Keep reading to uncover the full recipe and mastering tips.
Key Takeaways
- Parker House Rolls are a classic American bread originating from the historic Parker House Hotel in Boston, Massachusetts, dating back to the 19th century.
- The rolls are known for their buttery, pillowy texture and subtle sweetness, making them a versatile option for various dining occasions.
- The baking process involves essential techniques like kneading the dough, proofing, and shaping the rolls to achieve the desired soft and golden-brown appearance.
- Mastering the Parker House Rolls technique can enhance one's overall baking skills and allow for experimentation with different flavors.
- These rolls are widely enjoyed, whether served with soups, stews, salads, or as a standalone accompaniment, offering a comforting and nostalgic dining experience.
History
The Parker House Roll, a beloved staple of New England cuisine, traces its origins to the historic Parker House hotel in Boston, Massachusetts. Opened in 1855, this esteemed establishment was known for its exceptional hospitality and culinary innovations.
It was here, in the hotel's kitchens, that the iconic Parker House Roll was first conceived. Legend has it that the recipe was the creation of a resourceful baker who sought to utilize the leftover dough from the hotel's bread production. The result was a soft, buttery roll with a distinctive crease down the center, a nod to the baker's clever folding technique.
The Parker House Roll quickly gained popularity, becoming a fixture on the hotel's menus and a sought-after delicacy throughout the region. Its enduring appeal has earned it a place in the annals of American baking history, solidifying its status as a beloved symbol of Boston's rich culinary heritage.
Recipe
Parker House Rolls
Parker House rolls are a classic American dinner roll that originated in the Parker House Hotel in Boston, Massachusetts. These soft, buttery rolls are known for their signature crescent shape and tender, flaky texture.
To make these delightful rolls, you'll need a few simple ingredients and a bit of time to allow the dough to rise. The result is a warm, comforting bread that pairs perfectly with any meal.
Ingredients:
- 2 1/4 teaspoons active dry yeast
- 1/4 cup warm water (100-110°F)
- 1 cup milk
- 1/4 cup granulated sugar
- 1/4 cup unsalted butter, softened
- 1 teaspoon salt
- 4 1/2 cups all-purpose flour, plus more for dusting
Instructions:
In a small bowl, combine the warm water and yeast. Let sit for 5-10 minutes until foamy.
In a saucepan, heat the milk over medium heat until it reaches 100-110°F. Remove from heat and stir in the sugar, butter, and salt until the butter is melted and the sugar is dissolved.
Let the milk mixture cool to 100-110°F. In a large bowl, combine the yeast mixture, milk mixture, and 3 cups of the flour.
Knead the dough, adding the remaining 1 1/2 cups of flour as needed, until it becomes smooth and elastic, about 5-7 minutes.
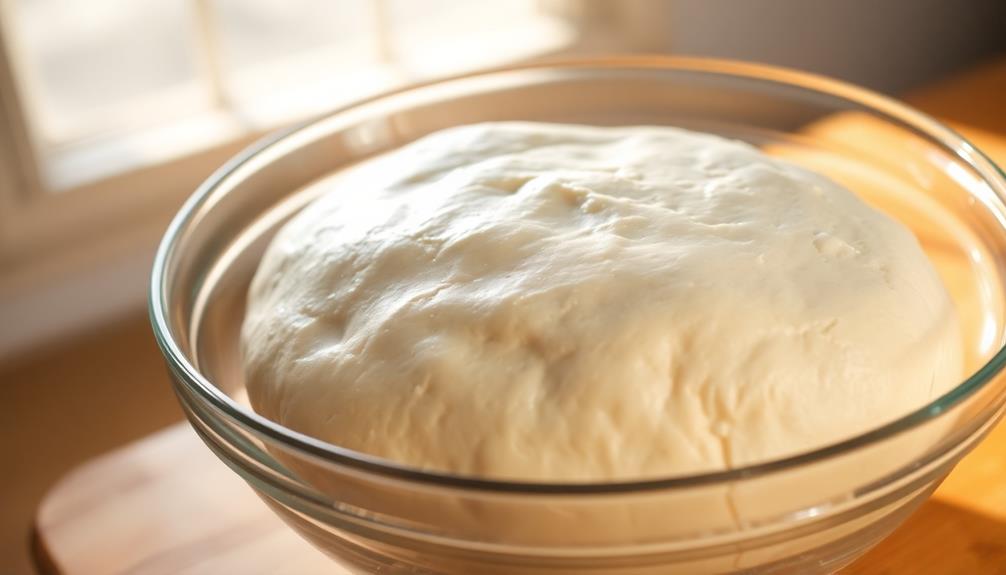
Place the dough in a lightly greased bowl, cover, and let rise for 1 hour or until doubled in size.
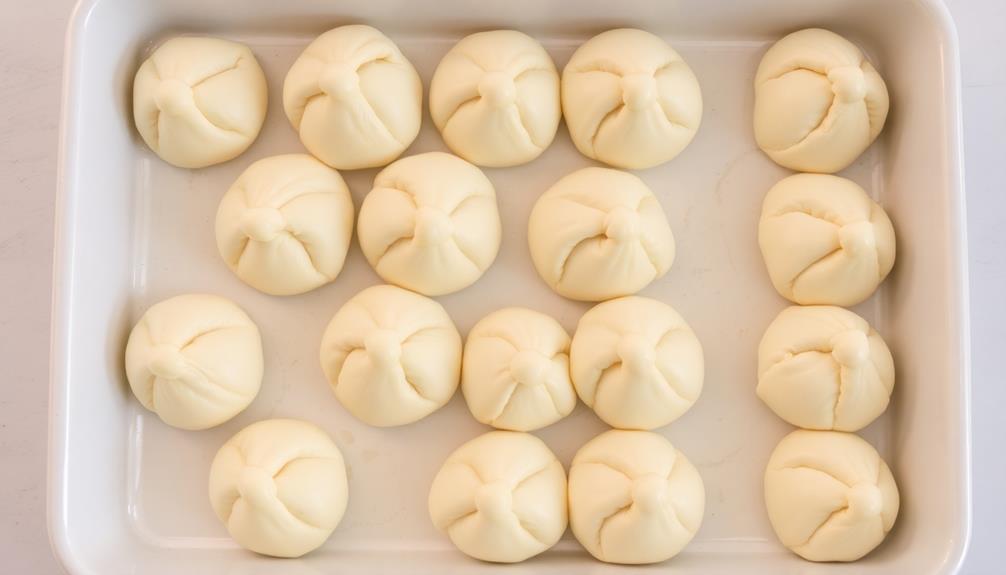
Punch down the dough and divide it into 12 equal pieces. Roll each piece into a ball and place them in a greased 9×13 inch baking dish.
Cover and let rise for 30 minutes. Preheat the oven to 400°F.
Bake the rolls for 15-18 minutes, or until golden brown. Serve hot with butter.
To ensure your Parker House rolls turn out perfectly, be sure to use warm (not hot) water and milk to activate the yeast.
Additionally, be careful not to over-knead the dough, as this can result in tough, dense rolls. Enjoy these classic, buttery rolls with your favorite meals or as a tasty snack.
Cooking Steps
To begin, you'll want to knead the dough thoroughly until it's smooth and elastic.
After that, cover the dough and let it rise until it's doubled in size.
Once it's risen, punch down the dough to release any air pockets, then divide it into equal portions and shape them into rolls.
Step 1. Knead the Dough Thoroughly

After the dough has risen, it's time to knead it thoroughly. This step is crucial for developing the gluten structure, which gives the rolls their soft, pillowy texture.
Begin by turning the dough out onto a lightly floured surface. Using the heel of your hand, push the dough away from you, then fold it back toward you. Repeat this motion, rotating the dough as you go, for about 5-7 minutes.
As you knead, you'll notice the dough become smoother, more elastic, and less sticky. This is a good sign that the gluten is forming properly. Be sure to knead with confidence, applying steady pressure to really work the dough. If it starts to feel too sticky, you can add a light dusting of flour to your hands and the surface.
Once the dough passes the "window pane test" – where you can stretch a small piece thin enough to see light through it without it tearing – you'll know it's been kneaded thoroughly.
At this point, it's ready for shaping into rolls.
Step 2. Cover and Let Rise
With the dough now thoroughly kneaded, it's time to let it rise.
Place the dough in a large, lightly greased bowl, turning it to coat the entire surface. Cover the bowl with a clean, damp towel or plastic wrap, and set it in a warm, draft-free spot.
The ideal temperature for proofing is between 75-85°F. This allows the yeast to work its magic, producing carbon dioxide that causes the dough to expand and become light and airy.
Depending on the temperature, the first rise can take 1-2 hours, during which the dough should double in size.
Once the dough has risen, gently punch it down to release any trapped air bubbles. This step helps to redistribute the yeast and ensure an even rise in the final product.
At this point, the dough is ready to be shaped into Parker House rolls. Proceed with the next steps to create those light, fluffy dinner rolls.
Step 3. Punch Down Risen Dough

Once the dough has doubled in size, gently punch it down to release any trapped air bubbles. This step is crucial, as it helps to redistribute the yeast and prevents the dough from over-rising and becoming dense or dry.
Using your fist, slowly push down on the center of the dough, working your way outwards. This will expel excess carbon dioxide and create a smooth, uniform texture.
After punching down the dough, gather it into a ball and place it back in the bowl. Cover it once more and allow it to rise for an additional 30-45 minutes. This second rise will further develop the dough's flavor and structure, ensuring your Parker House rolls have a soft, pillowy texture.
When the dough has finished its second rise, it's time to shape the rolls. Divide the dough into equal pieces, roll them into balls, and arrange them in a greased baking pan.
Cover and let them rise for one final time before baking to perfection.
Step 4. Divide Dough Into Equal Portions
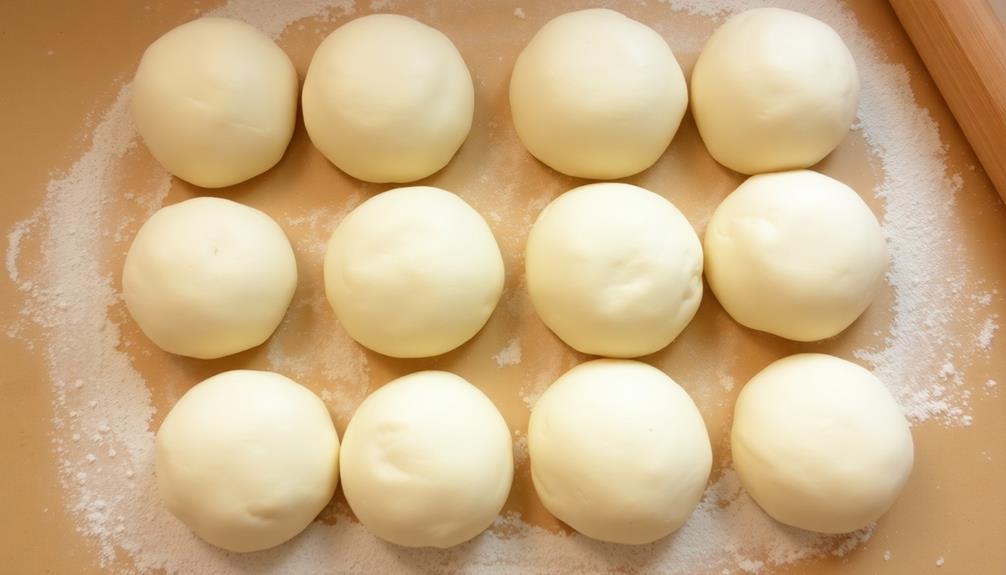
Having completed the second rise, divide the dough into equal portions to begin shaping the Parker House rolls. Gently punch down the dough to release any remaining air pockets.
Lightly flour your work surface and turn the dough out onto it. Using a sharp knife or a dough scraper, divide the dough into 12 equal pieces. Aim for each portion to weigh approximately 2 to 2 1/2 ounces. This will ensure your rolls bake evenly and have a consistent size and shape.
To divide the dough, first cut it in half, then cut each half in half, and continue halving the pieces until you have 12 equal portions.
Roll each piece of dough into a smooth, round ball. Place the portions on a parchment-lined baking sheet, spacing them about 2 inches apart. This will allow the rolls to rise and bake without touching each other.
With the dough now divided, you're ready to begin shaping the Parker House rolls.
Step 5. Shape Into Rolls
To shape the Parker House rolls, gently roll each portion of dough into a smooth, round ball. Place the balls, evenly spaced, on a parchment-lined baking sheet. Using the palm of your hand, lightly press down on each ball to flatten it slightly.
Then, with a sharp knife or bench scraper, cut each flattened ball in half, creating a crescent shape. Carefully fold each crescent in half, pressing gently to adhere the layers. Arrange the shaped rolls on the baking sheet, allowing enough space between them for expansion during baking.
Cover the rolls with a clean kitchen towel or plastic wrap and let them rise for 30 minutes to 1 hour, or until they've puffed up and are nearly doubled in size.
Preheat your oven to 375°F (190°C). Bake the rolls for 15 to 20 minutes, or until they're golden brown on top. Serve the fluffy, buttery Parker House rolls warm, with your favorite accompaniments.
Final Thoughts
Parker House rolls are a classic bread that deserve a place in any home baker's repertoire. These buttery, pillowy rolls are a delight to make and an absolute pleasure to enjoy. With their signature softness, subtle sweetness, and golden-brown tops, they exemplify the art of traditional baking.
While the shaping process may seem daunting at first, the end result is well worth the effort. Once you've mastered the technique, you'll be able to whip up batch after batch with ease.
These rolls are versatile enough to grace any table, whether it's a holiday feast or a simple family dinner. Fresh out of the oven, the aroma of these soft and fluffy dinner rolls is enough to make anyone’s mouth water. The golden-brown crust gives way to a light and airy interior that practically melts in your mouth. It’s no wonder that these rolls are always the first to disappear from the breadbasket.
Beyond their delectable taste, Parker House rolls hold a special place in culinary history. Their origins can be traced back to the iconic Parker House hotel in Boston, where they were first served in the 19th century.
Frequently Asked Questions
What Is the Difference Between Parker House Rolls and Dinner Rolls?
You'll find that Parker House rolls have a distinct crescent shape and buttery flavor, while dinner rolls are typically more plain and circular in shape. The Parker House roll is a bit more refined and indulgent compared to a basic dinner roll.
Can I Freeze Parker House Rolls for Later Use?
You can definitely freeze Parker House rolls for later use. Just make sure to wrap them tightly and store them in an airtight container. When you're ready to enjoy them, simply thaw and reheat the rolls before serving.
How Long Do Homemade Parker House Rolls Stay Fresh?
Homemade rolls can stay fresh for 3-4 days when stored properly. Keep them in an airtight container at room temperature. You can also freeze them for up to 3 months to enjoy later.
Can I Use Whole Wheat Flour Instead of All-Purpose Flour?
You can absolutely use whole wheat flour instead of all-purpose flour. The resulting rolls may have a slightly denser texture, but the flavor and nutritional profile will be enhanced. Just adjust the amount of liquid to achieve the desired consistency.
How Can I Make Parker House Rolls Gluten-Free?
To make these rolls gluten-free, you'll need to replace the all-purpose flour with a gluten-free flour blend. You can also use almond or coconut flour, but you may need to adjust the other ingredients as well. Experiment to find the right balance.