
To make perfect turkey gravy from pan drippings, start by skimming excess fat while keeping enough for flavor. Season gradually with salt, pepper, garlic, or herbs like thyme and rosemary, tasting as you go. Create a slurry with flour or cornstarch to thicken, whisking smoothly into simmering drippings until you reach your desired consistency. Aim for a glossy, smooth finish by stirring well. If you want to master the technique, keep exploring these essential tips for rich, flavorful gravy.
Key Takeaways
- Skim excess fat from pan drippings, leaving enough for flavor, then deglaze with broth or wine to loosen browned bits.
- Season the drippings with salt, pepper, and herbs like thyme or rosemary, tasting and adjusting gradually.
- Create a slurry with flour or cornstarch and cold water or broth, then whisk into hot drippings to thicken.
- Simmer the gravy until smooth, glossy, and flavorful, adjusting thickness with additional broth if needed.
- Strain the gravy for a silky texture, then serve hot, reheating gently if prepared in advance.

After roasting your turkey, the flavorful pan drippings are the perfect foundation for a rich, homemade gravy. To make the most of these drippings, you want to start with good seasoning tips. First, skim off excess fat from the pan, but leave enough for flavor. Seasoning your gravy is about balancing salt, pepper, and additional herbs or spices. A pinch of thyme or rosemary can enhance the earthy richness, while a splash of garlic or onion powder adds depth. Taste as you go, and remember that the gravy will intensify in flavor as it cooks, so don’t over-season at the start. Consider adding a splash of soy sauce or Worcestershire for umami, but do so sparingly. The key is to layer flavors gradually, tasting often, and adjusting accordingly. Proper technique in developing your gravy can make all the difference in achieving a rich and well-rounded flavor profile.
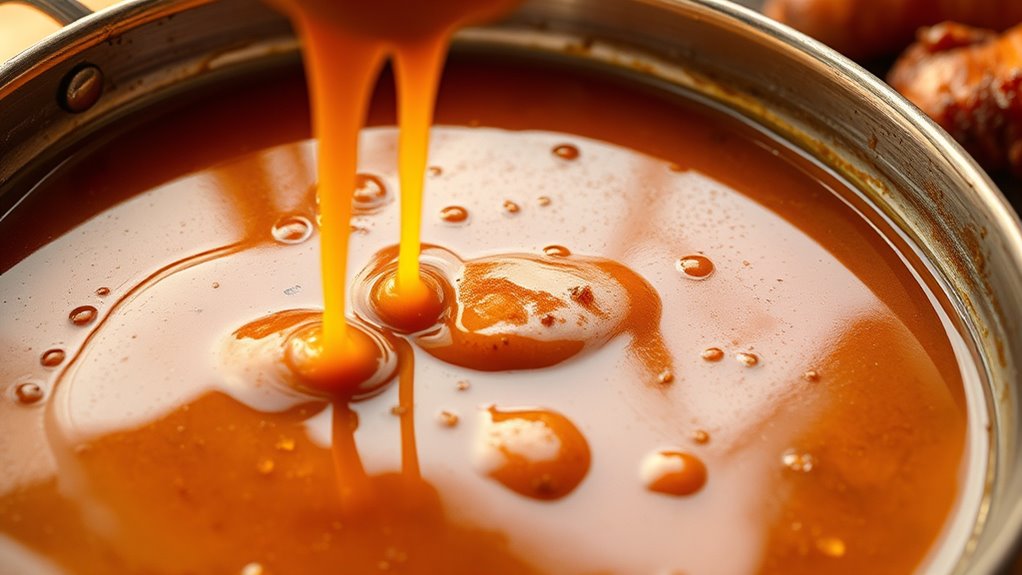
Once you’ve perfected your seasoning, it’s time to thicken the gravy. Typically, you’ll create a slurry with flour or cornstarch, mixing it with cold water or broth before whisking it into the hot drippings. Stir constantly to prevent lumps, and cook until the gravy thickens to your desired consistency. If it gets too thick, just whisk in a bit more broth or water to loosen it up. Conversely, if it’s too thin, continue simmering or add a bit more thickener. Remember, the gravy’s flavor should be rich and well-developed, so give it time to simmer and meld. Using the correct thickening agents ensures a smooth, glossy finish that complements the savory drippings beautifully.
When you’re finished, proper gravy storage is essential. If you’re not serving it immediately, transfer the gravy to an airtight container and store it in the refrigerator. It will stay good for up to 2-3 days. To reheat, do so gently on the stove over low heat, stirring frequently to prevent sticking or burning. If the gravy thickens upon cooling, stir in a splash of broth or water to restore its smooth texture. Avoid storing the gravy at room temperature, as bacteria can develop quickly, especially because of the dairy or flour content. For longer storage, you can freeze the gravy in portions—just be aware that reheating may cause some texture changes, but a quick whisk can help restore smoothness. Proper handling and storage practices are crucial to maintaining gravy quality and safety.
Top picks for "perfect turkey gravy"
Open Amazon search results for this keyword.
As an affiliate, we earn on qualifying purchases.
Frequently Asked Questions
Can I Make Gravy Without Turkey Drippings?
Yes, you can make gravy without turkey drippings. Use vegetable broth as a flavorful base, then add a thickening agent like flour or cornstarch to achieve the desired consistency. Whisk the thickening into the hot broth and cook until it thickens up. This method creates a tasty gravy that complements your meal, even without the traditional pan drippings. Adjust seasoning to taste, and enjoy your homemade gravy!
How Do I Prevent Lumps in Gravy?
To prevent lumps in gravy, you should whisk continuously as you add the thickening agent, like flour or cornstarch. Use whisking techniques that keep the mixture smooth, starting with a small amount of liquid to create a slurry before pouring it into the hot gravy. Stir constantly, and avoid adding all the thickener at once. This ensures even distribution and helps you achieve a silky, lump-free gravy every time.
What’s the Best Type of Pan for Gravy?
You should use a heavy-bottomed pan or a sturdy roasting pan for making gravy. A pan with good heat conduction, like stainless steel or cast iron, helps prevent hot spots and lumps. A roasting pan with a wide, shallow design allows you to easily gather drippings and make smooth gravy. Avoid thin or flimsy pans that can scorch or create uneven heat, making it harder to achieve a silky, lump-free gravy.
How Long Can Gravy Be Stored Safely?
You can safely store gravy in the refrigerator for up to 3-4 days. To guarantee it stays fresh, make sure to store it in an airtight container and chill it promptly within two hours of cooking. Refrigeration tips include dividing large portions into smaller containers for quicker cooling. If you want longer storage, consider freezing gravy for up to 3 months, but always reheat thoroughly before serving.
Can I Reheat Gravy Without Losing Quality?
Yes, you can reheat gravy without losing quality by stirring it well and reheating gently. To maintain flavor and consistency, consider adding seasoning variations like herbs or a splash of broth. Use gravy thickening techniques if it becomes too thin, such as simmering until it reaches your desired consistency or whisking in a bit of flour or cornstarch. This guarantees your gravy stays flavorful and smooth, just like the first time.
Conclusion
Now, as you pour that rich, velvety gravy over your perfectly cooked turkey, remember—those pan drippings hold a secret that can elevate your meal to unforgettable heights. Just a little patience and the right touch reveal a depth of flavor that keeps everyone guessing. So, trust the process, and get ready to serve a gravy that will leave your guests asking for your secret. The best part? It’s waiting right there—just beneath the surface.