Connect with us

Mexican Cuisine

Fish a La Veracruzana

Mouthwatering fish fillets simmered in a vibrant tomato-based sauce, this Mexican coastal dish showcases a captivating blend of flavors and textures. Discover the secrets behind this delightful culinary experience.

Published

on

veracruz style fish dish

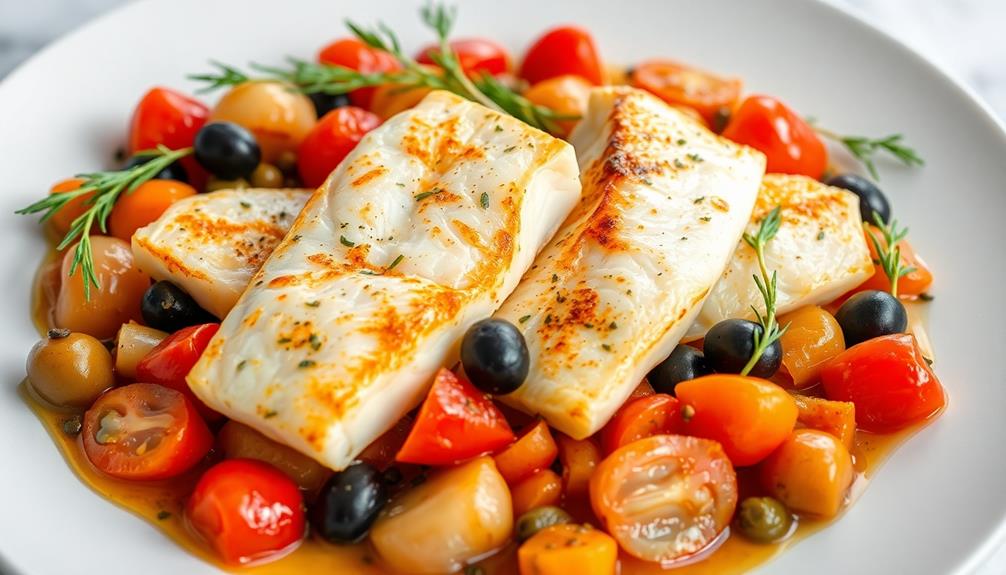
Take a delicious journey to the vibrant coastal cuisine of Mexico with fish à la Veracruzana! This beloved seafood dish blends Spanish, indigenous, and Mesoamerican influences into a tantalizing tomato-based sauce that perfectly complements delicate white fish fillets. The bright, tangy sauce enhances the flaky fish, while the variety of textures, aromatic spices, and juicy tomatoes create an exciting flavor experience. It's a restaurant-quality dish you can easily make at home, whether you're impressing family and friends or enjoying a comforting dinner. And there's more to discover about this classic Mexican delight…

Key Takeaways

  1. Fish à la Veracruzana is a classic Mexican dish originating from the coastal region of Veracruz, reflecting diverse culinary influences.
  2. The dish features a flavorful tomato-based sauce that complements delicate white fish, such as tilapia, cod, or halibut.
  3. The sauce combines tangy tomatoes, briny olives, and aromatic spices, creating a complex and balanced flavor profile.
  4. The dish is recommended for those exploring the rich culinary traditions of Mexico and can be served with steamed rice or crusty bread.
  5. Fish à la Veracruzana is a simple yet impressive recipe that can be prepared quickly, making it suitable for both casual gatherings and special occasions.

History

Originating from the coastal region of Veracruz, Mexico, Fish à la Veracruzana has a rich history that reflects the diverse culinary influences that have shaped the region.

The dish's roots can be traced back to the arrival of Spanish conquistadors in the 16th century, who brought with them a love for seafood and a wealth of Mediterranean cooking techniques. As these new flavors blended with the indigenous ingredients and cooking methods of the local Mesoamerican cultures, the unique and flavorful Fish à la Veracruzana was born.

Over time, the recipe has evolved, with each generation of Veracruzano cooks adding their own special touches, like the signature tangy-sweet tomato-based sauce or the fragrant blend of herbs and spices that give the dish its unmistakable aroma.

Today, Fish à la Veracruzana remains a beloved staple in homes and restaurants throughout Veracruz, a culinary legacy that continues to delight and inspire food lovers around the world.

Recipe

Fish a la Veracruzana is a classic Mexican dish that originates from the coastal city of Veracruz. It features a flavorful tomato-based sauce that complements the delicate white fish perfectly. This dish is a wonderful way to bring the vibrant flavors of Mexico to your table. For an added twist on this classic dish, you can try incorporating elements of a traditional chermoula fish recipe from North Africa. This could include adding a blend of herbs, spices, and citrus to the fish before cooking it in the Veracruzana sauce. The fusion of flavors from both regions creates a unique and delicious dish that is sure to impress your dinner guests.

Advertisement

The combination of the tangy tomatoes, briny olives, and aromatic spices creates a complex and satisfying dish that's sure to impress your guests. Whether you're looking to add a new seafood recipe to your repertoire or simply want to explore the rich culinary traditions of Mexico, this Fish a la Veracruzana is a must-try.

Ingredients:

  • 4 white fish fillets (such as tilapia, cod, or halibut)
  • 2 tablespoons olive oil
  • 1 onion, diced
  • 3 garlic cloves, minced
  • 1 (14.5 oz) can diced tomatoes
  • 1/4 cup green olives, sliced
  • 2 tablespoons capers
  • 1 teaspoon dried oregano
  • 1 teaspoon ground cumin
  • Salt and pepper to taste
  • Chopped fresh cilantro for garnish

Instructions:

In a large skillet, heat the olive oil over medium heat. Add the onion and garlic, and sauté until softened, about 5 minutes.

Add the diced tomatoes, green olives, capers, oregano, and cumin. Simmer the sauce for 10-15 minutes, allowing the flavors to meld.

Season the fish fillets with salt and pepper, then gently place them into the simmering sauce. Cover the skillet and cook for 10-12 minutes, or until the fish is opaque and flakes easily with a fork.

Advertisement

Garnish the dish with chopped fresh cilantro before serving.

Tips:

For best results, use fresh, high-quality white fish fillets. Avoid overcooking the fish, as it can become dry and tough.

Adjust the seasoning to your taste, adding more salt, pepper, or other spices as desired. Serve the Fish a la Veracruzana with steamed rice or crusty bread to soak up the delicious sauce.

Cooking Steps

First, rinse the fish and pat it dry.

Advertisement

Then, sauté the onions and garlic in a pan until they're nice and fragrant.

Next, add the juicy tomatoes, briny capers, and tangy olives – this is where the flavors really start to come together!

Step 1. Rinse and Pat Fish Dry

prepare fish for cooking

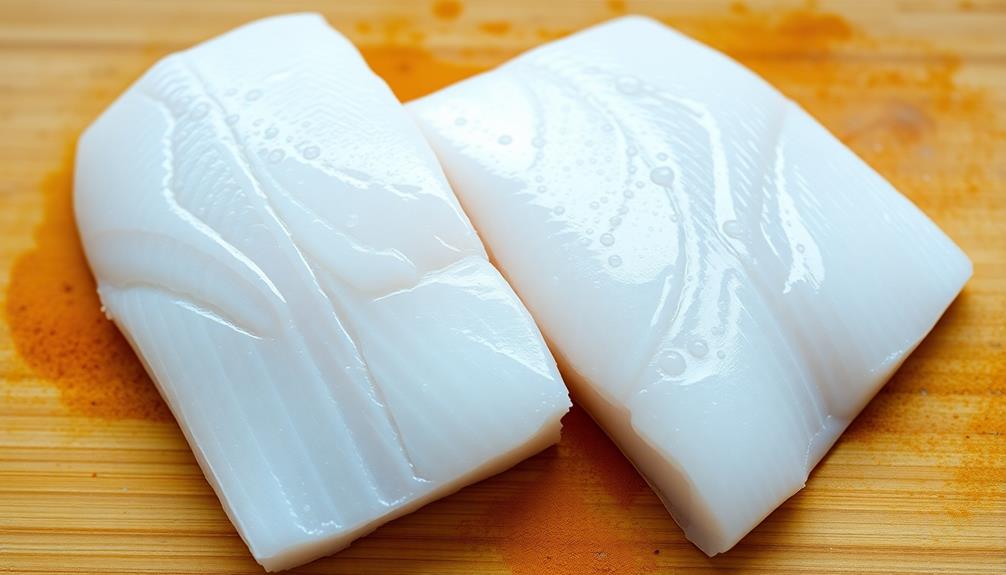
Before you begin cooking, take a moment to prepare the fish. Rinse the fillets under cool, running water, gently patting them dry with paper towels. This simple step helps the fish cook up crispy and delicious!

You'll want to make sure each piece is thoroughly dry, as any excess moisture can cause the oil to splatter when you start frying.

Once your fillets are nicely dried, it's time to get cooking. Heat up a skillet over medium-high heat and add a couple tablespoons of olive oil.

When the oil is shimmering, carefully place the fish fillets into the pan. Listen for that satisfying sizzle – that's how you'll know the oil is hot enough.

Advertisement

Fry the fish for 3-4 minutes per side, until the exterior is golden brown and flaky. Remember to flip the fillets gently with a spatula to keep them intact.

With just a little prep work, you're well on your way to a mouthwatering Veracruzana-style fish feast!

Step 2. Sauté Onions and Garlic

saut onions and garlic

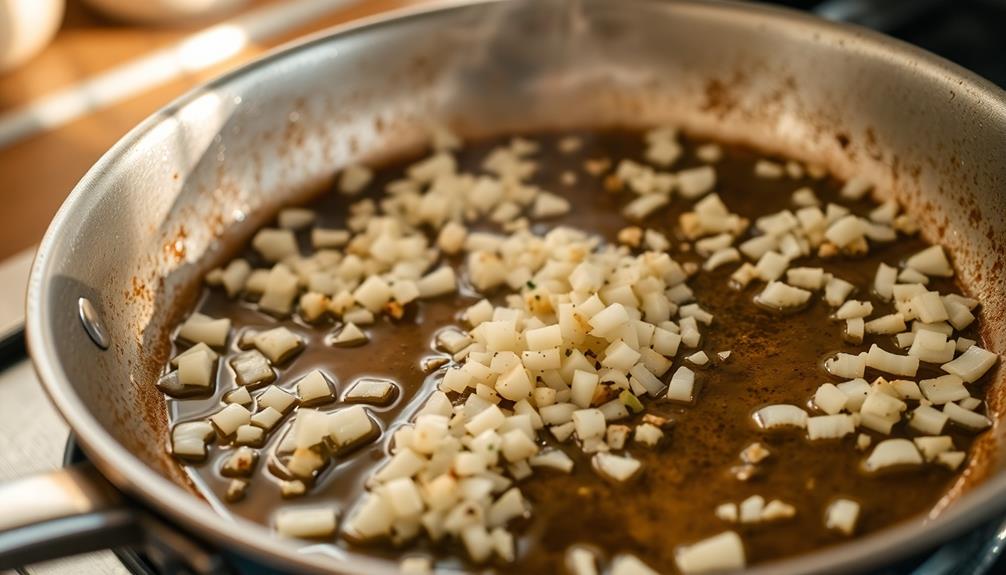
With the fish sizzling away, it's time to turn your attention to the aromatic elements that will bring this dish to life.

In a large skillet, heat a few tablespoons of olive oil over medium heat. Once the oil is shimmering, add the diced onion and minced garlic.

Sauté these fragrant ingredients, stirring frequently, until the onions are soft and translucent, and the garlic is wonderfully fragrant, about 5 to 7 minutes.

The aroma will start to fill your kitchen, making your mouth water in anticipation.

Advertisement

Be sure to keep an eye on the garlic, as it can easily burn and turn bitter.

Once the onions and garlic are perfectly cooked, it's time to add the tomatoes, olives, and other flavorful components to create the Veracruzana sauce.

Get ready for your taste buds to be taken on a flavor-packed journey!

Step 3. Add Tomatoes

incorporate diced tomatoes

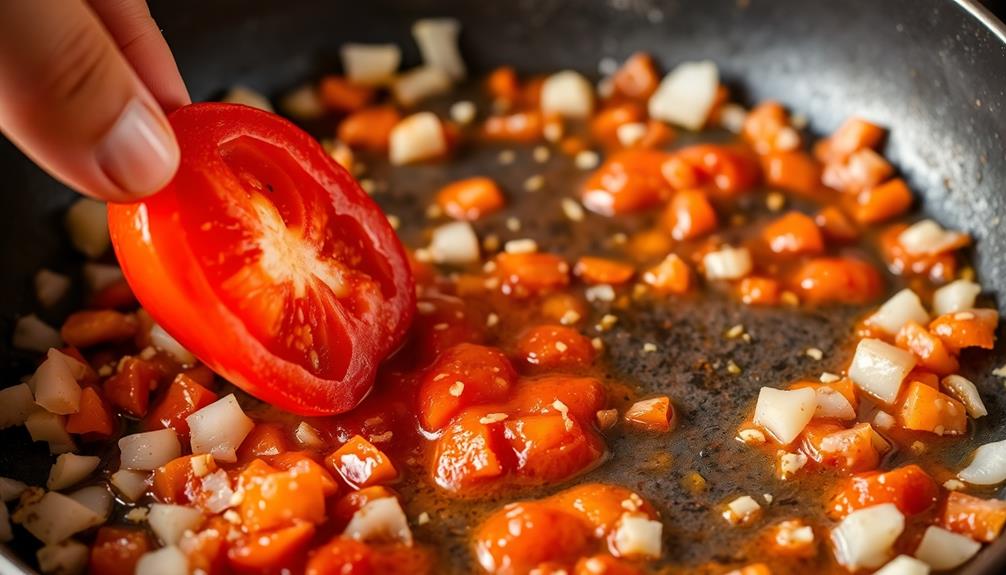
After the onions and garlic have sautéed, add the diced tomatoes to the skillet. You'll see the tomatoes start to sizzle and release their juices, filling the air with a mouthwatering aroma.

Gently stir the tomatoes into the aromatic mixture, letting them cook for a few minutes until they soften and release their natural sweetness.

As the tomatoes break down, they'll create a lovely sauce that coats the other ingredients. You can even use a wooden spoon to gently mash some of the tomatoes against the side of the pan, helping to thicken the sauce. This will give the dish a lovely, rich texture that's perfect for spooning over your fish fillets.

Advertisement

Be sure to keep an eye on the tomatoes, stirring occasionally, until they've reached your desired consistency.

Then you're ready to move on to the next step in creating this delicious Veracruzana-style fish dish!

Step 4. Add Capers and Olives

incorporate capers and olives

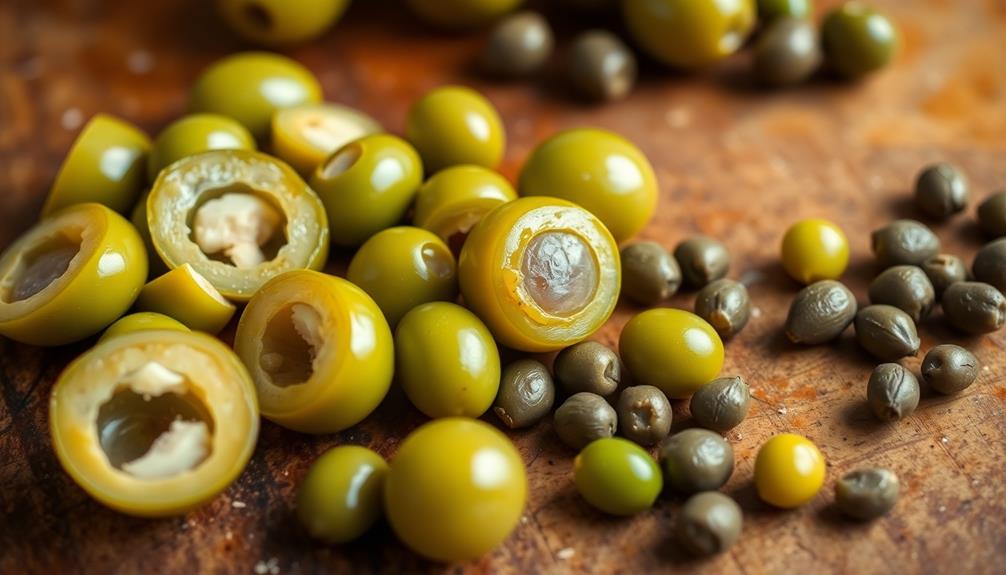
Once the tomatoes have softened and created a savory sauce, it's time to add the briny capers and olives. These tasty little additions will really take your Pescado a La Veracruzana to the next level!

First, grab a handful of juicy green olives and give them a rough chop. The salty, pungent flavor of the olives will complement the tangy tomatoes beautifully.

Next, sprinkle in a couple of tablespoons of those caper buds. Their briny, slightly lemony taste will add a delightful zing to the dish.

As the capers and olives mingle with the sauce, you'll start to smell the aroma wafting through your kitchen – it's simply mouthwatering!

Advertisement

Give everything a gentle stir to combine, then let the flavors meld together for a few minutes. Your fish is going to be so flavorful and delicious, your family will be begging for seconds.

Get ready for rave reviews!

Step 5. Add Fish and Simmer

add fish simmer gently

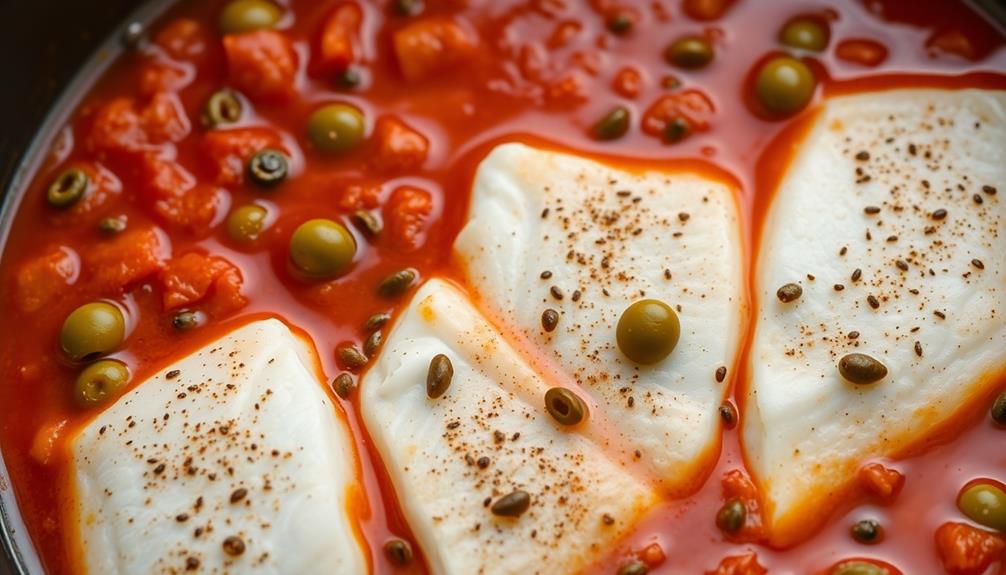
Now that you've added the capers and olives, it's time to add the fish. Grab your favorite white fish fillets – perhaps some flaky tilapia or succulent cod.

Carefully place the fish into the simmering sauce, making sure each piece is fully submerged. Let the fish gently poach in the aromatic broth, allowing the flavors to mingle and the fish to become delightfully tender.

As the fish cooks, the sauce will thicken slightly, creating a mouthwatering texture. Breathe in the heavenly scents of tomatoes, garlic, and the tang of the olives – your taste buds are in for a real treat!

Keep an eye on the fish, gently flipping the pieces occasionally, until they flake easily with a fork. Once the fish is cooked through, remove the pan from the heat.

Advertisement

You're one step closer to enjoying this classic Veracruzana dish bursting with the vibrant flavors of Mexico.

Final Thoughts

The simplicity and vibrant flavors of Fish a la Veracruzana make it an excellent choice for a quick, yet satisfying meal. The combination of tender white fish, juicy tomatoes, and aromatic spices creates a delightful party for your tastebuds.

Plus, it's a breeze to prepare, so you can enjoy a restaurant-quality dish in the comfort of your own home.

Whether you're in the mood for a light lunch or a comforting dinner, this dish is sure to hit the spot. The bright, tangy sauce complements the flaky fish perfectly, and the variety of textures adds an exciting element to each bite.

It's a fantastic way to bring a taste of Mexico to your table and impress your family and friends.

Advertisement

Frequently Asked Questions

What Type of Fish Is Best for Pescado a La Veracruzana?

To prepare the iconic "Pescado a la Veracruzana," you'll want to use a firm, white-fleshed fish like snapper, tilapia, or grouper. These fish hold up well to the flavorful tomato-based sauce and won't fall apart during cooking.

Can I Substitute Any Ingredients in the Recipe?

You can absolutely substitute ingredients in the recipe. Feel free to use different types of fish, vegetables, or seasonings that suit your taste preferences. Just be mindful of maintaining the overall flavor profile of the dish.

How Long Does the Dish Take to Prepare?

You can expect the dish to take approximately 45 minutes to an hour to prepare, depending on your cooking experience and efficiency in the kitchen. The various steps involved, such as chopping vegetables and simmering the sauce, contribute to the overall preparation time.

Can Pescado a La Veracruzana Be Made in Advance?

Can a dish be made in advance? Absolutely! Many recipes can be prepared ahead of time, allowing you to save time and enjoy a delicious meal with minimal effort. Consider your schedule and the dish's components to determine if it's suitable for advance preparation.

Is the Dish Suitable for Vegetarians or Vegans?

You're in luck! This dish can easily be made vegetarian or vegan by substituting the fish with plant-based protein options like tofu, tempeh, or even roasted vegetables. Just swap out the main ingredient, and you've got a delicious meat-free version.

Advertisement

Advertisement

Mexican Cuisine

Coronado Cajeta: Mexican Caramel Sauce You’ll Fall in Love With

Graced with a velvety texture and rich, creamy flavor, Coronado Cajeta is a Mexican caramel sauce that will captivate your senses and leave you craving more. Discover why this beloved culinary treasure is a must-try.

Published

on

delicious mexican caramel sauce

Coronado cajeta, a delightful Mexican caramel sauce, will captivate your senses with its velvety texture and rich, creamy flavor. Influenced by Spanish settlers, this beloved culinary treasure originated in the colonial era. The secret lies in the use of goat's milk, which creates a unique creaminess you'll fall in love with. Whether you drizzle it over desserts, dip fresh fruit in it, or enjoy it straight from the jar, cajeta promises a sweet and indulgent experience. The perfect balance of sugar, milk, and spices makes this sauce a must-try for any Mexican cuisine enthusiast. And if you keep reading, you'll discover even more about this captivating caramel delight.

Key Takeaways

  • Coronado Cajeta is a rich, velvety Mexican caramel sauce made with the key ingredient of goat's milk, giving it a unique, creamy texture and flavor.
  • The cooking process involves simmering and caramelizing the milk and sugar mixture to develop the signature sweet, gooey consistency of cajeta.
  • Cajeta is a beloved element of Mexican cuisine, often featured in celebrations and culinary circles for its versatility in enhancing both sweet and savory dishes.
  • The sauce appeals to both casual and gourmet cooks, offering a unique flavor profile compared to traditional caramel and providing some nutritional benefits from the goat's milk.
  • Achieving the desired consistency of cajeta requires patience and proper caramelization, but the resulting homemade version offers a rich, glossy texture and deep caramel color.

History

historical events and narratives

Where does the history of Mexican caramel sauce begin? You might be surprised to learn that it dates back centuries! Cajeta, the traditional Mexican caramel sauce, has its roots in the colonial era. Wealthy Spanish settlers brought the recipe from Europe, and over time, it evolved into the unique, delicious treat we know today.

The key ingredient in cajeta is goat's milk, which gives it a rich, creamy texture. As the milk simmers and caramelizes, it develops a deep, complex flavor that's both sweet and slightly tangy. This process was perfected by skilled Mexican cooks, who passed down their techniques from generation to generation.

Today, cajeta remains a beloved part of Mexican cuisine, enjoyed as a topping for ice cream, drizzled over churros, or savored by the spoonful.

Whether you're celebrating a special occasion or simply craving a taste of Mexican culture, this caramel sauce is sure to delight your taste buds and warm your heart.

Recipe

cooking instructions and ingredients

Caramel is a beloved treat around the world, and Mexican caramel sauce is a unique and delightful variation. This rich, creamy sauce is perfect for drizzling over desserts, dipping churros, or even spooning straight from the jar.

Understanding how to budget for ingredients can enhance your cooking experience and ensure you have everything you need for this delicious recipe. The key to this recipe is the use of piloncillo, a type of unrefined Mexican brown sugar that adds a deep, complex flavor to the caramel.

Advertisement

The combination of piloncillo, creamy evaporated milk, and a touch of cinnamon creates a truly special sauce that will transport your taste buds to the heart of Mexico.

  • 1 cup piloncillo or dark brown sugar
  • 1 cup evaporated milk
  • 1/2 cup water
  • 1/4 teaspoon ground cinnamon
  • 1/4 teaspoon salt

In a medium saucepan, combine the piloncillo, evaporated milk, and water. Bring the mixture to a simmer over medium heat, stirring occasionally, until the piloncillo has dissolved.

Reduce the heat to low and continue to cook, stirring frequently, for 15-20 minutes or until the sauce has thickened to a caramel-like consistency. Stir in the cinnamon and salt.

To achieve the best texture, be patient and allow the sauce to cook slowly, stirring constantly towards the end to prevent burning. The longer the sauce simmers, the richer and more complex the flavor will become. Be sure to taste the sauce periodically and adjust the seasoning as needed to ensure a balanced flavor. This slow-cooked sauce pairs perfectly with a hearty meal, such as a classic chicken fried steak recipe. Once the sauce reaches the desired consistency, it’s ready to be served over your favorite dish to elevate it with delicious, homemade goodness.

Serve the Mexican caramel sauce warm or at room temperature, and enjoy the delightful balance of sweet and spice in every bite. Remember, a well-planned budget can help you enjoy this culinary adventure without financial stress, especially when you consider common financial terms.

Cooking Steps

step by step cooking instructions

In a large saucepan, combine the goat's milk and sugar.

Simmer the mixture over medium heat until it thickens, about 15 minutes.

Advertisement

Skim off any impurities that rise to the surface.

Once cooled, transfer the luscious caramel sauce into airtight containers for future use.

Step 1. Combine Goat's Milk and Sugar

mix goat s milk sugar

To make the caramel sauce, you'll need to combine the goat's milk and sugar. In a large pot, pour in the creamy, rich goat's milk.

Then, sprinkle in the granulated sugar and stir until it's fully dissolved. You'll want to keep a close eye on the pot, gently stirring the mixture as it heats up.

As the temperature rises, the sugar will start to caramelize, turning the mixture a beautiful golden-brown color.

Don't worry if it bubbles and simmers – that's exactly what you want! Just be patient and let the sauce thicken to your desired consistency.

Advertisement

Once it's reached the perfect texture, remove the pot from the heat.

Now, you've got a luscious, velvety Mexican caramel sauce ready to drizzle over ice cream, pancakes, or anything else your heart desires.

Get ready for your taste buds to do a happy dance!

Step 2. Simmer Until Thickened

simmer mixture until thickened

Gently simmering the milk and sugar mixture is key to developing that signature caramel flavor and velvety texture. Stir the pot occasionally as the liquid bubbles and reduces, keeping a close eye to prevent scorching.

You'll know it's ready when the mixture coats the back of a spoon, and a trail drawn through it remains for a few seconds. This may take 30-45 minutes, so be patient! The longer you simmer, the deeper the caramel notes will become.

Once thickened, remove the pot from heat and allow the cajeta to cool slightly. It will continue to thicken as it cools.

Advertisement

Serve the Mexican-style caramel sauce warm or at room temperature, drizzling it over churros, ice cream, or fresh fruit for a truly decadent treat. You can even use it as a dip for apple slices or pound cake.

However you enjoy it, this homemade cajeta is sure to delight your taste buds and transport you to the vibrant markets of Mexico.

Step 3. Remove Impurities

purification process step three

After your cajeta has thickened to the perfect consistency, you'll want to remove any impurities that may have developed during the simmering process.

Don't worry, this step is a breeze! Gently skim the surface of your cajeta with a spoon, carefully removing any foam or scum that has accumulated. This helps ensure your delicious caramel sauce is silky-smooth and free of unwanted bits.

Next, you'll pass your cajeta through a fine-mesh strainer or cheesecloth. This extra step will catch any stray impurities, leaving you with a beautifully clear and refined sauce.

Once strained, your cajeta is ready to be enjoyed! You can drizzle it over ice cream, pancakes, or even use it as a dip for fresh fruit. The possibilities are endless with this versatile Mexican delight.

Advertisement

Get ready to impress your family and friends with your homemade cajeta masterpiece!

Step 4. Cool Down Mixture

cool down mixture process

Once your cajeta has been strained, it's time to let the mixture cool down. Don't worry, this part's a breeze!

Carefully pour the hot cajeta into a clean, heat-resistant container. You'll want to use a bowl or pan that's big enough to allow the sauce to spread out and cool evenly.

Now, find a nice, cool spot on your counter or table and set the container there. As the cajeta starts to cool, you might notice it thickening up a bit. That's exactly what you want!

Resist the urge to stir or disturb the mixture – just let it do its thing.

In about 30 minutes, your cajeta should be at a perfect, spreadable consistency. Give it a gentle stir, then transfer it to an airtight container.

Advertisement

Pop it in the fridge to chill completely before serving. Mmm, can you already smell the sweet, caramel-y goodness? Get ready – your tastebuds are in for a real treat!

Step 5. Transfer to Containers

container transfer process initiated

With your cajeta now cooled and thickened to the perfect consistency, it's time to transfer it to airtight containers for storage.

Grab a few clean, dry jars or airtight containers and start scooping that luscious, golden caramel into them. Don't be shy – fill those containers up to the top! You'll want to leave just a tiny bit of space at the top to allow for easy sealing.

Once your containers are filled, take a moment to admire your handiwork. Isn't that cajeta just gorgeous? The rich, glossy texture and deep caramel color are simply mesmerizing.

Now, seal those containers tightly to keep your homemade Mexican caramel sauce fresh and ready to enjoy whenever a craving strikes.

With your cajeta safely tucked away, you can rest easy knowing you have a delicious treat on hand.

Advertisement

Whether you plan to drizzle it over ice cream, use it as a dip for fresh fruit, or simply savor it by the spoonful, this cajeta is sure to become a new family favorite.

Final Thoughts

concluding reflections and insights

The Mexican caramel sauce is a delight that can elevate any dessert or dish. Just imagine drizzling it over ice cream, pancakes, or even fresh fruit – the possibilities are endless!

This rich, velvety sauce is sure to impress your family and friends. Once you've mastered the art of making it, you'll find yourself whipping up batch after batch.

It's the perfect way to add a touch of Mexican flair to your culinary creations. From cozy movie nights to festive celebrations, this cajeta will become a staple in your kitchen.

Don't be intimidated by the process – with a little practice, you'll be stirring up this sweet, gooey goodness like a pro.

Drizzle it, dip it, or simply enjoy it by the spoonful. However you choose to indulge, one thing is certain: you're going to fall head over heels for this Mexican caramel sauce.

Advertisement

Frequently Asked Questions

How Long Does Cajeta Last After Being Made?

Homemade cajeta will typically last 2-3 weeks when stored properly in the refrigerator. Its shelf life depends on the ingredients used and how well you seal the container. With proper care, you can enjoy your cajeta for quite some time.

Can Cajeta Be Used in Other Recipes Besides Desserts?

Absolutely! Cajeta can be used in a variety of recipes beyond just desserts. You can use it as a topping for savory dishes, drizzle it over pancakes or waffles, or even use it as a glaze for roasted meats.

Is There a Vegetarian or Vegan Alternative to Traditional Cajeta?

Yes, there are vegan alternatives to traditional cajeta. You can make a plant-based version using ingredients like coconut milk, dates, and spices to achieve a similar rich, caramelized flavor without using dairy.

How Should Cajeta Be Stored to Maintain Its Quality?

To maintain its quality, you should store cajeta in an airtight container in the refrigerator. This will help preserve its texture and flavor, ensuring you can enjoy it for longer.

Can I Use a Different Type of Milk in the Recipe?

You can certainly use a different type of milk in the recipe. Goat's milk, sheep's milk, or even plant-based milk like almond or coconut milk can work, but the flavor and texture may vary from the traditional cajeta made with cow's milk.

Advertisement

Continue Reading

Mexican Cuisine

Mexican Elote: Grilled Corn Delights

Absolutely irresistible, the beloved Mexican street food known as elote captivates the senses with its charred corn, tangy lime, and creamy cotija cheese.

Published

on

grilled corn mexican delicacy

Grilled to perfection and bursting with vibrant Mexican flavors, the beloved street food known as elote captivates your taste buds with its irresistible combination of charred corn, tangy lime, and creamy cotija cheese. Originating from ancient Mesoamerican civilizations, this iconic treat has evolved over centuries, becoming a staple of Mexican culture. Whether you enjoy it fresh off the grill or diced into a colorful salad, elote offers a sensational experience that celebrates the rich heritage of Mexican cuisine. Get ready to indulge in this delightful grilled corn delight that's sure to leave you craving more.

Key Takeaways

  • Elote, a traditional Mexican dish of grilled corn, combines charred, juicy kernels with a creamy, tangy sauce and zesty toppings like chili powder and cotija cheese.
  • Originating from ancient Mesoamerican civilizations, elote has evolved over time to reflect the vibrant culture and regional variations of Mexican cuisine.
  • Preparation of elote involves grilling the corn, coating it in a sauce made of mayonnaise and lime, and garnishing it with a variety of toppings.
  • The unique flavor profile of elote, with its balance of savory, tangy, and creamy elements, has contributed to its growing popularity worldwide as a delightful street food.
  • Elote represents a celebration of Mexican culinary heritage, often served at festivals and gatherings, and continues to inspire fusion cuisine and culinary creativity globally.

History

Elote, the beloved Mexican street food, has a rich history rooted in the culinary traditions of ancient Mesoamerican civilizations. For centuries, indigenous peoples, such as the Aztecs and the Maya, have been enjoying this delightful grilled corn dish. Back then, they'd roast the corn over open fires, seasoning it with chile, lime, and other flavorful spices.

As Spanish conquistadors arrived in the 16th century, they encountered this tasty treat and quickly became enamored with it. The dish then spread throughout Mexico, evolving and adapting to local tastes and ingredients.

Today, elote is a beloved part of Mexican street food culture, with vendors selling their fragrant, smoky creations from carts and stands all over the country. Whether you're strolling through a bustling market or attending a lively festival, the aroma of freshly grilled elote is sure to delight your senses and transport you to the vibrant heart of Mexican cuisine.

Recipe

Elote, or Mexican street corn, is a beloved street food in Mexico that has gained global popularity in recent years. This grilled corn on the cob is coated in a creamy, tangy, and flavorful sauce, making it a delightful and satisfying dish.

The combination of sweet corn, a savory sauce, and a sprinkle of tangy cheese creates a perfect balance of flavors. Elote is often served as a snack or side dish, but it can also be enjoyed as a main course, especially when paired with other Mexican dishes.

Advertisement

Ingredients:

  • 6 ears of fresh corn, husks and silk removed
  • 1/2 cup mayonnaise
  • 1/2 cup crumbled cotija cheese (or queso fresco)
  • 1 lime, cut into wedges
  • 1 teaspoon chili powder
  • 1/2 teaspoon ground cumin
  • 1/4 cup chopped cilantro (optional)
  • Salt and pepper to taste

Instructions:

Preheat your grill or grill pan to medium-high heat. Grill the corn, turning occasionally, until charred and tender, about 12-15 minutes.

In a small bowl, mix the mayonnaise, cotija cheese, chili powder, and cumin until well combined. Generously brush the grilled corn with the mayonnaise mixture, making sure to coat all sides.

Sprinkle with chopped cilantro, if desired, and serve immediately with lime wedges on the side.

When cooking this dish, be sure to use fresh, high-quality corn for the best flavor and texture. You can also experiment with different toppings, such as crumbled queso fresco, chopped jalapeños, or a drizzle of Mexican crema, to customize the dish to your taste.

Advertisement

Enjoy the delicious and authentic flavors of Mexican elote!

Cooking Steps

Alright, let's get started on those yummy elote cooking steps!

First, you'll need to husk and clean your corn.

Then, you'll soak the corn in some seasoned water to really amp up the flavor.

Finally, you'll grill that corn over medium heat until it's nice and charred.

Advertisement

Can't wait to slather on that butter and seasonings – it's gonna be delicious with a squeeze of lime!

Step 1. Husk and Clean Corn

prepare and clean corn

Husking and cleaning the corn is the first crucial step in preparing delectable Mexican elote. Gently peel back the green husks, revealing the golden kernels beneath. Be careful not to tear the delicate leaves – you want them intact to use as a handle later.

Once the husks are removed, pick off any stray silk strands clinging to the cob. These can interfere with the smooth, creamy texture you're going for. Run the corn under cool water, gently rubbing to wash away any dirt or debris.

Pat the cobs dry with a clean towel, ensuring they're ready for the next step of seasoning and grilling. With the husks and silk removed, the corn is now prepped and primed to soak up all the zesty flavors of the Mexican elote seasonings.

Get ready for an explosion of tasty delight in every bite!

Step 2. Soak Corn in Seasoned Water

soak corn in seasoning

The corn's next stop is a quick soak in a seasoned water bath.

You'll want to fill up a large bowl or container with cool water and add a generous pinch of salt. Give it a good stir to dissolve the salt.

Advertisement

Now, carefully submerge the cleaned corn cobs in the salted water. Let them soak for about 15-20 minutes. This simple step helps the corn absorb some of the seasoning, making the flavor pop even more once it hits the grill.

As the corn soaks, the salt water will gently season the kernels, preparing them for their grand finale.

You can even add a few dashes of chili powder or garlic powder to the water if you want an extra flavor boost. Just be sure not to let the corn soak for too long, or it may become waterlogged.

When the time is up, remove the corn from the water and give it a quick pat dry. Now it's ready to hit the grill and get that delightful char and caramelization going!

Step 3. Grill Corn Over Medium Heat

grill corn medium heat

After the corn has soaked, it's time to fire up the grill! Get ready for some delightful, smoky flavors.

First, make sure your grill is heated to medium heat – you don't want to burn those precious kernels. Gently place the cobs of corn directly onto the grates, making sure to rotate them every few minutes.

Advertisement

As the corn sizzles and caramelizes, you'll start to smell that irresistible, toasted aroma. Keep a close eye, though – you don't want the corn to overcook and become dry.

Once the kernels are tender and slightly charred, it's time to remove them from the heat.

Be careful when handling the hot cobs – use tongs or oven mitts to avoid any painful mishaps.

Now, you're ready to slather on the toppings and enjoy your perfectly grilled Mexican elote! The combination of the sweet, smoky corn and all those delicious seasonings is simply out of this world.

Step 4. Apply Butter and Seasonings

butter and seasonings application

Grab a generous pat of butter and gently spread it all over the hot, freshly grilled corn. The butter will melt instantly, creating a glossy, golden coating that glistens in the sun.

This delicious addition not only enhances the flavor but also provides a rich source of natural fats, which are becoming increasingly popular as consumers shift away from margarine in favor of butter due to its health benefits and global butter consumption trends.

Advertisement

Now, it's time to add the seasonings! Sprinkle on some chili powder – just a pinch will do – and let that zesty flavor sizzle.

Next, a dusting of cotija cheese, a traditional Mexican crumbly delight, adds a salty, tangy kick. Don't forget the lime wedges! Squeeze those bright, citrusy juices all over the buttery, seasoned corn, letting the flavors mingle and dance on your taste buds.

Step 5. Serve With Lime Wedges

serve with lime wedges

Once the corn is beautifully coated in butter and seasoned to perfection, squeeze those vibrant lime wedges all over the top. The tangy citrus notes will dance across your taste buds, complementing the savory flavors of the elote.

Don't be shy – give each cob a generous squeeze, letting the bright green juice drizzle down the golden kernels. The contrast of the warm, buttery corn and the cool, refreshing lime is simply irresistible.

As you take your first bite, the flavors will burst forth, awakening your senses. The lime adds a lovely brightness that cuts through the richness, creating a truly harmonious experience.

Savor each delectable mouthful, relishing the perfect balance of sweet, salty, and tangy. This is a flavor combination that will have you coming back for more, so be sure to have extra lime wedges on hand.

Advertisement

Get ready for an explosion of Mexican flavor in every single bite!

Final Thoughts

Quintessentially, Mexican elote is a delightful street food that captivates the senses. The aroma of freshly grilled corn, the tantalizing flavors of creamy mayonnaise, the zesty kick of lime, and the warmth of melted cotija cheese create a harmonious symphony that leaves a lasting impression.

As you sink your teeth into the tender kernels, you'll be transported to the vibrant streets of Mexico, where the lively energy and cultural richness shine through in every bite. The blend of textures, from the charred exterior to the juicy interior, adds an irresistible complexity that keeps you coming back for more. Every bite is a celebration of the flavors and traditions that have been passed down through generations, making each nibble a tribute to the rich culinary heritage of Mexico. The smoky, savory essence of the corn is a testament to the time-honored techniques and ingredients that define this traditional Mexican dish. With each bite, you can almost hear the sounds of bustling markets and sizzling grills, creating a sensory experience that is truly unforgettable.

Whether enjoyed as a snack or a meal, Mexican elote is a true culinary gem that celebrates the rich heritage and vibrant flavors of Mexico. Indulge in this delightful treat and let the flavors transport you to a world of pure delight.

Frequently Asked Questions

What Is the Best Way to Remove Corn Kernels From the Cob?

To remove corn kernels from the cob, you can stand the cob upright and run a sharp knife down the sides, cutting the kernels off in neat rows. Alternatively, you can use a corn kernel stripper for a quick, easy job.

Advertisement

Can Mexican Elote Be Made With Frozen Corn?

You can certainly make Mexican elote using frozen corn. The key is to thaw the corn thoroughly and pat it dry before sautéing or grilling it to get that charred, flavorful result.

How Long Can Leftover Mexican Elote Be Stored?

Leftover elote can typically be stored in the fridge for 3-4 days. Be sure to store it in an airtight container to keep it fresh. You can also freeze leftover elote for 2-3 months.

What Are Some Alternative Toppings for Mexican Elote?

When it comes to alternative toppings for Mexican elote, you can get creative. Try sprinkling chili powder, lime juice, crumbled cotija cheese, or even a drizzle of crema for a flavorful twist on this classic street food.

Is Mexican Elote Suitable for Vegetarians or Vegans?

Yes, Mexican elote can be suitable for vegetarians and vegans. You can opt for a dairy-free crema or vegan cheese, and skip the traditional toppings like cotija cheese. With the right substitutions, you can enjoy this grilled corn delight!

Advertisement

Continue Reading

Mexican Cuisine

Ceviche is a vibrant seafood dish

Hailing from the vibrant shores of Peru, ceviche captivates with its zesty citrus, tender seafood, and rich history, inviting you to embark on a culinary adventure.

Published

on

fresh citrus marinated seafood

Ceviche is a vibrant seafood dish from Peru that'll transport you right to the sunny shores of the Pacific. You'll love the refreshing blend of citrus, herbs, and tender fish! The origins trace back to the Incan Empire, where they cured raw fish with zesty citrus. Today, ceviche celebrates Peru's incredible culinary diversity – from the northern coast's bright, tangy flavors to the spicy kick of the southern highlands. It's not only delicious, but also healthy, packed with omega-3s and antioxidants. Get ready to embark on a flavorful journey as you discover the rich history and preparation techniques behind this mouthwatering dish.

Key Takeaways

  • Ceviche is a Peruvian dish made with fresh raw fish marinated in citrus juices, onions, chili peppers, and cilantro.
  • The dish has a rich historical origin, tracing back to pre-Columbian times in the Incan Empire and evolving with the introduction of Spanish ingredients.
  • Ceviche is low in calories, rich in omega-3 fatty acids, and packed with vitamins and minerals from the fresh seafood and vegetables.
  • Proper preparation techniques, such as precise fish cutting and marination, are crucial for achieving the desired texture and flavor profile of ceviche.
  • Ceviche holds significant cultural importance in Peru, where it is celebrated as a national dish and recognized as part of the Intangible Cultural Heritage of Humanity.

History

Ceviche, the renowned Peruvian seafood dish, has a rich and captivating history that spans centuries. Dating back to the Incan Empire, this vibrant dish evolved from the indigenous practice of curing raw fish in citrus juices.

As the Spanish conquistadors arrived in the 16th century, they introduced new ingredients like onions, chili peppers, and cilantro, further enhancing the flavor profile. Over time, ceviche became a beloved staple across Peru, each region developing its own unique twist.

From the zesty citrus notes of the northern coast to the spicy kick of the southern highlands, the diversity of ceviche is a testament to the country's culinary heritage.

Today, this refreshing seafood delight has captured the hearts and palates of food enthusiasts worldwide, showcasing the enduring influence of Peruvian cuisine.

Whether you're savoring it on a sun-drenched beach or in the bustling streets of Lima, ceviche remains a delightful reminder of its rich and storied past.

Advertisement

Recipe

Ceviche is a refreshing seafood dish that originated in Peru. It's made by marinating raw fish or seafood in an acidic citrus-based marinade, typically lime or lemon juice. This process, known as "cooking" by acid, denatures the proteins in the seafood, giving it a firm, cooked-like texture without the use of heat.

The key to a successful ceviche is the freshness of the seafood and the balance of flavors in the marinade. The marinade should be just enough to lightly "cook" the fish, while still allowing the natural taste of the seafood to shine.

  • Fresh white fish (such as halibut, sea bass, or tilapia), cut into 1-inch cubes
  • Lime juice, enough to cover the fish
  • Red onion, thinly sliced
  • Tomatoes, diced
  • Cilantro, chopped
  • Jalapeño or serrano chile, finely chopped (optional)
  • Salt and pepper to taste

In a non-reactive bowl, combine the fish, lime juice, onion, tomatoes, cilantro, and chile (if using). Cover and refrigerate for 30 minutes to 1 hour, stirring occasionally, until the fish is opaque and firm.

Serve the ceviche immediately, with tortilla chips or crackers on the side. The acidity of the lime juice will continue to "cook" the fish, so it's best to consume the ceviche shortly after preparing it.

Adjust seasoning with additional salt, pepper, or lime juice as needed.

Cooking Steps

Dice the fish into bite-sized cubes, then let it soak in the tangy citrus juice.

Advertisement

Next, add the crunchy onions and spicy chiles to make it truly pop.

Don't forget the fresh herbs and seasonings – they'll take your ceviche to the next level.

Serve it up immediately on chilled plates for the ultimate refreshing experience.

Step 1. Dice the Fish Into Cubes

dice fish into cubes

Careful preparation is key when dicing the fish into uniform cubes. First, grab a sharp knife and a sturdy cutting board. You'll want to work on a stable surface to prevent any accidents.

Gently place your fish fillet on the board and start slicing it into thin strips, about 1-inch wide. Next, turn the strips and carefully cut them crosswise to create those perfect little cubes. Try to make them all the same size, around 1/2-inch each. This will ensure the fish cooks evenly in the citrus marinade.

Once you've diced the entire fillet, give the cubes a gentle rinse under cold water. Blot them dry with a paper towel before adding them to your citrus mixture. With the fish prepped, you're one step closer to enjoying that bright, refreshing ceviche!

Advertisement

Step 2. Marinate the Fish in Citrus

citrus marinated fish preparation

With the fish prepped, it's time to get the citrus marinade going. In a large bowl, you'll need freshly squeezed juice from some juicy limes, lemons, and oranges. The more citrus, the better! Go ahead and give those fruits a good squeeze until you have about a cup of tangy, vibrant juice.

Now, add a pinch of salt and a sprinkle of black pepper. Give it a good stir to combine. Gently place the diced fish into the citrusy mixture, making sure each piece is fully submerged. Cover the bowl and pop it in the fridge.

Let the fish marinate for 30 minutes to an hour, patiently waiting as the acidic juice "cooks" the seafood to perfection.

As the fish marinates, the citrus will transform the raw cubes into tender, flavorful bites. You'll know it's ready when the fish turns opaque and looks nice and firm.

Time to move on to the next step – adding all the fresh veggies!

Step 3. Add Onions and Chiles

incorporate onions and chiles

Now that the fish has had a chance to marinate in the citrusy goodness, it's time to add some crisp onions and spicy chiles.

Thinly slice some red or white onion and give it a good rinse to wash away that strong onion bite. Chop up a couple of fresh jalapeños or serranos, leaving the seeds in if you want an extra kick of heat. The onions will add a wonderful crunch and the chiles will bring the fire, creating a perfect balance of flavors.

Advertisement

Gently fold the onions and chiles into the marinated fish. Be sure not to overmix, as you don't want to break up the delicate pieces of fish.

Now, let this delicious mixture sit for another 10-15 minutes, allowing the flavors to meld together. Your ceviche is really starting to come together now! The bright, citrusy tang, the sharp onion crunch, and the spicy chili heat – it's a party in your mouth.

Step 4. Add Herbs and Seasonings

herbs and seasonings addition

After the onions and chiles have had a chance to marry with the citrusy fish, you'll want to add some fresh herbs and seasonings to really elevate the flavors.

Reach for a handful of fragrant cilantro and gently tear the leaves, releasing their bright, herbal aroma. Sprinkle in a dash of cumin, its earthy, warm spice notes complementing the citrus.

Don't forget the zest of a lime – just a teaspoon or two will add a lovely pop of freshness. A pinch of salt and pepper brings everything together, balancing the acidity and enhancing the natural flavors.

Mix everything together gently, allowing the herbs and spices to mingle with the cured fish, onions, and chiles.

Advertisement

Now your ceviche is truly ready to shine, each bite bursting with vibrant, complex flavors that will have your taste buds dancing with delight.

Step 5. Serve Immediately on Chilled Plates

serve immediately on chilled plates

Once the herbs and seasonings have been gently incorporated, it's time to serve your ceviche.

Grab some chilled plates and arrange the marinated seafood in a pretty, appetizing display. Doesn't it look so fresh and vibrant? The citrusy scent is simply mouthwatering. Can't you just imagine the burst of tangy, savory flavors?

Now, don't wait another minute – dive right in! Grab a fork and take your first delectable bite. The tender, slightly-firm texture of the seafood perfectly contrasts the crisp, cool vegetables.

Each flavorful morsel melts in your mouth, leaving you craving more. Mmm, this is the taste of summertime bliss!

Be sure to savor every last drop of that zesty, aromatic marinade, too. It's an integral part of the ceviche experience.

Advertisement

Serve it up with some crunchy tortilla chips or fresh, crusty bread for the ultimate flavor combination. Trust us, your taste buds are in for a real treat!

Final Thoughts

Ceviche is a versatile and flavorful dish that has captured the hearts of food enthusiasts worldwide.

Whether you're hosting a lively party or enjoying a quiet night in, this refreshing seafood delight is sure to impress. The key is to serve it immediately on chilled plates, allowing the bright, tangy flavors to shine.

As you take that first bite, the burst of citrus, the tender seafood, and the mix of crisp vegetables will dance on your tongue, leaving you craving more.

Ceviche is a true celebration of the ocean's bounty, and each recipe is a unique expression of the chef's creativity.

Advertisement

Frequently Asked Questions

Is Ceviche a Raw Fish Dish?

Yes, ceviche is a raw fish dish. The fish is "cooked" by being marinated in citrus juices, which chemically denatures the proteins, giving the fish a firm, "cooked" texture without the use of heat.

How Long Does Ceviche Need to Marinate?

The length of time needed to marinate depends on the type of seafood used. Generally, it should marinate for 30 minutes to 2 hours, allowing the acidic marinade to "cook" the fish without heat.

Can Ceviche Be Made With Cooked Seafood?

Yes, you can make ceviche with cooked seafood. The acid in the marinade will still "cook" the fish, but the texture won't be as delicate as with raw seafood. It's a great option if you prefer a firmer bite.

Is Ceviche Safe to Eat for Pregnant Women?

Ceviche made with raw seafood may pose a risk for pregnant women due to potential bacteria and parasites. It's best to consult a healthcare provider before consuming raw or undercooked foods during pregnancy to ensure safety.

Can Ceviche Be Frozen for Later Use?

Yes, you can freeze ceviche for later use. The acidic marinade helps preserve the fish, so it'll stay fresh in the freezer for several months. Just be sure to thaw it properly before serving.

Advertisement

Continue Reading

Affiliate Disclaimer
As an affiliate, we may earn a commission from qualifying purchases. We get commissions for purchases made through links on this website from Amazon and other third parties.

Advertisement

Vetted

top local car washes top local car washes
Vetted2 months ago

14 Best Car Washes Near You for a Sparkling Clean Ride

I discovered the 14 best car washes near you that promise a sparkling clean ride, and you won't want to...

top mops for 2024 top mops for 2024
Vetted2 months ago

The 15 Best Mops of 2025 – Your Ultimate Guide to a Spotless Home

Find the perfect mop for your cleaning needs in 2025, and discover how these top choices can revolutionize your home...

top women s fragrances 2024 top women s fragrances 2024
Vetted2 months ago

15 Best Perfumes for Women in 2025 – A Fragrance Guide You Can’t Miss

Keen to discover the top 15 perfumes for women in 2025? Uncover unique scents that will elevate your fragrance game!

top local bars guide top local bars guide
Vetted2 months ago

14 Best Bars Near You for an Unforgettable Night Out

Looking for the perfect bar to elevate your night out? Discover the 14 best spots that promise unforgettable experiences!

luxurious beard oil selection luxurious beard oil selection
Vetted2 months ago

15 Best Beard Oils for a Luxurious Grooming Experience in 2025

Shop the 15 best beard oils for a luxurious grooming experience in 2025 and discover which ones will elevate your...

top college laptops 2024 top college laptops 2024
Vetted2 months ago

15 Best College Laptops of 2025: The Ultimate Guide for Students

With our guide to the 15 best college laptops of 2025, discover which powerful models will elevate your academic experience...

waterproof mascaras for tears waterproof mascaras for tears
Vetted2 months ago

15 Best Waterproof Mascaras That Will Survive Any Tear-Jerker

Outstanding waterproof mascaras await to keep your lashes flawless through any emotional moment; discover which ones made the top 15...

top flavorful disposable vapes top flavorful disposable vapes
Vetted2 months ago

15 Best Disposable Vapes of 2025: Top Picks for Flavor and Convenience

Prepare to discover the 15 best disposable vapes of 2025 that blend exceptional flavor and convenience, but which ones truly...

refreshing lunch salad ideas refreshing lunch salad ideas
Vetted2 months ago

15 Best Salads Near You That Will Freshen Up Your Lunch Routine

Transform your lunch with the 15 best salads nearby that will tantalize your taste buds and leave you craving more...

top convertible car seats top convertible car seats
Vetted2 months ago

15 Best Convertible Car Seats of 2025 – Safety and Comfort for Your Little One

Get ready to discover the top 15 convertible car seats of 2025 that blend safety and comfort—find out which models...

delicious fast food breakfast delicious fast food breakfast
Vetted2 months ago

15 Best Fast Food Breakfast Options That Will Make Your Mornings Delicious

Uncover the 15 best fast food breakfast options that will transform your mornings into a delicious experience you won't want...

stylish contacts for vision stylish contacts for vision
Vetted2 months ago

14 Best America’s Contacts for Clear Vision and Style

Browse through the 14 best contact lenses in America for clear vision and style, and discover which one perfectly complements...

Trending