Connect with us

Farm-to-Table Cooking

Fresh Fruit Galette

Fragrant, flaky, and full of fresh fruit, this galette is a delightful dessert that will have you craving more with every bite.

Published

on

delicious rustic fruit tart

Enjoy the seasonal flavors of a fresh fruit galette! This rustic-style tart showcases nature's bounty with a buttery, flaky crust that perfectly complements the juicy fruit filling. The galette's origins trace back to the French countryside, where it evolved from simple tarts to refined desserts. To create your own, simply roll out pastry dough, arrange vibrant fruit slices in the center, and fold the edges over for a charming, homemade look. Bake until golden, then serve warm or with a scoop of vanilla ice cream. This classic treat is easy to make and offers endless opportunities to experiment with seasonal fruit combinations.

Key Takeaways

  • Fresh Fruit Galette is a classic French dessert that showcases seasonal produce in a flaky, buttery crust.
  • The galette features a rustic, freeform shape that allows the natural sweetness of the fruit to shine.
  • Preparation involves rolling out pastry dough, arranging sliced fruits, and baking at a high temperature for a crisp, golden crust.
  • Serving options include pairing the galette with vanilla ice cream or whipped cream for a creamy contrast.
  • Experimenting with different fruit combinations and adding spices can create unique flavor profiles for the Fresh Fruit Galette.

History

The origins of the fruit galette can be traced back to the French countryside, where resourceful bakers would craft these rustic tarts to showcase the season's freshest produce.

Over time, the galette evolved from a simple, free-form pastry to a more refined and structured dessert. Its name comes from the French word "galet," meaning "pebble," a nod to the original round, flat shape of the tart.

Traditionally, galettes were made with a buttery, flaky crust and filled with a variety of seasonal fruits, such as apples, pears, or berries. The dough would be rolled out and then gently folded over the fruit, creating a rustic, yet elegant presentation.

This free-form style allowed bakers to highlight the natural beauty of the fruit without the constraints of a traditional pie or tart pan.

Today, the fruit galette remains a beloved and versatile treat, enjoyed for its simplicity, flavor, and the ability to showcase the best of the season's bounty.

Advertisement

Recipe

A fresh fruit galette is a rustic and delightful pastry that showcases the natural sweetness of ripe, seasonal fruit. The flaky crust provides a perfect contrast to the juicy filling, making this dessert a crowd-pleaser.

Preparing a fruit galette is a simple yet rewarding process that allows you to showcase your culinary creativity. By using a versatile dough and a variety of fresh fruits, you can experiment with different flavor combinations to suit your personal taste preferences.

Ingredients:

  • 1 1/2 cups all-purpose flour
  • 1/2 teaspoon salt
  • 1 cup unsalted butter, chilled and cubed
  • 1/4 cup ice water
  • 3 cups assorted fresh fruit (such as peaches, berries, or plums), sliced or chopped
  • 1/4 cup granulated sugar
  • 1 tablespoon all-purpose flour
  • 1 egg, beaten with 1 tablespoon water for the egg wash

Preheat your oven to 400°F (200°C). On a lightly floured surface, roll the dough into a circle approximately 12 inches in diameter. Transfer the dough to a parchment-lined baking sheet.

In a large bowl, gently toss the sliced fruit with the sugar and 1 tablespoon of flour. Arrange the fruit mixture in the center of the dough, leaving a 2-inch border. Fold the border over the fruit, pleating the dough as you go. Brush the dough with the egg wash.

Baking the galette at a high temperature allows the crust to become crisp and golden, while the fruit filling bubbles and caramelizes. Serve the galette warm or at room temperature, either on its own or with a scoop of vanilla ice cream for an extra-special treat.

Advertisement

Cooking Steps

Roll out the pastry on a lightly floured surface until it's about 1/8-inch thick.

Arrange the sliced fruit in an overlapping pattern in the center of the pastry.

Fold the pastry edges over the fruit, creating a rustic, free-form tart.

Step 1. Roll Out the Pastry

roll out the pastry

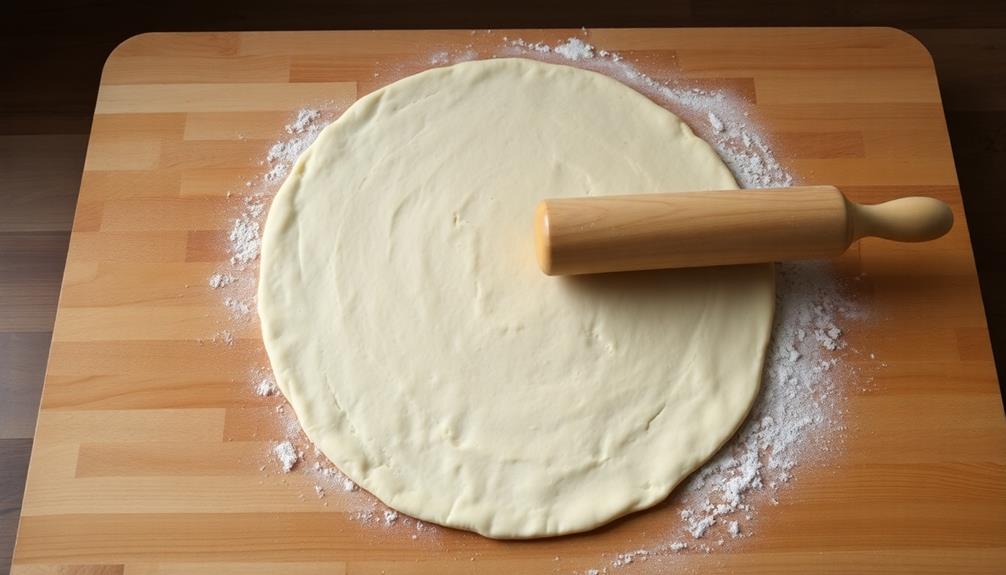
Typically, you'll want to roll out the pastry on a lightly floured surface. This helps prevent the dough from sticking as you work it.

Use a rolling pin to gently roll the dough out into a large circle, about 12 inches in diameter. Don't worry if the edges are a bit uneven – that's part of the rustic charm of a galette.

As you roll, occasionally lift the dough and add a light dusting of flour underneath to keep it from sticking. Apply gentle, even pressure, rolling from the center outwards. This helps create a nice, even thickness throughout.

Advertisement

When the dough is your desired size, transfer it to a parchment-lined baking sheet. Gently fold the dough in half, then in half again, to make it easier to transfer. Unfold the dough on the baking sheet, ready for the next step.

Step 2. Arrange Fruit in Overlapping Pattern

overlapping fruit arrangement technique

Next, begin arranging the fresh fruit in an overlapping pattern across the center of the dough, leaving a 2-inch border around the edges.

Start with your larger fruit pieces, like sliced peaches or nectarines, and layer them in a circular or spiral design. Fill in the gaps with smaller berries, like raspberries or blueberries, creating a vibrant, colorful arrangement.

Overlap the fruit slightly so there are no gaps between the pieces. This not only looks beautiful, but it also helps the fruit cook evenly.

As you work, be mindful of the border – you want to leave enough room for the dough to fold up and over the fruit. Tuck any stray fruit pieces under the edges to keep them in place.

Step back and admire your work – the galette should resemble an elegant, rustic tart, ready for baking.

Advertisement

Step 3. Fold Pastry Edges Over Fruit

fold pastry over fruit

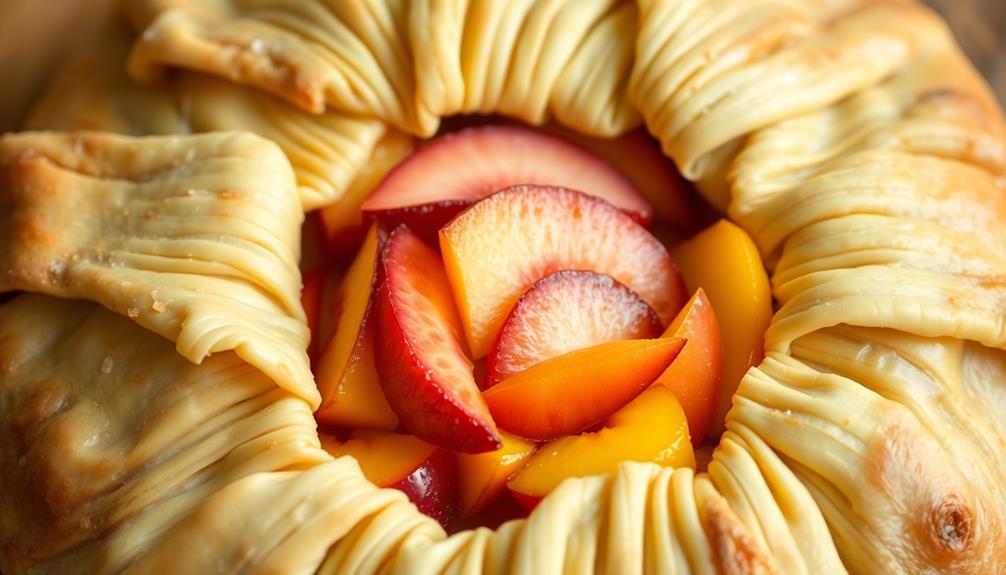
With the fruit arranged, it's time to fold the pastry edges over the fruit. Gently lift the pastry edges and begin folding them inwards, overlapping each piece as you go.

The folds don't need to be perfect – a rustic, imperfect look is part of the charm of a galette. Work your way around the fruit, folding the pastry over to create a lovely, free-form shape.

As you fold, be mindful not to tear the pastry. If it cracks or splits, simply pinch it back together. The overlapping folds will help hold the shape.

Once you've gone all the way around, take a step back and admire your handiwork. The fruit should be peeking out between the folds, creating a beautiful, artful presentation.

With the pastry folded, your galette is almost ready for the oven. Just a few more steps to go before you can enjoy the delicious, flaky pastry and juicy, fresh fruit.

Step 4. Bake Until Pastry Is Golden

bake pastry until golden

Preheat your oven to 400°F (200°C). Once it's nice and hot, pop that gorgeous fruit galette right in. Let it bake for 25-30 minutes, until the pastry turns a lovely golden brown.

Keep an eye on it, though – you don't want the edges to get too dark. As the galette bakes, your kitchen will fill with the most amazing aroma. The fruit juices will bubble up, caramelizing around the edges.

Advertisement

It's going to look absolutely scrumptious when it comes out of the oven. Once the timer goes off, carefully remove the galette and let it cool for about 10 minutes. This gives the fruit a chance to set up a bit.

Then, you can slice into that flaky, golden crust and enjoy the sweet, jammy filling. Serve it warm, maybe with a scoop of vanilla ice cream on the side. Mmm, what a delightful way to savor the season's freshest fruit!

Step 5. Brush Pastry With Egg Wash

brush pastry with egg

Before popping the galette into the oven, you'll want to give the pastry a quick egg wash. This step helps the crust achieve a beautiful golden-brown color and a lovely shine.

Simply crack an egg into a small bowl, add a splash of water, and whisk it together until it's nicely combined. Then, use a clean pastry brush to gently brush the egg wash all over the exposed pastry, being careful not to drip any onto the fruit filling.

Make sure to get into all the nooks and crannies for even coverage. This extra step may seem small, but it makes a big difference in the final appearance of your rustic galette.

After the egg wash, the galette is ready to bake until the crust is golden and the fruit is bubbling. The egg wash seals in the flakiness and gives the pastry an appetizing sheen.

Advertisement

A simple touch that elevates your homemade masterpiece.

Final Thoughts

The Fresh Fruit Galette is a delightful dessert that's perfect for any occasion. You'll be amazed by how easy it's to create a rustic, homemade treat that looks and tastes like it came from a professional bakery.

The combination of the flaky, golden pastry crust and the vibrant, juicy fruit filling is simply irresistible.

Once you've mastered the art of the galette, you can experiment with different fruit combinations and seasonal flavors. Try a classic apple galette in the fall or a berry medley in the summer. The possibilities are endless!

Just remember to brush the pastry with an egg wash before baking to achieve that beautiful golden-brown color and sheen.

Advertisement

With its impressive appearance and mouthwatering flavors, the Fresh Fruit Galette is sure to impress your family and friends. Serve it warm, with a scoop of vanilla ice cream or a dollop of whipped cream for an extra special touch.

Frequently Asked Questions

Can the Galette Be Made With Frozen Fruit?

Absolutely, you can make a galette with frozen fruit. The frozen fruit will work just as well as fresh, providing you thaw it properly and drain any excess liquid before assembling your galette.

How Long Does the Galette Typically Take to Bake?

The baking time for a galette typically ranges from 30 to 45 minutes, depending on the size and filling. You'll know it's done when the crust is golden brown and the fruit is bubbling. Keep an eye on it during the last 10 minutes.

Can the Dough Be Made in Advance?

You can definitely make the dough in advance. Prepare the dough, wrap it in plastic, and refrigerate it for up to 3 days. This allows you to save time when you're ready to assemble and bake the galette.

Is the Galette Suitable for Special Dietary Needs?

Yes, the galette can be suitable for special dietary needs. You can make it gluten-free, dairy-free, or vegan by using alternative ingredients. Just be sure to adjust the recipe accordingly to accommodate your dietary requirements.

Advertisement

Can the Galette Be Served Warm or Cold?

The galette can be served warm or cold, depending on your preference. Warm, it'll have a cozy, comforting feel, while cold, it'll offer a refreshing treat. Choose whichever temperature suits your mood and the occasion best.

Continue Reading
Advertisement

Farm-to-Table Cooking

Whole Roasted Heritage Chicken

Nurture your taste buds with the captivating flavors of a whole roasted heritage chicken, where every bite reveals a culinary journey worth exploring.

Published

on

heritage chicken roasted whole

Whole roasted heritage chicken is a delightful culinary experience. You'll love its golden-brown skin, juicy meat, and complex flavors from aromatic spices. This poultry breed has a rich history – it was carefully bred to maintain unique traits when commercial varieties threatened their diversity. Start by brining the chicken to retain moisture, then rub it with an herb-garlic butter before roasting at high heat. Baste frequently for a crispy exterior. Serve with roasted veggies for a complete meal. Savor the joy of this homemade dish and the satisfaction it brings. There's more to discover about this impressive heritage bird.

Key Takeaways

  • Whole roasted heritage chickens are a result of preservation efforts to maintain genetic diversity of traditional chicken breeds.
  • The preparation process involves brining the chicken, trussing it, and rubbing it with a herb-garlic butter mixture for enhanced flavor and crispy skin.
  • The chicken is roasted at a high temperature of 425°F (220°C) for 60-75 minutes, basting it every 15 minutes to ensure juicy and tender meat.
  • Serving suggestions include pairing the roasted chicken with roasted vegetables, a side salad, and offering sauces or gravies for a complete meal.
  • Enjoying the whole roasted heritage chicken creates a warm, family-style atmosphere and highlights the importance of quality ingredients and homemade cooking.

History

The heritage chicken's rich history can be traced back to the early 20th century, when small-scale farmers and homesteaders across America sought to preserve the genetic diversity of poultry breeds.

These dedicated individuals recognized the importance of maintaining traditional chicken varieties, which were gradually being replaced by commercially-bred birds optimized for industrial production.

Through careful breeding and selection, they worked to keep alive the unique traits and characteristics of heritage chicken breeds, ensuring that these precious genetic resources wouldn't be lost to future generations.

Today, the term "heritage chicken" refers to poultry that can trace its lineage back to these early preservation efforts, showcasing the remarkable diversity and resilience of America's poultry heritage.

Recipe

Roasting a whole heritage chicken is a simple yet impressive way to prepare this flavorful and succulent bird. The slow roasting process allows the chicken to cook evenly, resulting in a juicy interior and a crisp, golden-brown skin.

Advertisement

The key to a successful whole roasted heritage chicken is to start with a high-quality bird. Heritage chickens are known for their rich, intense flavor and firm texture, making them an excellent choice for this type of preparation. With the right technique and a few essential ingredients, you can create a truly exceptional meal.

  • 1 (4-5 pound) heritage chicken, at room temperature
  • 2 tablespoons unsalted butter, softened
  • 1 tablespoon kosher salt
  • 1 teaspoon freshly ground black pepper
  • 1 lemon, halved
  • 4 sprigs of fresh thyme
  • 2 cloves of garlic, peeled and crushed

Preheat your oven to 425°F (220°C). Pat the chicken dry with paper towels and rub the softened butter all over the skin. Generously season the chicken with the kosher salt and black pepper, making sure to season both the inside and outside of the bird.

Place the chicken in a large roasting pan and tuck the lemon halves and thyme sprigs inside the cavity. Scatter the crushed garlic cloves around the chicken. Roast the chicken for 60-75 minutes, or until the internal temperature reaches 165°F (75°C) in the thickest part of the thigh. Baste the chicken occasionally with the pan juices during the cooking process.

Once the chicken is cooked, let it rest for 15 minutes before carving and serving. This resting period allows the juices to redistribute throughout the meat, ensuring a perfectly moist and flavorful result. Enjoy your delicious whole roasted heritage chicken!

Cooking Steps

First, brine the chicken overnight to help it stay moist and flavorful.

Next, truss the chicken tightly for even cooking.

Advertisement

Then, preheat your oven to 425°F and rub the chicken with a delicious herb-garlic butter before roasting until it's golden brown perfection.

Step 1. Brine the Chicken Overnight

brine chicken overnight preparation

Brining the chicken overnight is a crucial first step in ensuring your Whole Roasted Heritage Chicken turns out moist and flavorful. In a large container, mix together water, salt, sugar, and any aromatics you'd like, such as herbs, garlic, or citrus. Submerge the whole chicken in the brine, cover, and refrigerate for at least 8 hours, or up to 24 hours.

The brine helps the meat retain moisture during the roasting process. The salt and sugar also season the chicken from the inside out, infusing it with delicious flavor.

Be sure to pat the chicken dry with paper towels before seasoning and roasting – you don't want any excess moisture interfering with getting that beautiful crispy skin.

After brining, the chicken is ready for the next step: seasoning and roasting to perfection. This simple but essential technique sets the stage for a juicy, well-seasoned Whole Roasted Heritage Chicken.

Step 2. Truss the Chicken for Roasting

truss chicken for roasting

After brining the chicken, go ahead and truss it up for roasting.

Trussing helps the chicken cook evenly and retains its shape. Start by tucking the wing tips under the body.

Advertisement

Then, use a piece of kitchen string to tie the legs together at the ankles. Pull the string tight, then loop it around the body and tie it off.

Next, take the string and make a loop around the neck, pulling the skin taut. Finally, tie the ends of the string together at the back.

This secures the chicken for even cooking in the oven. Be sure to tuck any loose skin under the string as you go.

With the chicken nicely trussed, it's ready for the oven. This step ensures a beautiful presentation and even heat distribution throughout the bird as it roasts to perfection.

Step 3. Preheat Oven to 425°F

preheat oven 425 f

With the chicken neatly trussed, you're now ready to start cooking. Preheat your oven to 425°F. This high temperature is crucial for achieving a crisp, golden-brown skin on your heritage chicken.

As the oven heats up, the intense heat will render the fat under the skin, helping it to crisp to perfection.

Advertisement

While the oven is preheating, take a moment to gather your baking sheet or roasting pan. You'll want to use a rimmed baking sheet or a shallow roasting pan to catch any juices that may drip from the chicken as it cooks.

Line the pan with foil or parchment paper for easy cleanup later.

Once the oven is hot and ready, carefully place the trussed chicken, breast-side up, in the prepared pan. The high heat will help the skin become wonderfully crispy, while the interior remains juicy and flavorful.

Get ready to enjoy the mouthwatering aroma that will soon fill your kitchen!

Step 4. Rub With Herb-Garlic Butter

herb garlic butter application

Next, create a flavorful herb-garlic butter to rub all over the chicken. In a small bowl, combine 4 tablespoons of softened unsalted butter, 2 cloves of minced garlic, 1 teaspoon of chopped fresh thyme, 1 teaspoon of chopped fresh rosemary, and a pinch of salt and pepper.

Mix the ingredients together until they're well-incorporated. Gently loosen the skin of the chicken, being careful not to tear it. Spread half of the herb-garlic butter directly onto the meat under the skin.

Advertisement

Rub the remaining butter all over the outside of the chicken, making sure to cover every nook and cranny. This aromatic, golden-brown layer of butter will baste the chicken as it roasts, infusing it with mouthwatering flavor.

Once the chicken is fully coated, it's ready to go into the preheated oven. The herb-garlic butter will transform this heritage bird into a showstopping main course.

Step 5. Roast Chicken Until Golden Brown

roast chicken golden brown

Preheat your oven to 425°F. Place the prepared chicken in a large roasting pan or rimmed baking sheet. Make sure the chicken is centered and not touching the sides of the pan.

Roast the chicken for 45-55 minutes, basting it every 15 minutes with the pan juices. The chicken is done when the juices run clear, and the internal temperature reaches 165°F in the thickest part of the thigh.

Once the chicken is cooked through, transfer it to a cutting board and let it rest for 10-15 minutes. This allows the juices to redistribute throughout the meat, resulting in a more tender and flavorful bird.

While the chicken rests, take a moment to admire its beautiful golden-brown skin. The herb-garlic butter has done its job, creating a crisp, flavorful exterior that's sure to impress your guests.

Advertisement

Final Thoughts

As you set the table and gather your loved ones, savor the delightful aromas that have filled your home. The whole roasted heritage chicken you've just prepared is sure to impress with its golden-brown skin and juicy, flavorful meat. This dish isn't just a meal – it's an experience to be savored.

With your first bite, you'll be transported by the complex interplay of spices and the natural sweetness of the heritage breed. Each slice reveals the care and attention you've put into this roast, from the perfect seasoning to the gentle basting that's produced such a stunning presentation.

As you enjoy this special meal together, take a moment to appreciate the joy of sharing a homemade dish made with quality ingredients. This is the kind of meal that nourishes both the body and the soul, and it's sure to become a new family favorite.

Savor every last morsel, then sit back and bask in the satisfied smiles all around.

Frequently Asked Questions

Can I Substitute a Regular Chicken for a Heritage Chicken?

You certainly can substitute a regular chicken for a heritage chicken. The cooking time and method will be similar, though the flavor and texture may differ slightly. Feel free to experiment and find what works best for your preferences.

Advertisement

How Long Does It Take to Prepare a Whole Roasted Heritage Chicken?

The preparation time for a whole roasted heritage chicken can vary, but it typically takes 60-90 minutes to properly cook it. The exact time will depend on the size of the bird and your oven temperature.

What Are the Best Side Dishes to Serve With Roasted Heritage Chicken?

When serving roasted chicken, you'll want complementary side dishes that enhance the flavors. Consider roasted vegetables, mashed potatoes, a fresh salad, or crusty bread to create a well-balanced and delightful meal.

Can I Use This Recipe for a Smaller or Larger Heritage Chicken?

You can certainly use this recipe for a smaller or larger heritage chicken. Just adjust the cooking time accordingly – a smaller bird will need less time, while a larger one will require more. The core technique remains the same.

How Can I Tell if a Heritage Chicken Is Cooked Through?

To tell if a heritage chicken is cooked through, use a meat thermometer. Insert it into the thickest part of the thigh, avoiding the bone. The internal temperature should reach 165°F (74°C) for doneness.

Advertisement
Continue Reading

Farm-to-Table Cooking

Nettle and Potato Soup

Savor the earthly delights of Nettle and Potato Soup, a budget-friendly dish packed with vitamins and minerals that will keep you feeling full and nourished.

Published

on

hearty nettle potato soup

Nettles and potatoes combine for a comforting, nourishing soup enjoyed across Europe for centuries. You'll love the earthy, balanced flavors. First, sauté onions and garlic, then add potatoes and broth. Towards the end, toss in fresh nettle leaves – their vitamins and minerals make this soup super healthy. The potatoes provide carbs for energy, while the high fiber keeps you feeling full. This budget-friendly dish is easy to customize with different herbs or veggies. Discover how versatile this soup can be as you continue exploring its benefits.

Key Takeaways

  • Nettle and potato soup is a traditional dish with a history traced back to ancient Greece and Rome, where nettles were used as a survival food.
  • Nettles are highly nutritious, containing essential vitamins, minerals, antioxidants, and fiber, making them a healthy addition to this comforting soup.
  • The recipe involves sautéing onions and garlic, then adding potatoes, nettles, and broth to create a flavorful and satisfying soup.
  • Proper handling and cooking of nettles are crucial to remove bitterness and enhance the overall taste and texture of the dish.
  • The versatility of the recipe allows for adaptations with different herbs, seasonal vegetables, and the ability to adjust consistency and serve as a base for other soups or stews.

History

Nettles, with their stinging leaves, have long been a part of culinary traditions across Europe. These resilient plants have been foraged and used in cooking for centuries, prized for their nutritional benefits and unique flavor.

Interestingly, the earliest known records of nettle consumption date back to ancient Greece and Rome, where the leaves were used in soups, stews, and even as a green vegetable.

During the Middle Ages, nettles became an important survival food, particularly in times of scarcity. Peasants and the working class would gather the wild plants, which were abundant and easy to obtain, to supplement their diets.

The nettle's ability to thrive in a variety of soil conditions made it a reliable and accessible ingredient, even in the harshest of environments.

Today, the humble nettle continues to be celebrated in regional cuisines, with nettle and potato soup being a classic example of its enduring presence in European culinary traditions.

Advertisement

Recipe

Nettle and Potato Soup

Nettle, a common weed often found in damp areas, is a surprisingly versatile and nutritious ingredient. Its earthy, spinach-like flavor lends itself beautifully to hearty soups and stews. Pairing it with the humble potato creates a comforting, nourishing dish that's sure to delight the senses.

This recipe showcases the harmony of these two ingredients, resulting in a vibrant, flavorful soup that's both satisfying and easy to prepare. The nettle's subtle bitterness is balanced by the potato's starchy creaminess, making for a well-rounded and deeply satisfying experience.

  • 1 lb (450g) fresh nettle leaves, washed and stems removed
  • 3 medium potatoes, peeled and diced
  • 1 onion, diced
  • 3 cloves of garlic, minced
  • 4 cups (1 liter) vegetable or chicken broth
  • 2 tbsp olive oil
  • Salt and pepper to taste

In a large pot, sauté the onion and garlic in the olive oil over medium heat until translucent. Add the diced potatoes and broth, and bring to a boil. Reduce heat and simmer for 15-20 minutes, until the potatoes are tender.

Gently stir in the nettle leaves and continue to simmer for another 5-10 minutes, until the nettle is wilted and tender. Season with salt and pepper to taste.

It's important to handle the nettle with care, as the leaves can cause a stinging sensation on the skin. Be sure to wear gloves when harvesting and preparing the nettle.

Advertisement

The soup can be served as a main course or as a side, and it pairs wonderfully with crusty bread or a fresh salad.

Cooking Steps

First, harvest some fresh nettle leaves from your garden or local forager.

Then, peel and chop the potatoes into bite-sized pieces.

Next, sauté the onions in a pot until they're translucent, about 5 minutes.

After that, add the nettles and pour in the vegetable stock.

Advertisement

Step 1. Harvest Fresh Nettle Leaves

gather fresh nettle leaves

Gather your gardening gloves and a pair of scissors as you venture into the lush greenery to collect the delicate nettle leaves.

These remarkable plants thrive in moist, shaded areas, so keep an eye out for them along the edges of forests or near stream banks. When you spot a nettle plant, gently grasp the leaves near the stem and snip them off, taking care to avoid the prickly stems.

Be sure to wear your gloves, as the leaves contain tiny, stinging hairs that can irritate unprotected skin. Collect only the fresh, vibrant green leaves, leaving behind any damaged or discolored ones.

Aim to gather about a handful of leaves per serving of soup. With your nettle bounty in hand, you're ready to bring their delightful flavor and nutritional benefits to your delectable Nettle and Potato Soup.

Step 2. Peel and Chop Potatoes

peel and chop potatoes

With the fresh nettle leaves safely collected, turn your attention to the potatoes.

You'll need to peel them first, so grab a sharp paring knife and get to work. Carefully slice off the skin, making sure to remove any eyes or blemishes. Once peeled, rinse the potatoes under cool water to wash away any dirt or debris.

Next, it's time to chop the potatoes into bite-sized pieces. Place them on a cutting board and, using a chef's knife, slice them into thin, even rounds.

Advertisement

Then, stack the rounds and cut them crosswise into cubes. Aim for pieces that are about 1/2-inch to 1-inch in size – this will help them cook evenly in the soup.

As you chop, be mindful of your fingers and use the knife safely. Take your time and focus on creating uniform potato pieces.

With the potatoes prepped, you're ready to add them to the soup and let the flavors meld together.

Step 3. Sauté Onions Until Translucent

saut onions until translucent

Having peeled and chopped the potatoes, you'll now sauté the onions until they're translucent.

In a large pot or Dutch oven, heat a couple of tablespoons of olive oil over medium heat. Once the oil is shimmering, add the diced onions.

Stir the onions occasionally, letting them cook for about 5-7 minutes. You'll know they're ready when they've softened and turned a lovely, pale golden color.

Advertisement

Be careful not to let them brown too much, as you want the onions to be sweet and aromatic, not caramelized.

As the onions sauté, they'll release their natural sugars, creating a delightful aroma that will fill your kitchen.

This step is crucial for building the flavor base of the soup, so take your time and enjoy the process.

Once the onions are perfectly translucent, you can move on to the next step in creating your delicious Nettle and Potato Soup.

Step 4. Add the Nettles

incorporate the nettles

Next, add the freshly harvested nettle leaves to the pot. Be careful when handling the nettles, as they can sting your skin.

Gently add them to the sautéed onions, stirring to combine. The nettles will quickly wilt down, releasing their earthy, bold flavor into the soup. Allow the nettles to cook for about 2-3 minutes, until they've softened. Their vibrant green color will contrast beautifully with the golden onions.

Advertisement

Nettles are packed with essential vitamins and minerals, so you're getting a nutritious boost in this soup.

Once the nettles have wilted, it's time to add the potatoes. Carefully cube the potatoes and gently stir them into the pot. The nettles and potatoes will now simmer together, blending their flavors and textures to create a hearty, comforting soup.

Get ready for the delicious aroma to fill your kitchen!

Step 5. Add Vegetable Stock

incorporate vegetable stock now

After adding the nettles, pour in the vegetable stock. You'll want to use about 4 cups of stock to cover the nettles and potatoes.

Bring the mixture to a gentle simmer, then let it cook for 15-20 minutes. This allows the flavors to meld and the vegetables to become nice and tender.

As the soup simmers, the stock will infuse the nettles and potatoes with a delicious savory flavor. The stock helps to balance out the slight bitterness of the nettles. You can use a homemade vegetable stock, or opt for a high-quality store-bought version.

Advertisement

Either way, the stock ties all the ingredients together into a harmonious, comforting soup.

Be sure to taste the soup as it cooks and adjust the seasoning as needed. You may want to add a pinch of salt and pepper to enhance the flavors.

The soup should have a nice, velvety texture when it's done. Serve it hot, garnished with a sprinkle of fresh herbs if desired.

Final Thoughts

This nettle and potato soup is a comforting and nourishing dish that showcases the humble ingredients in a delightful way. The combination of earthy nettles and starchy potatoes creates a flavorful and satisfying soup that's perfect for cool evenings or as a light meal.

The key is to handle the nettles carefully and thoroughly cook them to remove any unpleasant bitterness. The potato chunks add substance and creaminess, while the vegetable stock provides a savory backdrop.

Advertisement

Don't be afraid to experiment with different herbs and seasonings to suit your personal preferences. Once you've mastered this recipe, you can easily adapt it to use up other seasonal vegetables or adjust the consistency to your liking.

This soup is a versatile and budget-friendly option that's sure to become a staple in your recipe repertoire. Enjoy the comforting flavors and nourishing benefits of this simple yet delicious nettle and potato soup.

Frequently Asked Questions

Are Nettles Edible, and How Do I Safely Handle Them?

Yes, nettles are edible and packed with nutrients. To handle them safely, wear gloves to avoid the stinging leaves. Gently rinse them and cook thoroughly to remove the sting before enjoying their earthy, spinach-like flavor.

What Are the Health Benefits of Consuming Nettles?

Consuming nettles provides an array of health benefits. They're rich in vitamins and minerals, like vitamins A, C, and K, as well as iron and calcium. Nettles also have anti-inflammatory properties, making them a nutritious addition to your diet.

Can I Substitute Spinach or Kale for Nettles in the Recipe?

You can substitute spinach or kale for nettles in a recipe, but you won't get the same nutritional benefits. Nettles are packed with vitamins, minerals, and antioxidants that spinach and kale may not provide in the same quantities.

Advertisement

How Long Does the Soup Keep, and Can It Be Frozen?

The soup can typically last 3-4 days in the refrigerator and can be frozen for up to 3 months. When ready to serve, simply thaw it in the fridge and reheat it on the stovetop.

Can I Use a Blender Instead of a Hand Blender for the Soup?

You can certainly use a blender instead of a hand blender for the soup. Just be careful not to overfill the blender and work in batches, if needed, to ensure a smooth and consistent texture.

Continue Reading

Farm-to-Table Cooking

Roasted Bone Marrow With Herb Salad

Captivating the senses, roasted bone marrow with a vibrant herb salad offers a decadent and intriguing culinary experience. Uncover the secrets behind this prized delicacy.

Published

on

herb salad with bone marrow

You'll love the rich, indulgent roasted bone marrow, with its creamy texture and savory flavor. This prized delicacy was cherished in ancient Rome and is making a comeback today. Roast the marrow to perfection, then pair it with a bright, herbaceous salad for a memorable flavor experience. Handle the hot marrow carefully and finish it off with a sprinkle of flaky sea salt. You'll be wowed by how the luxurious marrow contrasts with the fresh herbs – an engaging blend of textures and tastes. Let's explore the history and cooking steps in more detail.

Key Takeaways

  • Roasted bone marrow offers a rich, creamy texture and depth of flavor that can be highlighted by pairing it with a bright and herbaceous salad.
  • Preparation of the dish involves properly roasting the bone marrow and assembling a simple yet flavorful herb salad to balance the indulgent nature of the marrow.
  • The recipe can be served as an appetizer or as part of a larger meal, impressing guests with its unique combination of flavors and textures.
  • Proper handling and presentation of the roasted marrow are essential, as it should be served warm with small forks or spoons for easy enjoyment.
  • The dish can be further enhanced by adding a drizzle of fresh lemon juice to help balance the richness of the marrow and complement the freshness of the herbs.

History

Bone marrow has long been a prized delicacy, with its rich, creamy texture and savory flavor. Throughout history, various cultures have cherished this nutrient-dense food. In ancient Rome, bone marrow was considered a luxurious treat, often served as a spread or added to soups and stews.

During the Middle Ages, bone marrow was highly sought after, and it became a symbol of wealth and status.

In many traditional cuisines, bone marrow has been used in hearty, nourishing dishes. In France, it's commonly roasted and served with a simple salad, showcasing its delicate flavor. Similarly, in Mexico, bone marrow is scooped out of the bone and used in stews and sauces, providing a velvety mouthfeel.

Today, the popularity of bone marrow has experienced a resurgence, with chefs and home cooks alike rediscovering its versatility and unique taste. Whether roasted, braised, or incorporated into other dishes, bone marrow remains a treasured ingredient that connects us to the culinary past.

Recipe

Roasted bone marrow is a delicacy that offers a rich, creamy texture and a depth of flavor that pairs beautifully with a bright and herbaceous salad. This recipe combines the indulgent nature of the bone marrow with the freshness of a vibrant herb salad, creating a harmonious balance of flavors and textures.

Advertisement

The key to perfectly roasted bone marrow lies in the proper preparation and cooking technique. By seasoning the marrow with a simple blend of salt and pepper and roasting it until it's hot and spreadable, you can unlock its full potential and create a luxurious base for the accompanying salad.

  • 4 to 6 beef marrow bones, cut crosswise into 1-inch slices
  • Kosher salt and freshly ground black pepper
  • 1 bunch fresh parsley, leaves only
  • 1 bunch fresh chives, chopped
  • 1 bunch fresh tarragon, leaves only
  • 1 bunch fresh mint, leaves only
  • 2 tablespoons extra-virgin olive oil
  • 1 tablespoon fresh lemon juice
  • Flaky sea salt, for serving

Preheat your oven to 400°F (200°C). Arrange the marrow bones on a baking sheet and season them generously with kosher salt and freshly ground black pepper. Roast the bones for 15 to 20 minutes, or until the marrow is hot and spreadable.

While the marrow is roasting, prepare the herb salad by combining the parsley, chives, tarragon, and mint leaves in a bowl. Drizzle the olive oil and lemon juice over the herbs, and toss gently to coat.

To serve, transfer the roasted marrow bones to plates and top with the herb salad. Finish the dish with a sprinkle of flaky sea salt.

For the best results, be sure to use fresh, high-quality ingredients and handle the marrow bones with care to prevent any spillage. Additionally, keep a close eye on the marrow during the roasting process, as it can go from perfectly cooked to overcooked quickly. Enjoy this decadent and flavorful dish as an appetizer or a unique side to your meal.

Cooking Steps

Slice the bone marrow lengthwise, then roast it at 450°F until golden brown.

Advertisement

Whip up a quick parsley herb salad while the marrow cooks.

Step 1. Slice Bone Marrow Lengthwise

slice bone marrow lengthwise

After preheating the oven, grab the bone marrow and carefully slice it lengthwise using a sharp knife.

You'll want to work slowly and steadily, applying gentle pressure to avoid breaking the marrow. Each piece should be about 1-inch thick, revealing the creamy interior.

Once you've sliced the marrow, arrange the pieces in a single layer on a baking sheet.

This will ensure they cook evenly and the edges get nice and crispy. Drizzle a bit of olive oil over the top, just enough to lightly coat the marrow. You can also sprinkle on some salt and pepper at this stage if you'd like.

Now pop the baking sheet into the preheated oven and let the marrow roast for 12-15 minutes.

Advertisement

Keep an eye on it, as you want the outside to be golden brown but the insides to stay soft and spreadable. When it's ready, the marrow will be sizzling and the aroma will be mouthwatering.

Careful, it'll be hot!

Step 2. Roast Bone Marrow at 450°F

roast bone marrow 450 f

Preheat your oven to 450°F.

Once it's nice and hot, carefully place the marrow bones on a rimmed baking sheet. Make sure they're not touching each other – you want plenty of room for the marrow to sizzle and caramelize.

Pop them in the oven and roast for 12 to 15 minutes. Keep an eye on them, as you want the tops to be golden brown but not burnt.

The marrow should be soft and jiggly when the time's up. Use tongs to transfer the bones to a serving platter.

Advertisement

Let them cool for a couple of minutes before serving. The interior will be steaming hot, so be careful when you scoop it out.

Drizzle the marrow with a bit of lemon juice and sprinkle with flaky sea salt.

Serve it up with your herb salad on the side for a truly decadent appetizer.

Get ready for oohs and aahs from your guests!

Step 3. Make Parsley Herb Salad

prepare parsley herb salad

Gather a mix of fresh herbs, such as parsley, chives, and tarragon, and roughly chop them. You'll want a generous handful of each herb. Incorporating herbs like parsley can also provide potential health benefits, including essential oils for respiratory health that help support your overall well-being.

Next, thinly slice a shallot and add it to the chopped herbs. Drizzle the herb mixture with a bit of olive oil and a splash of red wine vinegar. Season with a pinch of salt and freshly cracked black pepper, then gently toss everything together.

Advertisement

The goal is to create a vibrant, flavorful salad that pairs perfectly with the rich, savory roasted bone marrow. Let the salad sit for a few minutes to allow the flavors to meld.

When you're ready to serve, spoon the bone marrow onto plates and top each portion with a generous helping of the herby salad. The contrast of the creamy marrow and the bright, fresh salad is simply divine. Enjoy this delightful combination of textures and tastes.

Step 4. Serve Bone Marrow With Salad

serve marrow with salad

Once the herby salad is ready, it's time to serve the roasted bone marrow. Gently transfer the roasted bone marrow from the baking dish to a serving platter or individual plates. Be careful, as the bone marrow will be very hot! Drizzle any pan juices over the top.

Now, it's time to assemble the dish. Place a generous spoonful of the parsley herb salad directly next to the bone marrow. The cool, fresh flavors of the salad will provide a lovely contrast to the rich, savory bone marrow. You can even top the bone marrow with a bit of the salad if you'd like.

Serve the roasted bone marrow and herb salad immediately, while the marrow is still warm and the salad is crisp. Provide small forks or spoons for your guests to easily scoop out and enjoy the bone marrow.

This dish makes for an impressive and delicious appetizer or side. Bon appétit!

Advertisement

Step 5. Drizzle With Lemon Juice

drizzle with lemon juice

To finish off the dish, drizzle a bit of fresh lemon juice over the roasted bone marrow. The tart and bright acidity of the lemon helps to balance the rich, fatty texture of the bone marrow.

Just a light drizzle is all you need – you don't want to overwhelm the delicate flavor of the marrow. The lemon juice also helps to enhance the herbal notes in the salad, creating a harmonious blend of flavors on the plate.

Be sure to use freshly squeezed lemon juice for the best results. Bottled juice just won't have the same vibrant, zesty punch.

If you have a lemon wedge or two leftover, you can even offer those on the side so your guests can add a little extra lemon to their taste.

The final touch of lemon really takes this dish to the next level, so don't skip this simple but essential step!

Final Thoughts

Ultimately, roasted bone marrow with a vibrant herb salad makes for a delightful and indulgent dish. The rich, buttery texture of the bone marrow pairs beautifully with the bright, fresh flavors of the herbs.

Advertisement

The lemon juice provides a welcome zing, cutting through the richness and elevating the entire dish. This recipe is sure to impress your guests, whether served as an appetizer or as part of a larger meal.

The best part? It's surprisingly simple to prepare, requiring minimal hands-on time. Simply roast the bone marrow, whip up the quick salad, and you're ready to enjoy.

The contrasts in texture and flavor create a truly memorable experience. So don't hesitate – give this roasted bone marrow dish a try and savor the delightful combination of indulgence and freshness.

Frequently Asked Questions

What Nutrients Does Bone Marrow Provide?

Bone marrow provides you with an abundance of essential nutrients, including protein, iron, zinc, and vitamins A, C, and K. It's a nutritional powerhouse that can support your overall health and well-being.

Is Bone Marrow Suitable for Vegetarians?

Bone marrow isn't suitable for vegetarians, as it's a purely animal-derived product. Since vegetarians avoid all animal products, including those derived from animals, bone marrow wouldn't align with their dietary restrictions.

Advertisement

How Long Can Roasted Bone Marrow Be Stored?

Roasted bone marrow can typically be stored for up to 3 days in the refrigerator when stored properly in an airtight container. However, it's best to consume it within 1-2 days for optimal freshness and flavor.

Can Bone Marrow Be Substituted in Other Recipes?

Absolutely! Bone marrow can substitute for other fats or oils in various recipes. It adds a rich, creamy texture and deep, savory flavor to dishes like soups, sauces, and even baked goods.

Does the Type of Bone Affect the Taste of Roasted Bone Marrow?

The type of bone does affect the taste of roasted bone marrow. Bones from different animals, like beef or lamb, have distinct flavors that'll come through when you roast the marrow. Try experimenting to find your preferred taste.

Continue Reading
Advertisement

Affiliate Disclaimer
As an affiliate, we may earn a commission from qualifying purchases. We get commissions for purchases made through links on this website from Amazon and other third parties.

Advertisement

Latest

sweet fruity unique grapes sweet fruity unique grapes
Graduations/Birthdays23 seconds ago

Cotton Candy Grapes

Satisfy your sweet tooth with the captivating flavor of Cotton Candy Grapes, a unique fruit that replicates the taste of...

colorful rimmed beverages colorful rimmed beverages
Graduations/Birthdays6 mins ago

Sprinkle-Rimmed Drinks

Whimsical and visually captivating, sprinkle-rimmed drinks transport you to a world of playful flavors and enchanting presentations that will leave...

festive puppy chow treats festive puppy chow treats
Graduations/Birthdays11 mins ago

Birthday Cake Puppy Chow

Uncover the captivating blend of crunchy Chex, creamy white chocolate, and vibrant sprinkles that make Birthday Cake Puppy Chow an...

magical colorful chocolate beverage magical colorful chocolate beverage
Graduations/Birthdays18 mins ago

Unicorn Hot Chocolate

Otherworldly and whimsical, unicorn hot chocolate transports you to a realm of vibrant colors and sweet indulgence, where the possibilities...

colorful skewered fruit delights colorful skewered fruit delights
Graduations/Birthdays23 mins ago

Rainbow Fruit Kebabs

Tantalizing and refreshing, these rainbow fruit kebabs offer a delightful twist on a classic snack, with a vibrant array of...

colorful cheese filled tortillas colorful cheese filled tortillas
Graduations/Birthdays29 mins ago

Confetti Quesadillas

Heighten your taste buds with the vibrant burst of color and flavor in confetti quesadillas, a fusion of Mexican cuisine...

celebratory dessert beverage fusion celebratory dessert beverage fusion
Graduations/Birthdays35 mins ago

Birthday Cake Milkshake

Fulfill your childhood nostalgia with the irresistible Birthday Cake Milkshake, a creamy, indulgent treat that's a celebration in every sip....

colorful cake batter dip colorful cake batter dip
Graduations/Birthdays40 mins ago

Funfetti Dip

Celebrate the vibrant and creamy delight of Funfetti Dip, the ultimate party treat that will captivate your taste buds and...

celebratory sweet snack treat celebratory sweet snack treat
Graduations/Birthdays46 mins ago

Birthday Cake Flavored Popcorn

Outrageous and irresistibly sweet, this birthday cake flavored popcorn promises a flavor explosion that will leave you craving more. Discover...

graduation jewelry and snacks graduation jewelry and snacks
Graduations/Birthdays52 mins ago

Class Ring Onion Rings

Feast on the nostalgic delight of Class Ring Onion Rings, a crispy, golden-brown treat that will transport you back to...

breadsticks resembling pencils breadsticks resembling pencils
Graduations/Birthdays58 mins ago

Pencil-Shaped Breadsticks

Harnessing the rich history and versatility of pencil-shaped breadsticks, explore how to craft these unique and captivating snacks that will...

colorful candy dessert layers colorful candy dessert layers
Graduations/Birthdays1 hour ago

Smarties Candy Parfaits

Observe the vibrant layers of creamy yogurt, pudding, and whipped cream, elevated by the delightful crunch of classic Smarties candies...

Advertisement

Trending