To carve a turkey like a pro, start by letting it rest for 20 minutes to keep the juices in. Use a sharp carving knife and a carving fork for stability. Begin by cutting through the skin to remove the legs and thighs, then separate the drumsticks from the thighs at the joints. Next, slice along the breastbone, following its natural shape to remove the breast in one piece. Finally, carve the breast into thin, even slices, and carefully arrange everything for a beautiful presentation—continue for expert tips that will elevate your technique.
Key Takeaways
- Use a sharp carving knife and a stable carving fork for precise, clean cuts.
- Rest the cooked turkey for at least 20 minutes to allow juices to redistribute.
- Begin by removing legs and thighs, cutting through joints with steady, confident strokes.
- Slice the breast meat along the rib cage with smooth, long cuts for even, thin slices.
- Serve each part neatly, ensuring slices are uniform and presentation is polished.

Carving a turkey is an essential skill that guarantees you serve up slices that are both attractive and easy to eat. To do this well, you need to master proper knife techniques and select the right carving tools. Start by choosing a sharp carving knife, preferably one with a long, thin blade that can smoothly glide through the meat. A carving fork is also helpful to stabilize the bird, keeping it steady on the cutting board as you work. Before you begin, let the turkey rest for at least 20 minutes after roasting. This allows the juices to redistribute, making the meat more tender and easier to carve.
Position the turkey on a stable cutting surface with the breast side facing up. Use your carving fork to hold the bird securely, then begin by removing the legs and thighs. Cut through the skin connecting the leg to the body with steady, confident strokes, keeping your knife at a slight angle. Once free, gently pull the leg away from the body and cut through the joint to detach it completely. Repeat with the other leg. These initial cuts set the foundation for easier slicing of the meat.
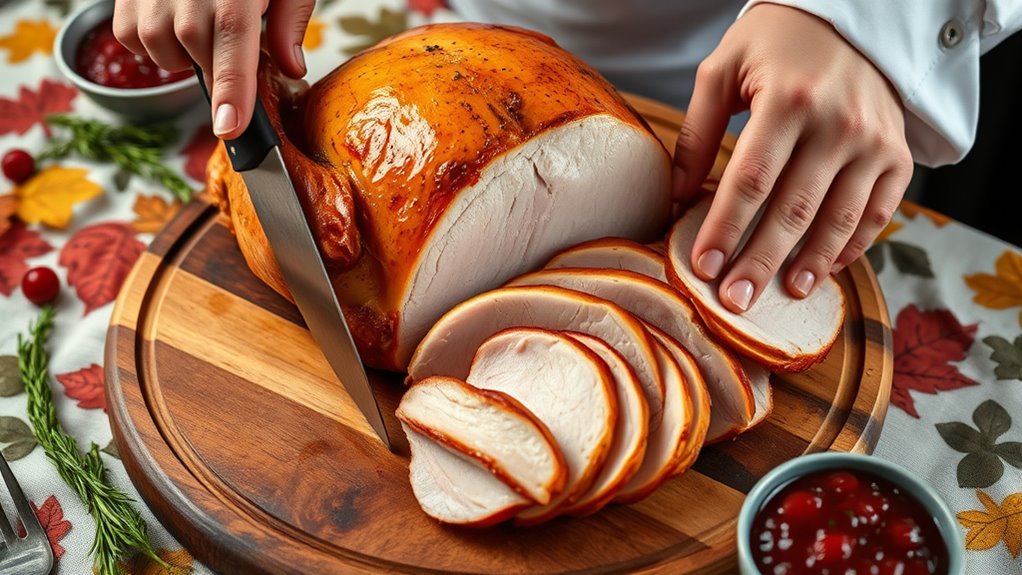
Next, remove the breast meat. Locate the breastbone and make a long, smooth cut along one side of it, starting at the top of the breast and working downwards. Use your knife techniques to keep the blade close to the bone, minimizing waste and ensuring clean, attractive slices. Carefully slide the knife along the rib cage, following the natural contours of the meat to remove whole breast portions. For thin, uniform slices, use a gentle slicing motion rather than pressing down with the knife. Repeat on the other side.
With the main parts removed, you can now carve the breast meat into individual slices. Use a gentle sawing motion to create even pieces, and remember to keep your knife sharp for the best results. For the drumsticks and thighs, slice through the joints and serve as is or cut into smaller pieces if desired. Throughout the process, keep your carving tools clean and sharp, which makes the task easier and results in better presentation.
Frequently Asked Questions
What Tools Are Essential for Perfect Turkey Carving?
To carve a turkey like a pro, you need a sharp carving knife and a sturdy fork, ensuring knife safety throughout. Use a serrated or flexible knife for smooth, precise cuts, and employ proper carving techniques to avoid tearing the meat. A carving board with grooves helps catch juices, making the process cleaner. These tools and techniques help you serve perfectly sliced turkey with confidence and safety.
How Do I Ensure the Turkey Stays Moist After Carving?
Did you know that resting your turkey for 20 minutes can improve moisture retention by up to 25%? To keep it moist after carving, cover the slices loosely with foil and let it rest. This helps the juices redistribute and prevents dryness. For gravy enhancement, use the pan drippings to add flavor and moisture back into the meat. This simple step guarantees every bite stays tender and flavorful.
Can I Carve the Turkey Ahead of Time?
Yes, you can carve the turkey ahead of time. Make ahead preparations by carving the meat into slices and storing it properly. Use storage tips like placing the carved turkey in an airtight container or wrapping it tightly in foil. Keep it refrigerated at 40°F or below, and consume within 3-4 days to guarantee freshness. Reheat gently before serving to maintain moisture and flavor.
What’s the Best Way to Present Carved Turkey?
Ever wondered how to make your carved turkey look irresistible? Use elegant plating techniques like arranging slices neatly or fanning them out for visual appeal. Add fresh herbs, a drizzle of gravy, or colorful sides for contrast. Presentation tips also include serving on a warm platter and garnishing thoughtfully. With these tricks, your turkey will not only taste amazing but also wow your guests with its stunning appearance.
How Do I Avoid Shredding the Meat During Carving?
To avoid shredding the meat during carving, use proper carving techniques. Start by letting the turkey rest so the juices settle, making the meat firmer and easier to slice. Use a sharp carving knife and steady, smooth motions, slicing against the grain. Avoid pressing down too hard, which can cause meat shredding. Keep your cuts even and gentle, and you’ll achieve neat, tender slices without shredding the meat.
Conclusion
Now that you know how to carve a turkey like a pro, your guests will be impressed by your skills. Remember, the average American consumes about 16 pounds of turkey each year—so mastering this technique makes every holiday meal special. With a steady hand and confidence, you’ll serve perfectly sliced meat every time. Practice makes perfect, and soon, carving will feel natural. Enjoy your beautifully presented turkey and the compliments that come with it!