Connect with us

West African Cuisine

Fufu With Chicken Soup: a West African Comfort Meal

Join the journey of savoring Fufu with chicken soup, a delightful West African comfort meal that promises warmth and togetherness—discover the recipe inside!

Published

on

west african comfort food

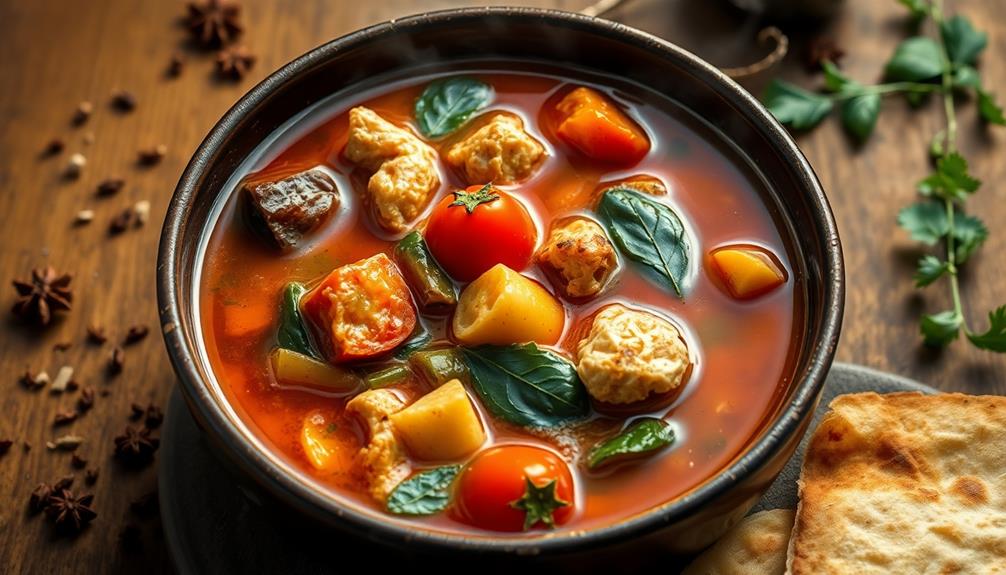
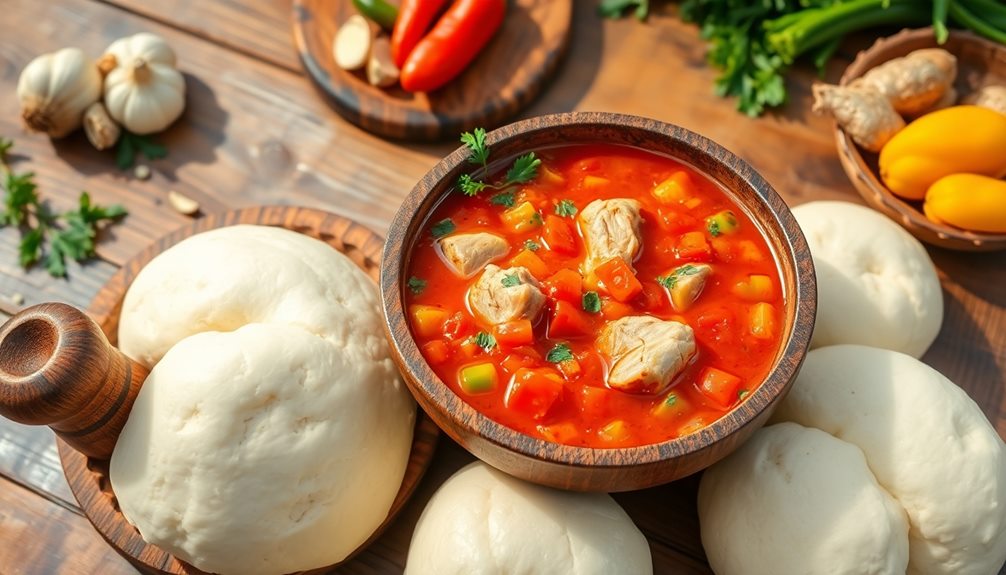
Fufu with chicken soup is a delicious West African comfort meal that's sure to make you smile! This warming dish combines smooth, stretchy fufu, made from starchy foods like cassava or yams, with a savory chicken soup filled with tender chicken, fresh vegetables, and tasty spices. You'll love how easy it is to prepare, from simmering the chicken with flavorful herbs to blending in colorful veggies. It's not just a meal; it's a celebration of culture and togetherness. So, gather your ingredients, try this recipe, and enjoy a delightful experience that brings people together at the table!

Key Takeaways

  • Fufu with chicken soup is a traditional West African dish symbolizing love, hospitality, and cultural heritage, often enjoyed during celebrations.
  • Fufu is made from starchy ingredients like cassava or yams, pounded into a smooth, stretchy consistency.
  • The chicken soup features seasoned chicken, vegetables, and spices, creating a rich and flavorful broth.
  • This dish is typically served in a bowl with chicken soup poured over fufu, often enjoyed with fingers or wooden utensils.
  • Fufu with chicken soup fosters connections and memories, celebrating the joy of sharing meals and cultural traditions.

History

The history of fufu with chicken soup is rich and deeply rooted in West African culture. This delicious dish has been enjoyed for generations, bringing families together over shared meals.

Fufu itself is made from starchy foods, like cassava or yams, which are boiled and pounded into a smooth, stretchy consistency. People in many West African countries have their own special ways to prepare it, making it unique to their traditions.

Chicken soup adds warmth and flavor to fufu, creating a comforting and satisfying meal. It's not just about eating; it's about connecting with family and friends. In many homes, you'll find everyone gathering around the table, enjoying the delightful taste of fufu and the hearty chicken soup together.

This dish often plays a role in celebrations, marking important events like weddings and holidays. Sharing fufu with chicken soup shows love and hospitality, making guests feel welcome.

Cooking Steps

To create a delicious fufu with chicken soup, start by gathering your ingredients and tools. You'll need cassava flour, plantains, chicken pieces, onions, tomatoes, and your favorite spices. Grab a large pot, a wooden spoon, and a mixing bowl.

Advertisement

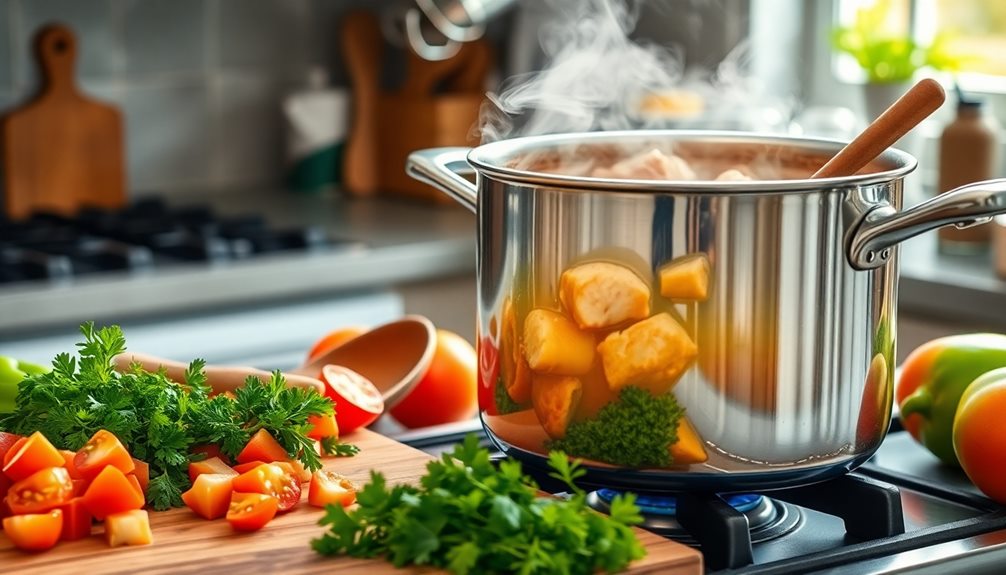
First, cook your chicken in the pot with chopped onions, diced tomatoes, and spices. Let it simmer for about 30 minutes until the chicken is tender.

While that's cooking, peel and chop the plantains. In another pot, bring water to a boil, then add the plantains and cook until they're soft.

Next, drain the plantains and mash them in a mixing bowl. Slowly add cassava flour and mix until it becomes a smooth, stretchy dough. This is your fufu!

Once the chicken is done, taste the soup and adjust the spices as needed. Serve the chicken soup in a bowl and scoop up some fufu with your fingers.

It's best enjoyed when you dip the fufu into the soup, letting all those yummy flavors combine. Enjoy the warmth and comfort of this delightful West African dish with your family and friends!

Advertisement

Step 1. Prepare Ingredients for Soup

gather soup preparation ingredients

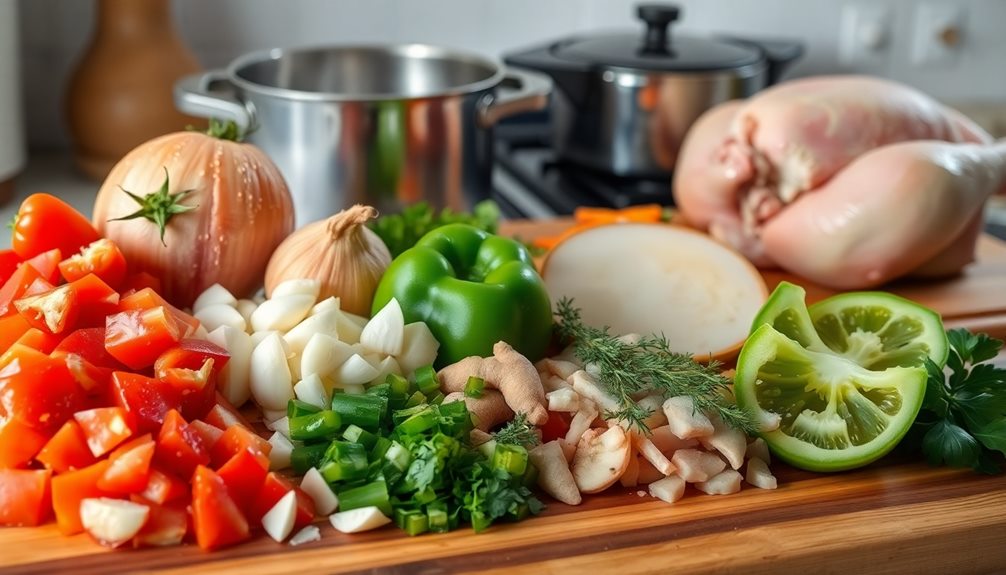
Now, let's add some greens. Spinach or kale is perfect, as they not only make your soup vibrant but also pack in nutrients. You can simply tear the greens into smaller pieces and stir them in during the final few minutes of cooking to retain their freshness and bright color. Their earthy flavor complements the hearty base of the soup beautifully, making every bite a delight. If you’re looking for more ways to enjoy nutrient-rich greens, you might also love exploring an Ethiopian lentil salad recipe, which pairs the bold flavors of lentils and spices with fresh, crisp vegetables.

For flavor, grab some fresh herbs like thyme or parsley. They'll make your soup smell amazing!

You'll also want to pick up spices like salt, pepper, and maybe a bit of cayenne if you like it spicy.

And, of course, some water or chicken broth is needed to bring everything together.

Lastly, consider adding a splash of lemon juice or a few slices of lime at the end for a zesty kick.

With these ingredients prepped, you're on your way to creating a comforting chicken soup that warms the heart and soul.

Advertisement

Now, let's get ready to simmer that chicken with all these wonderful flavors!

Step 2. Simmer Chicken With Spices

simmer chicken with spices

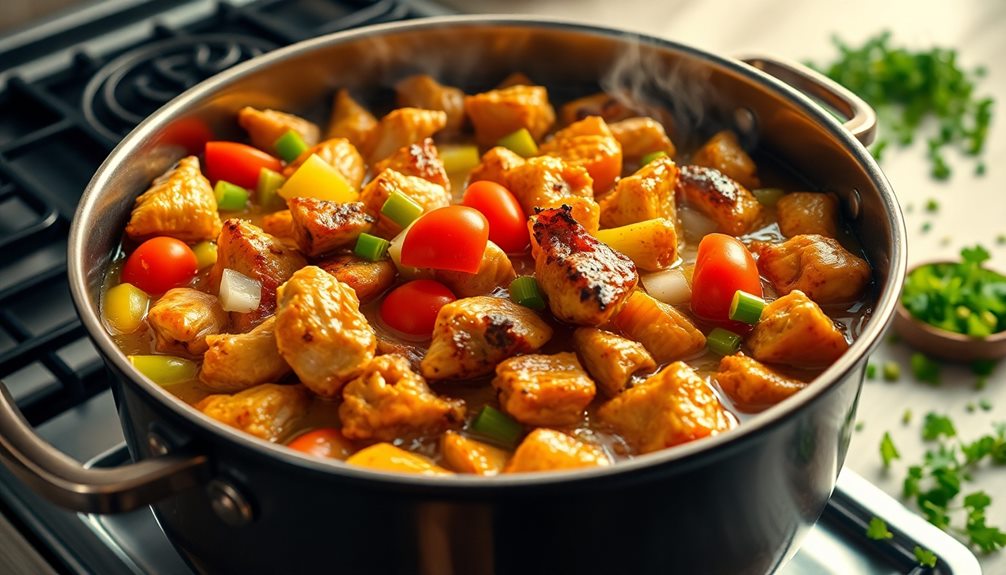
The chicken's rich flavor really shines when you simmer it with spices. First, grab your chicken pieces and give them a good rinse under cool water. Pat them dry with a paper towel, and then season them with salt and pepper. This simple step makes a big difference!

Next, heat some oil in a large pot over medium heat. Once it's hot, add the seasoned chicken and let it brown on all sides. This should take about 5-7 minutes, and you'll love that delicious smell filling your kitchen!

Now, it's time to add your spices. You can use garlic, ginger, and some chili powder for a little kick! Stir them in, and let the spices mingle with the chicken.

Pour in enough water to cover the chicken, then bring it to a gentle boil. Once it's bubbling, reduce the heat and let it simmer for 30-40 minutes. This slow cooking allows the flavors to blend beautifully.

Check that the chicken is cooked through; it should be tender and juicy. You're doing great! This step sets the stage for a comforting bowl of chicken soup that's perfect with fufu!

Advertisement

Step 3. Blend in Vegetables

incorporate vegetables thoroughly

Next up, you'll want to stir in your vegetables to enhance the soup's flavor and texture. This step is super important because it adds color and nutrition to your dish! You can choose any vegetables you like; popular options include carrots, bell peppers, and spinach. Chop them into small pieces so they cook evenly and fit nicely with the chicken.

Once your veggies are prepped, add them gently to the pot, and give everything a good stir. You'll notice how the vibrant colors brighten your soup! Let the vegetables cook for about 5 to 10 minutes. This allows them to soften and mingle with the chicken and spices. Keep an eye on them; you want them tender but not mushy. If you like a little crunch, aim for that perfect balance!

While it's cooking, take a moment to enjoy the delicious aroma filling your kitchen. It's a sure sign that your soup is coming together beautifully.

Step 4. Add Water to Soup

incorporate water into soup

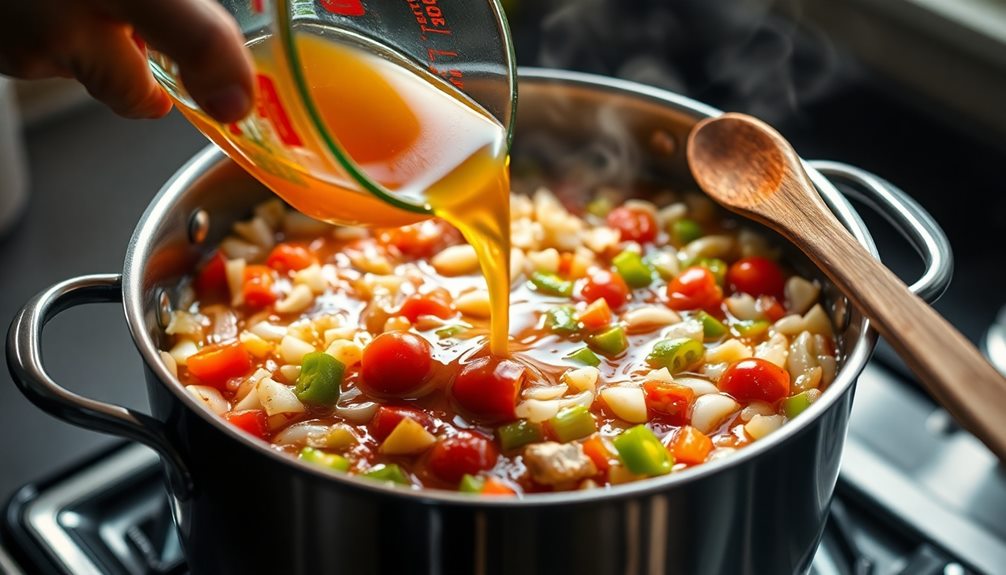
After letting the vegetables cook and release their flavors, it's time to add water to your soup. You'll want to pour in enough water to cover the blended mixture. This step is super important because it helps create that delicious, comforting broth that makes your chicken soup so special.

Grab a measuring cup or a large bowl, and start adding water slowly. If you're not sure how much to use, start with about four cups. You can always add more later if you want a thinner soup. Stir everything together as you pour, making sure the vegetables mix well with the water. This way, all the yummy flavors blend together!

Once you've added the water, turn up the heat and let your soup come to a gentle boil. You'll notice the wonderful aromas filling your kitchen, making you even more excited to taste it!

Keep an eye on it, and let it simmer for about 20-30 minutes. This allows the chicken to cook through and the flavors to deepen, creating a warm, inviting dish that's perfect for sharing with family and friends. Enjoy the process; your soup is almost ready!

Advertisement

Step 5. Adjust Seasoning to Taste

seasoning adjustment for flavor

Once you've let your soup simmer and the flavors meld together, it's time to adjust the seasoning to taste. This step is really important because it helps make your soup delicious and just right for you!

Grab a spoon and take a little taste. Does it need more salt? Maybe a pinch of pepper for some heat?

If you think it's a bit bland, sprinkle in some more spices. Try adding a little bit of garlic powder or some fresh herbs like parsley or cilantro. These can really brighten up the flavors!

Don't forget to mix well after each addition.

After you adjust the seasoning, let the soup simmer for a few more minutes. This allows the new flavors to blend in nicely.

Remember, cooking is all about experimenting, so don't be afraid to play around with the ingredients.

Advertisement

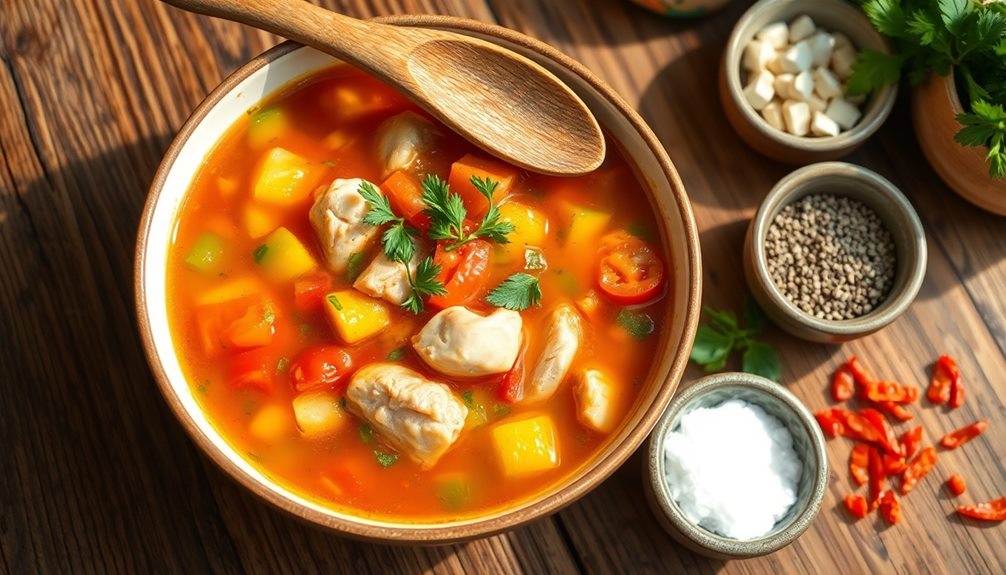
Once you're happy with the taste, it's time to serve! Ladle the warm soup into bowls and get ready to enjoy this comforting dish with your fufu.

You've made something special, and that's something to celebrate! Enjoy every bite!

Final Thoughts

When it comes to enjoying fufu with chicken soup, the experience is about more than just the flavors; it's a celebration of culture and tradition. Each bite connects you to a rich history that spans generations.

You'll find joy in the way the fufu and soup blend together, creating a warm hug for your taste buds.

As you gather around the table with family or friends, the spirit of togetherness comes alive. You share stories and laughter, making memories that last long after the meal is done. It's not just food; it's a time to bond and create connections that matter.

Advertisement

Don't forget that making fufu and chicken soup is an adventure in itself! You can experiment with different recipes, adding your own twist to this classic dish.

Every spoonful tells a story, whether it's a family recipe passed down or a new creation you've tried.

Frequently Asked Questions

What Are the Best Side Dishes to Serve With Fufu?

When you're pairing side dishes with fufu, consider serving spicy stews, grilled meats, or sautéed vegetables. These options complement the texture and flavor, enhancing your meal experience and making it even more satisfying.

Can I Use a Gluten-Free Alternative for Fufu?

Yes, you can use gluten-free alternatives for fufu. Options like cassava flour, plantains, or yams work well. Just cook and mash them to achieve a similar texture, making it a delicious and safe dish for you.

How Long Does Leftover Fufu Last in the Fridge?

Leftover fufu typically lasts about 3 to 5 days in the fridge if stored properly in an airtight container. Just make sure to check for any signs of spoilage before reheating and enjoying it again.

Advertisement

What Traditional Drinks Pair Well With Fufu and Chicken Soup?

When enjoying fufu, consider pairing it with traditional drinks like palm wine or ginger beer. These beverages complement the dish's flavors, enhancing your overall experience and making your meal even more enjoyable.

Are There Any Vegetarian Variations of Chicken Soup for Fufu?

Yes, you can enjoy vegetarian variations by using vegetable broth, adding mushrooms, carrots, and spices to create a hearty soup. It complements fufu well, giving you a flavorful, satisfying meal without chicken. Enjoy!

Advertisement

West African Cuisine

Afang Soup Recipe: The Nutritious Nigerian Leaf Soup

Crave a taste of authentic Nigerian cuisine? Discover the secrets to crafting the beloved afang soup, a nutritious leaf soup that will delight your senses.

Published

on

nigerian afang soup recipe

Get ready to embark on a flavorful journey through the heart of Nigerian cuisine with afang soup! This robust and nutritious leaf soup originates from the Efik and Ibibio people, who've perfected its preparation over generations. The key? Tender afang leaves, simmered to perfection with a mix of meats, fish, and spices. First, you'll wash and slice the leaves, then add fragrant chicken stock and a blend of savory seasonings. Don't forget the juicy periwinkles – they lend a unique depth of flavor. As the soup simmers, the aroma will have your mouth watering. And if you keep reading, you'll uncover the secrets to crafting this beloved Nigerian dish.

Key Takeaways

  • Afang soup originates from the Efik and Ibibio people of southeastern Nigeria and is considered a nutritious staple in Nigerian cuisine.
  • The unique preparation method involves simmering afang leaves, meats, fish, and spices to create a flavorful and culturally significant dish.
  • Proper washing and slicing of the afang leaves are crucial for enhancing the soup's flavor and texture balance.
  • The addition of chicken stock, onions, and dried afang leaves creates a robust and savory base for the soup.
  • Patience during the simmering process allows the flavors to meld, resulting in tender afang leaves and a satisfying dining experience.

History

historical events and timelines

Although the exact origins of afang soup are unclear, it's believed to have emerged from the culinary traditions of the Efik and Ibibio people of southeastern Nigeria. These ethnic groups have long prized the nutritious afang leaves, which grow abundantly in the region's tropical forests.

Over time, the locals developed unique ways of preparing the leaves, blending them with a variety of meats, fish, and spices to create the flavorful and satisfying afang soup.

The dish's name is derived from the Efik word "afang," which refers to the leaves used in the recipe. These broad, dark green leaves not only add depth of flavor but also provide an impressive array of vitamins, minerals, and other beneficial nutrients.

Afang soup has become a beloved staple in Nigerian cuisine, enjoyed by families across the country and often served during special occasions and celebrations.

Cooking Steps

step by step cooking instructions

With eager anticipation, the cooking process for this delightful Afang soup begins. First, gather all your ingredientsAfang leaves, shredded chicken or beef, palm oil, stock, crayfish, and your choice of seasoning.

Wash the Afang leaves thoroughly and chop them into bite-sized pieces. In a large pot, heat the palm oil over medium heat. Add the chopped Afang leaves and sauté for a few minutes, stirring constantly, until the leaves are wilted and tender.

Advertisement

Next, pour in the stock and bring the mixture to a boil. Reduce the heat and let the soup simmer for about 10 minutes.

Add the shredded meat, crayfish, and your desired seasonings. Taste and adjust the seasoning if needed. Let the soup continue simmering for an additional 5-7 minutes, or until the flavors have melded together.

Serve the Afang soup hot, accompanied by your choice of starch, such as garri, eba, or fufu. Enjoy the rich, nutritious, and comforting flavors of this traditional Nigerian dish.

Step 1. Wash and Slice Afang Leaves

wash and slice leaves

Begin by thoroughly rinsing the afang leaves under running water. This step is crucial to remove any dirt or debris that may have accumulated on the leaves.

Gently shake off the excess water and place the leaves on a clean surface. Using a sharp knife, carefully slice the afang leaves into thin strips, about 1-2 inches long. This will help them cook faster and create a beautiful texture in the soup.

Be mindful of your fingers as you slice, ensuring you don't cut yourself. Once the leaves are sliced, set them aside, ready to be added to the pot later in the recipe.

Advertisement

Washing and slicing the afang leaves properly is an essential step that will ensure your soup has the perfect balance of flavors and textures. Take your time with this process, and you'll be one step closer to enjoying a delicious and authentic Nigerian afang soup.

Step 2. Add Chicken Stock

add chicken stock now

After slicing the afang leaves, you'll need to prepare the chicken stock. Start by grabbing a large pot and pouring in about 4 cups of water.

Now, add 2 cups of chicken broth or bouillon cubes dissolved in water. Bring the mixture to a boil over medium-high heat.

Once it's bubbling, drop in the sliced afang leaves. Let them simmer for about 10 minutes, until they become nice and tender. The leaves will release their natural thickening properties, making the soup rich and creamy.

Now, it's time to season your afang soup. Sprinkle in a teaspoon of salt and a pinch of black pepper.

You can also add a dash of ground nutmeg or cayenne pepper for an extra kick of flavor. Give everything a good stir and let it simmer for 5 more minutes.

Advertisement

Your nutritious and delicious afang soup is now ready to serve!

Step 3. Add Stock Ingredients

incorporate stock ingredients now

Now, grab a large pot and pour in about 4 cups of water. This will be the base for your delicious Afang soup.

Next, slice up one medium onion and toss it into the pot. Onions add such wonderful flavor to soups!

Don't forget the broth ingredients. Measure out 2 cubes of chicken bouillon and drop them in. The bouillon will dissolve, creating a savory chicken stock.

If you have fresh chicken or vegetable broth on hand, you can use 4 cups of that instead.

Now, reach for that jar of dried Afang leaves you've been saving. Carefully add a handful of the vibrant green leaves to the pot. They'll need a bit of time to soften and release their earthy, spinach-like taste.

Advertisement

Step 4. Add Periwinkles

incorporate periwinkle flowers

Next, add the periwinkles. These small, spiral-shaped seafood treats will bring a delightful briny flavor to your Afang soup.

Carefully rinse the periwinkles under cool running water, removing any dirt or debris. Then, add them to the simmering pot, making sure they're fully submerged in the savory broth.

As the periwinkles cook, they'll release their natural juices, enriching the soup's overall taste. Be patient and let them simmer for about 10-15 minutes, until they've opened up and become tender.

The periwinkles should now be ready to enjoy! Their firm, chewy texture and oceanic essence will perfectly complement the earthy Afang leaves and other flavorful ingredients in your soup.

Stir the periwinkles gently to incorporate them throughout the dish, then ladle the steaming hot Afang soup into bowls.

Get ready for a delightful seafood-infused experience that will transport your taste buds to the vibrant culinary world of Nigeria.

Advertisement

Step 5. Simmer Until Leaves Are Tender

simmer until leaves tender

Once the periwinkles have been added, let the soup simmer for about 30 minutes, or until the Afang leaves have become tender and fully cooked through.

This gentle simmering process allows the flavors to meld together beautifully. You'll know the leaves are ready when they've softened and lost their initial crunch.

Keep an eye on the pot, stirring occasionally to prevent anything from sticking to the bottom. The rich, aromatic broth will gradually infuse the Afang, making each bite more delectable than the last.

Don't be tempted to rush this step – patience is key for achieving the perfect texture and taste.

Once the leaves are tender, your Afang soup is well on its way to being a culinary masterpiece. Get ready to savor the incredible flavors that are about to emerge!

Final Thoughts

concluding reflections and insights

With the preparation and cooking steps complete, how can you best enjoy this delightful Afang soup? First, take a deep breath and savor the aroma – the earthy fragrance of the Afang leaves, the richness of the palm oil, and the warmth of the spices all come together in a symphony of flavors.

Grab your spoon and scoop up a steaming hot bite, letting the nourishing broth and tender leaves dance on your tongue. As you savor each mouthful, let the flavors transport you to the vibrant markets of Nigeria, where the locals have perfected this traditional dish over generations.

Advertisement

Don't be afraid to get a little messy – Afang soup is meant to be enjoyed with your hands, tearing off pieces of eba or garri to soak up every last drop. Pour a cold glass of water or juice to balance the robust flavors.

Most importantly, share this wholesome meal with family and friends, creating cherished memories around the table. With each bite, you'll appreciate the love and care that went into preparing this authentic Nigerian delicacy.

Frequently Asked Questions

What Is the Difference Between Afang and Edikang Ikong Soup?

You'll find that afang and edikang ikong soups differ in their base ingredients. Afang soup uses the afang leaf, while edikang ikong utilizes the ikong leaf. Both offer distinct flavors and nutritional profiles within the Nigerian soup repertoire.

Can I Substitute Afang Leaves With Any Other Green Leafy Vegetables?

You can substitute afang leaves with other green leafy vegetables, but the flavor and texture won't be the same. Alternatives like spinach, kale, or bok choy can work, but they'll lack the unique taste of authentic afang soup.

How Long Can Afang Soup Be Stored After Cooking?

You can store the afang soup for up to 3-4 days in the refrigerator. Just make sure to keep it in an airtight container. Reheat it thoroughly before serving for the best flavor and texture.

Advertisement

Is Afang Soup Safe for People With High Blood Pressure?

Yes, afang soup can be a safe option for those with high blood pressure. The soup's ingredients, like leafy greens and low-sodium broth, make it a heart-healthy choice when consumed in moderation as part of a balanced diet.

What Are the Health Benefits of Afang Leaves?

Afang leaves are packed with vitamins and minerals that can benefit your health. They're rich in antioxidants, which can help lower blood pressure and reduce inflammation. Plus, the leaves are a good source of fiber, supporting digestive health.

Continue Reading

West African Cuisine

What Does Garri Taste Like? Discover This West African Staple

Unlock the delicate sweetness and versatility of garri, a beloved West African staple that has nourished communities for centuries, in this captivating exploration.

Published

on

garri s unique west african flavor

Dive into the rich, toasted flavor of garri – a beloved West African staple that's been nourishing communities for centuries. This versatile cassava-based delight offers a delicate sweetness that'll have your taste buds dancing. Start by soaking the garri in water, then drain and rinse it to unlock its true essence. Next, add boiling water and stir until it reaches your desired creamy texture. Serve it warm, getting creative with sweet or savory toppings that'll make each bite even more delightful. Garri's adaptability means the culinary possibilities are endless – let your taste buds be your guide on this flavorful journey.

Key Takeaways

  • Garri has a slightly sour, earthy flavor due to the fermentation process during its traditional production.
  • The texture of garri can range from coarse and granular to smooth and creamy, depending on personal preference.
  • Garri can be served in a variety of ways, from a porridge-like consistency to a crunchier, fried form.
  • The taste of garri can be easily enhanced by adding sweet or savory toppings, such as honey, milk, or peanut butter.
  • Garri is a staple food in West Africa, deeply rooted in local culinary traditions and cultural identity.

History

historical events and narratives

The history of garri, a staple food in West Africa, dates back centuries. This beloved cassava-based snack has been a dietary staple for countless generations across the region.

Garri's origins can be traced to the traditional agricultural practices of indigenous communities, who discovered innovative ways to process the humble cassava root.

Over time, the production of garri evolved, with local communities refining the techniques to create the distinct flavors and textures we know today. From the grating and fermentation of the cassava to the careful drying and roasting, each step in the process contributes to the unique taste and versatility of this West African icon.

As the popularity of garri grew, it became more than just a food – it became a symbol of cultural identity and pride.

Today, garri continues to be a beloved part of the culinary landscape, connecting people to their heritage and nourishing communities across the region.

Advertisement

Cooking Steps

meal preparation process

To get started, begin by thoroughly washing the garri with clean water. This helps to remove any impurities or debris that may have accumulated during the processing.

Once the garri is clean, you'll need to add some water to it. The amount of water you use will depend on how you plan to cook the garri. If you're making a porridge-like dish, you'll want to use more water, about 2 cups of water for every 1 cup of garri.

Next, place the garri and water mixture in a pot and bring it to a boil. Stir the mixture constantly to prevent it from sticking to the pot.

Once the garri has thickened to your desired consistency, you can add in any additional ingredients, such as sugar, milk, or even savory toppings.

Step 1. Soak Garri in Water

soak garri in water

First, add the desired amount of garri to a clean bowl or container. The amount you use will depend on how hungry you're and how much you want to prepare.

Once you have the garri in the bowl, it's time to add water. Slowly pour in water while stirring the garri. You want to add just enough water to moisten the garri, but not so much that it becomes mushy.

The key is to get the perfect consistency – not too dry, but not too wet either. As you stir, you'll notice the garri start to swell and become soft.

Advertisement

Keep adding small amounts of water and stirring until you achieve the desired texture. Some people like their garri a bit chunky, while others prefer it smoother.

Experiment to find your perfect garri soaking method. With a little practice, you'll be a garri-soaking pro in no time!

Step 2. Drain and Rinse the Garri

drain and rinse garri

Once the garri has reached the desired consistency, it's time to drain and rinse it. You'll need to grab a large strainer or colander and carefully pour the garri into it.

Gently shake the strainer to allow the excess water to drain off. Next, run some cool, clean water over the garri, swishing it around to remove any lingering cloudiness or impurities. This rinsing step is crucial, as it helps to further purify the garri and enhance its flavor.

After a thorough rinsing, you can give the garri a gentle squeeze to remove any remaining water. Be careful not to press too hard, as you don't want to break up the delicate granules.

Once the garri is nicely drained, it's ready to be used in your favorite dishes or enjoyed on its own. The clean, refreshed garri will have a light, airy texture and a delightful, subtly sweet taste.

Advertisement

Get ready to savor the authentic flavors of West African cuisine!

Step 3. Add Boiling Water

add boiling water carefully

Adding boiling water is the next crucial step in preparing the garri. Once you've drained and rinsed the garri, you'll need to add boiling water to it. This helps to soften the granules and creates the smooth, creamy texture that garri is known for.

Start by bringing a kettle of water to a rolling boil. Then, slowly pour the boiling water over the garri, stirring constantly with a wooden spoon. The ratio of water to garri can vary, but a good starting point is about 1 cup of boiling water for every 1/2 cup of garri.

Continue stirring the mixture until it reaches your desired consistency. The garri will quickly absorb the water, transforming from a dry, granular texture to a soft, gelatinous one.

You may need to add a bit more boiling water if the mixture seems too thick. Just be sure to stir thoroughly after each addition.

Once you've achieved the perfect garri texture, it's ready to serve and enjoy!

Advertisement

Step 4. Stir the Garri Mixture

stir the garri mixture

After adding the boiling water, you'll want to thoroughly stir the garri mixture. This step is crucial to ensure the garri reaches the perfect consistency.

Grab a large spoon and start stirring the mixture in a circular motion. As you stir, you'll notice the garri gradually thickening and becoming more uniform in texture.

Keep stirring for about 2-3 minutes, making sure to scrape the sides of the pot to incorporate all the garri. The goal is to create a smooth, lump-free porridge-like consistency.

Don't be afraid to add a bit more water if the mixture seems too thick. The right balance of garri and water will result in a wonderfully creamy and satisfying texture.

Once you're satisfied with the consistency, you can move on to the next step of enjoying your freshly prepared garri.

Get ready to savor the unique and comforting flavors of this West African staple!

Advertisement

Step 5. Serve Garri Warm With Desired Toppings

serve garri warm toppings

With the garri now at the perfect consistency, you can begin serving it warm with your desired toppings.

Garri is incredibly versatile, so feel free to get creative! You might start by spooning the warm, fluffy garri into a bowl.

Then, consider adding a drizzle of honey or a sprinkle of sugar to sweeten things up. If you're in the mood for something savory, try topping the garri with a splash of milk or a dollop of peanut butter.

You could even stir in some diced onions, tomatoes, or peppers for a burst of flavor. The key is to experiment and find the combination that best suits your taste buds.

Remember, the beauty of garri is that it's a blank canvas, ready to be dressed up however you like.

Final Thoughts

concluding reflections and insights

Garri, a staple food in many West African countries, has captured the hearts and palates of its devoted consumers.

As you've explored the unique flavors and textures of this versatile cassava-based delicacy, you've discovered that it's more than just a simple meal – it's a cultural tradition that has been passed down through generations.

Advertisement

Whether you enjoy it warm with your favorite toppings or chilled as a refreshing snack, garri's versatility knows no bounds. Its ability to adapt to various culinary preferences makes it a beloved ingredient in kitchens across the region.

As you bid farewell to your journey of discovering the taste of garri, remember that this humble food represents the rich culinary heritage of West Africa.

Frequently Asked Questions

How Long Does Garri Keep Once Opened?

Once you open a package of garri, it'll typically keep for about 2-3 weeks if you store it properly in an airtight container. Just be sure to watch for any signs of spoilage before consuming.

Can I Use Garri as a Substitute for Breadcrumbs?

You can use garri as a substitute for breadcrumbs, but the texture and flavor will be different. Garri has a slightly tangy, nutty taste and a coarser, drier texture than breadcrumbs. It may work well in certain dishes.

Is Garri Gluten-Free?

Yes, garri is gluten-free. It's made from cassava, a root vegetable that doesn't contain gluten. You can use garri as a gluten-free alternative to breadcrumbs in your recipes without any issues.

Advertisement

Can I Add Garri to Soups or Stews?

You can absolutely add garri to soups or stews. It'll thicken the dish and provide a nutty, earthy flavor. Just be sure to stir it in gradually to prevent clumping.

What's the Difference Between White and Yellow Garri?

The main difference between white and yellow garri is the processing method. White garri is made from raw cassava, while yellow garri is made from fermented cassava. This affects the taste, texture, and nutritional content of the final product.

Continue Reading

West African Cuisine

Yam and Egg Sauce: A Hearty West African Breakfast

Uncover the secrets of a West African breakfast staple, where the starchy goodness of yams meets the creamy richness of eggs in a savory delight. Learn how to make this incredible dish.

Published

on

hearty west african breakfast

Yam and egg sauce is a delicious West African breakfast dish that's been a staple in the region for centuries. It combines the hearty, starchy goodness of yams with the creamy richness of eggs – a truly satisfying way to start your day. You'll love how the dish blends the earthy flavor of the yams with the protein-packed eggs, all seasoned to perfection. It's a comforting and nourishing meal that brings families and communities together, celebrating the vibrant culinary heritage of West Africa. And if you keep reading, you'll discover the step-by-step guide to making this incredible breakfast dish at home.

Key Takeaways

  • Yam and egg sauce is a staple dish in West African cuisines, combining the starchy tuber and protein-rich eggs.
  • The dish originated from the region's agricultural practices and has evolved over time with local flavor variations.
  • The cooking process involves boiling and mashing yams, then gently scrambling eggs into the mixture.
  • Yam and egg sauce provides a hearty, nutritious, and comforting meal, suitable for breakfast, brunch, or light lunch.
  • Preparing this dish celebrates West African culinary heritage and brings families and communities together.

History

past events and narratives

Yam and egg sauce has long been a staple dish in many African cuisines. This hearty meal has been enjoyed for generations, rooted in the rich culinary traditions of West Africa.

Yams, a starchy tuber, have been a dietary staple in the region for centuries, providing a filling and nutritious base. The addition of eggs, a readily available protein source, creates a satisfying and balanced dish.

The origins of yam and egg sauce can be traced back to the agricultural practices of communities across West Africa. As yams were cultivated and eggs were produced, cooks began experimenting with combining these ingredients to create a nourishing breakfast or brunch option.

Over time, the recipe evolved, with variations emerging based on local flavors and preferences.

Today, yam and egg sauce remains a beloved comfort food, cherished for its simplicity, heartiness, and cultural significance. This dish continues to bring families and communities together, celebrating the rich culinary heritage of West Africa.

Advertisement

Cooking Steps

recipe preparation instructions

To start, gather all the necessary ingredients and equipment. You'll need a peeled and diced yam, eggs, onions, tomatoes, pepper, and a few other kitchen staples.

Don't forget a pot, a pan, and a spatula.

Next, dice the onions and tomatoes. Crack the eggs into a bowl and beat them until well combined. In the pot, add some oil and sauté the onions until they're soft and fragrant.

Toss in the diced yam and stir-fry for a few minutes.

Now, pour in just enough water to cover the yam. Let it simmer until the yam is tender.

Carefully add the beaten eggs and stir gently. As the eggs cook, they'll create a creamy, scrambled texture.

Advertisement

Step 1. Peel and Slice the Yams

peel slice yams

Begin by thoroughly washing the yams under running water. Make sure to scrub away any dirt or debris that may be clinging to the surface.

Once they're nice and clean, grab a sharp knife and peel the yams. Start at the top and use long, smooth strokes to remove the tough skin, being careful not to waste too much of the yam itself.

Now that the yams are peeled, it's time to slice them. Place the peeled yams on a stable cutting board and, using a sharp knife, carefully cut them into thin, even slices.

Try to make the slices about 1/4 inch thick – this will help them cook evenly. As you slice, be mindful of your fingers and keep them tucked safely away from the blade.

Once all the yams are sliced, you're ready to move on to the next step in the recipe. Your yams are now prepped and ready to be cooked to perfection!

Step 2. Boil the Sliced Yams Until Tender

boil sliced yams tender

Next, you'll want to bring a large pot of salted water to a boil on the stovetop.

Once the water is bubbling, carefully add the sliced yams. Let them cook for about 12-15 minutes, or until they're nice and tender when you poke them with a fork. You'll know they're done when you can easily pierce through the slices without any resistance.

Advertisement

Be sure to keep an eye on the pot and give the yams a gentle stir every few minutes. This will help them cook evenly and prevent any from sticking to the bottom.

When they're perfectly tender, use a slotted spoon to transfer the yams to a colander in the sink. Let them drain for a minute or two, then they're ready to move on to the next step in creating your delicious yam and egg sauce!

Step 3. Mash the Boiled Yams

mash the boiled yams

After draining the boiled yams, transfer them to a large bowl.

Grab a potato masher or a sturdy fork and start mashing the yams. Mash them until they're smooth and creamy, with no big lumps left. Don't be afraid to put some muscle into it – the yams need to be thoroughly mashed for the best texture.

Once they're nicely mashed, add a splash of milk or cream to the bowl. The milk will help make the mashed yams extra silky and rich.

Give everything a good stir to incorporate the milk evenly. If the mixture seems a bit too thick, you can add a bit more milk until you reach your desired consistency.

Advertisement

Now, season the mashed yams with a sprinkle of salt and a pinch of pepper. Taste as you go, and adjust the seasoning to your liking.

The mashed yams are now ready to be used in the next step of the Yam and Egg Sauce recipe. Get ready to create an amazing, comforting West African breakfast!

Step 4. Add Chopped Onions to Mashed Yams

chopped onions in yams

Next, grab a sharp knife and finely chop a small onion. The aromatic, crunchy bits will add a wonderful flavor and texture to your mashed yams.

Go ahead and dice the onion into small, even pieces – about 1/4 inch is perfect. Be careful with your fingers as you chop, and take your time to get nice, uniform pieces.

Once your onion is ready, add it right into the bowl of mashed yams. Use a fork or spoon to gently mix the onion in, making sure it's evenly distributed throughout.

The cool, crisp onion will contrast nicely with the warm, creamy yams. Give it a taste and add a pinch of salt and pepper if needed. The onion will infuse the yams with a savory, slightly sweet note that's simply delightful.

Advertisement

Now your mashed yams are ready for the next step – adding the egg sauce! Get excited, because this dish is about to get even more delicious.

Step 5. Beat the Eggs

whisk the eggs thoroughly

To prepare the egg sauce, crack 2 large eggs into a small bowl.

You'll need to beat them well until they're nice and smooth. Don't be afraid to really whisk those eggs – you want them to be light and fluffy.

Once they're all beaten up, it's time to add a pinch of salt and a sprinkle of black pepper. This will give the eggs a little extra flavor.

Now, grab a small saucepan and place it over medium heat on the stove.

Gently pour the beaten eggs into the pan and start stirring them around with a wooden spoon.

Advertisement

You'll want to stir constantly as the eggs cook, breaking them up into small pieces.

Keep an eye on them and don't let the eggs overcook – you still want them to be a bit soft and creamy.

When they're done, remove the pan from the heat and set the egg sauce aside.

It's now ready to be combined with the mashed yams for a delicious West African breakfast!

Final Thoughts

concluding reflections and insights

This simple yet satisfying dish offers a delightful balance of flavors and textures. The interplay of the creamy, savory yam and the rich, protein-packed eggs creates a harmonious blend that's sure to delight your taste buds.

Whether enjoyed for breakfast, brunch, or even a light lunch, this dish is a true celebration of West African culinary traditions.

Advertisement

As you savor each bite, you'll appreciate the careful balance of spices and seasonings that bring out the best in the ingredients. The silky, velvety texture of the egg sauce complements the firm, slightly sweet yam perfectly, making for a truly satisfying and nourishing meal.

Ultimately, this dish is a testament to the power of simple, wholesome ingredients coming together to create something truly special. With its comforting flavors and easy-to-prepare nature, it's a recipe that's sure to become a new family favorite.

Frequently Asked Questions

What Is the Nutritional Value of Yam and Egg Sauce?

The nutritional value of yam and egg sauce provides a balanced meal with complex carbohydrates, protein, vitamins, and minerals. It's a hearty and filling breakfast that can power you through the day.

Can I Substitute the Yam With Another Starchy Vegetable?

You can certainly substitute the yam with another starchy vegetable like potatoes, cassava, or plantains. These alternatives will provide similar nutritional benefits and create a satisfying dish. Experiment to find your preferred starchy base for the sauce.

How Long Does the Yam and Egg Sauce Keep in the Fridge?

The yam and egg sauce will keep in the fridge for 3-4 days. You can store it in an airtight container and enjoy it as a quick and flavorful breakfast option throughout the week.

Advertisement

Is the Yam and Egg Sauce Suitable for Vegetarians or Vegans?

The yam and egg sauce isn't suitable for vegetarians or vegans, as it contains eggs. If you're looking for a plant-based option, consider a yam-based dish without the egg sauce or explore other West African vegetarian/vegan breakfast options.

Can I Freeze the Leftover Yam and Egg Sauce?

You can certainly freeze the leftover yam and egg sauce. It'll hold up well in the freezer, and you can easily reheat it when you're ready to enjoy it again. Just be sure to let it thaw fully before reheating.

Continue Reading

Affiliate Disclaimer
As an affiliate, we may earn a commission from qualifying purchases. We get commissions for purchases made through links on this website from Amazon and other third parties.

Advertisement

Vetted

top local car washes top local car washes
Vetted2 months ago

14 Best Car Washes Near You for a Sparkling Clean Ride

I discovered the 14 best car washes near you that promise a sparkling clean ride, and you won't want to...

top mops for 2024 top mops for 2024
Vetted2 months ago

The 15 Best Mops of 2025 – Your Ultimate Guide to a Spotless Home

Find the perfect mop for your cleaning needs in 2025, and discover how these top choices can revolutionize your home...

top women s fragrances 2024 top women s fragrances 2024
Vetted2 months ago

15 Best Perfumes for Women in 2025 – A Fragrance Guide You Can’t Miss

Keen to discover the top 15 perfumes for women in 2025? Uncover unique scents that will elevate your fragrance game!

top local bars guide top local bars guide
Vetted2 months ago

14 Best Bars Near You for an Unforgettable Night Out

Looking for the perfect bar to elevate your night out? Discover the 14 best spots that promise unforgettable experiences!

luxurious beard oil selection luxurious beard oil selection
Vetted2 months ago

15 Best Beard Oils for a Luxurious Grooming Experience in 2025

Shop the 15 best beard oils for a luxurious grooming experience in 2025 and discover which ones will elevate your...

top college laptops 2024 top college laptops 2024
Vetted2 months ago

15 Best College Laptops of 2025: The Ultimate Guide for Students

With our guide to the 15 best college laptops of 2025, discover which powerful models will elevate your academic experience...

waterproof mascaras for tears waterproof mascaras for tears
Vetted2 months ago

15 Best Waterproof Mascaras That Will Survive Any Tear-Jerker

Outstanding waterproof mascaras await to keep your lashes flawless through any emotional moment; discover which ones made the top 15...

top flavorful disposable vapes top flavorful disposable vapes
Vetted2 months ago

15 Best Disposable Vapes of 2025: Top Picks for Flavor and Convenience

Prepare to discover the 15 best disposable vapes of 2025 that blend exceptional flavor and convenience, but which ones truly...

refreshing lunch salad ideas refreshing lunch salad ideas
Vetted2 months ago

15 Best Salads Near You That Will Freshen Up Your Lunch Routine

Transform your lunch with the 15 best salads nearby that will tantalize your taste buds and leave you craving more...

top convertible car seats top convertible car seats
Vetted2 months ago

15 Best Convertible Car Seats of 2025 – Safety and Comfort for Your Little One

Get ready to discover the top 15 convertible car seats of 2025 that blend safety and comfort—find out which models...

delicious fast food breakfast delicious fast food breakfast
Vetted2 months ago

15 Best Fast Food Breakfast Options That Will Make Your Mornings Delicious

Uncover the 15 best fast food breakfast options that will transform your mornings into a delicious experience you won't want...

stylish contacts for vision stylish contacts for vision
Vetted2 months ago

14 Best America’s Contacts for Clear Vision and Style

Browse through the 14 best contact lenses in America for clear vision and style, and discover which one perfectly complements...

Trending