Hoy Tod, an irresistible oyster or mussel omelet, originated in 19th century coastal communities where ingenious fishermen blended fresh seafood with eggs. This beloved dish remains a cherished part of the culinary heritage in seaside towns, celebrating the bounty of the sea and community resourcefulness. To create this delightful treat, you'll shuck and clean the oysters, beat the eggs until fluffy, then cook the oysters briefly before pouring the eggs over the top. Fold the omelet with care, and don't forget to experiment with herbs, spices, and vegetables to find your perfect flavor profile. Continue reading to discover more about mastering this traditional dish.
Key Takeaways
- Hoy Tod is a traditional seafood omelet dish originating from early 19th century coastal communities in Asia.
- The recipe features fresh oysters or mussels combined with beaten eggs, fish sauce, and optional vegetables.
- The cooking process involves briefly cooking the seafood, then pouring the egg mixture over and folding it into an omelet.
- Hoy Tod is known for its balance of flavors, highlighting the bounty of the sea and community resourcefulness.
- Mastering the cooking techniques, such as whisking eggs thoroughly and flipping the omelet gently, is key to achieving the desired texture and presentation.
History
The history of Hoy Tod dates back to the early 19th century. This beloved dish, a savory omelet made with either oysters or mussels, has been a staple in coastal communities for generations.
In the 1820s, hardworking fishermen and their families would combine the fresh seafood they'd harvested with eggs, creating a hearty and satisfying meal.
Over time, the recipe evolved, with different regions developing their own unique variations. Some added vegetables like onions or tomatoes, while others incorporated spices to give the Hoy Tod a zestier flavor.
Today, this time-honored dish remains a beloved part of the culinary heritage in many seaside towns.
Whether you're enjoying a classic rendition or trying a modern twist, the Hoy Tod continues to bring people together and celebrate the bounty of the sea.
Its rich history is a testament to the ingenuity and resourcefulness of the communities that have cherished this dish for generations.
Recipe
Cooking a delightful and savory dish can be a rewarding experience. Whether you're an experienced chef or a novice in the kitchen, the right recipe can guide you through the process, ensuring a satisfying outcome. In this recipe, we'll explore the steps to create a mouthwatering dish that will delight your senses.
The key to a successful dish lies in the balance of flavors and the careful preparation of the ingredients. By following this recipe, you'll be able to bring together a harmonious blend of tastes that will leave your guests or family members thoroughly impressed.
- 2 pounds of boneless, skinless chicken breasts
- 1 cup of diced onions
- 3 cloves of garlic, minced
- 2 cups of chopped bell peppers
- 1 can (14.5 oz) of diced tomatoes
- 1 cup of uncooked long-grain rice
- 2 cups of chicken broth
- 1 teaspoon of dried oregano
- 1 teaspoon of dried basil
- Salt and black pepper to taste
Preheat your oven to 375°F (190°C). In a large, oven-safe skillet or Dutch oven, sauté the onions and garlic until they become fragrant and translucent.
Add the diced bell peppers and continue cooking for an additional 5 minutes. Pour in the can of diced tomatoes, including the juices, and stir to combine.
Add the uncooked rice, chicken broth, dried oregano, and dried basil. Season with salt and black pepper to taste. Bring the mixture to a simmer, then cover the pan and transfer it to the preheated oven. Bake for 25-30 minutes, or until the rice is tender and the chicken is cooked through.
Remember to let the dish rest for a few minutes before serving, as this will allow the flavors to meld together perfectly.
Enjoy your delicious creation, and don't hesitate to experiment with different herbs, spices, or vegetable combinations to suit your personal preferences.
Cooking Steps
First, shuck and clean the oysters.
Next, beat the eggs until they're nice and fluffy.
Then, cook the oysters briefly before pouring the beaten eggs over the top.
Step 1. Shuck and Clean Oysters
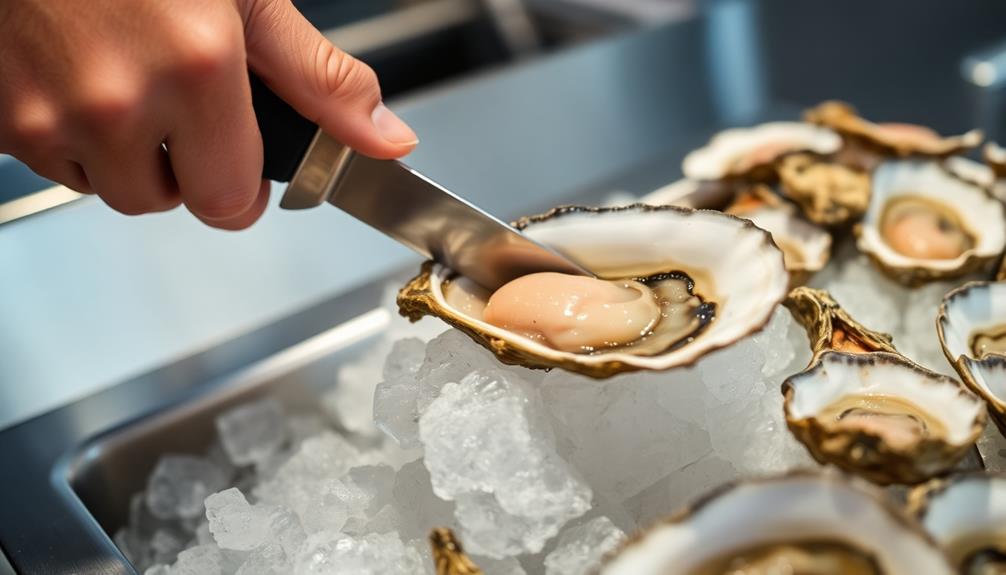
Shucking and cleaning oysters is a straightforward process that you can master with a little practice.
First, grab a sturdy oyster knife and a heavy glove to protect your hand. Gently insert the knife into the hinge of the oyster shell and twist to pop it open. Be careful not to spill any of the precious oyster liquor inside.
Once open, use the knife to gently detach the oyster from the shell. Rinse the oyster under cool running water to remove any dirt or debris. Discard any oysters with cracked or damaged shells.
Next, use a small paring knife to trim away the tough muscle that attaches the oyster to the shell. Finally, give the oyster a final rinse and you're ready to enjoy its briny, succulent flavor.
With a little practice, you'll be shucking and cleaning oysters like a pro in no time.
Step 2. Beat Eggs
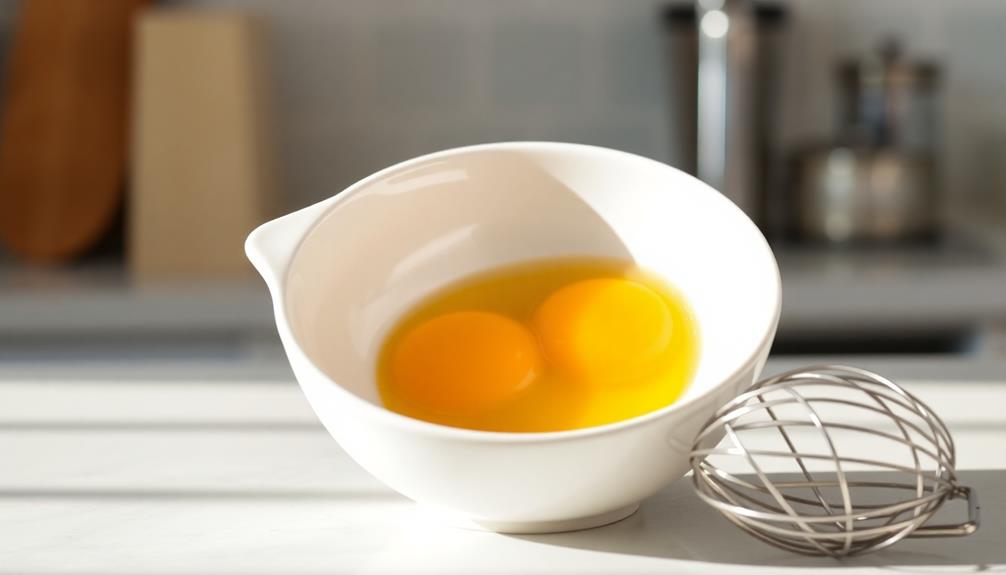
To beat eggs properly, crack them into a clean bowl. Use a fork or whisk to vigorously mix the eggs until they're fully combined and uniform in color.
You'll want to beat them for about 30 seconds to a minute, depending on how many eggs you're working with. Be sure to incorporate air into the eggs as you beat them – this will help them get nice and fluffy when you cook them.
Once the eggs are beaten, you can add any additional ingredients you'd like, such as a splash of milk or cream, some salt and pepper, or herbs and spices.
Just gently fold those in with a spatula. Be careful not to overmix, or you'll end up with tough, rubbery eggs.
Now your eggs are ready to cook up into a delicious omelet or scramble. The key is taking the time to beat them thoroughly at the start for the best texture.
Step 3. Cook Oysters Briefly
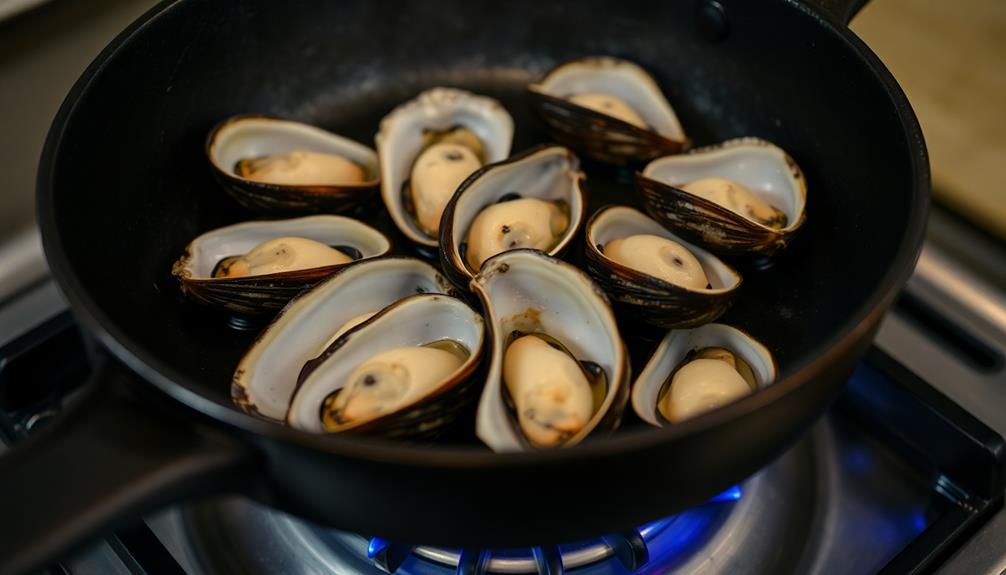
When cooking oysters, it's best to handle them briefly over high heat. Oysters are delicate and overcooking can make them tough and rubbery. The goal is to lightly cook them just until they've opened up and the edges have curled slightly.
Start by shucking the oysters, reserving the juices in the bottom shell. Heat a skillet over high heat and add the oysters and their juices. Cook for 2-3 minutes, gently stirring, until the oysters have opened. Be careful not to overcrowd the pan – work in batches if needed.
Once cooked, transfer the oysters to a plate, being careful not to lose any of the flavorful juices. Serve the oysters immediately, drizzling any reserved juices over the top. They pair wonderfully with mignonette sauce, lemon wedges, or your favorite hot sauce.
The quick cooking preserves the delicate, briny flavor of the oysters. With a little practice, you'll be a pro at cooking oysters to perfection.
Step 4. Pour Eggs Over Oysters
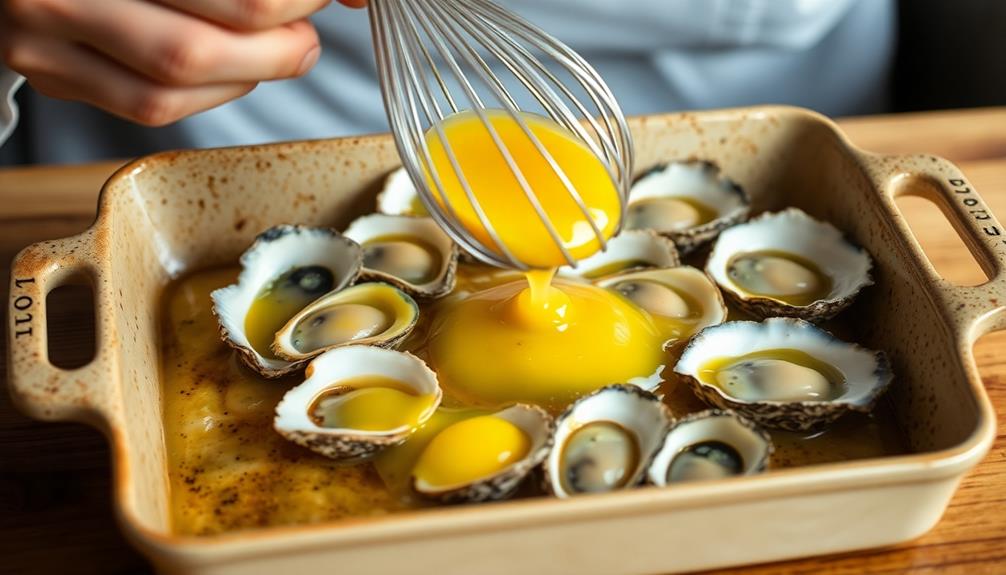
With the oysters cooked to perfection, you can now pour some eggs over them to create a delightful dish.
Crack a few fresh eggs into a bowl, being careful not to let any shells fall in. Gently whisk the eggs until they're well-blended.
Slowly pour the egg mixture over the hot oysters, making sure to cover them evenly. As the eggs cook, you'll see them start to set around the edges.
Use a spatula to gently lift and fold the eggs over the oysters, creating a fluffy, golden omelet. Cook until the eggs are completely set, but still soft and moist.
Be careful not to overcook, as you want the oysters to stay juicy and tender. Once the omelet is ready, slide it onto a plate and serve hot.
The savory oysters paired with the creamy eggs make for a truly delicious and satisfying meal.
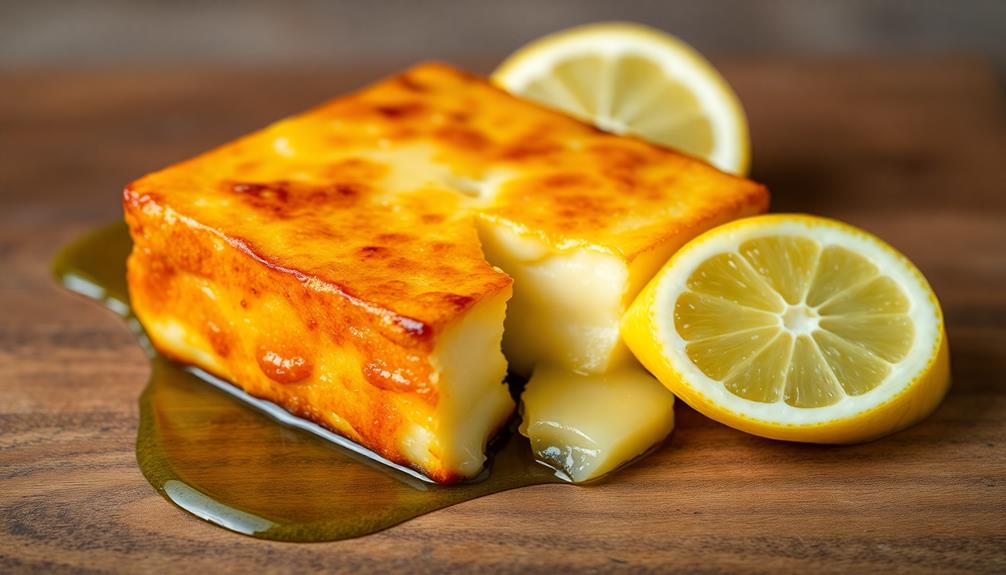
Step 5. Fold Omelet and Serve
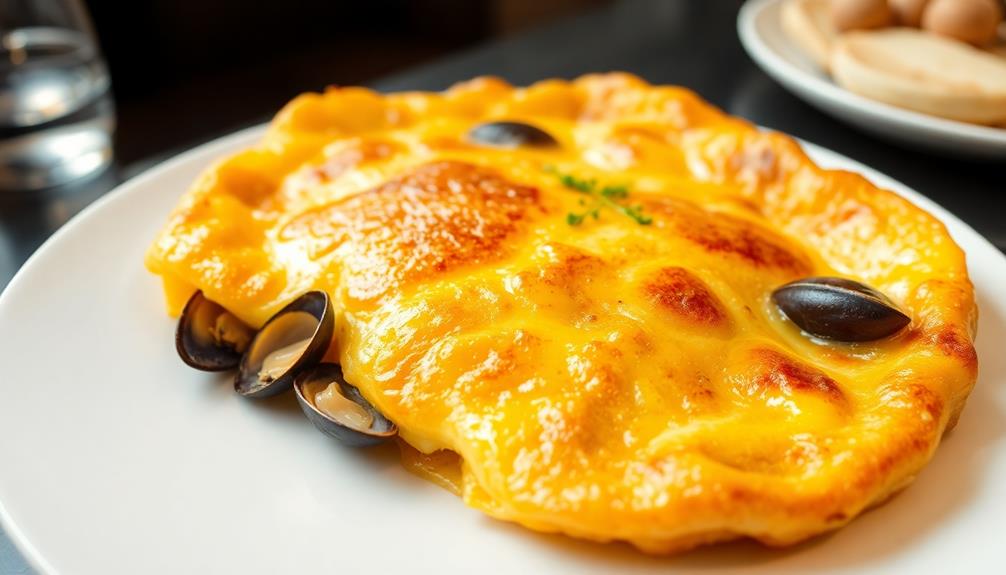
Once the eggs have fully set around the edges, it's time to fold the omelet.
Using a spatula, gently lift one side of the omelet and fold it over the center. Then, lift the other side and fold it over the first. This creates a neat, tidy package.
You'll want to be gentle and take your time – you don't want to tear the delicate eggs.
Now that your omelet is folded, it's time to slide it onto a plate.
Use the spatula to carefully transfer the omelet, ensuring it retains its shape. The goal is to create a beautiful, golden-brown package bursting with savory fillings.
To serve, you can top the omelet with a sprinkle of chopped green onions or a dollop of Sriracha for extra flavor.
The folded omelet is the perfect canvas for all sorts of tasty additions. Enjoy your perfectly cooked Hoy Tod!
Final Thoughts
As we reach the conclusion of this article, some final reflections are warranted. Cooking a hoy tod, or oyster/mussel omelet, can be a delightful and satisfying experience.
You've learned how to properly fold and serve this flavorful dish, ensuring each bite is perfectly cooked. Remember, the key to a great hoy tod lies in the balance of ingredients – the savory oysters or mussels, the fluffy eggs, and the aromatic herbs and seasonings.
Don't be afraid to experiment and find your own preferred method. Perhaps you'll add a touch more fish sauce or sprinkle in some crushed red pepper flakes.
The beauty of hoy tod is its versatility. Serving it alongside steamed rice or a fresh salad can transform it into a complete and satisfying meal. For a heartier meal, adding some protein such as shrimp or tofu can bring a nice balance of flavors and textures to the dish. And for those with a sweet tooth, a homemade tao huay recipe can be the perfect way to finish off the meal with a delightful and refreshing dessert. Whether it’s a simple weeknight dinner or a special occasion, hoy tod can easily be adapted to suit any taste or preference. Its adaptability and deliciousness make it a popular choice for many households.
As you continue to refine your hoy tod skills, take pride in creating a dish that celebrates the bounty of the sea. Enjoy the process, and savor each delicious forkful.
Frequently Asked Questions
Can I Use Shrimp Instead of Oysters/Mussels?
Absolutely! You can use shrimp instead of oysters or mussels in your omelet. The flavors will complement each other nicely, and you'll end up with a delicious seafood-based dish.
Is It Possible to Bake the Hoy Tod Instead of Frying?
You can certainly bake the dish instead of frying it. The texture and flavor will be a bit different, but it's a viable option if you prefer to avoid frying. Just be sure to adjust the cooking time and temperature accordingly.
How Long Can the Leftover Hoy Tod Be Stored?
You can typically store leftover omelet for 3-4 days in the refrigerator in an airtight container. However, the texture and flavor may degrade over time, so it's best to enjoy it within a couple of days for the best quality.
Can I Add Vegetables to the Hoy Tod Recipe?
Absolutely! You can add various vegetables to your recipe. Incorporating vegetables can enhance the flavor and nutritional value of your dish. Feel free to experiment with ingredients like bell peppers, onions, or spinach to create a more well-rounded and delicious meal.
Is It Necessary to Use a Non-Stick Pan for Cooking Hoy Tod?
Using a non-stick pan isn't strictly necessary, but it'll make your life easier. The smooth surface helps prevent the omelet from sticking and makes it easier to flip and slide onto a plate. Give it a try for best results!