Witch hat cookies are a fun and festive Halloween treat that have captivated bakers for generations. Their origins trace back to the mid-20th century, when these whimsical cookies were dreamed up to celebrate the spooky holiday. Crafted from a simple shortbread dough and adorned with a chocolate "buckle," these cookies combine buttery goodness with rich chocolate for a delightful flavor. Easy to make, they're perfect for beginner bakers looking to add some enchantment to their Halloween festivities. And if you're curious to learn more about the history and baking process behind these enchanting cookies, keep reading.
Key Takeaways
- Witch hat cookies are a popular Halloween treat inspired by the pointed hats worn by witches in folklore and stories.
- The cookies are made from a simple shortbread dough and adorned with a chocolate "buckle" for added spookiness.
- The baking process involves shaping the dough into cone-shaped witch hats, baking, and decorating with frosting or melted chocolate.
- Witch hat cookies are easy to make, suitable for beginner bakers, and create a visually appealing dessert that evokes a magical theme.
- Baking and decorating witch hat cookies can be a fun and engaging activity for families and friends, fostering creativity and community engagement.
History
Although the origins of witch hat cookies remain somewhat obscure, they're believed to have emerged as a popular Halloween treat in the mid-20th century.
These delightful confections were likely inspired by the iconic pointed hats worn by witches in classic folklore and stories. As the spooky holiday gained more prominence, bakers began crafting these whimsical cookies, delighting children and adults alike with their playful shape and festive flavors.
The witch hat design lent itself perfectly to cookie-making, allowing for a variety of decorative touches. Bakers could add swirls of frosting, sprinkle on colorful sugar, or even incorporate chocolate chips or other fun toppings to bring the witch's hat to life.
These sweet treats quickly became a staple at Halloween parties, school functions, and family gatherings, adding a touch of magic to the seasonal celebrations.
Today, witch hat cookies remain a beloved tradition, capturing the spirit of Halloween and bringing smiles to faces young and old.
Recipe
Witch Hat Cookies
Recipe
Witch hat cookies are a fun and festive treat perfect for Halloween or any time of the year. These whimsical cookies are made with a simple shortbread dough, shaped into mini witch hats, and adorned with a chocolate "buckle" for an extra touch of spookiness.
Whether you're baking them for a party or enjoying them as a sweet snack, these cookies are sure to delight both children and adults alike. The combination of buttery shortbread and rich chocolate creates a delightful flavor profile that will have everyone reaching for more.
Plus, the easy-to-make recipe makes these witch hat cookies a breeze to whip up, even for the beginner baker.
- 2 cups all-purpose flour
- 1/2 cup granulated sugar
- 1 cup unsalted butter, softened
- 1 teaspoon vanilla extract
- 1/4 teaspoon salt
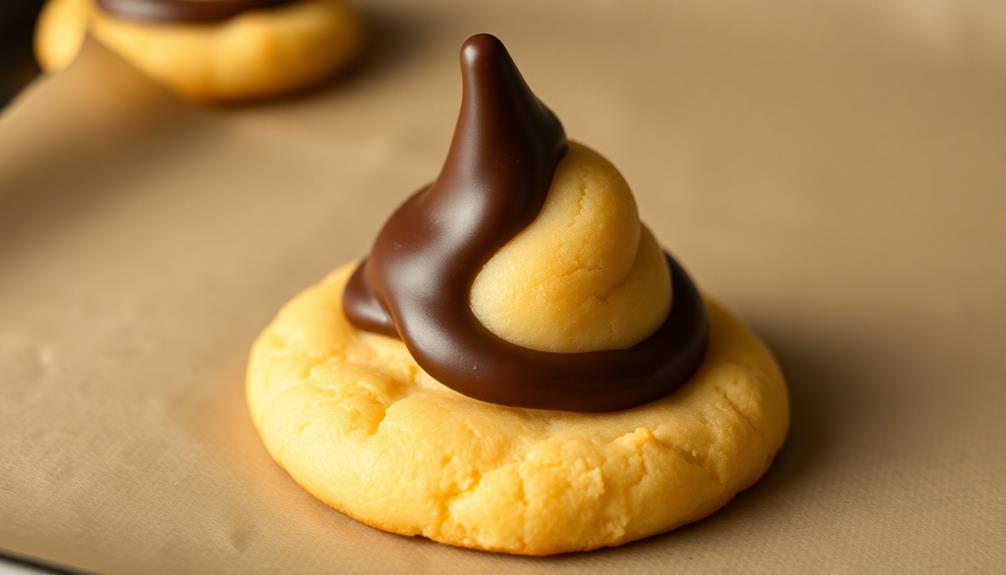
- 24 chocolate kisses or small chocolate chips
Preheat your oven to 375°F (190°C). In a large mixing bowl, cream together the butter and sugar until light and fluffy. Add the vanilla and salt, then gradually mix in the flour until a dough forms.
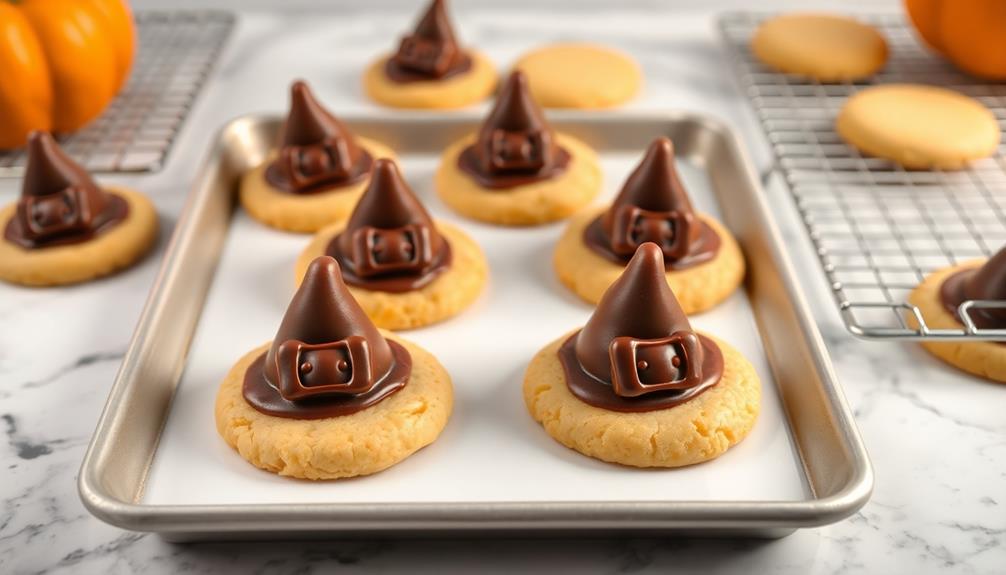
Roll the dough into 1-inch balls and place them on a parchment-lined baking sheet, spacing them about 2 inches apart. Gently press a chocolate kiss or chip into the center of each ball, creating a "buckle" effect. Bake for 12-15 minutes, or until the cookies are lightly golden.
Allow them to cool on the baking sheet for 5 minutes before transferring to a wire rack to cool completely. For an extra touch of whimsy, you can use a small knife or toothpick to create a "rim" around the chocolate buckle, giving the cookies an even more authentic witch hat appearance.
Store the witch hat cookies in an airtight container for up to 1 week.
Cooking Steps
Preheat your oven to 350°F – the perfect temperature for baking these spooky-yet-delightful witch hat cookies!
Next, mix up the ingredients until they're well-combined.
Then, grab your piping bag and pipe a swirly design onto each cookie before popping them in the oven for 10-12 minutes.
Step 1. Preheat Oven to 350°F
To begin, preheat your oven to 350°F. This crucial step ensures your cookies bake evenly and turn out perfectly. Make sure your oven is nice and hot before you start assembling the dough.
Once the oven's ready, you can focus on mixing up the batter. This recipe calls for basic ingredients you likely have on hand, like flour, sugar, and butter. Just combine them in a bowl until you've got a smooth, cohesive dough.
Remember to cream the butter and sugar together first for the best texture.
After that, you'll need to shape the dough into small, cone-shaped witch hats. Get creative with this part – you can make them tall and pointy or a bit more rounded. Be gentle as you form the hats so they hold their shape in the oven.
Then, pop them right in and let them bake until golden brown. In no time, you'll have a batch of adorable, spooky-yet-delicious witch hat cookies ready to enjoy!
Step 2. Mix Ingredients

Begin by creaming the butter and sugar together in a large bowl until light and fluffy. This means you'll mix them really well until the mixture becomes smooth and creamy.
Next, add in the egg and vanilla extract, mixing everything together until it's fully combined.
In a separate bowl, whisk together the flour, baking powder, and salt. Slowly add this dry ingredient mixture to the wet ingredients, mixing just until no dry spots remain. Be careful not to overmix – you want the dough to be nice and soft.
Scoop out heaping tablespoons of the dough and roll them into little balls. Place the balls on a baking sheet, then use your thumb to gently press down the center of each one, creating a small indentation. This will be where the "hat" part of your witch hat cookies will sit.
Bake the cookies for 8-10 minutes, until the edges are lightly golden. Let them cool completely before decorating.
Step 3. Pipe Swirl Onto Cookies

After the cookies have cooled completely, prepare the frosting. In a piping bag fitted with a small round tip, pipe a swirl on top of each cookie.
Start at the outer edge and work your way in, creating a spiral pattern. Be sure to apply even pressure as you pipe to maintain a consistent, smooth swirl.
Once all the cookies have been frosted, let the frosting set for about 10 minutes. This will help it hold its shape.
Now, it's time to add the finishing touch – the witch hat! Take a small piece of black or purple fondant and roll it into a cone shape.
Gently press the fondant hat onto the center of the frosted cookie, creating a whimsical and spooky topping.
Your witch hat cookies are now ready to serve and enjoy! The contrast of the crisp cookie, creamy frosting, and playful fondant hat will delight everyone who tries them.
Step 4. Bake Cookies for 10-12 Minutes
Preheat your oven to 350°F (175°C) and line a baking sheet with parchment paper.
Now, it's time to bake those delightful witch hat cookies! Carefully place the piped cookies onto the prepared baking sheet, spacing them a few inches apart. This will give the cookies room to spread and maintain their shape as they bake.
Set the timer for 10-12 minutes. Keep a close eye on the cookies, as oven temperatures can vary. You'll know they're done when the edges start to turn a light golden brown.
Be careful not to overbake them, or they may become dry and crumbly. Once the timer goes off, remove the baking sheet from the oven and let the cookies cool on the sheet for a few minutes before transferring them to a wire rack.
This cooling period helps the cookies firm up and prevents them from breaking apart. With just a little bit of patience, your witch hat cookies will be ready to serve and enjoy!
Step 5. Cool Witch Hats
Once the cookies have been removed from the oven, let them cool on the baking sheet for 5-7 minutes. This will allow the witch hats to set and hold their shape.
After the cooling time, you can begin shaping the witch hats.
Take each cookie and gently pinch the top, forming a point to create the classic witch hat shape. Be careful not to press too hard, as you don't want to crack the cookies. If needed, you can use a butter knife or the back of a spoon to help guide the shaping.
Once all the cookies have been shaped, it's time to decorate! Use a small spoon or piping bag to add a dollop of frosting or melted chocolate to the top of each witch hat. Sprinkle on some colorful sprinkles or Halloween-themed candies for a festive touch.
The final step is to let the decorated witch hats cool completely before serving. This will ensure the toppings are set and the cookies are ready to enjoy!
Final Thoughts
With the witch hat cookies now complete, you can take a moment to admire your handiwork. These whimsical treats are sure to delight your family and friends. The combination of the rich chocolate cookie and the sweet, colorful icing creates a visual masterpiece. If you’re looking to create a full spread of Halloween treats, consider pairing these witch hat cookies with a spooky witches fingers recipe. The combination of the two will surely make your Halloween gathering a hit. With just a little bit of creativity and some simple ingredients, you can create a spread that will impress and delight all of your guests.
Imagine the excitement on their faces as they take their first bite, instantly transported to a magical world of witches and wizards.
Now that you've mastered the art of making these captivating cookies, consider sharing your newfound skills with others. Gather the kids and host a baking party, where you can teach them your techniques and watch as they unleash their creativity.
Alternatively, package a few of your creations and deliver them to your neighbors, spreading a little enchantment throughout your community.
As you savor the last crumb of your delectable witch hat cookies, feel a sense of pride and accomplishment. These treats aren't only delicious but also a reflection of your imagination and culinary prowess.
Frequently Asked Questions
What Is the Origin of the Witch Hat Cookie Shape?
You may not know the exact origin of the witch hat cookie shape, but it likely evolved from the traditional pointed hats worn by witches in folklore and pop culture. The distinctive shape has become a Halloween classic.
Are These Cookies Safe for Children to Eat?
As long as they don't contain any unsafe ingredients, witch hat cookies should be safe for children to eat. However, it's always best to check the recipe and ingredients to ensure they're appropriate for young ones.
Can I Substitute the Ingredients With Gluten-Free Alternatives?
You can certainly substitute the ingredients with gluten-free alternatives. Just be sure to adjust the measurements and baking times as needed to achieve the desired texture and flavor. Enjoy your delicious, allergy-friendly treats!
How Long Do These Cookies Typically Last After Baking?
Freshly baked cookies typically have a shelf life of 3-5 days when stored properly. Their longevity depends on factors like ingredients, storage conditions, and personal preferences. For best results, enjoy them within a few days of baking.
Can I Freeze the Dough for Later Use?
You can certainly freeze the dough for later use. Simply scoop the dough into balls, place them on a baking sheet, and freeze until solid. Then, transfer the frozen dough balls to an airtight container or bag for storage.
Conclusion
Witch hat cookies are the perfect spooky treat for your Halloween bash! They're easy to make, and you'll love their adorable shape and delicious chocolate flavor. Gather your friends and get baking – these festive cookies are sure to delight everyone. Plus, you can have fun decorating them in all sorts of creative ways. Whip up a batch today and enjoy the sweet, witchy goodness!

Chloe is the go-to for classic Southern comfort food. From buttery biscuits to crispy fried chicken, Chloe knows how to whip up soul-warming meals that make you feel at home. She also loves hosting outdoor barbecues and picnics, bringing a touch of Southern hospitality to every dish.