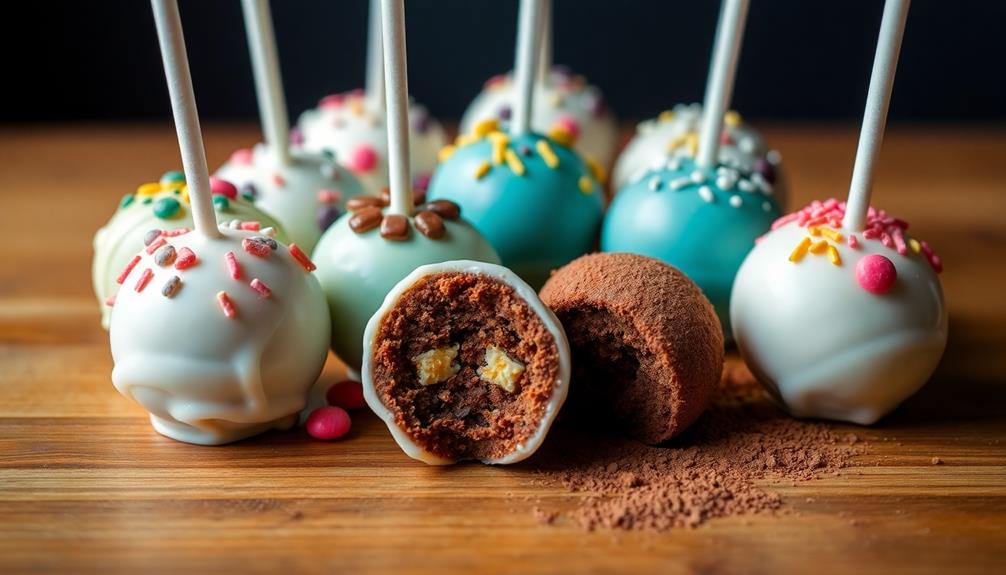
Cake pops are the perfect sweet treat that'll have you hooked from the first lick! These bite-sized delights begin with moist, crumbled cake that's mixed with frosting, then rolled into adorable balls and dipped in rich chocolate. The chilling process sets the chocolate coating to perfection. Whether you prefer classic chocolate or tantalizing flavors like lemon, the options are endless! Get creative with colorful coatings and fun decorations to make these irresistible pops your own. Cake pops are a crowd-pleasing favorite for parties, weddings, and beyond – and you'll discover why once you try them yourself.
Key Takeaways
- Cake pops are bite-sized confections made by shaping crumbled cake into balls, coating them in chocolate, and placing them on lollipop sticks.
- Cake pops offer versatile flavor combinations, with classic chocolate and tangy lemon being popular choices among enthusiasts.
- The chilling process is crucial for achieving the right texture and stability of cake pops, ensuring the chocolate coating sets properly.
- Creative decorations and presentation ideas, such as contrasting colors and themed displays, can enhance the visual appeal of cake pops.
- Cake pops are suitable for various occasions, including parties, gatherings, and as a sweet treat or favor.
Top picks for "cake pops"
Open Amazon search results for this keyword.
As an affiliate, we earn on qualifying purchases.
History
Cake pops' origins can be traced back to the early 2000s, when baking enthusiasts began experimenting with leftover cake scraps.
These clever cooks discovered that by rolling the cake into bite-sized balls, covering them in chocolate, and adding sticks, they could create a delightful new treat.
As the trend gained popularity, creative bakers started playing with different cake flavors and decorations.
Soon, cake pops became a staple at parties, weddings, and even school bake sales. Their portable size and customizable designs made them an instant hit with both kids and adults.
Today, cake pops are a beloved dessert worldwide.
Bakeries and home chefs continue to push the boundaries, crafting whimsical designs that are as much fun to make as they're to eat.
Whether you prefer classic chocolate or adventurous flavors, there's a cake pop out there to delight any sweet tooth.
Recipe
Cake pops are a delightful and versatile dessert that have gained immense popularity in recent years. These bite-sized treats combine the richness of cake with the convenience of a portable snack. Whether you're hosting a party, looking for a unique gift, or simply craving a sweet indulgence, cake pops are a fantastic choice.
The process of creating cake pops may seem daunting at first, but with a few simple steps and the right techniques, you can easily master the art of cake pop making. In this recipe, we'll guide you through the essential steps to crafting your own delectable cake pops.
Ingredients:
- 1 box of your favorite cake mix
- 1 can of frosting
- Lollipop sticks
- Chocolate, melted (for coating)
- Sprinkles or other decorations (optional)
Instructions:
Bake the cake according to the instructions on the box, then crumble the cooled cake into a large bowl. Add the desired amount of frosting and mix until the mixture is well combined and can be easily rolled into balls.
Scoop the cake mixture and roll it into 1-inch balls, placing them on a baking sheet or parchment paper. Insert a lollipop stick into the center of each ball, pressing it gently to secure it in place.
Melt the chocolate in a double boiler or microwave, being careful not to overheat it. Dip the cake pops into the melted chocolate, coating them completely. Allow any excess chocolate to drip off, then place the coated pops on a baking sheet or parchment paper.
Decorate with sprinkles or other desired toppings while the chocolate is still wet.
To ensure your cake pops turn out perfectly, it's essential to chill the pops in the refrigerator for at least 30 minutes before serving. This will help the chocolate set and the pops hold their shape.
Additionally, consider experimenting with different cake flavors, frostings, and toppings to create unique and personalized cake pops that will delight your guests.
Cooking Steps
Crumble that cake into fine pieces, then use your hands to form the mixture into perfectly round balls.
For a healthier version, consider using crafting vegan cake pops by incorporating plant-based ingredients.
Next, dip those tasty balls into melted chocolate until they're coated from top to bottom.
Finally, carefully insert lollipop sticks and pop the chocolate-coated creations into the fridge to chill.
Can't wait to see how your cake pops turn out!
Step 1. Crumble Cake Into Fine Pieces
Once the cake has completely cooled, you'll want to start crumbling it into fine, manageable pieces. Use your hands to gently break the cake apart, creating a pile of soft, crumbly cake bits.
Don't be too rough – you want the texture to be light and airy, not dense or compacted. Work in small sections, taking your time to ensure the cake is evenly crumbled. Once you’ve achieved the desired consistency, you can start shaping the cake crumbles into whatever size or shape you need for your recipe. Whether you’re making cake pops, truffles, or a classic cake, the process remains the same. And if you’re looking for inspiration, there are plenty of easy sheet cake recipes available online that can help you take your crumbled cake creations to the next level.
As you crumble, pay attention to the size of the pieces. You're aiming for a consistency that's not too fine, like breadcrumbs, but also not too chunky.
The ideal texture should be somewhere in the middle – small enough to easily shape into balls, but with some variation in size to add visual interest. Periodically check the crumbs, making adjustments as needed until you have the perfect cake-pop base.
With the cake fully crumbled, you're now ready to move on to the next step: mixing in the frosting. This is where the real magic of cake pops begins!
Step 2. Form Cake Ball Mixture
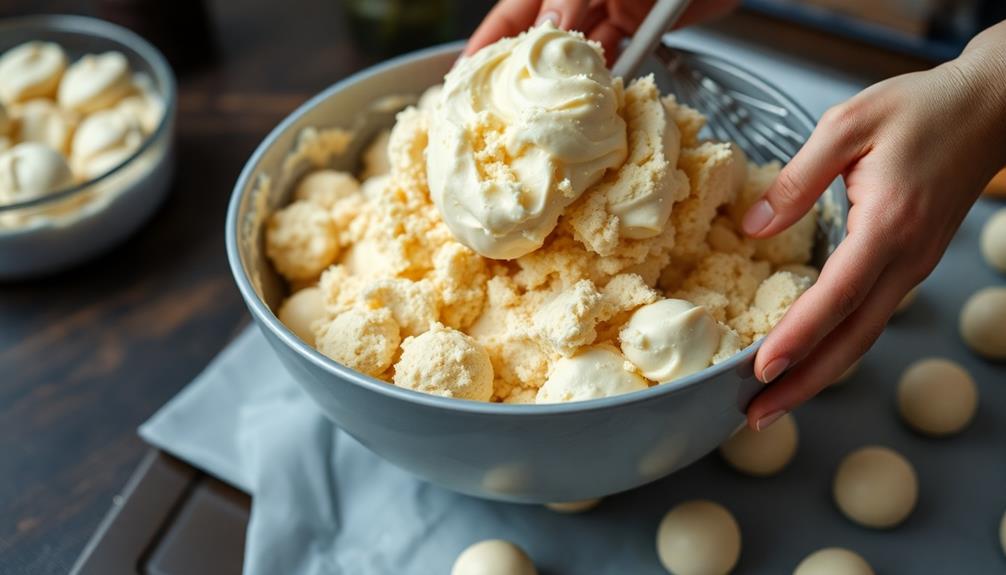
With the cake fully crumbled, you'll want to start forming the mixture into bite-sized balls. Take a handful of the crumbled cake and gently press it together in the palm of your hand.
Carefully roll the mixture between your palms to create a smooth, round ball. Make sure not to squeeze too hard, as you don't want the cake to become dense or tough.
As you continue forming the cake balls, aim for them to be about the size of a golf ball. If the mixture seems a bit dry, you can add a small amount of frosting or melted chocolate to help it hold its shape.
Once you've got all the cake formed into balls, place them on a baking sheet or plate. Pop the tray in the refrigerator for 30 minutes to an hour. This will help the cake balls firm up, making them easier to work with in the next step.
Step 3. Dip Balls in Melted Chocolate
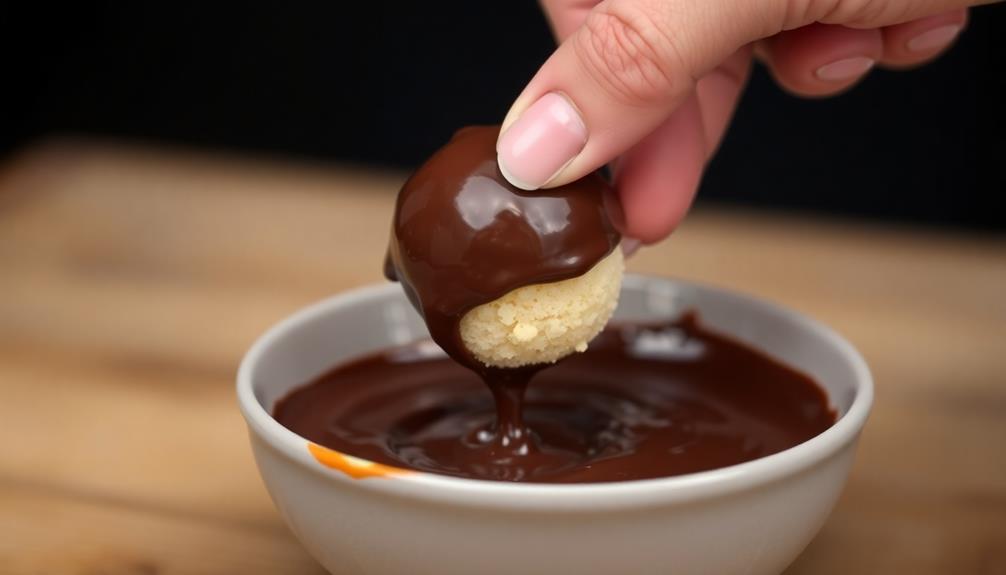
After the cake balls have had a chance to firm up in the refrigerator, you'll want to start dipping them in melted chocolate.
Grab a double boiler or a heat-safe bowl set over a pot of simmering water. Slowly melt the chocolate, stirring occasionally until it's smooth and creamy.
Now, one by one, carefully lower the cake balls into the melted chocolate. Use a fork or a dipping tool to roll the balls around, making sure they're fully coated.
Gently lift the ball out of the chocolate, allowing any excess to drip back into the bowl.
Place the dipped cake balls onto a parchment-lined baking sheet. Work in batches, keeping the remaining cake balls chilled until you're ready to dip them.
Once all the balls are coated, pop the tray into the fridge for the chocolate to set. In no time, you'll have a tray of beautifully dipped cake pops, ready to be enjoyed or decorated further.
Step 4. Insert Lollipop Sticks

To insert the lollipop sticks, you'll first need to prepare the cake balls. Once your delicious cake balls are ready, it's time to add the sticks.
Gently push a lollipop stick into the center of each cake ball, making sure not to push it all the way through. Leave about an inch or two of the stick exposed above the cake. This will provide a sturdy handle for your cake pops.
Be careful not to push the stick in too far, as this could cause the cake ball to crack or break apart. Take your time and gently insert each stick, rotating the cake ball as you go to ensure an even, centered placement.
With the lollipop sticks in place, your cake pops are now ready for the next step – dipping them in melted chocolate!
This will create a smooth, glossy coating that will make your cake pops look professional and delicious. Get ready to impress your friends and family with these adorable and tasty treats.
Step 5. Chill the Chocolate-Coated Pops
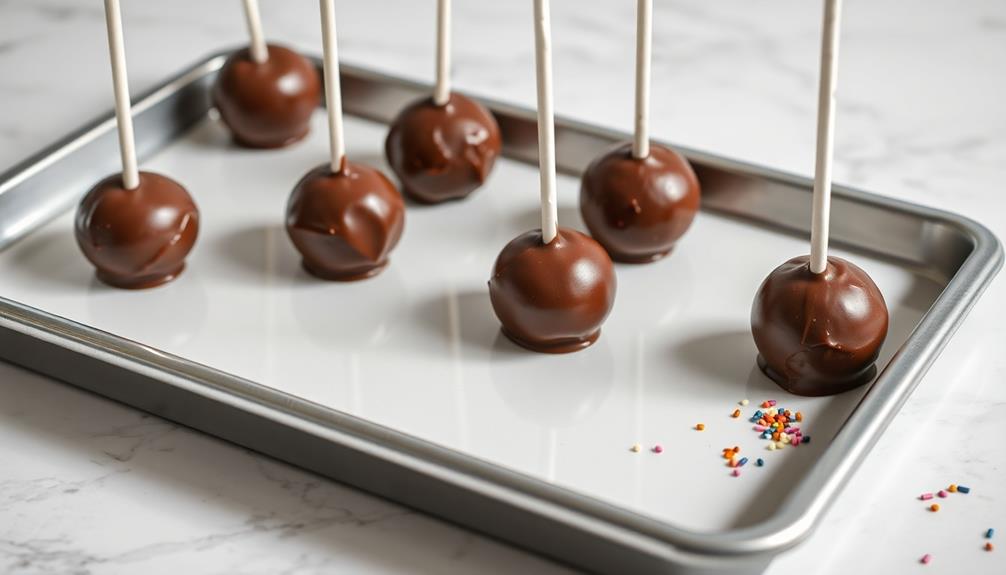
Once you've coated the cake pops in melted chocolate, it's important to chill them. This helps the chocolate set and creates a smooth, shiny finish. Simply place the chocolate-dipped pops on a baking sheet or platter and pop them in the fridge for about 15 minutes. You'll know they're ready when the chocolate has hardened completely.
While the pops are chilling, you can start preparing the next batch or tidy up your work area. Just be careful not to leave them in the fridge for too long, as the chocolate can start to crack or peel.
Once the chocolate is set, you can add any final decorations, like sprinkles or drizzles. Then they're ready to serve and enjoy! The chilled, chocolate-coated cake pops make a delightful and impressive treat.
With a little patience, you'll have professional-looking cake pops that are sure to impress your friends and family.
Final Thoughts
Cake pops can be a delightful and versatile treat for any occasion. With their bite-sized portions and endless flavor combinations, these whimsical treats are perfect for parties, gatherings, or just a sweet indulgence.
Whether you prefer classic chocolate, tangy lemon, or a festive holiday theme, the possibilities are endless.
Once you've mastered the chilling process, you can unleash your creativity and experiment with different coatings, sprinkles, and decorations.
The sky's the limit when it comes to making your cake pops truly unique and eye-catching. Impress your friends and family with your newfound cake pop expertise, and don't be afraid to get creative.
Frequently Asked Questions
Can Cake Pops Be Made Without a Cake Pop Maker?
Yes, you can make cake pops without a specialized cake pop maker. Simply crumble baked cake, mix it with frosting, and roll the mixture into balls. Then dip the balls in melted chocolate or candy coating.
How Long Do Homemade Cake Pops Last?
Homemade treats like these generally last 3-5 days at room temperature when stored properly. The key is to keep them in an airtight container away from moisture and direct sunlight. Enjoy your homemade delights while they're fresh!
Can Cake Pops Be Frozen for Later Use?
Yes, you can freeze cake pops for later use. They'll stay fresh for up to 3 months in the freezer. Just be sure to store them in an airtight container or freezer bag to prevent freezer burn.
What Is the Best Way to Dip Cake Pops?
You can dip your cake pops a few different ways. Use a small bowl or cup to dip them, or you can use a spoon to coat the pops. Make sure the coating is smooth and covers the entire pop.
Can Cake Pops Be Made With Gluten-Free or Vegan Ingredients?
Yes, you can make cake pops with gluten-free or vegan ingredients. Use a gluten-free cake or vegan cake recipe, and opt for dairy-free melting chocolate or candy melts to coat the pops. Get creative with your toppings and flavors.
Conclusion
You've made it this far, so you're ready to enjoy your delectable cake pops! Take a moment to admire your handiwork – these bite-sized treats are simply irresistible. With their moist cake centers and smooth, glossy coatings, they're the perfect balance of flavors and textures. Now, go ahead and indulge in your creation – you deserve to savor every last crumb! These cake pops are sure to delight your taste buds and bring a smile to your face.