Christmas Recipes
Thumbprint Cookies
Perfectly delightful thumbprint cookies with buttery shortbread dough and scrumptious fruit preserves will have your taste buds craving more. Discover the secrets to these irresistible holiday treats.
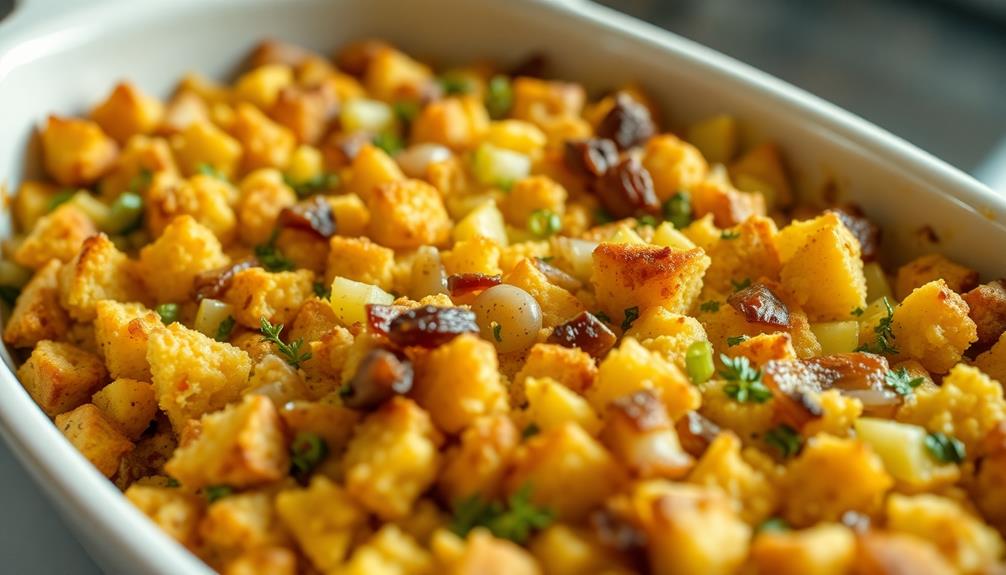
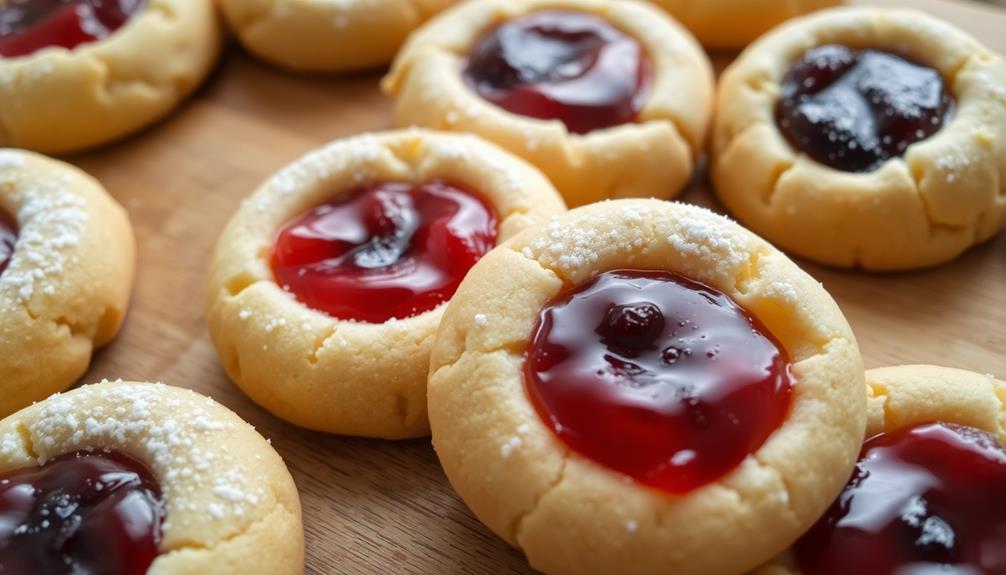
Thumbprint cookies are the sweetest little treats that'll have your mouth watering! These classic holiday cookies start with a buttery shortbread-like dough that you get to shape into balls and press your thumb into, making a perfect little well for scrumptious fruit preserves. You can use all kinds of yummy fillings – raspberry, strawberry, even lemon or apple! Once baked to golden perfection, these cookies are so soft and melt-in-your-mouth delicious. Kids love helping make them, and they're a wonderful addition to any holiday cookie platter. Ready to get baking? There's so much more to discover about these delightful little cookies!
Key Takeaways
- Thumbprint cookies are a classic holiday treat with a history dating back to the late 1800s, inspired by traditional linzer cookies.
- The recipe involves pressing a thumbprint into dough to create a well for fruit jams or preserves, resulting in a soft, buttery texture.
- Thumbprint cookies are highly customizable, allowing for a variety of fruit fillings and optional additions like chopped nuts or chocolate drizzle.
- Baking thumbprint cookies can be a fun family activity, as children enjoy pressing their thumbs into the dough and selecting different filling flavors.
- Thumbprint cookies represent a balance of simplicity and creativity, making them a perfect dessert for any occasion.
History
Thumbprint cookies trace their origins back over a century, with the earliest known recipes appearing in the late 1800s.
These delightful treats were likely inspired by the traditional linzer cookies, which feature a thumbprint-shaped indentation filled with jam. As the story goes, resourceful homemakers started using their thumbs to create these handy little wells, making them perfect for holding a dollop of your favorite preserves.
Over time, the thumbprint cookie became a beloved classic, popping up in church cookbooks and on holiday platters everywhere.
Today, you can find endless variations, from chocolate-dipped to nut-topped, but the original buttery goodness and satisfying jam filling remains a timeless favorite.
Whether you're baking them for a special occasion or just because, thumbprint cookies are sure to bring a smile to your face and warmth to your heart.
Recipe
Thumbprint cookies are a classic holiday treat that are easy to make and endlessly customizable. These buttery bites are made by pressing a thumbprint into the center of each cookie before baking, creating a perfect well for a dollop of your favorite jam or preserves.
They can be a delightful addition to any dessert spread, especially alongside other fun desserts like Dirt Cups, which are perfect for kids' parties. The soft, tender texture of these cookies pairs beautifully with the sweet, fruity filling. Plus, they're a fun project to tackle with little helpers in the kitchen, as the thumbprint step allows for plenty of creative expression. If you’re looking for a delicious pinwheel cookie recipe, these thumbprint cookies are a great place to start. The combination of the buttery cookie base and the jammy center is simply irresistible. Plus, they make for a stunning presentation on any dessert table. So, gather the ingredients and get ready to bake up a batch of these delightful thumbprint cookies!
Ingredients:
- 1 cup unsalted butter, softened
- 3/4 cup granulated sugar
- 1 egg
- 2 teaspoons vanilla extract
- 1/4 teaspoon salt
- 2 1/4 cups all-purpose flour
- 1/2 cup assorted fruit jams or preserves
Preheat your oven to 350°F (175°C). In a large bowl, cream the butter and sugar together until light and fluffy. Beat in the egg and vanilla, then stir in the salt and flour until a soft dough forms.
Scoop tablespoon-sized balls of dough and place them 2 inches apart on parchment-lined baking sheets. Use your thumb to gently press an indentation into the center of each cookie. Bake for 10-12 minutes, until the edges are lightly golden.
Remove from the oven and immediately use the back of a spoon to re-press the indentations. Allow the cookies to cool completely on the baking sheets before filling the centers with your desired jam or preserves.
For best results, be sure to use room temperature butter and avoid overbaking the cookies, as they can become dry and crumbly. Experiment with different jam flavors to find your favorite combination, or even try adding a sprinkle of chopped nuts or a drizzle of melted chocolate for extra flair.
Cooking Steps
First, you'll need to preheat your oven to a toasty 350°F.
Next, cream the butter and sugar together until they're light and fluffy.
Then, mix in the egg and vanilla to give your cookies that irresistible flavor.
Time to add the dry ingredients and roll the dough into little balls – get ready for some delicious thumbprint cookies!
Step 1. Preheat Oven to 350°F
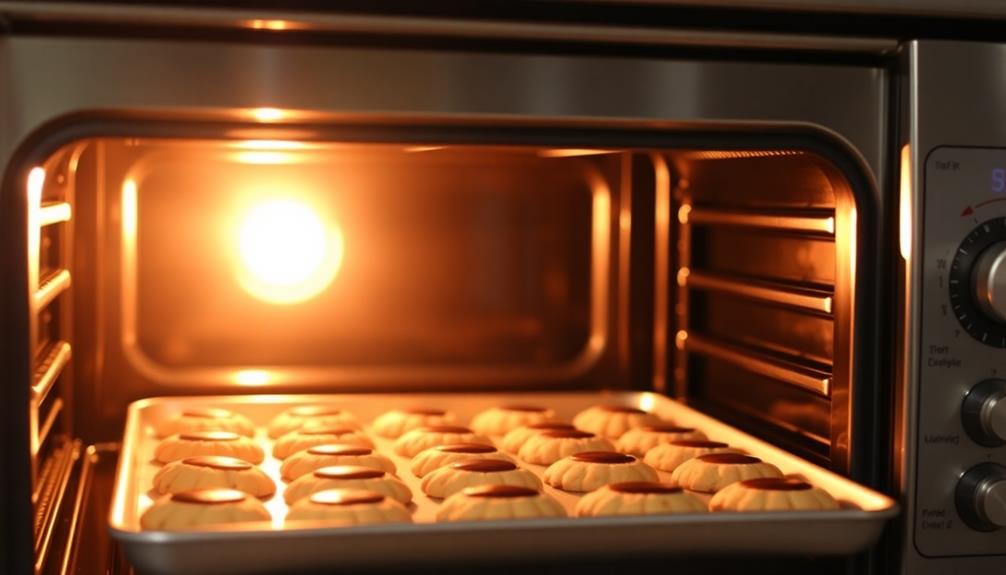
Preparation is key when baking delightful treats. To start, you'll want to preheat your oven to a toasty 350°F. This temperature is just right for ensuring your thumbprint cookies bake to perfection.
While the oven is warming up, you can gather all your ingredients and tools. Having everything ready to go makes the process super smooth and stress-free.
Once the oven is at the perfect temp, you can pop your cookies in and let the magic happen. The delicious aroma of freshly baked thumbprints will soon fill your kitchen, making your mouth water in anticipation.
As the cookies bake, you'll notice them turning a beautiful golden brown. This is your cue that they're almost ready to come out and cool. Just be sure to keep an eye on them, as oven temperatures can vary.
With a little patience, you'll have a batch of warm, irresistible thumbprint cookies ready to enjoy. Yum!
Step 2. Cream Butter and Sugar Together
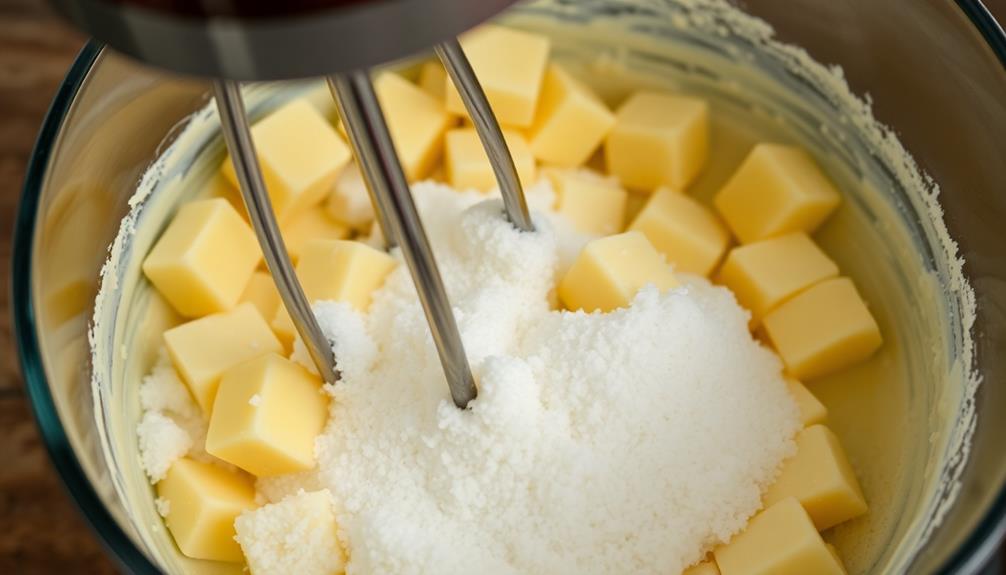
To begin, cream the butter and sugar together until the mixture is light and fluffy. This step is really important because it helps create the perfect texture for your thumbprint cookies.
You'll want to use a hand mixer or stand mixer to get the butter and sugar nice and creamy. Cream them together for about 2-3 minutes, scraping down the sides of the bowl as needed.
The butter should be at room temperature, so it'll blend easily with the sugar. Once the mixture looks smooth and fluffy, you're ready for the next step.
You'll notice the color will become paler as you cream the butter and sugar – that's exactly what you want! This creaming process traps tiny air bubbles, which will make your cookies nice and soft.
Keep an eye on it and stop mixing once the texture is just right. Now you can move on to adding the other ingredients and shaping your thumbprint cookies!
Step 3. Add Egg and Vanilla
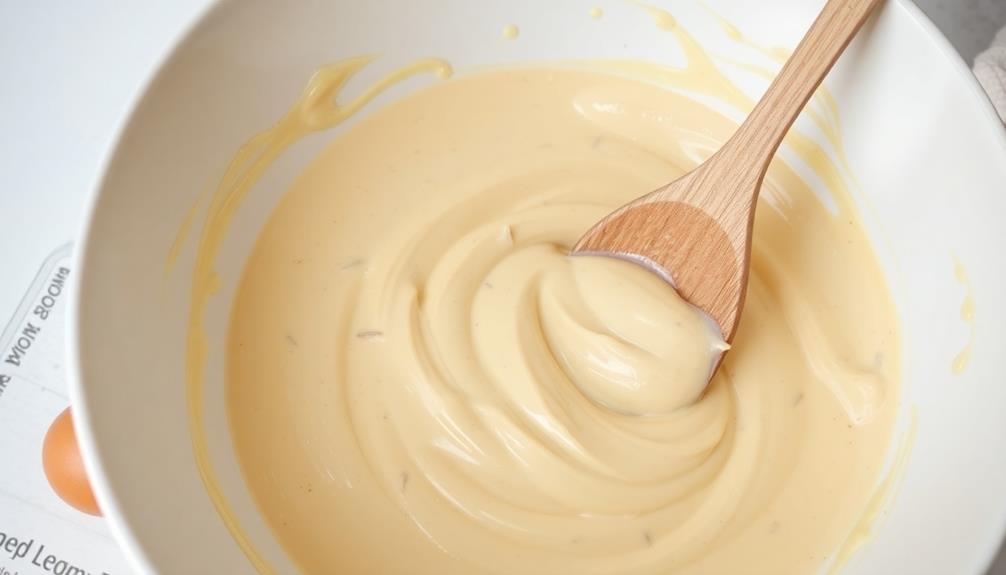
After creaming the butter and sugar to perfection, you'll now add the egg and vanilla to the mix. Crack the egg into a small bowl, being careful not to let any eggshell bits fall in. Use a fork to gently whisk the egg until it's nice and smooth.
Now, add a teaspoon of vanilla extract and give everything a good stir. The sweet vanilla aroma will start to fill the air, making your mouth water in anticipation. To further enhance your baking adventures, consider using flavors inspired by popular ice cream varieties like Birthday Cake or Cotton Candy.
Slowly pour the egg and vanilla mixture into the creamed butter and sugar, mixing it all together with a wooden spoon or your trusty electric mixer. Keep mixing until the dough is silky smooth and fully combined.
Yum, can you already imagine how delicious these cookies are going to be? The egg helps bind everything together, while the vanilla adds that signature flavor we all know and love.
Get ready, because the next step is shaping these thumbprint cookies into perfection!
Step 4. Add Dry Ingredients
With the wet ingredients now incorporated, it's time to add the dry components. In a separate bowl, whisk together the all-purpose flour, baking powder, and a pinch of salt.
The flour will give your cookies structure, while the baking powder acts as a leavening agent, helping them rise to fluffy perfection. The salt enhances all the flavors, making each bite simply delightful.
Gently pour the dry mixture into the bowl with the creamed butter and sugar. Using a wooden spoon or a sturdy spatula, fold the ingredients together until a soft dough forms.
Be careful not to overmix, or your cookies might end up tough. The dough should come together easily, with no dry pockets remaining.
Now you're ready to roll up your sleeves and start shaping those thumbprint cookies!
Step 5. Roll Dough Into Balls
Begin by rolling the dough into small, uniform balls. Use your hands to gently scoop up a bit of the dough and roll it between your palms until it forms a smooth, round shape. Make sure each ball is about the same size so they'll bake evenly.
As you roll, imagine the dough is a little snowball – just don't pack it too tightly!
Once you've rolled all the dough into balls, it's time to get creative. Gently press your thumb into the center of each ball, making a little indentation. This is where you'll add the delicious jam or filling later.
Be careful not to press too hard, or you might end up with cookies that are misshapen.
Arrange the dough balls on a baking sheet, making sure to leave a bit of space between each one. They'll need room to spread out as they bake.
Now you're ready for the next step – popping these tasty treats in the oven!
Final Thoughts
Thumbprint cookies are a classic holiday treat that can be enjoyed year-round. These charming little cookies are the perfect way to add a personal touch to your baking.
Once you've rolled the dough into delightful balls and pressed your thumbprint into each one, you can fill the indents with all sorts of delicious jams and preserves. The possibilities are endless!
The best part about making thumbprint cookies is that you can get the whole family involved. Kids will love pressing their thumbs into the dough to create the signature indents.
And everyone can have fun choosing their favorite fillings to complete these tasty treats. Whether you opt for classic flavors like raspberry or strawberry, or get adventurous with unique jams, each cookie will be a unique work of art.
Frequently Asked Questions
How Long Can Thumbprint Cookies Be Stored?
You can store thumbprint cookies for up to a week in an airtight container at room temperature. For longer storage, they can be frozen for up to three months. Just be sure to thaw them before serving.
Can I Use Different Fillings for the Cookies?
Definitely! You can experiment with various fillings for your cookies. Whether it's fruit preserves, chocolate ganache, or even savory options, the possibilities are endless. Get creative and find your favorite flavor combinations.
Do Thumbprint Cookies Require Refrigeration?
Thumbprint cookies don't necessarily require refrigeration, but it depends on the filling. If you're using a filling that's perishable, like fruit or cream, you'll want to keep the cookies chilled to prevent spoilage.
Can I Freeze Unbaked Thumbprint Cookie Dough?
Yes, you can freeze unbaked thumbprint cookie dough. Simply scoop the dough onto a baking sheet, freeze until firm, then transfer to an airtight container or bag. When ready to bake, thaw in the fridge overnight.
Are Thumbprint Cookies Gluten-Free or Vegan?
You can make thumbprint cookies gluten-free by using gluten-free flour. To make them vegan, substitute the butter or eggs with plant-based alternatives. Adjust the recipe accordingly to achieve the desired texture and flavor.
Rachel is all about nostalgic comfort food with a modern twist. She brings the flavors of classic American diners to Cook if Ya, with her takes on burgers, fries, and milkshakes. Rachel’s love for simple, hearty meals brings a bit of retro flair to the table, reminding us all of the joys of classic diner dishes.
Christmas Recipes
Christmas Eve Feast of Seven Fishes: Italian Tradition Explained
Brimming with seafood and steeped in Italian-American heritage, the Feast of the Seven Fishes on Christmas Eve captivates with its rich culinary history and familial traditions.
The Feast of the Seven Fishes is a cherished Italian-American tradition rooted in Catholic practices. It traces back to Southern Italy, where families would abstain from meat on Christmas Eve. The number seven represents perfection, and the feast celebrates an abundance of diverse seafood. You'll find classics like baccalà (salted cod) and spaghetti with clams, all infused with garlic, olive oil, and fresh herbs. Families create unique menus, preserving their heritage while honoring ancestors. It's a joyous gathering that strengthens bonds and evokes nostalgia – you'll surely want to learn more about this beloved tradition.
Key Takeaways
- The Feast of the Seven Fishes is a time-honored Italian-American Christmas Eve tradition with deep cultural roots in Catholic practices and symbolism.
- The seafood-centric feast celebrates an abundance of diverse flavors and textures, typically featuring seven different types of fish and shellfish.
- The preparation process involves sautéing, simmering, and seasoning the seafood with garlic, olive oil, and fresh herbs for a harmonious dining experience.
- Contemporary adaptations of the feast may include non-traditional seafood, fusion dishes, and sustainable sourcing practices, reflecting modern culinary trends.
- The feast is an emotional gathering that strengthens family bonds, preserves cultural heritage, and creates lasting memories through the sharing of stories and traditional recipes.
History
The Feast of the Seven Fishes is a beloved Italian-American Christmas Eve tradition with deep roots in Italian culture. This seafood-centric meal has been passed down for generations, celebrating the vigil before the Christmas holiday.
The tradition likely started as a way to observe the Catholic practice of abstaining from meat and dairy on the eve of certain holy days. Fishing was a common livelihood in coastal Italy, so serving seven different types of fish or seafood became a special way to mark the occasion.
The number seven holds symbolic significance in many religions and cultures, representing completeness or perfection. In the case of the Feast of the Seven Fishes, the seven courses are thought to represent the seven sacraments or the seven days of creation.
Over time, the feast evolved, and families would prepare their own unique menus featuring a variety of fish and seafood dishes. Today, this vibrant tradition continues to bring families together, preserving Italian heritage and celebrating the magic of Christmas.
Recipe
The Feast of the Seven Fishes is a beloved Italian-American Christmas Eve tradition that celebrates the abundance of the sea. This seafood-centric meal is a culinary delight, showcasing the diverse flavors and textures of various marine delicacies.
Preparing the perfect Feast of the Seven Fishes requires thoughtful planning and execution. Each dish should be carefully crafted to complement the others, creating a harmonious and satisfying dining experience.
- Calamari
- Shrimp
- Clams
- Mussels
- Lobster
- Anchovies
- Salmon
To cook the Feast of the Seven Fishes, start by sautéing the calamari and shrimp in a large skillet with olive oil, garlic, and parsley. Add the clams and mussels, and steam until they open.
Next, gently poach the lobster, anchovies, and salmon in a flavorful seafood broth. Serve each component individually or combine them in a grand seafood stew.
When preparing this dish, be mindful of timing and ensure that each seafood item is cooked to perfection. Maintain a balance of flavors and textures throughout the meal, and consider serving the feast with crusty bread and a crisp, dry white wine to complement the seafood.
Cooking Steps
First, gather and prep your seafood ingredients – you'll need plenty of fresh, juicy morsels like shrimp, scallops, and calamari.
Next, sauté the seafood in some rich olive oil until it's nicely browned.
Then, let it simmer in a splash of crisp white wine, adding a sprinkle of fragrant parsley and a squeeze of tangy lemon wedges.
Serve this seafood feast piping hot with crusty bread for dipping – it's sure to delight your holiday guests! The rich, savory broth pairs perfectly with the crusty bread, allowing diners to soak up every last bit of flavor. For an added touch of indulgence, consider offering a charcuterie platter featuring Vietnamese head cheese, which adds a unique and flavorful twist to your spread. This unexpected combination will surely impress and become a memorable staple of your gatherings.
Step 1. Gather and Prep Seafood Ingredients
Assembling the seafood ingredients is the foundation for the Feast of Seven Fishes. You'll need a variety of fresh fish and shellfish to create the traditional Italian-American Christmas Eve meal.
Start by gathering shrimp, clams, calamari, and perhaps some scallops or cod. Rinse the seafood under cool water and pat it dry with paper towels. If you're using whole fish, you'll need to clean and fillet them. Don't forget to save any bones or heads – they can be used to make a flavorful broth later.
Next, chop or slice the seafood into bite-sized pieces. This will make it easier to cook and serve. Measure out the amounts you'll need for each recipe. Having all your ingredients prepped and ready to go will make the cooking process smooth and efficient.
With the seafood ingredients assembled, you're well on your way to an authentic Feast of Seven Fishes!
Step 2. Sauté Seafood in Olive Oil
Next, sauté the seafood in olive oil. Heat a large skillet over medium-high heat and add a few tablespoons of high-quality olive oil. Once the oil is shimmering, it's time to add your delicious seafood ingredients.
Start by sautéing the shrimp, scallops, and calamari. Gently place them in the hot oil and let them cook for 2-3 minutes per side, until they're lightly browned and cooked through. Be careful not to overcrowd the pan – work in batches if needed to ensure even cooking.
Once the shellfish is sautéed, remove it from the pan and set it aside. Next, sauté the white fish fillets, such as cod or halibut, for 3-4 minutes per side.
Finally, add the mussels and clams to the pan and cover it with a lid. Let them steam for 5-7 minutes, until they've opened up. Avoid overcooking to keep the seafood tender and juicy.
Now that all the seafood is sautéed to perfection, it's ready to be incorporated into your next course!
Step 3. Simmer Seafood in White Wine
Simmering the seafood in a fragrant white wine broth infuses each bite with delightful flavors.
Start by gently sautéing some garlic and onions in olive oil until they're soft and translucent. Then, add the seafood – maybe some shrimp, calamari, and white fish like cod or halibut. Pour in a splash of crisp white wine and let it simmer, allowing the alcohol to cook off and the flavors to meld together.
As the seafood simmers, the white wine creates a mouthwatering sauce that coats each piece. The delicate proteins soak up all the aromatic goodness, resulting in a dish that's bursting with taste.
Don't forget to season with a pinch of salt and pepper, and maybe some fresh herbs like parsley or basil. Serve the simmered seafood with crusty Italian bread to soak up every last drop of that flavorful broth.
This simple yet elegant preparation is sure to delight your Christmas Eve feast guests.
Step 4. Add Parsley and Lemon Wedges
To complete the dish, gently stir in some fresh parsley, chopping it coarsely to release its vibrant aroma. The parsley's bright, earthy notes will perfectly complement the simmered seafood.
Squeeze in the juice of a few lemon wedges, too. The zesty citrus will brighten up the flavors and balance the richness of the white wine sauce.
Those lemon wedges also make a lovely garnish, adding a pop of color to the plate. Arrange them around the edges, inviting guests to squeeze a little extra juice over their portions as they dig in.
The combination of the tender seafood, the fragrant parsley, and the vibrant lemon is simply divine. It's the perfect way to celebrate the Feast of Seven Fishes and welcome the Christmas season.
With just a few finishing touches, your delightful holiday dish is ready to enjoy.
Step 5. Serve Hot With Crusty Bread
Once you've added the fresh parsley and lemon wedges, your seafood feast is ready to serve.
Gather up those crusty, warm bread slices and start dishing out the hot, fragrant dishes. The aroma of the seafood is sure to have everyone's mouth watering in anticipation.
Dunk the bread into the sauces and juices, soaking up every last drop. The combination of the tender, flavorful fish and the hearty, crusty bread is simply divine.
Don't be afraid to go back for seconds – this feast is meant for indulging! As your loved ones gather around the table, encourage them to savor each bite and share in the joy of this cherished Italian tradition.
The Christmas Eve Feast of Seven Fishes is a time-honored celebration, and serving it piping hot with crusty bread makes it all the more special.
Enjoy this beloved feast to the fullest!
Final Thoughts
As the Christmas Eve feast comes to a close, the flavors of the seven fishes linger on your palate, each dish a harmonious symphony of the sea. You sit back, feeling satisfied and content.
The family gathers around, swapping stories and cherished memories of Christmases past. This annual tradition is more than just a meal – it's a celebration of Italian heritage, a time to come together and honor age-old customs.
While the feast may be over, the spirit of the occasion remains. You can't help but feel a sense of nostalgia and gratitude for the rich culture that has been passed down through generations.
As you sip your after-dinner coffee, you know that next year, you'll be back, ready to embark on another culinary adventure and create new memories with loved ones.
The Feast of Seven Fishes is a cherished tradition that will continue to bring joy and togetherness for years to come.
Frequently Asked Questions
What Is the Significance of the Number Seven in the Feast?
The number seven represents the seven sacraments in Catholicism. It's believed that by honoring the holy number, you'll bring good luck and blessings for the new year.
Can the Feast Be Adapted for Dietary Restrictions?
Absolutely, the Feast of Seven Fishes can be adapted for dietary restrictions. You can swap out seafood for plant-based proteins or opt for vegetarian dishes to accommodate various dietary needs and preferences.
How Long Does It Typically Take to Prepare the Entire Meal?
The preparation time for the entire Feast of Seven Fishes meal can vary, but it's generally a labor-intensive process that can take hours, even days, depending on the number of dishes and the complexity of each recipe.
Is the Feast Only Celebrated in Italy or Other Countries as Well?
The Feast of the Seven Fishes isn't just an Italian tradition. Many other countries, including the United States, have embraced this Christmas Eve celebration, making it a beloved and widespread holiday custom around the world.
How Did the Tradition of the Feast Originate?
The tradition of the Feast of Seven Fishes originated in Italy, where it's believed to have roots in the Roman Catholic tradition of abstaining from meat and dairy on the eve of certain holidays. It's now celebrated worldwide.
Christmas Recipes
Christmas Goose: A Traditional Feast
Kindle the holiday spirit with the story of the Christmas goose, a culinary tradition that captures the essence of the festive season.
Christmas goose has been a beloved centerpiece of holiday feasts for centuries, symbolizing the warmth and abundance of the season. This traditional dish, with its crisp golden-brown skin and succulent, flavorful meat, evokes the comforting flavors and cherished memories that make Christmas such a special time. Preparing a Christmas goose is a true culinary art, requiring care and attention to create the perfect balance of savory flavors. Gather your family around the table to enjoy this festive feast and discover the rich history and time-honored traditions that make this dish a Christmas celebration to remember. There's even more to explore about this beloved holiday classic!
Key Takeaways
- The Christmas goose is a traditional European dish that has become a symbol of prosperity and abundance during the holiday season.
- Roasting a whole goose requires careful attention to achieve a crispy skin and succulent meat, often accompanied by savory stuffing and complementary sides.
- Basting the goose with its own pan drippings throughout the roasting process is essential for enhancing the flavor and creating an evenly browned presentation.
- Serving the Christmas goose is a cherished holiday tradition that brings families together, fostering a sense of community and creating lasting memories.
- Dessert options, such as homemade pies or decadent cakes, can provide a fitting conclusion to the festive Christmas goose feast.
History
The tradition of serving Christmas goose traces its origins back to medieval Europe. Back then, geese were abundant and easy to raise, making them a popular choice for holiday feasts. As the seasons changed, families would eagerly await the arrival of the first geese, signaling the start of the Christmas celebrations.
Roasting a goose was no easy task, but the end result was a delicious and tender bird that became a symbol of prosperity and abundance. The golden-brown skin, crispy and flavorful, would fill the air with mouthwatering aromas, drawing everyone to the table.
Over the centuries, the Christmas goose has evolved, but its place at the heart of the holiday feast remains unchanged.
Today, families continue to gather around the table, savoring the rich, juicy meat and the comforting traditions that have been passed down through the generations.
Recipe
Cooking a Christmas goose is a time-honored tradition that can add a touch of elegance and richness to your holiday feast. This succulent bird, with its crisp golden skin and flavorful meat, is a beloved centerpiece for many families.
Preparing a Christmas goose requires a bit of care and attention, but the end result is well worth the effort. The key is to balance the savory flavors of the goose with complementary sides and sauces, creating a harmonious and satisfying dining experience.
Ingredients:
- 1 (8-10 lb) whole goose
- 1 onion, diced
- 2 carrots, peeled and diced
- 2 celery stalks, diced
- 4 sprigs of fresh thyme
- 2 bay leaves
- Salt and pepper to taste
Instructions:
Preheat your oven to 375°F (190°C). Rinse the goose under cold water and pat it dry with paper towels. Season the cavity with salt and pepper, then stuff it with the onion, carrots, celery, thyme, and bay leaves.
Truss the goose with kitchen string to help it maintain its shape during roasting. Place the goose on a rack in a large roasting pan and roast for approximately 2-2.5 hours, or until the internal temperature reaches 165°F (74°C) in the thickest part of the thigh. Baste the goose regularly with the pan juices to ensure a crisp, golden-brown skin.
When cooking a Christmas goose, be mindful that the bird can be quite rich and fatty. To help balance the flavors, consider serving the goose with tart cranberry sauce, tangy apple chutney, or a light, refreshing salad.
Additionally, it's essential to let the goose rest for at least 15-20 minutes before carving to allow the juices to redistribute, ensuring a juicy and flavorful dining experience.
Cooking Steps
Preheat your oven to 375 degrees Fahrenheit and get ready to create a delicious Christmas goose!
First, rub the goose with seasoned butter to give it a mouthwatering flavor.
Then, stuff the goose with bread cubes for a classic holiday stuffing.
Step 1. Preheat Oven to 375 Degrees Fahrenheit
Preheating your oven to 375 degrees Fahrenheit is the crucial first step in this roasting process.
You'll want to make sure your oven is nice and toasty before you pop that magnificent goose inside. This high temperature helps the skin get all nice and crispy, while the meat stays juicy and flavorful.
As the oven warms up, you can start preparing the rest of your ingredients. Gather your seasoning, basting tools, and any other goodies you'd like to add to the pan.
Once that oven beeps, signaling it's reached the perfect temp, you're ready to get cooking! Carefully slide the goose into the oven, being mindful of that hot air.
Close the door quickly to trap all that delicious heat inside. Now, sit back, breathe in those mouthwatering aromas, and get ready for an unforgettable Christmas feast!
Step 2. Rub Goose With Seasoned Butter
With the oven preheated, it's time to prepare the goose. First, take the goose and pat it dry with paper towels.
In a small bowl, mix together softened butter, garlic, thyme, salt, and pepper. Gently rub this seasoned butter all over the surface of the goose, making sure to get it into all the nooks and crannies. This will help the skin get crispy and golden brown as it roasts.
Don't forget to rub some of the butter under the skin too – this will keep the meat juicy and flavorful. Once the goose is fully coated, tie the legs together with kitchen string and tuck the wing tips under the body.
Now your beautifully buttered bird is ready for the oven. The delicious aroma of roasting garlic and herbs will soon fill your kitchen, making everyone's mouths water in anticipation.
Get ready for a truly scrumptious Christmas feast!
Step 3. Stuff Goose With Bread Cubes
After rubbing the seasoned butter all over the goose, it's time to stuff the bird with a delicious bread cube mixture.
Grab a large bowl and start tearing up some fresh, crusty bread into bite-sized cubes. Don't worry if the pieces aren't perfect – a little texture is great!
Next, sauté some onions, celery, and herbs in a pan until they're nice and fragrant. Toss the sautéed veggies with the bread cubes, and season the mixture with salt, pepper, and a pinch of poultry seasoning.
Gently stuff this savory stuffing into the cavity of the goose, being careful not to pack it in too tightly. The bread cubes will soak up all the flavorful juices as the goose roasts, creating a mouthwatering, golden-brown centerpiece for your Christmas feast. As the goose continues to roast to perfection, you can turn your attention to side dishes and desserts, like making festive reindeer cupcakes to delight your guests. The sweet aroma of baked treats will complement the rich, savory scents filling your kitchen, creating an atmosphere of warmth and holiday cheer. When everything is ready, gather your family around the table for a truly unforgettable holiday meal.
Now that the goose is stuffed, you're one step closer to enjoying a truly memorable holiday meal!
Step 4. Roast Goose for 2-3 Hours
Now that the goose is stuffed with the flavorful bread cube mixture, it's time to get it in the oven. Preheat your oven to a toasty 350°F (175°C).
Carefully place the prepared goose, breast-side up, in a large roasting pan. You'll want to make sure the pan is big enough to accommodate the bird without it being cramped.
Once the oven is ready, pop that goose right in and let it roast for 2 to 3 hours. As it cooks, the savory scent will start to fill your kitchen, making your mouth water in anticipation.
Every 30 minutes or so, use a basting brush to coat the goose with the delicious juices that collect in the bottom of the pan. This will help the skin turn a beautiful golden brown.
When the timer goes off, use a meat thermometer to check that the internal temperature of the goose has reached at least 165°F (75°C).
If it's good to go, carefully remove the pan from the oven and let the goose rest for 10-15 minutes before carving and serving.
Step 5. Baste Goose With Drippings Periodically
Basting the goose periodically with the drippings in the pan will help create a beautifully browned and crispy skin.
As the goose cooks, juices and fat will collect at the bottom of the roasting pan. Every 30 minutes or so, use a basting brush to scoop up these delicious drippings and generously coat the top and sides of the goose.
This will keep the meat moist and infuse it with even more rich, savory flavor. You'll notice the skin starting to turn a lovely golden-brown as it crisps up.
Be sure to baste the goose well, getting the drippings all over the surface. This will ensure an evenly cooked, picture-perfect bird that will impress your family and friends when you bring it to the table.
The aroma wafting through the kitchen as you baste will have everyone's mouths watering in anticipation!
Final Thoughts
As you prepare to serve your delectable Christmas goose, take a moment to savor the accomplishment. Your hard work and dedication have paid off, and now you can sit back and enjoy the fruits of your labor.
The golden-brown skin, the juicy and tender meat, and the delectable aroma wafting through the air – it's all worth it.
Your guests will be in for a real treat as they dive into the succulent goose, paired with your carefully crafted side dishes. The crispy skin, the flavorful stuffing, and the rich gravy will have them raving about your culinary skills.
And don't forget to save room for dessert – a warm slice of homemade pie or a decadent chocolate cake will be the perfect way to cap off this festive feast.
Enjoy every moment of this special occasion, and cherish the memories you'll create as you gather around the table with your loved ones.
Merry Christmas!
Frequently Asked Questions
How to Properly Store a Christmas Goose Before Cooking?
To properly store a Christmas goose before cooking, keep it refrigerated at 40°F or below. Wrap it tightly in plastic or foil to prevent drying. Thaw in the fridge for 1-2 days before cooking.
Can I Use a Different Type of Goose Instead?
You can definitely use a different type of goose instead of a traditional Christmas goose. Other types of geese, like Toulouse or Muscovy, will work just as well for your holiday feast.
What Are the Best Side Dishes to Serve With Christmas Goose?
When serving Christmas goose, you'll want to choose complementary side dishes. Consider roasted root vegetables, savory stuffing, cranberry sauce, and a light salad to balance the rich, flavorful meat.
How Long Does It Take to Thaw a Frozen Christmas Goose?
Depending on the size of the frozen goose, it can take anywhere from 24 to 72 hours to thaw it safely in the refrigerator. The larger the bird, the longer it'll need to fully defrost.
Is It Possible to Make a Vegetarian Version of Christmas Goose?
You can certainly create a vegetarian version of a Christmas goose. Try using a soy or seitan-based roast that mimics the texture and flavor of a traditional goose. Season it with savory herbs and serve it as the centerpiece of your meatless feast.
Alejandro is a vibrant advocate of traditional Mexican cuisine. From spicy tacos and enchiladas to rich moles and tamales, Alejandro’s dishes celebrate the colorful, bold flavors of Mexico. His recipes bring authentic Mexican street food and home-cooked meals to your table, with a focus on using fresh, flavorful ingredients.
Christmas Recipes
Reindeer Cupcakes
Irresistibly adorable and packed with holiday cheer, these reindeer cupcakes are a festive treat that will have you dreaming of sleigh rides and snowy nights. Learn how to make them.
You'll love making these festive reindeer cupcakes that have been a cherished holiday treat for generations, dating back to ancient Nordic celebrations of the winter solstice. With their chocolatey goodness and whimsical antler decorations, these cupcakes are sure to spread joy at any seasonal gathering. You can easily customize the flavors and frosting, and get creative with candies and pretzel sticks to design your own unique reindeer faces. Whether you're hosting a holiday party or just looking for a cozy afternoon treat, these reindeer cupcakes are sure to delight. And if you'd like to learn more about their history and how to make them, keep reading!
Key Takeaways
- Reindeer cupcakes are festive holiday treats featuring a chocolate cupcake base with chocolate frosting, candies for facial features, and pretzel sticks for antlers.
- The origins of reindeer cupcakes can be traced back to ancient Nordic communities, where they were created for winter solstice celebrations.
- Reindeer cupcakes are easy to make using basic ingredients like cupcake mix, chocolate frosting, and candies, making them suitable for holiday parties or cozy afternoon treats.
- Creative decoration options, such as tinted frosting, different colored candies, and edible glitter, allow for unique and personalized reindeer cupcake designs.
- Reindeer cupcakes can enhance the overall holiday spirit and atmosphere, foster connections with family and friends, and create lasting memories through the shared experience of making and enjoying them.
History
According to historical records, reindeer cupcakes have been a beloved holiday treat for centuries. These delightful confections were first enjoyed by ancient Nordic communities, who'd bake them to celebrate the winter solstice and the return of the sun. The reindeer, a majestic creature revered in many northern cultures, was a natural choice to adorn these festive cakes.
Over the years, the recipe for reindeer cupcakes has evolved, with different regions and bakers adding their own unique touches. Some might top the cupcakes with shredded coconut to mimic the reindeer's soft, fluffy fur, while others might use cinnamon candies or chocolate chips to create the distinctive antlers.
The rich, moist sponge and creamy frosting provide the perfect canvas for these whimsical decorations, making each bite a delightful experience.
Whether enjoyed at a cozy holiday gathering or shared with friends and family, reindeer cupcakes continue to spread joy and delight during the most wonderful time of the year.
Recipe
The Reindeer Cupcakes are a delightful and whimsical treat that can be enjoyed by people of all ages.
These cupcakes feature a festive design, with reindeer-inspired decorations that will bring a smile to everyone's face. Whether you're baking them for a holiday party, a family gathering, or just a cozy afternoon indulgence, these cupcakes are sure to delight.
These cupcakes are easy to make and can be customized to fit your personal taste or dietary needs. You can experiment with different flavors of cupcakes and frostings to create your own unique version of these adorable treats.
Ingredients:
- 1 box of your favorite cupcake mix
- Ingredients required by the cupcake mix (typically eggs, oil, and water)
- 1 can of chocolate frosting
- Red and brown M&Ms or other small candies for the nose and antlers
- Pretzel sticks for the antlers
Cooking Instructions:
Preheat your oven to the temperature specified on the cupcake mix box. Prepare the cupcake batter according to the instructions on the box.
Divide the batter evenly among the cupcake liners in your baking pan. Bake the cupcakes until a toothpick inserted into the center comes out clean, approximately 18-20 minutes. Allow the cupcakes to cool completely before frosting.
Once the cupcakes are cooled, spread the chocolate frosting evenly over the top of each cupcake. Place two red M&Ms or other small candies near the top of the cupcake to create the reindeer's nose.
Break the pretzel sticks into pieces and arrange them on the top of the cupcake to create the reindeer's antlers.
Tips:
- For a more festive look, you can tint the frosting with a few drops of green or red food coloring.
- Try using different colored candies or sprinkles to create unique variations of the reindeer design.
- Store the cupcakes in an airtight container at room temperature for up to 3 days.
Cooking Steps
Preheat your oven to a toasty 350°F, then mix up the dry ingredients until they're well combined.
Pop the cupcakes in the oven and bake them for 18-20 minutes until they're golden brown.
Step 1. Preheat Oven to 350°F
Preheat your oven to 350°F. You'll need to get the oven nice and toasty before you can start baking your delightful reindeer cupcakes. Once it reaches the perfect temperature, you can pop those cupcake tins right in and let the magic happen.
As the oven warms up, you can start gathering your other ingredients. You'll want to have your cake batter all mixed and ready to go. The smell of the batter will have your mouth watering in anticipation!
Once the oven is preheated, you can carefully scoop the batter into the cupcake liners. Be sure to fill them up just the right amount – not too much, not too little.
Now, all you have to do is set the timer and wait patiently. You'll know the cupcakes are done when the tops are golden brown and a toothpick inserted comes out clean. Can you already imagine how amazing they'll taste? Get ready for the most scrumptious reindeer cupcakes ever!
Step 2. Mix Dry Ingredients
With the oven preheated, let's start mixing the dry ingredients for your reindeer cupcakes. In a large bowl, whisk together the all-purpose flour, baking powder, and a pinch of salt.
These dry ingredients will give your cupcakes the perfect fluffy texture.
Next, add in the unsweetened cocoa powder. This will give your reindeer cupcakes a rich, chocolatey flavor that everyone will love.
Be sure to sift the cocoa powder first, so there are no pesky lumps.
Now it's time for the brown sugar. Sprinkle it in and use a fork to break up any clumps.
The brown sugar will add a lovely caramel-y sweetness to balance out the chocolate.
Give everything a good stir until the dry ingredients are well combined.
The mixture should look smooth and uniform.
You're doing great – the hard part is over! Now we can move on to the wet ingredients to bring these reindeer cupcakes to life.
Step 3. Bake Cupcakes for 18-20 Minutes
Having mixed the dry ingredients, you're now ready to bake the reindeer cupcakes. Preheat your oven to 350°F (175°C) and line a 12-cup muffin tin with festive cupcake liners. Scoop the batter evenly into the prepared cups, filling them about three-quarters full.
Carefully place the muffin tin in the preheated oven and set a timer for 18-20 minutes. As the cupcakes bake, your kitchen will fill with the delightful aroma of chocolate and spices. You'll be tempted to peek, but resist the urge! Opening the oven door too often can affect the baking time. Instead, enjoy the tantalizing scent and imagine the light, fluffy texture of the cupcakes when they're done.
When the timer goes off, use oven mitts to gently remove the muffin tin from the oven. The cupcakes should be golden brown and a toothpick inserted into the center should come out clean. Allow them to cool in the tin for a few minutes before transferring them to a wire rack to cool completely.
Step 4. Frost Cupcakes With Buttercream
Once the cupcakes have cooled completely, it's time to start frosting them with delectable buttercream.
First, gather your butter and powdered sugar. In a large bowl, beat the butter until it's light and fluffy. Gradually add the powdered sugar, a little at a time, mixing well after each addition. Keep mixing until the buttercream is smooth and creamy.
Now it's time to frost your cupcakes! Dip a butter knife or small spatula into the buttercream and swirl it on top of each cupcake. Smooth the frosting with the back of the knife, creating soft, billowy peaks.
Don't be afraid to pile on the buttercream – the more the better!
Once all your cupcakes are frosted, you can get creative. Use a piping bag to pipe rosettes or other designs on top. Or sprinkle on some colorful sprinkles or crushed candy canes.
The possibilities are endless! Your reindeer cupcakes are now ready to delight your friends and family.
Step 5. Decorate With Chocolate Antlers
To decorate your reindeer cupcakes, you'll need to create chocolate antlers. First, gather your supplies: chocolate candy melts, a piping bag, and a small, sharp knife.
Melt the candy melts according to the package instructions, then let them cool slightly until they're thick enough to pipe.
Next, snip the tip off the piping bag and carefully pipe the melted chocolate into antler shapes onto a baking sheet lined with parchment paper. Don't worry if they're not perfectly symmetrical – reindeer antlers come in all shapes and sizes! Once you’ve piped all the antlers, place the baking sheet in the fridge to allow the chocolate to harden. Meanwhile, if you’re feeling extra creative, you can look up how to make tree meringues to add a festive touch to your dessert display. These whimsical treats will pair perfectly with your reindeer-themed goodies!
Once you've piped all the antlers, pop the tray into the fridge to let the chocolate harden, about 10 minutes.
Gently remove the hardened antlers from the parchment paper. Using the knife, carefully trim any uneven edges to make them look their best.
Final Thoughts
As you've whipped up these delightful reindeer cupcakes, you can sit back and admire your handiwork. The chocolate antlers, the fluffy frosting, and the shiny red noses – your creations are simply too cute to eat!
You should feel proud of yourself for bringing these festive treats to life. Not only do they look adorable, but they're sure to delight everyone who tries them.
Imagine the smiles on your family and friends' faces as they bite into the moist, chocolatey cupcake and discover the delightful surprises inside.
These reindeer cupcakes aren't just desserts – they're edible works of art that capture the spirit of the holidays.
Frequently Asked Questions
What Is the Nutritional Value of Reindeer Cupcakes?
The nutritional value of reindeer cupcakes isn't something you'd typically consider. They're likely high in sugar, fat, and calories from the cake and frosting, without much nutritional benefit. It's best to enjoy them in moderation as an occasional treat.
Can Reindeer Cupcakes Be Made Gluten-Free?
Yes, you can make reindeer cupcakes gluten-free. Use gluten-free flour, baking powder, and other common cupcake ingredients. Just be sure to adjust the recipe accordingly to achieve the desired texture and taste.
How Long Can Reindeer Cupcakes Be Stored?
You can typically store homemade cupcakes for 3-4 days at room temperature, or up to a week in the fridge. However, the exact storage time may vary depending on the ingredients and how they're prepared.
Are Reindeer Cupcakes Suitable for Vegetarians?
Are reindeer cupcakes suitable for vegetarians? Well, that depends on the ingredients used. If they're made with non-dairy butter and eggs, they could be a vegetarian-friendly treat. But you'll want to double-check the recipe to be sure.
Can Reindeer Cupcakes Be Used as Party Decorations?
Yes, you can certainly use reindeer cupcakes as party decorations. They make for a whimsical and festive addition to any celebration, adding a touch of holiday cheer to your event.
Rachel is all about nostalgic comfort food with a modern twist. She brings the flavors of classic American diners to Cook if Ya, with her takes on burgers, fries, and milkshakes. Rachel’s love for simple, hearty meals brings a bit of retro flair to the table, reminding us all of the joys of classic diner dishes.
-
Brazilian Cuisine3 months ago
Tacacá
-
Polish Comfort Food3 months ago
Krupnik (Barley Soup)
-
Brazilian Cuisine3 months ago
Caldeirada
-
Brazilian Cuisine3 months ago
Chicken in Brown Sauce
-
Southern Comfort Food3 months ago
Cheese Straws
-
African Cuisine3 months ago
Kedjenou (Ivory Coast)
-
Polish Comfort Food3 months ago
Vegetable Salad
-
American Diner Classics3 months ago
The Maillard Reaction: Understanding the Chemistry of Browning {Food Science and Cooking}