Gingerbread houses are a delightful holiday tradition that whisks you away to a whimsical world of spices and creativity! These charming abodes were first baked by German bakers centuries ago, inspired by the fairy tale "Hansel and Gretel." Today, families come together to roll, cut, and decorate gingerbread dough into colorful, edible masterpieces. The sweet, warm aroma of freshly-baked gingerbread and the joy of designing your own festive creation make this activity a cherished experience. Whether you're a seasoned pro or a first-time baker, crafting a gingerbread house is sure to fill you with holiday cheer. Want to learn more about the history and techniques behind these delightful treats?
Key Takeaways
- Gingerbread houses originated in the 16th century from German bakers, inspired by the fairy tale "Hansel and Gretel".
- The recipe for gingerbread houses includes flour, baking soda, spices, butter, brown sugar, egg, and molasses, with a crucial dough refrigeration step.
- The cooking process involves preheating the oven, rolling out the dough, cutting shapes, baking, and assembling the house using royal icing.
- Constructing and decorating a gingerbread house requires a sturdy foundation, colorful icing, and a variety of candies for a festive and whimsical design.
- Building a gingerbread house provides a sense of accomplishment, creates cherished memories, and allows for the display and sharing of a holiday centerpiece.
Top picks for "gingerbread house"
As an affiliate, we earn on qualifying purchases.
History
The origins of the gingerbread house can be traced back to the 16th century, when German bakers first created these charming edible structures.
These delightful homes were inspired by the fairy tale "Hansel and Gretel," where two children stumble upon a witch's house made entirely of gingerbread and candy. As the story became more popular, bakers began to recreate these whimsical dwellings, using their creativity and skills to craft intricate designs.
Over time, the gingerbread house evolved, with bakers experimenting with different spices, decorations, and techniques.
Today, these festive treats are a beloved tradition, often made during the holiday season. Families gather together to build and decorate their own gingerbread houses, filling their homes with the warm, spicy aroma of freshly baked gingerbread.
Whether you're young or old, the magic of the gingerbread house is sure to delight and inspire your imagination, transporting you to a world of fairytales and sweet delights.
Recipe
Gingerbread houses are a beloved Christmas tradition, bringing a festive and whimsical touch to the holiday season. These charming structures not only serve as delightful decorations but also offer a delicious treat for the senses. Baking a gingerbread house from scratch can be a fun and rewarding experience, allowing you to unleash your creativity and impress your loved ones.
The key to a successful gingerbread house lies in the dough. The combination of warm spices, such as ginger, cinnamon, and cloves, creates a rich and aromatic foundation that sets the stage for your edible masterpiece. With the right ingredients and a bit of patience, you can craft a gingerbread house that will be the talk of the holiday season.
Ingredients:
- 3 cups all-purpose flour
- 1 teaspoon baking soda
- 1/2 teaspoon salt
- 1 tablespoon ground ginger
- 1 teaspoon ground cinnamon
- 1/4 teaspoon ground cloves
- 1/2 cup unsalted butter, softened
- 1 cup brown sugar
- 1 egg
- 1/2 cup molasses
Instructions:
In a large bowl, whisk together the flour, baking soda, salt, ginger, cinnamon, and cloves. In a separate bowl, cream the butter and brown sugar until light and fluffy. Beat in the egg and molasses until well combined. Gradually add the dry ingredients to the wet ingredients, mixing until a dough forms.
Divide the dough into two equal portions, shape them into discs, wrap in plastic, and refrigerate for at least 2 hours or up to 3 days.
When ready to assemble your gingerbread house, preheat your oven to 350°F (175°C). Roll out the dough on a lightly floured surface to a thickness of 1/4 inch. Use your desired gingerbread house templates to cut out the pieces, ensuring they fit together seamlessly.
Transfer the pieces to parchment-lined baking sheets and bake for 12-15 minutes, or until the edges are lightly golden. Allow the pieces to cool completely before assembling your gingerbread house.
Cooking Steps
Preheat your oven to 350°F, then roll out that dough and cut it into fun shapes.
Bake the dough until it's golden brown, and get ready to assemble and decorate your very own gingerbread house!
This is where the real magic happens, so let's dive in and have a blast.
Step 1. Preheat Oven to 350°F

Before you begin assembling your gingerbread house, ensure your oven is preheated to 350°F. This important first step will make sure your gingerbread pieces bake up perfectly crisp and golden.
Simply turn the oven dial to 350°F and let it preheat. While you wait, you can gather your other ingredients and prepare your work surface.
When the oven beeps to let you know it's reached the right temperature, you'll be ready to slide in your gingerbread shapes and watch them transform into delicious, fragrant houses.
Preheating the oven is a crucial part of making the best gingerbread possible. The high, even heat ensures your dough bakes evenly, with no soggy bottoms or uncooked centers.
In just a few minutes, you'll have an oven that's perfectly primed for baking your holiday masterpiece. Then you can start assembling and decorating your gingerbread house with confidence!
Step 2. Roll Out Dough

Roll up your sleeves and dive into the next step – rolling out the dough! This is where the real magic happens. Grab your rolling pin and get ready to transform that ball of dough into a smooth, even sheet.
Dust your work surface with a bit of flour to prevent sticking, then place the dough right in the center. Gently press down to flatten it out a bit before you start rolling.
Now, with steady strokes, roll the dough back and forth, gradually increasing the size until it's the perfect thickness for your gingerbread house. Be careful not to roll too thin or it might tear.
Take your time and enjoy the satisfying rhythm of the rolling motion. As the dough takes shape, you'll start to see the outline of your future masterpiece emerging.
Once it's just right, use your trusty cookie cutters to cut out the shapes you need – walls, roof, and any other decorative pieces. Carefully transfer the dough shapes to a parchment-lined baking sheet, and you're one step closer to creating your very own edible winter wonderland!
Step 3. Cut Dough Into Shapes

With your dough rolled out to the perfect thickness, it's time to start cutting out the shapes for your gingerbread house. Grab your favorite cookie cutters and get ready to create the walls, roof, and adorable details that will bring your dream home to life.
As you press the cutters into the soft, golden dough, you can almost smell the warm, spicy scent of gingerbread filling the air. Be careful not to stretch or distort the shapes – you want clean, sharp edges for your gingerbread masterpiece.
Once you've cut out all the pieces, gently transfer them to a parchment-lined baking sheet, making sure they've enough space between them.
Now it's time to get creative! Use a toothpick or the tip of a knife to add intricate designs and patterns to your gingerbread shapes. Swirls, dots, and zig-zags will make each piece truly unique.
When you're done, pop the tray into the oven and get ready to assemble your gingerbread house!
Step 4. Bake Dough Until Golden Brown

Once the gingerbread shapes have been carefully cut out, it's time to bake them until they're perfectly golden brown. Preheat your oven to a toasty 375°F (190°C) and grab a baking sheet. Lightly grease the sheet so your precious gingerbread pieces don't stick.
Carefully transfer the shaped dough onto the prepared pan, making sure to leave a little space between each one.
Now, pop that pan into the preheated oven and let the magic happen! The delicious aroma of gingerbread will start to fill your kitchen, making your mouth water. Keep a close eye on the cookies, checking them every 8-10 minutes. You'll know they're ready when the edges have turned a beautiful golden brown and the centers are firm to the touch.
Once they're perfectly baked, use oven mitts to carefully remove the pan from the oven. Set the gingerbread pieces aside to cool completely before decorating.
Can you almost taste the sweet, spicy goodness? Get ready for the next step – it's time to bring your gingerbread house to life! Once you’ve constructed your gingerbread house, why not savor the experience with a delicious gingerbread latte? This festive drink is the perfect way to cozy up and enjoy the fruits of your labor. Whip out your favorite mug and follow this delicious gingerbread latte recipe for the ultimate indulgence.
Step 5. Assemble and Decorate Gingerbread House
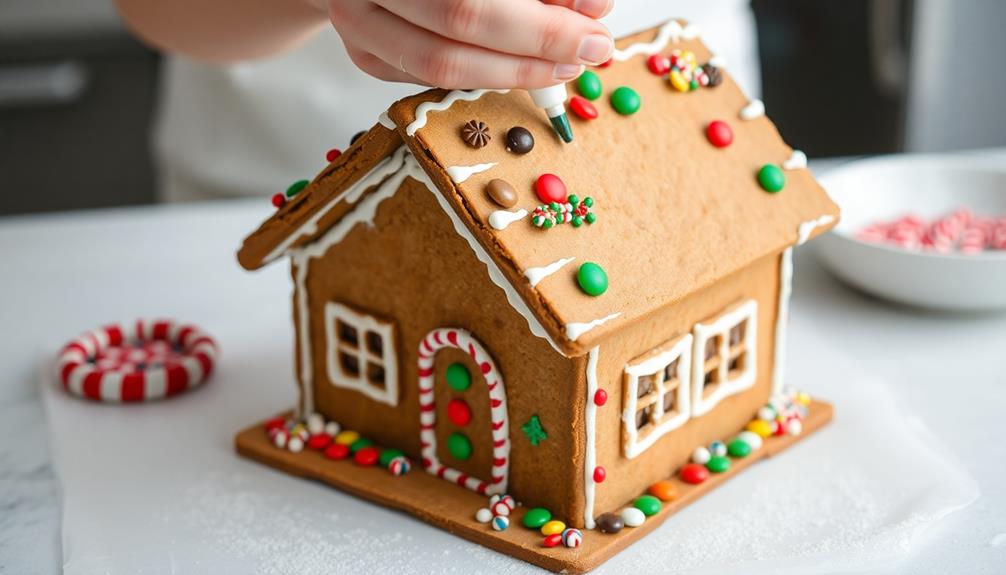
Gather your freshly baked gingerbread pieces and let the assembly process begin! Carefully arrange the walls, forming a sturdy foundation for your delightful creation.
Don't forget to use a generous amount of royal icing as the "glue" to hold everything together. Gently press the pieces in place, making sure they're aligned and secure.
Next, add the roof panels, slowly and steadily applying the icing to create a seamless join. Step back and admire your progress – your gingerbread house is taking shape!
Now for the fun part: decorating! Squeeze colorful icing in intricate patterns, creating a festive and whimsical design. Sprinkle on your favorite candies, adorning the house with a sparkly, sugary touch.
Don't be afraid to get creative – this is your chance to unleash your inner artist!
As you step back to admire your masterpiece, you'll feel a sense of pride and accomplishment. Your gingerbread house is now ready to be the centerpiece of your holiday celebrations!
Final Thoughts
After completing the gingerbread house, you should take a step back and admire your handiwork. Isn't it amazing what you've created? From rolling out the dough to assembling the walls and roof, you've put in a lot of hard work.
And now, seeing the final product, covered in colorful candies and icing, you can't help but feel a sense of pride.
Remember, the joy of building a gingerbread house isn't just in the end result, but in the process itself. The time you spent carefully decorating each section, the laughter you shared with friends and family, and the memories you've made – those are the true treasures.
So, take a moment to savor this accomplishment and let the holiday spirit fill your heart.
Now, it's time to display your creation and share it with others. Gingerbread houses are meant to be admired and enjoyed by all.
Frequently Asked Questions
What Is the Significance of the Gingerbread House Tradition?
The gingerbread house tradition symbolizes the joy of creating and sharing edible art, fostering family bonding, and preserving the festive spirit of the holiday season through a delightfully sweet and whimsical activity.
Can I Use Store-Bought Gingerbread for My House?
You can certainly use store-bought gingerbread for your house. It'll save you time and effort, and the end result can still be just as festive and delightful. Don't be afraid to get creative with your decorations too!
How Long Does a Gingerbread House Typically Last?
How long your gingerbread house lasts depends on various factors. With proper storage and care, it can last for weeks or even months. However, the decorations and icing may start to deteriorate over time.
Can I Make a Gingerbread House Year-Round?
You can make a gingerbread house year-round, but it's typically associated with the holiday season. The ingredients and construction can be done any time, allowing you to enjoy this delightful project whenever the mood strikes.
What Are Some Creative Ways to Decorate a Gingerbread House?
You can decorate your gingerbread house in countless creative ways! Use edible decorations like colorful candy, frosting, sprinkles, and even mini-marshmallows. Let your imagination run wild and make it truly unique.