Spanish Cuisine
Valencian Paella
Keenly crafted with a medley of locally-sourced ingredients, Valencian paella transports diners on a gastronomic journey through the vibrant flavors of Spain’s eastern coast.
Valencian paella is a vibrant and flavorful Spanish dish that's rooted in the culinary traditions of the Valencian region. It all started with resourceful farmworkers who combined rice, saffron, and whatever ingredients they had on hand, like rabbit and chicken. Over time, the dish evolved to include tasty seafood like shrimp and squid. The essential paella pan adds a signature touch, while the saffron-tinged rice, tender veggies, and succulent proteins create an unforgettable dining experience. Paella is celebrated as a symbol of Spanish culture, and it's often enjoyed during family gatherings and local festivals – a shared experience that truly captures the essence of Valencian cuisine.
Key Takeaways
- Valencian paella is an iconic Spanish dish originating from the Valencia region, representing the essence of Valencian culture and culinary tradition.
- The essential ingredients of Valencian paella include short-grain Spanish rice, chicken or rabbit, Valencian white beans, saffron, olive oil, and vegetables.
- Valencian paella is typically cooked in a wide, shallow pan called a "paellera" over an open flame or specialized paella burner, emphasizing layering flavors and achieving the perfect socarrat (crispy bottom).
- Valencian paella has evolved over time, with modern interpretations including fusion flavors, vegan and gluten-free versions, and creative presentations influenced by social media trends.
- Valencian paella is celebrated as a symbol of Spanish culture, recognized by UNESCO as an Intangible Cultural Heritage of Humanity, and often served during family gatherings and local festivals in Valencia.
History
Paella, the iconic Spanish rice dish, traces its origins to the Valencian region of eastern Spain. This beloved culinary creation has a rich history that dates back centuries.
Believed to have been developed by farmworkers in the fields, paella was initially a simple dish made with rice, saffron, and whatever ingredients were available, such as rabbit, chicken, or vegetables.
Over time, the recipe evolved, with the addition of seafood like shrimp, mussels, and squid. The dish's name is derived from the paella pan, a large, shallow pan traditionally used to cook the rice over an open fire.
Today, paella has become a symbol of Spanish culture, celebrated in annual festivals and enjoyed by locals and visitors alike.
Whether cooked over a wood fire or on a stovetop, paella remains a beloved and iconic part of Valencian heritage.
Recipe
Paella is a quintessential Spanish dish that has been a staple in the Valencian region for centuries. It's a rice-based dish that showcases the vibrant flavors and fresh ingredients of the Mediterranean. The key to a truly authentic Valencian paella lies in the careful selection and preparation of the ingredients.
The foundation of the dish is the short-grain Spanish rice, which is essential for achieving the perfect texture and absorption of the flavorful broth. The rice is cooked in a large, shallow pan over an open fire, allowing for even heat distribution and the creation of the signature crispy layer on the bottom, known as the "socarrat." The dish is then topped with a variety of ingredients such as seafood, chicken, or vegetables, each adding their own unique flavors and textures to the final product. Once the paella is finished cooking, it is typically enjoyed with a side of traditional Spanish dessert, such as flan or churros, to complete the meal with a touch of sweetness. This combination of savory and sweet flavors makes for a truly satisfying and authentic Spanish dining experience.
- Short-grain Spanish rice
- Chicken, rabbit, or a combination
- Garrofó (Valencian white beans) or lima beans
- Saffron threads
- Paprika
- Olive oil
- Onion
- Tomato
- Chicken or vegetable broth
- Salt and pepper to taste
In the paella pan, sauté the onion and garlic in olive oil until translucent. Add the chicken or rabbit and brown it on all sides. Stir in the paprika and saffron, and then add the tomatoes and cook until the mixture is slightly thickened.
Pour in the broth and bring to a boil. Add the rice and the beans, and then reduce the heat to a simmer. Cover the pan and cook for 18-20 minutes, or until the rice is tender and has absorbed all the flavorful liquid.
When cooking Valencian paella, it's important to resist the urge to stir the rice during the cooking process, as this can disrupt the formation of the prized socarrat. Additionally, be sure to use the best-quality ingredients you can find, as they'll make a significant difference in the final flavor of the dish.
Cooking Steps
Sauté the aromatic vegetables in olive oil to start.
Then, add the rice and saffron, creating a fragrant base.
Next, layer in the chicken and spicy sausage, followed by the fresh seafood.
Step 1. Sauté Aromatics in Olive Oil
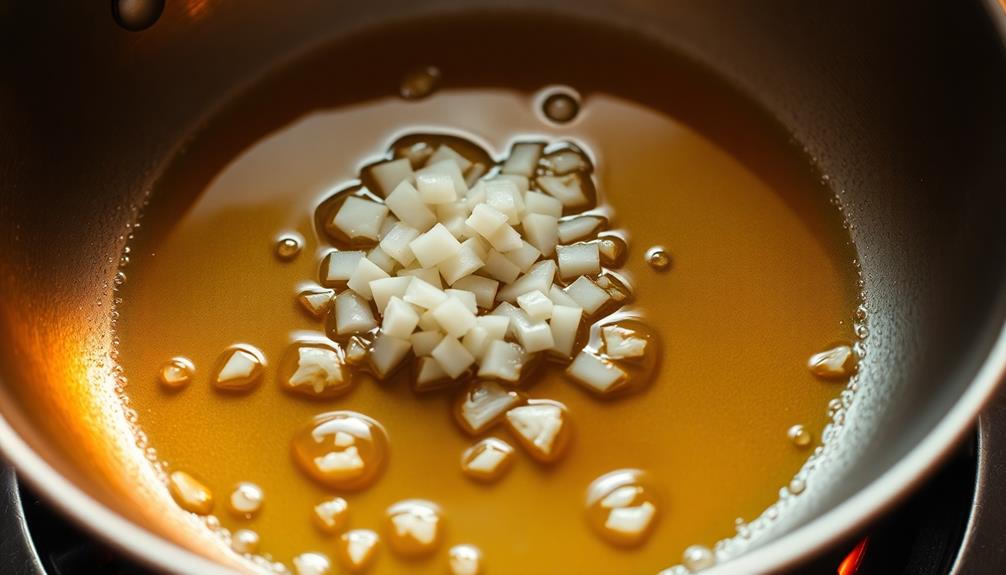
Gather your olive oil and aromatic ingredients.
In a large, shallow pan, heat the olive oil over medium heat. Once it's shimmering, add the diced onions and sauté for 2-3 minutes, stirring occasionally, until they become translucent.
Next, toss in the minced garlic and stir for an additional minute, being careful not to let the garlic burn.
Now, it's time to add the finely chopped tomatoes. Cook for 5-7 minutes, allowing the tomatoes to break down and the flavors to meld.
Sprinkle in a pinch of paprika and a dash of dried thyme, then give everything a good stir.
Let the aromatic mixture simmer for a couple of minutes, allowing the spices to bloom and infuse the oil.
Once the sautéed aromatics are fragrant and well-combined, you're ready to move on to the next step in crafting your authentic Valencian paella.
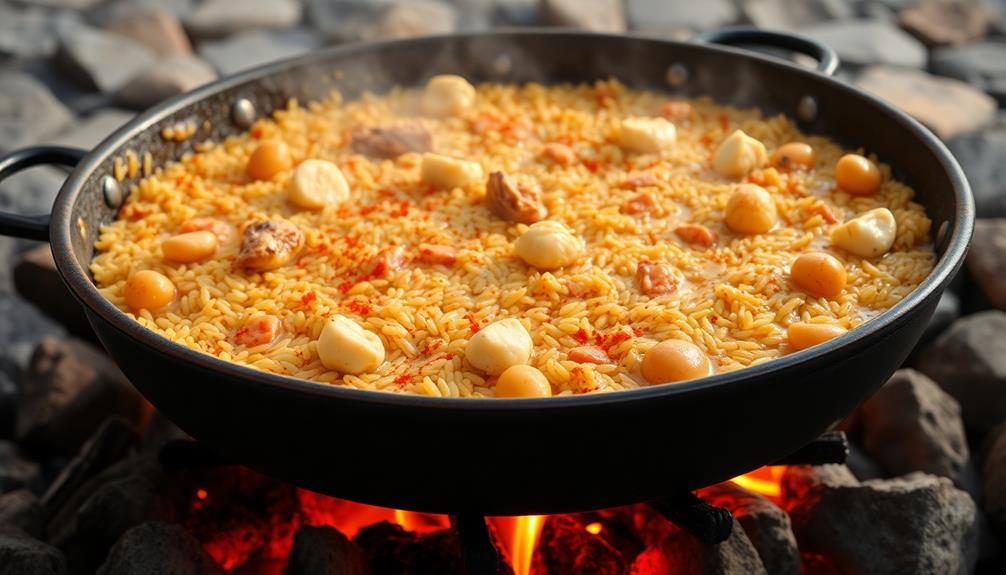
Step 2. Add Rice and Saffron
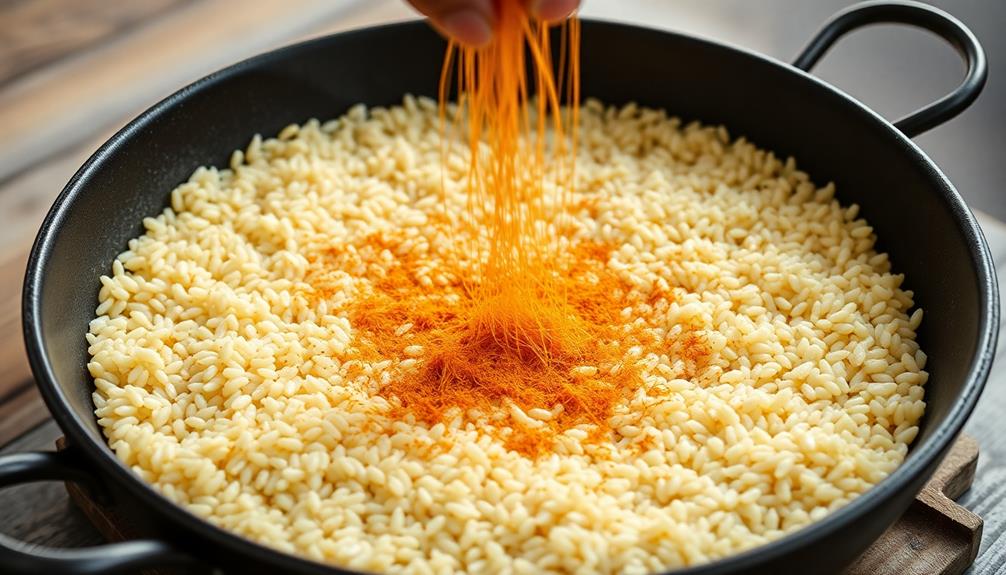
With the aromatic base prepared, it's time to add the rice and saffron. Pour in the short-grain Valencian rice and gently stir to coat each grain in the flavorful oil. This special rice is essential for achieving the signature texture of paella – firm yet creamy.
Next, sprinkle in the vibrant threads of saffron. This precious spice not only lends its golden hue to the dish but also imparts a unique, earthy aroma. Gently mix the saffron into the rice, ensuring its flavor is evenly distributed.
Now, pour in the hot broth, making sure to cover all the rice. Bring the mixture to a boil, then reduce the heat to maintain a gentle simmer.
Allow the rice to cook, undisturbed, for about 15-20 minutes, or until it has absorbed the flavorful broth and achieved the perfect bite.
Step 3. Add Chicken and Sausage
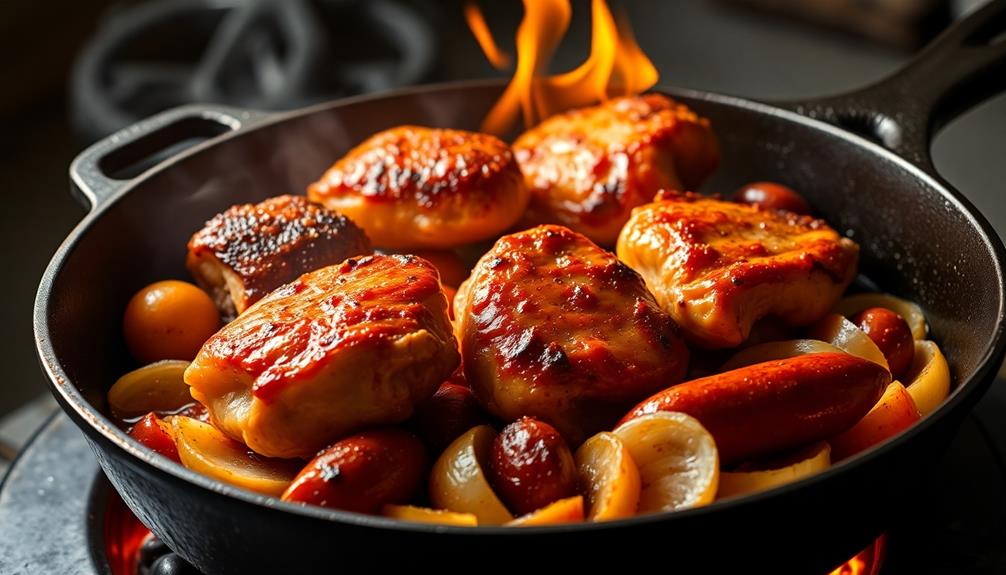
Once the rice has had a chance to absorb the flavorful broth, it's time to add the chicken and sausage. Nestle the chicken pieces into the rice, making sure they're submerged in the liquid. The sausage can be sliced and scattered over the top.
This step adds heartiness and depth of flavor to the paella. The chicken will cook through, becoming tender and infusing the dish with its savory goodness. The sausage, meanwhile, will release its spices and oils, creating a wonderful aroma and complementing the other ingredients.
Be sure to stir everything together gently, taking care not to break up the rice grains. Allow the paella to continue simmering until the chicken is cooked through and the sausage is heated. This should take about 15-20 minutes.
Keep an eye on the liquid level, adding a bit more broth if needed to prevent the rice from drying out. With the chicken and sausage now incorporated, the paella is well on its way to being a complete and delicious meal.
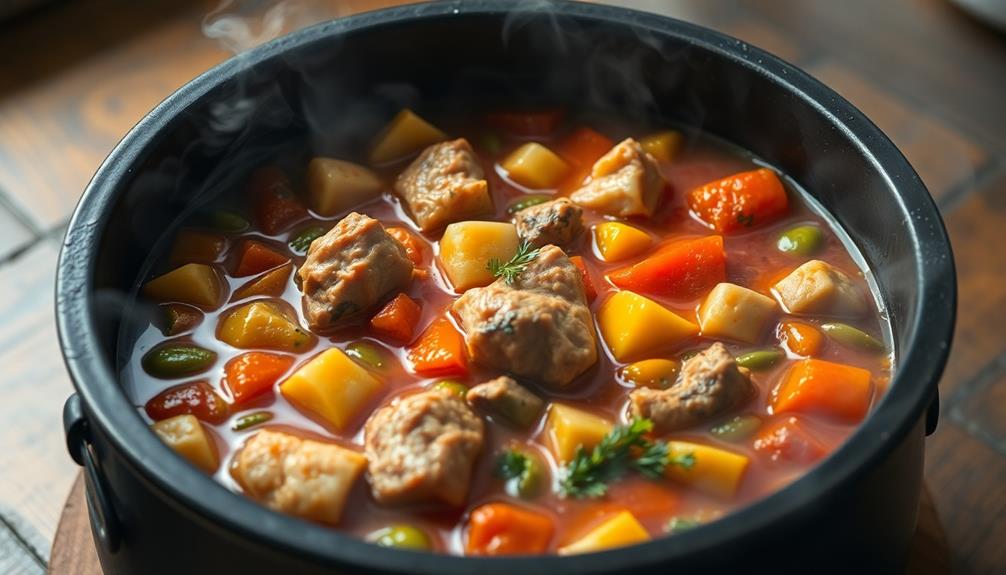
Step 4. Add Seafood
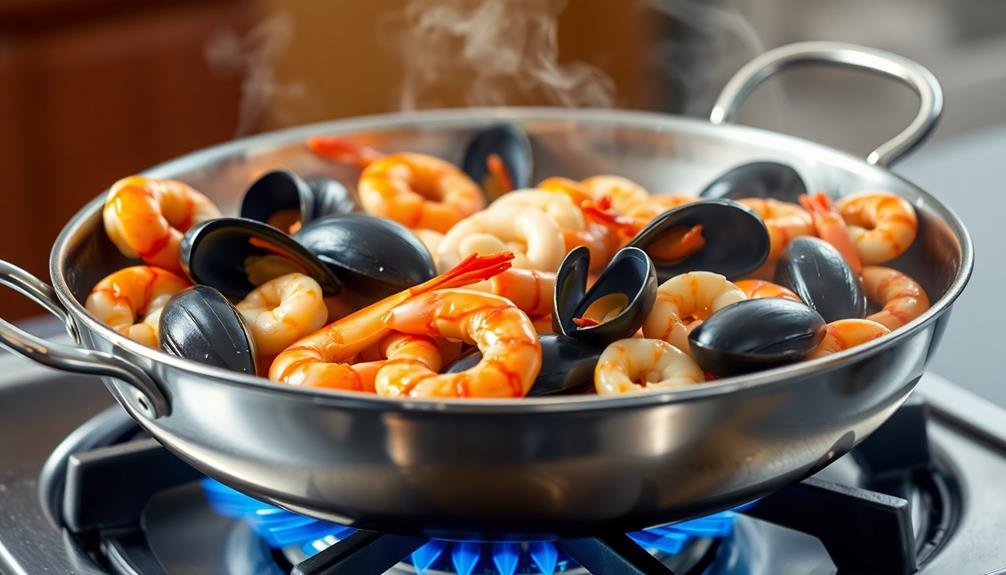
After the chicken and sausage have been incorporated, it's time to add the seafood that will truly make this Valencian paella shine.
First, add a handful of fresh prawns, peeled and deveined, to the pan. Gently nestle them into the rice, being careful not to overcrowd.
Next, toss in some mussels, scrubbed and debearded. Their briny flavor will perfectly complement the other ingredients.
Don't forget the star of the show – chunks of white fish, such as cod or haddock. Gently lower these into the pan, making sure they're submerged in the saffron-infused broth.
As the seafood cooks, it will release its juices, further enhancing the overall flavor.
Step 5. Simmer Until Rice Is Tender
Now that the seafood has been added, it's time to let the paella simmer until the rice is tender. Reduce the heat to medium-low and allow the dish to gently simmer, uncovered, for about 20-25 minutes. This slow simmering allows the flavors to meld together and the rice to become perfectly cooked.
As the paella simmers, keep an eye on it, stirring occasionally to prevent sticking or burning. You'll know the rice is done when it's tender but still has a slight bite to it. The liquid should be mostly absorbed, but the paella shouldn't be dry. If needed, you can add a splash of hot broth or water to adjust the consistency.
Once the rice is tender, remove the paella from the heat. Let it rest for 5-10 minutes to allow the flavors to further develop before serving. This resting period is crucial, as it ensures the rice continues to cook and the overall dish achieves its signature texture.
Final Thoughts
Paella is a dish that encapsulates the essence of Valencian culture. When you've followed the steps to create the perfect Valencian paella, the final result is a true celebration of the region's flavors and traditions. The saffron-tinged rice, tender-crisp vegetables, and succulent proteins come together in a harmonious symphony on the plate.
As you savor each bite, you'll be transported to the sun-drenched plazas and lively markets of Valencia. The vibrant colors and aromas will ignite your senses, evoking the spirit of this vibrant Mediterranean city.
Paella isn't just a meal; it's a shared experience that brings people together, fostering conversation and creating lasting memories.
Whether you're hosting a family gathering or entertaining friends, serving Valencian paella is a surefire way to impress and delight. So don't be afraid to experiment and put your own twist on this iconic dish – the possibilities are endless when you embrace the rich culinary heritage of Valencia.
Frequently Asked Questions
How Long Does It Take to Prepare Paella Valenciana?
Preparing a dish can take time, doesn't it? For Paella Valenciana, you'll need about 1-2 hours to gather the ingredients, cook the rice, and assemble the dish. The exact time may vary depending on your experience and familiarity with the recipe.
What Type of Rice Is Best for Paella Valenciana?
The best type of rice for paella is a short-grain, medium-grain, or round rice like Bomba or Calasparra. These rices have the right texture and starch content to soak up the flavorful broth and produce the characteristic creamy, toothsome paella.
Can Paella Valenciana Be Made Vegetarian or Vegan?
You can absolutely make a vegetarian or vegan version of paella. Swap out any meat or seafood for your favorite veggies and use a plant-based broth to create a delicious meat-free dish.
How Do I Ensure the Proper Socarrat (Crispy Rice) in Paella Valenciana?
To get the perfect socarrat, ensure your rice is spread evenly in the pan, use the right amount of liquid, and let it cook undisturbed until it develops a crispy, golden-brown crust on the bottom.
Is Paella Valenciana Gluten-Free?
Yes, paella valenciana is typically gluten-free. The dish is made with rice, vegetables, and meat or seafood, without any wheat-based ingredients. As long as you avoid any sauces or accompaniments that contain gluten, you can enjoy paella valenciana on a gluten-free diet.
Carlos is an expert in traditional Spanish cuisine. From the rich flavors of paella and tapas to the bold, savory dishes of Spain’s various regions, Carlos brings the spirit of Spain to your table. His recipes showcase the vibrant colors and fresh ingredients that are the hallmark of Spanish cooking.
Spanish Cuisine
Paella Valenciana: Spanish Seafood Rice
Hypnotizing with its vibrant hues and irresistible flavors, Paella Valenciana is the quintessential Spanish seafood rice dish that transports you to the sun-drenched coasts of Valencia.
Paella Valenciana, the iconic Spanish seafood rice dish, transports you to the sun-drenched coasts of Valencia with its vibrant golden hue, fragrant aromas, and irresistible flavors. This communal dish combines juicy chicken, succulent shrimp, aromatic saffron, and fresh vegetables like onions, peppers, and peas. The key is using high-quality short-grain Spanish rice that soaks up the rich broth, creating a satisfying and comforting meal. Paella Valenciana is a beloved classic that brings families and friends together, and as you'll soon discover, there's so much more to explore about this culinary delight.
Key Takeaways
- Paella Valenciana is a traditional Spanish rice dish originating from the Valencia region, known for its vibrant golden color and diverse ingredients.
- The dish combines short-grain Spanish rice with a flavorful broth, chicken, shrimp, and fresh vegetables like onions, garlic, bell peppers, and tomatoes.
- Saffron threads are an essential ingredient, providing the signature aroma and color that distinguishes Paella Valenciana from other rice dishes.
- Proper preparation techniques, such as soaking the saffron, sautéing the aromatics, and allowing the rice to absorb the flavors, are crucial for achieving an authentic paella.
- Paella Valenciana is often enjoyed as a communal dish, fostering sharing and connection among diners and transporting them to the coastal regions of Spain.
History
The origins of Paella Valenciana can be traced back to the 19th century, when Spanish farmers near the city of Valencia began experimenting with cooking rice over an open fire.
They'd toss in whatever ingredients they'd on hand – chicken, rabbit, green beans, and of course, the all-important saffron. Over time, this dish evolved into the classic Paella Valenciana we know and love today. The dish became a symbol of communal gatherings, with each region of Spain adding its own touch based on local ingredients and traditions. Just as Paella has deep roots in Spanish culture, other iconic foods also reflect the spirit and history of their origins. For example, the history of vada pav reveals its humble beginnings as street food in Mumbai, born out of necessity and now cherished by millions, much like the regional pride associated with paella.
You can just imagine the aroma wafting through the air as those early chefs stirred and simmered their creation. The saffron lent a vibrant, golden hue, while the tender meats and crisp veggies added texture and flavor.
It wasn't long before Paella Valenciana became a staple of Spanish cuisine, enjoyed by families and friends gathered around the table.
Whether you're scooping up a hearty bite or simply admiring its beautiful presentation, this historical dish is a true taste of Spain's rich culinary heritage.
Get ready to be transported back in time with every delicious mouthful!
Recipe
Paella Valenciana is a classic Spanish dish that originates from the Valencia region. It's a rice-based dish that's typically made with a variety of meats, seafood, and vegetables. This recipe will guide you through the steps to create an authentic Paella Valenciana at home.
Paella is a communal dish that's often served family-style. The preparation and cooking process can take some time, but the end result is a flavorful and satisfying meal that's sure to impress your guests.
Ingredients:
- 1 cup short-grain Spanish rice
- 4 cups chicken or vegetable stock
- 1 onion, diced
- 3 cloves garlic, minced
- 1 red bell pepper, diced
- 1 tomato, diced
- 1 teaspoon smoked paprika
- 1/4 teaspoon saffron threads
- 1 pound chicken thighs, cut into bite-sized pieces
- 1 pound shrimp, peeled and deveined
- 1 cup green peas
- Salt and pepper to taste
- Lemon wedges for serving
Instructions:
In a large paella pan or heavy-bottomed skillet, heat a few tablespoons of olive oil over medium-high heat. Add the chicken and cook until lightly browned, about 5-7 minutes. Remove the chicken from the pan and set aside.
In the same pan, sauté the onion and garlic until fragrant, about 2-3 minutes. Add the bell pepper and tomato, and continue cooking for an additional 3-4 minutes.
Stir in the rice, smoked paprika, and saffron, and toast the rice for 1-2 minutes, stirring constantly. Pour in the stock and bring the mixture to a boil. Reduce the heat to low, cover, and simmer for 15-20 minutes, or until the rice is tender and has absorbed most of the liquid.
Nestle the chicken, shrimp, and peas into the rice. Cover and continue cooking for an additional 10-15 minutes, or until the shrimp are opaque and cooked through.
Once the paella is cooked, remove from heat and let it rest for 5-10 minutes before serving. Garnish with lemon wedges and enjoy!
Tips:
- Use the highest quality, freshest ingredients you can find for the best flavor.
- Be sure to use a large enough pan to accommodate all the ingredients and prevent overcrowding.
- Saffron is an essential ingredient in authentic Paella Valenciana, so don't skip it if possible.
- Experiment with different types of seafood or meats to suit your personal preferences.
Cooking Steps
First, you'll want to soak those saffron threads in some hot water to let the flavor really shine.
Next, sauté the onion and garlic until they're fragrant and softened.
Then, add the rice and broth, followed by the delicious seafood, juicy tomatoes, and sweet peas.
Get ready for an incredible flavor explosion!
Step 1. Soak Saffron Threads in Hot Water
Saffron's vibrant hue and distinct aroma are the hallmark of authentic Paella Valenciana. To capture this essential flavor, you'll need to soak the saffron threads in hot water. Simply place the delicate threads in a small bowl and pour in just enough hot water to cover them.
Let the saffron steep for about 10 minutes, allowing the water to become a beautiful golden yellow. This infusion will imbue your paella with that signature sunny color and warm, earthy taste.
Don't be tempted to rush this step – patience is key. As the saffron soaks, its oils and aromas will gradually release, creating a fragrant base for your dish.
When the time's up, the saffron-infused water will be ready to add to your paella, bringing everything together in a symphony of flavors. With this simple preparation, you're well on your way to crafting an authentic Paella Valenciana that'll transport your taste buds straight to the sun-drenched fields of Spain.
Step 2. Sauté Onion and Garlic
Next, sauté the onion and garlic to build the flavor foundation of your paella.
Grab a large skillet and heat it over medium heat. Add a splash of olive oil and let it shimmer. Toss in the diced onion and minced garlic. Stir them around with a wooden spoon, letting the aromas fill your kitchen.
The onion will start to soften and turn golden brown, while the garlic will become fragrant and nutty. Don't let the garlic burn – keep it moving! After about 5 minutes, your onion and garlic will be perfectly sautéed, ready to infuse the rest of your paella with their savory goodness.
This is an essential step that adds so much flavor to the dish. Keep an eye on the heat and stir frequently to prevent anything from sticking or burning.
With the onion and garlic sizzling away, you're well on your way to an authentic, mouthwatering Paella Valenciana!
Step 3. Add Rice and Broth
With the aromatic onion and garlic ready, it's time to add the rice and broth to your paella.
Grab your trusty paella pan and pour in the short-grain Spanish rice. Give it a gentle stir, making sure the grains are evenly distributed.
Now, it's time for the star of the show – the flavorful broth! Slowly pour in the hot chicken or seafood broth, taking care not to splash.
As the liquid simmers, you'll see the rice start to plump up and release its starchy goodness. The aroma will fill your kitchen, making your mouth water in anticipation.
Stir the mixture occasionally, allowing the rice to absorb all the rich flavors. Be patient, as this process takes time, but the end result will be worth it – a perfectly cooked, aromatic base for your delectable paella Valenciana.
Get ready to add the rest of your ingredients and create a true Spanish feast!
Step 4. Add Seafood
Once the rice has had a chance to absorb the broth, it's time to add the seafood! This is where the dish really comes to life, as the delicious flavors of the sea mingle with the aromatic rice.
Gently place your shrimp, mussels, and calamari right into the pan. Watch as they sizzle and turn a beautiful pink color. The mussels will start to open up, letting you know they're cooked to perfection.
Give everything a gentle stir to make sure the seafood is evenly distributed throughout the rice.
Now, take a deep breath and savor the aroma – the briny scent of the ocean, the warmth of the saffron, and the subtle sweetness of the peppers. This is a feast for the senses!
Let the seafood cook for just a few minutes until tender, then remove the pan from the heat. Your paella Valenciana is almost ready to serve.
Get ready to enjoy a taste of the Mediterranean right in your own home!
Step 5. Add Tomatoes and Peas
After you've added the seafood, it's time to stir in the tomatoes and peas. These colorful veggies will bring a delightful pop of flavor and texture to your paella.
First, grab a few ripe tomatoes and dice them up. The juicy, tangy tomatoes will mingle with the savory rice and seafood, creating a harmonious balance of tastes.
Next, it's time for the peas. Frozen peas work wonderfully here, as their sweet, tender nature complements the other ingredients. Sprinkle them in, and watch them sizzle and turn a vibrant green.
Stir everything together gently, so the peas and tomatoes are evenly distributed throughout the dish.
As the tomatoes and peas cook, they'll release their natural sugars, adding a touch of sweetness to balance the saltiness of the seafood. The colors will become even more vivid, making your paella a true feast for the eyes.
Get ready to enjoy the fresh, summery flavors that the tomatoes and peas bring to this classic Spanish dish.
Final Thoughts
Paella Valenciana is a beloved Spanish dish that has captivated the hearts and palates of people around the world.
After carefully preparing the rice, simmering the broth, and adding the delightful ingredients, you're now ready to sit back, relax, and savor the masterpiece you've created.
The vibrant colors, the tantalizing aromas, and the burst of flavors in every bite make this dish a true culinary delight.
As you take your first forkful, you'll be transported to the sun-drenched coasts of Valencia, where this iconic dish was born.
Whether you're sharing it with family or enjoying it on your own, Paella Valenciana is a meal that will leave you feeling satisfied and content.
So, go ahead, dive in, and let the flavors of Spain dance on your taste buds.
This is a dish that's sure to become a cherished part of your culinary repertoire.
Frequently Asked Questions
How Long Does It Take to Prepare Paella Valenciana?
To prepare Paella Valenciana, it'll take you around 1-2 hours. The exact time may vary depending on your experience and the complexity of the dish, but it's generally a time-consuming process that requires patience and attention to detail.
What Type of Rice Is Best for Making Paella?
You'll want to use a short-grain rice when making paella. Arborio or Bomba rice are the best choices, as they'll release starch and create the signature creamy, slightly sticky texture that paella is known for.
Can I Substitute Chicken for Seafood in Paella Valenciana?
Absolutely, you can substitute chicken for seafood in paella. The dish will have a different flavor profile, but the cooking method and rice will remain the same. Feel free to experiment and find what you enjoy most.
How Many People Can a Typical Paella Valenciana Serve?
A typical paella valenciana can usually serve 4-6 people, depending on their appetites and whether it's the main course or part of a larger meal. The size of the pan and ingredients used will also affect the serving size.
Is Paella Valenciana Difficult to Make at Home?
Is paella valenciana difficult to make at home? While it may seem complex, with a bit of practice, you can absolutely make an authentic paella valenciana in your own kitchen. The key is to get the rice and seafood cooked just right.
Carlos is an expert in traditional Spanish cuisine. From the rich flavors of paella and tapas to the bold, savory dishes of Spain’s various regions, Carlos brings the spirit of Spain to your table. His recipes showcase the vibrant colors and fresh ingredients that are the hallmark of Spanish cooking.
Spanish Cuisine
Cava (Sparkling Wine)
Lovers of Spanish sparkling wine can discover the captivating story and versatile pairings of Cava, a Catalonian delight that effortlessly elevates any occasion.
Cava is a beloved Spanish sparkling wine that originates from the Penedès region of Catalonia. Made using the traditional Champagne method, Cava captivates with its effervescence, crisp acidity, and delightful flavors of apple, pear, and citrus. The production process involves a secondary fermentation in the bottle, which enhances the wine's complexity and character. Cava's versatility makes it a refined choice for celebrations and casual gatherings alike, pairing beautifully with seafood, tapas, and even desserts. Whether served chilled as an aperitif or incorporated into creative cocktails, Cava's sophisticated style is sure to impress. To discover more about this enchanting Spanish sparkling wine, keep reading.
Key Takeaways
- Cava is a Spanish sparkling wine originating from the Catalonia region, primarily made from indigenous grape varieties like Macabeo, Xarel-lo, and Parellada.
- The production process involves secondary fermentation in the bottle, aging on lees, and manual disgorging, contributing to Cava's distinctive crisp and refreshing profile.
- Cava is recognized for its balanced flavors, ranging from apple, pear, and citrus to toasty and nutty notes, and varying sweetness levels from brut nature to semi-seco.
- Cava is versatile in pairing with a wide range of cuisines, from seafood and tapas to desserts, and can also be used as a base for creative cocktails.
- Cava has gained global recognition and popularity as a sophisticated sparkling wine option, often associated with Spanish celebrations, traditions, and a lifestyle of elegance.
History
Cava, the renowned Spanish sparkling wine, traces its roots back to the late 19th century. It all started when a Catalan winemaker, Josep Raventós, visited the Champagne region of France and was inspired to create his own version of the famous French bubbly.
Raventós returned home and began experimenting with the traditional Champagne method, using local grape varieties like Macabeo, Parellada, and Xarel-lo. The first bottles of Cava were produced in 1872, and over the next few decades, the industry grew steadily.
Today, Cava is produced in various regions of Spain, with the Penedès area in Catalonia being the most famous. Cava's production method, which involves a second fermentation in the bottle, gives it a distinctive taste and aroma, often described as crisp, dry, and refreshing.
Whether you're celebrating a special occasion or simply enjoying a casual moment, a glass of Cava is sure to add a touch of Spanish flair to your festivities.
Recipe
Cava, the sparkling wine from Spain, is a versatile beverage that can be enjoyed on its own or incorporated into a variety of recipes. Whether you're hosting a special occasion or looking to add a touch of elegance to your everyday dining experience, a Cava-based recipe can be a delightful addition to your culinary repertoire.
One classic way to showcase the refreshing and lively character of Cava is in a Cava Cocktail. This simple yet sophisticated drink is perfect for setting the tone for any gathering or as a pre-dinner aperitif.
- 1 bottle of Cava
- 2 ounces of your preferred fruit juice (such as orange, grapefruit, or cranberry)
- 1 ounce of a liqueur (such as Cointreau or St-Germain)
- Fresh fruit or a twist of citrus for garnish
To prepare the Cava Cocktail, simply combine the Cava, fruit juice, and liqueur in a chilled champagne flute or coupe glass. Gently stir to combine and garnish with a slice of fresh fruit or a twist of citrus. The effervescence of the Cava, coupled with the sweetness of the fruit and the subtle complexity of the liqueur, creates a delightful and refreshing beverage.
When preparing a Cava Cocktail, it's important to use a high-quality Cava to ensure the best possible flavor and aroma. Additionally, be mindful of the proportions to achieve the perfect balance of flavors.
Experimenting with different juice and liqueur combinations can also be a fun way to explore the versatility of Cava in cocktail-making.
Cooking Steps
Manually cap each bottle's cork to seal in the fizz.
Allow the bottles to chill, then gently shake them to distribute the bubbles.
Uncork the bottles carefully, and pour the bubbly Cava into your glasses, ready to enjoy!
Step 1. Manually Cap Each Bottle's Cork
Capping each bottle's cork manually is the final step in the Cava production process. This delicate task is carried out with great care to ensure the perfect seal and presentation of the sparkling wine.
First, you'll need to carefully place the cork into the bottle's neck, ensuring it's centered and snug. Then, using a specialized capping tool, you'll gently press down on the cork, securing it in place. Be sure to apply even pressure to avoid any tilting or misalignment.
Once the cork is firmly in position, you'll add the metal cage that helps hold it securely. Finally, you'll tuck the wire cage's ends neatly under the bottle's lip, completing the process.
This meticulous manual capping preserves the Cava's carbonation and quality, allowing you to enjoy the perfect glass of sparkling delight. With each bottle sealed with care, the Cava is ready to be enjoyed.
Step 2. Allow the Bottles to Chill
After carefully capping each bottle, the next step is to allow the Cava to chill. Chilling the sparkling wine is crucial to achieve the perfect serving temperature and enhance its refreshing flavors.
Place the bottles in the refrigerator, making sure they're positioned upright to prevent any loss of carbonation. Depending on the size of your fridge, you may need to rearrange other items to fit the Cava bottles comfortably.
Allow the Cava to chill for at least 2 hours, but no more than 4 hours. This will bring the temperature down to the recommended range of 45-50°F (7-10°C), which is ideal for serving.
You can check the temperature by gently placing your hand on the bottles. If they feel chilled but not icy cold, they're ready to be enjoyed.
Step 3. Gently Shake the Bottles
Gently shaking the chilled bottles helps to distribute the yeast sediment evenly throughout the Cava. This step is essential for achieving the perfect balance of flavors and textures.
First, hold the bottle at a 45-degree angle, with the label facing up. Using both hands, gently rotate the bottle back and forth about 10-15 times. This circular motion ensures the sediment integrates without creating too much agitation.
Next, return the bottle to an upright position and give it a gentle side-to-side shimmy 5-7 times. This final motion helps settle any remaining particles.
Be careful not to shake the bottle vigorously, as this can cause the Cava to become overly foamy. The goal is a delicate, controlled movement that evenly distributes the yeast without excessive effervescence.
Once shaken, your Cava is ready to be served and enjoyed!
Step 4. Uncork the Bottles Carefully
With the Cava gently shaken, it's time to carefully uncork the bottles.
Hold the bottle at a 45-degree angle, pointing it away from yourself and any guests. Use your thumb to slowly release the wire cage around the cork. Gently twist the bottle while maintaining steady pressure on the cork.
As it begins to release, keep a firm grip and allow the cork to come out smoothly and quietly. Don't let the cork pop! Popping corks can cause the wine to spray, wasting precious bubbles.
Once the cork is out, pour the Cava into chilled glasses, filling them about three-quarters full. This allows room for the wine to expand and release its delightful effervescence.
Serve immediately and enjoy the crisp, refreshing flavor of your perfectly uncorked Cava.
Step 5. Pour Into Glasses
Once the cork is out, you can pour the Cava into the chilled glasses.
Hold each glass at an angle and slowly tilt it back upright as you fill it. This helps the sparkling wine cascade down the side, creating a lovely, foamy head. Fill the glasses about three-quarters full to leave room for the bubbles to form.
Be gentle when pouring to avoid excessive frothing. The ideal pour should produce a thin, steady stream of Cava.
As the glasses fill, you'll see the bubbles begin to dance and rise to the surface, adding a festive sparkle.
Once all the glasses are filled, you can admire the golden hue and delicate effervescence of the Cava before taking your first sip.
Enjoy the crisp, refreshing flavor and the celebratory mood the sparkling wine brings to any occasion.
Final Thoughts
As you've explored the world of cava, the Spanish sparkling wine, you've likely gained a deeper appreciation for its unique qualities and the craftsmanship behind its production.
From its traditional method of fermentation to the diverse range of styles and flavors, cava has proven itself to be a versatile and delightful beverage.
When selecting a cava, consider the occasion and your personal preferences.
Brut cavas with their crisp, dry profiles make for excellent aperitifs, while more full-bodied reserva or gran reserva cavas can complement a wide array of foods.
Don't be afraid to experiment and discover your favorite cava pairings.
Whether you're hosting a celebratory gathering or simply enjoying a quiet moment, cava is the perfect choice to elevate the experience.
Its effervescence and balanced flavors make it a refreshing and sophisticated option that's sure to delight your senses.
Embrace the art of cava and let it become a cherished part of your culinary and social experiences.
Frequently Asked Questions
What Is the Difference Between Cava and Champagne?
The key difference between cava and champagne is their region of origin. Champagne can only be produced in the Champagne region of France, while cava is a Spanish sparkling wine made using the traditional method as in Champagne.
How Long Does Cava Typically Need to Age?
Typically, cava needs to age for a minimum of 9 months, though some producers may age it for up to 24 months to develop more complex flavors and a creamier texture. The longer the aging, the richer the final sparkling wine.
What Are the Most Common Cava Grape Varieties?
Typically, the most common cava grape varieties are Macabeo, Parellada, and Xarel-lo. These Spanish white grapes provide the base for this sparkling wine, creating a balanced and lively final product. This traditional blend of grapes delivers a crisp and refreshing flavor profile that pairs perfectly with a variety of dishes. The combination of these grape varieties is also used to create the renowned white wine from Txakoli, a regional specialty in the Basque Country of Spain. The unique characteristics of these grapes add depth and complexity to both cava and Txakoli, making them distinct and beloved choices for wine enthusiasts.
Is Cava a Good Option for Special Occasions?
Absolutely, sparkling wine is a fantastic option for special occasions. Its vibrant bubbles and crisp, refreshing flavors make it the perfect celebratory drink, whether you're toasting a milestone or ringing in the new year.
How Does the Production Process of Cava Differ From Other Sparkling Wines?
The production process of cava differs from other sparkling wines in that it undergoes a secondary fermentation in the bottle, resulting in a more complex and refined flavor profile. This traditional method gives cava its distinct character.
Carlos is an expert in traditional Spanish cuisine. From the rich flavors of paella and tapas to the bold, savory dishes of Spain’s various regions, Carlos brings the spirit of Spain to your table. His recipes showcase the vibrant colors and fresh ingredients that are the hallmark of Spanish cooking.
Spanish Cuisine
Txakoli (White Wine)
Unlock the secrets of Txakoli, a captivating Basque white wine renowned for its crisp acidity and effervescent charm, as you delve into its rich history and production.
Txakoli is a crisp and effervescent white wine hailing from the Basque Country of Northern Spain. For centuries, the region's rich viticultural heritage has refined traditional production methods, resulting in Txakoli's distinct flavor profile. Grapes are cultivated on steep coastal slopes, thriving in the ideal microclimate. This unique white wine boasts a tart acidity and subtle effervescence, making it a perfect pairing for local seafood and tapas. Txakoli is typically enjoyed young and vibrant, with its ability to cleanse the palate often celebrated. If you'd like to learn more about Txakoli's history, characteristics, and the process behind its production, keep reading.
Key Takeaways
- Txakoli is a unique white wine originating from the Basque Country in Northern Spain, known for its tart acidity and subtle effervescence.
- Txakoli has a long viticultural heritage, with traditional production methods refined over time to create its distinct flavor profile.
- Txakoli is typically enjoyed young and vibrant, pairing beautifully with local seafood and tapas to cleanse the palate.
- The production of Txakoli involves gentle pressing of grapes, controlled fermentation, and clarification to preserve its crisp and refreshing character.
- Txakoli is celebrated for its ability to enhance dining experiences, with its low alcohol content and zesty acidity making it a versatile and popular choice.
History
Txakoli's origins can be traced back to the Basque Country of Northern Spain, where it has been produced for centuries. This unique white wine is deeply rooted in the region's rich viticultural heritage.
Over time, the traditional methods of Txakoli production have been refined, resulting in a distinct, lively, and refreshing beverage.
The vineyards that cultivate the grapes for Txakoli are often located on steep, coastal slopes, which provide the ideal microclimate for the indigenous grape varieties. The cool, Atlantic-influenced weather and mineral-rich soils impart the wine with its characteristic tart acidity and subtle effervescence.
Txakoli is typically enjoyed as a young, vibrant wine, celebrated for its ability to pair beautifully with the local seafood and tapas of the Basque region.
Today, Txakoli continues to be an integral part of the cultural fabric of Northern Spain, with its production and consumption deeply intertwined with the region's rich gastronomic traditions.
Recipe
Txakoli is a light, acidic white wine that originates from the Basque region of Spain. Its crisp, refreshing character makes it an excellent pairing for a variety of seafood dishes. Crafting a simple, yet flavorful Txakoli-based recipe can be a delightful way to enjoy this unique wine.
To begin, let's explore how to create a vibrant Txakoli-infused dish that celebrates the wine's distinctive qualities. This recipe will highlight the wine's natural acidity, while complementing it with fresh, seasonal ingredients.
- Txakoli white wine
- Shrimp, peeled and deveined
- Lemon juice
- Olive oil
- Garlic, minced
- Cherry tomatoes, halved
- Fresh parsley, chopped
- Salt and pepper to taste
In a large skillet, sauté the shrimp in a combination of olive oil and minced garlic over medium-high heat until the shrimp are pink and opaque. Add the halved cherry tomatoes and continue cooking for an additional 2-3 minutes, or until the tomatoes begin to soften.
Deglaze the pan with a generous splash of Txakoli, allowing the wine to simmer and reduce for a minute or two. Finally, stir in a squeeze of fresh lemon juice and a handful of chopped parsley. Season with salt and pepper to taste. This flavorful sauce will perfectly complement the tender and flaky fish. It’s a simple finishing touch that will elevate the dish to new heights. You can also use this sauce as a dressing for a variety of seafood dishes, or even incorporate it into a Russian salad recipe for a refreshing and tangy twist.
When serving this Txakoli-infused dish, be sure to have additional chilled Txakoli on hand to enjoy alongside the meal. The wine's bright acidity and subtle effervescence will help to cleanse the palate and enhance the overall dining experience.
Cooking Steps
Crush and destem the grapes, then gently press them to extract the juice.
Next, ferment the grape juice to create the Txakoli wine.
Step 1. Crush and Destem the Grapes
Once the grapes are harvested, it's time to begin the process of crushing and destemming them. First, you'll need to gather your equipment – a large container, a sturdy press, and a destemming tool.
Carefully place the grapes into the container, making sure to remove any leaves or stems that may have come along for the ride.
Next, it's time to get your hands dirty! Using the press, gently crush the grapes, being careful not to over-crush and release too many tannins. This step is crucial, as it helps to release the juice and start the fermentation process.
Once the grapes are sufficiently crushed, you can use the destemming tool to remove the stems, leaving behind only the flavorful grape pulp.
Step 2. Gently Press the Grapes
With the grapes now crushed, it's time to gently press them. This step is crucial for extracting the precious Txakoli wine juice.
Grab your wine press and carefully place the crushed grapes inside. Slowly turn the handle, applying gentle pressure to the grapes. The juice will begin to flow out, collecting in the catch basin below.
Be patient and resist the urge to press too hard. Overly aggressive pressing can release bitter tannins and undesirable flavors. Your goal is a delicate, light-bodied Txakoli.
Once the juice flow slows to a trickle, you're done. Carefully remove the pressed grape pomace.
Now, it's time to move on to the next step: clarifying the raw Txakoli wine. This involves allowing the juice to settle and removing any sediment.
With your gentle pressing complete, you're well on your way to crafting a refreshing, authentic Txakoli.
Step 3. Ferment the Grape Juice
After gently pressing the grapes, you'll transfer the raw Txakoli wine juice to a fermentation vessel. This is where the magic of fermentation begins!
You'll carefully add your chosen yeast strain, which will feast on the natural sugars in the juice, converting them into alcohol and carbon dioxide.
As the yeast works its wonders, you'll need to monitor the temperature and specific gravity of the fermenting Txakoli. The ideal temperature range is between 60-70°F, which helps the yeast thrive.
You'll use a hydrometer to track the specific gravity, watching as it gradually decreases over time. This indicates the yeast is successfully converting the sugars into alcohol.
Patience is key during this fermentation process, as it can take several weeks or even months to reach the desired alcohol content and flavor profile.
But don't worry, the end result will be a delightfully crisp, slightly effervescent Txakoli wine that's well worth the wait!
Step 4. Clarify and Stabilize the Wine
As the fermentation winds down, it's time to clarify and stabilize your Txakoli wine. This process helps remove any sediment and ensures the wine is crystal clear and ready to enjoy.
First, you'll need to rack the wine, which means carefully transferring it to a clean container, leaving behind the sediment that has accumulated at the bottom. This helps clarify the wine and prepares it for the next step.
Next, you'll add a fining agent, such as bentonite clay or gelatin, to help remove any remaining particles. Gently stir the agent into the wine and let it work its magic.
Over time, the fining agent will bind to the particles, causing them to sink to the bottom, leaving you with a perfectly clear Txakoli.
Step 5. Bottle and Age the Wine
Once the wine is clarified and stabilized, you can proceed to bottle your Txakoli. Carefully transfer the wine into clean, sterilized bottles, leaving a small amount of headspace at the top. This space allows the wine to develop its signature effervescence.
Next, seal the bottles with high-quality corks or screw caps. Corks are the traditional choice, but screw caps are becoming more popular for their convenience and ability to maintain the wine's freshness.
After bottling, it's time to age your Txakoli. These wines are typically meant to be enjoyed young, within a year or two of bottling. However, you can cellar them for up to 3-5 years to allow the flavors to evolve and the carbonation to gently integrate.
Store the bottles in a cool, dark place, away from direct light and vibration, to preserve the wine's delicate character.
When ready to serve, chill the Txakoli to around 46-50°F (8-10°C) to bring out its refreshing acidity and delicate aromas. Enjoy this lively, food-friendly white wine with tapas, seafood, or light dishes that complement its crisp, slightly tart profile.
Final Thoughts
Txakoli, a unique Basque wine, offers a delightful experience that transcends the ordinary.
As you savor the final sips, you'll appreciate the care and tradition that went into crafting this vibrant, refreshing beverage.
Whether you're enjoying Txakoli on a sun-dappled patio or pairing it with a lively tapas spread, this wine's zesty acidity and low alcohol content make it a perfect companion for any occasion.
Frequently Asked Questions
What Is the Recommended Serving Temperature for Txakoli?
The recommended serving temperature for this wine is around 8-12°C (46-54°F). You'll want to chill it before serving to bring out its vibrant acidity and fresh, crisp flavors. Enjoy this wine well-chilled for the best drinking experience.
How Long Can a Bottle of Txakoli Be Stored?
You can generally store a bottle of txakoli for up to 2 years. However, it's best enjoyed fresh, so it's recommended to drink it within the first year of purchase for the most vibrant and lively flavors.
Is Txakoli Suitable for Those With Gluten Intolerance?
Yes, txakoli is suitable for those with gluten intolerance. As a wine made from grapes, it's naturally gluten-free, making it a safe and enjoyable option for those who need to avoid gluten in their diet.
What Is the Typical Alcohol Content of Txakoli?
The typical alcohol content of txakoli is generally around 11-12% ABV. As a light, crisp white wine, it's a refreshing option that won't overwhelm you with a high alcohol content. Give it a try if you enjoy such wines!
Can Txakoli Be Used in Cocktails or Mixed Drinks?
Sure, you can use txakoli in cocktails and mixed drinks. Its light, crisp, and slightly fizzy profile makes it a versatile ingredient that can complement a variety of mixers and spirits. Get creative and experiment with txakoli-based cocktails.
Carlos is an expert in traditional Spanish cuisine. From the rich flavors of paella and tapas to the bold, savory dishes of Spain’s various regions, Carlos brings the spirit of Spain to your table. His recipes showcase the vibrant colors and fresh ingredients that are the hallmark of Spanish cooking.
-
Brazilian Cuisine3 months ago
Tacacá
-
Polish Comfort Food3 months ago
Krupnik (Barley Soup)
-
Brazilian Cuisine3 months ago
Caldeirada
-
Brazilian Cuisine3 months ago
Chicken in Brown Sauce
-
Southern Comfort Food3 months ago
Cheese Straws
-
African Cuisine3 months ago
Kedjenou (Ivory Coast)
-
Polish Comfort Food3 months ago
Vegetable Salad
-
American Diner Classics3 months ago
The Maillard Reaction: Understanding the Chemistry of Browning {Food Science and Cooking}