Connect with us

Spanish Cuisine

Ajo Blanco

With its creamy blend of toasted almonds, garlic, and olive oil, Ajo Blanco is a refreshing cold soup that transports you to the sun-drenched regions of southern Spain. Keep reading to discover the authentic recipe and cooking steps.

Published

on

chilled almond garlic soup

Ajo Blanco is a refreshing cold soup that originated in southern Spain, influenced by Moorish culture. This traditional dish features a creamy blend of toasted almonds, garlic, bread, and olive oil – perfect for serving during hot summer months. Often paired with seasonal fruits like grapes, Ajo Blanco is a staple at local festivals, showcasing Spain's rich culinary heritage. To make this chilled soup, you'll soak the almonds, blend the ingredients, and chill it for a few hours. Top it with toasted almond slivers and fresh herbs for a visually appealing presentation. Curious to learn more about this unique Spanish specialty? Keep reading for a closer look at the recipe and cooking steps.

Key Takeaways

  • Ajo Blanco is a traditional chilled Spanish soup originating from the Andalusia region, known for its unique blend of toasted almonds, garlic, bread, and olive oil.
  • The soup is typically served as a refreshing appetizer or light main course during hot summer months and is a staple at local festivals.
  • The main ingredients in Ajo Blanco include blanched almonds, garlic, day-old bread, olive oil, and sherry vinegar, which are blended to create a creamy, pourable consistency.
  • Ajo Blanco can be customized with additions like grapes, melon, or cucumber, and is often garnished with toasted almond slivers and fresh herbs for presentation.
  • Ajo Blanco is a nutritious dish, rich in healthy fats from almonds and olive oil, low in calories, and provides a good source of protein and vitamins.

History

Although the exact origins of Ajo Blanco are unclear, it's believed to have first emerged as a traditional dish in the southern regions of Spain. This cool, creamy soup has been enjoyed for centuries, with its roots tracing back to the Moorish influence in the Iberian Peninsula.

As the name suggests, Ajo Blanco is made primarily with garlic, or "ajo" in Spanish. The dish also features almonds, bread, olive oil, and vinegar, creating a harmonious blend of flavors.

During the hot summer months, Ajo Blanco provided a refreshing and nourishing meal for laborers and farmers in the countryside.

Today, Ajo Blanco remains a beloved part of Spanish culinary heritage, particularly in the Andalusia region. It's commonly served as an appetizer or light main course, often accompanied by grapes or other seasonal fruits.

The creamy, garlicky soup has become a staple at local festivals and celebrations, showcasing the rich cultural traditions of this unique Spanish dish.

Advertisement

Recipe

Ajo Blanco is a chilled Spanish soup that originated in the Andalusia region. This refreshing, creamy concoction is a perfect summer dish, offering a delightful balance of tangy, nutty, and garlicky flavors. The traditional recipe calls for a simple blend of toasted almonds, garlic, olive oil, bread, and vinegar, resulting in a velvety, cool soup that's both nourishing and indulgent. Ajo Blanco is often garnished with grapes and sliced almonds for an extra burst of sweetness and crunch. This dish is a staple in many Spanish households and is often served alongside other traditional Spanish dishes like paella and Spanish omelette recipe. Its simplicity and versatility make it a popular choice for entertaining or a light, yet satisfying, meal.

Ajo Blanco is a versatile dish that can be customized to suit individual tastes. While the classic version is delicious on its own, some variations may include the addition of grapes, melon, or cucumber, adding a touch of sweetness and crunch to the soup.

Ingredients:

  • 1 cup blanched almonds
  • 3 cloves of garlic, peeled
  • 1/2 cup diced day-old bread (without crust)
  • 1/4 cup extra-virgin olive oil
  • 2 tablespoons sherry vinegar
  • 2 cups cold water
  • 1/2 teaspoon sea salt

To prepare the Ajo Blanco, begin by toasting the almonds in a dry skillet over medium heat until fragrant and lightly browned. Allow to cool, then transfer to a food processor or high-powered blender.

Add the garlic, bread, olive oil, vinegar, water, and salt. Blend until the mixture is smooth and creamy, about 2-3 minutes.

Chill the Ajo Blanco for at least 2 hours before serving. This allows the flavors to meld and the soup to reach the perfect temperature.

Advertisement

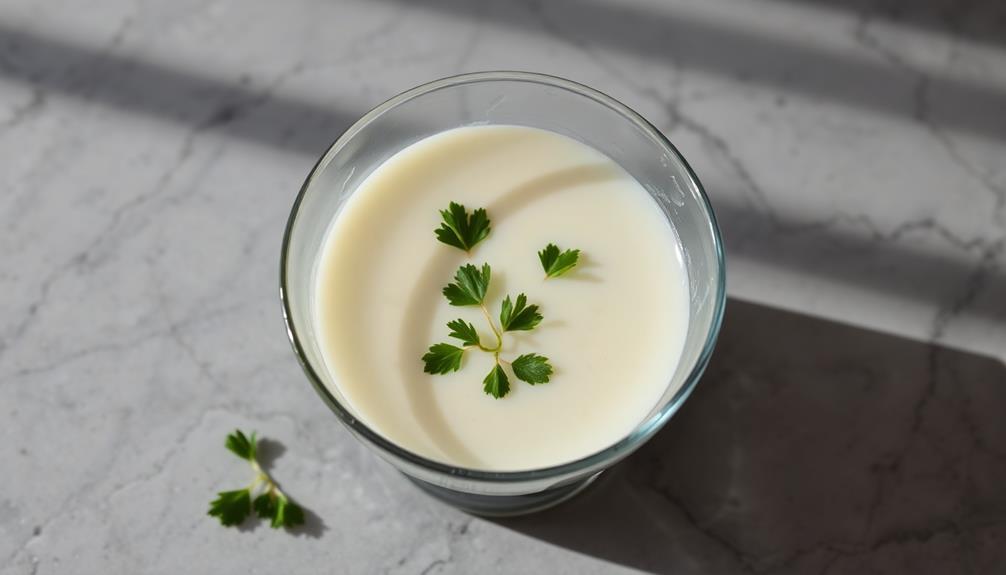
Serve the chilled soup garnished with toasted almond slivers, a drizzle of olive oil, and a sprinkle of fresh herbs, such as chives or parsley, if desired. Enjoy the refreshing and flavorful Ajo Blanco on a warm summer day.

Cooking Steps

First, you'll want to soak the almonds for several hours.

After that, strain and discard the almond skins.

Then, blend the soaked almonds with garlic and add in some vinegar.

Don't forget to chill the mixture before serving this delightful dish.

Advertisement

Step 1. Soak Almonds for Several Hours

soak almonds for hours

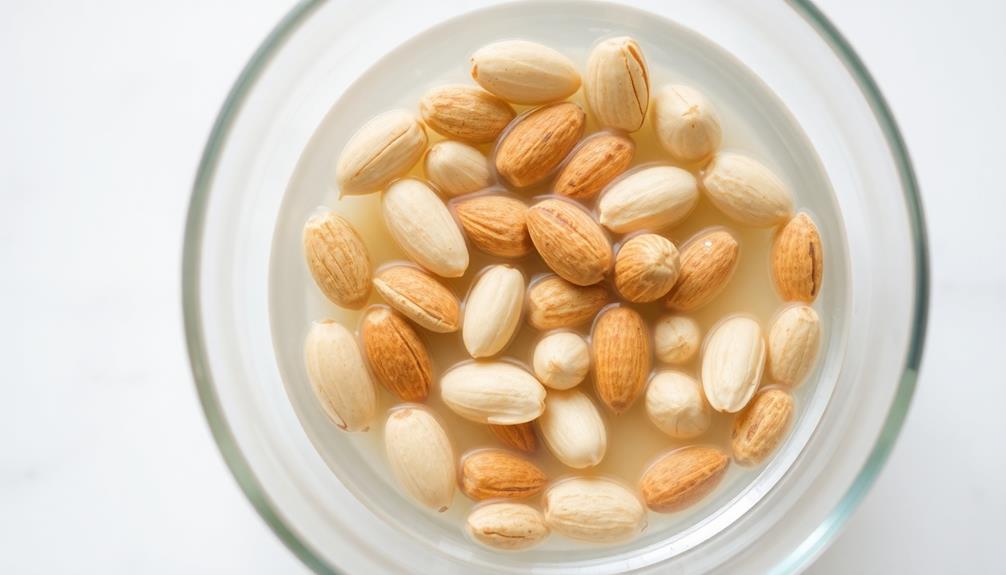
Begin by soaking the almonds for several hours. This is a crucial first step in making the classic Spanish cold soup, ajo blanco. Submerge the almonds in water and let them soak for at least 3 to 4 hours, or even overnight. This helps soften the nuts, making them easier to blend into a smooth, creamy texture later on.

During the soaking process, the almonds will absorb water and plump up. This hydration is essential for achieving the desired consistency of the ajo blanco.

Once the almonds have soaked, drain and rinse them thoroughly. They're now ready to be combined with the other key ingredients – garlic, bread, olive oil, and sherry vinegar – to create the refreshing, garlicky soup.

The soaked almonds will blend seamlessly into the mixture, lending their nutty flavor and luxurious creaminess to the ajo blanco. This simple prep work sets the stage for the delicious cold soup to come.

Step 2. Strain and Discard Almond Skins

strain and discard skins

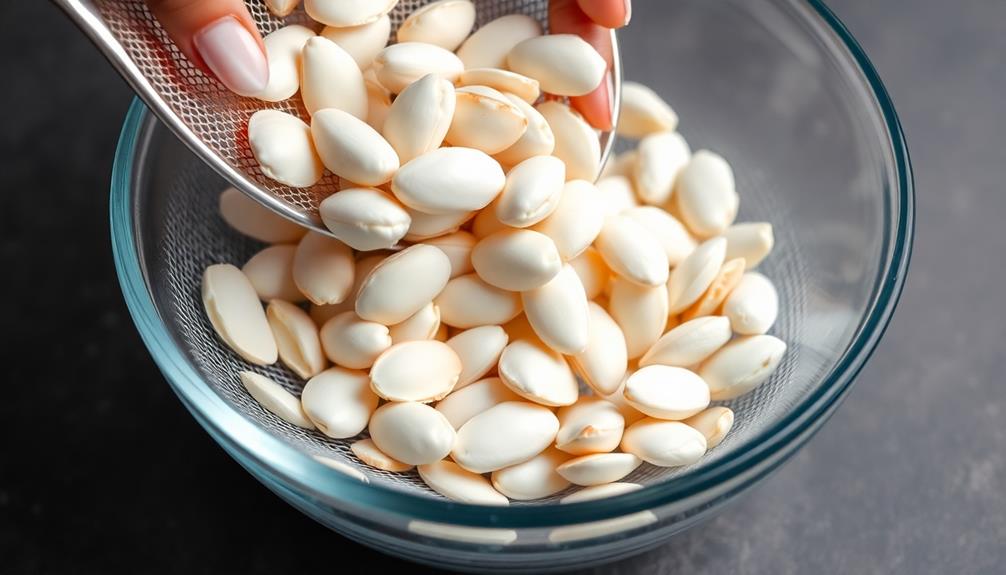
After draining and rinsing the soaked almonds, it's time to remove their skins.

Grab a clean kitchen towel and place the almonds on it. Gently rub the almonds between the towel, applying light pressure. This should cause the skins to slip off easily.

Once an almond is peeled, simply discard the skin. Continue this process until all the almonds have been skinned.

Advertisement

Be careful not to press too hard, as you don't want to crush the almonds. The peeled almonds will have a smooth, pale appearance.

Discard the almond skins, as they won't be used in the ajo blanco recipe. This step helps create a creamy, velvety texture in the final dish.

With the almonds now skinned, you're ready to move on to the next step in making this delicious cold Spanish soup.

Step 3. Blend Soaked Almonds With Garlic

blend almonds and garlic

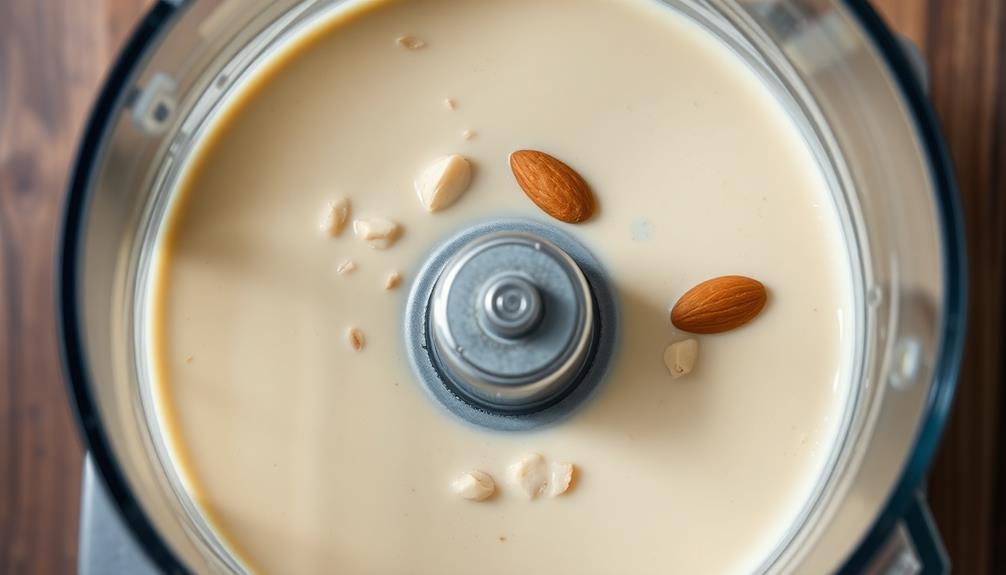
Once the almonds have been peeled, you'll need to blend them together with garlic to create the foundation for the ajo blanco.

In a food processor or high-powered blender, add the soaked and drained almonds along with 2-3 cloves of peeled garlic. Pulse the mixture until it forms a smooth, creamy paste. You may need to stop and scrape down the sides a few times to ensure everything is evenly incorporated.

The blended almond-garlic mixture will have a rich, nutty aroma that fills the air. Be sure to taste it and adjust the garlic to your liking, adding more if you prefer a stronger flavor.

Advertisement

This thick, velvety base will provide the essential texture and taste for the final ajo blanco soup. With the almonds and garlic now blended, you're ready to move on to the next step: thinning the mixture with broth or water.

Step 4. Add Vinegar

incorporate vinegar into mixture

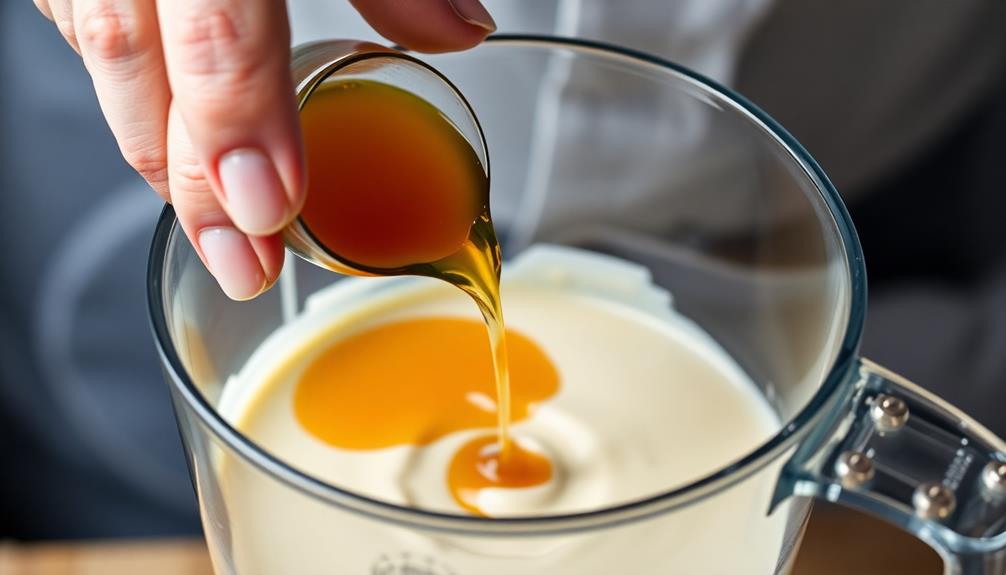
The next step is to add vinegar to the blended almond-garlic mixture. This sour element helps to balance the richness of the almonds and the pungency of the garlic.

Pour in a few tablespoons of sherry vinegar or white wine vinegar and stir it in gently. The vinegar will react with the other ingredients, creating a bright, tangy flavor that brightens up the creamy base.

Taste the mixture and add more vinegar if you'd like a more pronounced acidity. You can also experiment with different types of vinegar to find your preferred flavor profile. Just be sure to start with a small amount and gradually increase until you reach the perfect balance.

The vinegar will help to thin out the texture of the ajo blanco as well, making it more pourable and smooth.

After incorporating the vinegar, you're ready to move on to the next step of seasoning the soup with salt and pepper to taste. This simple addition of vinegar really helps to elevate the flavors and bring the ajo blanco together.

Advertisement

Step 5. Chill Mixture Before Serving

chill mixture before serving

With the vinegar now incorporated, chill the ajo blanco mixture before serving. This creamy, chilled soup is best enjoyed after it has had time to cool in the refrigerator.

Pour the mixture into a large serving bowl or individual bowls, then place it in the fridge for at least 2 hours, or until it's thoroughly chilled.

Chilling the ajo blanco allows the flavors to meld and the texture to become delightfully smooth and velvety. The cold temperature also helps to balance the richness of the olive oil and almonds.

Before serving, you may want to give the mixture a gentle stir to ensure an even temperature throughout.

Once chilled, the ajo blanco is ready to be enjoyed. Ladle it into bowls and top with any desired garnishes, such as toasted almond slivers, fresh grapes, or a drizzle of high-quality olive oil.

The cool, creamy soup is a refreshing and flavorful start to any summer meal.

Advertisement

Final Thoughts

Ajo Blanco, the captivating Spanish chilled almond soup, has undoubtedly captured the hearts and palates of food enthusiasts worldwide. This delectable dish's simplicity and versatility make it a must-try for anyone seeking a refreshing and flavorful summer treat.

Whether you're hosting a backyard gathering or simply craving a cool, creamy delight, Ajo Blanco is the perfect choice.

As you savor the final spoonfuls of this delightful soup, you can't help but appreciate the harmony of flavors and textures. The silky smooth texture, the crunch of toasted almonds, and the bright acidity of the wine vinegar come together in perfect harmony.

It's a culinary experience that lingers in your memory, leaving you eager to recreate this Spanish gem in your own kitchen.

Frequently Asked Questions

Is Ajo Blanco Suitable for Vegans and Vegetarians?

Yes, ajo blanco is suitable for vegans and vegetarians. It's a chilled Spanish almond and garlic soup that doesn't contain any animal products, making it a perfect plant-based option for those following a vegan or vegetarian diet.

Advertisement

How Long Does Ajo Blanco Typically Last When Stored Properly?

When stored properly, ajo blanco typically lasts 3-5 days in the refrigerator. It's essential to keep it chilled and covered to preserve the fresh flavors and prevent spoilage.

Can Ajo Blanco Be Served Warm or Should It Always Be Chilled?

You can serve ajo blanco warm or chilled, depending on your preference. While it's often served cold, the dish can be enjoyed at room temperature or even slightly warmed, allowing the flavors to mingle and shine.

Are There Any Variations or Alternatives to the Traditional Ajo Blanco Recipe?

There are a few variations and alternatives to the traditional recipe. You can add fruits like grapes or apples, experiment with different nuts, or even make a creamy version by blending in avocado.

What Are the Health Benefits of Consuming Ajo Blanco?

Consuming ajo blanco can provide several health benefits. It's rich in antioxidants, which can help boost your immune system and reduce inflammation. The garlic and nuts in ajo blanco also contain compounds that may support heart health and improve digestion.

Advertisement

Advertisement

Spanish Cuisine

Paella Valenciana: Spanish Seafood Rice

Hypnotizing with its vibrant hues and irresistible flavors, Paella Valenciana is the quintessential Spanish seafood rice dish that transports you to the sun-drenched coasts of Valencia.

Published

on

seafood rice dish spain

Paella Valenciana, the iconic Spanish seafood rice dish, transports you to the sun-drenched coasts of Valencia with its vibrant golden hue, fragrant aromas, and irresistible flavors. This communal dish combines juicy chicken, succulent shrimp, aromatic saffron, and fresh vegetables like onions, peppers, and peas. The key is using high-quality short-grain Spanish rice that soaks up the rich broth, creating a satisfying and comforting meal. Paella Valenciana is a beloved classic that brings families and friends together, and as you'll soon discover, there's so much more to explore about this culinary delight.

Key Takeaways

  • Paella Valenciana is a traditional Spanish rice dish originating from the Valencia region, known for its vibrant golden color and diverse ingredients.
  • The dish combines short-grain Spanish rice with a flavorful broth, chicken, shrimp, and fresh vegetables like onions, garlic, bell peppers, and tomatoes.
  • Saffron threads are an essential ingredient, providing the signature aroma and color that distinguishes Paella Valenciana from other rice dishes.
  • Proper preparation techniques, such as soaking the saffron, sautéing the aromatics, and allowing the rice to absorb the flavors, are crucial for achieving an authentic paella.
  • Paella Valenciana is often enjoyed as a communal dish, fostering sharing and connection among diners and transporting them to the coastal regions of Spain.

History

The origins of Paella Valenciana can be traced back to the 19th century, when Spanish farmers near the city of Valencia began experimenting with cooking rice over an open fire.

They'd toss in whatever ingredients they'd on hand – chicken, rabbit, green beans, and of course, the all-important saffron. Over time, this dish evolved into the classic Paella Valenciana we know and love today. The dish became a symbol of communal gatherings, with each region of Spain adding its own touch based on local ingredients and traditions. Just as Paella has deep roots in Spanish culture, other iconic foods also reflect the spirit and history of their origins. For example, the history of vada pav reveals its humble beginnings as street food in Mumbai, born out of necessity and now cherished by millions, much like the regional pride associated with paella.

You can just imagine the aroma wafting through the air as those early chefs stirred and simmered their creation. The saffron lent a vibrant, golden hue, while the tender meats and crisp veggies added texture and flavor.

It wasn't long before Paella Valenciana became a staple of Spanish cuisine, enjoyed by families and friends gathered around the table.

Whether you're scooping up a hearty bite or simply admiring its beautiful presentation, this historical dish is a true taste of Spain's rich culinary heritage.

Advertisement

Get ready to be transported back in time with every delicious mouthful!

Recipe

Paella Valenciana is a classic Spanish dish that originates from the Valencia region. It's a rice-based dish that's typically made with a variety of meats, seafood, and vegetables. This recipe will guide you through the steps to create an authentic Paella Valenciana at home.

Paella is a communal dish that's often served family-style. The preparation and cooking process can take some time, but the end result is a flavorful and satisfying meal that's sure to impress your guests.

Ingredients:

  • 1 cup short-grain Spanish rice
  • 4 cups chicken or vegetable stock
  • 1 onion, diced
  • 3 cloves garlic, minced
  • 1 red bell pepper, diced
  • 1 tomato, diced
  • 1 teaspoon smoked paprika
  • 1/4 teaspoon saffron threads
  • 1 pound chicken thighs, cut into bite-sized pieces
  • 1 pound shrimp, peeled and deveined
  • 1 cup green peas
  • Salt and pepper to taste
  • Lemon wedges for serving

Instructions:

In a large paella pan or heavy-bottomed skillet, heat a few tablespoons of olive oil over medium-high heat. Add the chicken and cook until lightly browned, about 5-7 minutes. Remove the chicken from the pan and set aside.

Advertisement

In the same pan, sauté the onion and garlic until fragrant, about 2-3 minutes. Add the bell pepper and tomato, and continue cooking for an additional 3-4 minutes.

Stir in the rice, smoked paprika, and saffron, and toast the rice for 1-2 minutes, stirring constantly. Pour in the stock and bring the mixture to a boil. Reduce the heat to low, cover, and simmer for 15-20 minutes, or until the rice is tender and has absorbed most of the liquid.

Nestle the chicken, shrimp, and peas into the rice. Cover and continue cooking for an additional 10-15 minutes, or until the shrimp are opaque and cooked through.

Once the paella is cooked, remove from heat and let it rest for 5-10 minutes before serving. Garnish with lemon wedges and enjoy!

Tips:

Advertisement
  • Use the highest quality, freshest ingredients you can find for the best flavor.
  • Be sure to use a large enough pan to accommodate all the ingredients and prevent overcrowding.
  • Saffron is an essential ingredient in authentic Paella Valenciana, so don't skip it if possible.
  • Experiment with different types of seafood or meats to suit your personal preferences.

Cooking Steps

First, you'll want to soak those saffron threads in some hot water to let the flavor really shine.

Next, sauté the onion and garlic until they're fragrant and softened.

Then, add the rice and broth, followed by the delicious seafood, juicy tomatoes, and sweet peas.

Get ready for an incredible flavor explosion!

Step 1. Soak Saffron Threads in Hot Water

soak saffron in water

Saffron's vibrant hue and distinct aroma are the hallmark of authentic Paella Valenciana. To capture this essential flavor, you'll need to soak the saffron threads in hot water. Simply place the delicate threads in a small bowl and pour in just enough hot water to cover them.

Let the saffron steep for about 10 minutes, allowing the water to become a beautiful golden yellow. This infusion will imbue your paella with that signature sunny color and warm, earthy taste.

Don't be tempted to rush this step – patience is key. As the saffron soaks, its oils and aromas will gradually release, creating a fragrant base for your dish.

Advertisement

When the time's up, the saffron-infused water will be ready to add to your paella, bringing everything together in a symphony of flavors. With this simple preparation, you're well on your way to crafting an authentic Paella Valenciana that'll transport your taste buds straight to the sun-drenched fields of Spain.

Step 2. Sauté Onion and Garlic

saut onion and garlic

Next, sauté the onion and garlic to build the flavor foundation of your paella.

Grab a large skillet and heat it over medium heat. Add a splash of olive oil and let it shimmer. Toss in the diced onion and minced garlic. Stir them around with a wooden spoon, letting the aromas fill your kitchen.

The onion will start to soften and turn golden brown, while the garlic will become fragrant and nutty. Don't let the garlic burn – keep it moving! After about 5 minutes, your onion and garlic will be perfectly sautéed, ready to infuse the rest of your paella with their savory goodness.

This is an essential step that adds so much flavor to the dish. Keep an eye on the heat and stir frequently to prevent anything from sticking or burning.

With the onion and garlic sizzling away, you're well on your way to an authentic, mouthwatering Paella Valenciana!

Advertisement

Step 3. Add Rice and Broth

add rice and broth

With the aromatic onion and garlic ready, it's time to add the rice and broth to your paella.

Grab your trusty paella pan and pour in the short-grain Spanish rice. Give it a gentle stir, making sure the grains are evenly distributed.

Now, it's time for the star of the show – the flavorful broth! Slowly pour in the hot chicken or seafood broth, taking care not to splash.

As the liquid simmers, you'll see the rice start to plump up and release its starchy goodness. The aroma will fill your kitchen, making your mouth water in anticipation.

Stir the mixture occasionally, allowing the rice to absorb all the rich flavors. Be patient, as this process takes time, but the end result will be worth it – a perfectly cooked, aromatic base for your delectable paella Valenciana.

Get ready to add the rest of your ingredients and create a true Spanish feast!

Advertisement

Step 4. Add Seafood

incorporate seafood ingredients

Once the rice has had a chance to absorb the broth, it's time to add the seafood! This is where the dish really comes to life, as the delicious flavors of the sea mingle with the aromatic rice.

Gently place your shrimp, mussels, and calamari right into the pan. Watch as they sizzle and turn a beautiful pink color. The mussels will start to open up, letting you know they're cooked to perfection.

Give everything a gentle stir to make sure the seafood is evenly distributed throughout the rice.

Now, take a deep breath and savor the aroma – the briny scent of the ocean, the warmth of the saffron, and the subtle sweetness of the peppers. This is a feast for the senses!

Let the seafood cook for just a few minutes until tender, then remove the pan from the heat. Your paella Valenciana is almost ready to serve.

Get ready to enjoy a taste of the Mediterranean right in your own home!

Advertisement

Step 5. Add Tomatoes and Peas

incorporate tomatoes and peas

After you've added the seafood, it's time to stir in the tomatoes and peas. These colorful veggies will bring a delightful pop of flavor and texture to your paella.

First, grab a few ripe tomatoes and dice them up. The juicy, tangy tomatoes will mingle with the savory rice and seafood, creating a harmonious balance of tastes.

Next, it's time for the peas. Frozen peas work wonderfully here, as their sweet, tender nature complements the other ingredients. Sprinkle them in, and watch them sizzle and turn a vibrant green.

Stir everything together gently, so the peas and tomatoes are evenly distributed throughout the dish.

As the tomatoes and peas cook, they'll release their natural sugars, adding a touch of sweetness to balance the saltiness of the seafood. The colors will become even more vivid, making your paella a true feast for the eyes.

Get ready to enjoy the fresh, summery flavors that the tomatoes and peas bring to this classic Spanish dish.

Advertisement

Final Thoughts

Paella Valenciana is a beloved Spanish dish that has captivated the hearts and palates of people around the world.

After carefully preparing the rice, simmering the broth, and adding the delightful ingredients, you're now ready to sit back, relax, and savor the masterpiece you've created.

The vibrant colors, the tantalizing aromas, and the burst of flavors in every bite make this dish a true culinary delight.

As you take your first forkful, you'll be transported to the sun-drenched coasts of Valencia, where this iconic dish was born.

Whether you're sharing it with family or enjoying it on your own, Paella Valenciana is a meal that will leave you feeling satisfied and content.

Advertisement

So, go ahead, dive in, and let the flavors of Spain dance on your taste buds.

This is a dish that's sure to become a cherished part of your culinary repertoire.

Frequently Asked Questions

How Long Does It Take to Prepare Paella Valenciana?

To prepare Paella Valenciana, it'll take you around 1-2 hours. The exact time may vary depending on your experience and the complexity of the dish, but it's generally a time-consuming process that requires patience and attention to detail.

What Type of Rice Is Best for Making Paella?

You'll want to use a short-grain rice when making paella. Arborio or Bomba rice are the best choices, as they'll release starch and create the signature creamy, slightly sticky texture that paella is known for.

Can I Substitute Chicken for Seafood in Paella Valenciana?

Absolutely, you can substitute chicken for seafood in paella. The dish will have a different flavor profile, but the cooking method and rice will remain the same. Feel free to experiment and find what you enjoy most.

Advertisement

How Many People Can a Typical Paella Valenciana Serve?

A typical paella valenciana can usually serve 4-6 people, depending on their appetites and whether it's the main course or part of a larger meal. The size of the pan and ingredients used will also affect the serving size.

Is Paella Valenciana Difficult to Make at Home?

Is paella valenciana difficult to make at home? While it may seem complex, with a bit of practice, you can absolutely make an authentic paella valenciana in your own kitchen. The key is to get the rice and seafood cooked just right.

Continue Reading

Spanish Cuisine

Cava (Sparkling Wine)

Lovers of Spanish sparkling wine can discover the captivating story and versatile pairings of Cava, a Catalonian delight that effortlessly elevates any occasion.

Published

on

sparkling spanish wine cava

Cava is a beloved Spanish sparkling wine that originates from the Penedès region of Catalonia. Made using the traditional Champagne method, Cava captivates with its effervescence, crisp acidity, and delightful flavors of apple, pear, and citrus. The production process involves a secondary fermentation in the bottle, which enhances the wine's complexity and character. Cava's versatility makes it a refined choice for celebrations and casual gatherings alike, pairing beautifully with seafood, tapas, and even desserts. Whether served chilled as an aperitif or incorporated into creative cocktails, Cava's sophisticated style is sure to impress. To discover more about this enchanting Spanish sparkling wine, keep reading.

Key Takeaways

  • Cava is a Spanish sparkling wine originating from the Catalonia region, primarily made from indigenous grape varieties like Macabeo, Xarel-lo, and Parellada.
  • The production process involves secondary fermentation in the bottle, aging on lees, and manual disgorging, contributing to Cava's distinctive crisp and refreshing profile.
  • Cava is recognized for its balanced flavors, ranging from apple, pear, and citrus to toasty and nutty notes, and varying sweetness levels from brut nature to semi-seco.
  • Cava is versatile in pairing with a wide range of cuisines, from seafood and tapas to desserts, and can also be used as a base for creative cocktails.
  • Cava has gained global recognition and popularity as a sophisticated sparkling wine option, often associated with Spanish celebrations, traditions, and a lifestyle of elegance.

History

Cava, the renowned Spanish sparkling wine, traces its roots back to the late 19th century. It all started when a Catalan winemaker, Josep Raventós, visited the Champagne region of France and was inspired to create his own version of the famous French bubbly.

Raventós returned home and began experimenting with the traditional Champagne method, using local grape varieties like Macabeo, Parellada, and Xarel-lo. The first bottles of Cava were produced in 1872, and over the next few decades, the industry grew steadily.

Today, Cava is produced in various regions of Spain, with the Penedès area in Catalonia being the most famous. Cava's production method, which involves a second fermentation in the bottle, gives it a distinctive taste and aroma, often described as crisp, dry, and refreshing.

Whether you're celebrating a special occasion or simply enjoying a casual moment, a glass of Cava is sure to add a touch of Spanish flair to your festivities.

Recipe

Cava, the sparkling wine from Spain, is a versatile beverage that can be enjoyed on its own or incorporated into a variety of recipes. Whether you're hosting a special occasion or looking to add a touch of elegance to your everyday dining experience, a Cava-based recipe can be a delightful addition to your culinary repertoire.

Advertisement

One classic way to showcase the refreshing and lively character of Cava is in a Cava Cocktail. This simple yet sophisticated drink is perfect for setting the tone for any gathering or as a pre-dinner aperitif.

  • 1 bottle of Cava
  • 2 ounces of your preferred fruit juice (such as orange, grapefruit, or cranberry)
  • 1 ounce of a liqueur (such as Cointreau or St-Germain)
  • Fresh fruit or a twist of citrus for garnish

To prepare the Cava Cocktail, simply combine the Cava, fruit juice, and liqueur in a chilled champagne flute or coupe glass. Gently stir to combine and garnish with a slice of fresh fruit or a twist of citrus. The effervescence of the Cava, coupled with the sweetness of the fruit and the subtle complexity of the liqueur, creates a delightful and refreshing beverage.

When preparing a Cava Cocktail, it's important to use a high-quality Cava to ensure the best possible flavor and aroma. Additionally, be mindful of the proportions to achieve the perfect balance of flavors.

Experimenting with different juice and liqueur combinations can also be a fun way to explore the versatility of Cava in cocktail-making.

Cooking Steps

Manually cap each bottle's cork to seal in the fizz.

Allow the bottles to chill, then gently shake them to distribute the bubbles.

Advertisement

Uncork the bottles carefully, and pour the bubbly Cava into your glasses, ready to enjoy!

Step 1. Manually Cap Each Bottle's Cork

manually cap each bottle

Capping each bottle's cork manually is the final step in the Cava production process. This delicate task is carried out with great care to ensure the perfect seal and presentation of the sparkling wine.

First, you'll need to carefully place the cork into the bottle's neck, ensuring it's centered and snug. Then, using a specialized capping tool, you'll gently press down on the cork, securing it in place. Be sure to apply even pressure to avoid any tilting or misalignment.

Once the cork is firmly in position, you'll add the metal cage that helps hold it securely. Finally, you'll tuck the wire cage's ends neatly under the bottle's lip, completing the process.

This meticulous manual capping preserves the Cava's carbonation and quality, allowing you to enjoy the perfect glass of sparkling delight. With each bottle sealed with care, the Cava is ready to be enjoyed.

Step 2. Allow the Bottles to Chill

chill the bottles now

After carefully capping each bottle, the next step is to allow the Cava to chill. Chilling the sparkling wine is crucial to achieve the perfect serving temperature and enhance its refreshing flavors.

Place the bottles in the refrigerator, making sure they're positioned upright to prevent any loss of carbonation. Depending on the size of your fridge, you may need to rearrange other items to fit the Cava bottles comfortably.

Advertisement

Allow the Cava to chill for at least 2 hours, but no more than 4 hours. This will bring the temperature down to the recommended range of 45-50°F (7-10°C), which is ideal for serving.

You can check the temperature by gently placing your hand on the bottles. If they feel chilled but not icy cold, they're ready to be enjoyed.

Step 3. Gently Shake the Bottles

gently shake the bottles

Gently shaking the chilled bottles helps to distribute the yeast sediment evenly throughout the Cava. This step is essential for achieving the perfect balance of flavors and textures.

First, hold the bottle at a 45-degree angle, with the label facing up. Using both hands, gently rotate the bottle back and forth about 10-15 times. This circular motion ensures the sediment integrates without creating too much agitation.

Next, return the bottle to an upright position and give it a gentle side-to-side shimmy 5-7 times. This final motion helps settle any remaining particles.

Be careful not to shake the bottle vigorously, as this can cause the Cava to become overly foamy. The goal is a delicate, controlled movement that evenly distributes the yeast without excessive effervescence.

Advertisement

Once shaken, your Cava is ready to be served and enjoyed!

Step 4. Uncork the Bottles Carefully

uncork bottles with caution

With the Cava gently shaken, it's time to carefully uncork the bottles.

Hold the bottle at a 45-degree angle, pointing it away from yourself and any guests. Use your thumb to slowly release the wire cage around the cork. Gently twist the bottle while maintaining steady pressure on the cork.

As it begins to release, keep a firm grip and allow the cork to come out smoothly and quietly. Don't let the cork pop! Popping corks can cause the wine to spray, wasting precious bubbles.

Once the cork is out, pour the Cava into chilled glasses, filling them about three-quarters full. This allows room for the wine to expand and release its delightful effervescence.

Serve immediately and enjoy the crisp, refreshing flavor of your perfectly uncorked Cava.

Advertisement

Step 5. Pour Into Glasses

pour liquid into glasses

Once the cork is out, you can pour the Cava into the chilled glasses.

Hold each glass at an angle and slowly tilt it back upright as you fill it. This helps the sparkling wine cascade down the side, creating a lovely, foamy head. Fill the glasses about three-quarters full to leave room for the bubbles to form.

Be gentle when pouring to avoid excessive frothing. The ideal pour should produce a thin, steady stream of Cava.

As the glasses fill, you'll see the bubbles begin to dance and rise to the surface, adding a festive sparkle.

Once all the glasses are filled, you can admire the golden hue and delicate effervescence of the Cava before taking your first sip.

Enjoy the crisp, refreshing flavor and the celebratory mood the sparkling wine brings to any occasion.

Advertisement

Final Thoughts

As you've explored the world of cava, the Spanish sparkling wine, you've likely gained a deeper appreciation for its unique qualities and the craftsmanship behind its production.

From its traditional method of fermentation to the diverse range of styles and flavors, cava has proven itself to be a versatile and delightful beverage.

When selecting a cava, consider the occasion and your personal preferences.

Brut cavas with their crisp, dry profiles make for excellent aperitifs, while more full-bodied reserva or gran reserva cavas can complement a wide array of foods.

Don't be afraid to experiment and discover your favorite cava pairings.

Advertisement

Whether you're hosting a celebratory gathering or simply enjoying a quiet moment, cava is the perfect choice to elevate the experience.

Its effervescence and balanced flavors make it a refreshing and sophisticated option that's sure to delight your senses.

Embrace the art of cava and let it become a cherished part of your culinary and social experiences.

Frequently Asked Questions

What Is the Difference Between Cava and Champagne?

The key difference between cava and champagne is their region of origin. Champagne can only be produced in the Champagne region of France, while cava is a Spanish sparkling wine made using the traditional method as in Champagne.

How Long Does Cava Typically Need to Age?

Typically, cava needs to age for a minimum of 9 months, though some producers may age it for up to 24 months to develop more complex flavors and a creamier texture. The longer the aging, the richer the final sparkling wine.

Advertisement

What Are the Most Common Cava Grape Varieties?

Typically, the most common cava grape varieties are Macabeo, Parellada, and Xarel-lo. These Spanish white grapes provide the base for this sparkling wine, creating a balanced and lively final product. This traditional blend of grapes delivers a crisp and refreshing flavor profile that pairs perfectly with a variety of dishes. The combination of these grape varieties is also used to create the renowned white wine from Txakoli, a regional specialty in the Basque Country of Spain. The unique characteristics of these grapes add depth and complexity to both cava and Txakoli, making them distinct and beloved choices for wine enthusiasts.

Is Cava a Good Option for Special Occasions?

Absolutely, sparkling wine is a fantastic option for special occasions. Its vibrant bubbles and crisp, refreshing flavors make it the perfect celebratory drink, whether you're toasting a milestone or ringing in the new year.

How Does the Production Process of Cava Differ From Other Sparkling Wines?

The production process of cava differs from other sparkling wines in that it undergoes a secondary fermentation in the bottle, resulting in a more complex and refined flavor profile. This traditional method gives cava its distinct character.

Continue Reading

Spanish Cuisine

Txakoli (White Wine)

Unlock the secrets of Txakoli, a captivating Basque white wine renowned for its crisp acidity and effervescent charm, as you delve into its rich history and production.

Published

on

refreshing basque white wine

Txakoli is a crisp and effervescent white wine hailing from the Basque Country of Northern Spain. For centuries, the region's rich viticultural heritage has refined traditional production methods, resulting in Txakoli's distinct flavor profile. Grapes are cultivated on steep coastal slopes, thriving in the ideal microclimate. This unique white wine boasts a tart acidity and subtle effervescence, making it a perfect pairing for local seafood and tapas. Txakoli is typically enjoyed young and vibrant, with its ability to cleanse the palate often celebrated. If you'd like to learn more about Txakoli's history, characteristics, and the process behind its production, keep reading.

Key Takeaways

  • Txakoli is a unique white wine originating from the Basque Country in Northern Spain, known for its tart acidity and subtle effervescence.
  • Txakoli has a long viticultural heritage, with traditional production methods refined over time to create its distinct flavor profile.
  • Txakoli is typically enjoyed young and vibrant, pairing beautifully with local seafood and tapas to cleanse the palate.
  • The production of Txakoli involves gentle pressing of grapes, controlled fermentation, and clarification to preserve its crisp and refreshing character.
  • Txakoli is celebrated for its ability to enhance dining experiences, with its low alcohol content and zesty acidity making it a versatile and popular choice.

History

Txakoli's origins can be traced back to the Basque Country of Northern Spain, where it has been produced for centuries. This unique white wine is deeply rooted in the region's rich viticultural heritage.

Over time, the traditional methods of Txakoli production have been refined, resulting in a distinct, lively, and refreshing beverage.

The vineyards that cultivate the grapes for Txakoli are often located on steep, coastal slopes, which provide the ideal microclimate for the indigenous grape varieties. The cool, Atlantic-influenced weather and mineral-rich soils impart the wine with its characteristic tart acidity and subtle effervescence.

Txakoli is typically enjoyed as a young, vibrant wine, celebrated for its ability to pair beautifully with the local seafood and tapas of the Basque region.

Today, Txakoli continues to be an integral part of the cultural fabric of Northern Spain, with its production and consumption deeply intertwined with the region's rich gastronomic traditions.

Advertisement

Recipe

Txakoli is a light, acidic white wine that originates from the Basque region of Spain. Its crisp, refreshing character makes it an excellent pairing for a variety of seafood dishes. Crafting a simple, yet flavorful Txakoli-based recipe can be a delightful way to enjoy this unique wine.

To begin, let's explore how to create a vibrant Txakoli-infused dish that celebrates the wine's distinctive qualities. This recipe will highlight the wine's natural acidity, while complementing it with fresh, seasonal ingredients.

  • Txakoli white wine
  • Shrimp, peeled and deveined
  • Lemon juice
  • Olive oil
  • Garlic, minced
  • Cherry tomatoes, halved
  • Fresh parsley, chopped
  • Salt and pepper to taste

In a large skillet, sauté the shrimp in a combination of olive oil and minced garlic over medium-high heat until the shrimp are pink and opaque. Add the halved cherry tomatoes and continue cooking for an additional 2-3 minutes, or until the tomatoes begin to soften.

Deglaze the pan with a generous splash of Txakoli, allowing the wine to simmer and reduce for a minute or two. Finally, stir in a squeeze of fresh lemon juice and a handful of chopped parsley. Season with salt and pepper to taste. This flavorful sauce will perfectly complement the tender and flaky fish. It’s a simple finishing touch that will elevate the dish to new heights. You can also use this sauce as a dressing for a variety of seafood dishes, or even incorporate it into a Russian salad recipe for a refreshing and tangy twist.

When serving this Txakoli-infused dish, be sure to have additional chilled Txakoli on hand to enjoy alongside the meal. The wine's bright acidity and subtle effervescence will help to cleanse the palate and enhance the overall dining experience.

Cooking Steps

Crush and destem the grapes, then gently press them to extract the juice.

Advertisement

Next, ferment the grape juice to create the Txakoli wine.

Step 1. Crush and Destem the Grapes

crush and destem grapes

Once the grapes are harvested, it's time to begin the process of crushing and destemming them. First, you'll need to gather your equipment – a large container, a sturdy press, and a destemming tool.

Carefully place the grapes into the container, making sure to remove any leaves or stems that may have come along for the ride.

Next, it's time to get your hands dirty! Using the press, gently crush the grapes, being careful not to over-crush and release too many tannins. This step is crucial, as it helps to release the juice and start the fermentation process.

Once the grapes are sufficiently crushed, you can use the destemming tool to remove the stems, leaving behind only the flavorful grape pulp.

Step 2. Gently Press the Grapes

gently press the grapes

With the grapes now crushed, it's time to gently press them. This step is crucial for extracting the precious Txakoli wine juice.

Grab your wine press and carefully place the crushed grapes inside. Slowly turn the handle, applying gentle pressure to the grapes. The juice will begin to flow out, collecting in the catch basin below.

Advertisement

Be patient and resist the urge to press too hard. Overly aggressive pressing can release bitter tannins and undesirable flavors. Your goal is a delicate, light-bodied Txakoli.

Once the juice flow slows to a trickle, you're done. Carefully remove the pressed grape pomace.

Now, it's time to move on to the next step: clarifying the raw Txakoli wine. This involves allowing the juice to settle and removing any sediment.

With your gentle pressing complete, you're well on your way to crafting a refreshing, authentic Txakoli.

Step 3. Ferment the Grape Juice

fermenting grape juice process

After gently pressing the grapes, you'll transfer the raw Txakoli wine juice to a fermentation vessel. This is where the magic of fermentation begins!

You'll carefully add your chosen yeast strain, which will feast on the natural sugars in the juice, converting them into alcohol and carbon dioxide.

Advertisement

As the yeast works its wonders, you'll need to monitor the temperature and specific gravity of the fermenting Txakoli. The ideal temperature range is between 60-70°F, which helps the yeast thrive.

You'll use a hydrometer to track the specific gravity, watching as it gradually decreases over time. This indicates the yeast is successfully converting the sugars into alcohol.

Patience is key during this fermentation process, as it can take several weeks or even months to reach the desired alcohol content and flavor profile.

But don't worry, the end result will be a delightfully crisp, slightly effervescent Txakoli wine that's well worth the wait!

Step 4. Clarify and Stabilize the Wine

clarify and stabilize wine

As the fermentation winds down, it's time to clarify and stabilize your Txakoli wine. This process helps remove any sediment and ensures the wine is crystal clear and ready to enjoy.

First, you'll need to rack the wine, which means carefully transferring it to a clean container, leaving behind the sediment that has accumulated at the bottom. This helps clarify the wine and prepares it for the next step.

Advertisement

Next, you'll add a fining agent, such as bentonite clay or gelatin, to help remove any remaining particles. Gently stir the agent into the wine and let it work its magic.

Over time, the fining agent will bind to the particles, causing them to sink to the bottom, leaving you with a perfectly clear Txakoli.

Step 5. Bottle and Age the Wine

bottle and age wine

Once the wine is clarified and stabilized, you can proceed to bottle your Txakoli. Carefully transfer the wine into clean, sterilized bottles, leaving a small amount of headspace at the top. This space allows the wine to develop its signature effervescence.

Next, seal the bottles with high-quality corks or screw caps. Corks are the traditional choice, but screw caps are becoming more popular for their convenience and ability to maintain the wine's freshness.

After bottling, it's time to age your Txakoli. These wines are typically meant to be enjoyed young, within a year or two of bottling. However, you can cellar them for up to 3-5 years to allow the flavors to evolve and the carbonation to gently integrate.

Store the bottles in a cool, dark place, away from direct light and vibration, to preserve the wine's delicate character.

Advertisement

When ready to serve, chill the Txakoli to around 46-50°F (8-10°C) to bring out its refreshing acidity and delicate aromas. Enjoy this lively, food-friendly white wine with tapas, seafood, or light dishes that complement its crisp, slightly tart profile.

Final Thoughts

Txakoli, a unique Basque wine, offers a delightful experience that transcends the ordinary.

As you savor the final sips, you'll appreciate the care and tradition that went into crafting this vibrant, refreshing beverage.

Whether you're enjoying Txakoli on a sun-dappled patio or pairing it with a lively tapas spread, this wine's zesty acidity and low alcohol content make it a perfect companion for any occasion.

Frequently Asked Questions

What Is the Recommended Serving Temperature for Txakoli?

The recommended serving temperature for this wine is around 8-12°C (46-54°F). You'll want to chill it before serving to bring out its vibrant acidity and fresh, crisp flavors. Enjoy this wine well-chilled for the best drinking experience.

Advertisement

How Long Can a Bottle of Txakoli Be Stored?

You can generally store a bottle of txakoli for up to 2 years. However, it's best enjoyed fresh, so it's recommended to drink it within the first year of purchase for the most vibrant and lively flavors.

Is Txakoli Suitable for Those With Gluten Intolerance?

Yes, txakoli is suitable for those with gluten intolerance. As a wine made from grapes, it's naturally gluten-free, making it a safe and enjoyable option for those who need to avoid gluten in their diet.

What Is the Typical Alcohol Content of Txakoli?

The typical alcohol content of txakoli is generally around 11-12% ABV. As a light, crisp white wine, it's a refreshing option that won't overwhelm you with a high alcohol content. Give it a try if you enjoy such wines!

Can Txakoli Be Used in Cocktails or Mixed Drinks?

Sure, you can use txakoli in cocktails and mixed drinks. Its light, crisp, and slightly fizzy profile makes it a versatile ingredient that can complement a variety of mixers and spirits. Get creative and experiment with txakoli-based cocktails.

Advertisement

Continue Reading

Affiliate Disclaimer
As an affiliate, we may earn a commission from qualifying purchases. We get commissions for purchases made through links on this website from Amazon and other third parties.

Advertisement

Vetted

top local car washes top local car washes
Vetted2 months ago

14 Best Car Washes Near You for a Sparkling Clean Ride

I discovered the 14 best car washes near you that promise a sparkling clean ride, and you won't want to...

top mops for 2024 top mops for 2024
Vetted2 months ago

The 15 Best Mops of 2025 – Your Ultimate Guide to a Spotless Home

Find the perfect mop for your cleaning needs in 2025, and discover how these top choices can revolutionize your home...

top women s fragrances 2024 top women s fragrances 2024
Vetted2 months ago

15 Best Perfumes for Women in 2025 – A Fragrance Guide You Can’t Miss

Keen to discover the top 15 perfumes for women in 2025? Uncover unique scents that will elevate your fragrance game!

top local bars guide top local bars guide
Vetted2 months ago

14 Best Bars Near You for an Unforgettable Night Out

Looking for the perfect bar to elevate your night out? Discover the 14 best spots that promise unforgettable experiences!

luxurious beard oil selection luxurious beard oil selection
Vetted2 months ago

15 Best Beard Oils for a Luxurious Grooming Experience in 2025

Shop the 15 best beard oils for a luxurious grooming experience in 2025 and discover which ones will elevate your...

top college laptops 2024 top college laptops 2024
Vetted2 months ago

15 Best College Laptops of 2025: The Ultimate Guide for Students

With our guide to the 15 best college laptops of 2025, discover which powerful models will elevate your academic experience...

waterproof mascaras for tears waterproof mascaras for tears
Vetted2 months ago

15 Best Waterproof Mascaras That Will Survive Any Tear-Jerker

Outstanding waterproof mascaras await to keep your lashes flawless through any emotional moment; discover which ones made the top 15...

top flavorful disposable vapes top flavorful disposable vapes
Vetted2 months ago

15 Best Disposable Vapes of 2025: Top Picks for Flavor and Convenience

Prepare to discover the 15 best disposable vapes of 2025 that blend exceptional flavor and convenience, but which ones truly...

refreshing lunch salad ideas refreshing lunch salad ideas
Vetted2 months ago

15 Best Salads Near You That Will Freshen Up Your Lunch Routine

Transform your lunch with the 15 best salads nearby that will tantalize your taste buds and leave you craving more...

top convertible car seats top convertible car seats
Vetted2 months ago

15 Best Convertible Car Seats of 2025 – Safety and Comfort for Your Little One

Get ready to discover the top 15 convertible car seats of 2025 that blend safety and comfort—find out which models...

delicious fast food breakfast delicious fast food breakfast
Vetted2 months ago

15 Best Fast Food Breakfast Options That Will Make Your Mornings Delicious

Uncover the 15 best fast food breakfast options that will transform your mornings into a delicious experience you won't want...

stylish contacts for vision stylish contacts for vision
Vetted2 months ago

14 Best America’s Contacts for Clear Vision and Style

Browse through the 14 best contact lenses in America for clear vision and style, and discover which one perfectly complements...

Trending