Nigerian Cuisine
Tuwo: a Savory Nigerian Side Dish With a Soft, Smooth Texture
Prepare to discover the secrets of Tuwo, a beloved Nigerian staple that effortlessly pairs with a variety of savory dishes and captivates the palate.
Tuwo is a beloved staple side dish in Nigerian cuisine, offering a soft, smooth texture that complements a variety of savory stews, curries, and grilled meats and fish. This dish originates from various ethnic groups across Nigeria, each with unique variations reflecting the diverse flavors and ingredients of the region. Whether it's served at a family gathering or a special occasion, tuwo remains a cherished part of Nigeria's culinary heritage. To learn more about the rich history and step-by-step instructions for crafting this authentic Nigerian delight, keep reading.
Key Takeaways
- Tuwo is a staple side dish in Nigerian cuisine, with diverse variations across different ethnic groups.
- The dish is versatile, serving as an accompaniment to a wide range of savory stews, curries, grilled meats, and fish.
- The preparation involves boiling tuwo leaves, mashing them into a smooth paste, and cooking with stock to achieve a soft, creamy texture.
- The cooking process involves continuous stirring to prevent lumps and allow the starches to gelatinize, resulting in a velvety, porridge-like consistency.
- Tuwo remains a beloved part of Nigerian culinary heritage, often enjoyed at gatherings and special occasions, and is known for its nourishing qualities and crowd-pleasing appeal.
History
Tuwo, a savory Nigerian side dish, has long been a staple in the culinary traditions of the West African nation. This hearty porridge-like dish has been enjoyed for generations, passed down through families and communities.
The origins of tuwo can be traced back to the various ethnic groups that make up Nigeria, each with their own unique variations and preparation methods.
Over time, tuwo has evolved, reflecting the diverse flavors and ingredients found across the country. From the northern regions, where it's often made with millet or sorghum, to the southern parts, where it can be crafted from yams or cassava, tuwo has become a unifying element in Nigerian cuisine.
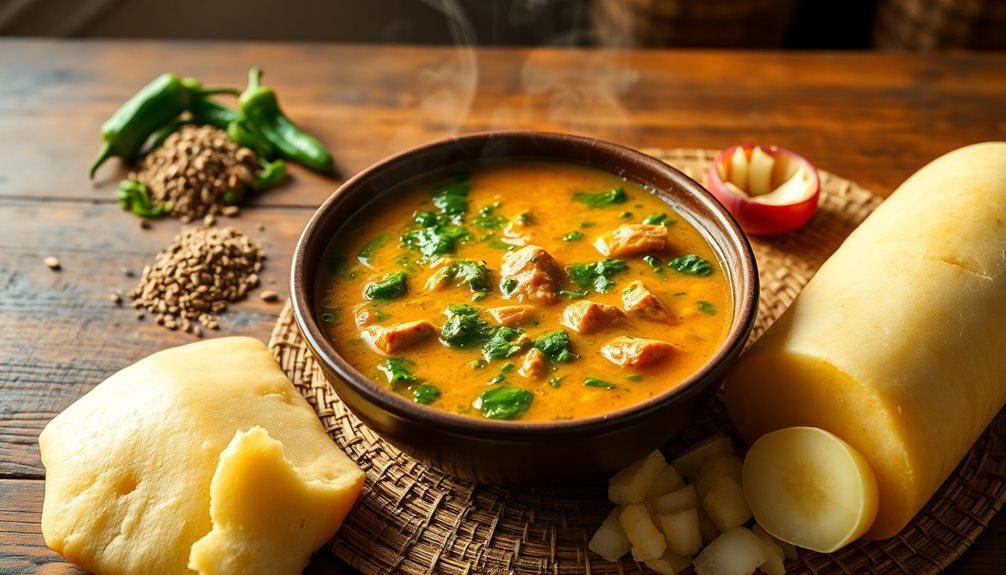
The soft, smooth texture and savory taste of tuwo make it a versatile accompaniment to a wide range of dishes, from stews and curries to grilled meats and fish.
Whether served at family gatherings, special occasions, or as a comforting everyday meal, tuwo remains a beloved and enduring part of Nigerian culinary heritage.
Cooking Steps
Having gathered your ingredients, begin by thoroughly washing the tuwo leaves. You'll want to remove any dirt or debris before moving on.
Next, tear the leaves into smaller pieces, making them easier to work with. In a large pot, bring some water to a boil. Once boiling, carefully add the torn leaves and let them cook for about 10 minutes, stirring occasionally. This will help soften the leaves.
Drain the cooked leaves in a colander, then return them to the pot. Using a wooden spoon or pestle, mash the leaves until they form a smooth, uniform paste.
Gradually add your stock, stirring constantly to prevent lumps from forming. Continue cooking and stirring for about 15 minutes, until the tuwo has a soft, creamy texture.
Season with salt and any other desired spices. Serve hot, either on its own or as a delicious accompaniment to your main dish.
Step 1. Combine Water and Tuwo Flour
To begin the cooking process, add the tuwo flour to a large pot and gradually pour in the water while stirring continuously.
Keep a close eye as you mix, making sure to incorporate the flour and water thoroughly. The key is to create a smooth, lump-free consistency.
Once you've combined the ingredients, it's time to place the pot over medium heat.
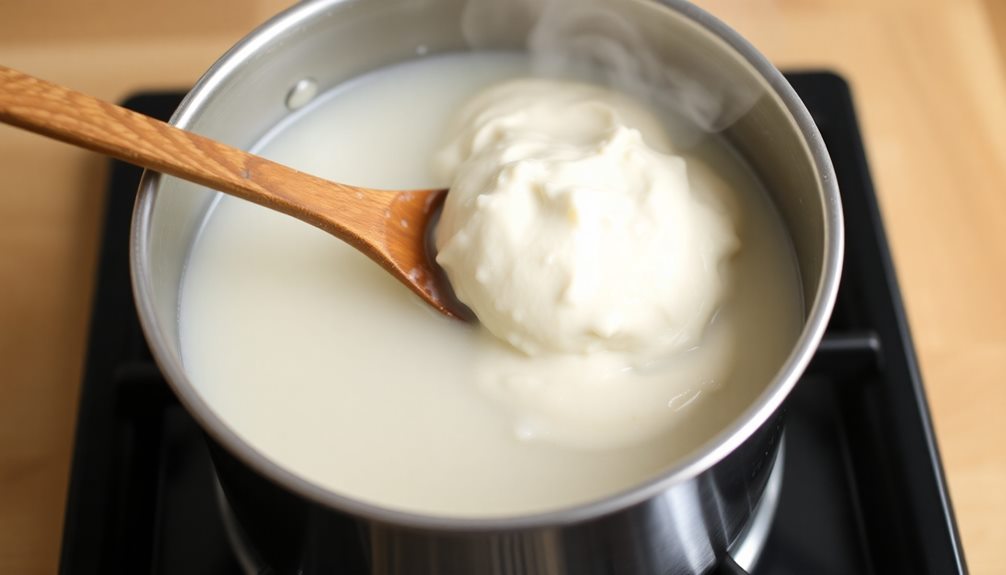
Stir the mixture constantly, using a wooden spoon or whisk to prevent any lumps from forming. As the tuwo heats up, it will start to thicken and take on a glossy sheen.
Be patient and keep stirring – this process can take around 10 to 15 minutes.
When the tuwo has reached your desired thickness, turn off the heat.
The texture should be soft, smooth, and pliable. You can now transfer the tuwo to a serving dish and enjoy it as a delicious side to your Nigerian meal.
Step 2. Stir Continuously Until Thickened
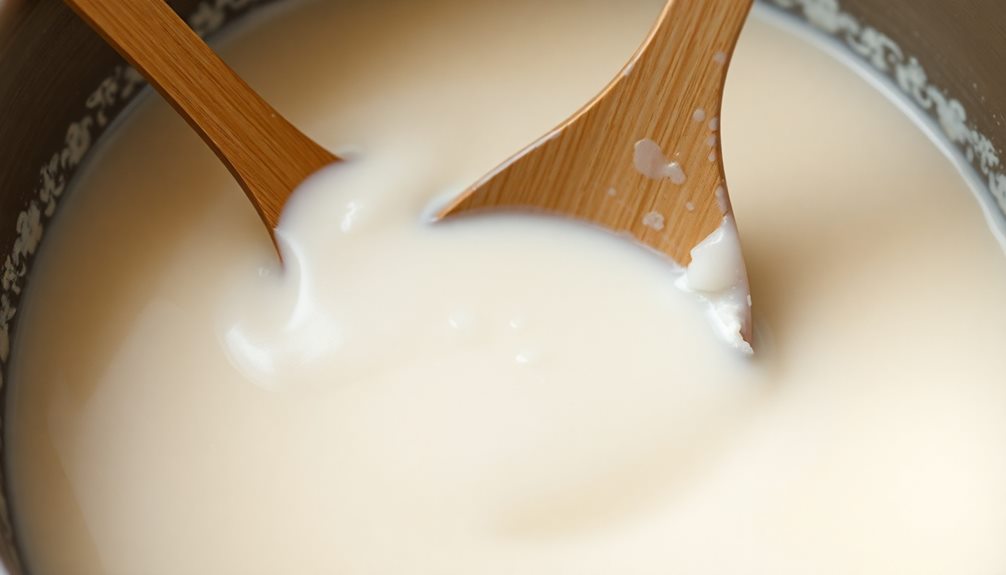
Once you've combined the flour and water, it's time to get stirring. Grab a sturdy wooden spoon and start stirring the mixture vigorously.
You'll want to stir continuously, keeping a close eye on the pot as the tuwo begins to thicken. Don't be afraid to put some muscle into it – you need to stir quickly and constantly to prevent any lumps from forming.
As the tuwo cooks, you'll notice it start to transform from a thin, watery consistency into a thick, smooth paste. This is exactly what you're aiming for.
Keep stirring until the mixture has reached a nice, porridge-like texture. It's important to be patient and not rush this step, as letting the tuwo thicken properly is key to achieving that signature soft, velvety finish.
Once the tuwo has reached the desired consistency, you can remove it from the heat. Get ready to serve up this delicious Nigerian side dish!
Step 3. Cover and Simmer
After you've stirred the tuwo continuously until it's thickened, cover the pot and let it simmer for about 15-20 minutes. This gentle simmering process allows the starches to fully gelatinize, creating the signature soft, smooth texture of this classic Nigerian dish.
As the tuwo simmers, the lid traps the steam, helping to cook the mixture evenly and infuse it with aromatic flavors.
Keep a close eye on the pot, stirring occasionally to prevent sticking or burning on the bottom. The simmering should be at a low, steady heat, not a rapid boil, which could make the tuwo lose its delicate, creamy consistency.
When the time is up, the tuwo should have a luxuriously thick and velvety appearance, ready to be served as a tasty accompaniment to your favorite Nigerian stew or sauce.
Get ready to savor the comforting, homemade goodness of this authentic Nigerian side dish.
Step 4. Remove Pot From Heat
Once the tuwo has simmered for 15-20 minutes, you'll want to remove the pot from the heat. This is a crucial step that'll ensure your tuwo has that perfect, soft and smooth texture you're after.
Carefully lift the pot off the burner, being mindful of the steam that'll escape. You don't want any nasty burns!
Now, let the tuwo sit for a minute or two. This resting period allows the starch to fully cook through, creating that signature silky consistency.
While you wait, take a moment to admire your handiwork – the tuwo should be a lovely, pale yellow color.
After that brief rest, you're ready for the next step. Grab your wooden spoon and get ready to stir and serve up this delicious Nigerian side dish. The vibrant medley of vegetables, eggs, and creaminess comes together beautifully as you mix everything with care. Make sure each ingredient is coated evenly, enhancing the delightful texture and flavor. Once done, scoop out portions of the fresh and crunchy Nigerian salad onto plates, and watch as your loved ones eagerly dig in!
With the heat turned off, you can take your time ensuring every bit of the tuwo is well-mixed and ready to enjoy.
Just wait until you try that first bite – it's going to be absolutely heavenly!
Step 5. Serve Warm With Preferred Accompaniment
With the tuwo now perfectly cooked and rested, go ahead and serve it warm with your preferred accompaniment. This versatile Nigerian staple can be enjoyed in so many delicious ways!
One popular option is to pair it with a savory stew or soup. The soft, smooth texture of the tuwo complements the rich flavors beautifully. You could also try it with a spicy, tomato-based sauce or a creamy peanut sauce.
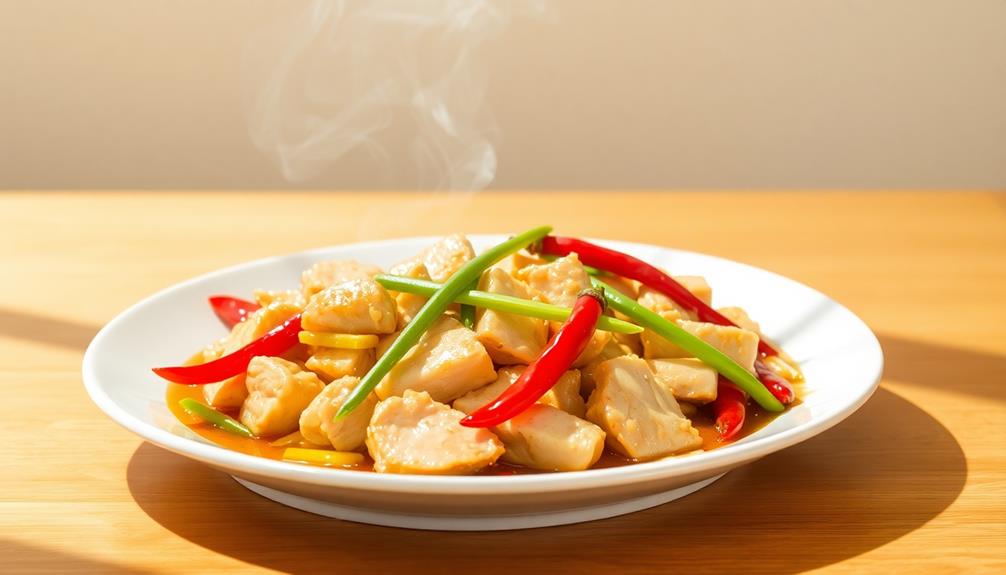
For a heartier meal, serve the tuwo alongside grilled or fried fish, meat, or vegetables.
No matter what you choose, the tuwo will make a satisfying and comforting side dish. Its neutral flavor allows it to enhance a variety of dishes.
Scoop it onto plates, letting the warmth radiate through. Invite your family and friends to dig in and savor the authentic taste of Nigeria.
With each bite, you'll be transported to the vibrant markets and bustling communities that inspired this beloved recipe.
Final Thoughts
Tuwo is a savory and versatile Nigerian side dish that deserves a place in your culinary repertoire. This soft, smooth porridge-like dish is incredibly versatile, making it a great accompaniment to a wide variety of Nigerian meals.
Whether you serve it with stew, grilled meats, or even as a base for other dishes, Tuwo's delicate flavor and comforting texture will delight your taste buds.
As you've discovered, preparing Tuwo is a straightforward process that allows for personal customization. Feel free to experiment with different spices or toppings to find your perfect flavor profile. The possibilities are endless, so don't be afraid to get creative.
Tuwo's simplicity and versatility make it an ideal choice for busy weeknights or special occasions. With its nourishing qualities and crowd-pleasing appeal, this Nigerian staple is sure to become a new favorite in your household.
Frequently Asked Questions
What Is the Nutritional Value of Tuwo?
The nutritional value of this dish can vary, but it's typically a good source of carbohydrates and may provide some fiber, protein, and essential vitamins and minerals. The exact nutritional profile depends on the specific ingredients used in preparing it.
Can Tuwo Be Made Ahead of Time?
Yes, you can make tuwo ahead of time. It stores well in the fridge for 3-4 days or freezes beautifully for up to 3 months. Just reheat it gently before serving for a quick and easy side dish.
How Long Does Tuwo Take to Prepare?
Preparing tuwo doesn't take too long. You can whip it up in about 30-40 minutes, depending on your familiarity with the process. It's a fairly straightforward dish that comes together quickly once you get the hang of it.
Is Tuwo Gluten-Free or Suitable for Special Diets?
Yes, tuwo is typically gluten-free and suitable for many special diets, including vegan and dairy-free. It's made from ground grains or legumes, making it a versatile option for those with dietary restrictions.
What Are Some Common Variations of Tuwo?
There are several common variations of tuwo you can try. You can make it with different types of grains, like millet, corn, or rice. You can also add spices or vegetables to change the flavor.
Amara brings her deep knowledge of African cuisine to the table, with a focus on the rich and hearty flavors of Senegal. She loves to share slow-cooked dishes like thieboudienne (rice and fish), which reflect the warmth and hospitality of African cooking. Amara’s approach to food is all about creating comforting meals that nourish the soul.
Nigerian Cuisine
Creamy Coconut Rice Nigerian Style: A Recipe to Try
Unleash your culinary skills with this creamy coconut rice Nigerian style recipe that promises to elevate your meals to new heights. Discover the secret ingredients!
You're going to love making creamy coconut rice Nigerian style! Start by rinsing and soaking 2 cups of rice for 30 minutes. Then, combine the soaked rice with a can of coconut milk, a cup of water, and a teaspoon of salt in a pot. Bring it to a gentle simmer and cover it for about 20 minutes until the rice is tender. Fluff it with a fork, and if you like, stir in extra coconut milk for more creaminess. This delicious dish pairs perfectly with stews, veggies, or even fried plantains. There's so much more to explore about it!
Key Takeaways
- Creamy coconut rice is made with long-grain rice, coconut milk, water, salt, and vegetable oil for a rich flavor.
- Rinse and soak jasmine rice to enhance texture and prevent excess starch for fluffy results.
- Combine soaked rice with coconut milk and optional spices, then simmer until tender for about 20 minutes.
- Fluff the rice with a fork after cooking, and consider adding extra coconut milk for added creaminess.
- Serve creamy coconut rice alongside spicy stews, curries, or fried plantains for a delicious and balanced meal.
History
Creamy coconut rice has roots that stretch across various cultures, particularly in Southeast Asia and the Caribbean, where rice is a staple. It's fascinating how this dish combines simple ingredients like rice, coconut milk, and a touch of sweetness to create something so special.
In Southeast Asia, coconut rice often accompanies savory meals, bringing a unique flavor that perfectly balances spices. You can just imagine families gathering around the table, enjoying delicious dishes together!
In the Caribbean, creamy coconut rice often highlights vibrant flavors, like tropical fruits and spices, making it a festive treat at celebrations. It's exciting to think about how this dish has traveled across oceans and adapted to local tastes.
You might notice slight variations depending on the region, but the comforting, creamy texture remains the same.
As you explore this delightful dish, remember that it connects people through shared meals and memories. Whether you're enjoying it at a restaurant or making it at home, creamy coconut rice brings a bit of warmth and joy to your table.
Cooking Steps
To make delicious coconut rice, start by rinsing one cup of jasmine rice under cold water until the water runs clear. This helps remove extra starch, making your rice fluffy.
Next, in a medium pot, combine the rinsed rice, one can of coconut milk, and one cup of water. Add a pinch of salt to enhance the flavor.
Now, put the pot on medium heat and bring the mixture to a gentle boil. Once it's bubbling, reduce the heat to low, cover the pot, and let it simmer for about 15-20 minutes. You'll know it's done when all the liquid is absorbed, and the rice is tender.
While the rice cooks, you can sauté a chopped onion in a little oil until it's soft and fragrant.
When the rice is ready, fluff it with a fork and stir in the sautéed onions. For a burst of flavor, you might want to add a handful of chopped bell peppers or peas.
Step 1. Rinse the Rice Thoroughly
Rinsing your rice thoroughly is an essential step that can make a significant difference in the final texture of your creamy coconut rice. When you rinse the rice, you're washing away excess starch that can make it sticky. Nobody wants clumpy rice, right? You want each grain to stand out and soak up that delicious coconut flavor!
To start, place your rice in a fine-mesh strainer or a bowl. If you use a bowl, fill it with cold water and gently swish the rice around with your hands. You'll see the water become cloudy as the starch washes away. This is a good sign!
Drain that cloudy water and repeat the process a few times until the water runs clear. This usually takes about three to four rinses.
Once the water is clear, you're ready to move on to the next step. Rinsing your rice isn't just a chore; it's a way to ensure your coconut rice turns out perfectly fluffy and creamy.
Step 2. Soak the Rice for 30 Minutes
Soaking the rice for 30 minutes is a crucial step that helps enhance its texture and flavor. When you soak the rice, it absorbs some water, making it softer and fluffier when cooked. This means each grain will be beautiful and tender, just how you want it!
To soak the rice, simply place it in a bowl and cover it with enough water. Make sure the rice is fully submerged. You can give it a little stir to ensure all the grains are wet.
While you wait, this is a great time to gather your other ingredients and get excited about your delicious dish!
After 30 minutes, drain the rice in a colander. You'll notice how it's plumped up a bit, which is exactly what you want.
This soaking step also helps remove excess starch, preventing your rice from getting sticky. Plus, it sets the stage for the next flavors you'll be adding.
Step 3. Add Coconut Milk and Spices
Now that your rice is soaked and ready, it's time to infuse it with the rich flavors of coconut milk and spices. First, grab a medium saucepan and pour in your soaked rice.
Next, it's time to add that creamy coconut milk! You'll want to use about one can, which is usually about 13.5 ounces. This is what makes your rice super creamy and delicious!
Now, add some water to help cook the rice. A good rule of thumb is to use equal parts coconut milk and water.
Then, sprinkle in some spices to make your rice even tastier. A pinch of salt is essential to bring out all those wonderful flavors. You might also like to add a dash of ground ginger or a little bit of turmeric for a warm, earthy taste.
Stir everything gently with a wooden spoon to combine, and watch how the rice starts to come alive with color and aroma! It's like a little party in your pot.
Make sure everything is mixed well before moving on to the next cooking step, where the magic truly happens. Get ready for some tasty coconut rice!
Step 4. Simmer Until Tender
With the mixture of coconut milk, water, and spices ready, bring it to a gentle simmer over medium heat. As you watch the bubbles form, you'll start to smell those delicious flavors coming together. It's like magic!
Stir the rice into the mixture and let it soak up all that creamy goodness.
Once you've added the rice, lower the heat a bit. You want it to cook slowly and evenly. Cover the pot with a lid to trap in the steam, which helps the rice cook perfectly.
You'll need to let it simmer for about 20 minutes, but check it occasionally. If you notice the liquid disappearing too quickly, add a splash more water to keep everything nice and moist.
When the time's up, take off the lid and peek inside. The rice should be tender and fluffy, almost like little clouds! If it still feels a bit hard, give it a few more minutes.
Step 5. Fluff With a Fork
Have you ever wondered how to achieve that perfect, fluffy texture in your coconut rice? Well, once your rice has simmered until tender, it's time for the fun part—fluffing it with a fork! This step is crucial because it helps separate the grains, giving your rice that light and airy quality that everyone loves.
First, grab a fork and gently poke around in the rice. You don't want to stir too hard; just lift and toss the rice a bit. This way, you'll break up any clumps without mashing the grains.
As you fluff, you'll notice the beautiful coconut aroma filling the air, making your mouth water even more!
Make sure to fluff the rice right after it's done cooking while it's still warm. This helps keep it from getting sticky or gummy. If you'd like, you can also add a little extra coconut milk at this stage for an even creamier texture.
Once you've fluffed it up nicely, serve it hot as a delicious side dish or base for your favorite Nigerian meals. Enjoy every fluffy bite of your creamy coconut rice!
Final Thoughts
Reflecting on this creamy coconut rice recipe, you'll discover how effortlessly it elevates any meal. This dish isn't just about filling your stomach; it brings a delightful taste and aroma that can make even a simple dinner feel special.
Imagine serving it alongside grilled chicken or spicy vegetables. It'll not only make your plate look colorful but will also create a yummy harmony of flavors.
Making this coconut rice is super easy, and you'll feel proud as you watch your family and friends enjoy it. The creaminess from the coconut milk makes every bite feel like a little treat. Plus, it's a fantastic way to introduce new tastes into your kitchen.
Don't forget to experiment! You can add nuts, spices, or even your favorite veggies to make it your own.
The best part? You can whip it up for any occasion, from a casual family dinner to a festive gathering. So, go ahead and give this creamy coconut rice a try! You might just find it becoming a new favorite in your home.
Happy cooking!
Frequently Asked Questions
Can I Use Brown Rice Instead of White Rice?
Yes, you can use brown rice instead of white rice. Just remember, brown rice takes longer to cook and has a nuttier flavor. Adjust your cooking time and liquid accordingly for the best results.
What Dishes Pair Well With Coconut Rice?
Coconut rice pairs beautifully with spicy curries, grilled chicken, or seafood dishes. It also complements stir-fried vegetables and fruity salsas, bringing a creamy texture and subtle sweetness that enhances the overall flavors of your meal.
How Do I Store Leftover Coconut Rice?
To store leftover coconut rice, let it cool to room temperature, then transfer it to an airtight container. Refrigerate for up to four days or freeze for longer storage. Just reheat before enjoying!
Can I Make This Recipe Vegan-Friendly?
Absolutely, you can make this recipe vegan-friendly! Just replace any non-vegan ingredients with plant-based alternatives. Use coconut milk, vegetable broth, and ensure any added seasonings or toppings are also vegan. Enjoy your delicious vegan coconut rice!
What Brand of Coconut Milk Is Recommended?
For coconut milk, you can't go wrong with brands like Thai Kitchen or Aroy-D. They're creamy and flavorful, perfect for your dishes. Just check the label to ensure it fits your dietary preferences!
Alem is our Ethiopian cuisine specialist, bringing Ethiopia’s bold, aromatic flavors to Cook if Ya. From the spicy, earthy flavors of doro wat to the fragrant, spongy injera, Alem’s recipes showcase Ethiopian cuisine’s unique and flavorful dishes. His cooking emphasizes the communal nature of Ethiopian meals, perfect for sharing with friends and family.
Nigerian Cuisine
Ewedu and Gbegiri: Nigerian Soups Perfect Together
Nourish your taste buds with the delightful combination of Ewedu and Gbegiri; discover the secrets to making these perfect Nigerian soups together!
Ewedu and Gbegiri are two amazing Nigerian soups that work perfectly together! Ewedu brings a smooth, velvety texture and a unique flavor, while Gbegiri adds a hearty and creamy touch from mashed beans. When you mix them, you create a delicious combination that warms your heart and brings family and friends together. You'll love how easy they are to prepare. First, you blend Ewedu leaves, then simmer them with meat or fish. Gbegiri is made by mashing cooked beans and adding spices. If you're curious about the steps to enjoy this delightful pairing, stick around to learn more!
Key Takeaways
- Ewedu and Gbegiri soups showcase Nigeria's rich culinary heritage, combining unique flavors and traditions from various regions.
- Ewedu is made from jute leaves, while Gbegiri is a nutritious bean soup, creating a complementary texture and taste when served together.
- The preparation involves blending Ewedu leaves and mashing cooked beans, with added seasonings for depth of flavor in both soups.
- These soups are often enjoyed with side dishes, fostering connection and storytelling among family and friends during shared meals.
- Nutrient-packed and comforting, Ewedu and Gbegiri are perfect for any occasion, celebrating the essence of Nigerian cuisine.
History
Exploring the history of Nigerian soups reveals a rich tapestry of cultural influences and regional variations. You might be surprised to learn that these delightful dishes have been enjoyed for centuries! Each region in Nigeria has its own unique flavors and ingredients, shaped by local customs and traditions. For instance, the Yoruba people often use vegetables like ewedu, while the Igbo might prefer oha leaves.
These soups not only nourish the body but also tell stories of the people who make them. They've been passed down through generations, each family adding its special touch. You can imagine a grandmother teaching her grandchildren how to prepare a warm, comforting bowl of soup, sharing secrets and memories along the way.
As you dive into the world of Nigerian soups, you'll notice how they reflect the country's diverse cultures. From the spicy pepper soup to the savory gbegiri, each dish offers a taste of history.
You'll find that these soups are more than just food; they unite friends and families, bringing everyone together over a shared meal. So, get ready to explore these delicious dishes and their fascinating backgrounds!
Cooking Steps
Cooking delicious Nigerian soups involves a series of straightforward yet essential steps that ensure rich flavors and satisfying textures.
First, gather your ingredients! For Ewedu, you'll need fresh Ewedu leaves, water, and spices like locust beans and salt. For Gbegiri, have some cooked beans, stock, and seasonings ready.
Next, wash the Ewedu leaves thoroughly, then blend or pound them until smooth. In a pot, add water and bring it to a boil. Stir in the blended leaves, add locust beans, and season with salt. Let it simmer for about 15-20 minutes, allowing the flavors to blend beautifully.
Meanwhile, for Gbegiri, mash the cooked beans until you get a creamy consistency. In another pot, heat your stock and mix in the mashed beans. Add spices and let it cook for about 10-15 minutes.
Once both soups are ready, serve them together! Pour Gbegiri into a bowl and add Ewedu on top. Enjoy the delightful flavors and textures with your favorite side dish, like pounded yam or rice.
Step 1. Prepare Fresh Ewedu Leaves
Fresh ewedu leaves are the star ingredient in a delicious bowl of jute soup, and preparing them properly is essential for the best flavor and texture.
First, gather a bunch of fresh ewedu leaves from your local market or garden. Look for vibrant green leaves without any yellow or brown spots.
Once you have your leaves, rinse them thoroughly under cold running water. This removes dirt and any tiny bugs hiding among the leaves.
After washing, gently shake off excess water and place the leaves on a clean cutting board. Now, it's time to trim! Use a sharp knife to cut off the tough stems and any discolored parts.
Next, stack a few leaves on top of each other and slice them into smaller pieces. You want them to be about one inch wide. This makes it easier to cook and eat later on.
Step 2. Blend Ewedu With Water
To achieve a smooth and flavorful jute soup, you'll want to blend the prepared ewedu leaves with a bit of water.
Start by gathering your ingredients: the fresh ewedu leaves, some clean water, and a blender. If you don't have a blender, a mortar and pestle will work too!
Next, place the ewedu leaves into the blender. Make sure you don't overload it; it's better to blend in batches if you have a lot.
Add just enough water to help the blending process. You want the mixture to be smooth, but not too watery.
Once you've added the water, secure the lid tightly. Turn on the blender and watch the magic happen!
Blend until you have a velvety green puree. If you're using a mortar and pestle, mash the leaves together with some water until you achieve a similar consistency.
After blending, pour the ewedu mixture into a bowl, and admire the vibrant color!
You're now ready to take the next step in creating your delicious jute soup. It's getting exciting, isn't it? Enjoy every moment of cooking!
Step 3. Add Locust Bean Seasoning
Once you've got your seasoning ready, sprinkle it into the pot with your blended jute leaves.
Stir it in gently, allowing the seasoning to mix well with the soup. As you stir, you'll notice a beautiful aroma filling your kitchen—this is the magic of locust bean!
It's important to let the locust bean simmer for a few minutes. This helps release its full flavor, enhancing the overall taste of your soup.
While you wait, take a moment to enjoy the delightful scents wafting around. It's a sign that you're on your way to a fantastic meal!
Step 4. Simmer With Meat or Fish
Now that your soup is infused with the rich flavors of locust bean, it's time to enhance it further by adding your choice of meat or fish. This step is super exciting because it brings hearty goodness to your dish! You can choose from chicken, beef, goat, or even fish. Each option adds its own special flavor.
First, if you're using meat, cut it into bite-sized pieces. Then, add it to your pot and let it simmer on medium heat. This allows the meat to soak up all those delicious soup flavors.
If you prefer fish, add it a little later, so it doesn't break apart too much.
While everything cooks, make sure to stir occasionally. This helps everything blend together, making your soup even tastier! You'll notice the aroma filling your kitchen, making your tummy rumble in anticipation.
Cook the meat until it's tender, usually about 30-40 minutes, depending on what you chose. If you're using fish, let it simmer for about 10-15 minutes.
Once everything's cooked, you're almost ready for the final touches! Enjoy the delightful journey of flavors as your soup comes together.
Step 5. Adjust Consistency With Water
After your meat or fish has simmered to perfection, you might find the soup needs a little adjustment in consistency.
Don't worry, fixing it's super easy! Just grab a cup of warm water and add it slowly to your pot. As you pour, stir the soup gently. This way, you can see how the texture changes, making sure it's just right for you.
If your soup feels too thick, keep adding water until it reaches the consistency you love. Remember, you want a nice, smooth, and slightly thick soup that'll coat your spoon perfectly.
On the other hand, if it's too watery, don't panic! You can let it simmer for a bit longer to thicken it up.
Taste your soup along the way, too! This will help you figure out if you need to add a pinch of salt or any other spices to amp up the flavor.
Cooking is all about finding what makes you happy. So, enjoy the process of adjusting your soup, and soon you'll have a delicious bowl of Ewedu or Gbegiri ready to serve!
Final Thoughts
As you explore the rich world of Nigerian soups, it's clear that these dishes are more than just meals; they're a vibrant tapestry of culture and tradition.
Ewedu and Gbegiri, in particular, showcase the beauty of Nigerian cuisine. When enjoyed together, they create a delightful mix of flavors and textures that can warm your heart and satisfy your taste buds.
Imagine sitting down with family or friends, sharing stories, and enjoying a hearty bowl of these soups. You can feel the love and history in every spoonful.
Plus, the health benefits of these soups can't be overlooked! Packed with nutrients, they're also comforting and delicious, making them perfect for any occasion.
Frequently Asked Questions
What Are the Health Benefits of Ewedu and Gbegiri?
Ewedu and gbegiri offer numerous health benefits. You'll find they're rich in vitamins, minerals, and fiber, promoting digestion and boosting immunity. They also provide essential nutrients, supporting overall health and well-being in your diet.
Can Ewedu and Gbegiri Be Frozen for Later Use?
Yes, you can freeze both ewedu and gbegiri for later use. Just ensure they're cooled completely before transferring them to airtight containers. When you're ready to eat, simply thaw and reheat thoroughly.
What Side Dishes Pair Well With Ewedu and Gbegiri?
When enjoying your meal, consider pairing it with jollof rice, fried plantains, or pounded yam. These sides complement the flavors beautifully, enhancing your dining experience and making it more satisfying and delicious.
Are There Vegetarian Versions of Gbegiri?
Yes, you can make vegetarian versions of gbegiri using plant-based proteins like tofu or lentils. Just substitute traditional ingredients while maintaining the flavor profile, and you'll have a delicious, meat-free option that everyone can enjoy.
How Can I Adjust the Spice Levels in These Soups?
To adjust the spice levels in your soups, start by adding spices gradually. Taste as you go, and remember you can always add more, but it's tough to tone down heat once it's there.
Alem is our Ethiopian cuisine specialist, bringing Ethiopia’s bold, aromatic flavors to Cook if Ya. From the spicy, earthy flavors of doro wat to the fragrant, spongy injera, Alem’s recipes showcase Ethiopian cuisine’s unique and flavorful dishes. His cooking emphasizes the communal nature of Ethiopian meals, perfect for sharing with friends and family.
Nigerian Cuisine
Egg Sauce Nigerian Style: A Simple Yet Flavorful Side
Bring vibrant flavors to your table with this simple Nigerian Egg Sauce, perfect as a side dish that will leave you craving more!
Egg Sauce is an exciting Nigerian dish that's super easy to make and full of flavor! You start by chopping fresh tomatoes, onions, and bell peppers, then sauté them in oil until soft. Next, you add diced tomatoes and season with salt and pepper for a delicious taste. Pour in beaten eggs gently, stirring to create a creamy mix. Simmer until the eggs are fluffy, and you're ready to enjoy! Serve it as a side with rice or bread at any meal. It's delicious and will surely make your kitchen smell amazing, so stick around to explore more tasty ideas!
Key Takeaways
- Egg Sauce is an affordable and protein-rich dish, perfect for breakfast, lunch, or dinner.
- The dish features fresh ingredients like eggs, tomatoes, onions, and bell peppers for vibrant flavor.
- Cooking Egg Sauce is quick and easy, making it suitable for busy individuals or novice cooks.
- It pairs well with starchy sides like rice, yam, or bread, enhancing its versatility.
- Experiment with spices to customize the flavor profile, making it a family favorite.
History
Egg sauce has often been a staple in Nigerian cuisine, celebrated for its simplicity and rich flavor. The history of egg sauce is fascinating and reflects the vibrant culture of Nigeria. You mightn't know that this dish has roots in the traditional cooking of many Nigerian families. It's been passed down through generations, with each family adding their own special touch.
Egg sauce likely became popular because eggs are affordable and easy to cook. They provide a great source of protein, making this dish both nutritious and delicious. You can imagine families gathering around the table, sharing heartwarming stories while enjoying this savory meal together.
Over time, egg sauce has evolved. While many people still make it the traditional way, others have experimented with different ingredients, like tomatoes, onions, and spices. This creativity makes every version unique!
As you learn more about Nigerian cuisine, you'll find that egg sauce remains a favorite for breakfast, lunch, or dinner. It's a dish that brings people together, creating memories filled with laughter and joy.
Cooking Steps
Starting with fresh ingredients will set the foundation for a delicious Nigerian egg sauce. First, gather your ingredients: eggs, tomatoes, onions, bell peppers, and spices.
Chop the tomatoes, onions, and bell peppers into small pieces. This makes everything easier to cook and eat!
Next, heat some oil in a pan over medium heat. Once the oil is hot, add the chopped onions. Stir them until they become soft and fragrant.
Then, toss in the tomatoes and bell peppers. Cook them together for about five minutes, so they blend and create a flavorful sauce.
Now it's time to add your spices! Sprinkle in salt, pepper, and any other spices you like. Stir everything well to combine those tasty flavors.
Crack the eggs into a bowl and whisk them until they're all mixed up. Pour the eggs into the pan with the sauce.
Gently stir everything together until the eggs are cooked but still soft.
Once it's ready, serve your egg sauce warm over rice or with bread. Enjoy this tasty dish, and share it with your family and friends! They're sure to love it just as much as you do!
Step 1. Chop Onions and Peppers
Chopping onions and peppers is a crucial step in creating a flavorful egg sauce. First, grab a cutting board and a sharp knife. You'll want to peel the onions, removing the outer skin until you see the shiny, white layers. Then, chop the onion into small pieces. Be careful! The smell can make your eyes water, but it'll be worth it.
Next, pick your peppers. You can use bell peppers or even spicy ones if you like a kick! Wash them under cold water, then cut them open to remove the seeds. Slice the peppers into small chunks.
The mix of colors from the onions and peppers isn't just pretty; it adds a nice flavor to your dish, too.
Once you've chopped everything, take a moment to enjoy the colorful mix you've created. It's almost like a rainbow on your cutting board!
You're now ready to turn these chopped veggies into something delicious. So, gather them up and get ready to add them to your cooking pot. Your egg sauce is going to be so tasty with these fresh ingredients! Happy cooking!
Step 2. Add Diced Tomatoes
With your colorful mix of chopped onions and peppers ready, it's time to enhance the flavor of your egg sauce by adding diced tomatoes. Grab your can of diced tomatoes or chop up some fresh ones; either works great! Carefully pour them into your sizzling pan, and watch as those juicy red pieces mix with your onions and peppers.
Stir everything together gently for about a minute. You'll notice the vibrant colors blending, creating a beautiful sight in your pan. The tomatoes will start to soften and release their delicious juices, adding a rich taste to your sauce.
This step is super important, as the tomatoes bring a lovely sweetness that balances the savory flavors of the onions and peppers. Don't rush this part! Give the tomatoes a moment to shine, and let their flavors mingle with the other ingredients.
As they cook, you'll see the mixture begin to thicken slightly, making your sauce even more delightful. Take a moment to enjoy the aroma filling your kitchen; it's a sign that something special is on its way! Now you're just a step away from making your egg sauce truly irresistible!
Step 3. Add Seasoning and Stir
Now that your tomatoes have softened and melded beautifully with the onions and peppers, you can season your sauce to elevate its flavor. Start by adding salt to taste; it brings out the natural sweetness of the tomatoes and balances everything nicely.
Next, sprinkle in some ground pepper for a little kick. If you like it spicy, consider adding some chili powder or diced Scotch bonnet peppers—just be careful, as they can pack a punch!
Stir everything together gently, making sure the seasoning mixes evenly throughout the sauce. You'll start to smell the amazing aroma of the spices, and that means you're on the right track!
You can also add a pinch of thyme or curry powder for an extra layer of flavor, but this is totally up to you.
As you stir, watch the sauce transform into something truly delicious. You want it to simmer for a few more minutes so all those flavors blend perfectly.
Keep an eye on the consistency; it should be thick enough to coat a spoon but not too dry. Enjoy this exciting step as your kitchen fills with delightful scents, readying you for the next part of your egg sauce adventure!
Step 4. Add Beaten Eggs Gently
Once the sauce is simmering to perfection, it's time to incorporate the star ingredient: the beaten eggs. This is where the magic happens!
First, take your bowl of beaten eggs and hold it close. With a gentle hand, slowly pour the eggs into the bubbling sauce. You want to make sure you do this carefully so the eggs mix evenly without scrambling too quickly.
As you pour, use a wooden spoon to stir the sauce lightly. This helps the eggs spread out and blend with all the delicious flavors in the sauce. You'll see how the eggs start to swirl into the mixture, turning it creamy and rich. Isn't that exciting?
Keep stirring just enough to combine everything, but don't worry about making it perfect. The goal is to make sure the eggs get a chance to mingle with the spices and tomatoes.
Let the warmth from the sauce work its magic on the eggs. Trust me, you're going to love how it all comes together! Your kitchen will be filled with a wonderful aroma, making everyone eager for a taste of your delectable egg sauce.
Enjoy this fun cooking moment!
Step 5. Simmer Until Eggs Set
As the egg mixture blends into the sauce, reduce the heat to low and cover the pot. This is where the magic happens!
Let the mixture simmer gently, allowing the eggs to cook through and set. You'll want to keep an eye on it, as the cooking time can vary. It usually takes about 5 to 10 minutes for the eggs to fully set, depending on how many eggs you added to the sauce.
While it simmers, you'll notice the wonderful aroma filling your kitchen. It's hard to resist taking a peek!
When you lift the lid, you should see the eggs looking fluffy and bright, perfectly cooked and ready to enjoy. If you like your eggs a bit firmer, just let them simmer a couple of minutes longer, but be careful not to overcook them.
Once the eggs are set, turn off the heat and let the dish rest for a minute. This will help the flavors blend even more.
Now, you're ready to serve this delicious egg sauce over rice, plantains, or even with some bread. Enjoy every bite of your homemade creation!
Final Thoughts
When it comes to making egg sauce Nigerian style, embracing the simplicity and flavor of this dish can elevate your meals significantly.
You've got this amazing combination of eggs, tomatoes, and spices that packs a punch. It's not just about the taste; it's about how easy it's to whip up. Whether you're in a hurry or looking to impress, this dish fits the bill perfectly!
Imagine serving this delicious sauce over rice, yam, or even bread. Your family and friends will love it, and you'll feel proud knowing you made something so tasty.
Plus, it's a great way to introduce different flavors to your meals. You can mix and match spices to make it your own!
[DIRECTIONS]:
Frequently Asked Questions
Can I Use Alternative Oils for Making Egg Sauce?
You can definitely use alternative oils for making egg sauce. Just choose oils like olive, coconut, or avocado. Each will bring a unique flavor, so experiment to find what you enjoy the most!
What Dishes Pair Well With Nigerian Egg Sauce?
You can pair Nigerian egg sauce with rice, plantains, or steamed vegetables. It also complements bread, yams, and even fried potatoes. Each option enhances the dish's flavor, creating a delightful and satisfying meal.
Is Egg Sauce Suitable for Meal Prep?
Yes, egg sauce is great for meal prep! You can make it ahead, store it in the fridge, and easily reheat it. It stays flavorful, making your busy days a lot simpler and tastier.
How Can I Store Leftover Egg Sauce?
To store leftover egg sauce, let it cool completely, then transfer it to an airtight container. Refrigerate for up to three days or freeze for longer storage. Just reheat before enjoying again!
Can I Add Vegetables to Egg Sauce?
Absolutely, you can add vegetables to your egg sauce! Chopped bell peppers, onions, or spinach enhance the flavor and nutrition. Just sauté them before mixing in your eggs for a delicious twist you'll love.
Amara brings her deep knowledge of African cuisine to the table, with a focus on the rich and hearty flavors of Senegal. She loves to share slow-cooked dishes like thieboudienne (rice and fish), which reflect the warmth and hospitality of African cooking. Amara’s approach to food is all about creating comforting meals that nourish the soul.
-
Brazilian Cuisine3 months ago
Tacacá
-
Polish Comfort Food3 months ago
Krupnik (Barley Soup)
-
Brazilian Cuisine3 months ago
Caldeirada
-
Brazilian Cuisine3 months ago
Chicken in Brown Sauce
-
Southern Comfort Food3 months ago
Cheese Straws
-
African Cuisine3 months ago
Kedjenou (Ivory Coast)
-
Polish Comfort Food3 months ago
Vegetable Salad
-
American Diner Classics3 months ago
The Maillard Reaction: Understanding the Chemistry of Browning {Food Science and Cooking}