Connect with us

Fusion Cuisine

Bulgogi Cheesesteak: Korean BBQ Meets Philly Classic

Blending the bold flavors of Korean BBQ and the indulgent goodness of a classic Philly cheesesteak, this unique fusion dish is a must-try for adventurous foodies.

Published

on

korean bbq cheesesteak fusion

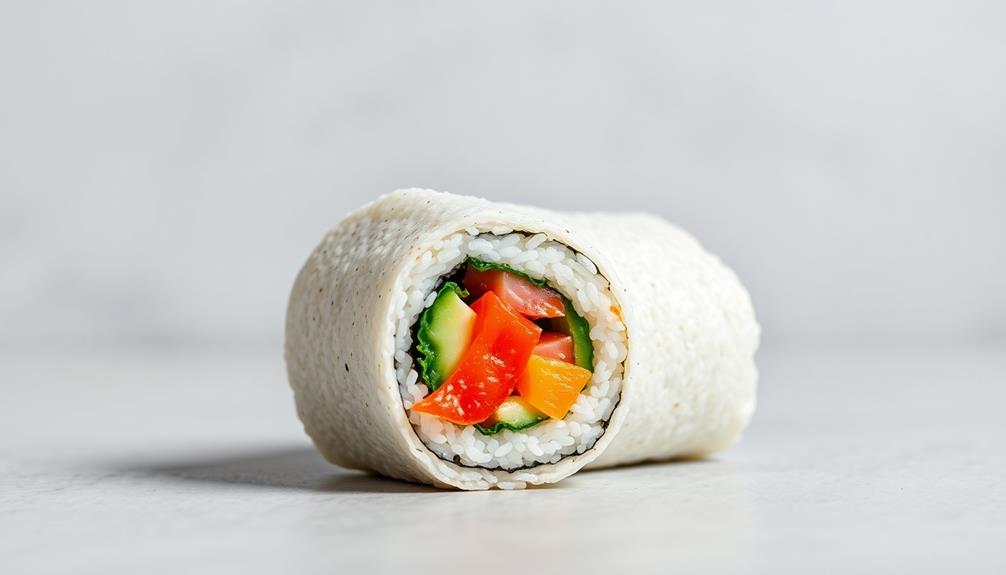
You'll be delighted to discover the Bulgogi Cheesesteak, a mouthwatering fusion of Korean BBQ and the classic Philly cheesesteak that's taking the culinary world by storm! This unique sandwich blends the rich, marinated flavors of bulgogi beef with the creamy goodness of melted cheese, all nestled between toasted bread, creating a truly extraordinary taste experience. Originating in late 20th century Philadelphia, this dish symbolizes the versatility of the cheesesteak and the growing popularity of Korean BBQ in the U.S. The contrasting flavors and textures will leave your taste buds engaged and satisfied – there's more to explore about this creative culinary creation. If you’re a fan of fusion dishes, the Bulgogi Cheesesteak is just the beginning. In fact, the popularity of global mashups like the banh mi burger fusion is further proof that combining bold flavors from different cuisines can result in unforgettable creations. Whether you try it at a local food truck or a gourmet restaurant, this trend of inventive culinary blendings is here to stay!

Key Takeaways

  • The Bulgogi Cheesesteak is a fusion dish that combines Korean bulgogi beef with the classic American Philly cheesesteak, reflecting the growing trend of global flavors in local cuisine.
  • The dish originates from Philadelphia, where Korean immigrants introduced bulgogi, which was then combined with the Philly cheesesteak to create this unique sandwich.
  • The Bulgogi Cheesesteak features thinly sliced beef marinated in a bulgogi sauce, sautéed vegetables, and melted provolone cheese, offering a balance of savory and slightly sweet flavors.
  • The dish appeals to fans of both Korean and American cuisines, providing a comforting and versatile meal option that can be customized with various toppings and side dishes.
  • Quality ingredients, proper marinating, and toasting the bread are key factors in ensuring the best taste and texture experience of the Bulgogi Cheesesteak.

History

The Bulgogi Cheesesteak, a fusion of Korean and American culinary traditions, has a storied history dating back to the late 20th century.

It all began when Korean immigrants settled in Philadelphia, bringing their beloved bulgogi – tender, marinated beef – with them. As these new residents craved the comforts of home, they found inspiration in the iconic Philly cheesesteak. By combining the flavors of their homeland with the local specialty, the Bulgogi Cheesesteak was born.

Over time, this unique dish gained popularity, captivating the taste buds of both locals and visitors alike.

The savory, caramelized bulgogi, paired with melted cheese and nestled in a soft hoagie roll, created a harmonious blend of textures and flavors.

Today, the Bulgogi Cheesesteak remains a beloved staple, showcasing the creative ways in which diverse culinary traditions can come together to form something truly remarkable.

Advertisement

Recipe

Bulgogi, the beloved Korean beef dish, takes a delightful turn in this fusion recipe for Bulgogi Cheesesteak. Combining the bold flavors of marinated bulgogi with the comfort of a classic cheesesteak, this dish is sure to delight your taste buds.

The key to this recipe lies in the preparation of the bulgogi. Thinly sliced beef is marinated in a savory mixture of soy sauce, brown sugar, garlic, and sesame oil, infusing it with a depth of flavor that will elevate the entire dish.

  • 1 lb thinly sliced beef (such as flank steak or ribeye)
  • 1/4 cup soy sauce
  • 2 tablespoons brown sugar
  • 3 cloves garlic, minced
  • 1 tablespoon sesame oil
  • 1 onion, thinly sliced
  • 1 red bell pepper, thinly sliced
  • 4 hoagie rolls, split lengthwise
  • 8 oz provolone cheese, sliced

In a large bowl, combine the sliced beef, soy sauce, brown sugar, garlic, and sesame oil. Mix well and let the beef marinate for at least 30 minutes, or up to 2 hours in the refrigerator.

Heat a large skillet or griddle over high heat. Add the marinated beef and cook, stirring occasionally, until the beef is cooked through and starting to caramelize, about 5-7 minutes.

Add the sliced onion and bell pepper and continue cooking until the vegetables are tender, another 3-5 minutes.

To assemble the Bulgogi Cheesesteaks, divide the beef and vegetable mixture evenly among the hoagie rolls. Top with slices of provolone cheese. Broil the sandwiches until the cheese is melted and bubbly, about 2-3 minutes. Serve hot and enjoy the delightful fusion of flavors.

Advertisement

Cooking Steps

First, you'll want to slice the beef into thin, delectable strips.

Next, sauté the onions and mushrooms until they're nice and tender.

Then, add that tasty bulgogi sauce and let it all mingle together.

Top it off with some melty provolone cheese, and you're ready to assemble your mouthwatering sandwich.

Pop it under the broiler until the cheese is gooey and perfect.

Advertisement

Step 1. Slice Beef Into Thin Strips

slice beef into strips

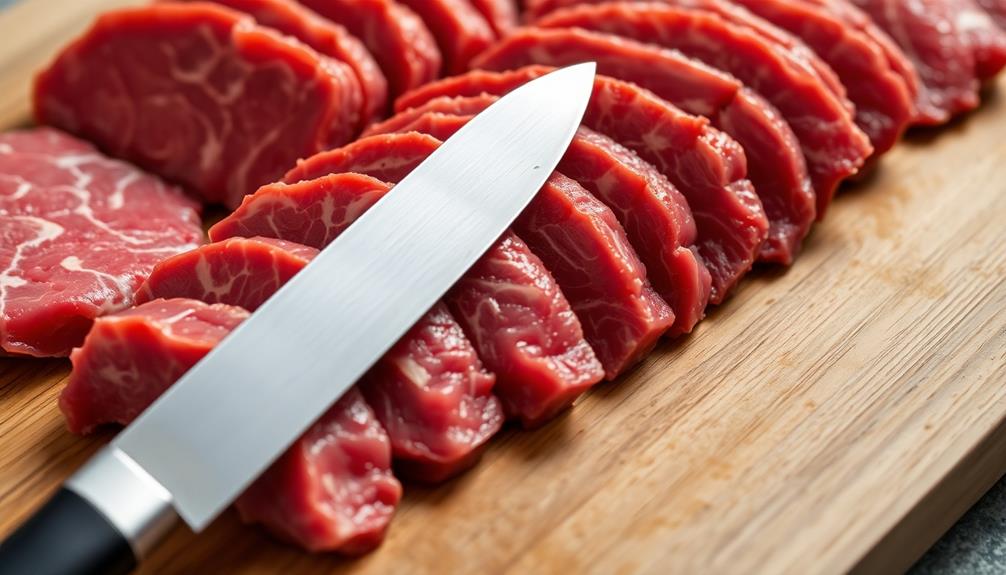
To begin, grab your knife and carefully slice the beef into thin, uniform strips. This is an important step to ensure the bulgogi cooks evenly and quickly. Use a sharp knife and gently saw back and forth as you slice the meat. You want the strips to be about 1/4 inch thick – not too thick, but not paper-thin either.

Take your time and focus on making each slice consistent. Cutting the beef properly will help it soak up all the delicious bulgogi marinade later on. The thinner the strips, the more surface area they'll have to absorb those bold Korean flavors.

When you're done, you should have a nice pile of tender, bite-sized beef ready to be marinated. Be sure to separate the strips as you cut so they don't stick together. With the beef prepped, you're one step closer to sinking your teeth into that mouthwatering bulgogi cheesesteak!

Step 2. Sauté Onions and Mushrooms

saut onions and mushrooms

With the beef sliced and ready, it's time to turn your attention to the onions and mushrooms. In a large skillet over medium-high heat, add a drizzle of oil. Toss in the onion slices and let them sizzle, stirring occasionally, until they turn golden brown and start to caramelize, about 5-7 minutes. This brings out the natural sweetness of the onions, enhancing the overall flavor of your dish while also being mindful of the environmental impact of your cooking methods, such as the impact of wood-burning.

Next, add the mushrooms to the skillet. They'll release some moisture as they cook, so keep stirring to ensure even browning. Let the mushrooms sauté for another 3-5 minutes, until they're tender and have developed a nice, earthy flavor.

Now, the onions and mushrooms are perfectly cooked and ready to be combined with the marinated bulgogi beef. This flavorful vegetable mixture will add wonderful texture and depth to your bulgogi cheesesteak. Get ready for the delicious aroma to fill your kitchen!

Step 3. Add Bulgogi Sauce

incorporate bulgogi sauce

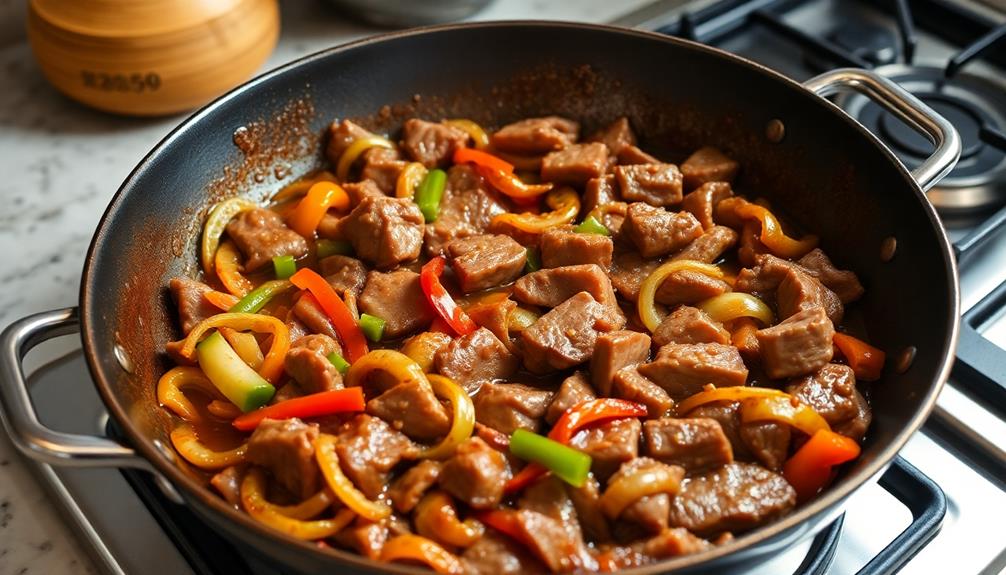
With the onions and mushrooms sautéed to perfection, it's time to add the bulgogi sauce. This special Korean BBQ sauce is the star of the show, bringing a burst of savory, sweet, and slightly spicy flavors to your Bulgogi Cheesesteak.

In a small bowl, whisk together the soy sauce, brown sugar, garlic, ginger, and a pinch of red pepper flakes. This aromatic blend will infuse your steak with an irresistible Korean twist. Drizzle the sauce over the sautéed vegetables and steak, then gently toss everything together.

Advertisement

The sauce will coat each piece, ensuring every bite is packed with flavor. As the sauce simmers, you'll notice the steak absorbing all those wonderful umami notes. The sweetness will caramelize slightly, creating a sticky, glazed texture that complements the soft onions and hearty mushrooms.

Get ready for an explosion of taste in every mouthful!

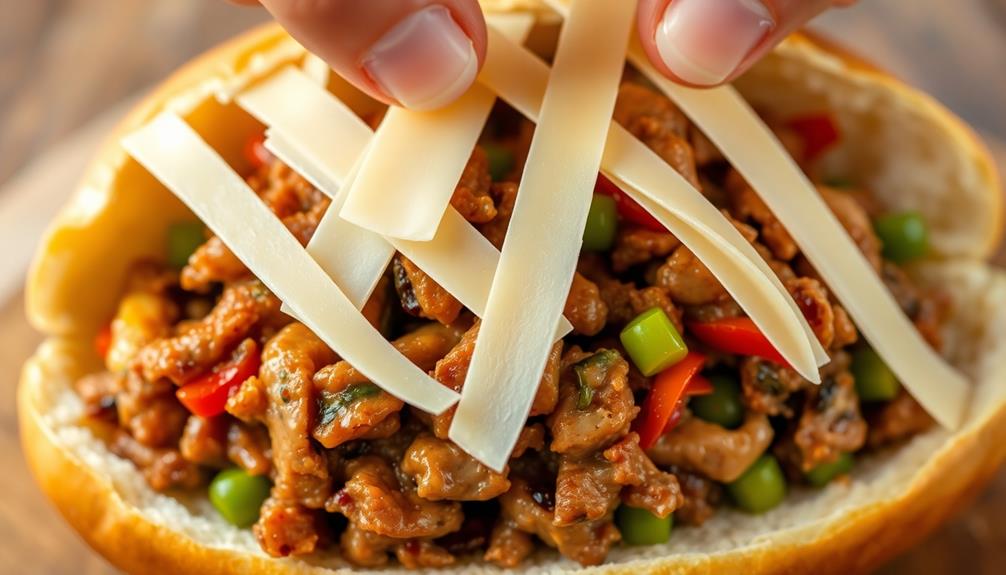
Step 4. Add Provolone Cheese

add provolone cheese now

Next, pile the bulgogi-coated steak and veggies onto your toasted hoagie rolls.

Now, it's time to add the provolone cheese. Take a few slices of the creamy, melty provolone and layer them over the top of the bulgogi mixture.

Make sure to cover the whole surface area so you get a delicious cheesy bite in every mouthful. As the cheese melts, it'll blend beautifully with the savory flavors of the bulgogi.

The provolone's mild, nutty taste complements the Korean-inspired seasonings perfectly. You'll get that classic Philly cheesesteak experience with an exciting twist.

Advertisement

Once the cheese has melted, your bulgogi cheesesteak is ready to enjoy. The combination of tender steak, crunchy veggies, tangy sauce, and gooey cheese is simply irresistible.

Get ready for an explosion of flavors in every bite!

Step 5. Assemble Sandwich and Broil Until Melted

assemble and broil sandwich

Assembling the bulgogi cheesesteak is the final step in crafting this mouthwatering fusion dish.

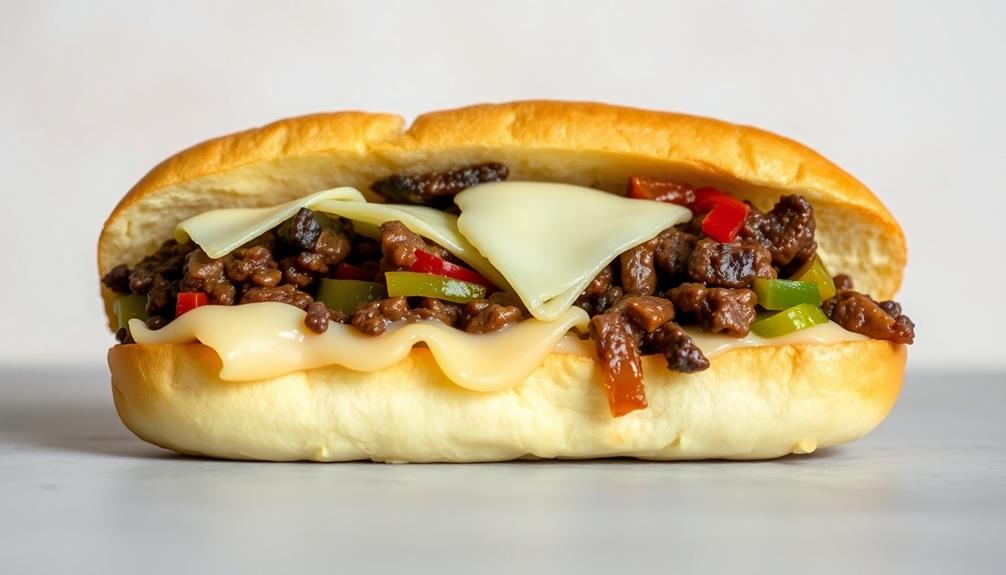
Start by placing the toasted hoagie roll on a baking sheet. Arrange the sliced bulgogi on the bottom half of the roll, then top it with the melted provolone cheese.

Now, it's time to broil the sandwich until the cheese is bubbly and golden brown. Keep a close eye on it, as the broiling process happens quickly.

Once the cheese is perfectly melted, remove the baking sheet from the oven.

Advertisement

Carefully place the top half of the hoagie roll over the bulgogi and cheese. Press down gently to secure the sandwich.

Slice the bulgogi cheesesteak in half, revealing the delicious layers of flavors and textures. Serve hot and enjoy this unique and satisfying fusion of Korean and Philly classics.

Final Thoughts

The Bulgogi Cheesesteak is a delightful fusion of Korean and American culinary traditions, creating a harmonious blend of flavors and textures.

Imagine the savory, tender bulgogi beef mingling with the melty, gooey cheese, all nestled between soft, toasted bread. The combination is simply irresistible!

This dish is a true culinary delight, perfect for those seeking a unique and satisfying meal. The contrasting flavors and textures create a symphony of taste that will leave your taste buds dancing with joy.

Advertisement

Whether you're a fan of Korean BBQ or a lover of classic Philly cheesesteaks, this dish is sure to impress.

So, why not give it a try? Indulge in the Bulgogi Cheesesteak and experience the perfect marriage of two beloved cuisines.

It's a delicious adventure you won't want to miss!

Frequently Asked Questions

What Is the Origin of the Bulgogi Cheesesteak?

You're curious about the origins of the bulgogi cheesesteak, aren't you? It's a fusion dish that combines the flavors of Korean bulgogi with the classic Philly cheesesteak, creating a unique and delicious culinary experience.

Can the Bulgogi Cheesesteak Be Made Vegetarian or Vegan?

Absolutely, you can make a vegetarian or vegan version of the bulgogi cheesesteak. Use plant-based protein like soy or portobello mushrooms instead of beef, and opt for dairy-free cheese to create a delicious meatless take on this fusion dish.

Advertisement

How Long Does It Take to Prepare the Bulgogi Cheesesteak?

Preparing the vegetarian or vegan bulgogi cheesesteak takes around 45 minutes to an hour, depending on your experience level. You'll need to marinate the plant-based protein, sauté the veggies, and assemble the sandwich.

Is the Bulgogi Cheesesteak Gluten-Free?

The bulgogi cheesesteak isn't inherently gluten-free. It'd depend on the specific ingredients used, like the bread or any sauces. You'll need to check with the restaurant or review the menu details to determine if it can be made gluten-free.

What Are Some Common Serving Suggestions for the Bulgogi Cheesesteak?

You can serve the bulgogi cheesesteak with a side of kimchi, pickled radish, or fries to complement the bold flavors. It also pairs well with a crisp Asian-inspired slaw or a light salad for a balanced meal.

Advertisement

Fusion Cuisine

Bulgogi Pasta: A Fusion Dish That Combines Korean and Italian Flavors

Luscious Korean bulgogi and Italian-style pasta collide in this mouthwatering fusion dish, offering a culinary adventure that will leave you craving more.

Published

on

korean italian fusion bulgogi pasta

Bulgogi Pasta is a mouthwatering fusion dish that combines the rich, tender flavors of traditional Korean bulgogi with the comforting texture of Italian-style pasta. You'll savor the tangy marinade of soy sauce, garlic, and brown sugar as it's sautéed with the beef, creating a sweet-savory sauce that coats every noodle. Crunchy sautéed mushrooms and onions add depth, while toasted sesame seeds sprinkled on top provide a nutty crunch. This dish represents a delightful cultural exchange, blending the best of Korean and Italian cuisines into one unforgettable meal. Prepare to embark on a flavor journey like no other!

Key Takeaways

  • Bulgogi pasta is a culinary fusion that blends the savory and tender Korean beef dish with the Italian staple of pasta.
  • The dish combines the rich, sweet-soy marinade of bulgogi with the comforting texture of pasta, creating a unique and flavorful meal.
  • Sautéed mushrooms and onions add depth and balance to the pasta, complementing the bold bulgogi flavors.
  • Toasted sesame seeds provide a crunchy, nutty garnish that enhances the overall experience of the dish.
  • Bulgogi pasta represents the cultural exchange and innovation in cuisine, showcasing the versatility of ingredients and culinary creativity.

History

understanding past events significance

Bulgogi, the beloved Korean beef dish, has a rich history that has inspired the creation of Bulgogi Pasta. This iconic dish originated in the Goguryeo kingdom, which thrived in ancient Korea.

Over time, bulgogi evolved, with each dynasty adding its own twist. Nowadays, it's a staple in Korean cuisine, loved for its tender, marinated beef and sweet-savory flavors.

As Korean culture spread globally, bulgogi found its way to the world stage. Enterprising chefs began experimenting, blending it with other cuisines.

The result? Bulgogi Pasta – a delightful fusion that brings together the best of Korean and Italian flavors. The tender, seasoned beef pairs perfectly with al dente pasta, creating a harmonious dance of textures and tastes.

This dish showcases the creative spirit of culinary innovation, proving that great things can happen when diverse cultures come together in the kitchen.

Advertisement

Cooking Steps

step by step cooking instructions

Once you've gathered your ingredients, the cooking process comes together quickly.

First, you'll cook the pasta according to the package instructions. While the pasta boils, it's time to work on the bulgogi. In a large skillet, sauté the thinly sliced beef until it's browned and cooked through. Toss in the soy sauce, brown sugar, garlic, and sesame oil, and let the flavors meld together.

Now, drain the pasta and add it to the skillet with the bulgogi. Gently toss everything together, making sure the pasta is evenly coated in the savory sauce.

Sprinkle in some green onions for a pop of color and freshness. Finally, top it all off with toasted sesame seeds for a nutty crunch.

The best part? You can have this delicious fusion dish on the table in under 30 minutes. Serve it warm, and get ready for your taste buds to be blown away by the irresistible combination of Korean and Italian flavors.

Step 1. Marinate Bulgogi Beef in Soy Sauce

marinate bulgogi beef soy sauce

Grab a large resealable bag or a shallow dish and add the sliced bulgogi beef.

Now, it's time to give those tender strips a tasty soak! Pour in some soy sauce – about 1/4 cup should do the trick. Don't be afraid to really get in there and massage the beef, making sure every piece is fully coated.

Advertisement

Next, grab a few cloves of garlic and mince them up. Toss the garlic into the bag or dish, and give it all a good stir.

The savory flavors of the soy sauce and garlic will start to work their magic, transforming the beef into a mouthwatering marinade. Cover the dish or seal the bag and pop it in the fridge. Let it hang out for at least 30 minutes, or up to 2 hours if you've got the time. The longer it marinates, the more intense the flavor will be.

When you're ready to cook, simply remove the beef from the marinade and you're all set to start sizzling!

Step 2. Sauté Sliced Mushrooms and Onions

saut sliced mushrooms onions

With the bulgogi beef now marinated, it's time to sauté the sliced mushrooms and onions.

Grab your sauté pan and heat it over medium-high heat. Once it's hot, add a drizzle of olive oil. Toss in the sliced mushrooms and sauté them for a few minutes, stirring occasionally, until they start to soften and brown.

Next, add the sliced onions to the pan. Sauté the onions and mushrooms together for 5-7 minutes, until the onions are translucent and the mushrooms are nicely caramelized.

Advertisement

Be sure to stir the mixture frequently to prevent burning. The aromas wafting through your kitchen will have your mouth watering in anticipation!

Once the mushrooms and onions are cooked to perfection, remove the pan from the heat.

You're now ready to combine the sautéed veggies with the marinated bulgogi beef. Get ready for an explosion of Korean-Italian fusion flavors in your Bulgogi Pasta dish!

Step 3. Cook Pasta According to Package

cook pasta per instructions

To prepare the pasta, bring a large pot of salted water to a boil.

Once the water is boiling, carefully add the pasta and cook according to the package instructions.

Stir the pasta occasionally to prevent it from sticking together.

Advertisement

Keep a close eye on the clock, as you don't want to overcook the pasta. You want it to be al dente, which means it should have a slightly firm bite to it.

When the pasta is cooked to your liking, drain it in a colander.

Be sure to reserve a cup of the pasta cooking water in case you need to thin out the bulgogi sauce later.

Rinse the cooked pasta under cool running water to stop the cooking process and prevent it from becoming sticky.

Then, transfer the drained pasta to a large bowl, ready to be combined with the delicious bulgogi sauce.

Advertisement

Step 4. Toss Cooked Pasta With Beef Mixture

combine pasta and beef

Once the pasta is cooked and drained, you'll want to toss it with the prepared bulgogi beef mixture. Grab a large bowl and gently fold the cooked pasta into the savory, slightly sweet beef. Make sure to coat each strand evenly so every bite is bursting with Korean-Italian flavor.

Don't be afraid to get in there with your hands – the best way to get the pasta and beef married together is to use your fingers to gently mix and toss.

As you're mixing, take a moment to admire the beautiful colors and textures. The rich, caramelized beef, the tender pasta, and the bright green onions all come together in perfect harmony.

Give it a few more tosses to ensure everything is well combined. Now it's time to serve! Scoop generous portions onto plates or bowls, making sure each serving has a nice balance of pasta and beef.

Get ready for taste buds to dance with joy at the first delicious bite of your homemade Bulgogi Pasta.

Step 5. Garnish With Toasted Sesame Seeds

garnish with sesame seeds

Now that the pasta and beef are perfectly combined, it's time to add the finishing touch – toasted sesame seeds. This simple step will bring a delightful crunch and a nutty aroma to your bulgogi pasta dish.

To toast the sesame seeds, simply heat a small skillet over medium heat. Add the sesame seeds and let them cook, stirring frequently, until they turn golden brown and become fragrant. This should only take about 2-3 minutes, so keep a close eye on them to prevent burning.

Advertisement

Once the sesame seeds are toasted, remove the skillet from the heat and let them cool slightly.

Then, sprinkle the toasted sesame seeds generously over the top of your bulgogi pasta. The crunchy texture and nutty flavor will perfectly complement the savory beef and the tender pasta, creating a truly unforgettable dish.

Enjoy your bulgogi pasta with the added touch of toasted sesame seeds!

Final Thoughts

reflective conclusion summary

Bulgogi pasta is a delightful fusion of Korean and Italian culinary traditions. The combination of tender marinated beef, sweet-savory bulgogi sauce, and al dente pasta creates a harmony of flavors that will delight your taste buds. This dish is a true testament to the versatility of ingredients and the boundless creativity of chefs.

As you savor each bite, you'll be transported to the vibrant streets of Seoul and the charming trattorias of Italy. The toasted sesame seeds add a delightful crunch, complementing the rich, umami-packed flavors.

This fusion dish isn’t only a culinary adventure but also a testament to the power of cultural exchange and the endless possibilities that arise when we embrace diversity in the kitchen. One such example of this is the tandoori chicken pizza recipe, which combines the traditional flavors of Indian cuisine with the iconic Italian dish. This fusion not only creates a unique and delicious meal, but also sparks conversation and appreciation for the blending of different culinary traditions. It serves as a reminder that when we open our minds and palates to new experiences, we can create something truly special.

Advertisement

Bulgogi pasta is a must-try for any food enthusiast, blending the best of both worlds in a delectable and satisfying package. Indulge in this unique and flavorful creation and let your taste buds be the judge of this remarkable fusion.

Frequently Asked Questions

What Is the Ideal Cheese to Use in Bulgogi Pasta?

For bulgogi pasta, you'll want a cheese that can stand up to the bold Korean flavors. Consider using a sharp, aged cheddar or a nutty Parmesan to create a perfect balance of tastes and textures.

Can I Substitute Beef for Pork in the Bulgogi Recipe?

You can certainly substitute pork for beef in the bulgogi recipe. Pork will provide a similar rich, savory flavor profile. Just be sure to adjust the cooking time as pork may cook more quickly than beef.

How Can I Make the Bulgogi Pasta More Authentic?

To make the bulgogi pasta more authentic, you could use Korean ingredients like gochujang (Korean chili paste) and sesame oil. Additionally, you could use traditional bulgogi marinade flavors and techniques, like grilling the beef instead of sautéing.

Is Bulgogi Pasta Suitable for Vegetarians or Vegans?

While bulgogi pasta isn't traditionally vegetarian or vegan, you can easily make it so by substituting the meat with grilled tofu or mushrooms. This would create a tasty meatless version that maintains the core flavors.

Advertisement

How Long Does the Bulgogi Marinade Need to Sit?

The bulgogi marinade should sit for at least 30 minutes, but you can let it marinate for up to 4 hours. This allows the flavors to fully develop and the meat to tenderize.

Continue Reading

Fusion Cuisine

Sushi Burritos: When Japan Meets Mexico

Intrigued by the fusion of Japanese and Mexican flavors? Discover the captivating world of sushi burritos and how they’ve taken the culinary scene by storm.

Published

on

fusion cuisine delightfully combined

Sushi burritos are the delightful fusion of Japanese and Mexican cuisine that's taken the culinary world by storm! By combining fresh sushi ingredients with the portability of a burrito, innovative chefs have created a handheld treat that's as flavorful as it is fun. You'll find sushi-grade fish, crunchy veggies, and savory sauces all wrapped in a toasty tortilla. It's a unique dining experience that celebrates diversity and celebrates the joys of fusion cuisine. The best part? There are endless ways to customize your sushi burrito, so you can craft the perfect portable meal. Let's dive in and explore this captivating culinary crossover!

Key Takeaways

  • Sushi burritos originated in the early 2010s as a fusion of Japanese and Mexican culinary traditions, blending sushi flavors with burrito convenience.
  • Sushi burritos combine traditional Japanese sushi ingredients like sushi-grade fish, sushi rice, and nori with Mexican burrito elements like tortillas and various fillings.
  • The customizable nature of sushi burritos allows for experimentation with diverse ingredient combinations, reflecting the growing popularity of fusion cuisine worldwide.
  • Sushi burritos provide a balance of proteins, healthy fats, and carbohydrates, offering a portable and nutritious meal option.
  • The popularity of sushi burritos continues to grow, as they are frequently featured in food blogs, social media, and fast-casual dining establishments.

History

The sushi burrito, a fusion creation blending Japanese and Mexican culinary traditions, has gained widespread popularity in recent years. Its origins can be traced back to the early 2010s, when enterprising chefs began experimenting with the idea of combining the flavors and textures of sushi with the convenience and portability of a burrito.

These innovative culinary artists recognized the potential in merging the delicate rice, fresh seafood, and bold sauces of sushi with the hearty tortilla wrap and array of fillings found in Mexican cuisine. The result was a handheld, meal-sized treat that quickly captured the imaginations of food lovers around the world.

As the sushi burrito trend spread, it evolved with new ingredient combinations and creative presentations. From classic fillings like tuna and avocado to more adventurous options like tempura shrimp and spicy mayo, the sushi burrito has become a beloved staple of the modern food landscape, bridging the gap between two vastly different yet complementary culinary traditions.

Recipe

Sushi Burritos are a delightful fusion of traditional Japanese sushi and the beloved handheld Mexican wrap. This unique dish combines the fresh flavors of sushi-grade fish, crisp vegetables, and flavorful sauces, all wrapped up in a warm, soft tortilla.

Whether you're looking for a fun and creative meal or a portable option for on-the-go dining, the sushi burrito is sure to delight your taste buds.

Advertisement

Preparing a sushi burrito at home allows you to customize the ingredients to your liking, experiment with different flavor combinations, and enjoy a restaurant-quality dish in the comfort of your own kitchen.

With a bit of preparation and the right techniques, you can easily recreate this fusion masterpiece in your own kitchen.

  • Sushi-grade tuna or salmon
  • Cooked sushi rice
  • Nori (seaweed sheets)
  • Avocado, sliced
  • Cucumber, julienned
  • Carrots, julienned
  • Green onions, sliced
  • Soy sauce
  • Wasabi (optional)
  • Mayonnaise (optional)
  • Large tortillas or nori sheets

Begin by cooking the sushi rice according to package instructions and let it cool slightly.

Lay a nori sheet on a clean surface and spoon a portion of the sushi rice onto the center.

Arrange the sliced avocado, julienned cucumber and carrots, and green onions in a line across the center of the rice.

Carefully roll the nori sheet around the fillings, creating a tight cylinder.

Advertisement

Place the rolled burrito in the center of a warm tortilla and fold the sides over the filling, then wrap the tortilla tightly around the burrito.

To enhance the flavors, you can drizzle a bit of soy sauce, wasabi, and/or mayonnaise over the filling before rolling.

Additionally, for a crunchier texture, you can lightly toast the tortilla before assembling the burrito.

Enjoy your homemade sushi burrito immediately, or wrap it in parchment paper or foil for a convenient on-the-go meal.

Cooking Steps

Slice up those sushi rolls into bite-sized pieces, then wrap them up in a tortilla.

Advertisement

Now, add your favorite fillings and sprinkle some sesame seeds on top.

Get ready to savor your very own sushi burrito creation!

Step 1. Slice Sushi Rolls Into Bite-Sized Pieces

slice sushi into pieces

Once you've carefully assembled your sushi roll, it's time to slice it into bite-sized pieces. Using a sharp knife, gently slice the roll into 6-8 even pieces. Be sure to use a sawing motion and avoid pressing down too hard, as this can squish the filling.

Take your time and make clean, smooth cuts for the best presentation.

Now, arrange the sushi pieces on a serving plate or platter. You can place them in a row or fan them out, whichever looks most appealing.

If you want to get creative, try cutting the pieces at an angle or even making them into mini-triangles. Just be sure to keep the pieces intact and avoid any messy breaks.

Advertisement

Step 2. Wrap Sushi in Tortilla

sushi wrapped in tortilla

Take a flour tortilla and lay it flat on a clean surface.

Grab your favorite sushi fillings – think sliced cucumber, avocado, cooked shrimp, or thinly sliced carrots.

Place these ingredients in a line down the center of the tortilla, leaving a bit of space on the edges.

Now it's time to roll it up! Fold the bottom edge of the tortilla over the filling, then tightly roll it up like a burrito.

Use a bit of water to seal the edge if needed.

Slice the sushi burrito in half diagonally for easy eating.

Advertisement

The flavors of sushi blended with the hearty tortilla makes for a unique and satisfying meal.

Get creative with your fillings – the possibilities are endless!

Serve with soy sauce, wasabi, or even a spicy mayo for dipping.

Enjoy your homemade sushi burrito, a delicious fusion of two beloved cuisines.

Step 3. Add Desired Fillings

incorporate chosen fillings now

On the center of the flour tortilla, arrange your favorite sushi fillings. You can use any combination of ingredients you like!

Try sprinkling in some crunchy vegetables, like julienned carrots, sliced cucumbers, or chopped green onions. These will add a nice crunch and freshness to your sushi burrito.

Advertisement

Don't forget the classic sushi staples too. Thinly sliced avocado, tender pieces of tuna or salmon, and a drizzle of creamy sauce like spicy mayo or eel sauce would be delicious.

You can even add a sprinkle of toasted sesame seeds for extra flavor and texture.

Once you've piled on all your desired fillings, it's time to roll it up! Carefully fold the bottom of the tortilla over the fillings, then tightly wrap the sides and continue rolling until you have a neat, compact sushi burrito.

Slice it in half and enjoy this unique fusion of Japanese and Mexican cuisine!

Step 4. Sprinkle Sesame Seeds on Top

sprinkle sesame seeds generously

Sprinkle a generous amount of toasted sesame seeds over the top of your rolled sushi burrito. The nutty, crunchy seeds add a delightful finishing touch, elevating the flavors and creating an appealing visual presentation.

The sesame seeds' distinct aroma and texture complement the other ingredients wonderfully, enhancing the overall sensory experience.

Advertisement

Be sure to use lightly toasted sesame seeds, as they'll provide a delightful crunch and a slightly deeper flavor profile compared to raw seeds. Evenly distribute the seeds across the top of the burrito, covering as much surface area as possible. This will ensure each bite includes a satisfying sprinkle of sesame goodness.

The sesame seeds not only look fantastic, but they also offer a nutritional boost. They're a great source of healthy fats, protein, and minerals like calcium, iron, and magnesium.

Enjoy the added nourishment and deliciousness in every delectable bite of your sushi burrito.

Step 5. Enjoy Your Creation!

savor your masterpiece

With your sushi burrito beautifully assembled and sprinkled with the toasted sesame seeds, it's time to savor the fruits of your labor.

Take a moment to admire your creation – the vibrant colors, the perfect sushi roll shape, and the delightful blend of flavors. Now, it's time to dive in!

Gently pick up your sushi burrito and take a big bite. The combination of tender rice, fresh vegetables, and succulent protein is sure to delight your taste buds.

Advertisement

As you chew, the flavors will meld together, creating a harmonious symphony in your mouth. The crunch of the sesame seeds adds a delightful texture that complements the soft textures of the other ingredients.

With each bite, you'll be transported to a culinary fusion of Japanese and Mexican cuisines.

Enjoy the unique and satisfying experience of indulging in a sushi burrito. Savor every moment, as the flavors linger on your tongue, leaving you eager for the next delectable mouthful.

Final Thoughts

Sushi burritos, a delightful fusion of two culinary classics, have captured the hearts and taste buds of food enthusiasts across the globe. As you've discovered, these mouthwatering creations offer the perfect balance of flavors and textures, seamlessly blending the savory elements of sushi with the heartiness of a burrito.

Whether you've mastered the art of rolling sushi or are a burrito-wrapping pro, the joy of assembling your own sushi burrito is undeniable. With endless ingredient combinations at your fingertips, the possibilities for customization are truly endless.

Advertisement

Embrace your creativity and let your taste buds guide you on a flavorful adventure. As you savor the final bites, take a moment to appreciate the cultural fusion that has resulted in this culinary delight. Each ingredient tells a story, blending traditions and flavors from different corners of the world. Whether it’s the zest of Mediterranean spices or the indulgence of Vietnamese jellied pork for celebrations, every element contributes to a harmonious symphony of taste. Together, they create not just a meal, but an unforgettable experience that honors culinary artistry and heritage.

Sushi burritos are a testament to the power of culinary innovation, reminding us that the best things in life often come from unexpected combinations.

Frequently Asked Questions

How Do Sushi Burritos Differ From Traditional Sushi Rolls?

Sushi burritos differ from traditional sushi rolls in their larger size, different shape, and the addition of burrito-style fillings like rice, vegetables, and proteins. They offer a unique fusion of Japanese and Mexican cuisine, providing a more substantial and portable dining experience.

What Are the Most Common Fillings Used in Sushi Burritos?

The most common fillings used in sushi burritos include rice, fresh seafood like tuna or salmon, avocado, cucumber, carrots, and sauces like spicy mayo or teriyaki. You can also find variations with tempura, fried chicken, or even pulled pork.

Can Sushi Burritos Be Made at Home or Are They Only Available in Restaurants?

You can definitely make sushi burritos at home. All you need are the typical sushi ingredients like rice, seaweed, and your favorite fillings. It's a fun and creative way to enjoy sushi in a handheld format.

Advertisement

How Healthy Are Sushi Burritos Compared to Regular Burritos?

Sushi burritos can be a healthier alternative to regular burritos, as they're typically made with fresh fish, vegetables, and rice instead of heavier fillings like beans, cheese, and sour cream. However, the overall nutritional value depends on the specific ingredients used.

Where Can One Find the Best Sushi Burritos in the Country?

You can find some of the best sushi burritos in major cities like New York, Los Angeles, and San Francisco. Popular spots include Sushirrito, Hissho Sushi, and Shaka Bowl, which offer creative flavor combinations and fresh ingredients.

Continue Reading

Fusion Cuisine

Kimchi Quesadillas: Korean-Mexican Fusion at Its Finest

Yearning for a culinary adventure? Discover the bold flavors of Kimchi Quesadillas, a captivating fusion of Korean and Mexican cuisine that will tantalize your taste buds.

Published

on

korean mexican culinary fusion

Kimchi Quesadillas are a mouthwatering fusion of Korean and Mexican cuisines! You'll love the bold, tangy flavor of kimchi blended with the warm, melty comfort of a classic quesadilla. This dish adds a spicy, crunchy twist to an old favorite, making it perfect for quick weeknight dinners or sharing with friends. It's easy to customize to your tastes, so everyone can enjoy the unique flavors. Once you try this creative combination, you'll be hooked! Let's dive in and explore the cultural history and cooking steps behind this delectable dish.

Key Takeaways

  • Kimchi Quesadillas blend the bold, tangy flavors of Korean kimchi with the comforting warmth of Mexican quesadillas, creating a unique culinary fusion.
  • The dish showcases the impact of globalization on food, as traditional cuisines collaborate to produce innovative and delicious dishes.
  • Kimchi Quesadillas are customizable, allowing for individual preferences and encouraging experimentation with bold flavor combinations.
  • Preparing Kimchi Quesadillas involves simple steps, making it a quick and easy option for weeknight dinners or gatherings.
  • The harmonious blend of flavors, textures, and colors in Kimchi Quesadillas provides a delightful taste journey for the senses.

History

Originating in Korea, kimchi has long been a staple of the country's cuisine, its pungent flavors and crunchy texture captivating taste buds for centuries.

This fermented cabbage dish has become a beloved part of Korean culture, with recipes passed down through generations. While kimchi is traditionally enjoyed on its own, it's now finding its way into all sorts of creative dishes, including the mouthwatering Kimchi Quesadillas.

These fusion treats blend the bold, tangy notes of kimchi with the warm, melty comfort of a quesadilla.

It's a match made in culinary heaven, bringing together the best of Korean and Mexican flavors. The crunchy, spicy kimchi perfectly complements the gooey cheese, creating a symphony of textures and tastes in every bite. This fusion dish not only satisfies cravings but also sparks curiosity about global cuisines and their unique twists. It’s a playful reminder of how food can be a bridge between cultures, much like the ongoing debates about Korean ramen vs Japanese ramen—where bold spice meets umami depth. Together, these contrasting yet harmonious elements create a dining experience that’s both comforting and adventurous.

Whether you're a fan of Korean cuisine or simply love trying new and exciting flavor combinations, Kimchi Quesadillas are sure to delight your palate and leave you craving more.

Advertisement

Recipe

Kimchi, the spicy and fermented Korean side dish, can be a delightful addition to classic Mexican quesadillas. The tangy, crunchy texture of kimchi pairs surprisingly well with the melted cheese and warm tortilla. This fusion dish is a fun way to explore the versatility of kimchi and create a unique and flavorful meal.

Quesadillas are a quick and easy option for a weeknight dinner or a casual gathering with friends. The combination of kimchi and cheese makes for a satisfying and crowd-pleasing dish that can be customized to individual tastes.

  • 2 cups shredded cheddar or Monterey Jack cheese
  • 1 cup drained and chopped kimchi
  • 8 (8-inch) flour tortillas
  • 2 tablespoons butter or olive oil

In a large skillet or griddle over medium heat, place one tortilla and top with a quarter of the cheese and kimchi. Top with another tortilla and cook for 2-3 minutes per side, or until the cheese is melted and the tortilla is lightly browned.

Repeat with the remaining ingredients to make 4 quesadillas.

For best results, be sure to drain the kimchi well before adding it to the quesadillas. This will prevent the tortillas from becoming soggy.

Serve the kimchi quesadillas immediately, with any desired dipping sauces or toppings such as sour cream, salsa, or chopped scallions.

Advertisement

Cooking Steps

Warm up the tortillas on medium heat.

Once they're nice and toasty, add a generous helping of that tasty kimchi right onto the tortilla.

Sprinkle the shredded cheese evenly over the top, fold the quesadilla in half, and cook it until it's golden and delicious.

Cut it up and get ready to dig in!

Step 1. Warm Tortillas on Medium Heat

warm tortillas on heat

Preheat a large skillet over medium heat.

You'll want to warm up the tortillas before assembling your quesadillas. Place a tortilla in the hot skillet and let it sizzle for about 30 seconds. Flip it over and warm the other side for another 30 seconds. The tortilla should be slightly pliable and lightly toasted when you're done.

Advertisement

Repeat this process with the remaining tortillas, stacking them on a plate as you go. Be sure to keep the heat at medium – you don't want the tortillas to burn.

Toasting them gently helps create the perfect texture for your quesadillas. Once all the tortillas are warmed, you can start building your Korean-Mexican fusion masterpieces!

The soft, pliable tortillas will be ready to fold around the flavorful kimchi and melty cheese. Get ready for an explosion of delicious flavors in every bite.

Step 2. Add Kimchi to Tortilla

add kimchi to tortilla

With your tortillas warmed and ready, start building your kimchi quesadillas. Take a generous spoonful of that tangy, spicy, and crunchy kimchi and place it onto one half of the tortilla. Spread it out evenly, leaving a bit of room around the edges.

Now, it's time to add the cheese. Sprinkle a handful of shredded mozzarella or cheddar over the kimchi, making sure to cover the entire surface. Fold the other half of the tortilla over the filling, creating a perfect half-moon shape.

Place your quesadilla in a large skillet or griddle set to medium heat. Cook for 2-3 minutes per side, or until the tortilla is golden brown and the cheese is melted and gooey. Be gentle when flipping to keep the quesadilla intact.

Advertisement

Once both sides are nicely toasted, remove it from the heat and slice it into wedges. Serve your delightful kimchi quesadilla hot, with a side of your favorite dipping sauce for an extra flavor boost.

Step 3. Sprinkle Shredded Cheese Evenly

evenly sprinkle shredded cheese

Sprinkle a handful of shredded mozzarella or cheddar evenly over the kimchi, ensuring the entire surface is covered. You want every bite to have that gooey, melty cheese goodness.

Gently press the cheese down so it adheres to the kimchi. This will help the quesadilla hold together when you fold it.

Next, take another tortilla and place it on top, pressing down lightly to create a sandwich. Your kimchi quesadilla is now ready to be cooked!

Heat a skillet or griddle over medium heat and carefully transfer the quesadilla to the hot surface. Cook for 2-3 minutes per side, or until the tortilla is golden brown and the cheese is melted.

Keep an eye on it, and flip the quesadilla gently using a spatula. You want both sides to be evenly toasted and the cheese to be melted throughout.

Advertisement

Once it's perfectly crispy, remove the quesadilla from the heat and slice it into wedges. Enjoy this delicious fusion of Korean and Mexican flavors!

Step 4. Fold Quesadilla, Cook Until Golden

fold and cook quesadilla

Once the cheese is evenly dispersed, take the remaining tortilla and place it atop the kimchi-cheese layer, gently pressing down to create a sandwich.

Now, it's time to fold the quesadilla. Grab the edges of the top tortilla and carefully fold it in half, sealing the kimchi-cheese goodness inside. This folding technique helps the quesadilla hold its shape as it cooks.

Next, heat a large skillet or griddle over medium heat. Once the surface is nice and hot, gently place the folded quesadilla into the pan.

Let it cook for 2-3 minutes, or until the bottom is golden brown and crispy. Use a spatula to flip the quesadilla over and cook the other side for another 2-3 minutes.

Keep an eye on it, as you want both sides to be evenly toasted and the cheese melted throughout.

Advertisement

Step 5. Cut Quesadilla and Serve

cut and serve quesadilla

Once the quesadilla is golden brown and the cheese is melted, it's time to cut and serve. Using a sharp knife, carefully slice the quesadilla into wedges or triangles. This will make it easy to grab and enjoy.

Be sure to use caution, as the quesadilla will be hot right off the skillet. Slowly and steadily, cut through the crunchy exterior and the gooey, melted interior. As you make each slice, the aroma of the toasted tortilla, the savory kimchi, and the melted cheese will fill the air.

Once it's cut, arrange the quesadilla wedges on a plate or platter. You can serve it as is, or add a dollop of sour cream, a sprinkle of chopped green onions, or a drizzle of your favorite hot sauce for extra flavor.

The vibrant colors and textures of the quesadilla will make it a true feast for the senses. Dig in and savor the delightful fusion of Korean and Mexican cuisines in every bite!

Final Thoughts

As you savor the final bites of your Kimchi Quesadillas, you can't help but be struck by the harmonious blend of flavors that have danced across your palate.

The crisp, golden-brown exterior of the quesadilla gives way to a symphony of textures and tastes. The tangy, fermented bite of the kimchi perfectly complements the melted, gooey cheese, creating a harmonious fusion that lingers on your tongue.

Advertisement

With each crunchy bite, you're transported to the vibrant streets of Seoul and the bustling cantinas of Mexico, where cultures collide to create something truly special.

It's a culinary adventure that celebrates the art of blending the unexpected. As you savor the final moments, you can't help but feel a sense of satisfaction, knowing that you've experienced a truly unique and delightful creation.

The Kimchi Quesadilla has proven that the possibilities for culinary innovation are endless when we embrace the spirit of cultural exchange and bold experimentation.

Frequently Asked Questions

What Makes Kimchi Quesadillas a Unique Fusion Dish?

Kimchi quesadillas are a unique fusion dish because they combine the spicy, fermented flavors of Korean kimchi with the cheesy, grilled goodness of a classic Mexican quesadilla. The contrast of these two distinct cuisines creates a truly one-of-a-kind culinary experience.

Can I Substitute Regular Kimchi for the Recipe?

You can substitute regular kimchi for the recipe, but it won't have the same flavor profile. The combination of the spicy, fermented kimchi and the melted cheese creates a unique fusion that regular kimchi may not capture.

Advertisement

How Long Do the Quesadillas Take to Prepare?

The quesadillas should take you around 15-20 minutes to prepare. This includes assembling the ingredients and cooking the quesadillas on the stovetop until they're golden brown and the cheese has melted. It's a quick and easy dish to make.

Can I Make the Quesadillas Ahead of Time?

You can absolutely make the quesadillas ahead of time. Just assemble them, then simply reheat in the oven or on the stovetop when you're ready to serve. This allows you to prepare them in advance for convenience.

Are There Any Vegetarian or Vegan Variations of the Dish?

You can definitely create vegetarian or vegan variations of this dish. Simply swap out the traditional fillings with your preferred plant-based ingredients like tofu, mushrooms, or a blend of roasted veggies for a delicious meatless option.

Continue Reading

Affiliate Disclaimer
As an affiliate, we may earn a commission from qualifying purchases. We get commissions for purchases made through links on this website from Amazon and other third parties.

Advertisement

Vetted

top local car washes top local car washes
Vetted2 months ago

14 Best Car Washes Near You for a Sparkling Clean Ride

I discovered the 14 best car washes near you that promise a sparkling clean ride, and you won't want to...

top mops for 2024 top mops for 2024
Vetted2 months ago

The 15 Best Mops of 2025 – Your Ultimate Guide to a Spotless Home

Find the perfect mop for your cleaning needs in 2025, and discover how these top choices can revolutionize your home...

top women s fragrances 2024 top women s fragrances 2024
Vetted2 months ago

15 Best Perfumes for Women in 2025 – A Fragrance Guide You Can’t Miss

Keen to discover the top 15 perfumes for women in 2025? Uncover unique scents that will elevate your fragrance game!

top local bars guide top local bars guide
Vetted2 months ago

14 Best Bars Near You for an Unforgettable Night Out

Looking for the perfect bar to elevate your night out? Discover the 14 best spots that promise unforgettable experiences!

luxurious beard oil selection luxurious beard oil selection
Vetted2 months ago

15 Best Beard Oils for a Luxurious Grooming Experience in 2025

Shop the 15 best beard oils for a luxurious grooming experience in 2025 and discover which ones will elevate your...

top college laptops 2024 top college laptops 2024
Vetted2 months ago

15 Best College Laptops of 2025: The Ultimate Guide for Students

With our guide to the 15 best college laptops of 2025, discover which powerful models will elevate your academic experience...

waterproof mascaras for tears waterproof mascaras for tears
Vetted2 months ago

15 Best Waterproof Mascaras That Will Survive Any Tear-Jerker

Outstanding waterproof mascaras await to keep your lashes flawless through any emotional moment; discover which ones made the top 15...

top flavorful disposable vapes top flavorful disposable vapes
Vetted2 months ago

15 Best Disposable Vapes of 2025: Top Picks for Flavor and Convenience

Prepare to discover the 15 best disposable vapes of 2025 that blend exceptional flavor and convenience, but which ones truly...

refreshing lunch salad ideas refreshing lunch salad ideas
Vetted2 months ago

15 Best Salads Near You That Will Freshen Up Your Lunch Routine

Transform your lunch with the 15 best salads nearby that will tantalize your taste buds and leave you craving more...

top convertible car seats top convertible car seats
Vetted2 months ago

15 Best Convertible Car Seats of 2025 – Safety and Comfort for Your Little One

Get ready to discover the top 15 convertible car seats of 2025 that blend safety and comfort—find out which models...

delicious fast food breakfast delicious fast food breakfast
Vetted2 months ago

15 Best Fast Food Breakfast Options That Will Make Your Mornings Delicious

Uncover the 15 best fast food breakfast options that will transform your mornings into a delicious experience you won't want...

stylish contacts for vision stylish contacts for vision
Vetted2 months ago

14 Best America’s Contacts for Clear Vision and Style

Browse through the 14 best contact lenses in America for clear vision and style, and discover which one perfectly complements...

Trending