Farm-to-Table Cooking
Roasted Bone Marrow With Herb Salad
Captivating the senses, roasted bone marrow with a vibrant herb salad offers a decadent and intriguing culinary experience. Uncover the secrets behind this prized delicacy.
You'll love the rich, indulgent roasted bone marrow, with its creamy texture and savory flavor. This prized delicacy was cherished in ancient Rome and is making a comeback today. Roast the marrow to perfection, then pair it with a bright, herbaceous salad for a memorable flavor experience. Handle the hot marrow carefully and finish it off with a sprinkle of flaky sea salt. You'll be wowed by how the luxurious marrow contrasts with the fresh herbs – an engaging blend of textures and tastes. Let's explore the history and cooking steps in more detail.
Key Takeaways
- Roasted bone marrow offers a rich, creamy texture and depth of flavor that can be highlighted by pairing it with a bright and herbaceous salad.
- Preparation of the dish involves properly roasting the bone marrow and assembling a simple yet flavorful herb salad to balance the indulgent nature of the marrow.
- The recipe can be served as an appetizer or as part of a larger meal, impressing guests with its unique combination of flavors and textures.
- Proper handling and presentation of the roasted marrow are essential, as it should be served warm with small forks or spoons for easy enjoyment.
- The dish can be further enhanced by adding a drizzle of fresh lemon juice to help balance the richness of the marrow and complement the freshness of the herbs.
History
Bone marrow has long been a prized delicacy, with its rich, creamy texture and savory flavor. Throughout history, various cultures have cherished this nutrient-dense food. In ancient Rome, bone marrow was considered a luxurious treat, often served as a spread or added to soups and stews.
During the Middle Ages, bone marrow was highly sought after, and it became a symbol of wealth and status.
In many traditional cuisines, bone marrow has been used in hearty, nourishing dishes. In France, it's commonly roasted and served with a simple salad, showcasing its delicate flavor. Similarly, in Mexico, bone marrow is scooped out of the bone and used in stews and sauces, providing a velvety mouthfeel.
Today, the popularity of bone marrow has experienced a resurgence, with chefs and home cooks alike rediscovering its versatility and unique taste. Whether roasted, braised, or incorporated into other dishes, bone marrow remains a treasured ingredient that connects us to the culinary past.
Recipe
Roasted bone marrow is a delicacy that offers a rich, creamy texture and a depth of flavor that pairs beautifully with a bright and herbaceous salad. This recipe combines the indulgent nature of the bone marrow with the freshness of a vibrant herb salad, creating a harmonious balance of flavors and textures.
The key to perfectly roasted bone marrow lies in the proper preparation and cooking technique. By seasoning the marrow with a simple blend of salt and pepper and roasting it until it's hot and spreadable, you can unlock its full potential and create a luxurious base for the accompanying salad.
- 4 to 6 beef marrow bones, cut crosswise into 1-inch slices
- Kosher salt and freshly ground black pepper
- 1 bunch fresh parsley, leaves only
- 1 bunch fresh chives, chopped
- 1 bunch fresh tarragon, leaves only
- 1 bunch fresh mint, leaves only
- 2 tablespoons extra-virgin olive oil
- 1 tablespoon fresh lemon juice
- Flaky sea salt, for serving
Preheat your oven to 400°F (200°C). Arrange the marrow bones on a baking sheet and season them generously with kosher salt and freshly ground black pepper. Roast the bones for 15 to 20 minutes, or until the marrow is hot and spreadable.
While the marrow is roasting, prepare the herb salad by combining the parsley, chives, tarragon, and mint leaves in a bowl. Drizzle the olive oil and lemon juice over the herbs, and toss gently to coat.
To serve, transfer the roasted marrow bones to plates and top with the herb salad. Finish the dish with a sprinkle of flaky sea salt.
For the best results, be sure to use fresh, high-quality ingredients and handle the marrow bones with care to prevent any spillage. Additionally, keep a close eye on the marrow during the roasting process, as it can go from perfectly cooked to overcooked quickly. Enjoy this decadent and flavorful dish as an appetizer or a unique side to your meal.
Cooking Steps
Slice the bone marrow lengthwise, then roast it at 450°F until golden brown.
Whip up a quick parsley herb salad while the marrow cooks.
Step 1. Slice Bone Marrow Lengthwise
After preheating the oven, grab the bone marrow and carefully slice it lengthwise using a sharp knife.
You'll want to work slowly and steadily, applying gentle pressure to avoid breaking the marrow. Each piece should be about 1-inch thick, revealing the creamy interior.
Once you've sliced the marrow, arrange the pieces in a single layer on a baking sheet.
This will ensure they cook evenly and the edges get nice and crispy. Drizzle a bit of olive oil over the top, just enough to lightly coat the marrow. You can also sprinkle on some salt and pepper at this stage if you'd like.
Now pop the baking sheet into the preheated oven and let the marrow roast for 12-15 minutes.
Keep an eye on it, as you want the outside to be golden brown but the insides to stay soft and spreadable. When it's ready, the marrow will be sizzling and the aroma will be mouthwatering.
Careful, it'll be hot!
Step 2. Roast Bone Marrow at 450°F
Preheat your oven to 450°F.
Once it's nice and hot, carefully place the marrow bones on a rimmed baking sheet. Make sure they're not touching each other – you want plenty of room for the marrow to sizzle and caramelize.
Pop them in the oven and roast for 12 to 15 minutes. Keep an eye on them, as you want the tops to be golden brown but not burnt.
The marrow should be soft and jiggly when the time's up. Use tongs to transfer the bones to a serving platter.
Let them cool for a couple of minutes before serving. The interior will be steaming hot, so be careful when you scoop it out.
Drizzle the marrow with a bit of lemon juice and sprinkle with flaky sea salt.
Serve it up with your herb salad on the side for a truly decadent appetizer.
Get ready for oohs and aahs from your guests!
Step 3. Make Parsley Herb Salad
Gather a mix of fresh herbs, such as parsley, chives, and tarragon, and roughly chop them. You'll want a generous handful of each herb. Incorporating herbs like parsley can also provide potential health benefits, including essential oils for respiratory health that help support your overall well-being.
Next, thinly slice a shallot and add it to the chopped herbs. Drizzle the herb mixture with a bit of olive oil and a splash of red wine vinegar. Season with a pinch of salt and freshly cracked black pepper, then gently toss everything together.
The goal is to create a vibrant, flavorful salad that pairs perfectly with the rich, savory roasted bone marrow. Let the salad sit for a few minutes to allow the flavors to meld.
When you're ready to serve, spoon the bone marrow onto plates and top each portion with a generous helping of the herby salad. The contrast of the creamy marrow and the bright, fresh salad is simply divine. Enjoy this delightful combination of textures and tastes.
Step 4. Serve Bone Marrow With Salad
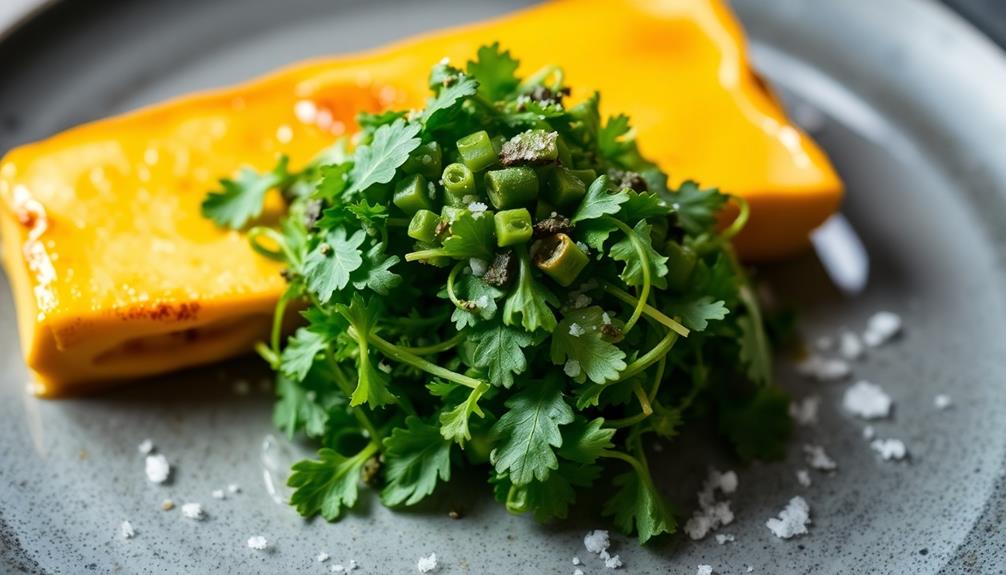
Once the herby salad is ready, it's time to serve the roasted bone marrow. Gently transfer the roasted bone marrow from the baking dish to a serving platter or individual plates. Be careful, as the bone marrow will be very hot! Drizzle any pan juices over the top.
Now, it's time to assemble the dish. Place a generous spoonful of the parsley herb salad directly next to the bone marrow. The cool, fresh flavors of the salad will provide a lovely contrast to the rich, savory bone marrow. You can even top the bone marrow with a bit of the salad if you'd like.
Serve the roasted bone marrow and herb salad immediately, while the marrow is still warm and the salad is crisp. Provide small forks or spoons for your guests to easily scoop out and enjoy the bone marrow.
This dish makes for an impressive and delicious appetizer or side. Bon appétit!
Step 5. Drizzle With Lemon Juice
To finish off the dish, drizzle a bit of fresh lemon juice over the roasted bone marrow. The tart and bright acidity of the lemon helps to balance the rich, fatty texture of the bone marrow.
Just a light drizzle is all you need – you don't want to overwhelm the delicate flavor of the marrow. The lemon juice also helps to enhance the herbal notes in the salad, creating a harmonious blend of flavors on the plate.
Be sure to use freshly squeezed lemon juice for the best results. Bottled juice just won't have the same vibrant, zesty punch.
If you have a lemon wedge or two leftover, you can even offer those on the side so your guests can add a little extra lemon to their taste.
The final touch of lemon really takes this dish to the next level, so don't skip this simple but essential step!
Final Thoughts
Ultimately, roasted bone marrow with a vibrant herb salad makes for a delightful and indulgent dish. The rich, buttery texture of the bone marrow pairs beautifully with the bright, fresh flavors of the herbs.
The lemon juice provides a welcome zing, cutting through the richness and elevating the entire dish. This recipe is sure to impress your guests, whether served as an appetizer or as part of a larger meal.
The best part? It's surprisingly simple to prepare, requiring minimal hands-on time. Simply roast the bone marrow, whip up the quick salad, and you're ready to enjoy.
The contrasts in texture and flavor create a truly memorable experience. So don't hesitate – give this roasted bone marrow dish a try and savor the delightful combination of indulgence and freshness.
Frequently Asked Questions
What Nutrients Does Bone Marrow Provide?
Bone marrow provides you with an abundance of essential nutrients, including protein, iron, zinc, and vitamins A, C, and K. It's a nutritional powerhouse that can support your overall health and well-being.
Is Bone Marrow Suitable for Vegetarians?
Bone marrow isn't suitable for vegetarians, as it's a purely animal-derived product. Since vegetarians avoid all animal products, including those derived from animals, bone marrow wouldn't align with their dietary restrictions.
How Long Can Roasted Bone Marrow Be Stored?
Roasted bone marrow can typically be stored for up to 3 days in the refrigerator when stored properly in an airtight container. However, it's best to consume it within 1-2 days for optimal freshness and flavor.
Can Bone Marrow Be Substituted in Other Recipes?
Absolutely! Bone marrow can substitute for other fats or oils in various recipes. It adds a rich, creamy texture and deep, savory flavor to dishes like soups, sauces, and even baked goods.
Does the Type of Bone Affect the Taste of Roasted Bone Marrow?
The type of bone does affect the taste of roasted bone marrow. Bones from different animals, like beef or lamb, have distinct flavors that'll come through when you roast the marrow. Try experimenting to find your preferred taste.
Ethan’s passion for farm-to-table cooking comes through in every dish he creates. He focuses on fresh, organic, and locally sourced ingredients, crafting seasonal recipes that celebrate the natural flavors of the earth. Based in California, Ethan’s modern approach to cooking is all about sustainability and simplicity.
Farm-to-Table Cooking
Whole Roasted Heritage Chicken
Nurture your taste buds with the captivating flavors of a whole roasted heritage chicken, where every bite reveals a culinary journey worth exploring.
Whole roasted heritage chicken is a delightful culinary experience. You'll love its golden-brown skin, juicy meat, and complex flavors from aromatic spices. This poultry breed has a rich history – it was carefully bred to maintain unique traits when commercial varieties threatened their diversity. Start by brining the chicken to retain moisture, then rub it with an herb-garlic butter before roasting at high heat. Baste frequently for a crispy exterior. Serve with roasted veggies for a complete meal. Savor the joy of this homemade dish and the satisfaction it brings. There's more to discover about this impressive heritage bird.
Key Takeaways
- Whole roasted heritage chickens are a result of preservation efforts to maintain genetic diversity of traditional chicken breeds.
- The preparation process involves brining the chicken, trussing it, and rubbing it with a herb-garlic butter mixture for enhanced flavor and crispy skin.
- The chicken is roasted at a high temperature of 425°F (220°C) for 60-75 minutes, basting it every 15 minutes to ensure juicy and tender meat.
- Serving suggestions include pairing the roasted chicken with roasted vegetables, a side salad, and offering sauces or gravies for a complete meal.
- Enjoying the whole roasted heritage chicken creates a warm, family-style atmosphere and highlights the importance of quality ingredients and homemade cooking.
History
The heritage chicken's rich history can be traced back to the early 20th century, when small-scale farmers and homesteaders across America sought to preserve the genetic diversity of poultry breeds.
These dedicated individuals recognized the importance of maintaining traditional chicken varieties, which were gradually being replaced by commercially-bred birds optimized for industrial production.
Through careful breeding and selection, they worked to keep alive the unique traits and characteristics of heritage chicken breeds, ensuring that these precious genetic resources wouldn't be lost to future generations.
Today, the term "heritage chicken" refers to poultry that can trace its lineage back to these early preservation efforts, showcasing the remarkable diversity and resilience of America's poultry heritage.
Recipe
Roasting a whole heritage chicken is a simple yet impressive way to prepare this flavorful and succulent bird. The slow roasting process allows the chicken to cook evenly, resulting in a juicy interior and a crisp, golden-brown skin.
The key to a successful whole roasted heritage chicken is to start with a high-quality bird. Heritage chickens are known for their rich, intense flavor and firm texture, making them an excellent choice for this type of preparation. With the right technique and a few essential ingredients, you can create a truly exceptional meal.
- 1 (4-5 pound) heritage chicken, at room temperature
- 2 tablespoons unsalted butter, softened
- 1 tablespoon kosher salt
- 1 teaspoon freshly ground black pepper
- 1 lemon, halved
- 4 sprigs of fresh thyme
- 2 cloves of garlic, peeled and crushed
Preheat your oven to 425°F (220°C). Pat the chicken dry with paper towels and rub the softened butter all over the skin. Generously season the chicken with the kosher salt and black pepper, making sure to season both the inside and outside of the bird.
Place the chicken in a large roasting pan and tuck the lemon halves and thyme sprigs inside the cavity. Scatter the crushed garlic cloves around the chicken. Roast the chicken for 60-75 minutes, or until the internal temperature reaches 165°F (75°C) in the thickest part of the thigh. Baste the chicken occasionally with the pan juices during the cooking process.
Once the chicken is cooked, let it rest for 15 minutes before carving and serving. This resting period allows the juices to redistribute throughout the meat, ensuring a perfectly moist and flavorful result. Enjoy your delicious whole roasted heritage chicken!
Cooking Steps
First, brine the chicken overnight to help it stay moist and flavorful.
Next, truss the chicken tightly for even cooking.
Then, preheat your oven to 425°F and rub the chicken with a delicious herb-garlic butter before roasting until it's golden brown perfection.
Step 1. Brine the Chicken Overnight
Brining the chicken overnight is a crucial first step in ensuring your Whole Roasted Heritage Chicken turns out moist and flavorful. In a large container, mix together water, salt, sugar, and any aromatics you'd like, such as herbs, garlic, or citrus. Submerge the whole chicken in the brine, cover, and refrigerate for at least 8 hours, or up to 24 hours.
The brine helps the meat retain moisture during the roasting process. The salt and sugar also season the chicken from the inside out, infusing it with delicious flavor.
Be sure to pat the chicken dry with paper towels before seasoning and roasting – you don't want any excess moisture interfering with getting that beautiful crispy skin.
After brining, the chicken is ready for the next step: seasoning and roasting to perfection. This simple but essential technique sets the stage for a juicy, well-seasoned Whole Roasted Heritage Chicken.
Step 2. Truss the Chicken for Roasting
After brining the chicken, go ahead and truss it up for roasting.
Trussing helps the chicken cook evenly and retains its shape. Start by tucking the wing tips under the body.
Then, use a piece of kitchen string to tie the legs together at the ankles. Pull the string tight, then loop it around the body and tie it off.
Next, take the string and make a loop around the neck, pulling the skin taut. Finally, tie the ends of the string together at the back.
This secures the chicken for even cooking in the oven. Be sure to tuck any loose skin under the string as you go.
With the chicken nicely trussed, it's ready for the oven. This step ensures a beautiful presentation and even heat distribution throughout the bird as it roasts to perfection.
Step 3. Preheat Oven to 425°F
With the chicken neatly trussed, you're now ready to start cooking. Preheat your oven to 425°F. This high temperature is crucial for achieving a crisp, golden-brown skin on your heritage chicken.
As the oven heats up, the intense heat will render the fat under the skin, helping it to crisp to perfection.
While the oven is preheating, take a moment to gather your baking sheet or roasting pan. You'll want to use a rimmed baking sheet or a shallow roasting pan to catch any juices that may drip from the chicken as it cooks.
Line the pan with foil or parchment paper for easy cleanup later.
Once the oven is hot and ready, carefully place the trussed chicken, breast-side up, in the prepared pan. The high heat will help the skin become wonderfully crispy, while the interior remains juicy and flavorful.
Get ready to enjoy the mouthwatering aroma that will soon fill your kitchen!
Step 4. Rub With Herb-Garlic Butter
Next, create a flavorful herb-garlic butter to rub all over the chicken. In a small bowl, combine 4 tablespoons of softened unsalted butter, 2 cloves of minced garlic, 1 teaspoon of chopped fresh thyme, 1 teaspoon of chopped fresh rosemary, and a pinch of salt and pepper.
Mix the ingredients together until they're well-incorporated. Gently loosen the skin of the chicken, being careful not to tear it. Spread half of the herb-garlic butter directly onto the meat under the skin.
Rub the remaining butter all over the outside of the chicken, making sure to cover every nook and cranny. This aromatic, golden-brown layer of butter will baste the chicken as it roasts, infusing it with mouthwatering flavor.
Once the chicken is fully coated, it's ready to go into the preheated oven. The herb-garlic butter will transform this heritage bird into a showstopping main course.
Step 5. Roast Chicken Until Golden Brown
Preheat your oven to 425°F. Place the prepared chicken in a large roasting pan or rimmed baking sheet. Make sure the chicken is centered and not touching the sides of the pan.
Roast the chicken for 45-55 minutes, basting it every 15 minutes with the pan juices. The chicken is done when the juices run clear, and the internal temperature reaches 165°F in the thickest part of the thigh.
Once the chicken is cooked through, transfer it to a cutting board and let it rest for 10-15 minutes. This allows the juices to redistribute throughout the meat, resulting in a more tender and flavorful bird.
While the chicken rests, take a moment to admire its beautiful golden-brown skin. The herb-garlic butter has done its job, creating a crisp, flavorful exterior that's sure to impress your guests.
Final Thoughts
As you set the table and gather your loved ones, savor the delightful aromas that have filled your home. The whole roasted heritage chicken you've just prepared is sure to impress with its golden-brown skin and juicy, flavorful meat. This dish isn't just a meal – it's an experience to be savored.
With your first bite, you'll be transported by the complex interplay of spices and the natural sweetness of the heritage breed. Each slice reveals the care and attention you've put into this roast, from the perfect seasoning to the gentle basting that's produced such a stunning presentation.
As you enjoy this special meal together, take a moment to appreciate the joy of sharing a homemade dish made with quality ingredients. This is the kind of meal that nourishes both the body and the soul, and it's sure to become a new family favorite.
Savor every last morsel, then sit back and bask in the satisfied smiles all around.
Frequently Asked Questions
Can I Substitute a Regular Chicken for a Heritage Chicken?
You certainly can substitute a regular chicken for a heritage chicken. The cooking time and method will be similar, though the flavor and texture may differ slightly. Feel free to experiment and find what works best for your preferences.
How Long Does It Take to Prepare a Whole Roasted Heritage Chicken?
The preparation time for a whole roasted heritage chicken can vary, but it typically takes 60-90 minutes to properly cook it. The exact time will depend on the size of the bird and your oven temperature.
What Are the Best Side Dishes to Serve With Roasted Heritage Chicken?
When serving roasted chicken, you'll want complementary side dishes that enhance the flavors. Consider roasted vegetables, mashed potatoes, a fresh salad, or crusty bread to create a well-balanced and delightful meal.
Can I Use This Recipe for a Smaller or Larger Heritage Chicken?
You can certainly use this recipe for a smaller or larger heritage chicken. Just adjust the cooking time accordingly – a smaller bird will need less time, while a larger one will require more. The core technique remains the same.
How Can I Tell if a Heritage Chicken Is Cooked Through?
To tell if a heritage chicken is cooked through, use a meat thermometer. Insert it into the thickest part of the thigh, avoiding the bone. The internal temperature should reach 165°F (74°C) for doneness.
Ethan’s passion for farm-to-table cooking comes through in every dish he creates. He focuses on fresh, organic, and locally sourced ingredients, crafting seasonal recipes that celebrate the natural flavors of the earth. Based in California, Ethan’s modern approach to cooking is all about sustainability and simplicity.
Farm-to-Table Cooking
Nettle and Potato Soup
Savor the earthly delights of Nettle and Potato Soup, a budget-friendly dish packed with vitamins and minerals that will keep you feeling full and nourished.
Nettles and potatoes combine for a comforting, nourishing soup enjoyed across Europe for centuries. You'll love the earthy, balanced flavors. First, sauté onions and garlic, then add potatoes and broth. Towards the end, toss in fresh nettle leaves – their vitamins and minerals make this soup super healthy. The potatoes provide carbs for energy, while the high fiber keeps you feeling full. This budget-friendly dish is easy to customize with different herbs or veggies. Discover how versatile this soup can be as you continue exploring its benefits.
Key Takeaways
- Nettle and potato soup is a traditional dish with a history traced back to ancient Greece and Rome, where nettles were used as a survival food.
- Nettles are highly nutritious, containing essential vitamins, minerals, antioxidants, and fiber, making them a healthy addition to this comforting soup.
- The recipe involves sautéing onions and garlic, then adding potatoes, nettles, and broth to create a flavorful and satisfying soup.
- Proper handling and cooking of nettles are crucial to remove bitterness and enhance the overall taste and texture of the dish.
- The versatility of the recipe allows for adaptations with different herbs, seasonal vegetables, and the ability to adjust consistency and serve as a base for other soups or stews.
History
Nettles, with their stinging leaves, have long been a part of culinary traditions across Europe. These resilient plants have been foraged and used in cooking for centuries, prized for their nutritional benefits and unique flavor.
Interestingly, the earliest known records of nettle consumption date back to ancient Greece and Rome, where the leaves were used in soups, stews, and even as a green vegetable.
During the Middle Ages, nettles became an important survival food, particularly in times of scarcity. Peasants and the working class would gather the wild plants, which were abundant and easy to obtain, to supplement their diets.
The nettle's ability to thrive in a variety of soil conditions made it a reliable and accessible ingredient, even in the harshest of environments.
Today, the humble nettle continues to be celebrated in regional cuisines, with nettle and potato soup being a classic example of its enduring presence in European culinary traditions.
Recipe
Nettle and Potato Soup
Nettle, a common weed often found in damp areas, is a surprisingly versatile and nutritious ingredient. Its earthy, spinach-like flavor lends itself beautifully to hearty soups and stews. Pairing it with the humble potato creates a comforting, nourishing dish that's sure to delight the senses.
This recipe showcases the harmony of these two ingredients, resulting in a vibrant, flavorful soup that's both satisfying and easy to prepare. The nettle's subtle bitterness is balanced by the potato's starchy creaminess, making for a well-rounded and deeply satisfying experience.
- 1 lb (450g) fresh nettle leaves, washed and stems removed
- 3 medium potatoes, peeled and diced
- 1 onion, diced
- 3 cloves of garlic, minced
- 4 cups (1 liter) vegetable or chicken broth
- 2 tbsp olive oil
- Salt and pepper to taste
In a large pot, sauté the onion and garlic in the olive oil over medium heat until translucent. Add the diced potatoes and broth, and bring to a boil. Reduce heat and simmer for 15-20 minutes, until the potatoes are tender.
Gently stir in the nettle leaves and continue to simmer for another 5-10 minutes, until the nettle is wilted and tender. Season with salt and pepper to taste.
It's important to handle the nettle with care, as the leaves can cause a stinging sensation on the skin. Be sure to wear gloves when harvesting and preparing the nettle.
The soup can be served as a main course or as a side, and it pairs wonderfully with crusty bread or a fresh salad.
Cooking Steps
First, harvest some fresh nettle leaves from your garden or local forager.
Then, peel and chop the potatoes into bite-sized pieces.
Next, sauté the onions in a pot until they're translucent, about 5 minutes.
After that, add the nettles and pour in the vegetable stock.
Step 1. Harvest Fresh Nettle Leaves
Gather your gardening gloves and a pair of scissors as you venture into the lush greenery to collect the delicate nettle leaves.
These remarkable plants thrive in moist, shaded areas, so keep an eye out for them along the edges of forests or near stream banks. When you spot a nettle plant, gently grasp the leaves near the stem and snip them off, taking care to avoid the prickly stems.
Be sure to wear your gloves, as the leaves contain tiny, stinging hairs that can irritate unprotected skin. Collect only the fresh, vibrant green leaves, leaving behind any damaged or discolored ones.
Aim to gather about a handful of leaves per serving of soup. With your nettle bounty in hand, you're ready to bring their delightful flavor and nutritional benefits to your delectable Nettle and Potato Soup.
Step 2. Peel and Chop Potatoes
With the fresh nettle leaves safely collected, turn your attention to the potatoes.
You'll need to peel them first, so grab a sharp paring knife and get to work. Carefully slice off the skin, making sure to remove any eyes or blemishes. Once peeled, rinse the potatoes under cool water to wash away any dirt or debris.
Next, it's time to chop the potatoes into bite-sized pieces. Place them on a cutting board and, using a chef's knife, slice them into thin, even rounds.
Then, stack the rounds and cut them crosswise into cubes. Aim for pieces that are about 1/2-inch to 1-inch in size – this will help them cook evenly in the soup.
As you chop, be mindful of your fingers and use the knife safely. Take your time and focus on creating uniform potato pieces.
With the potatoes prepped, you're ready to add them to the soup and let the flavors meld together.
Step 3. Sauté Onions Until Translucent
Having peeled and chopped the potatoes, you'll now sauté the onions until they're translucent.
In a large pot or Dutch oven, heat a couple of tablespoons of olive oil over medium heat. Once the oil is shimmering, add the diced onions.
Stir the onions occasionally, letting them cook for about 5-7 minutes. You'll know they're ready when they've softened and turned a lovely, pale golden color.
Be careful not to let them brown too much, as you want the onions to be sweet and aromatic, not caramelized.
As the onions sauté, they'll release their natural sugars, creating a delightful aroma that will fill your kitchen.
This step is crucial for building the flavor base of the soup, so take your time and enjoy the process.
Once the onions are perfectly translucent, you can move on to the next step in creating your delicious Nettle and Potato Soup.
Step 4. Add the Nettles
Next, add the freshly harvested nettle leaves to the pot. Be careful when handling the nettles, as they can sting your skin.
Gently add them to the sautéed onions, stirring to combine. The nettles will quickly wilt down, releasing their earthy, bold flavor into the soup. Allow the nettles to cook for about 2-3 minutes, until they've softened. Their vibrant green color will contrast beautifully with the golden onions.
Nettles are packed with essential vitamins and minerals, so you're getting a nutritious boost in this soup.
Once the nettles have wilted, it's time to add the potatoes. Carefully cube the potatoes and gently stir them into the pot. The nettles and potatoes will now simmer together, blending their flavors and textures to create a hearty, comforting soup.
Get ready for the delicious aroma to fill your kitchen!
Step 5. Add Vegetable Stock
After adding the nettles, pour in the vegetable stock. You'll want to use about 4 cups of stock to cover the nettles and potatoes.
Bring the mixture to a gentle simmer, then let it cook for 15-20 minutes. This allows the flavors to meld and the vegetables to become nice and tender.
As the soup simmers, the stock will infuse the nettles and potatoes with a delicious savory flavor. The stock helps to balance out the slight bitterness of the nettles. You can use a homemade vegetable stock, or opt for a high-quality store-bought version.
Either way, the stock ties all the ingredients together into a harmonious, comforting soup.
Be sure to taste the soup as it cooks and adjust the seasoning as needed. You may want to add a pinch of salt and pepper to enhance the flavors.
The soup should have a nice, velvety texture when it's done. Serve it hot, garnished with a sprinkle of fresh herbs if desired.
Final Thoughts
This nettle and potato soup is a comforting and nourishing dish that showcases the humble ingredients in a delightful way. The combination of earthy nettles and starchy potatoes creates a flavorful and satisfying soup that's perfect for cool evenings or as a light meal.
The key is to handle the nettles carefully and thoroughly cook them to remove any unpleasant bitterness. The potato chunks add substance and creaminess, while the vegetable stock provides a savory backdrop.
Don't be afraid to experiment with different herbs and seasonings to suit your personal preferences. Once you've mastered this recipe, you can easily adapt it to use up other seasonal vegetables or adjust the consistency to your liking.
This soup is a versatile and budget-friendly option that's sure to become a staple in your recipe repertoire. Enjoy the comforting flavors and nourishing benefits of this simple yet delicious nettle and potato soup.
Frequently Asked Questions
Are Nettles Edible, and How Do I Safely Handle Them?
Yes, nettles are edible and packed with nutrients. To handle them safely, wear gloves to avoid the stinging leaves. Gently rinse them and cook thoroughly to remove the sting before enjoying their earthy, spinach-like flavor.
What Are the Health Benefits of Consuming Nettles?
Consuming nettles provides an array of health benefits. They're rich in vitamins and minerals, like vitamins A, C, and K, as well as iron and calcium. Nettles also have anti-inflammatory properties, making them a nutritious addition to your diet.
Can I Substitute Spinach or Kale for Nettles in the Recipe?
You can substitute spinach or kale for nettles in a recipe, but you won't get the same nutritional benefits. Nettles are packed with vitamins, minerals, and antioxidants that spinach and kale may not provide in the same quantities.
How Long Does the Soup Keep, and Can It Be Frozen?
The soup can typically last 3-4 days in the refrigerator and can be frozen for up to 3 months. When ready to serve, simply thaw it in the fridge and reheat it on the stovetop.
Can I Use a Blender Instead of a Hand Blender for the Soup?
You can certainly use a blender instead of a hand blender for the soup. Just be careful not to overfill the blender and work in batches, if needed, to ensure a smooth and consistent texture.
Ethan’s passion for farm-to-table cooking comes through in every dish he creates. He focuses on fresh, organic, and locally sourced ingredients, crafting seasonal recipes that celebrate the natural flavors of the earth. Based in California, Ethan’s modern approach to cooking is all about sustainability and simplicity.
Farm-to-Table Cooking
Grilled Peach and Burrata Salad
Luscious grilled peaches and creamy burrata come together in a refreshing summer salad that will tantalize your taste buds and leave you craving more.
Grilled peach and burrata salad is a tantalizing blend of sweet, savory, and tangy flavors that'll transport you straight to the heart of Italy. First, you'll grill juicy peaches to bring out their natural sugars and add a smoky edge. Then, you'll nestle the grilled peaches alongside creamy burrata cheese, creating a textural contrast that'll delight your senses. Topped with a balsamic glaze and fresh herbs, this dish is both visually stunning and bursting with Mediterranean flair. It's the perfect light and refreshing meal for summer – and if you keep reading, you'll discover even more delectable details about this culinary masterpiece.
Key Takeaways
Key points about Grilled Peach and Burrata Salad:
- The salad originates from Italian culinary traditions, combining sweet grilled peaches with creamy burrata cheese and showcasing seasonal Mediterranean produce.
- The dish balances sweet, savory, and tangy flavors, with grilled peaches adding smoky notes and burrata's creamy texture contrasting beautifully.
- The cooking process involves preheating the grill, brushing peach slices with oil, and grilling them for 2-3 minutes per side to achieve caramelization.
- The visually stunning presentation features grilled peach slices arranged with burrata cheese, drizzled with balsamic glaze, and garnished with fresh basil leaves and flaky sea salt.
- The salad is nutritious, rich in vitamins from the seasonal produce, while burrata adds protein and healthy fats, making it a balanced and refreshing summer dish.
History
Although the exact origins of the grilled peach and burrata salad are unclear, it's believed to have emerged from the culinary traditions of Italy, where the pairing of sweet, juicy peaches and creamy, rich burrata cheese has long been a beloved flavor combination.
The dish likely evolved as a way to showcase the beautiful, seasonal produce common in Mediterranean cuisines, with the grilled peaches adding a delightful smoky-sweet note and the burrata providing a luscious, indulgent contrast.
Over time, the salad has gained popularity worldwide, becoming a summertime favorite for its ability to capture the essence of the season in a single bite.
Whether served as a light starter or a main course, the grilled peach and burrata salad continues to delight and inspire home cooks and chefs alike, who find endless ways to riff on the classic combination and make it their own.
Recipe
Grilled peaches are a delightful summer treat, and when paired with creamy burrata cheese, they create a sophisticated and flavorful salad. The smoky, caramelized notes of the grilled peaches complement the rich, velvety texture of the burrata beautifully. This dish is a perfect balance of sweet, savory, and tangy flavors, making it an ideal choice for a light and refreshing meal.
The key to this salad is to grill the peaches just until they develop a slight char, which brings out their natural sweetness and enhances the overall dish. The burrata cheese, with its soft, mozzarella-like interior and creamy exterior, provides a luxurious contrast to the grilled peaches.
- 4 ripe peaches, halved and pitted
- 8 ounces burrata cheese
- 2 cups mixed greens
- 1/4 cup balsamic vinegar
- 2 tablespoons olive oil
- 1 teaspoon honey
- Salt and freshly ground black pepper to taste
Preheat a grill or grill pan to medium-high heat. Brush the peach halves with a small amount of olive oil and grill for 2-3 minutes per side, or until they develop grill marks and become slightly softened. Remove the grilled peaches from the heat and set aside to cool slightly.
In a large salad bowl, combine the mixed greens, grilled peach halves, and burrata cheese. Drizzle the balsamic vinegar, remaining olive oil, and honey over the salad, and gently toss to coat. Season with salt and pepper to taste.
Serve the grilled peach and burrata salad immediately, while the peaches are still warm and the burrata is at its creamiest.
For best results, use ripe, in-season peaches and high-quality burrata cheese. The contrasting textures and flavors of this dish make it a refreshing and impressive summer salad that's sure to delight your guests.
Cooking Steps
Preheat your grill to medium-high heat.
Brush the peach slices lightly with olive oil, then grill them until they're nicely charred.
Arrange the grilled peaches and creamy burrata on a plate, and drizzle the whole thing with a tantalizing balsamic glaze.
Step 1. Preheat Grill to Medium-High Heat
First, make sure to preheat your grill to a medium-high heat. You'll want to get those grates nice and hot so the peaches can develop those irresistible grill marks.
It's important to let the grill fully preheat, which should take around 10-15 minutes. While you're waiting, go ahead and prep the rest of your ingredients so you're ready to go once the grill is hot.
Once the grill is preheated, you can start adding the peach slices. Be careful when placing them on the grates – you don't want them to stick or fall through.
Let the peaches sizzle and caramelize for 2-3 minutes per side, until they're tender and charred in all the right places. Keep an eye on them to make sure they don't overcook.
Perfectly grilled peaches are the star of this salad, so you'll want to nail that step. With the grill ready to go, you can now move on to assembling the rest of the dish.
Step 2. Brush Peaches With Olive Oil
Before placing the peach slices on the hot grill grates, you'll want to brush them lightly with olive oil. This helps create a delicious caramelized crust on the outside of the peaches while keeping the inside juicy and tender.
Take a pastry brush and gently coat the surface of each peach slice, making sure to get an even layer of oil. Don't be afraid to use a bit more oil if the peaches seem dry – you want them to have a nice sheen.
Once they're oiled up, you're ready to pop them onto the preheated grill. Be careful when handling the hot peach slices, and use tongs to turn them over for even cooking. The goal is to get those beautiful grill marks without overcooking the fruit.
Keep a close eye on them, and remove from heat as soon as they're softened and lightly charred around the edges. Now you've got perfectly grilled peach slices, ready to assemble into your tasty salad.
Step 3. Grill Peaches Until Lightly Charred
Once the grill is hot and ready, carefully place the oiled peach slices directly onto the grates.
Let them sizzle and char, turning them occasionally with tongs, until they're lightly golden and caramelized all over, about 2-3 minutes per side.
You'll know they're done when they're soft and tender, with those irresistible grill marks adding an extra layer of flavor.
Don't be tempted to move them too much – let them get that nice char before flipping.
The key is to get a quick sear on the peaches without overcooking them.
Once they're perfectly grilled, use the tongs to transfer the peach slices to a plate or platter, ready to assemble your salad.
The smoky, sweet peaches will be the star of the show, so be sure to savor every bite!
Step 4. Arrange Peaches and Burrata on Plate
Arrange the grilled peach slices in a single layer on a serving plate or platter.
Gently place the fresh burrata cheese in the center of the arrangement, allowing its soft, creamy texture to contrast with the charred, juicy peaches.
Drizzle the entire dish with a high-quality balsamic glaze, letting it seep between the peach slices and around the burrata.
Sprinkle a few fresh basil leaves over the top, their vibrant green color and aromatic flavor complementing the sweetness of the peaches and the richness of the cheese.
Finally, finish the salad with a light sprinkle of flaky sea salt, which will enhance the natural flavors and bring everything together in a harmonious balance of textures and tastes.
Step back and admire your beautifully assembled grilled peach and burrata salad, ready to be enjoyed by family and friends.
Step 5. Drizzle With Balsamic Glaze
Drizzle the balsamic glaze generously over the arranged peach slices and burrata cheese. The sweet-tart glaze will complement the juicy peaches and creamy burrata perfectly.
Use a spoon to slowly drizzle the glaze in a zig-zag motion across the entire plate. Make sure to get a little bit of the glaze on each piece of fruit and cheese. The balsamic will soak into the peaches, adding an extra layer of flavor.
Plus, the glossy sheen of the glaze will make your salad look extra appetizing. Don't be afraid to use a generous amount – you want enough glaze to coat everything nicely. The balsamic will provide a nice balance to the richness of the burrata.
Take your time and enjoy the process of artfully drizzling the glaze over your creation.
Final Thoughts
With the flavors of juicy grilled peaches, creamy burrata, and a tangy vinaigrette, this Grilled Peach and Burrata Salad is the perfect summer dish.
You'll marvel at how the sweet, caramelized peaches pair so beautifully with the rich, luxurious burrata. The addition of fermented vegetables can add a probiotic boost and a delightful crunch to this salad, enhancing its nutritional profile. The balsamic glaze adds a delightful touch of acidity, elevating the entire salad.
This dish is a true celebration of seasonal produce. The grilling brings out the peaches' natural sweetness, while the burrata provides a creamy, indulgent contrast. The vinaigrette ties it all together, offering a refreshing balance of flavors.
It's a salad that's both visually stunning and incredibly delicious.
When you serve this Grilled Peach and Burrata Salad, your guests will be impressed by the thoughtful combination of ingredients and the attention to detail.
It's a dish that's sure to become a summer staple, perfect for al fresco dining or as a light and satisfying main course.
Frequently Asked Questions
Can I Use Other Types of Cheese Instead of Burrata?
Absolutely! You can use other types of cheese instead of burrata. Consider soft, creamy cheeses like fresh mozzarella, ricotta, or even goat cheese. They'll all pair beautifully with the grilled peaches and complement the salad's flavors.
Is It Possible to Grill the Peaches in Advance?
Yes, you can grill the peaches in advance. Just be sure to store them properly in the refrigerator until you're ready to assemble your salad. This will save you time and ensure your peaches retain their flavor and texture.
What Type of Lettuce or Greens Work Best in This Salad?
For a refreshing salad, you can't go wrong with mixed greens like arugula, spinach, or spring mix. Their peppery or delicate flavors pair perfectly with the sweetness of the grilled peaches and creamy burrata cheese.
How Long Can the Salad Be Stored Before Serving?
You can store the salad for up to 2 days in the fridge, but it's best to dress it right before serving. This will prevent the greens from getting soggy and the flavors from melding too much.
Can I Substitute Balsamic Vinegar for the Honey-Lemon Dressing?
You can substitute balsamic vinegar for the honey-lemon dressing, but the flavors won't be the same. The balsamic will provide a more intense, tangy note compared to the honey-lemon's sweetness. Consider how it may impact the overall taste of the dish.
Ethan’s passion for farm-to-table cooking comes through in every dish he creates. He focuses on fresh, organic, and locally sourced ingredients, crafting seasonal recipes that celebrate the natural flavors of the earth. Based in California, Ethan’s modern approach to cooking is all about sustainability and simplicity.
-
Southern Comfort Food22 hours ago
Cheese Straws
-
African Cuisine1 day ago
Poulet DG (Cameroon)
-
Southern Comfort Food24 hours ago
Creamed Corn
-
Brazilian Cuisine1 day ago
Caldeirada
-
Indian Meals21 hours ago
Gobi Manchurian
-
Southern Comfort Food23 hours ago
Squash Casserole
-
Polish Comfort Food22 hours ago
Potatoes With Sour Milk
-
Polish Comfort Food23 hours ago
Krupnik (Barley Soup)