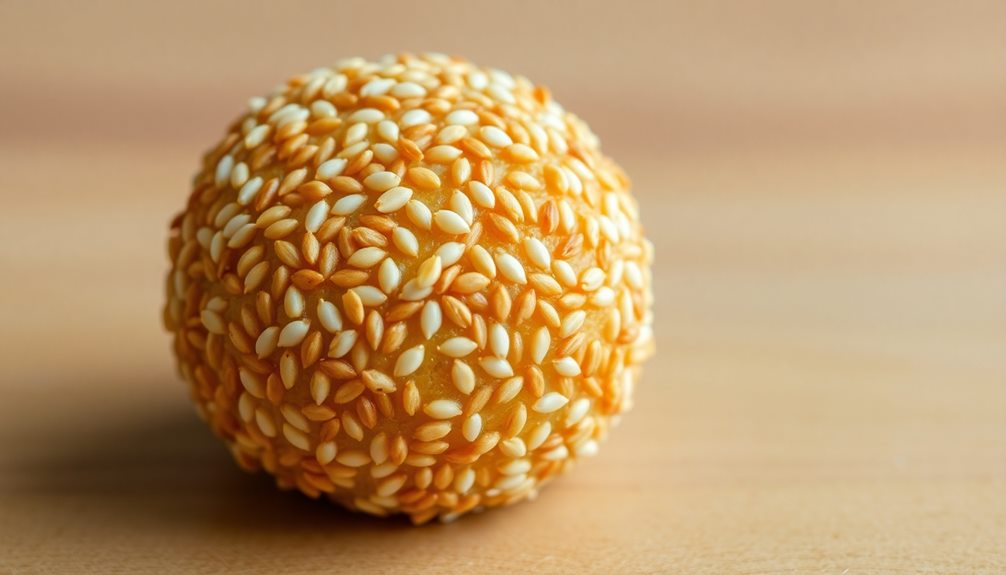

You'll love sinking your teeth into the addictive Vietnamese sesame ball – a snack that's delightfully crispy on the outside and wonderfully chewy on the inside. These morsels have been enjoyed for centuries, with their irresistible balance of nutty sesame and sweet filling captivating taste buds across generations. Crafted with care, the sesame balls start with soaking glutinous rice flour overnight, then get kneaded into an elastic dough, filled with a delectable surprise, and fried to golden perfection. One bite reveals why this timeless Vietnamese treat continues to delight – and if you keep reading, you'll uncover the secrets to making them yourself.
Key Takeaways
- Vietnamese sesame balls are a beloved snack with a crispy sesame coating and chewy interior, originating from Vietnam's rich culinary heritage.
- The key to the perfect texture lies in soaking the glutinous rice flour overnight and kneading the dough to release the gluten.
- Filling the dough balls with a sweet red bean paste and rolling them in toasted sesame seeds creates a delightful balance of flavors.
- Frying the sesame balls until golden brown results in a crispy exterior while maintaining a soft, chewy center.
- Enjoyed as a snack or dessert, Vietnamese sesame balls offer a satisfying sensory experience with their unique combination of textures and tastes.
Top picks for "vietnamese sesame ball"
Open Amazon search results for this keyword.
As an affiliate, we earn on qualifying purchases.
History

The sesame ball, a beloved Vietnamese delicacy, traces its origins to the country's rich culinary heritage. This tasty treat has been enjoyed by generations of Vietnamese families, with its origins dating back centuries.
The sesame ball is believed to have first emerged in the bustling markets of ancient Vietnamese cities, where vendors would skillfully craft these small, golden spheres filled with a sweet, sticky rice center.
Over time, the sesame ball has become a beloved part of Vietnamese culture, often served during special occasions and celebrations. The unique combination of crispy sesame coating and chewy, sweet interior has captivated the taste buds of locals and visitors alike.
Today, the sesame ball remains a beloved snack, carrying on the traditions of Vietnamese cuisine and delighting those who savor its delectable flavors.
Cooking Steps
To begin the cooking process, first prepare a work surface by lightly dusting it with flour. This will prevent the sticky dough from sticking as you roll and shape the sesame balls.
Next, in a medium-sized bowl, mix the glutinous rice flour, warm water, and a pinch of salt until a soft, pliable dough forms. Knead the dough for a minute or two until it's smooth and elastic.
Divide the dough into 12 equal pieces and roll each one into a small ball. Flatten the balls slightly, then place a teaspoon of the sweet filling in the center of each one. Carefully wrap the dough around the filling, pinching and sealing the edges to enclose it completely.
Now, it's time to roll the filled balls in the toasted sesame seeds, coating them evenly.
Gently place the coated sesame balls in the hot oil and fry them for 2-3 minutes, turning occasionally, until golden brown. Drain the fried sesame balls on a paper towel-lined plate and serve warm, ready to be savored and enjoyed.
Step 1. Soak Glutinous Rice Flour Overnight
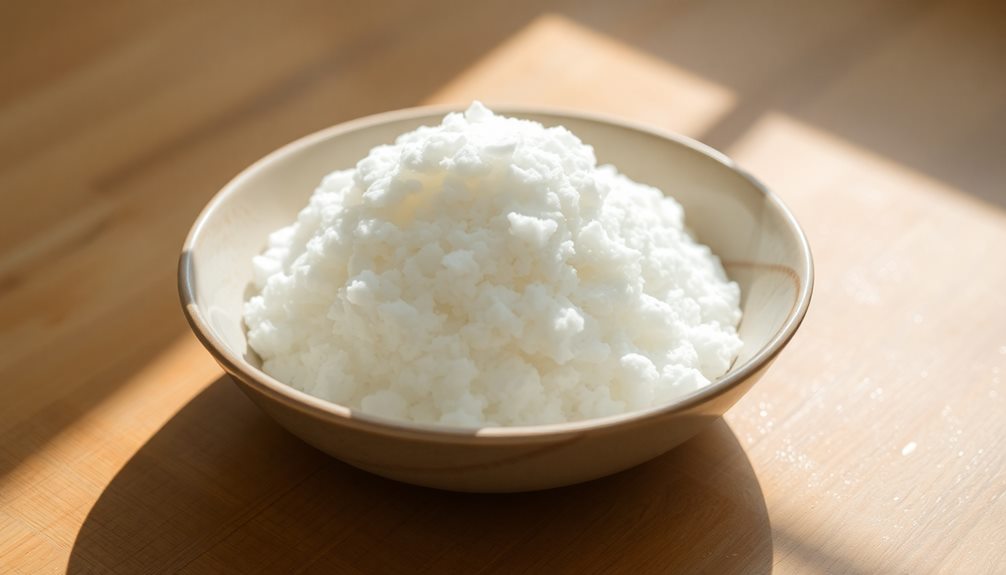
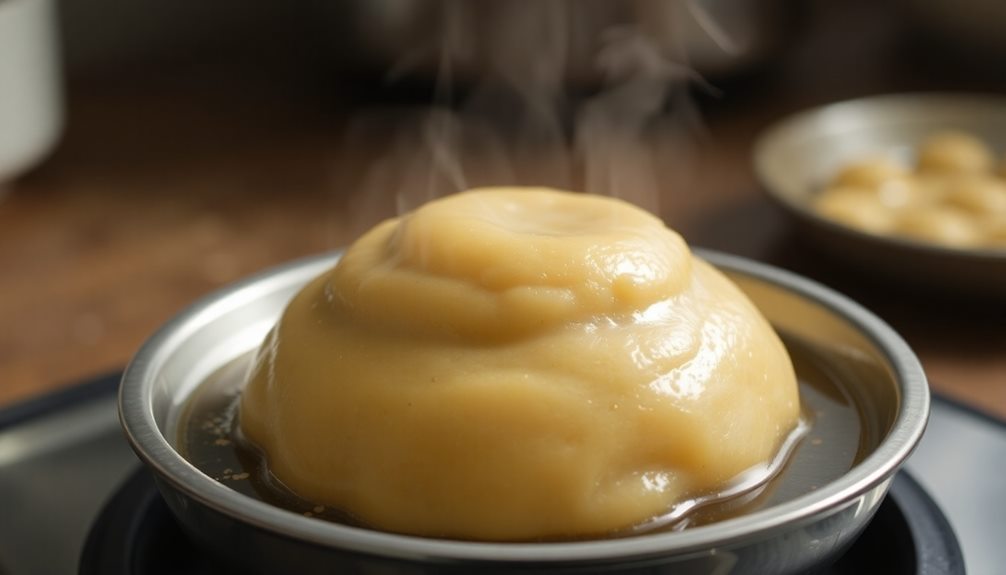
Start by soaking the glutinous rice flour overnight. This crucial step helps the flour absorb moisture, making it easier to work with later.
Simply place the rice flour in a large bowl, then add enough water to cover it completely. Let it sit on the counter for 8 to 12 hours, stirring occasionally. The flour will transform into a smooth, sticky dough-like consistency.
After the soaking time is up, drain any excess water from the bowl. The glutinous rice flour should now have a soft, pliable texture.
This pre-soaking is what gives Vietnamese sesame balls their signature chewy and stretchy quality. It's an essential step you can't skip.
With the flour ready, you can now move on to the next part of making these delightful treats – shaping the dough into balls and coating them in a layer of toasted sesame seeds.
Get ready for the sweet, nutty flavors and irresistible texture that await!
Step 2. Knead the Dough Thoroughly
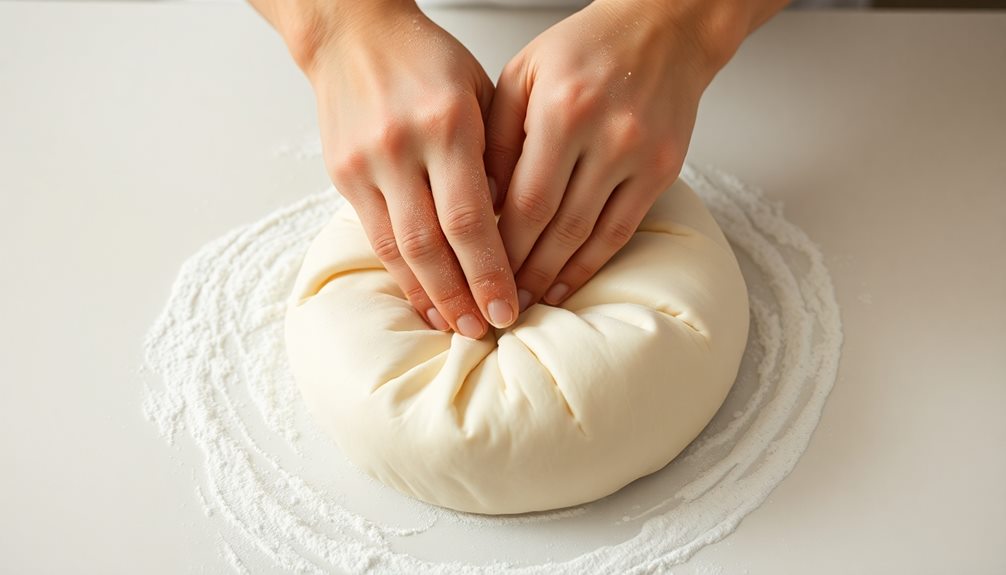
Once the glutinous rice flour has finished soaking, it's time to knead the dough thoroughly. This is a crucial step that ensures your Vietnamese sesame balls will have the perfect chewy texture.
Kneading also helps release gluten, which can enhance the texture of your dough, similar to how certain herbs like turmeric can aid in overall health and inflammation management natural supplement for chronic inflammation.
Grab the dough and start kneading it with your hands. Push the dough down, then fold it over itself. Keep repeating this motion, using the heel of your hand to really work the dough. You'll notice it becoming smoother and more pliable the more you knead it.
Don't be afraid to put some muscle into it – the more you knead, the better the dough will be. Spend about 5-10 minutes kneading until the dough is silky and elastic. If it starts to stick to your hands, just lightly dust them with some more glutinous rice flour.
Once the dough is properly kneaded, it's ready to be shaped into those delightful sesame balls. Get ready for some tasty, chewy goodness!
Step 3. Fill Sesame Balls
With the dough thoroughly kneaded, you can now start filling the sesame balls.
Take a small amount of the dough, about the size of a golf ball, and roll it into a smooth, round shape in the palm of your hand.
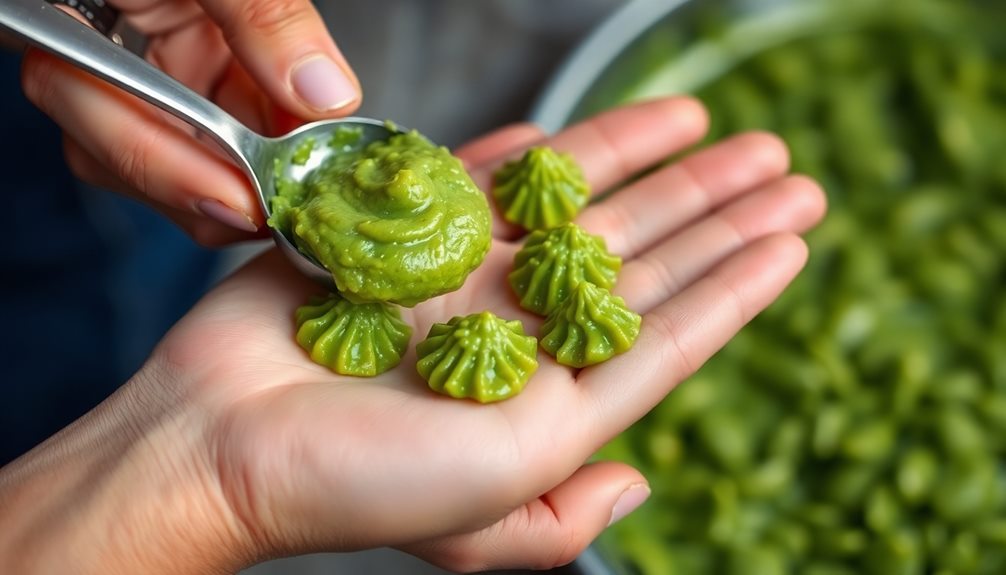
Next, use your finger to create a small indent in the center of the dough ball. Carefully spoon a teaspoon of the sweet red bean filling into the indent, making sure not to overfill it.
Gently pinch the dough around the filling, sealing it in completely. Roll the filled ball gently between your palms to smooth out any seams or cracks.
Continue this process until you've filled all the dough balls. Be gentle and take your time – the key is to ensure the filling is fully encased within the dough.
With your sesame balls ready, it's time to move on to the next step: deep-frying them to golden perfection.
Step 4. Fry the Sesame Balls Until Golden
To fry the sesame balls, heat about 2-3 inches of vegetable oil in a heavy-bottomed pot or wok over medium-high heat.
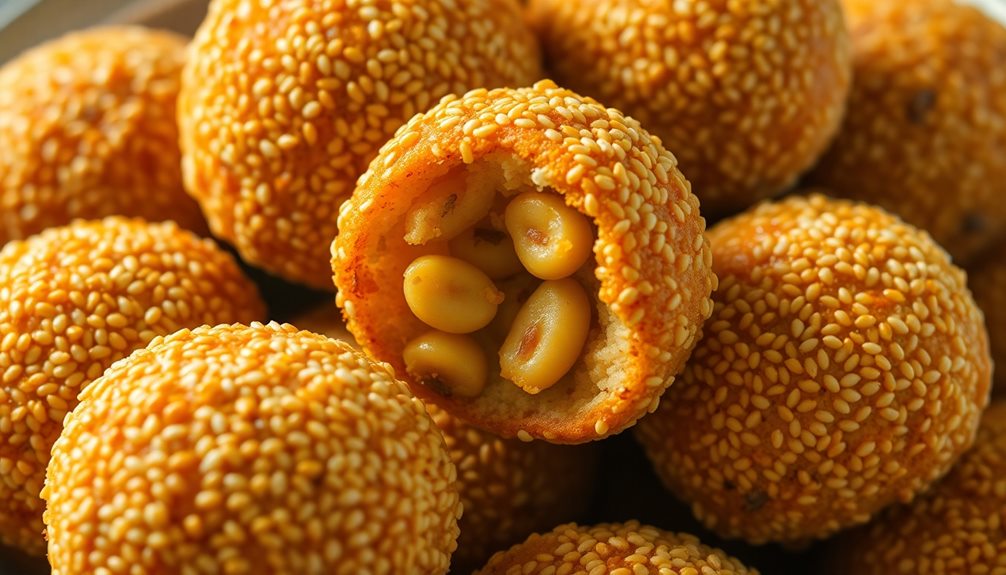
Once the oil is hot, gently drop the sesame balls into the oil, making sure not to overcrowd the pot. Fry the balls, turning them occasionally, until they're a beautiful golden brown all over, about 2-3 minutes.
Be careful, as the hot oil can splatter. Use a slotted spoon to transfer the fried sesame balls to a paper towel-lined plate to drain off any excess oil.
This step is crucial to get that perfect crispy outside and soft, chewy inside.
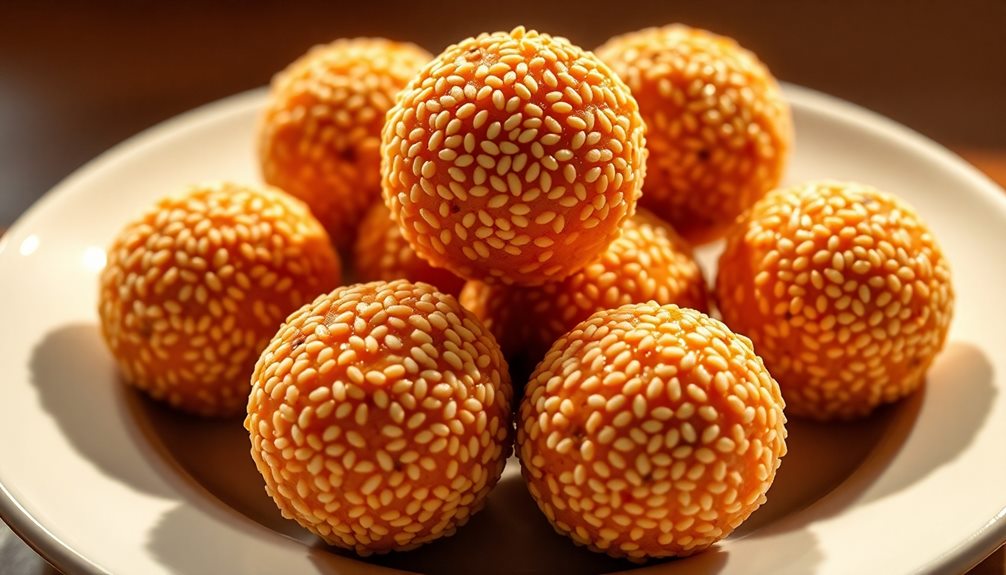
Once they've cooled slightly, you can serve the Vietnamese sesame balls warm, either plain or with a sweet dipping sauce on the side.
The combination of the crunchy exterior and the soft, sweet filling is absolutely irresistible. Enjoy this tasty treat with family and friends!
Step 5. Allow to Cool

After frying the sesame balls, let them cool slightly on the paper towel-lined plate. This will help absorb any excess oil, making them delightfully crispy on the outside.
Don't be tempted to dig in right away! Give them a few minutes to cool – you don't want to burn your tongue. As they sit, the insides will firm up, creating a lovely, chewy texture.
Once they've had a chance to rest, it's time to enjoy your homemade Vietnamese treats. Carefully transfer the sesame balls to a serving plate or bowl. They'll be hot, so use tongs or a spoon to handle them.
Now you can share these delicious snacks with your friends and family. The combination of the crunchy exterior and the soft, sweet filling is simply irresistible.
Savor each bite and let the flavors dance on your tongue. These sesame balls are the perfect balance of savory and sweet – a true delight for your taste buds!
Final Thoughts
These Vietnamese sesame balls are a delightful and satisfying treat. With their crisp, golden exteriors and soft, chewy centers, they offer a wonderful blend of textures and flavors that will delight your taste buds. The subtle sweetness of the filling pairs beautifully with the nutty aroma of toasted sesame seeds, creating a perfect balance in every bite. For an extra layer of indulgence, these sesame balls can be enjoyed alongside a dish that embraces the Vietnamese yogurt flavor profile, which is known for its rich, creamy tartness. Together, they make for a harmonious and refreshing combination that contrasts and complements the sesame balls’ textures and flavors.
The nutty aroma of the sesame seeds and the sweetness of the mung bean filling create a harmonious pairing that's simply irresistible.
Whether you're enjoying them as a snack, a dessert, or a special occasion treat, these sesame balls are sure to bring a smile to your face. Their compact size makes them easy to pop in your mouth, and their portability means you can savor them on the go.
As you bite into the sesame-coated crust, the warmth of the filling will spread through your mouth, creating a delightful sensory experience.
The combination of textures and flavors is sure to leave you craving more.
Frequently Asked Questions
Where Can I Buy Vietnamese Sesame Balls?
You can buy Vietnamese sesame balls at Asian grocery stores, specialty food shops, or online retailers that sell Vietnamese cuisine. Many Vietnamese restaurants and bakeries also offer these tasty treats on their menus.
How Long Do Homemade Sesame Balls Last?
Homemade sesame balls will typically last 3-5 days when stored in an airtight container at room temperature. They may soften over time, but they'll still be delicious. With proper storage, you can enjoy your homemade treats for several days.
Can I Substitute the Filling in Sesame Balls?
Yes, you can substitute the filling in sesame balls. Try different ingredients like sweetened mung bean paste, sweet potato, or even a savory filling like chicken or pork. Get creative and find a flavor you love.
Are Sesame Balls Gluten-Free?
Sesame balls typically contain wheat flour, which means they're not gluten-free. However, you can make gluten-free versions using ingredients like rice flour or glutinous rice flour instead. Just be sure to check the ingredients carefully.
How Do I Store Leftover Sesame Balls?
To store leftover sesame balls, you can keep them in an airtight container at room temperature for up to 3 days. Avoid refrigerating them as it'll make them dry and hard.