Connect with us

Vietnamese Cuisine

Mien Ga (Glass Noodle Chicken Soup)

Gluten-free and comforting, Mien Ga is a classic Vietnamese glass noodle chicken soup that’s easy to make at home and sure to delight your taste buds.

Published

on

glass noodle chicken soup

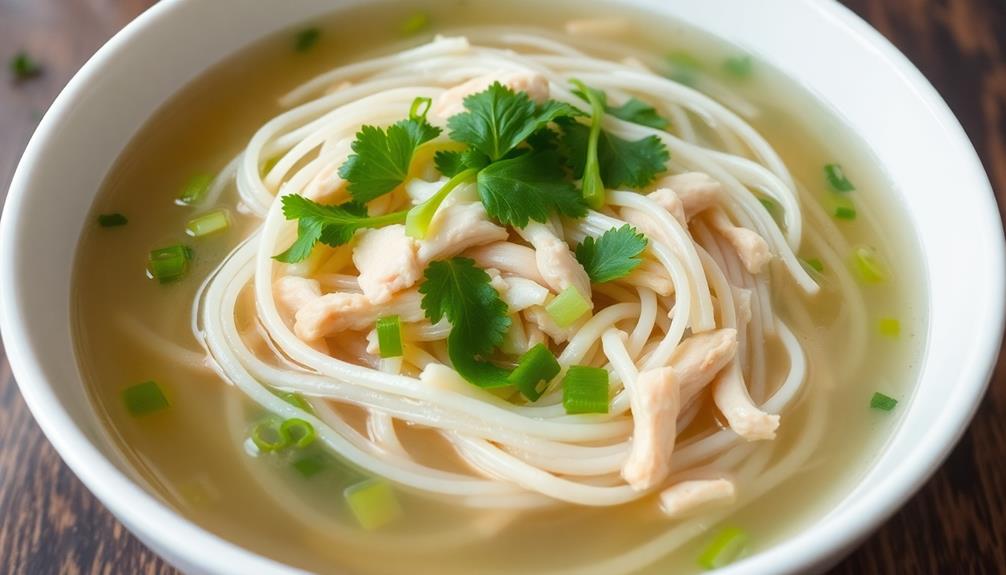
You'll love sinking your teeth into a comforting bowl of Mien Ga, the classic Vietnamese glass noodle chicken soup! This dish originated with Vietnamese immigrants in the early 1900s, blending tender shredded chicken, delicate glass noodles made from mung bean starch, and a rich, simmered broth infused with aromatic herbs. It's the perfect meal when you're feeling under the weather or craving something warm and nourishing. The chewy noodles, savory chicken, and fresh garnishes create a flavorful symphony that's sure to delight your taste buds. And you won't believe how easy it is to make at home! Let's dive into the recipe…

Key Takeaways

  • Mien Ga is a traditional Vietnamese dish featuring glass noodles and chicken, known for its comforting and nourishing qualities.
  • The dish originated in the early 20th century with Vietnamese immigrants in the U.S. and has evolved over decades with unique family variations.
  • The key ingredients include glass noodles, chicken (typically boiled or shredded), and a flavorful chicken broth, along with optional vegetables and garnishes.
  • The cooking process involves soaking the glass noodles, preparing the chicken broth, and combining the noodles and shredded chicken before serving with fresh herbs and lime.
  • Mien Ga is considered a healthy meal choice, low in calories, and rich in protein, vitamins, and minerals, making it a popular dish for recovery from illness.

History

The origins of Mien Ga can be traced back to the early 20th century when Vietnamese immigrants brought their culinary traditions to the United States. As these families settled in new communities, they began sharing their beloved recipes, and Mien Ga soon became a beloved dish across the country.

The name "Mien Ga" comes from the Vietnamese words for "glass noodle" and "chicken," reflecting the two main ingredients in this delightful soup. The glass noodles, made from mung bean starch, are delicate and chewy, while the tender chicken adds heartiness and flavor.

Over the decades, Mien Ga has evolved, with families adding their own unique twists and variations. Some might include mushrooms, while others might top it with fresh herbs or a sprinkle of roasted peanuts.

No matter the recipe, Mien Ga remains a comforting and authentic taste of Vietnamese cuisine.

Recipe

Mien Ga is a classic Vietnamese chicken noodle soup that's both comforting and flavorful. The key to a delicious Mien Ga lies in the broth, which is simmered for hours to extract the maximum amount of flavor from the chicken bones and aromatics. The use of butter in savory dishes can also enhance the flavor profile, making it a versatile addition to various recipes.

Advertisement

The addition of glass noodles, tender chicken, and a variety of fresh herbs and vegetables makes this dish a complete and satisfying meal. Mien Ga is often served as a lunch or dinner, but it can also be enjoyed as a light and nourishing breakfast.

  • 1 whole chicken or 3-4 lbs of chicken bones and parts
  • 1 large onion, halved
  • 3 inches fresh ginger, sliced
  • 5 cloves garlic, peeled
  • 2 tablespoons whole black peppercorns
  • 8 oz dried glass noodles
  • 2 cups shredded cooked chicken
  • 2 cups thinly sliced napa cabbage
  • 1 cup mung bean sprouts
  • 1/2 cup thinly sliced green onions
  • 1/4 cup chopped cilantro
  • Lime wedges, for serving

To prepare the dish, place the chicken, onion, ginger, garlic, and peppercorns in a large pot and cover with 8 cups of water. Bring to a boil, then reduce the heat and simmer for 2-3 hours, skimming any foam or impurities that rise to the surface.

Remove the chicken from the broth and shred the meat, discarding the skin and bones. Strain the broth to remove the solids, then return it to the pot and bring to a simmer.

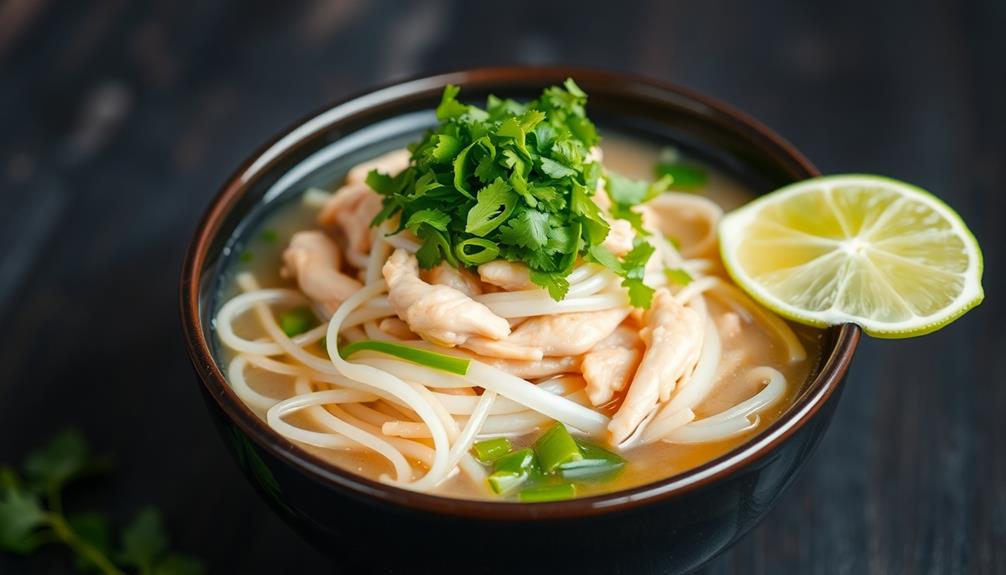
Add the glass noodles to the simmering broth and cook for 3-5 minutes, until tender. Stir in the shredded chicken, napa cabbage, bean sprouts, green onions, and cilantro. Serve the Mien Ga hot, with lime wedges on the side for squeezing over the top.

When cooking Mien Ga, be sure to use high-quality chicken bones or a whole chicken to ensure a rich and flavorful broth. Additionally, feel free to adjust the amounts of vegetables and herbs to your personal taste preferences.

Cooking Steps

First, soak those glass noodles in hot water until they're nice and soft.

Advertisement

Then, whip up a tasty chicken broth mixture and add the chicken and noodles.

Top it all off with your favorite garnishes, and serve it up piping hot with a squeeze of fresh lime. Yum!

Step 1. Soak Glass Noodles in Hot Water

soak glass noodles hot

To start, simply pour some hot water over the glass noodles and let them soak for a few minutes.

You'll see the noodles start to soften and absorb the water, becoming nice and pliable. Be sure to use hot water, as this helps the noodles soak up the liquid quickly.

Once they've had a few minutes to sit, you can give them a gentle stir to make sure all the noodles are submerged.

As they soak, the glass noodles will become translucent and silky. When they're ready, you can drain off the excess water and they'll be perfect for adding to your Mien Ga soup.

Advertisement

This easy step ensures your noodles are tender and ready to enjoy in the flavorful broth. So, don't skip this important prep work – those few minutes of soaking make all the difference!

Step 2. Prepare Chicken Broth Mixture

prepare chicken broth mixture

The next step is to prepare the flavorful chicken broth mixture.

You'll want to grab a large pot and add in 8 cups of water.

Now, it's time to add the star of the show – the chicken! Toss in a whole chicken or chicken pieces. Don't forget to season it up with a pinch of salt and pepper.

Now, let's get those aromatics going! Slice up an onion and a few cloves of garlic. Throw them right into the pot. For extra flavor, add a few slices of fresh ginger.

Bring the whole mixture to a boil, then reduce the heat and let it simmer for about 45 minutes. This will allow all the incredible flavors to blend together beautifully.

Advertisement

Once the chicken is cooked through, carefully remove it from the pot. Shred the meat off the bones and set it aside.

Now you've got a rich, flavorful broth ready to be the base of your delicious Mien Ga soup!

Step 3. Add Chicken and Noodles to Broth

combine chicken noodles broth

With the rich, aromatic broth prepared, it's time to build the foundation of your Mien Ga. First, add the shredded chicken to the simmering broth. Mmm, can you already smell the savory aroma?

Now, it's time for the star of the show – the glass noodles! Carefully drop the noodles into the broth, watching them dance and swirl as they absorb the flavorful liquid. Gently stir the noodles to ensure they're evenly distributed throughout the soup.

As the noodles soften, they'll create a delightful, slippery texture that's simply divine. Take a moment to admire the harmony of the chicken and noodles in the broth – it's a sight to behold!

Now, it's time to season the soup to your liking. Add a pinch of salt and a dash of pepper, tasting as you go to get the perfect balance of flavors.

Advertisement

With the chicken and noodles perfectly cooked, your Mien Ga is ready to be enjoyed!

Step 4. Add Garnishes

garnish your dish creatively

Once the chicken and noodles are nestled in the aromatic broth, it's time to add the final touches to your Mien Ga.

Start by slicing up some fresh herbs – fragrant cilantro, lively green onions, and zesty Thai basil. Sprinkle these colorful garnishes over the steaming soup, creating a vibrant and appetizing display.

Don't forget the crisp mung bean sprouts! Grab a handful and scatter them over the top, adding a delightful crunch to each bite.

For a burst of freshness, toss in a few thin slices of lime. The tangy citrus will complement the rich, savory broth perfectly.

Step 5. Serve Immediately With Lime Wedges

serve with lime wedges

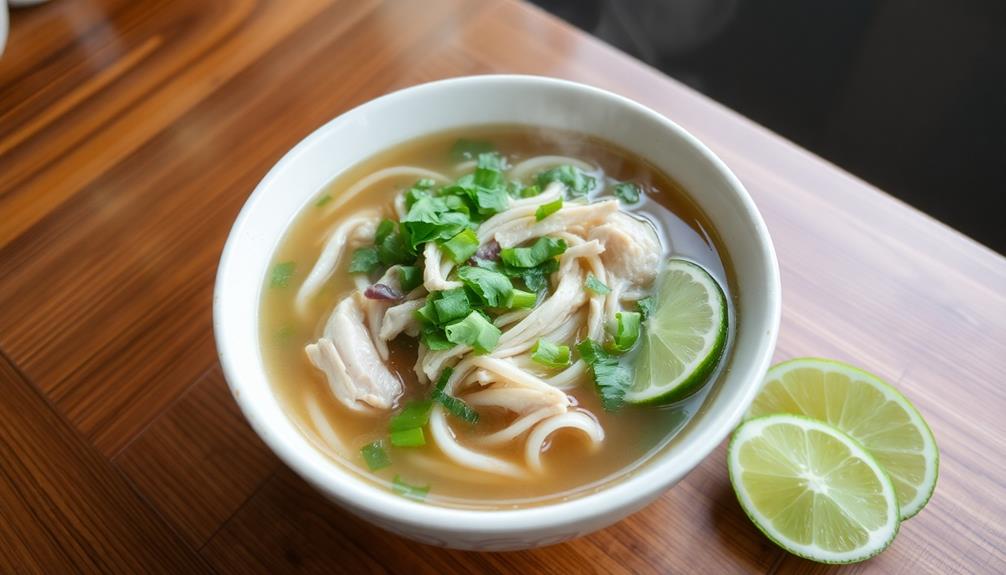
Serve the Mien Ga immediately, with a wedge of lime on the side. The bright, tangy flavor of the lime will perfectly complement the savory broth and tender chicken. Squeeze the lime over the top of the soup, letting the tangy juice mingle with the warm, aromatic liquid. The bright green color of the lime slice will also add a vibrant pop of color to your bowl, making it look as appetizing as it tastes.

Don't wait – dive right in and savor every slurp of the steaming hot soup. The fragrant lemongrass and ginger will dance on your tongue, while the soft glass noodles and shredded chicken provide a satisfying texture.

Advertisement

This comforting dish is sure to warm you from the inside out. So, grab your spoon and get ready to enjoy the delicious flavors of Mien Ga, with a refreshing lime wedge by your side.

Final Thoughts

As you've explored the intricacies of Mien Ga, it's important to reflect on the key takeaways. This delightful glass noodle chicken soup is a true delight for the senses. The perfectly tender chicken, the aromatic broth, and the satisfying chew of the noodles come together in perfect harmony.

Serving it immediately with a squeeze of fresh lime takes the flavors to the next level, brightening and balancing the dish.

What makes Mien Ga so special is its ability to warm the soul. It's a comforting and nourishing meal that can be enjoyed any time of the year. Whether you're feeling under the weather or simply craving something wholesome and delicious, this soup will hit the spot.

As you savor each spoonful, you'll be transported to a cozy and inviting atmosphere, surrounded by the flavors of Vietnam.

Advertisement

Frequently Asked Questions

How Long Can the Soup Be Stored in the Fridge?

You can typically store the soup in the fridge for up to 3-4 days. Be sure to keep it in an airtight container and reheat it thoroughly before serving to ensure food safety.

Can I Use Other Types of Noodles Instead of Glass Noodles?

You can certainly use other types of noodles instead of glass noodles. Try substituting rice noodles, udon, or even spaghetti for a different twist on the dish. The key is to choose a noodle that complements the flavors of the soup.

What Is the Ideal Temperature to Serve the Soup At?

The ideal temperature to serve the soup at is steaming hot, around 160-180°F (71-82°C). This temperature allows the flavors to shine and provides a comforting, nourishing experience. Adjust the heat according to your personal preference and enjoy the soup at its best.

Can I Substitute Chicken With Other Types of Meat?

You can certainly substitute the chicken with other types of meat in this dish. Pork, beef, or even shrimp would work well, allowing you to customize the recipe to your taste preferences.

How Spicy Is the Traditional Mien Ga Soup?

The traditional version of this soup isn't overly spicy. It has a mild, comforting flavor profile. However, you can certainly add more chili peppers or spices to make it as spicy as you'd like.

Advertisement
Continue Reading
Advertisement

Vietnamese Cuisine

Sugarcane Juice

You’ll be surprised by the refreshing, naturally sweet taste of homemade sugarcane juice, packed with essential vitamins and minerals.

Published

on

sweet refreshing tropical beverage

Sugarcane juice is a refreshing, naturally sweet beverage that's been cherished around the world for centuries. You can make it yourself by simply washing, peeling, and juicing fresh sugarcane – it's delightfully hydrating on a hot day! Packed with vitamins, minerals, and antioxidants, sugarcane juice is a healthy alternative to sugary sodas. While it's tasty on its own, you can also add a squeeze of lemon or lime for extra zing. Enjoyed by people of all ages, sugarcane juice is a beloved part of many cultures – and you're about to discover why it's such a celebrated drink.

Key Takeaways

  • Sugarcane juice is a popular and refreshing beverage derived from the sugarcane plant, primarily Saccharum officinarum, found in tropical and subtropical regions worldwide.
  • It is known for its natural sweetness and has been cultivated for thousands of years, transitioning from a luxury item to a widely enjoyed drink.
  • Sugarcane juice is rich in essential vitamins, minerals, and antioxidants, making it a healthier alternative to processed sugary drinks.
  • While sugarcane juice can provide hydration and energy, its high sugar content may not be suitable for individuals with diabetes without consultation.
  • The juice is typically prepared by washing, peeling, and juicing the fresh sugarcane, either using a juicer or a blender, and can be served over ice or flavored with ingredients like lemon, lime, or ginger.

History

Sugarcane, a tall, tropical grass, has a long and storied history that dates back thousands of years. From the rainforests of Southeast Asia to the sun-drenched fields of the Caribbean, this versatile plant has been cultivated and celebrated by cultures around the world.

You can imagine the sweet, earthy aroma of freshly pressed sugarcane juice, its amber liquid sparkling in the sunlight. Once a prized commodity traded along ancient trade routes, sugarcane has evolved from a luxury item to a beloved refreshment enjoyed by people of all ages.

Whether sipped straight from the cane or mixed into vibrant cocktails, this natural elixir has a way of transporting you to far-flung, exotic lands.

Marveling at its rich history, you can't help but feel a deep appreciation for the story of sugarcane and the countless generations who've cultivated and celebrated this remarkable plant.

Recipe

Sugarcane juice is a refreshing and healthy beverage enjoyed in many tropical and subtropical regions around the world. It's made by extracting the sweet juice from freshly harvested sugarcane stalks. This juice isn't only delicious but also offers a range of nutritional benefits, including vitamins, minerals, and antioxidants.

Advertisement

Preparing sugarcane juice at home is a simple process that allows you to enjoy this natural elixir in the comfort of your own kitchen. With just a few basic ingredients and a little bit of effort, you can create a glass of pure, unadulterated sugarcane goodness.

  • Fresh sugarcane stalks
  • Water
  • Ice (optional)
  • Lemon or lime (optional)

To make sugarcane juice, first, wash the sugarcane stalks thoroughly to remove any dirt or debris. Cut the stalks into manageable pieces and feed them through a juicer or sugarcane press. If you don't have either of these, you can use a blender and then strain the mixture through a fine-mesh sieve or cheesecloth to extract the juice.

Once you have the fresh sugarcane juice, you can serve it immediately over ice or add a squeeze of lemon or lime to enhance the flavor. Sugarcane juice is best consumed immediately, as it can quickly lose its freshness and sweetness.

If you have any leftover juice, store it in an airtight container in the refrigerator and consume it within a day or two.

Remember that the quality and sweetness of the sugarcane will vary depending on the variety, growing conditions, and time of harvest. Experiment with different types of sugarcane to find the one that best suits your taste preferences.

Enjoy your homemade sugarcane juice and revel in the refreshing and nourishing properties of this natural delight.

Advertisement

Cooking Steps

First, you'll want to wash and peel the sugarcane, then cut it into smaller pieces.

Next, pass the sugarcane through a juicer to extract that sweet, refreshing juice.

Step 1. Wash and Peel Sugarcane

prepare sugarcane for processing

Before you begin juicing the sugarcane, it's important to properly prepare it. First, give the sugarcane a good rinse under cool, running water. This will wash away any dirt or debris that might be clinging to the surface.

Next, use a sharp knife to peel off the tough, outer skin. Take your time and be careful, as the sugarcane can be quite fibrous. Try to remove as much of the skin as possible, as this will help the juice flow more freely.

Once the sugarcane is peeled, it's ready to be cut into manageable pieces. Slice the cane into 6-inch segments, making sure each piece is straight and even. This will help the sugarcane feed smoothly through your juicer.

With the cane prepped and ready, you can now start juicing and enjoy the sweet, refreshing taste of homemade sugarcane juice!

Advertisement

Step 2. Cut Sugarcane Into Smaller Pieces

cut sugarcane into pieces

With the sugarcane peeled and ready, you can now start cutting it into smaller pieces.

Grab a sharp knife and place the sugarcane on a sturdy cutting board. Carefully slice the sugarcane into 2-inch or 3-inch pieces, making sure to keep your fingers safe.

You'll want to create evenly-sized chunks so they can all cook at the same rate later on. As you work, you might notice the sweet, earthy aroma of the sugarcane filling the air. It's an exciting sign of the delicious juice to come!

Keep slicing until you've cut up the entire stalk. Once you have a pile of sugarcane pieces, you're ready for the next step – feeding them through the juicer.

Get ready to extract that amazing, nutrient-packed liquid gold! With a little effort, you'll have fresh, homemade sugarcane juice in no time.

Step 3. Pass the Sugarcane Through Juicer

juicing sugarcane process step

You'll need to have your juicer ready to go. Once you've cut the sugarcane into smaller pieces, it's time to get that sweet juice flowing!

Carefully place the prepared cane into the juicer's feeding chute. As the blades start spinning, the juice will begin to pour out, filling the container below.

Advertisement

Don't be afraid to push the cane down gently with the tamper to help the juicer extract every last drop. The fragrant, golden liquid will have a slightly thick, syrupy consistency that's absolutely heavenly.

Be sure to position the container close by to catch all that delicious nectar. The juicing process goes by quickly, so have your cups ready to fill up.

Once you've gotten all the juice out, you can set the leftover sugarcane pulp aside to use for other recipes.

With just a few simple steps, you'll have a refreshing glass of homemade sugarcane juice to enjoy!

Step 4. Add Ice

add ice to beverage

Once you have your freshly extracted sugarcane juice, it's time to add some ice. This is the perfect way to cool down and refresh on a hot day.

Grab a handful of ice cubes and gently drop them into the tall glass of vibrant, golden juice. Watch as the ice cubes sink and begin to melt, creating a slightly fizzy and chilly sensation.

Advertisement

The cold ice will instantly chill the juice, making it even more refreshing and delightful to sip. You'll love the way the icy coldness contrasts with the sweet, earthy flavor of the sugarcane. It's like taking a refreshing dip on a summer day, but in a glass!

As the ice melts, it will also slightly dilute the juice, creating the perfect balance of sweetness and coolness.

Stir the mixture gently with a spoon to distribute the ice evenly. Now, you're ready to enjoy this delightful and thirst-quenching treat!

Step 5. Serve Over Ice

serve chilled over ice

Serving sugarcane juice over ice is a refreshing way to enjoy this sweet treat. The cool, crisp ice perfectly complements the rich, tropical flavor of the sugarcane.

Simply fill a glass with plenty of ice cubes, then slowly pour the freshly extracted sugarcane juice over the top. The juice will cascade over the ice, creating a mesmerizing display of amber liquid and glistening ice crystals.

As you sip the chilled beverage, you'll be greeted with a burst of sweetness that quenches your thirst. The ice helps to mellow the intensity of the sugarcane, making it an incredibly refreshing and satisfying drink on a hot day.

Advertisement

The combination of cold and sweet is simply irresistible. Serve over ice and let the flavors of the tropics transport you to a peaceful oasis. This is the perfect way to savor the natural goodness of sugarcane juice.

Final Thoughts

While sugarcane juice may not be the most practical choice for everyday consumption, it's a refreshing and health-conscious alternative that's worth exploring.

The sweet, golden elixir offers a unique and flavorful experience, transporting you to tropical beaches and lush, verdant fields. Imagine the satisfying crunch as you bite into the fresh, vibrant green stalks, the aromatic scent of the juice filling the air.

As the cool, refreshing liquid touches your lips, you'll be treated to a burst of natural sweetness that invigorates the senses. Whether you're seeking a pick-me-up on a hot day or simply want to try something new, sugarcane juice is a delightful option that brings a touch of the exotic to your everyday.

Frequently Asked Questions

Is Sugarcane Juice Healthy for Diabetics?

You should be cautious about drinking sugarcane juice if you have diabetes, as it's high in natural sugars that can spike your blood sugar levels. It's best to consult your doctor before incorporating it into your diet.

Advertisement

Can I Store Leftover Sugarcane Juice?

You can store the leftover sugarcane juice, but it's best to consume it as soon as possible. Refrigerate it in an airtight container and it'll last for up to 3 days. Don't let it sit at room temperature.

How Long Does Sugarcane Juice Last?

Freshly squeezed sugarcane juice typically lasts 1-2 days when stored in the refrigerator. However, its shelf life can be extended to 3-5 days by immediately refrigerating it and keeping it tightly sealed. Proper storage is key to enjoying its refreshing flavor.

Can I Add Other Fruits to Sugarcane Juice?

You can certainly add other fruits to your sugarcane juice. It's a great way to enhance the flavor and nutritional value of your drink. Just be mindful of the sweetness levels when incorporating additional fruits.

Is Sugarcane Juice Good for Weight Loss?

Sugarcane juice can be a healthy part of a weight loss plan. It's low in calories and contains natural sugars and nutrients that may boost metabolism. However, it's important to consume it in moderation as part of a balanced diet.

Advertisement
Continue Reading

Vietnamese Cuisine

Iced Coffee With Condensed Milk

Opulent and indulgent, this Vietnamese iced coffee blends bold java with luscious condensed milk, creating a heavenly sip that will leave you craving more.

Published

on

sweetened iced coffee delight

Ah, a refreshing iced coffee with creamy condensed milk – what a delight! This Vietnamese classic blends bold coffee and sweet, velvety goodness, creating a heavenly sip that's perfect on a warm day. First, you brew the coffee using a special Vietnamese filter for a rich, intense flavor. Then, you stir in the luscious condensed milk, which adds a dreamy creaminess and pleasant sweetness. Finally, you top it off with plenty of ice cubes for a cool, satisfying crunch. It's a harmonious fusion of flavors that's sure to brighten your day. And there's so much more to explore about this beloved beverage!

Key Takeaways

  • Iced coffee with condensed milk is a popular Vietnamese beverage that combines brewed coffee, ice, and sweetened condensed milk for a rich, creamy, and refreshing taste.
  • The drink's origins can be traced back to the late 19th century during the French colonial era in Vietnam, reflecting the fusion of coffee traditions and local flavors.
  • The preparation involves brewing coffee using a traditional phin filter, adding sweetened condensed milk to taste, and then chilling the mixture with ice for a satisfying and balanced flavor profile.
  • Iced coffee with condensed milk is a versatile beverage that can be customized with additional flavors, such as vanilla or chocolate, to cater to diverse taste preferences.
  • While the drink offers a boost of caffeine, the high sugar content from the condensed milk should be considered, especially for those monitoring their sugar intake.

History

The origin of iced coffee with condensed milk can be traced back to Vietnam, where it has been a beloved beverage for decades. Known as "ca phe sua da," this delightful drink was first popularized in the late 19th century, during the French colonial era.

Back then, Vietnamese coffee growers needed a way to preserve their harvest, so they started mixing the freshly brewed coffee with sweetened condensed milk. This not only extended the shelf life of the coffee, but also created a rich, creamy, and refreshing taste that quickly became a local favorite.

Over the years, the recipe has remained largely unchanged, with the exception of serving it over ice to beat the tropical heat.

Today, ca phe sua da is a quintessential part of Vietnamese culture, enjoyed by people of all ages throughout the country. Whether sipped leisurely or gulped down quickly, this iced coffee delight remains a timeless treat that brings joy to all who try it.

Recipe

Iced coffee with condensed milk is a delightful Vietnamese-inspired treat that combines the rich creaminess of sweetened condensed milk with the refreshing bitterness of strong brewed coffee.

Advertisement

This simple yet indulgent beverage is the perfect pick-me-up on a hot day. The key to this recipe is to use a high-quality dark-roast coffee that can stand up to the bold flavors of the condensed milk.

The brewing method is also important, as the coffee needs to be strong enough to balance the sweetness of the milk.

Ingredients:

  • 1/2 cup strong brewed coffee, cooled
  • 1/4 cup sweetened condensed milk
  • Ice cubes

Directions:

Brew a strong batch of dark-roast coffee and allow it to cool completely. In a tall glass, combine the cooled coffee and sweetened condensed milk.

Stir well to combine. Add ice cubes and stir again to chill the drink. Serve immediately.

Advertisement

For best results, use freshly brewed coffee that has been allowed to cool to room temperature. The coffee should be strong and bold in flavor to provide a counterpoint to the rich, sweet condensed milk.

Adjust the ratio of coffee to condensed milk to suit your personal taste preferences.

Cooking Steps

Brew up a bold and flavorful cup of coffee using a traditional Vietnamese phin filter.

Then, stir in a generous helping of sweet and creamy condensed milk.

Finally, add some ice and give it all a good mix.

Advertisement

You're now ready to sip on this refreshing iced coffee treat!

Step 1. Brew Coffee Using a Phin Filter

brew coffee with phin

Brewing coffee with a phin filter is a straightforward process that yields a rich, aromatic result.

First, you'll place the metal filter into the phin's base, then add a couple of tablespoons of ground coffee. Gently tap the filter to level the grounds.

Next, slowly pour hot water over the coffee, making sure to wet all the grounds. Let it steep for about 2-3 minutes, then watch as the flavorful brew drips down into your waiting cup.

The phin filter creates a thick, concentrated coffee that's simply delightful. You can adjust the amount of coffee and steeping time to suit your personal taste preferences.

Whether you enjoy your iced coffee with a splash of condensed milk or black, the phin method delivers a wonderfully robust and smooth flavor in every sip.

Advertisement

Get ready to savor the authentic taste of Vietnamese-style iced coffee at home!

Step 2. Add Condensed Milk

add condensed milk now

Once you've brewed your coffee using the phin filter, it's time to add the signature ingredient that transforms it into authentic Vietnamese-style iced coffee – condensed milk.

This thick, sweet, and creamy milk is the secret to the rich and indulgent flavor of Ca Phe Sua Da. Grab your can of sweetened condensed milk and get ready to pour it in.

Slowly drizzle the condensed milk into your freshly brewed coffee, stirring gently to combine. Watch as the milk swirls and blends, creating a smooth and velvety texture. The sweet aroma will fill the air, making your mouth water in anticipation.

Once the condensed milk is fully incorporated, give your coffee a final stir to ensure everything is well-mixed.

Now, all that's left is to add ice and enjoy the perfect balance of bold coffee and decadent sweetness. Sip and savor this heavenly Vietnamese iced coffee creation!

Advertisement

Step 3. Add Ice

chill beverage with ice

After stirring in the condensed milk, it's time to add the ice.

You'll want to use plenty of ice cubes to get that nice, chilled iced coffee. Scoop a generous amount of ice into your glass, filling it up almost to the top. The cold, crunchy ice cubes will instantly cool down your freshly-brewed coffee, creating that perfect icy-cold beverage.

As the ice melts, it will dilute the coffee just a bit, balancing out the sweetness of the condensed milk. You'll end up with a smooth, refreshing iced coffee that's not too strong or too sweet.

The ice also adds a satisfying crunch with each sip, making the experience even more delightful.

Be sure to stir the iced coffee one more time before taking your first sip. This will ensure all the flavors are evenly distributed.

Now you can sit back, relax, and enjoy your perfectly chilled Ca Phe Sua Da!

Advertisement

Step 4. Stir to Combine Ingredients

combine ingredients by stirring

With the condensed milk added, give the iced coffee a good stir to fully incorporate all the ingredients.

You'll notice the liquid transform from a light, watery brown to a luscious, creamy tan color as the sweet, concentrated milk blends in.

The satisfying swish of the spoon against the glass creates a soothing, rhythmic sound, almost like a gentle rain shower.

As you stir, the aroma of the freshly brewed coffee grows stronger, mingling with the rich, decadent scent of the condensed milk.

Keep stirring until the mixture is thoroughly combined – no streaks or pockets of milk should remain.

Now, the iced coffee is ready to be enjoyed!

Advertisement

The smooth, velvety texture and perfect balance of coffee and sweetness will make each sip pure bliss.

Sit back, take a refreshing sip, and savor the delightful flavors of this classic Vietnamese iced coffee treat.

Step 5. Enjoy the Refreshing Beverage

savor your refreshing drink

Now that the ingredients are thoroughly combined, it's time to enjoy this refreshing Vietnamese iced coffee! Grab your glass and take a sip – the sweet, creamy condensed milk perfectly balances the bold, slightly bitter coffee. Mmm, can you taste the caramelized notes?

The ice cubes clink against the sides of the glass, creating a satisfying sound as the chilled liquid cools you down on a hot day. As you savor each sip, notice how the coffee's aroma wafts up, filling your nose with its enticing scent.

The smooth texture glides across your tongue, leaving behind a delightful aftertaste that'll have you reaching for another sip. This iced coffee is truly a taste of Vietnamese culture – a beloved tradition that's both refreshing and comforting.

Take your time and enjoy every moment of this delightful beverage. It's the perfect pick-me-up or afternoon treat. Sip, savor, and relax – you deserve this moment of pure refreshment!

Advertisement

Final Thoughts

Ultimately, the iced coffee with condensed milk stands as a delightful pick-me-up, a cool respite from the day's heat. Its rich, creamy texture and sweetness melt together in perfect harmony, creating a refreshing sensation that dances across your taste buds.

With each sip, you're transported to a quaint Vietnamese cafe, the bustling sounds of the city fading away as you savor the moment.

The contrasting temperatures of the iced coffee and the silky-smooth condensed milk make for a truly unique and satisfying experience. It's a beverage that can be enjoyed any time of day, whether you're seeking a morning boost or an afternoon pick-me-up.

The versatility of this drink is truly remarkable, appealing to a wide range of palates and preferences.

As you savor the final drops, you can't help but feel a sense of contentment and delight. The iced coffee with condensed milk is more than just a drink – it's a cultural experience that you'll want to revisit time and time again.

Advertisement

Frequently Asked Questions

How Do I Store Leftover Condensed Milk?

To store leftover condensed milk, keep it in the can or transfer it to an airtight container. Store it in the refrigerator for up to 2 weeks. Avoid leaving it at room temperature for extended periods to prevent spoilage.

Can I Use Other Types of Milk Besides Condensed Milk?

Yes, you can use other types of milk besides condensed milk. Try using regular milk, almond milk, or even coconut milk to create your own unique coffee beverage. Experiment with different flavors and see what you prefer.

What Is the Best Ratio of Coffee to Condensed Milk?

The best ratio of coffee to condensed milk depends on your personal taste preferences. Start with a 1:1 ratio and adjust to your desired level of sweetness and creaminess from there. Experiment until you find the perfect balance.

How Long Can the Iced Coffee Stay Fresh?

The iced coffee can stay fresh for up to 3-4 days when stored in an airtight container in the refrigerator. However, the flavor and quality may begin to degrade after 2 days, so it's best to consume it within that timeframe.

Can I Use Brewed Coffee Instead of Instant Coffee?

You can certainly use brewed coffee instead of instant coffee. The brewed coffee will have a richer, more robust flavor compared to instant. Just be sure to let the coffee cool before adding the condensed milk and ice.

Advertisement
Continue Reading

Vietnamese Cuisine

Tra Da (Iced Tea)

With its perfect balance of bold tea and creamy sweetness, Tra Da (Iced Tea) is a Vietnamese delight that will leave you craving more. Discover the captivating history behind this cherished beverage.

Published

on

refreshing iced tea beverage

You'll love sipping on the refreshing Vietnamese iced tea, known as tra da! This chilled delight blends bold black tea leaves with sweet and creamy condensed milk, creating a delightful flavor that's perfect for hot summer days. It's been a beloved beverage for generations, originating in the late 1800s and quickly spreading around the world. To make your own, simply steep the tea, chill it, and stir in the milk – easy as can be! And if you're curious to learn more about the rich history and diverse cultural traditions behind this thirst-quenching drink, there's plenty more to discover.

Key Takeaways

  • Tra Da, or Vietnamese iced tea, is a popular beverage made by combining strong black tea with sweetened condensed milk.
  • The brewing process involves steeping black tea leaves in hot water for 3-5 minutes, then chilling the tea before serving over ice.
  • Customization options for Tra Da include adjusting the tea strength and the amount of sweetened condensed milk to suit individual preferences.
  • Tra Da is a versatile drink that can be enjoyed year-round, often served at social gatherings and celebrations in Vietnam.
  • Iced tea, including Tra Da, offers potential health benefits such as providing hydration and containing antioxidants.

History

The origins of iced tea can be traced back to the late 19th century, when a pioneering entrepreneur introduced the refreshing beverage at the 1904 World's Fair in St. Louis, Missouri.

Visitors from all over the country were captivated by the cool, sweet taste of this unexpected delight, and the popularity of iced tea quickly spread across the United States.

Today, iced tea is a beloved summertime staple, enjoyed by people of all ages.

The crisp, invigorating flavor comes from steeping black or green tea leaves in cool water, then adding a touch of sugar or lemon to enhance the natural sweetness.

Whether you prefer it plain or with a twist, iced tea is the perfect way to quench your thirst on a hot, sunny day.

Advertisement

Its refreshing qualities have made it a fixture at picnics, barbecues, and outdoor gatherings, where friends and families can come together to savor the delicious taste of this timeless beverage.

Recipe

Tra Da, or Vietnamese Iced Tea, is a refreshing and popular beverage enjoyed throughout Vietnam. Its distinct flavor profile combines the robust taste of strong black tea with the sweetness of condensed milk, creating a delightful balance that's perfect for quenching thirst on a hot day.

The traditional method of preparing Tra Da involves steeping the tea leaves in boiling water to extract their full flavor. The resulting tea is then chilled and combined with sweetened condensed milk, creating a creamy and indulgent drink that's sure to delight the senses.

Ingredients:

  • 4 cups water
  • 4 teaspoons black tea leaves
  • 1/2 cup sweetened condensed milk

Instructions:

Bring the water to a boil in a saucepan. Remove from heat and add the tea leaves. Let the tea steep for 5-7 minutes, or until it reaches your desired strength. Strain the tea into a pitcher and refrigerate until completely chilled, about 2 hours.

Advertisement

When ready to serve, fill a glass with ice cubes. Pour the chilled tea over the ice and stir in the sweetened condensed milk until fully incorporated. Enjoy the refreshing and delightful flavor of Tra Da.

Additional Tips:

For a stronger tea flavor, use more tea leaves or steep the tea for a longer duration. Adjust the amount of condensed milk to suit your personal taste preferences. To make the drink extra creamy, consider using half-and-half or evaporated milk instead of condensed milk.

Cooking Steps

First, you'll need to boil some water for your tea leaves.

Once the water's nice and hot, go ahead and add those fragrant leaves.

Advertisement

Let 'em steep for 3 to 5 minutes, then strain the tea and transfer it to a pitcher.

Step 1. Boil Water for Tea Leaves

boil water for tea

Bring a pot of fresh, cold water to a rapid boil.

Once the water starts bubbling furiously, turn down the heat to maintain a gentle simmer. This is the perfect temperature to steep your fragrant tea leaves.

Carefully pour the hot water over the delicate leaves, filling your teapot to the brim. Cover the pot with a lid to trap the heat and let the tea steep for 3-5 minutes.

Breathe in the soothing aroma as the tea infuses the water with its rich flavor.

When the time is up, slowly pour the vibrant, amber-colored tea into your favorite glass or pitcher.

Advertisement

Add ice cubes to instantly chill the tea, making it refreshingly cool and perfect for a hot day.

Sip and savor the balanced, complex taste of your homemade iced tea. Enjoy!

Step 2. Add Tea Leaves

add tea leaves now

Once the water is at the perfect temperature, add 1-2 teaspoons of your preferred tea leaves directly to the hot water.

The choice of tea can significantly impact the flavor profile of your iced tea; for instance, brewing the perfect cup of tea can help you achieve the ideal taste.

Watch as the leaves dance and swirl, releasing their aromatic essence into the steaming liquid. The delicate tea leaves will slowly steep, infusing the water with their rich, bold flavor.

Gently stir the mixture to help the leaves fully submerge and distribute their taste throughout. As the tea steeps, the water will gradually deepen in color, transforming from a pale yellow to a vibrant amber hue.

Advertisement

Take a deep breath and savor the soothing, fragrant aroma wafting through the air. Allow the tea to steep for 3-5 minutes, depending on your desired strength.

When the tea has reached your preferred intensity, it's time to remove the leaves and prepare your refreshing glass of iced tea.

Step 3. Steep Tea Leaves for 3-5 Minutes

steep tea leaves minutes

After adding the tea leaves to the hot water, allow the mixture to steep for 3-5 minutes, depending on your desired strength. The longer you let it steep, the more intense the flavor will become.

You'll know it's ready when the water takes on a deep, rich color and the aroma of the tea fills the air. Gently lift the tea bag or strainer and watch as the liquid flows through, revealing the vibrant hues of the tea leaves. Inhale the inviting scent – it's almost time to enjoy your refreshing Tra Da!

As the tea steeps, the flavors and aromas will blossom, creating a truly delightful experience.

Feel free to adjust the steeping time to suit your personal preference. Some like it strong and bold, while others prefer a more delicate, nuanced flavor. Experiment and find the perfect balance that tantalizes your taste buds.

Advertisement

Get ready to savor the perfect cup of Tra Da, bursting with natural goodness.

Step 4. Strain and Transfer to Pitcher

strain and transfer pitcher

Once the tea has finished steeping, it's time to strain and transfer it to a pitcher. Carefully pour the fragrant, golden liquid through a fine mesh strainer, leaving behind those used tea leaves. Ah, doesn't the aroma just fill the air?

Now, you'll want to pour the freshly strained tea into a clean pitcher. Be sure to hold the strainer securely over the pitcher to catch every last drop of that delightful, flavorful tea.

With the tea now in the pitcher, it's ready to be chilled and enjoyed. Pop the pitcher into the fridge for about 30 minutes, or until it's nice and cold. Mmm, can you already imagine the refreshing sip of that icy, aromatic tea?

Once it's properly chilled, pour it over some ice and get ready to savor the perfect iced tea. Your thirst is about to be quenched in the most delightful way!

Step 5. Add Ice Cubes

add ice cubes now

Fill up your glass with the freshly brewed and chilled iced tea, then generously top it with crisp ice cubes.

Watch as the ice cubes clink against the sides of the glass, creating a refreshing melody. As the ice melts, it'll slowly dilute the tea, making it the perfect temperature to sip on a hot day.

Advertisement

The transparent ice cubes will also add a beautiful, sparkling effect to your beverage, making it look as tempting as it tastes.

Feel free to add as many ice cubes as you'd like – the more the merrier! The cold ice will perfectly complement the bold, flavorful tea, creating a delightful harmony of tastes and temperatures.

Enjoy taking that first, cool sip, savoring the refreshing blend of iced tea and ice.

It's the perfect way to quench your thirst and cool down on a warm afternoon. With the ice cubes in place, your homemade iced tea is now ready to be served and savored.

Final Thoughts

Although iced tea is a refreshing and versatile beverage that can be enjoyed year-round, it's important to consider a few final thoughts before savoring your next glass.

Advertisement

Remember, the beauty of iced tea is its customizability – you can experiment with different tea varieties, flavors, and sweeteners to find your perfect blend.

Why not try adding a twist of citrus or a sprig of mint for a burst of refreshing flavor?

And don't forget to share your creations with friends and family – iced tea is the perfect drink for making memories and creating special moments together.

So, the next time you pour yourself a glass of this delightful drink, take a moment to appreciate the art of iced tea and all the joy it can bring.

Cheers!

Advertisement

Frequently Asked Questions

How Long Does Tra Da Last Before Spoiling?

Iced tea will typically last 3-5 days when refrigerated. However, its shelf life can vary depending on factors like the ingredients, preparation method, and storage conditions. It's best to consume it within a few days for optimal freshness and safety.

Can Tra Da Be Made With Different Tea Types?

Yes, you can make iced tea with different tea types. Black tea, green tea, herbal tea – they all work well for creating refreshing iced tea. Experiment to find your favorite flavor profile.

What Are the Health Benefits of Drinking Tra Da?

Drinking iced tea offers several health benefits. It's packed with antioxidants that can boost your immune system, reduce inflammation, and even lower your risk of chronic diseases. Plus, it's a refreshing and hydrating beverage.

How Much Sugar Should Be Added to Tra Da?

You don't necessarily need to add a lot of sugar to your beverage. Start with a small amount and adjust to your taste preferences. Too much added sugar can negate the potential health benefits.

Can Tra Da Be Served Warm Instead of Iced?

Absolutely! You can certainly serve the beverage warm instead of iced. Simply heat it up to your desired temperature and enjoy the warm, flavorful drink. The choice is yours – iced or warm, it's a delightful refreshment either way.

Advertisement
Continue Reading
Advertisement

Affiliate Disclaimer
As an affiliate, we may earn a commission from qualifying purchases. We get commissions for purchases made through links on this website from Amazon and other third parties.

Advertisement

Latest

sweet and savory delight sweet and savory delight
Christmas Recipes3 mins ago

Honey Glazed Ham

Joyfully elevate your holiday meal with a honey-glazed ham that promises a mouthwatering fusion of sweet and savory flavors. Continue...

non alcoholic cocktail alternatives non alcoholic cocktail alternatives
Graduations/Birthdays5 mins ago

Mocktails

Knock yourself out with these vibrant, bubbly mocktails that let you enjoy the sophisticated taste of cocktails without the effects...

ice cream soda bar ice cream soda bar
Graduations/Birthdays10 mins ago

Soda Float Bar

Kicking it old-school with soda float bars, a classic American delight that blends carbonated fizz and rich ice cream, uncovering...

delicious nutritious blended beverages delicious nutritious blended beverages
Graduations/Birthdays15 mins ago

Smoothies

Kicking off your day with a nourishing smoothie is an easy way to pack in essential vitamins, minerals, and fiber,...

refreshing chilled beverage choice refreshing chilled beverage choice
Graduations/Birthdays21 mins ago

Iced Tea

You'll be amazed at the refreshing delight of iced tea, a timeless summertime favorite that's easy to prepare and perfect...

refreshing citrus beverage delight refreshing citrus beverage delight
Graduations/Birthdays26 mins ago

Lemonade

Whisking up a batch of homemade lemonade is a refreshing summertime ritual that has captivated palates for centuries, but the...

refreshing mixed fruit beverage refreshing mixed fruit beverage
Graduations/Birthdays32 mins ago

Fruit Punch

Fruit punch, a timeless delight tracing its origins to colonial exploration, offers a vibrant, customizable experience that will leave you...

delicious s mores dessert station delicious s mores dessert station
Graduations/Birthdays37 mins ago

S’mores Bar

Gather the perfect ingredients and craft your own delightful s'mores with endless flavor combinations, from milk chocolate to white chocolate...

creamy italian dessert delight creamy italian dessert delight
Graduations/Birthdays43 mins ago

Panna Cotta

Originating in the Piedmont region of Italy, panna cotta is a delightfully creamy and versatile dessert that has captured the...

delicious baked fruit dessert delicious baked fruit dessert
Graduations/Birthdays49 mins ago

Fruit Cobbler

Yes, you can discover the surprising origins and irresistible flavors of this classic American dessert by exploring the history and...

sweet baked treats recipe sweet baked treats recipe
Graduations/Birthdays55 mins ago

Sugar Cookies

Flavorful and versatile, sugar cookies have captivated bakers for generations, with a rich history and perfected techniques waiting to be...

decadent chocolate dessert delight decadent chocolate dessert delight
Graduations/Birthdays1 hour ago

Chocolate Mousse

Blissful spoonfuls of velvety chocolate mousse will transport you to a world of decadence, beckoning you to discover the rich,...

Advertisement

Trending