Connect with us

Thanksgiving

Scalloped Potatoes

With its rich, creamy sauce and tender, layered potatoes, this classic comfort food dish is a must-try for anyone who loves a satisfying side. Learn more about the history and recipe for scalloped potatoes.

Published

on

delicious creamy potato dish

Scalloped potatoes are a classic comfort food dish that originated in 17th century Europe. Peasants and farmers would layer sliced potatoes with cheese, milk, and seasonings to create a creamy, indulgent side dish. This tasty recipe gained popularity in America during the 19th century and remains a beloved classic today. To make scalloped potatoes, you'll slice potatoes into thin, even rounds, layer them in a baking dish, and pour a creamy sauce over the top before baking until golden brown and bubbly. The key is using high-quality ingredients and the right baking techniques to achieve the perfect texture and flavor. There's more to discover about this comforting dish.

Key Takeaways

  • Scalloped potatoes originated in 17th century Europe as a dish layered with sliced potatoes, cheese, milk, and seasonings.
  • The dish gained popularity in America during the 19th century as a comforting side dish, with variations including ham, bacon, or vegetables.
  • The key to making scalloped potatoes is to slice the potatoes evenly, layer them with a creamy, cheesy sauce, and bake until golden brown and tender.
  • The ideal baking temperature and time are crucial for achieving the perfect texture, avoiding mushy or crunchy potatoes.
  • Scalloped potatoes can be served as a side dish or paired with proteins for a complete meal, and leftover can be reused in various recipes.

History

Did you know that the scalloped potato dish has a rich and fascinating history? The origins of scalloped potatoes can be traced back to the 17th century in Europe, where farmers and peasants would layer sliced potatoes with cheese, milk, and seasonings, then bake the dish in a wood-fired oven. This practical and hearty meal helped stretch limited food resources.

The dish eventually made its way to America, where it gained popularity in the 19th century. Scalloped potatoes became a beloved comfort food, often served at family gatherings and holiday meals.

The dish's versatility allowed for endless variations, with ingredients like ham, bacon, or vegetables added to the layers.

Today, scalloped potatoes remain a classic side dish, enjoyed for its creamy texture and rich, satisfying flavor. Whether served as a main course or alongside roasted meats, this timeless recipe continues to delight and nourish generations of home cooks and diners.

Recipe

Scalloped potatoes are a classic comfort food dish that's perfect for a cozy meal or as a side dish. The creamy, cheesy sauce and tender potatoes make for a delicious and satisfying dish.

Advertisement

To prepare this dish, you'll need to take a bit of time, but the end result is well worth it. The key is to thinly slice the potatoes and layer them with a rich and flavorful sauce.

Ingredients:

  • 3 pounds russet potatoes, peeled and thinly sliced
  • 1 cup heavy cream
  • 1 cup milk
  • 2 cloves garlic, minced
  • 1 teaspoon dried thyme
  • 1 teaspoon salt
  • 1/2 teaspoon black pepper
  • 2 cups shredded cheddar cheese

Instructions:

Preheat the oven to 375°F. In a large saucepan, combine the heavy cream, milk, garlic, thyme, salt, and pepper. Bring the mixture to a simmer over medium heat, stirring occasionally, until it thickens slightly, about 5 minutes. Remove from heat and set aside.

Arrange the sliced potatoes in a greased 9×13-inch baking dish, overlapping the slices slightly. Pour the cream mixture over the potatoes, making sure to cover them evenly. Sprinkle the shredded cheese on top.

Cover the dish with aluminum foil and bake for 45 minutes. Remove the foil and continue baking for an additional 30-35 minutes, or until the potatoes are tender and the top is golden brown and bubbly.

Advertisement

Tips:

  • For extra flavor, try adding diced onions or sliced mushrooms to the dish.
  • You can also experiment with different types of cheese, such as Gruyère or Parmesan.
  • Leftover scalloped potatoes can be reheated in the oven or microwave, and they also make a great topping for shepherd's pie or other casseroles.

Cooking Steps

Slice the potatoes into uniformly thin rounds.

Layer the potato slices in a baking dish, pouring cream over each layer.

Bake the scalloped potatoes at 350°F for about 1 hour, then top with a layer of cheese.

Step 1. Slice Potatoes Uniformly Thin

uniformly thin potato slices

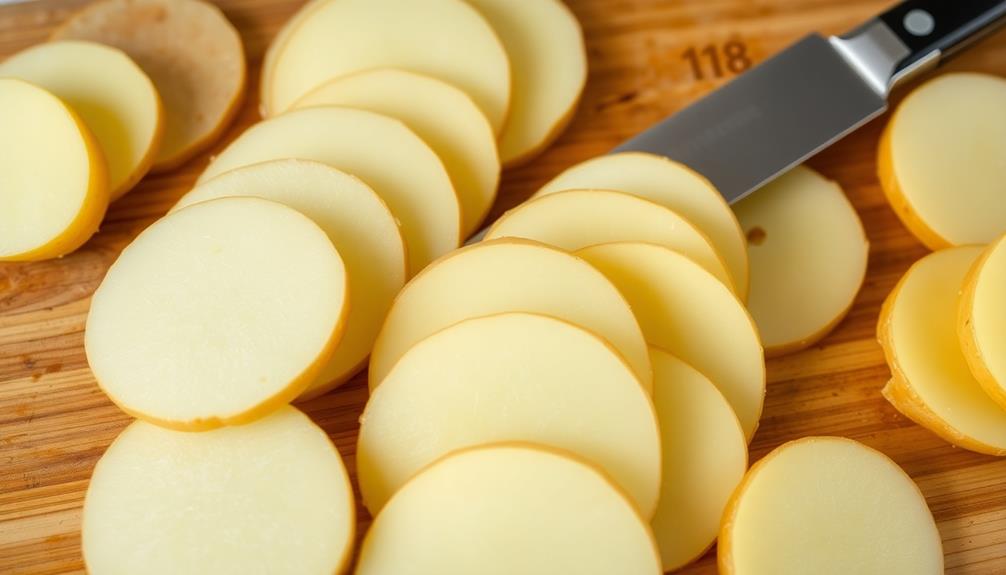
Carefully slice the potatoes into thin, even pieces, roughly 1/8 inch thick. This uniform thickness ensures the potatoes cook evenly, with no under or overcooked areas. Use a sharp knife or a mandoline slicer for the best results – the thinner the slices, the quicker they'll cook.

As you slice, try to keep the pieces around the same size and shape. This will help them layer neatly in the baking dish.

For easy, even slicing, start by cutting the potatoes in half lengthwise. This provides a flat surface to work with. Then, slice each half crosswise into thin, uniform pieces. Pay close attention to the thickness, adjusting your knife or mandoline as needed.

Advertisement

The goal is slices that are delicate yet sturdy enough to hold their shape during baking. With perfectly sliced potatoes, you're well on your way to creamy, decadent scalloped potatoes.

Step 2. Layer the Potato Slices

layering potato slices

With your beautifully sliced potatoes ready, begin layering them in your baking dish.

Start by placing a layer of potato slices on the bottom, overlapping them slightly to create an even surface. Sprinkle a light dusting of salt, pepper, and any desired herbs or spices over the layer.

Continue this process, creating additional layers, until you've used up all the potato slices.

Be sure to season each layer to ensure even flavor throughout. As you build the layers, try to keep the slices as uniform in thickness as possible for even cooking.

Once all the layers are in place, you can pour the cream or milk over the top, making sure to cover the potatoes completely.

Advertisement

This liquid will help the potatoes cook through and create the signature creamy texture of scalloped potatoes.

With the dish assembled, it's now ready to be baked to perfection.

Step 3. Pour Cream Over Layers

pour cream over layers

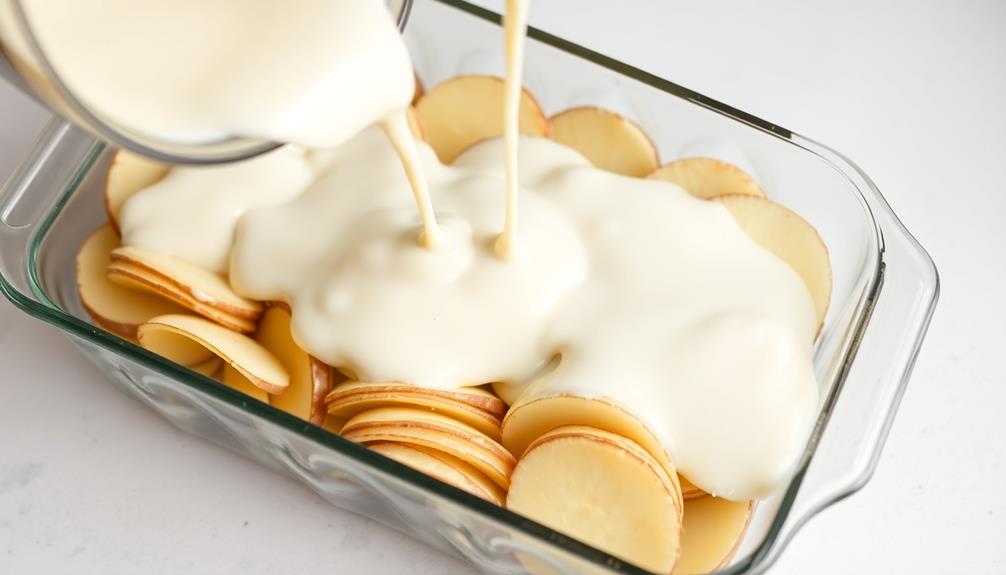
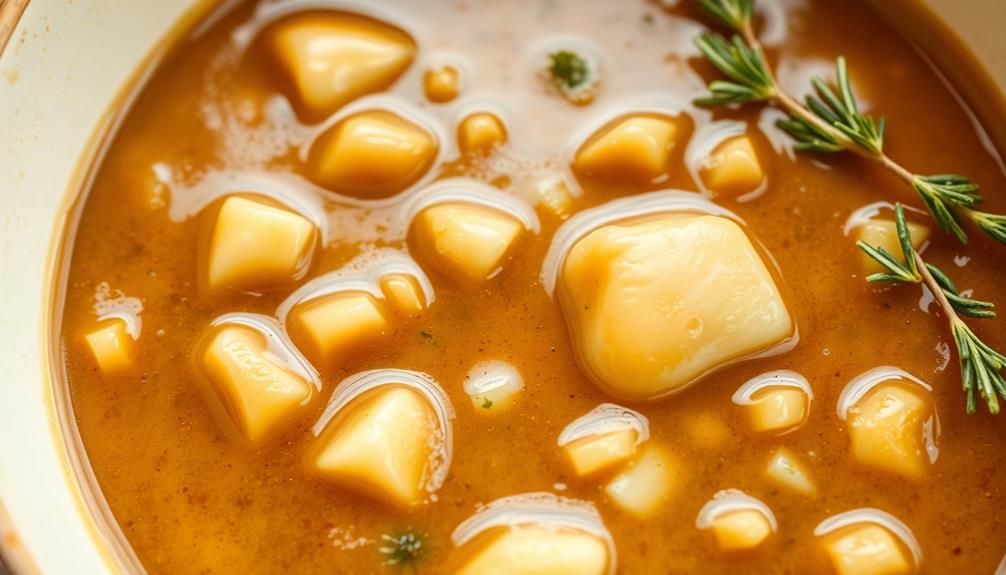
Once you've layered the potato slices, it's time to pour the cream or milk over the top. This step is crucial for creating the signature creamy, decadent texture of scalloped potatoes.

Use a high-quality heavy cream or whole milk for best results – the richer the dairy, the creamier the final dish.

Slowly pour the cream over the layered potatoes, making sure to evenly distribute it across the entire surface. The cream should come up just below the top layer of potatoes. If needed, add more cream to ensure the potatoes are fully submerged.

For extra flavor, you can also mix in a bit of garlic, thyme, or other seasonings with the cream before pouring. This will infuse the potatoes with delightful aromatic notes.

Advertisement

Step 4. Bake at 350°F for 1 Hour

bake at 350 f 1 hour

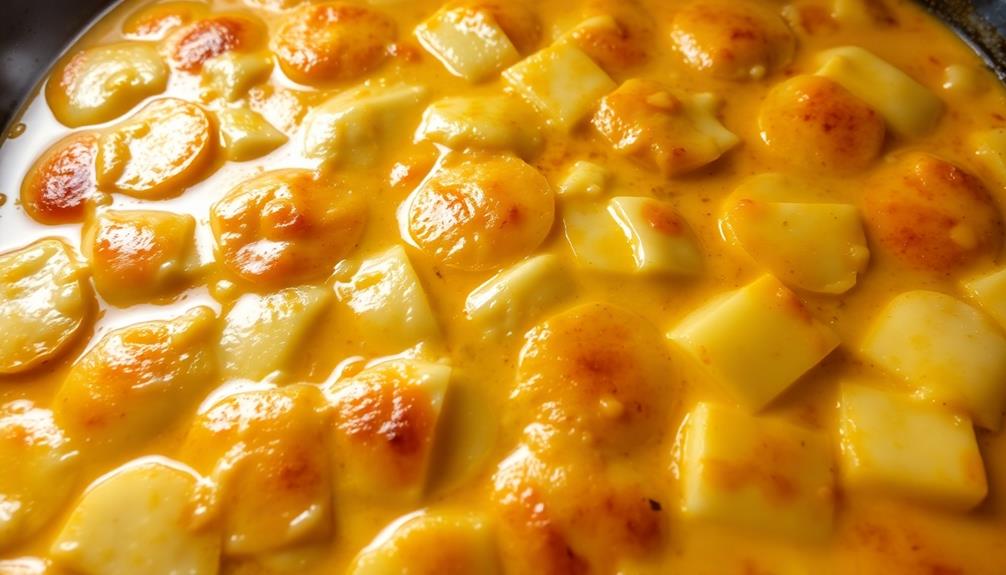
After pouring the cream over the layered potatoes, preheat your oven to 350°F. This temperature ensures the potatoes will cook through and develop a delightful golden-brown crust on top.

Once the oven is preheated, carefully transfer the baking dish into the center of the oven. Bake the scalloped potatoes for a full hour, allowing the cream to reduce and the flavors to meld together.

During the baking process, the kitchen will be filled with the mouthwatering aroma of the dish. Resist the temptation to open the oven door frequently, as this can disrupt the cooking and cause the potatoes to bake unevenly.

Instead, set a timer and resist the urge to peek until the hour has elapsed.

When the timer goes off, use oven mitts to remove the baking dish from the oven. The scalloped potatoes should be bubbling and the top should be beautifully browned.

Allow the dish to rest for 5-10 minutes before serving, as this will allow the creamy sauce to thicken slightly.

Advertisement

Step 5. Cover With Cheese

add cheese topping now

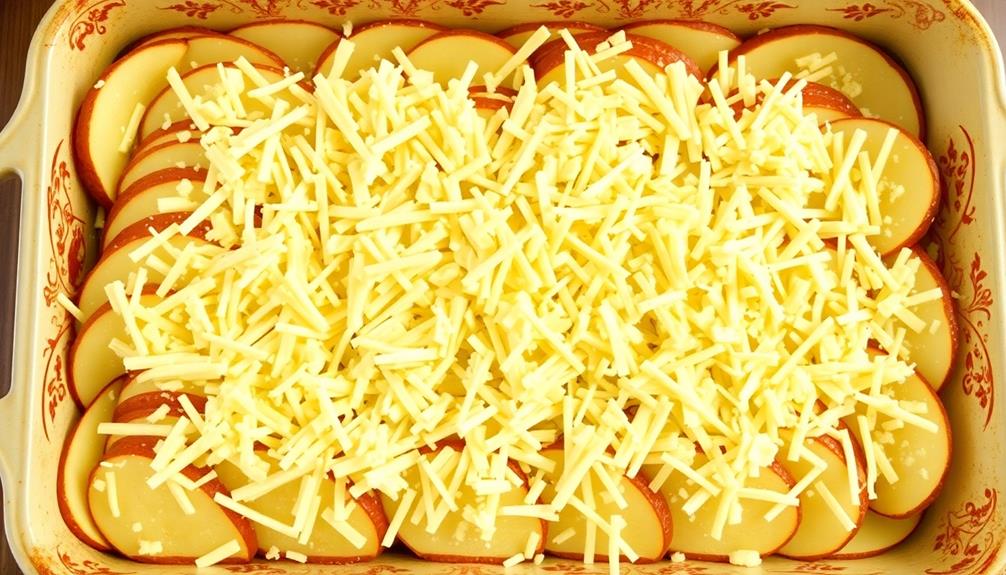
Grab a handful of your favorite shredded cheese, whether it's cheddar, Gruyère, or a blend of cheeses. Sprinkle it generously over the top of your partially baked scalloped potatoes. The cheese will melt and create a delectable, golden-brown crust, sealing in the creamy, tender potatoes beneath.

Ensure the cheese covers the entire surface, leaving no bare spots. This won't only enhance the presentation but also provide an even distribution of flavor and texture. For an extra indulgent touch, you can layer slices of cheese between the potato layers before baking.

Once the cheese has melted and the top is bubbly and crisp, your scalloped potatoes are ready to serve. The combination of the creamy, starchy potatoes and the rich, savory cheese creates a harmony of flavors and textures that will delight your taste buds.

Enjoy this comforting and satisfying side dish alongside your favorite main course.

Final Thoughts

Although scalloped potatoes are a classic side dish, it's important to keep a few key points in mind as you prepare this dish.

First and foremost, don't be afraid to get creative with your seasonings. While the traditional blend of salt, pepper, and cheese is delicious, experiment with herbs, spices, or even a touch of garlic to elevate the flavor.

Advertisement

Additionally, pay close attention to the baking time and temperature. Overcooked potatoes can become mushy, while undercooked ones will be crunchy.

Aim for a golden-brown top and fork-tender potatoes throughout.

Frequently Asked Questions

How Long Do Scalloped Potatoes Typically Last in the Refrigerator?

Typically, cooked potatoes can last 3-5 days in the refrigerator when stored properly. However, the exact shelf life depends on various factors like how they're prepared and stored. Make sure to keep an eye on their condition before consuming.

Can I Use Sweet Potatoes Instead of Regular Potatoes?

You can certainly use sweet potatoes instead of regular potatoes. The flavor and texture will be different, but it can work well in scalloped potatoes. Just adjust the seasonings to complement the sweetness of the sweet potatoes.

Do I Need to Peel the Potatoes Before Slicing?

You don't necessarily need to peel the potatoes before slicing them. The skin can provide extra texture and nutrition, but peeling them is an option if you prefer a smoother dish.

Advertisement

Can I Make Scalloped Potatoes in Advance and Reheat Them?

You can definitely make scalloped potatoes in advance and reheat them. Just be sure to store them properly and reheat them gently to prevent the potatoes from becoming dry or rubbery.

How Do I Prevent the Potatoes From Becoming Mushy?

To prevent your potatoes from becoming mushy, slice them thinly, don't overcrowd the dish, and don't overcook them. Bake them just until they're tender, then reheat gently when ready to serve. This will keep your scalloped potatoes from turning into a mushy mess.

Continue Reading
Advertisement

Thanksgiving

Leftover Turkey Casserole

Indulge in a cozy and comforting way to repurpose your leftover Thanksgiving turkey with this easy-to-make casserole that’s sure to impress your family and friends.

Published

on

thanksgiving turkey casserole recipe

Turn that leftover Thanksgiving turkey into a hearty and comforting casserole! This crowd-pleasing dish combines tender turkey with a creamy sauce, veggies, cheese, and a crunchy topping. It's easy to prepare, using simple ingredients you likely already have on hand. Just mix everything together, bake until bubbly and golden, and enjoy a delicious second-day meal. The casserole's versatility allows you to customize the flavors, making it a creative way to repurpose leftovers. Plus, it's cost-effective and minimizes food waste – a win-win. Keep reading to discover the full recipe and cooking steps for this beloved post-holiday classic.

Key Takeaways

  • The leftover turkey casserole is a popular dish that transforms tender turkey into a hearty and comforting meal, often combining it with a creamy sauce and a crunchy topping.
  • The recipe typically includes cooked turkey, cream of mushroom soup, vegetables, shredded cheddar cheese, and breadcrumbs, making it a convenient and versatile dish.
  • The casserole offers quick preparation, minimizing food waste by utilizing leftover turkey, and serves as an economical alternative to dining out or ordering in.
  • The dish can be customized with various ingredients and flavors, allowing for personal preferences and dietary restrictions, while promoting sustainable cooking practices.
  • The leftover turkey casserole not only provides a balanced meal but also encourages culinary creativity, inspiring experimentation with different flavor combinations and serving as a foundation for future meal ideas.

History

Turkey has been a staple of the American Thanksgiving feast for centuries. The origins of this beloved tradition can be traced back to the early days of the Plymouth Colony, where the Pilgrims and the Wampanoag people celebrated their first successful harvest in 1621. This shared feast, often referred to as the "First Thanksgiving," featured turkey as a centerpiece, alongside other wild game and locally grown produce.

Over time, the tradition of serving turkey on Thanksgiving evolved, becoming an integral part of the holiday's culinary landscape. As families gathered to give thanks, the leftover turkey became a practical and delicious way to continue the celebration.

Casseroles emerged as a popular method of utilizing these leftovers, allowing families to create new and satisfying dishes that could feed a crowd. Today, the leftover turkey casserole remains a beloved post-Thanksgiving staple, a testament to the enduring legacy of this cherished American tradition.

Recipe

Leftover turkey is a delightful ingredient that can be transformed into a hearty and comforting casserole. This dish isn't only a great way to use up any remaining turkey from your holiday feast but also a satisfying meal that the whole family can enjoy.

Similar to how bread pudding transforms stale bread, this casserole uses leftover turkey to create something truly special. The combination of tender turkey, creamy sauce, and a crunchy topping makes this casserole a true crowd-pleaser. It's perfect for a cozy weeknight dinner or as a simple yet impressive dish to share with guests.

Advertisement
  • 3 cups cooked turkey, shredded or diced
  • 1 can (10.5 oz) cream of mushroom soup
  • 1 cup milk
  • 1 cup frozen peas
  • 1 cup cooked, diced carrots
  • 1 cup cooked, diced potatoes
  • 1 cup shredded cheddar cheese
  • 1 cup breadcrumbs or crushed crackers
  • 2 tablespoons butter, melted

Preheat your oven to 375°F (190°C). In a large bowl, combine the shredded or diced turkey, cream of mushroom soup, milk, peas, carrots, and potatoes. Mix well until all the ingredients are evenly distributed.

Transfer the mixture to a greased 9×13-inch baking dish. Sprinkle the shredded cheddar cheese on top, followed by the breadcrumbs or crushed crackers. Drizzle the melted butter over the top.

Bake the casserole for 30-35 minutes, or until the top is golden brown and the filling is bubbly. Allow the casserole to cool for a few minutes before serving.

This dish can be paired with a fresh salad or your favorite sides for a complete and satisfying meal. Enjoy your delicious leftover turkey casserole!

Cooking Steps

Preheat your oven to 350°F.

In a large bowl, mix together the leftover turkey, vegetables, and seasonings.

Advertisement

Pour the mixture into a baking dish and bake for 30-40 minutes.

Once cooked, let the casserole stand for 5 minutes before serving.

Step 1. Preheat Oven to 350°F

preheat oven to 350 f

To get the oven ready for the casserole, you'll want to preheat it to 350°F. This temperature is perfect for baking the dish, ensuring it cooks through evenly without burning the top or leaving the center underdone.

It's important to give the oven time to fully heat up before adding the casserole. This typically takes around 15-20 minutes, depending on your oven. You can use this time to gather the remaining ingredients and prepare the baking dish.

Once the oven has reached 350°F, you're ready to assemble and bake the casserole. This step-by-step process will help the dish turn out perfectly every time.

Be sure to keep a close eye on the oven to prevent overcooking, and enjoy the delicious aroma as the casserole bakes to golden brown perfection.

Advertisement

Step 2. In a Large Bowl, Mix Ingredients

mix ingredients in bowl

In a large bowl, combine the cooked turkey, cooked stuffing, cream of mushroom soup, milk, frozen vegetables, and seasonings. Stir everything together until it's well-mixed.

This casserole is a great way to use up your leftover Thanksgiving turkey and stuffing. The cream of mushroom soup and milk create a rich, creamy base, while the frozen veggies add color and nutrition.

Feel free to adjust the ingredient amounts to your taste. For example, if you have a lot of extra turkey, you can add a bit more. Or if you prefer more veggies, toss in an extra handful or two. Just be sure to mix everything thoroughly so the flavors meld together.

Once the ingredients are combined, transfer the mixture to a greased baking dish. Smooth the top with a spatula to create an even layer.

Now you're ready to bake the casserole and enjoy a delicious, comforting meal made with your leftover turkey.

Step 3. Pour Into Baking Dish

pour mixture into dish

Once the ingredients are combined in the large bowl, transfer the mixture to a greased baking dish. This 9×13-inch dish should be lightly coated with cooking spray or butter to prevent sticking.

Gently pour the turkey and vegetable blend into the prepared dish, smoothing the top with a spatula to create an even layer.

Advertisement

Next, top the casserole with the cubed bread, ensuring the entire surface is covered. This layer of bread will soak up the delicious flavors as the dish bakes.

If desired, you can lightly press the bread cubes into the filling to help them adhere.

Step 4. Bake for 30-40 Minutes

bake for 30 40 minutes

Slide the baking dish into the preheated oven and let the turkey casserole bake for 30 to 40 minutes. This step allows the flavors to meld together and the dish to develop a golden-brown crust on top.

Keep an eye on it, as oven temperatures can vary. You'll know it's done when the edges are bubbling, and the center is hot and bubbly.

Once the timer goes off, carefully remove the casserole from the oven. Let it rest for about 5 minutes before serving. This resting period allows the casserole to set up and makes it easier to portion out.

When ready to serve, scoop portions onto plates or bowls. The turkey casserole pairs well with a fresh salad or steamed vegetables for a complete and satisfying meal.

Advertisement

Enjoy your delicious use of leftover turkey!

Step 5. Let Stand 5 Minutes Before Serving

let stand before serving

After removing the casserole from the oven, let it stand for about 5 minutes before serving. This resting period allows the flavors to meld together and the casserole to set up slightly. During this time, the hot, bubbly filling will thicken, making it easier to scoop out neat servings.

While you wait, this is a great opportunity to prepare any additional sides or garnishes. Perhaps you'd like to toss together a simple salad or warm up some dinner rolls to accompany the casserole. You could also take this time to set the table and gather any necessary serving utensils.

Once the 5 minutes are up, the casserole should be ready to serve. Scoop out portions using a large spoon or spatula, being careful not to disturb the layers too much.

Serve the casserole hot, garnished with a sprinkle of fresh parsley or a dollop of cranberry sauce, if desired. Enjoy this delicious way to use up your leftover turkey!

Final Thoughts

The Leftover Turkey Casserole is a delightful way to repurpose your holiday leftovers. This hearty dish not only saves you time and money but also reduces food waste, making it an eco-friendly option.

Advertisement

By incorporating the remaining turkey, vegetables, and stuffing into a creamy casserole, you've created a well-balanced meal that's sure to satisfy.

The best part? This recipe is incredibly versatile, allowing you to customize it based on your personal preferences or the ingredients you have on hand.

Feel free to experiment with different types of cheese, add extra veggies, or even switch up the protein. The key is to have fun and get creative with your leftovers.

As you savor the final bites of this comforting casserole, take a moment to appreciate the convenience and cost-effectiveness of this dish.

The Leftover Turkey Casserole not only provides a delicious second act for your holiday meal but also serves as a reminder that with a little creativity, you can transform your leftovers into something truly special.

Advertisement

Frequently Asked Questions

Can I Use Rotisserie Chicken Instead of Turkey?

Absolutely, you can use rotisserie chicken instead of turkey. The flavors and textures will be similar, and it'll make for a quick and easy meal. Just be sure to adjust the cooking time accordingly.

How Long Does the Casserole Last in the Fridge?

The casserole will usually last 3-4 days in the fridge. Be sure to store it in an airtight container and reheat it thoroughly before serving. Enjoy your delicious leftovers!

Can I Freeze the Leftover Casserole?

Yes, you can freeze the leftover casserole. Freezing is a great way to extend the shelf life of your meal. Simply portion it into airtight containers and store in the freezer for up to 3 months.

Is the Casserole Suitable for Vegetarians or Vegans?

The casserole may not be suitable for vegetarians or vegans, as it likely contains meat-based ingredients. It's best to check the recipe and adjust it accordingly if you want a plant-based version that meets your dietary needs.

Can I Add Additional Vegetables to the Recipe?

You can absolutely add additional vegetables to the recipe! Vegetables are a great way to boost the nutrition and flavor of any dish. Feel free to experiment with your favorite veggies to enhance the overall dish.

Advertisement
Continue Reading

Thanksgiving

Turkey Sandwich (For Leftovers)

Hanker for a tasty and portable lunch? Transform your Thanksgiving or holiday leftovers into a classic turkey sandwich. Read on to learn the secret to perfecting this versatile meal.

Published

on

leftover turkey sandwich recipe

Transform your Thanksgiving or holiday leftovers into a tasty and portable lunch with a classic turkey sandwich. This versatile meal originated in the early 20th century and gained popularity as industrialization made turkey more widely available. The secret to a delicious turkey sandwich lies in using fresh, high-quality ingredients – think freshly sliced turkey, your choice of bread, creamy condiments, and crunchy vegetables. Customize it to your liking, then enjoy the satisfying blend of savory, creamy, and fresh flavors in each bite. For more details on perfecting your turkey sandwich, keep reading.

Key Takeaways

  • Utilize leftover turkey to create a versatile and flavorful sandwich, featuring fresh bread, condiments, and customizable toppings.
  • Ensure quality ingredients like sliced turkey and preferred bread to enhance the overall taste and texture of the sandwich.
  • Experiment with various condiments and toppings, such as mayonnaise, mustard, lettuce, and tomato, to personalize the sandwich to your liking.
  • Assemble the sandwich with a balanced distribution of ingredients, considering the flavor profile, texture, and visual appeal.
  • Enjoy the nutritional benefits of the turkey sandwich, which provides lean protein, fiber, and essential vitamins and minerals.

History

The origins of the turkey sandwich can be traced back to the early 20th century, when the rise of industrialized food production and growing affluence in urban centers paved the way for its popularity.

As more Americans began to work in offices and factories, the need for a portable, filling meal arose. The turkey sandwich, with its combination of savory meat, bread, and often complementary condiments, emerged as a convenient and satisfying lunch option.

Driven by the expansion of commercial poultry farming, the availability of pre-sliced bread, and the increasing popularity of sandwich shops, the turkey sandwich quickly gained traction.

By the mid-20th century, it had become a staple in lunchboxes and diner menus nationwide.

The versatility of the turkey sandwich, allowing for creative ingredient combinations and adaptations, has contributed to its enduring appeal over the decades.

Advertisement

Today, the turkey sandwich remains a beloved classic, a testament to its enduring place in American culinary history.

Recipe

A classic turkey sandwich is a delightful and versatile meal that can be enjoyed any time of the day. Whether you're looking for a quick lunch or a satisfying snack, this simple recipe will guide you through the steps to create a delicious and satisfying sandwich.

The key to a great turkey sandwich lies in the quality of the ingredients. Start with freshly sliced turkey, preferably roasted or smoked for maximum flavor. Pair it with your choice of bread, from hearty whole-grain to soft and pillowy white, and don't forget the condiments and toppings that will bring the flavors together.

Ingredients:

  • 4 slices of bread
  • 6 ounces of sliced turkey
  • 2 slices of cheese (such as cheddar or swiss)
  • 2 tablespoons of mayonnaise
  • 1 tablespoon of Dijon mustard
  • 2 slices of tomato
  • 2 leaves of lettuce

Instructions:

Spread the mayonnaise and Dijon mustard on the four slices of bread. Layer the turkey, cheese, tomato, and lettuce on two of the slices. Top with the remaining two slices of bread to create the sandwiches.

Advertisement

When preparing this dish, consider toasting the bread for added crunch and warmth. You can also experiment with different types of cheese, vegetables, or condiments to personalize the flavor profile.

Remember to slice the tomatoes thinly to ensure a balanced texture in the sandwich.

Cooking Steps

Slice the bread to your desired thickness.

Spread your favorite condiments onto the bread slices.

Layer the turkey slices, add cheese slices, and top with any additional toppings you'd like.

Advertisement

Step 1. Slice Bread to Desired Thickness

slice bread to thickness

Slicing the bread to your preferred thickness is a crucial step in crafting the perfect turkey sandwich. The thickness of the bread can significantly impact the overall texture and balance of the sandwich, so it's essential to get it just right.

Using a sharp serrated knife, gently saw back and forth to slice the bread into even, uniform pieces. Aim for a thickness that's substantial enough to support the filling, yet not so thick that it overwhelms the other ingredients.

A good rule of thumb is to slice the bread between 1/4 to 1/2 inch thick. This range provides the optimal ratio of bread to turkey, cheese, and any other toppings you choose to include.

Take your time and pay attention to the thickness, adjusting as needed, to ensure each slice is cut precisely. Properly sliced bread lays the foundation for a well-balanced and delightful turkey sandwich.

Step 2. Spread Condiments on Bread Slices

spread condiments on bread

With your bread slices ready, you can now move on to spreading the condiments. The choice of condiments is entirely up to you, but classic options include mayonnaise, mustard, and/or a flavorful spread like pesto or hummus.

It's important to note that while some human foods are safe for dogs, others, like grapes, can be harmful; always consider your furry friends when preparing meals and feeding safe treats.

If using mayonnaise, start by applying a thin, even layer across the surface of each bread slice. This will help create a smooth, creamy base for the other ingredients.

Advertisement

For mustard, you can either spread it directly on the bread or mix it with a bit of mayonnaise to create a tangy, zesty blend.

Alternatively, if you prefer a more robust flavor, consider using a pesto or hummus. Spoon a small amount onto the bread and use the back of a knife to gently spread it, taking care not to tear the delicate surface.

The key is to ensure an even distribution of the condiment, providing maximum flavor in every bite.

Once the condiments are applied, you're ready to assemble the turkey sandwich!

Step 3. Layer Turkey Slices

layer turkey slices evenly

Now that you've prepared the bread with your choice of condiments, it's time to layer the turkey slices. This is a crucial step in crafting the perfect turkey sandwich, as the arrangement and placement of the turkey can make or break the overall experience.

Begin by selecting high-quality, thinly sliced turkey. Deli-style turkey works best, as it's delicate enough to layer neatly without overwhelming the other ingredients.

Advertisement

Arrange the turkey slices in a slightly overlapping pattern, ensuring that each slice covers the majority of the bread's surface area. This creates a uniform and visually appealing layer of turkey.

When layering, be mindful of the placement and distribution. You want to achieve a balance, with the turkey covering the bread evenly from edge to edge.

Avoid clustering the slices in the center, as this can create an uneven texture and make it challenging to take a satisfying bite.

Step 4. Add Cheese Slices

add cheese slices now

After you've carefully layered the turkey slices, it's time to add the cheese. Selecting the right cheese can truly elevate your turkey sandwich. Consider classic options like cheddar or Swiss, or get creative with pepper jack or provolone.

Slice the cheese into thin, even pieces, ensuring it covers the turkey completely. You want the cheese to melt seamlessly, creating a cohesive and flavorful layer.

When arranging the cheese, be mindful of overlapping the slices slightly to prevent gaps. Gently press the cheese down to help it adhere to the turkey. This will create a sturdy foundation for the rest of your sandwich.

Advertisement

Feel free to use as much or as little cheese as you prefer, depending on your personal taste preferences.

Step 5. Add Any Desired Toppings

add desired toppings now

Next, you can add any desired toppings to your turkey sandwich. The possibilities are endless when it comes to customizing your sandwich with tasty toppings.

Some popular options include:

  • Crisp lettuce leaves or fresh spinach to add a crunchy, nutritious element.
  • Juicy tomato slices or roasted red peppers for a burst of tangy flavor.
  • Thinly sliced onions, whether red, white, or shallots, for a subtle bite.
  • Crunchy pickle chips or relish to provide a tangy, briny contrast.
  • Creamy avocado slices or a smear of guacamole for a rich, creamy texture.
  • Crispy bacon strips to add a salty, smoky note.

Feel free to experiment with various combinations to find your perfect flavor profile.

Final Thoughts

The preparation of a satisfying turkey sandwich shouldn't be taken lightly. As the final step in your culinary journey, the choices you make regarding the finishing touches can truly elevate the entire experience.

Consider adding a sprinkle of salt and pepper to enhance the flavors, or a drizzle of your favorite condiment to provide a delightful contrast. Remember, the beauty of the turkey sandwich lies in its simplicity – don't overpower the natural goodness of the ingredients.

Once you've assembled your masterpiece, take a moment to admire your handiwork. Savor the aroma, the textures, and the harmonious blend of flavors.

Advertisement

Then, with a sense of pride and anticipation, take that first bite, allowing the flavors to dance across your palate. Enjoy every morsel, savoring the satisfaction of a job well done.

The turkey sandwich, a testament to your culinary skills, is now ready to be relished and shared with loved ones.

Frequently Asked Questions

How Long Can the Turkey Sandwich Be Stored in the Fridge?

You can store the sandwich in the fridge for 3-4 days. Keep it in an airtight container or wrap it tightly to prevent it from drying out. Consume it within that timeframe for the best quality and food safety.

Can I Use Different Types of Bread for the Sandwich?

You can definitely use different types of bread for your sandwich. The flavor and texture of the bread can change the overall taste and experience, so feel free to experiment with options like whole wheat, sourdough, or even croissants.

Is It Possible to Make the Sandwich Ahead of Time?

Yes, you can certainly make the sandwich ahead of time. Prepare it and store it in an airtight container in the fridge. Just be sure to eat it within a few days for best quality and freshness.

Advertisement

How Can I Make the Sandwich More Flavorful?

To make your sandwich more flavorful, you can try adding herbs, spices, or a flavor-packed condiment like pesto or roasted garlic aioli. Experiment with different combinations to find your perfect flavor profile.

Can I Add Any Extra Toppings or Condiments to the Sandwich?

You can definitely add more toppings and condiments to make your sandwich more flavorful. Consider adding crisp lettuce, juicy tomatoes, creamy avocado, or even a tangy pickle or two. Don't be afraid to experiment with different flavors!

Continue Reading

Thanksgiving

Turkey Soup (For Leftovers)

Prepare a nourishing and comforting turkey soup from your Thanksgiving leftovers, as this recipe walks you through the simple steps to create a soul-warming dish.

Published

on

leftover turkey soup recipe

Turkey soup is a time-honored dish that allows you to transform your Thanksgiving leftovers into a comforting and nourishing meal. Originating as a humble peasant dish, this soup has been enjoyed by cultures around the world for its rich flavor and nutritional benefits. To make it, simply combine your cooked turkey meat with flavorful broth, fresh vegetables, and aromatic herbs. Simmering the soup allows the flavors to meld together, creating a soul-warming dish that's perfect for enjoying with crusty bread or a salad. With just a few simple steps, you can create a satisfying meal that celebrates the season's bounty. And if you're interested in learning more, the recipe overview provides detailed instructions.

Key Takeaways

  1. Transform Thanksgiving leftovers into a comforting and nourishing turkey soup, utilizing the flavorful turkey meat, aromatic broth, and fresh vegetables.
  2. Simmer the turkey carcass with vegetables to create a rich and complex broth that serves as the base for the soup, maximizing the use of the whole bird.
  3. Incorporate the remaining turkey meat into the soup to reduce food waste and provide a satisfying protein source, maintaining the flavors of the original feast.
  4. Customize the soup with a variety of vegetables, herbs, and seasonings to create a regional variation that reflects personal preferences and local culinary traditions.
  5. Enjoy the turkey soup as a comforting and nourishing meal, paired with crusty bread or a fresh salad, for a satisfying post-Thanksgiving experience.

History

Originating as a humble peasant dish, turkey soup has long been a staple in many cultures, offering a nourishing and cost-effective way to utilize the abundant and versatile turkey.

From the ancient Greeks and Romans, who treasured the turkey's rich flavor and nutritional benefits, to the Native American tribes who incorporated the bird into their traditional stews, the history of turkey soup is deeply rooted in global culinary traditions.

During the colonial era in North America, turkey soup became a cherished part of Thanksgiving celebrations, allowing families to make the most of their holiday feast leftovers.

As the dish spread across the continent, regional variations emerged, each reflecting the unique ingredients and cooking methods of the local communities.

Today, turkey soup remains a beloved comfort food, a reminder of the enduring power of simple, homemade dishes to nourish the body and soul.

Advertisement

Recipe

Thanksgiving is a time-honored tradition in many households, and the centerpiece of the feast is often a perfectly roasted turkey. However, the true joy of this holiday lies in the delicious leftovers that can be transformed into a comforting and satisfying turkey soup.

This recipe for turkey soup is a simple yet flavorful way to make the most of those precious turkey scraps. The combination of tender turkey, fresh vegetables, and aromatic herbs creates a soul-warming dish that will have your family coming back for seconds.

Ingredients:

  • 4 cups cooked turkey meat, shredded or cubed
  • 8 cups turkey or chicken broth
  • 2 carrots, peeled and sliced
  • 2 celery stalks, sliced
  • 1 onion, diced
  • 2 cloves garlic, minced
  • 2 bay leaves
  • 1 teaspoon dried thyme
  • 1 teaspoon dried parsley
  • Salt and pepper to taste

Instructions:

In a large pot, combine the turkey broth, carrots, celery, onion, garlic, bay leaves, thyme, and parsley.

Bring the mixture to a boil, then reduce the heat and let it simmer for 20-25 minutes, or until the vegetables are tender.

Advertisement

Add the cooked turkey meat and season with salt and pepper to taste.

Let the soup simmer for an additional 10 minutes to allow the flavors to meld.

Serving Tips:

For a heartier meal, add cooked pasta, rice, or dumplings to the soup.

You can also garnish the soup with fresh parsley or thyme leaves for an extra touch of flavor.

Advertisement

Enjoy this comforting turkey soup with crusty bread or a side salad for a delicious and satisfying post-Thanksgiving meal.

Cooking Steps

First, remove the turkey meat from the carcass.

Next, chop up your favorite vegetables like carrots, celery, and onions to add to the broth.

Then, pour in the broth and seasonings, and let the soup simmer until the vegetables are tender.

Step 1. Remove Turkey Meat

remove turkey meat first

After the turkey has been roasted to perfection, it's time to carefully remove the meat from the bones.

Start by using a sharp knife to gently slice the skin and meat away from the carcass. Working slowly and methodically will help you avoid tearing the tender meat. The fat content in the leftover turkey can enhance the richness of your soup, similar to how butter enhances flavor in various dishes.

Advertisement

Once the large pieces have been removed, use your fingers to pick through the remaining bones and joints, extracting any smaller chunks or shreds of meat. Be thorough in this process, as the leftover pieces will be perfect for incorporating into your turkey soup.

Collect all the gathered meat in a bowl or container, discarding any skin, fat, or connective tissue.

Depending on the size of your turkey, you may end up with a substantial amount of meat – great news, as it will provide a hearty base for your soup.

With the meat removed, you're now ready to move on to the next step: preparing the broth.

Step 2. Add Vegetables

incorporate fresh vegetables

The leftover turkey carcass provides an excellent foundation for a rich and flavorful broth.

Now, it's time to add the vegetables that will bring depth and complexity to your turkey soup.

Advertisement

Start by chopping an onion, a few carrots, and a couple of celery stalks into bite-sized pieces. These aromatic veggies will add sweetness, crunch, and a subtle earthy flavor to the broth.

Next, mince a few cloves of garlic – they'll lend a fragrant, savory note to the soup.

Toss the chopped vegetables into the simmering broth and let them cook for about 20 minutes, or until they're tender.

Feel free to add any other vegetables you have on hand, such as potatoes, parsnips, or mushrooms. Just be sure to adjust the cooking time accordingly.

Once the vegetables are perfectly cooked, you're ready to move on to the next step: seasoning the soup to perfection.

Advertisement

Step 3. Add Broth and Seasonings

incorporate broth and seasonings

Add the turkey broth you made from the carcass to the pot with the simmered vegetables. This broth will provide a rich, savory base for your soup. If you don't have homemade broth, you can use low-sodium chicken or vegetable broth instead.

Next, add your desired seasonings. A classic blend for turkey soup includes dried thyme, sage, rosemary, and black pepper. Start with about 1 teaspoon of each, then adjust to taste. You can also add a bay leaf for extra depth of flavor.

For a little extra zing, consider including a splash of white wine or apple cider vinegar. This will help brighten the flavors. Finish by seasoning with salt to your preference.

Bring the soup to a simmer and let the flavors meld for 10-15 minutes. Taste and adjust seasonings as needed. Your savory turkey soup is now ready to serve!

Step 4. Simmer Until Vegetables Are Tender

simmer vegetables until tender

Once the broth and seasonings have been added, let the soup simmer on the stove. This low and slow cooking method will allow the flavors to meld together and the vegetables to become tender.

Adjust the heat to maintain a gentle simmer, avoiding a rapid boil that could make the soup tough.

Simmering typically takes 15-20 minutes, but you'll want to check the vegetables periodically. The carrots, celery, and onions should be fork-tender when done. Potatoes may take a bit longer, around 20-25 minutes. To test, simply pierce a piece with a fork – it should slide off easily.

Advertisement

Be sure to stir the soup occasionally, scraping the bottom to prevent any sticking or burning. This allows the flavors to circulate evenly.

Once the vegetables reach the desired tenderness, your turkey soup is ready to serve. Ladle it into bowls and enjoy the comforting, homemade goodness.

Step 5. Serve Hot With Crusty Bread

serve hot with bread

With the vegetables tender and the flavors blended, your turkey soup is now ready to be served. Ladle the piping hot soup into bowls, making sure to include ample chunks of turkey, vegetables, and herbs.

Accompany the soup with crusty, artisanal bread for dipping and sopping up every last drop. The bread should have a crunchy exterior and a soft, airy interior. Slice the loaf into thick, hearty pieces to provide the perfect complement to the rich, savory soup.

You can opt for a classic French baguette, rustic sourdough, or even rosemary-infused focaccia – the options are endless.

Encourage your guests to tear off pieces of the bread and use them to scoop up the flavorful broth. The contrast of the warm, crusty bread and the comforting turkey soup creates a harmonious dining experience.

Advertisement

Serve the soup and bread immediately, allowing your loved ones to indulge in the perfect cold-weather meal.

Final Thoughts

As you prepare to savor the aromatic delight of your homemade turkey soup, take a moment to reflect on the journey that led you here. This labor of love, born from the bountiful leftovers of a holiday feast, has transformed into a comforting and nourishing meal.

The process may have taken some time, but the payoff is undeniable. By simmering the turkey carcass and vegetables, you've extracted a rich, flavorful broth that serves as the foundation for your soup.

And by adding in the remaining turkey meat, you've created a dish that honors the original feast while providing a satisfying and economical option for the days that follow.

Now, as you ladle the steaming soup into your bowl, take pride in your culinary achievement. This homemade turkey soup isn't just a meal – it's a testament to your resourcefulness, your kitchen skills, and your ability to transform simple ingredients into something truly special.

Advertisement

Enjoy every sip, knowing that you've created a dish worthy of celebration.

Frequently Asked Questions

How Long Can Leftover Turkey Be Safely Stored in the Refrigerator?

Leftover turkey can be safely stored in the refrigerator for 3-4 days. Make sure to store it in an airtight container and use it within that timeframe to prevent bacterial growth and ensure food safety.

Can Turkey Soup Be Frozen for Later Use?

Absolutely, you can freeze turkey soup for later use. Simply let it cool completely, then pour into airtight containers or freezer bags. It'll keep for 2-3 months in the freezer, making it a convenient meal option.

What Are Some Alternative Vegetables That Can Be Used in Turkey Soup?

You can use a variety of veggies in your turkey soup, such as carrots, celery, onions, potatoes, or even greens like kale or spinach. Get creative and use whatever seasonal produce you have on hand.

Is It Necessary to Remove the Skin From the Turkey Before Making Soup?

You don't necessarily have to remove the skin from the turkey before making soup. The skin can add extra flavor and richness to the broth. However, if you prefer a lighter soup, you can remove the skin.

Advertisement

Can Turkey Soup Be Made in a Slow Cooker or Instant Pot?

Definitely, you can make turkey soup in a slow cooker or Instant Pot. These handy appliances make the process easy, allowing the flavors to meld together while the meat becomes deliciously tender.

Continue Reading
Advertisement

Affiliate Disclaimer
As an affiliate, we may earn a commission from qualifying purchases. We get commissions for purchases made through links on this website from Amazon and other third parties.

Advertisement

Latest

sweet and savory delight sweet and savory delight
Christmas Recipes3 mins ago

Honey Glazed Ham

Joyfully elevate your holiday meal with a honey-glazed ham that promises a mouthwatering fusion of sweet and savory flavors. Continue...

non alcoholic cocktail alternatives non alcoholic cocktail alternatives
Graduations/Birthdays5 mins ago

Mocktails

Knock yourself out with these vibrant, bubbly mocktails that let you enjoy the sophisticated taste of cocktails without the effects...

ice cream soda bar ice cream soda bar
Graduations/Birthdays10 mins ago

Soda Float Bar

Kicking it old-school with soda float bars, a classic American delight that blends carbonated fizz and rich ice cream, uncovering...

delicious nutritious blended beverages delicious nutritious blended beverages
Graduations/Birthdays15 mins ago

Smoothies

Kicking off your day with a nourishing smoothie is an easy way to pack in essential vitamins, minerals, and fiber,...

refreshing chilled beverage choice refreshing chilled beverage choice
Graduations/Birthdays21 mins ago

Iced Tea

You'll be amazed at the refreshing delight of iced tea, a timeless summertime favorite that's easy to prepare and perfect...

refreshing citrus beverage delight refreshing citrus beverage delight
Graduations/Birthdays26 mins ago

Lemonade

Whisking up a batch of homemade lemonade is a refreshing summertime ritual that has captivated palates for centuries, but the...

refreshing mixed fruit beverage refreshing mixed fruit beverage
Graduations/Birthdays32 mins ago

Fruit Punch

Fruit punch, a timeless delight tracing its origins to colonial exploration, offers a vibrant, customizable experience that will leave you...

delicious s mores dessert station delicious s mores dessert station
Graduations/Birthdays37 mins ago

S’mores Bar

Gather the perfect ingredients and craft your own delightful s'mores with endless flavor combinations, from milk chocolate to white chocolate...

creamy italian dessert delight creamy italian dessert delight
Graduations/Birthdays43 mins ago

Panna Cotta

Originating in the Piedmont region of Italy, panna cotta is a delightfully creamy and versatile dessert that has captured the...

delicious baked fruit dessert delicious baked fruit dessert
Graduations/Birthdays49 mins ago

Fruit Cobbler

Yes, you can discover the surprising origins and irresistible flavors of this classic American dessert by exploring the history and...

sweet baked treats recipe sweet baked treats recipe
Graduations/Birthdays55 mins ago

Sugar Cookies

Flavorful and versatile, sugar cookies have captivated bakers for generations, with a rich history and perfected techniques waiting to be...

decadent chocolate dessert delight decadent chocolate dessert delight
Graduations/Birthdays1 hour ago

Chocolate Mousse

Blissful spoonfuls of velvety chocolate mousse will transport you to a world of decadence, beckoning you to discover the rich,...

Advertisement

Trending