Connect with us

Graduations/Birthdays

Spring Rolls

Grab a taste of the Far East with spring rolls, a beloved Asian appetizer that combines fresh veggies, savory proteins, and a satisfying crunch in every bite.

Published

on

crispy rice paper appetizers

Spring rolls are a beloved appetizer enjoyed across Asia, featuring a delightful blend of fresh vegetables, savory proteins, and a satisfying crunch in every bite. Originating in China centuries ago, these crispy treats have evolved into regional specialties, with fillings like pork and shrimp in Vietnam or glass noodles in Thailand. Making spring rolls at home allows you to customize the flavors, from classic combinations to adventurous new twists. The simple rolling technique creates an impressive presentation, and serving them with flavorful dipping sauces takes the experience to new heights. Dive deeper into the world of spring rolls to discover their rich history and endless culinary possibilities.

Key Takeaways

  • Spring rolls originated in China during the Spring and Autumn period and have evolved to include diverse fillings across different Asian cuisines.
  • Spring rolls are popular appetizers or snacks that offer a blend of textures and flavors, enhancing the dining experience.
  • Making spring rolls allows for experimentation with various fillings, such as vegetables, meats, and seafood, as well as customization to suit different preferences.
  • The cooking process for spring rolls typically involves soaking rice paper wrappers, filling them with fresh ingredients, and then frying or baking them until golden brown.
  • Homemade spring rolls can impress guests and family, showcasing culinary skills and creativity, and can be made in batches for parties or gatherings.

History

Originating in China, spring rolls have a rich and storied past, with their origins dating back to the Spring and Autumn period (771-476 BC). During this time, people began wrapping seasonal vegetables in thin sheets of dough, creating a portable and nourishing snack.

Over the centuries, the recipe evolved, with the addition of meat and seafood fillings, as well as the distinctive crispy exterior that we know and love today.

As spring rolls spread across Asia, they took on unique regional flavors. In Vietnam, they're often filled with pork, shrimp, and vegetables, while in Thailand, you might find them stuffed with glass noodles and a piquant chili sauce.

No matter where you go, spring rolls are a beloved delicacy that capture the essence of the season. Whether you're enjoying them as an appetizer or a light meal, they're sure to delight your taste buds and transport you to faraway lands.

Recipe

Spring rolls are a beloved appetizer or snack that can be found in many Asian cuisines. These delightful rolls are made by wrapping a variety of fresh ingredients in a thin, crispy wrapper. The result is a harmonious blend of textures and flavors that's sure to delight the senses.

Advertisement

The process of making spring rolls can be a fun and rewarding experience, allowing you to experiment with different fillings and discover your own personal preferences. Whether you prefer a more traditional approach or a creative twist, the joy of crafting these rolls from scratch is well worth the effort.

Ingredients:

  • 8 ounces rice paper wrappers
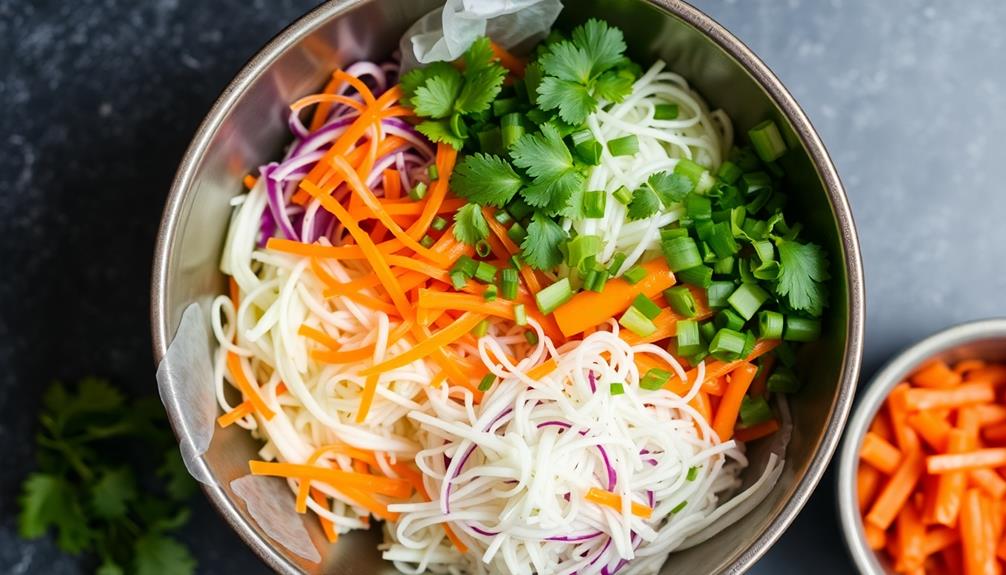
  • 2 cups shredded cabbage
  • 1 cup shredded carrots
  • 1 cup bean sprouts
  • 1/2 cup sliced green onions
  • 1/2 cup chopped fresh mint leaves
  • 1/2 cup chopped fresh cilantro
  • 2 tablespoons soy sauce
  • 1 tablespoon rice vinegar
  • 1 teaspoon sesame oil
  • 1/2 teaspoon ground ginger

Cooking Instructions:

Soak the rice paper wrappers in warm water for 30 seconds to 1 minute, or until they become pliable. Lay the wrappers on a clean, flat surface.

In a bowl, combine the cabbage, carrots, bean sprouts, green onions, mint, and cilantro. In a separate bowl, mix the soy sauce, rice vinegar, sesame oil, and ground ginger. Add the sauce to the vegetable mixture and stir to combine.

Spoon a portion of the filling onto the bottom third of each wrapper, then fold the sides inward and roll tightly to enclose the filling. Serve the spring rolls immediately, or store them in an airtight container in the refrigerator until ready to serve.

Advertisement

Tips:

Ensure that the rice paper wrappers aren't overly soaked, as they can become difficult to work with. Adjust the filling ingredients to your personal taste preferences, and consider adding cooked shrimp, chicken, or tofu for added protein.

Serve the spring rolls with a dipping sauce, such as a sweet chili sauce or a peanut sauce, for a complete and satisfying snack or appetizer.

Cooking Steps

Alright, let's get started on those spring rolls!

First, you'll want to wet your rice paper wrapper and get it nice and pliable.

Advertisement

Next, add your favorite filling ingredients – just be sure to place them in the center and leave some space at the edges.

Now, tightly roll up that wrapper, making sure to seal it well so your rolls stay together.

Time to serve 'em up with a delicious dipping sauce!

Step 1. Wet Rice Paper Wrapper

moisten rice paper wrapper

Typically, you'll want to wet the rice paper wrapper briefly under warm water before assembling your spring rolls. This softens the wrapper and makes it pliable, allowing you to roll and shape your spring rolls with ease.

Dip the entire wrapper in the water, letting it soak for just a few seconds. Be careful not to oversaturate it, as that can make the wrapper too fragile and difficult to work with.

Once the wrapper is wet, gently shake off any excess water and lay it flat on a clean, dry surface. The wrapper may feel a bit sticky, but that's normal.

Advertisement

Now you can start building your spring roll, placing your fillings in the center and rolling it up tightly. The damp wrapper will stick to itself, helping to hold the roll together.

With a little practice, you'll be rolling up delicious spring rolls in no time!

Step 2. Add Filling Ingredients

incorporate filling components now

Once you have your softened rice paper wrapper ready, it's time to start building your spring roll.

First, you'll want to add a few crisp, fresh veggies. Julienne some carrots and cucumbers, or thinly slice up some lettuce and cabbage. These crunchy, colorful ingredients will give your spring roll a satisfying texture.

Next, you can add a protein like cooked shrimp, sliced chicken, or tofu. Arrange the fillings in the center of the wrapper, leaving a couple of inches on each side. Be sure not to overstuff, as this can make the wrapper tear.

Now it's time to roll it up! Fold the bottom of the wrapper over the filling, then fold in the sides and continue rolling tightly up to the top.

Advertisement

With the filling nicely tucked inside, your spring roll is ready to enjoy. Feel free to get creative with different flavor combinations – the possibilities are endless!

Step 3. Tightly Roll the Wrapped Filling

tightly roll wrapped filling

After arranging the fillings in the center of the wrapper, tightly roll the spring roll. Grip the bottom corner of the wrapper and fold it over the filling.

Then, fold the sides inward and continue to roll the wrapper up tightly, using your fingers to keep the filling secure as you go. Roll it into a tight, neat cylinder.

Be gentle yet firm, making sure not to tear the delicate wrapper. As you roll, the wrapper will stick to itself, sealing the spring roll.

Keep rolling until you reach the top corner of the wrapper. Gently press down to seal the roll.

Repeat this process for each spring roll, creating a batch of beautifully rolled treats. The tightly wrapped filling will ensure your spring rolls hold their shape and stay fresh.

Advertisement

Now you're ready to fry or bake your homemade spring rolls to golden perfection!

Step 4. Tightly Seal the Rolled Wrapper

securely close rolled wrapper

To seal the rolled wrapper, firmly press down on the seam to ensure it adheres. Run your fingers along the entire length, gently pressing to create a tight seal. This will prevent the filling from spilling out as you fry the spring rolls.

Next, use your palms to roll the wrapper tightly, starting from one end and working your way to the other. Apply even pressure to maintain a uniform shape. Be careful not to tear the delicate wrapper. As you roll, the wrapper should conform neatly around the filling, creating a compact and cohesive spring roll.

Once fully rolled, moisten the final edge with a bit of water to help it stick. Pinch and hold the seam closed for a few seconds, sealing the wrapper completely. This will lock in the filling and prevent unraveling during the cooking process.

With the wrapper securely sealed, your spring rolls are now ready for frying!

Step 5. Serve Immediately With Dipping Sauce

serve hot with sauce

Carefully lower the sealed spring rolls into the hot oil and fry them until golden brown, about 2-3 minutes per batch.

Be sure to fry them in small batches to maintain the oil's temperature. Once they're nicely browned, remove the spring rolls from the oil and place them on a paper towel-lined plate to drain off any excess oil.

Advertisement

Serve the crispy spring rolls immediately while they're hot and crunchy. They'll be simply irresistible!

Offer a tasty dipping sauce on the side. A sweet and tangy sauce, like a Thai-style chili sauce or a soy-based dipping sauce, is a classic pairing.

The contrast of the warm, crispy rolls and the cool, flavorful dip is truly delightful. Encourage your guests to dunk the spring rolls in the sauce and enjoy every bite.

These freshly fried spring rolls are sure to be the star of your meal or appetizer spread.

Final Thoughts

Ultimately, spring rolls make a delightful appetizer or snack that can be customized to suit your taste preferences.

Advertisement

Whether you prefer a classic filling or something more adventurous, the possibilities are endless. The beauty of spring rolls lies in their versatility – you can experiment with different ingredients and flavors to create your own unique masterpiece.

As you've seen, the process of making spring rolls is relatively straightforward, and the result is a tasty treat that's sure to impress your friends and family.

Don't be afraid to get creative and put your own spin on this timeless dish. With a little practice, you'll be rolling like a pro in no time.

Frequently Asked Questions

What's the Difference Between Spring Rolls and Egg Rolls?

You'll find that spring rolls and egg rolls differ in their fillings and cooking methods. Spring rolls typically have a lighter, more veggie-based filling, while egg rolls usually contain more meat and are fried rather than baked.

Can I Use Frozen Spring Roll Wrappers?

You can absolutely use frozen spring roll wrappers! They're a convenient option that'll save you time. Just be sure to follow the package instructions for proper preparation and cooking. Enjoy your homemade spring rolls with the frozen wrappers!

Advertisement

How Long Can I Store Cooked Spring Rolls?

You can store cooked spring rolls in the refrigerator for up to 3-4 days. Make sure to let them cool completely before storing in an airtight container. Reheat in the oven or air fryer when ready to enjoy.

What's the Best Dipping Sauce for Spring Rolls?

The best dipping sauce for your spring rolls really depends on your personal taste preferences. You could try a tangy soy sauce, a sweet chili sauce, or a creamy peanut sauce – experiment to find your favorite!

Can I Bake Spring Rolls Instead of Frying?

You can certainly bake spring rolls instead of frying them. The result won't be as crispy, but it's a healthier option that can still deliver delicious flavors. Give it a try and see what you think!

Conclusion

Spring rolls are a delightful treat that'll transport you on a flavor journey! You'll love the crispy, golden shell and the tasty, fresh filling. They're perfect for sharing with friends or enjoying as a snack. Once you've tried making them, you'll be hooked! So, get rolling and savor the deliciousness. This is a recipe you'll want to make again and again.

Advertisement
Continue Reading
Advertisement

Graduations/Birthdays

Mocktails

Knock yourself out with these vibrant, bubbly mocktails that let you enjoy the sophisticated taste of cocktails without the effects of alcohol.

Published

on

non alcoholic cocktail alternatives

Mocktails are the fun and flavorful non-alcoholic drinks that let you enjoy the sophisticated taste of cocktails without the effects of alcohol. Whether you're hosting a party or treating yourself, mocktails offer a wide range of delicious possibilities. You can craft vibrant, bubbly concoctions using fresh fruits, herbs, and sweeteners – the options are endless! Mocktails are perfect for any occasion, from fancy gatherings to casual get-togethers. Plus, they're a healthier alternative to alcoholic drinks. If you're curious to explore the exciting world of mocktails, keep reading to discover some popular recipes and tips for crafting your own.

Key Takeaways

  • Mocktails are non-alcoholic beverages designed to mimic the taste and experience of traditional cocktails.
  • Mocktail recipes often feature a combination of fresh fruits, herbs, sweeteners, and carbonated mixers.
  • Mocktails provide a sophisticated alternative to alcoholic drinks, suitable for all ages and occasions.
  • The history of mocktails dates back to the early 20th century, with increased popularity during the Prohibition era.
  • Crafting unique mocktails allows for creativity and experimentation with a wide range of flavorful ingredients.

History

The history of mocktails can be traced back to the early 20th century. Back then, people started experimenting with non-alcoholic drinks that tasted just as exciting as their boozy counterparts. They mixed up all sorts of fruit juices, spices, and fizzy waters to create refreshing and festive beverages.

As the Prohibition era rolled in, the demand for mocktails grew even stronger. People wanted to enjoy the fun and flavor of cocktails without the alcohol. Clever bartenders rose to the challenge, crafting creative mocktail recipes that delighted the thirsty crowds.

Over the decades, the art of mocktail-making has continued to evolve. Today, you can find all kinds of innovative, flavor-packed mocktails that rival the most sophisticated cocktails.

Whether you're looking for a sophisticated sipper or a fun, fruity refresher, the history of mocktails has paved the way for endless delicious possibilities.

Recipe

Mocktails are a refreshing and alcohol-free way to enjoy a delightful beverage. Whether you're looking to cut back on alcohol consumption, are pregnant, or simply prefer non-alcoholic options, mocktails offer a wide range of flavors and ingredients to satisfy your thirst.

Advertisement

Crafting a delicious mocktail is an art form in itself, as it involves balancing a variety of flavors and textures to create a perfectly balanced and refreshing drink. With a little creativity and the right ingredients, you can concoct a mocktail that will delight your taste buds and impress your guests.

Ingredients:

  • 2 cups of fresh pineapple chunks
  • 1 cup of fresh orange juice
  • 1/2 cup of fresh lime juice
  • 1/4 cup of honey
  • 1 cup of chilled sparkling water
  • Ice cubes

Instructions:

In a blender, combine the pineapple chunks, orange juice, lime juice, and honey. Blend until smooth and creamy.

Pour the mixture into a pitcher and stir in the chilled sparkling water. Serve over ice in glasses and garnish with a slice of lime or pineapple if desired.

Tips:

Advertisement

When choosing the fruits for your mocktail, opt for the freshest and ripest options to ensure maximum flavor.

You can also experiment with different fruit combinations, such as mango, berries, or even herbs like mint or basil, to create unique and personalized mocktail recipes.

Additionally, consider adding a splash of bitters or a pinch of salt to balance the sweetness and enhance the overall flavor profile.

Cooking Steps

First, gather your ingredients and equipment.

Next, combine the ingredients in a shaker and give it a good shake.

Advertisement

Then, strain the mixture into a chilled glass, garnish with a fresh citrus slice, and enjoy over ice.

Step 1. Gather Ingredients and Equipment

collect ingredients and tools

To start crafting your mocktails, you'll need to gather a few key ingredients and equipment. First, you'll want a variety of juices like citrus, berry, and tropical fruits. These will provide the delicious flavors for your mocktails.

You'll also need some syrups, like grenadine or simple syrup, to add sweetness and body. Don't forget some sparkling waters or seltzers to give your drinks that bubbly flair.

In terms of equipment, you'll need a cocktail shaker or mason jar to mix your ingredients. A muddler is great for mashing fruit and herbs to release their flavors.

A jigger or measuring cup will help you measure liquids precisely. Garnishes like fruits, herbs, or edible flowers can add the perfect finishing touch to your mocktails.

With these tools and ingredients on hand, you'll be ready to start shaking, stirring, and crafting delicious non-alcoholic cocktails.

Advertisement

Step 2. Combine Ingredients in Shaker

mix ingredients in shaker

With your ingredients and equipment ready, you can begin combining them to craft your mocktail. Grab your shaker and add the chilled liquids like juices or syrups first.

Then, carefully drop in any solid ingredients like muddled fruits or herbs. Secure the lid and give the shaker a vigorous shake for about 10-15 seconds. This will ensure all the flavors blend together perfectly.

Next, remove the lid and give the mixture a quick sniff. The aroma should be bright and inviting. If it's not quite right, you can always add a touch more of one ingredient to adjust the flavor profile.

When you're satisfied, use your strainer to pour the mocktail into your prepared glass. Top it off with any garnishes you'd like, like a citrus twist or a sprig of mint.

Your delicious and refreshing mocktail is now ready to enjoy! Remember to sip slowly and savor each flavorful sip.

Step 3. Strain Into Chilled Glass

strain into chilled glass

After shaking the ingredients vigorously, it's time to strain the mocktail into a chilled glass. This crucial step helps to ensure a smooth and refreshing texture. Simply hold a fine-mesh strainer over your serving glass and gently pour the mixture through. This will catch any small ice chips or fruit pulp, leaving you with a beautifully clear and well-balanced drink.

Be sure to use a chilled glass to keep your mocktail nice and cold. You can chill the glass in the freezer for a few minutes before straining, or fill it with ice water while you're preparing the rest of the drink.

Advertisement

When you're ready, just dump out the water and strain your mocktail right into the chilled glass.

With the drink now strained and in its serving vessel, you're almost ready to enjoy your delicious mocktail creation. The final step is to garnish it with a fresh fruit slice, herb sprig, or other decorative touch that complements the flavors.

Step 4. Garnish With Fresh Citrus Slice

garnish with citrus slice

Adorning your chilled mocktail with a fresh citrus slice lends an elegant finishing touch, heightening both the visual appeal and aromatic experience. Selecting a vibrant, juicy slice of lemon, lime, or orange adds a pop of color and a tantalizing scent that tantalizes the senses.

Simply take your freshly prepared mocktail and carefully place the citrus slice on the rim of the glass, ensuring it sits at a slight angle. The slice not only looks stunning but also allows the natural oils to mingle with the drink, infusing it with a zesty burst of flavor.

As your guests lift the glass to their lips, they'll be delighted by the refreshing aroma and the touch of tartness that the citrus slice provides. This simple yet impactful garnish transforms your mocktail into a sophisticated and visually appealing non-alcoholic treat, elevating the overall drinking experience.

Step 5. Enjoy Over Ice

chill and savor drink

Serving your mocktail over ice infuses it with a delightfully chilled and refreshing quality. The ice cubes gently chill the drink, allowing the flavors to shine through while providing a satisfying temperature contrast. As the ice melts, it gradually dilutes the mocktail, creating a perfectly balanced sipping experience.

When preparing your mocktail, be sure to use high-quality ice cubes. Larger, clear cubes are best, as they melt more slowly and don't water down the drink too quickly.

Advertisement

Alternatively, you can fill a glass with crushed ice, which creates a fun, textured appearance and helps the mocktail stay cold for longer.

Don't be afraid to get creative with your ice! Try adding a few berries or citrus slices to the ice cubes for a visually appealing and flavorful touch. This not only enhances the overall presentation but also infuses the drink with subtle, natural flavors as the ice melts.

Final Thoughts

Mocktails can be a delightful and refreshing alternative to traditional cocktails, allowing you to enjoy the flavors and sociability of a bar experience without the need for alcohol.

As you've learned, crafting unique and tasty mocktails is a wonderful way to explore new ingredients and get creative in the kitchen.

Whether you're hosting a gathering or simply treating yourself, these non-alcoholic beverages can elevate any occasion with their vibrant colors, tantalizing aromas, and complex flavors.

Advertisement

Frequently Asked Questions

Are Mocktails Suitable for All Age Groups?

Mocktails are non-alcoholic beverages that can be enjoyed by people of all ages. You don't have to be of legal drinking age to enjoy the unique flavors and refreshing qualities of a well-crafted mocktail.

How Long Do Mocktails Last Once Made?

Mocktails can last for up to 3-4 days when stored properly in the refrigerator. The key is to use fresh ingredients and store them in an airtight container to maintain their flavor and prevent spoilage.

Can I Make Mocktails in Advance?

You can make mocktails in advance, but it's best to consume them within a few days. The ingredients may separate or lose their freshness over time, so it's ideal to prepare them shortly before serving.

What Are the Health Benefits of Mocktails?

Consuming mocktails can provide several health benefits. They're typically low in calories and sugar, helping you maintain a healthy weight. Plus, they can hydrate you without the negative effects of alcohol. Enjoy the flavor without the intoxication!

Can I Substitute Ingredients in Mocktail Recipes?

Absolutely! You can substitute ingredients in mocktail recipes to suit your taste preferences and dietary needs. Get creative and experiment with different flavors and combinations to find your perfect mocktail.

Advertisement

Conclusion

You've gotta give mocktails a try! They're the perfect solution when you want to enjoy a tasty, alcohol-free treat. From classic flavors to unique concoctions, the possibilities are endless. Whip up a refreshing mocktail and savor the delicious, guilt-free goodness. Whether you're hosting a party or relaxing at home, these fun, fizzy drinks are sure to delight. So what are you waiting for? Start exploring the world of mocktails today!

Continue Reading

Graduations/Birthdays

Soda Float Bar

Kicking it old-school with soda float bars, a classic American delight that blends carbonated fizz and rich ice cream, uncovering its captivating history.

Published

on

ice cream soda bar

Soda float bars have a cherished history, tracing back to the late 1800s when pharmacists first started mixing carbonated beverages with delightful ice cream. These classic American treats quickly gained popularity, becoming a staple in small-town drugstores and big-city diners. Featuring flavors like root beer, cola, and orange, soda floats offer a refreshing delight by combining the effervescence of soda with the richness of ice cream. To create your own, simply scoop ice cream into a tall glass and slowly pour soda over it, then top with whipped cream and toppings. It's a nostalgic experience that continues to delight generations – and there's more to discover about this beloved treat.

Key Takeaways

  • Soda Float Bars originated in the late 19th century as pharmacists mixed carbonated beverages and ice cream, becoming a staple in small-town drugstores and big-city diners.
  • Soda Floats combine the effervescence of soda with the richness of ice cream, creating a classic American treat with endless flavor possibilities.
  • The key ingredients for a Soda Float are soda, vanilla ice cream, whipped cream (optional), and toppings (optional), with the importance of using cold components for optimal texture and fizz.
  • The preparation of a Soda Float involves scooping ice cream into a glass and slowly pouring soda over it, gently stirring to combine without excessive foam or fizz.
  • Soda Float Bars are recognized as a delightful addition to local culinary scenes, offering a nostalgic experience that evokes memories of carefree summer days and community gatherings.

History

The soda float bar's origins can be traced back to the late 19th century when pharmacists started experimenting with carbonated beverages and ice cream. They'd mix the two, creating a delightful fizzy treat that quickly became a hit with customers. People loved the combination of the creamy, cold ice cream and the bubbly, effervescent soda.

Soon, soda float bars popped up all over, becoming a staple of small-town drugstores and big-city diners. Folks would belly up to the counter, eager to try the latest flavors. Root beer, cola, and orange were some of the most popular choices, but you could get all sorts of fun and creative mixes.

The soda float bar became a gathering place where friends could relax, enjoy a tasty treat, and catch up on the latest news.

Today, the soda float bar remains a beloved classic, evoking nostalgia for simpler times. Whether you're a longtime fan or trying it for the first time, there's nothing quite like the refreshing delight of a perfectly crafted soda float.

Recipe

A soda float is a classic American treat that combines the effervescence of soda with the creamy richness of ice cream. This simple yet delightful dessert is a perfect way to cool off on a hot day or indulge in a sweet moment.

Advertisement

To create the perfect soda float, it's important to strike the right balance between the carbonated soda and the smooth, velvety ice cream. The key is to use high-quality ingredients and to assemble the float with care, ensuring that each sip or spoonful is a harmonious blend of flavors and textures.

  • Soda (such as root beer, cola, or your favorite flavor)
  • Vanilla ice cream
  • Whipped cream (optional)
  • Cherries or other toppings (optional)

To prepare the soda float, scoop a few scoops of ice cream into a tall glass. Slowly pour the soda over the ice cream, allowing it to fizz and foam. If desired, top with whipped cream and a cherry or other toppings. Serve immediately and enjoy the refreshing and indulgent combination.

When making soda floats, it's important to use cold soda and ice cream straight from the freezer. This will help maintain the effervescence of the soda and the creamy texture of the ice cream.

Additionally, you can experiment with different soda and ice cream flavors to create unique and personalized variations on this classic treat.

Cooking Steps

Add a scoop of your favorite ice cream to the soda mixture and gently stir.

Top it off with a dollop of whipped cream and sprinkle some crushed cookies or candies on top.

Advertisement

Serve your creation immediately, complete with a cherry on top!

Step 1. Add Ice Cream Scoop

add ice cream scoop

With a large ice cream scoop, carefully place a generous portion of your desired ice cream flavor into each glass.

Whether you prefer classic vanilla, rich chocolate, or a fruity sorbet, the choice is yours! Scoop the cold, creamy treat into the waiting glasses, aiming to fill them about halfway. Gently tap the scoop against the side of the glass to release any excess ice cream.

Next, it's time to add the fizzy soda. Slowly pour the bubbly liquid over the ice cream, watching as it creates a delightful foamy topping.

Be careful not to overfill the glasses, leaving just a bit of room at the top. The combination of the cold ice cream and the effervescent soda will produce a delightful soda float that's perfect for a hot day.

Step 2. Stir Mixture Gently

gently stir the mixture

Once the ice cream and soda have been added, gently stir the mixture with a long-handled spoon or straw.

You'll want to move the spoon or straw in a slow, circular motion, taking care not to splash the soda float. The key is to incorporate the ice cream into the soda without creating too much foam or fizz.

Advertisement

Stir just until the mixture is combined and the ice cream has started to melt, creating a creamy, frothy texture. Don't overstir, or you'll end up with a watery, flat soda float.

Gently stir for about 10-15 seconds, then stop. The goal is to maintain the fizz and thickness of the soda float.

Once it's stirred, your soda float is ready to enjoy! Grab a long spoon or straw and dive in, savoring the sweet, creamy goodness.

Step 3. Add Whipped Cream Topping

add whipped cream topping

Now that you've gently stirred your soda float, it's time to take it to the next level with a cloud-like whipped cream topping.

Grab that can of freshly whipped cream and give it a good shake. Gently press the nozzle, allowing the thick, creamy whip to cascade over the top of your soda.

Watch as it swirls and twirls, creating a dreamy, fluffy peak. Don't be afraid to be generous – you can never have too much whipped cream on a soda float!

Advertisement

Lightly drag a spoon through the whipped cream, creating delicate swirls and peaks. This not only makes it look extra special, but it also allows the cool, crisp soda to peek through.

The contrast of the creamy whipped topping and the fizzy soda is pure magic.

Now take a big spoonful, making sure to get a bit of everything. Prepare to be delighted by the perfect combination of sweet, creamy, and refreshing flavors in every bite.

Step 4. Sprinkle Crushed Cookies or Candies

top with crushed treats

Next, grab a handful of your favorite crushed cookies or candies. Sprinkle them generously over the top of your soda float creation. The crunchy bits will add a delightful texture and a burst of extra flavor.

You can use crushed Oreos, graham crackers, or even crushed peppermint candies. Get creative and experiment with different combinations! The cookies or candies will sink down into the creamy ice cream, creating a delightful surprise in every bite.

Don't be afraid to go a little overboard – the more toppings, the merrier! Just make sure to leave room for a final swirl of whipped cream on top. This extra dollop will tie the whole dessert together, balancing the sweet and crunchy elements.

Advertisement

Get ready for an explosion of taste and texture in every spoonful. Your soda float is about to reach new, delicious heights!

Step 5. Serve Immediately With a Cherry

serve immediately with cherry

To complete your soda float masterpiece, grab a maraschino cherry and gently place it atop the whipped cream. The vibrant red cherry adds a delightful pop of color and a burst of sweetness to your refreshing soda float.

Don't be shy – you can add as many cherries as you'd like!

Once the cherry is nestled in, your soda float is ready to serve. Grab a long spoon and dive in, scooping up the creamy goodness along with the fizzy soda.

The combination of the cold, bubbly soda and the rich, velvety ice cream is a party in your mouth. Take your time savoring each spoonful, letting the flavors mingle and delight your taste buds.

Final Thoughts

The resounding success of the Soda Float Bar affirms its position as a delightful addition to the local culinary landscape. You can't help but feel a sense of excitement when you step up to the counter, eager to create your own unique flavor combination.

Advertisement

Whether you opt for a classic root beer float or venture into more adventurous territory with a cherry limeade soda float, the possibilities are endless.

As you savor each sip, the combination of sweet, creamy, and effervescent notes dances across your taste buds, transporting you to a bygone era of carefree summer days.

The Soda Float Bar has become a hub of community, where friends gather to catch up, families celebrate special occasions, and kids delight in the pure joy of indulging in a nostalgic treat.

Frequently Asked Questions

Can I Use Any Type of Ice Cream for the Soda Float?

You can use any type of ice cream for a soda float. The options are endless – from classic vanilla to exotic flavors like green tea or salted caramel. The ice cream will blend deliciously with the fizzy soda.

How Long Can the Soda Float Be Stored Before It Loses Its Fizz?

You can generally store a soda float for up to an hour before it starts losing its fizz. The carbonation will gradually dissipate, so it's best to enjoy your float as soon as possible for maximum effervescence.

Advertisement

Do I Need to Use a Specific Type of Soda for the Best Results?

For the best results, you'll want to use a soda with a higher carbonation level. Choosing a soda with a stronger fizz will help maintain the float's effervescence longer. Experiment to find your preferred soda.

Can I Make the Soda Float in Advance and Serve It Later?

You can make the soda float in advance, but it's best to serve it right away. The ice cream will start melting, and the carbonation will dissipate if you let it sit too long. For the best results, assemble the float just before serving.

Is There a Way to Make the Soda Float More Visually Appealing?

You can make the soda float more visually appealing by adding a dollop of whipped cream, a cherry on top, or a sprinkle of crushed nuts or chocolate shavings. These toppings will create a more attractive and inviting presentation.

Conclusion

Whoa, you'll love sipping on a cool, refreshing soda float! It's the perfect way to beat the heat and satisfy your sweet tooth. Just mix up your favorite soda and ice cream, and you've got a delightful treat that'll have your taste buds dancing. Go on, give it a try – you won't regret it! This classic combo is sure to bring a smile to your face with every sip.

Advertisement
Continue Reading

Graduations/Birthdays

Smoothies

Kicking off your day with a nourishing smoothie is an easy way to pack in essential vitamins, minerals, and fiber, leaving you energized and ready to tackle the day.

Published

on

delicious nutritious blended beverages

Smoothies are a delightful and versatile way to enjoy a burst of refreshing flavor and essential nutrients any time of day. Originating from humble beginnings in the early 20th century, these blended beverages have become staples in homes and restaurants, offering endless possibilities to suit your taste preferences and dietary needs. With a simple recipe of fruit, greens, liquid, and optional sweeteners, you can craft creamy, fruity, or indulgent smoothies packed with vitamins, minerals, and fiber. Unleash your creativity by experimenting with diverse ingredients – the delicious opportunities are endless! Keep reading to uncover more about the rich history and benefits of smoothies.

Key Takeaways

  • Smoothies trace their origins to the early 20th century with the advent of blenders and have grown in popularity due to their versatility and nutritional benefits.
  • Smoothies provide a variety of nutrients including vitamins, minerals, and fiber, and can be customized to suit different taste preferences and dietary needs.
  • A basic smoothie recipe includes 1 cup of fruit, 1 cup of liquid, 1/2 cup of leafy greens, 1 tablespoon of nut butter, and optional sweetener.
  • The preparation process involves blending all ingredients, adding desired sweetener, pouring into glasses, garnishing with fresh fruit, and chilling before serving.
  • Smoothies offer endless flavor combinations and can be adapted for different meal times or snacks, making them a versatile and accessible option for daily consumption.

History

The origins of smoothies can be traced back to the early 20th century, when blenders became more widely available to the general public. Before then, people had to blend their fruits and vegetables by hand, which was a tedious and time-consuming process.

But once blenders hit the market, it became much easier to create these nutritious and delicious drinks.

The word "smoothie" itself didn't come about until the 1930s, when health food stores and juice bars started offering these blended concoctions as a healthy alternative to traditional beverages.

Over the years, the popularity of smoothies has only grown, with endless flavor combinations and health benefits to explore.

Today, smoothies are a staple in many households and restaurants, beloved for their versatility and ability to pack a nutritional punch.

Advertisement

Whether you prefer them for breakfast, a snack, or even dessert, there's a smoothie out there to suit every taste bud.

Recipe

Smoothies are a refreshing and nutritious way to start your day or enjoy a healthy snack. They're versatile and can be tailored to your personal taste preferences. With just a few simple ingredients, you can create a delicious and satisfying smoothie that will leave you feeling energized and satisfied.

Smoothies are a great way to pack in a variety of nutrients, including vitamins, minerals, and fiber. They can be made with fresh or frozen fruits and vegetables, as well as other nutrient-dense ingredients like yogurt, nuts, and seeds. Experimenting with different combinations can lead to a wide range of flavors and textures, making smoothies a fun and enjoyable way to incorporate more healthy foods into your diet.

  • 1 cup of frozen or fresh fruit (e.g., bananas, strawberries, blueberries, mango)
  • 1 cup of liquid (e.g., milk, almond milk, yogurt, kefir)
  • 1/2 cup of leafy greens (e.g., spinach, kale)
  • 1 tablespoon of nut butter (e.g., peanut butter, almond butter)
  • 1 tablespoon of honey or maple syrup (optional)
  • 1/2 cup of ice (optional)

Add all the ingredients to a blender and blend until smooth and creamy. Adjust the consistency by adding more or less liquid as needed. Pour the smoothie into a glass and enjoy immediately.

When making smoothies, it's important to use ripe and flavorful fruits for the best taste. You can also experiment with different combinations of fruits, vegetables, and other ingredients to create your own unique recipes.

Smoothies are a great way to incorporate more nutrient-dense foods into your diet and enjoy a refreshing and satisfying treat.

Advertisement

Cooking Steps

Blend all the ingredients thoroughly until smooth and creamy.

Add a touch of your favorite sweetener to enhance the flavor.

Then, pour the refreshing smoothie into chilled glasses and garnish with fresh fruit for a delightful finishing touch.

Step 1. Blend All Ingredients Thoroughly

thoroughly blend all ingredients

Once you've gathered all your ingredients, it's time to start blending. You'll want to add them to your blender in the order they're listed in the recipe. This helps ensure everything gets mixed together thoroughly.

Begin by pouring in the liquid ingredients like milk, yogurt, or fruit juice. For those looking to maximize flavor and nutrition, consider using a cold press juicer for your juice base. Then, add the solid ingredients like fresh or frozen fruit, leafy greens, and any other mix-ins.

Next, secure the blender lid and turn on the machine. Start on a lower speed and gradually increase it to the highest setting. Blend the smoothie for about 30-60 seconds, or until it's completely smooth and creamy.

Advertisement

You might need to stop the blender and use a spatula to scrape down the sides a few times during the process. Once it's fully blended, your delicious smoothie is ready to enjoy!

Step 2. Add Desired Sweetener

incorporate preferred sweetener

With your smoothie blended to perfection, you may want to consider adding a touch of sweetener. This can help balance out any tart or bitter flavors in the fruit and bring out the natural sweetness. Honey, maple syrup, and agave nectar are all great options.

You might also want to think about the health benefits of your smoothie ingredients; for example, celery juice is known for its anti-inflammatory properties and may complement your sweetener choice a natural diuretic. Start with just a teaspoon and give it a taste. You can always add more if you'd like it a bit sweeter.

Maybe you prefer the subtle crunch of raw sugar or the rich flavor of molasses. Experiment to find your perfect level of sweetness. Keep in mind that the riper the fruit, the less sweetener you may need.

Pay attention to how much you add, as too much can overpower the other flavors. The beauty of making your own smoothie is that you get to customize it to your unique taste preferences. Have fun exploring different sweeteners until you land on your go-to smoothie.

Step 3. Pour Into Glasses

pour mixture into glasses

Finally, pour your perfectly blended smoothie into your favorite glasses. Whether you prefer tall, slender glasses or short, wide ones, the choice is yours! Carefully ladle the smooth, vibrant mixture into each container, filling them right to the top.

Listen as the liquid gurgles and splashes, promising a delightful sip to come. Smoothies can be enhanced with ingredients like celery juice and pregnancy benefits, adding extra nutrition and hydration to your drink.

Advertisement

Once your glasses are full, take a moment to admire the beautiful hues and layers of your creation. The colors will dance and swirl, tempting you to dive right in. But resist the urge – for now.

Grab a spoon or straw and get ready to enjoy your homemade smoothie masterpiece. With just a quick stir, the flavors will meld together perfectly.

Now it's time to savor every refreshing sip. Feel the cool, creamy texture coat your tongue as the vibrant taste explodes in your mouth. Smoothies are a delightful and healthy way to nourish your body.

Sip, savor, and smile – you did it!

Step 4. Garnish With Fresh Fruit

garnish with fresh fruit

Adorn your freshly poured smoothie with vibrant, sliced fruit. A sprinkle of juicy, colorful toppings will take your creation to the next level. Consider slicing up a ripe banana or arranging plump strawberry slices in a playful pattern. You can even get creative and add a few blueberries or small chunks of mango for a taste of tropical flair.

When selecting your garnishes, choose fruits that complement the flavors in your smoothie. For instance, if you blended together banana, peanut butter, and cocoa powder, a handful of fresh raspberries would make a delightful topping.

Advertisement

Or, if your smoothie features Greek yogurt and mixed berries, a scattering of kiwi slices would add a lovely contrast.

No matter which fruits you choose, the key is to slice or chop them into bite-sized pieces that will nestle nicely atop your refreshing beverage. A visually appealing smoothie not only looks tempting, but it also encourages you to savor every sip.

Step 5. Chill Smoothie Before Serving

chill smoothie before serving

After blending your smoothie ingredients, chill the mixture in the refrigerator for at least 30 minutes. This step is crucial for creating a refreshing and satisfying smoothie.

As it chills, the flavors will meld together, and the texture will become delightfully creamy. Chilling also helps retain the vibrant colors of your fresh fruits and vegetables, making your smoothie even more appetizing.

Once the 30 minutes are up, give your smoothie a gentle stir to ensure all the ingredients are evenly distributed. You'll notice the mixture has thickened up, creating a smooth and velvety consistency.

Now it's ready to be poured into your favorite glass or jar. For an extra touch of fun, you can garnish your chilled smoothie with a slice of fresh fruit, a sprinkle of toasted nuts, or a sprig of fresh mint.

Advertisement

Sip and savor the refreshing flavors, knowing you've created a delightful treat that's both healthy and delicious.

Final Thoughts

Smoothies can be a delightful and nutritious addition to your daily routine. With endless flavor combinations and a quick, easy preparation, they're the perfect way to fuel your body with wholesome ingredients.

Whether you prefer fruity blends or creamy indulgences, there's a smoothie to suit every taste.

As you experiment with different recipes, don't be afraid to get creative. Try adding a handful of spinach or kale for an extra nutrient boost, or even a dollop of nut butter for a touch of protein.

The beauty of smoothies is that you can customize them to your liking, making them a versatile and satisfying choice.

Advertisement

Frequently Asked Questions

What Blender Settings Are Best for Making Smooth Smoothies?

To make your smoothies smooth, use the highest blender setting. Blend on a high speed until the mixture reaches your desired consistency. This will ensure all ingredients are thoroughly combined for a creamy, lump-free texture.

Can I Use Frozen Fruit Instead of Fresh?

Yes, you can use frozen fruit instead of fresh. In fact, frozen fruit can be a great option as it's typically more affordable and convenient, and can result in a thicker, creamier smoothie texture.

How Can I Make My Smoothies More Filling?

To make your smoothies more filling, add ingredients like Greek yogurt, nut butters, or oats. They'll boost the protein, healthy fats, and fiber content, keeping you satisfied until your next meal.

What Are the Best Protein-Rich Ingredients for Smoothies?

To make your smoothies more protein-rich, try adding ingredients like Greek yogurt, nut butters, protein powder, or silken tofu. These will boost the protein content and help keep you feeling full and satisfied.

How Long Can I Store a Prepared Smoothie in the Fridge?

You can typically store a prepared smoothie in the fridge for 1-3 days. However, the exact storage time depends on the ingredients and whether you've added any dairy or fresh fruit. Be sure to refrigerate it promptly in an airtight container.

Advertisement

Conclusion

Smoothies are the perfect way to pack in a ton of nutrients and enjoy a tasty treat! You can whip up a refreshing smoothie in just minutes using your favorite fruits and veggies. Whether you're looking for a healthy breakfast or an afternoon pick-me-up, smoothies are a delicious and versatile option that the whole family will love. So why not give it a try? Your taste buds are in for a real treat!

Continue Reading
Advertisement

Affiliate Disclaimer
As an affiliate, we may earn a commission from qualifying purchases. We get commissions for purchases made through links on this website from Amazon and other third parties.

Advertisement

Latest

sweet and savory delight sweet and savory delight
Christmas Recipes1 min ago

Honey Glazed Ham

Joyfully elevate your holiday meal with a honey-glazed ham that promises a mouthwatering fusion of sweet and savory flavors. Continue...

non alcoholic cocktail alternatives non alcoholic cocktail alternatives
Graduations/Birthdays3 mins ago

Mocktails

Knock yourself out with these vibrant, bubbly mocktails that let you enjoy the sophisticated taste of cocktails without the effects...

ice cream soda bar ice cream soda bar
Graduations/Birthdays9 mins ago

Soda Float Bar

Kicking it old-school with soda float bars, a classic American delight that blends carbonated fizz and rich ice cream, uncovering...

delicious nutritious blended beverages delicious nutritious blended beverages
Graduations/Birthdays14 mins ago

Smoothies

Kicking off your day with a nourishing smoothie is an easy way to pack in essential vitamins, minerals, and fiber,...

refreshing chilled beverage choice refreshing chilled beverage choice
Graduations/Birthdays19 mins ago

Iced Tea

You'll be amazed at the refreshing delight of iced tea, a timeless summertime favorite that's easy to prepare and perfect...

refreshing citrus beverage delight refreshing citrus beverage delight
Graduations/Birthdays25 mins ago

Lemonade

Whisking up a batch of homemade lemonade is a refreshing summertime ritual that has captivated palates for centuries, but the...

refreshing mixed fruit beverage refreshing mixed fruit beverage
Graduations/Birthdays30 mins ago

Fruit Punch

Fruit punch, a timeless delight tracing its origins to colonial exploration, offers a vibrant, customizable experience that will leave you...

delicious s mores dessert station delicious s mores dessert station
Graduations/Birthdays36 mins ago

S’mores Bar

Gather the perfect ingredients and craft your own delightful s'mores with endless flavor combinations, from milk chocolate to white chocolate...

creamy italian dessert delight creamy italian dessert delight
Graduations/Birthdays41 mins ago

Panna Cotta

Originating in the Piedmont region of Italy, panna cotta is a delightfully creamy and versatile dessert that has captured the...

delicious baked fruit dessert delicious baked fruit dessert
Graduations/Birthdays47 mins ago

Fruit Cobbler

Yes, you can discover the surprising origins and irresistible flavors of this classic American dessert by exploring the history and...

sweet baked treats recipe sweet baked treats recipe
Graduations/Birthdays53 mins ago

Sugar Cookies

Flavorful and versatile, sugar cookies have captivated bakers for generations, with a rich history and perfected techniques waiting to be...

decadent chocolate dessert delight decadent chocolate dessert delight
Graduations/Birthdays59 mins ago

Chocolate Mousse

Blissful spoonfuls of velvety chocolate mousse will transport you to a world of decadence, beckoning you to discover the rich,...

Advertisement

Trending