Graduations/Birthdays
Mashed Potatoes
Uncover the rich history and essential steps to crafting the perfect batch of creamy, fluffy mashed potatoes, a beloved comfort food.
Mashed potatoes have a rich and fascinating history dating back to the 16th century when they were first introduced to Europe from the Andes. Once considered food for the poor, these fluffy, creamy spuds soon became a beloved staple across all social classes. Over the years, the recipe has evolved, with the addition of butter, milk, and seasonings. Today, mashed potatoes remain a cherished comfort food, often served at family gatherings and holiday meals. To make the perfect batch, you'll need starchy potatoes, a few simple ingredients, and a little bit of mashing magic. But that's just the start – there's more to discover about these versatile taters.
Key Takeaways
- Mashed potatoes were first introduced to Europe in the 16th century from the Andes region of South America.
- Ideal potato varieties for mashed potatoes are starchy types like Russet or Yukon Gold.
- The basic ingredients for classic mashed potatoes include potatoes, milk, butter, salt, and pepper.
- The cooking process involves boiling the potatoes until fork-tender, then mashing them to achieve a smooth consistency.
- Mashed potatoes can be customized by incorporating additional ingredients like cheese, chives, or roasted garlic for enhanced flavor.
History
Mashed potatoes have a long and storied history, dating back to the 16th century when they were first introduced to Europe from the Andes region of South America.
Originally, these humble tubers were seen as food for the poor, but as time passed, mashed potatoes became a beloved dish among all social classes.
During the 18th century, the recipe for mashed potatoes evolved, with the addition of butter, milk, and seasonings.
This combination created the rich, creamy texture we know and love today. As the potato's popularity grew, it became a staple in many European households, eventually making its way to the United States in the early 19th century.
Today, mashed potatoes remain a beloved comfort food, enjoyed at family gatherings, holiday meals, and as a simple, satisfying side dish.
From their humble beginnings to their current status as a culinary classic, the history of mashed potatoes is a testament to the enduring appeal of this versatile and delicious food.
Recipe
Mashed potatoes are a classic side dish that can complement a wide variety of meals. They're easy to prepare and can be customized to suit individual tastes. Whether you prefer them creamy, chunky, or with added ingredients, mashed potatoes are a versatile and comforting dish.
The key to making delicious mashed potatoes is to start with the right type of potato. Starchy potatoes, such as Russet or Yukon Gold, are ideal as they tend to become fluffy and light when mashed. Avoid watery or low-starch potatoes, as they can result in a gummy or dense texture.
- 4 pounds Russet or Yukon Gold potatoes, peeled and cut into 1-inch pieces
- 1 cup milk
- 4 tablespoons unsalted butter
- 1 teaspoon salt
- 1/4 teaspoon black pepper
Bring a large pot of salted water to a boil. Add the potato pieces and cook until fork-tender, about 15-20 minutes. Drain the potatoes in a colander and return them to the pot.
Add the milk and butter, and mash the potatoes using a potato masher or an electric mixer until smooth and creamy. Season with salt and pepper, and adjust the seasoning to taste.
For best results, serve the mashed potatoes hot and fresh. They can be kept warm in a slow cooker or covered in the pot until ready to serve.
For a richer flavor, consider adding grated cheese, chopped chives, or roasted garlic to the mashed potatoes. Experiment with different seasonings and mix-ins to find your perfect mashed potato recipe.
Cooking Steps
Alright, let's get cooking!
First, you'll need to peel and dice those potatoes. Once they're all chopped up, it's time to boil the potato chunks until they're nice and soft.
After that, you'll want to drain the cooked potatoes and mash them up real good.
Step 1. Peel and Dice Potatoes
Typically, you'll want to start by peeling and dicing the potatoes. Use a sharp knife or a vegetable peeler to carefully remove the skin. Be sure to wash the potatoes thoroughly under running water to remove any dirt or debris.
Once the potatoes are peeled, place them on a cutting board and use the knife to dice them into small, evenly-sized pieces. This will help ensure that they cook evenly when you boil them. As you're dicing, try to keep the pieces around 1 inch in size. This will give you the perfect texture for your mashed potatoes.
Cutting the potatoes into smaller pieces also helps them cook faster, so you'll spend less time waiting for them to become tender. After dicing, place the potatoes in a large pot and cover them with cold water. Now you're ready to move on to the next step in the process of making delicious mashed potatoes.
Step 2. Boil the Potato Chunks
Once the potato chunks are prepared, bring a large pot of salted water to a boil over high heat. Carefully add the potato pieces to the boiling water, making sure they're fully submerged.
Let the potatoes cook at a steady boil, stirring occasionally, until they're fork-tender, about 15-20 minutes.
To check if they're done, poke a potato chunk with a fork. If the fork easily slides in and out, the potatoes are ready. Avoid overcooking, as that can make the potatoes watery and difficult to mash.
When the potatoes are cooked through, carefully drain them in a colander. Make sure to reserve a cup of the starchy cooking water – you'll need it later for mashing.
Return the drained potato chunks to the empty pot and let them sit for a minute or two to allow any excess moisture to evaporate.
Now you're ready to mash and finish your delicious homemade mashed potatoes!
Step 3. Drain the Cooked Potatoes
Once the potatoes are cooked through, carefully drain them in a colander. Hold the colander over the sink and gently pour out the hot water. Be careful not to burn your hands – the potatoes will be piping hot!
Tilt the colander to make sure all the water drains out. You don't want any extra moisture left behind, as that can make your mashed potatoes watery.
With the potatoes drained, it's time to start mashing. Transfer the cooked and drained potatoes to a large bowl. Using a potato masher or a fork, gently mash the potatoes, breaking them down into a smooth and creamy texture.
Don't over-mash, or your potatoes will become gluey. Add in your desired seasonings, like butter, milk, salt, and pepper.
Continue mashing and stirring until you've reached your desired consistency. Now your mashed potatoes are ready to be served and enjoyed!
Step 4. Mash the Cooked Potatoes
With the potatoes drained, transfer them to a large bowl.
Using a potato masher, press down on the potatoes and mash them up. Keep mashing until the potatoes are smooth and creamy, without any lumps.
As you mash, you can add a few tablespoons of butter to make the mashed potatoes extra rich and flavorful. Be gentle, as you don't want to overmix and make the potatoes gummy.
Once the butter has melted in, you can stir in a splash of warm milk or cream. This will make the mashed potatoes light and fluffy.
Continue mashing and stirring until you've reached your desired consistency. Season with salt and pepper to taste.
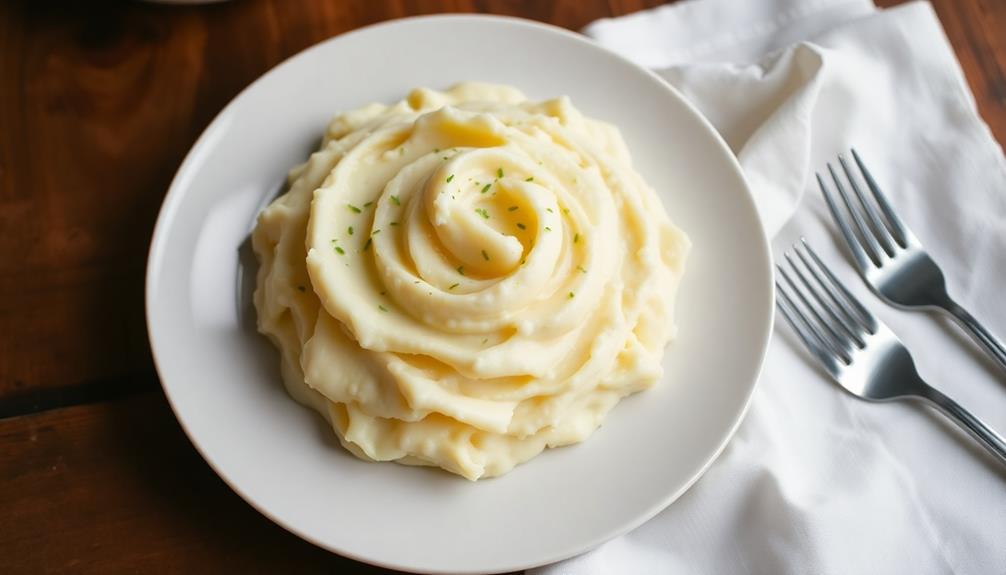
The mashed potatoes are now ready to serve! They pair perfectly with roasted meats, stews, or simply enjoyed on their own.
Step 5. Add Butter and Milk
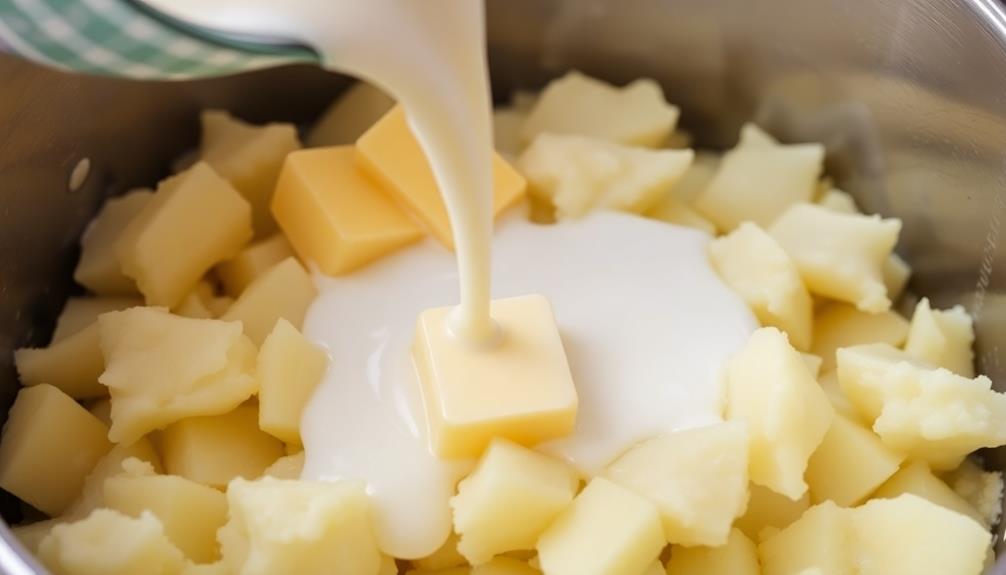
Add a pat of butter to the mashed potatoes and let it melt in. Gently stir the butter until it's fully incorporated, creating a rich and creamy texture.
Next, pour in a splash of milk and continue stirring. Add more milk a little at a time, mixing thoroughly after each addition, until the potatoes reach your desired consistency. They should be smooth and velvety, not lumpy or dry.
Taste the potatoes and season with salt and pepper as needed. The butter and milk will mellow out the starchiness of the potatoes, giving them a delightful flavor.
Be careful not to overmix, as that can make the potatoes gluey. Maintain a light hand for the best, fluffiest mashed potatoes.
Now they're ready to serve alongside your main dish or as the star of the meal. Enjoy!
Final Thoughts
Mashed potatoes are a beloved side dish that can elevate any meal. Whether you're enjoying them alongside a juicy steak, a roast chicken, or your favorite comfort food, these creamy, smooth potatoes are sure to delight your taste buds.
With the right techniques, you can make mashed potatoes that are truly exceptional. As you've learned, adding butter and milk is the key to achieving the perfect texture and flavor.
But don't stop there! Consider experimenting with different herbs, spices, or even roasted garlic to take your mashed potatoes to the next level. The possibilities are endless, so feel free to get creative and find your signature blend.
Frequently Asked Questions
How Long Do Mashed Potatoes Last in the Refrigerator?
Leftover mashed potatoes can typically last 3-4 days in the refrigerator when stored properly in an airtight container. However, the exact shelf life may vary depending on the ingredients used and storage conditions.
Can You Freeze Mashed Potatoes?
You can definitely freeze mashed potatoes! They'll keep well in the freezer for up to 3 months. Just be sure to let them cool completely before portioning and freezing for best results.
What Is the Best Way to Reheat Mashed Potatoes?
To reheat mashed potatoes, you can use the microwave, oven, or stovetop. For the microwave, heat in short bursts, stirring frequently. In the oven, bake at 350°F until heated through. On the stovetop, heat gently, stirring constantly to prevent scorching.
Can You Make Mashed Potatoes Ahead of Time?
Yes, you can make mashed potatoes ahead of time. Simply refrigerate them in an airtight container for up to 3 days. When ready to serve, reheat them gently on the stove or in the microwave, adding a splash of milk or cream to loosen them up.
What Are Some Creative Ways to Use Leftover Mashed Potatoes?
You can get creative with your leftover mashed potatoes! Try using them as a topping for shepherd's pie, making potato pancakes, or even mixing them into your breakfast scramble. The possibilities are endless when you get inventive with those tasty spuds.
Conclusion
Mashed potatoes are a classic comfort food that'll have your taste buds dancing with joy! Creamy, fluffy, and oh-so-satisfying, they're the perfect side dish to complete any meal. Whether you're whipping them up for a family dinner or a cozy night in, these spuds are sure to bring a smile to your face. So, what are you waiting for? Grab your masher and let's get mashing!
Graduations/Birthdays
Lemon Bars
Unlock the secrets to making the perfect lemon bars, a classic American dessert that combines a buttery crust with a tangy, creamy filling.
You'll love lemon bars! These classic American treats combine a buttery, flaky crust with a tangy, creamy lemon filling – it's a heavenly balance of flavors. Originating in the Southwest, lemon bars became popular at bake sales and family gatherings, and they're still a favorite today. The key is perfecting the ratio of sweetness and tartness in the filling. You'll need just a few simple ingredients like butter, sugar, flour, eggs, and fresh lemon juice and zest. The preparation is easy, too – just mix the crust, whisk the filling, and bake. Top it off with a dusting of powdered sugar, and you've got a delightful dessert that's sure to impress. Let's dive into making these irresistible lemon bars!
Key Takeaways
- Lemon bars are a beloved American dessert originating in the Southwest, characterized by a buttery shortbread crust and tangy, creamy lemon filling.
- The first known lemon bar recipe appeared in the Chicago Tribune in 1925, and the dessert gained popularity at bake sales, picnics, and family gatherings.
- The recipe requires a balance of sweetness and tartness, with key ingredients including unsalted butter, granulated sugar, all-purpose flour, eggs, fresh lemon juice, and optional lemon zest.
- The cooking process involves preparing the crust, whisking the eggs, adding the lemon components, and baking the filling, with a final dusting of powdered sugar for presentation.
- Lemon bars can be stored in an airtight container in the refrigerator for up to a week and can also be frozen for longer storage.
History
Originating from the American Southwest, lemon bars have been a beloved dessert for generations.
These tangy treats have a rich history that stretches back to the early 20th century. The first known recipe for lemon bars appeared in a 1925 edition of the Chicago Tribune, though variations likely existed even earlier.
As the popularity of lemon-flavored sweets grew, lemon bars became a staple at bake sales, picnics, and family gatherings across the United States.
What makes lemon bars so special? It's the perfect balance of a buttery, flaky crust and a tangy, creamy lemon filling.
The contrast of flavors and textures creates a delightful experience with each bite. Over the years, bakers have experimented with different twists, like adding a dusting of powdered sugar or a drizzle of lemon glaze, but the classic recipe remains a timeless favorite.
Today, lemon bars continue to delight taste buds and evoke nostalgic memories for people of all ages.
Their enduring popularity is a testament to the simple joys of this beloved dessert.
Recipe
Lemon bars are a classic dessert that combine a buttery shortbread crust with a tangy, creamy lemon filling. These bright, refreshing treats are perfect for any occasion, from casual gatherings to elegant dinner parties.
The key to successful lemon bars is balancing the sweetness and the tartness. The crust should be rich and buttery, providing a sturdy base for the tangy filling. The filling, in turn, should be silky smooth and bursting with fresh lemon flavor.
Ingredients:
- 1 cup (2 sticks) unsalted butter, softened
- 1/2 cup granulated sugar
- 2 cups all-purpose flour
- 1/4 teaspoon salt
- 4 large eggs
- 1 1/2 cups granulated sugar
- 1/4 cup all-purpose flour
- 1/2 cup fresh lemon juice (about 3-4 lemons)
- 1 tablespoon grated lemon zest
- Powdered sugar for dusting
Instructions:
In a medium bowl, cream the softened butter and 1/2 cup of granulated sugar until light and fluffy. Gradually add in the 2 cups of all-purpose flour and the 1/4 teaspoon of salt, mixing until a dough forms. Press the dough evenly into a 9×13 inch baking pan. Bake at 350°F for 20-25 minutes, or until the crust is lightly golden.
While the crust is baking, prepare the filling. In a large bowl, whisk together the 4 eggs and the 1 1/2 cups of granulated sugar until combined. Whisk in the 1/4 cup of all-purpose flour, the fresh lemon juice, and the lemon zest until smooth.
Pour the filling over the hot crust and return the pan to the oven. Bake for an additional 20-25 minutes, or until the filling is set.
Allow the lemon bars to cool completely, then dust the top generously with powdered sugar. For the best texture, refrigerate the bars for at least 2 hours before cutting and serving. Store any leftovers in the refrigerator.
Cooking Steps
Preheat your oven to 350°F.
In a large bowl, whisk the eggs, then add the lemon juice and zest.
Finish by sprinkling powdered sugar on top before baking until the filling is set.
Step 1. Preheat Oven to 350°F
First, preheat your oven to 350°F. This is an important first step in making delicious lemon bars. By heating the oven to the right temperature, you'll ensure your treats bake evenly and develop a perfect golden-brown crust.
Take a moment to double-check that your oven is set to 350°F. You can use the dial or digital display to confirm the temperature. Once you've verified it's ready, you can move on to the next steps. Preheating the oven typically takes 10-15 minutes, so use this time to gather the rest of your ingredients and prepare your baking pan.
When the oven is fully heated, you'll be ready to pop in the lemon bar batter and let the baking begin!
The preheat step may seem simple, but it's crucial for getting the best possible results. With your oven at the right temperature, you're one step closer to enjoying deliciously tart and sweet lemon bars.
Step 2. In a Large Bowl, Whisk Eggs
In a large bowl, whisk the eggs until they're light and frothy. This step is crucial for creating the perfect lemon bar texture. The whisking incorporates air into the eggs, making them light and airy.
Be sure to whisk vigorously for about a minute to really get those eggs nice and fluffy.
Next, add the granulated sugar to the whisked eggs and whisk again until the mixture is smooth and well combined. The sugar will help to thicken and set the lemon filling once the bars are baked.
Don't be afraid to give it a good whisk to make sure everything is evenly distributed.
Step 3. Add Lemon Juice and Zest
After whisking the eggs and sugar together, it's time to add the lemon juice and zest. Lemon juice and zest are the stars of the show when it comes to lemon bars. The bright, tangy flavor is what everyone loves!
First, grab a lemon and use a zester or the small holes on a cheese grater to grate the yellow peel. Be careful not to grate too deep, as you only want the thin, flavorful outer layer. The zest is packed with lemon oil, giving the bars an intense citrus punch.
Next, squeeze the lemon to extract the fresh juice. You'll need about 1/4 cup of lemon juice. The juice adds even more zing and tartness to balance the sweetness.
Whisk the lemon juice and zest into the egg mixture until fully combined. The lemon components are crucial for making these bars irresistible.
With the eggs and sugar already whisked, you're well on your way to creating the perfect lemon bars!
Step 4. Add Powdered Sugar to Top
Once the lemon bars have fully baked and cooled, it's time to add the finishing touch – a generous dusting of powdered sugar on top. This final step is the perfect way to elevate the already delicious lemon bars. The powdered sugar creates a beautiful snowy-white topping that contrasts beautifully with the bright yellow of the lemon filling.
To apply the powdered sugar, simply take a fine-mesh sieve and hold it about 6 inches above the bars. Gently tap the side of the sieve, allowing the powdered sugar to drift down in a gentle shower over the entire surface.
Make sure to cover every inch for an even, consistent coating. The powdered sugar will melt slightly, creating a lovely glazed effect.
Once the bars are dusted, they're ready to serve. The powdered sugar adds a wonderful sweetness that perfectly balances the tangy lemon flavor.
Dig in and enjoy the irresistible combination of tart and sweet in every bite!
Step 5. Bake Until Filling Is Set
Preheat your oven to 350°F and prepare the baking pan by lightly greasing it or lining it with parchment paper.
Once your oven is ready, carefully pour the lemon filling into the prepared pan. Be sure to spread it out evenly so it bakes consistently.
Now, it's time to bake the lemon bars until the filling is set. This will take about 20-25 minutes. Keep an eye on them, as you want the edges to be lightly golden, but the center should still have a slight jiggle when you gently shake the pan.
The filling should be firm to the touch when it's done. Don't worry if it looks a little soft in the middle – it will continue to set as it cools.
Once the bars are baked, remove them from the oven and let them cool completely on a wire rack. This step is crucial, as it allows the filling to fully set and the bars to develop their perfect texture.
With patience, your delicious lemon bars will be ready to enjoy!
Final Thoughts
Lemon bars are a delightful treat that can brighten up any occasion. These tangy and sweet desserts are the perfect balance of flavors, making them a crowd-pleasing favorite.
Baking them to perfection can take a bit of practice, but the final result is well worth the effort.
Once the lemon bars have cooled and the filling is set, it's time to slice and serve them. The combination of the buttery crust and the tart lemon filling is simply divine.
Whether you're enjoying them with family, bringing them to a potluck, or treating yourself to an indulgent snack, lemon bars are sure to put a smile on your face.
Frequently Asked Questions
Can I Use a Different Type of Citrus Fruit?
You can certainly use a different type of citrus fruit in place of lemons. Try substituting limes, oranges, or grapefruit for a unique twist on the classic recipe. The key is to adjust the sweetness to your taste.
How Long Do Lemon Bars Last on the Counter?
How long they last depends on the recipe, but you can typically keep homemade lemon bars on the counter for 3-5 days. Just be sure to store them in an airtight container to maintain their freshness.
Can I Use a Premade Crust Instead of Homemade?
Sure, you can use a pre-made crust instead of homemade. It'll save you time and effort, and the final result will still be delicious. Just be sure to follow the instructions on the pre-made crust package.
What Can I Do if the Lemon Filling Is Too Tart?
If the lemon filling is too tart, you can try adding a bit more sugar to balance out the acidity. You can also consider adding a touch of cream or milk to mellow the flavor.
Is It Possible to Make Lemon Bars Gluten-Free?
You can certainly make lemon bars gluten-free. Use gluten-free flour, such as almond or coconut flour, in the crust and adjust the ingredient ratios to achieve the desired texture and flavor. With a few simple substitutions, you can enjoy gluten-free lemon bars.
Conclusion
You've gotta try these lemon bars – they're the perfect balance of sweet and tart! The buttery crust and creamy lemon filling make for a heavenly treat. Whip up a batch and enjoy them with friends and family. These lemon bars are sure to become a new favorite. Just one bite, and you'll be hooked! Get ready for a burst of sunshine in every delectable morsel.
Graduations/Birthdays
Brownies
Joyful and decadent, the story of brownies dates back to a historic culinary mishap, unveiling a rich legacy of chocolate-infused delights that continue to captivate taste buds worldwide.
Brownies have a delightful history dating back to the early 20th century, when a chef's mistake in a Chicago hotel kitchen led to the creation of a dense, fudgy square that quickly gained widespread popularity. Today, this chocolate-based dessert comes in countless variations, from walnut to cream cheese, found in bakeries and cafes worldwide. The key to making the perfect brownie lies in balancing the right ingredients and following precise preparation methods. With rich chocolate flavor and a melt-in-your-mouth texture, homemade brownies offer a rewarding baking experience and a delectable treat to share with family and friends. There's much more to discover about these beloved squares.
Key Takeaways
- Brownies originated in the early 20th century due to a chef's mistake in a Chicago hotel kitchen, leading to their widespread popularity.
- The classic chocolate-based dessert features a balance of ingredients like unsalted butter, sugar, eggs, flour, cocoa powder, and optional additions like chocolate chips.
- The key to success in making brownies lies in proper preparation methods, such as melting the chocolate and butter, mixing the batter thoroughly, and baking at the right temperature.
- Brownies can be sliced into uniform squares and presented with optional toppings like powdered sugar or caramel sauce for added elegance.
- Baking and sharing brownies can be a rewarding communal experience, allowing for personal variations and the enjoyment of a beloved treat.
History
Tracing the origins of brownies takes us back to the early 20th century, when a chef's mistake in a Chicago hotel kitchen led to the creation of this beloved chocolate treat.
You see, the chef was trying to make a chocolate cake, but they forgot to add the flour. Instead of throwing it out, they decided to bake it anyway. The result was a dense, fudgy square that quickly became a hit with hotel guests.
From that humble beginning, brownies have evolved into a worldwide phenomenon.
Bakers have experimented with different ingredients, creating endless variations like walnut brownies, cream cheese brownies, and even brownies with chunks of chocolate bar mixed in.
Today, you can find brownies in bakeries, cafes, and even the aisles of your local grocery store.
Whether you prefer them cakey or fudgy, plain or loaded with extras, one thing's for sure – brownies have a special place in the hearts and stomachs of chocolate lovers everywhere.
Recipe
Brownies are a classic and beloved chocolate-based dessert that have been enjoyed for generations. These rich, fudgy treats are the perfect indulgence for any occasion, from casual gatherings to special events.
The key to making the perfect brownie lies in the balance of ingredients and the method of preparation. With the right recipe and a little bit of care, anyone can create a batch of brownies that will satisfy even the most discerning sweet tooth.
Ingredients:
- 1 cup (2 sticks) unsalted butter, melted
- 2 cups granulated sugar
- 4 large eggs
- 1 cup all-purpose flour
- 3/4 cup unsweetened cocoa powder
- 1 teaspoon salt
- 1 teaspoon baking powder
- 1 cup semi-sweet chocolate chips (optional)
Instructions: Preheat the oven to 350°F (180°C). Grease a 9×13-inch baking pan. In a large bowl, whisk together the melted butter and sugar until combined. Add the eggs, one at a time, mixing well after each addition.
In a separate bowl, sift together the flour, cocoa powder, salt, and baking powder. Gradually add the dry ingredients to the wet ingredients, mixing just until combined. Fold in the chocolate chips, if using. Pour the batter into the prepared baking pan and spread it evenly.
Bake for 25-30 minutes, or until a toothpick inserted into the center comes out clean. Allow the brownies to cool completely before cutting and serving.
To ensure the best results, be sure to use high-quality ingredients and follow the recipe closely. For an extra rich and fudgy texture, consider adding a touch of espresso powder or a splash of vanilla extract to the batter.
Additionally, experiment with different mix-ins, such as nuts, caramel, or even a swirl of peanut butter, to create your own unique twist on this classic dessert.
Cooking Steps
Preheat your oven to 350°F – this gets it ready for baking.
Next, melt the chocolate and butter together, creating a smooth, rich base.
Now, add the eggs and mix well, blending everything nicely.
Time to stir in the sugar and vanilla, bringing in that classic brownie flavor.
Step 1. Preheat Oven to 350°F
First, preheat your oven to 350°F. This crucial step ensures your brownies bake evenly and reach the perfect texture. Simply turn the dial on your oven to 350 degrees Fahrenheit and allow it a few minutes to reach the desired temperature.
Once your oven is hot and ready, grab your baking pan. Greasing or lining it with parchment paper will make removing the brownies a breeze later on.
Next, gather all your ingredients so they're within easy reach. This will help the baking process flow smoothly.
Now that your oven is preheated and your pan is prepared, you're one step closer to delicious homemade brownies! The next phase involves mixing the batter, which is where the real magic happens.
Pay close attention to the mixing instructions, as proper technique is key for that perfect fudgy texture. Soon, the aroma of freshly baked brownies will fill your kitchen, leaving you hungry for that first irresistible bite.
Step 2. Melt Chocolate and Butter Together
To make the perfect brownies, begin by melting the chocolate and butter together. In a medium-sized saucepan, gently heat the chocolate and butter over low heat, stirring constantly.
Be careful not to let the mixture boil, as that can cause the ingredients to separate. Instead, you want to melt them together slowly and smoothly, creating a rich, velvety base for your brownies.
Once the chocolate and butter have fully melted and combined, remove the saucepan from the heat. This step is crucial, as you don't want the mixture to overcook or burn.
Carefully pour the melted chocolate and butter into a large mixing bowl. This will make the next steps easier and help the brownies bake evenly.
Take your time with this process, as properly melting the chocolate and butter is the foundation for creating delicious, fudgy brownies. With the chocolate and butter ready, you can now move on to the next step in the recipe.
Step 3. Add Eggs and Mix Well
Having melted the chocolate and butter together, you can now crack the eggs into the bowl and mix everything well.
Gently crack 2 to 3 eggs directly into the melted mixture. Be careful not to let any eggshells fall in.
Once the eggs are in, use a spoon or whisk to stir the batter together. Mix thoroughly until the eggs are fully incorporated and the batter is smooth and uniform.
Don't overmix, or the brownies could turn out tough. Just mix until everything is well blended. The eggs will help hold the brownies together and give them a fudgy, moist texture.
Keep stirring until the batter looks rich and glossy.
Now that the chocolate, butter, and eggs are mixed, you're ready for the next step: adding the dry ingredients.
Step 4. Stir in Sugar and Vanilla
Now, stir in the sugar and vanilla. This is where the brownies start to come together!
First, add the granulated sugar. Stir it in gently until it's fully incorporated. The sugar will dissolve into the batter, adding sweetness and a lovely shine.
Next, pour in the vanilla extract. Vanilla is a classic flavor that pairs so well with chocolate. Give the batter another good stir to mix the vanilla throughout. You'll start to smell that delicious aroma filling the kitchen.
The sugar and vanilla work together to create a rich, fudgy texture in the final brownies. Keep stirring until the batter is smooth and homogeneous. Be careful not to overmix, though – you don't want to develop too much gluten, which can make the brownies tough.
Once the sugar and vanilla are evenly distributed, you're ready for the next step!
Step 5. Add Flour and Bake
Next, add the flour to the batter. Gently fold it in until no dry pockets remain. Be careful not to overmix, or your brownies will turn out tough and dry.
Once the flour is fully incorporated, your batter is ready for the oven.
Preheat your oven to 350°F (175°C). Grease an 8×8 inch baking pan or line it with parchment paper. Carefully pour the batter into the prepared pan, smoothing the top with a spatula.
Now, it's time to bake! Place the pan in the preheated oven and set a timer for 25-30 minutes. Keep an eye on the brownies, as oven temperatures can vary.
They're done when a toothpick inserted in the center comes out clean or with just a few moist crumbs.
Remove the brownies from the oven and let them cool completely before cutting into squares. Enjoy your delicious homemade treats!
Final Thoughts
As you put the finishing touches on your homemade brownies, take a moment to savor the accomplishment.
You've created a delectable treat that's sure to delight your family and friends. The rich, chocolatey aroma filling the air is a testament to your baking prowess.
Now, let's talk about the final steps. Once your brownies have cooled, it's time to slice them into perfect squares.
Be gentle and use a sharp knife to ensure clean, even cuts. You can even get creative with the presentation, adding a dusting of powdered sugar or a drizzle of caramel sauce for an extra touch of elegance.
As you stack the brownies on a serving plate, take pride in your work.
These brownies aren't just a dessert – they're a reflection of your culinary skills. Enjoy the fruits of your labor, and don't be afraid to share your recipe with others.
After all, the joy of baking is in the sharing.
Frequently Asked Questions
Are Brownies Gluten-Free?
No, brownies are typically not gluten-free. Most recipes for brownies contain wheat flour, which is a source of gluten. If you require a gluten-free dessert, you'll need to find a recipe that specifically uses gluten-free flour or ingredients.
Can Brownies Be Made Vegan?
Yes, you can absolutely make brownies vegan. Simply substitute the eggs and butter with plant-based alternatives like flax or chia eggs and vegan butter or oil. The result will be a delicious, dairy-free and egg-free treat.
How Long Do Homemade Brownies Last?
Homemade brownies typically last 3-5 days when stored properly at room temperature in an airtight container. Their shelf life can be extended to 5-7 days in the refrigerator. Proper storage is key to maintaining their freshness and texture.
Can I Freeze Baked Brownies?
You can freeze baked brownies. Once cooled, wrap them tightly in plastic wrap or aluminum foil, then place in a freezer-safe bag or container. Frozen brownies can last up to 3 months, making them a convenient treat to have on hand.
What Are the Best Toppings for Brownies?
When considering toppings for your sweet treats, you have a wealth of options to make them even more irresistible. From classic chocolate chips to decadent caramel drizzle, the possibilities are endless to personalize and elevate your homemade or store-bought brownies.
Conclusion
You've made it to the end of our brownie adventure! Now it's time to savor the delicious, chocolatey treats you've created. Grab a glass of milk, and dive in. These brownies are sure to bring a smile to your face and satisfy your sweet tooth. Enjoy every bite – you've earned it! Brownies are the perfect indulgence, and you know how to make them just right.
Graduations/Birthdays
Chocolate Chip Cookies
Homemade chocolate chip cookies with their buttery, crispy edges and soft, chewy centers have captivated taste buds for generations, but their intriguing history is what truly sets them apart.
Chocolate chip cookies are a beloved American classic with a fascinating history! They originated in the 1930s when Ruth Wakefield accidentally created the first batch at the Toll House Inn in Massachusetts. The recipe quickly gained popularity and became a household favorite, with Nestlé printing it on their chocolate bar packages. Over time, the recipe has evolved into various styles, but the timeless combination of buttery, crispy edges and soft, chewy centers remains a universal delight. With just a few simple ingredients, you can easily make these iconic cookies at home – and discover why they've captured hearts (and stomachs!) for generations.
Key Takeaways
- Chocolate chip cookies originated in the 1930s at the Toll House Inn in Massachusetts, created by Ruth Wakefield.
- The classic recipe consists of all-purpose flour, baking soda, salt, butter, granulated and brown sugar, eggs, vanilla, and semi-sweet chocolate chips.
- Proper preheating of the oven and creaming of the butter and sugar are crucial steps for achieving the desired texture and appearance.
- Gently folding in the chocolate chips ensures even distribution throughout the dough, resulting in a delightful flavor experience.
- Chocolate chip cookies have become a timeless tradition, fostering a sense of community and evoking happiness when shared.
History
The chocolate chip cookie's origins can be traced back to the 1930s, when Ruth Wakefield, the owner of the Toll House Inn in Whitman, Massachusetts, accidentally created the now-iconic treat.
While preparing a batch of chocolate cookies, Wakefield chopped up a Nestlé chocolate bar, thinking the pieces would melt into the dough. Instead, the chocolate held its shape, resulting in the first chocolate chip cookies. Word of this delicious discovery quickly spread, and the recipe was soon printed on the back of Nestlé chocolate bar packages, making it a household favorite.
Over the years, the chocolate chip cookie has become a beloved classic, with countless variations and recipes.
From soft and chewy to crispy and crunchy, these cookies have captured the hearts and taste buds of people around the world. The simple yet irresistible combination of chocolate and dough has stood the test of time, making the chocolate chip cookie a timeless treat that continues to delight and inspire bakers of all ages.
Recipe
Chocolate chip cookies are a classic dessert that are beloved by people of all ages. These cookies are a delightful combination of buttery, slightly crispy edges and a soft, chewy center. Baking these cookies is a fun and easy way to satisfy your sweet tooth. The rich, creamy flavor of butter enhances flavor and adds to the overall deliciousness of the cookies.
The key to making the perfect chocolate chip cookies is to use high-quality ingredients and to pay attention to the baking time. By following a few simple steps, you can create a batch of cookies that are sure to impress.
- 2 cups (250g) all-purpose flour
- 1 teaspoon baking soda
- 1/2 teaspoon salt
- 1 cup (230g) unsalted butter, softened
- 1 cup (200g) granulated sugar
- 1 cup (220g) light brown sugar
- 2 large eggs
- 2 teaspoons vanilla extract
- 2 cups (340g) semi-sweet chocolate chips
Preheat your oven to 375°F (190°C). Line two baking sheets with parchment paper. In a medium bowl, whisk together the flour, baking soda, and salt.
In a large bowl, beat the butter and both sugars until light and fluffy, about 2-3 minutes. Beat in the eggs one at a time, then stir in the vanilla. Gradually add the dry ingredients to the wet ingredients and mix until just combined. Fold in the chocolate chips.
Scoop the dough by the tablespoonful onto the prepared baking sheets, spacing them about 2 inches apart. Bake for 10-12 minutes, or until the edges are golden brown and the centers are still slightly soft.
Allow the cookies to cool on the baking sheets for 5 minutes before transferring them to a wire rack to cool completely. Enjoy your freshly baked chocolate chip cookies!
Cooking Steps
Preheat your oven to 375°F.
Next, cream the butter and brown sugar until they're light and fluffy.
Now, add the eggs and vanilla, mixing them in until they're well combined.
Step 1. Preheat Oven to 375°F
Preheat your oven to a toasty 375°F. This crucial step kickstarts the baking process, ensuring your cookies bake to golden-brown perfection. Heating the oven to the right temperature is key – too low, and your cookies won't rise properly; too high, and they may burn on the outside while remaining doughy inside.
Once the oven reaches 375°F, it's time to slide your cookie dough-filled baking sheet right on in. The intense heat will begin working its magic, causing the dough to spread and rise, creating those mouthwatering chocolate chip cookies you've been craving.
Be sure to set a timer, as baking time is typically around 8-12 minutes for standard-sized cookies. Keep an eye on them, though, as oven temperatures can vary. When the edges turn lightly golden and the centers look just set, your cookies are ready to be removed from the oven.
With the oven preheated, you're one step closer to enjoying warm, gooey chocolate chip cookies.
Step 2. Cream Butter and Brown Sugar
To begin the cookie-making process, cream the butter and brown sugar together in a large mixing bowl. Using an electric hand mixer or a sturdy wooden spoon, blend the two ingredients until they're light and fluffy.
This step is crucial as it incorporates air into the mixture, creating a soft and chewy cookie texture.
Ensure you're using room-temperature butter for the best results. The warmth helps the butter and sugar combine seamlessly.
Cream them together for about 2-3 minutes, pausing occasionally to scrape down the sides of the bowl. You'll know it's ready when the mixture turns a paler shade of brown and has a smooth, creamy consistency.
Once the butter and sugar are perfectly blended, you're ready to move on to the next step in the cookie-making process.
Get excited – the delicious reward of warm, homemade chocolate chip cookies is just around the corner!
Step 3. Add Eggs and Vanilla
Next, crack the eggs into the creamed butter and sugar mixture, one at a time, beating well after each addition. This helps the eggs incorporate fully, giving the cookies a soft, tender texture. Be sure to use large eggs for the best results.
Once the eggs are mixed in, it's time to add the vanilla extract. This fragrant ingredient will infuse the dough with a delightful vanilla aroma and flavor. Just a teaspoon or two is all you need. Stir the vanilla in gently until it's evenly distributed.
The eggs and vanilla work together to create a wonderfully rich and flavorful cookie dough. The eggs provide structure and moisture, while the vanilla enhances the overall taste.
With these key ingredients added, your chocolate chip cookie dough is really starting to come together. Get ready for the next step – mixing in the dry ingredients!
Step 4. Mix in Dry Ingredients
With the wet ingredients incorporated, it's time to mix in the dry ones. In a separate bowl, whisk together the flour, baking soda, and salt.
These dry ingredients will give your cookies the perfect structure and texture. Slowly add the dry mixture to the wet ingredients, mixing gently until just combined. Be careful not to overmix, as this can make your cookies tough.
Fold in the chocolate chips, making sure they're evenly distributed throughout the dough. The chocolate chips are the star of the show, so you'll want to make sure there's a delicious chip in every bite!
Once the dough is ready, it's time to scoop and bake. Use a cookie scoop or spoon to portion the dough onto your prepared baking sheets. This will help ensure all your cookies are the same size, baking evenly.
Now your chocolate chip cookie dough is ready for the oven! Get ready for the mouthwatering aroma of freshly baked cookies filling your kitchen.
Step 5. Fold in Chocolate Chips
Fold the chocolate chips into the cookie dough gently, ensuring they're evenly distributed throughout. You want those delectable morsels in every bite!
Slowly incorporate the chips, using a rubber spatula or wooden spoon to carefully fold them in. Be patient and take your time – you don't want to overmix and risk tough cookies.
With the chips now folded in, your dough is ready for scooping and baking. Use a cookie scoop or spoon to portion out the dough, placing the balls of dough on your prepared baking sheet.
Make sure to leave a bit of space between each one, as the cookies will spread as they bake.
Now you're all set to pop those cookie sheets in the oven. Bake until the edges are golden brown and the centers are still soft.
The aroma of warm, chocolate-studded cookies will fill your kitchen, making it nearly impossible to resist a taste straight from the oven!
Final Thoughts
The perfect chocolate chip cookie is a testament to the power of simplicity. With just a handful of classic ingredients, you can create a treat that delivers pure joy in every bite. As you savor that first warm, gooey cookie, you'll be reminded that the best things in life are often the most straightforward.
The joy of baking chocolate chip cookies goes beyond the final product. The process itself is a delightful sensory experience, from the aroma of melted butter to the satisfying thud of the dough as you scoop it onto the baking sheet.
Each step, from creaming the butter to folding in the chocolate chips, is a chance to connect with the timeless tradition of cookie-making.
Whether you're baking for yourself, your family, or to share with friends, these cookies are sure to bring a smile to everyone's face.
Frequently Asked Questions
How Do I Store Leftover Chocolate Chip Cookies?
To store leftover cookies, place them in an airtight container at room temperature. This will help them stay fresh for up to 5 days. Avoid refrigerating or freezing, as this can dry them out.
Can I Use a Different Type of Chocolate Chip?
Yes, you can use a different type of chocolate chip. Try swapping in dark chocolate, milk chocolate, or even white chocolate chips to change up the flavor profile of your cookies. Experiment to find your favorite!
How Can I Make My Cookies Chewier or Crunchier?
To make your cookies chewier, use more brown sugar and less white sugar. For crunchier cookies, bake them longer and use less moisture in the dough. Experiment with different ingredient ratios to achieve your desired texture.
Can I Freeze the Cookie Dough for Later Use?
Yes, you can freeze the cookie dough for later use. Simply scoop the dough into balls, place them on a baking sheet, and freeze until firm. Then, transfer the frozen dough balls to an airtight container or bag for up to 3 months.
What Are Some Creative Ways to Customize Chocolate Chip Cookies?
You can get creative with chocolate chip cookies by adding crushed nuts, drizzling them with caramel or chocolate, rolling them in cinnamon sugar, or even using different chocolate chips like white, dark, or peanut butter.
Conclusion
You've made it to the end, and what a delicious journey it's been! Chocolate chip cookies are a true classic – the perfect combination of sweet, gooey, and irresistible. Now that you've mastered the recipe, you can whip up a batch anytime you're craving that homemade goodness. Enjoy the warm, freshly-baked cookies, and don't be surprised if they disappear in a flash. These treats are simply too good to resist!
-
Southern Comfort Food22 hours ago
Cheese Straws
-
African Cuisine1 day ago
Poulet DG (Cameroon)
-
Southern Comfort Food24 hours ago
Creamed Corn
-
Brazilian Cuisine1 day ago
Caldeirada
-
Indian Meals21 hours ago
Gobi Manchurian
-
Southern Comfort Food23 hours ago
Squash Casserole
-
Polish Comfort Food23 hours ago
Krupnik (Barley Soup)
-
Farm-to-Table Cooking24 hours ago
Roasted Bone Marrow With Herb Salad