Connect with us

Graduations/Birthdays

Chocolate Mousse

Blissful spoonfuls of velvety chocolate mousse will transport you to a world of decadence, beckoning you to discover the rich, airy delight that awaits.

Published

on

decadent chocolate dessert delight

Chocolate mousse is a rich, decadent dessert that'll captivate your senses. This airy treat marries the luxurious richness of melted chocolate with the lightness of whipped cream and egg whites, creating an unforgettably smooth and silky texture. Originating in 18th century France, chocolate mousse has evolved with the addition of unique ingredients like liqueur and espresso. It's a simple yet impressive dessert to prepare, with the key to success lying in carefully whipping the egg whites and balancing the sweetness. Once chilled, the mousse develops its signature silky smooth consistency – the perfect indulgence that'll leave you craving more.

Key Takeaways

  • Chocolate mousse is a rich, decadent dessert with a luxurious, velvety texture achieved through careful whipping of egg whites and folding in of whipped cream.
  • The recipe for chocolate mousse has evolved over time, with variations incorporating ingredients like liqueur, espresso, or fruit purees to enhance the flavor profile.
  • The key to successful chocolate mousse preparation lies in melting the chocolate properly, whipping the egg whites to the right consistency, and striking the right balance between sweetness and richness.
  • Chocolate mousse can be made with a variety of chocolate types, ranging from dark chocolate for a deeper, more intense flavor to milk or white chocolate for a sweeter, creamier experience.
  • Chocolate mousse is a popular and beloved dessert that is deeply rooted in French and Italian culinary traditions, often served at celebrations and in fine dining establishments.

History

The origins of chocolate mousse can be traced back to the 18th century, when European chefs experimented with whipped cream and melted chocolate.

These early pioneers discovered that the combination of the light, airy texture of whipped cream and the rich, decadent flavor of chocolate created a truly delightful dessert.

Over time, the recipe evolved, with the addition of egg yolks to help stabilize the mousse and enhance its creamy consistency.

As the popularity of chocolate mousse grew, chefs in France and Italy began to put their own unique spin on the classic dish.

Some added a touch of liqueur or espresso to complement the chocolate, while others played with the presentation, layering the mousse with different fillings or garnishing it with fresh fruit.

Advertisement

Today, chocolate mousse remains a beloved treat, enjoyed for its luxurious mouthfeel and irresistible flavor.

Recipe

Chocolate mousse is a rich and decadent dessert that's both simple to make and incredibly satisfying. This creamy and airy treat is the perfect way to indulge in the deep, comforting flavor of chocolate.

The key to a successful chocolate mousse lies in the careful whipping of the egg whites and the perfect balance of sweetness and chocolate intensity. With just a few high-quality ingredients, you can create a dessert that will impress your guests and leave them craving more.

  • 8 oz dark chocolate, chopped
  • 4 eggs, separated
  • 1/2 cup granulated sugar
  • 1 cup heavy cream

In a double boiler or heatproof bowl set over a pot of simmering water, melt the dark chocolate, stirring occasionally until smooth. Remove from heat and let cool slightly.

In a large bowl, beat the egg whites until they start to form soft peaks. Gradually add the sugar, beating until the whites are stiff and glossy.

In a separate bowl, whip the heavy cream until it forms soft peaks.

Advertisement

Gently fold the melted chocolate into the egg yolks, then fold in the whipped cream, followed by the whipped egg whites. Pour the mousse into individual serving dishes or a large serving bowl and refrigerate for at least 2 hours before serving.

When serving, you can top the mousse with a dusting of cocoa powder, a drizzle of caramel sauce, or fresh berries for a beautiful and indulgent presentation. The key to a perfect chocolate mousse is to handle the mixture gently to preserve the airy texture.

Cooking Steps

First, you'll melt the chocolate in a double boiler, stirring it until it's smooth and velvety.

Next, you'll whisk the egg yolks right into the melted chocolate, blending them in seamlessly.

Finally, you'll gently fold in the whipped cream, creating a light and airy texture.

Advertisement

Once you've combined all the ingredients, it's time to chill the mixture until it's firm, then top it off with shaved chocolate for a delightful finishing touch.

Step 1. Melt Chocolate in Double Boiler

melt chocolate double boiler

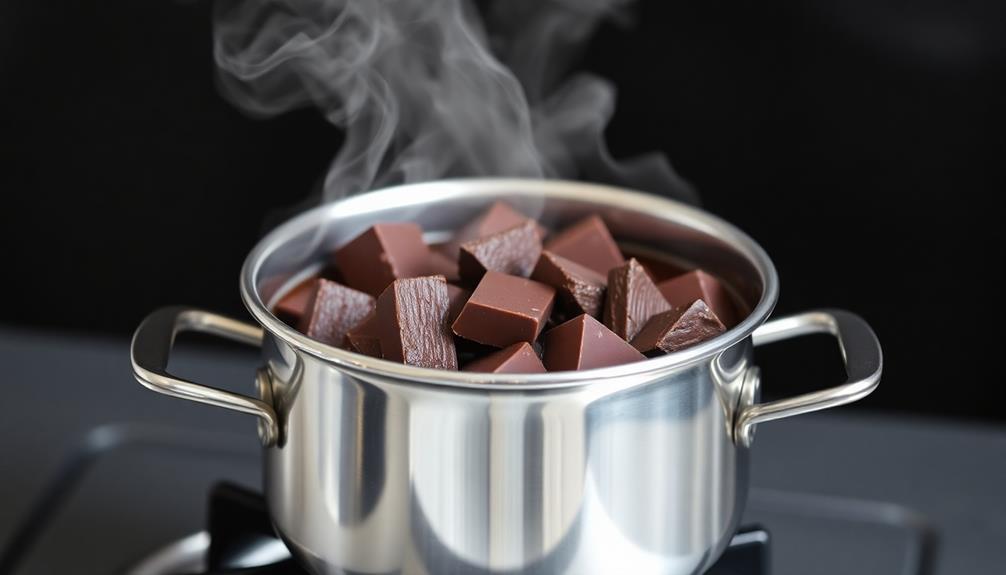
To begin, set up a double boiler on your stovetop. Fill the bottom pan about halfway with water and bring it to a gentle simmer over medium heat.

In the top pan, add your chopped chocolate. As the water beneath heats up, the steam will slowly melt the chocolate, creating a smooth, lump-free mixture.

Stir the chocolate occasionally with a spatula, making sure to scrape the sides and bottom of the pan. This will help the chocolate melt evenly.

Be patient, as this process can take several minutes. Keep a close eye on the chocolate, making sure it doesn't get too hot and scorch.

Once the chocolate is fully melted, remove the top pan from the heat. You're now ready to use the melted chocolate in your recipe!

Advertisement

Step 2. Whisk Egg Yolks Into Chocolate

whisk yolks into chocolate

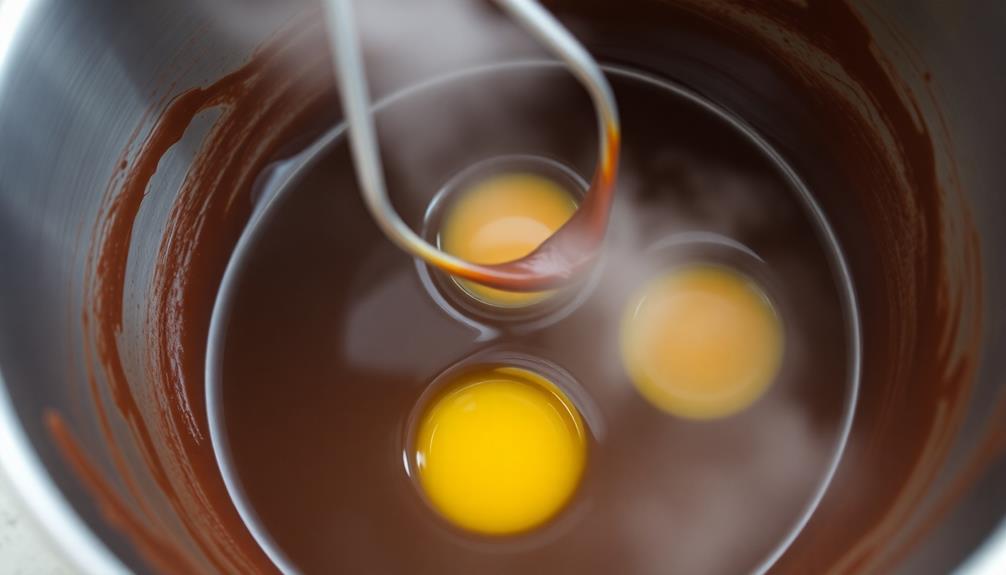
Now that you've got that silky smooth chocolate ready, it's time to whisk in the egg yolks. This is where the magic really starts to happen! Grab your whisk and a medium-sized bowl. Gently crack open the eggs, separating the yolks from the whites. You'll only need the yolks for this step.

Slowly pour the melted chocolate into the bowl with the egg yolks. Start whisking the mixture together in a gentle, circular motion. As you whisk, the yolks will help thicken and enrich the chocolate, creating a smooth, creamy texture.

Keep whisking until the mixture is well combined and has a velvety, pudding-like consistency. This chocolate and egg yolk mixture is the foundation of your delicious chocolate mousse.

Don't be afraid to whisk a little vigorously – you want to incorporate lots of air to make the mousse nice and light. Once it's all come together, you're ready for the next step!

Step 3. Fold in Whipped Cream Gently

gently fold in cream

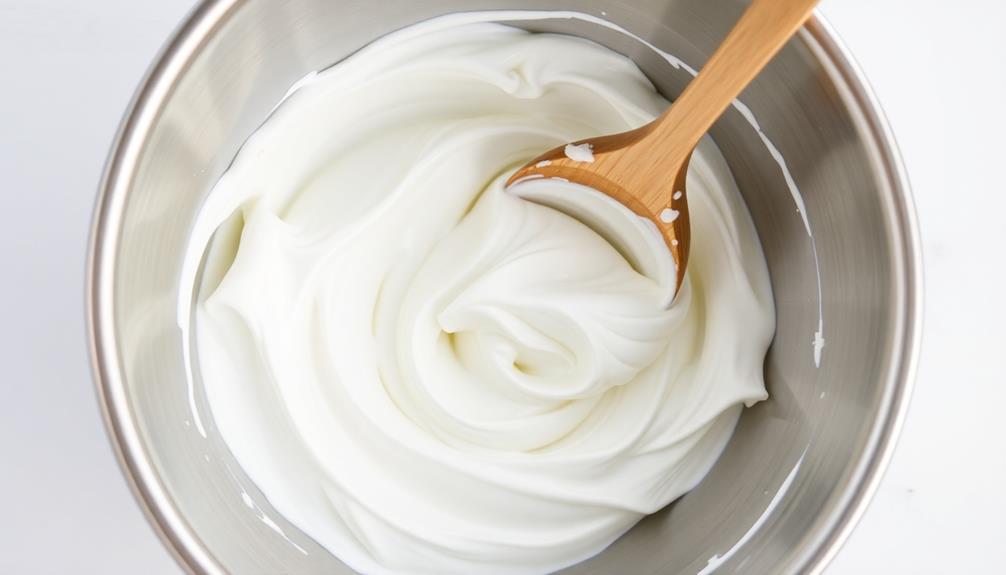
The next step is to fold in the whipped cream gently. This step is crucial to achieving the light and airy texture of a perfect chocolate mousse.

Grab a large spoon or a rubber spatula, and gently scoop the whipped cream into the chocolate mixture. Be careful not to overmix, as this can deflate the cream and ruin the mousse's delicate structure.

Fold the cream in using a gentle, circular motion, lifting the mixture from the bottom and carefully incorporating it. Keep going until the cream is evenly distributed, but don't overmix. You want to maintain as much air as possible in the mousse.

Advertisement

Once the cream is fully incorporated, your chocolate mousse is ready to be transferred to individual serving dishes or a larger serving bowl. Chill it in the refrigerator until ready to serve and enjoy the rich, velvety texture of your homemade chocolate masterpiece.

Step 4. Chill Mixture Until Firm

chill mixture until firm

After folding in the whipped cream, you'll want to chill the chocolate mousse mixture until it's firm. This is a crucial step in making the perfect chocolate mousse.

Pop the bowl in the fridge and let it sit for at least 2 hours, or until the mixture has thickened and holds its shape. You can even leave it in the fridge overnight if you'd like to prepare it ahead of time.

Chilling the mousse is important because it allows the ingredients to set and the flavors to meld together. As the mixture cools, the chocolate will firm up, and the air pockets from the whipped cream will set, giving the mousse its signature light and airy texture.

Once it's chilled, the mousse will be ready to scoop into serving dishes or to use in your favorite dessert recipes. Just be sure to give it enough time to chill thoroughly before digging in. The wait will be worth it, I promise!

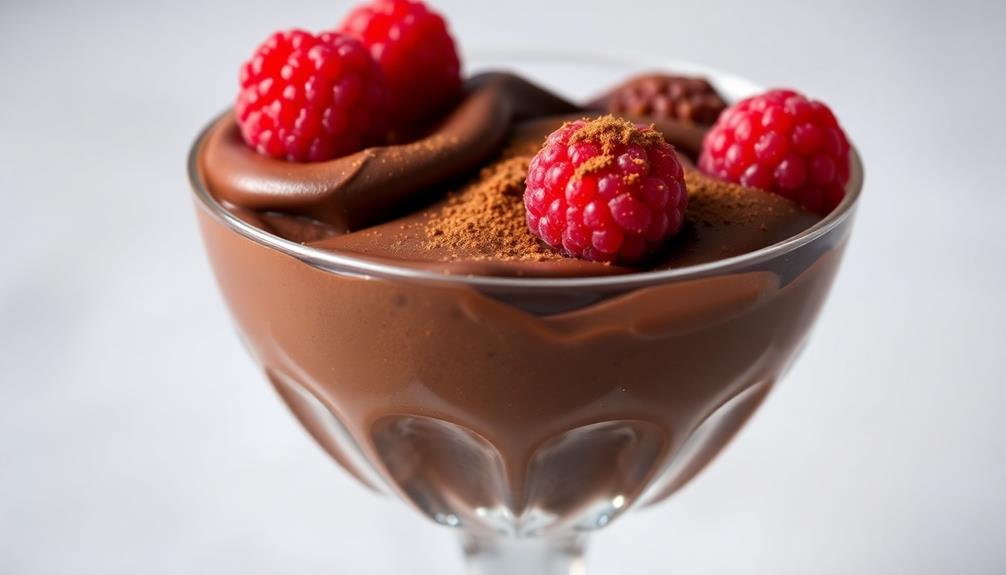
Step 5. Garnish With Shaved Chocolate

garnish with shaved chocolate

Once the chocolate mousse has thoroughly chilled, it's time to add the finishing touch – a garnish of shaved chocolate.

To create the chocolate shavings, you'll need a sharp knife or vegetable peeler. Carefully run the blade along the surface of a chocolate bar, applying gentle pressure to create thin, delicate curls. Alternate the direction of your strokes to produce a variety of shapes and sizes.

Advertisement

Gently sprinkle the chocolate shavings over the top of the chilled mousse, creating a visually appealing and textural contrast. The glossy, dark chocolate will beautifully complement the silky smooth mousse.

Feel free to be creative and arrange the shavings in a decorative pattern, or simply scatter them evenly across the surface. This simple garnish adds an elegant touch that will impress your guests and make your chocolate mousse look absolutely irresistible.

Now, your dessert is ready to be served and enjoyed!

Final Thoughts

Chocolate mousse's delightful richness and ethereal texture make it a truly indulgent dessert. Whether served as the grand finale of a fancy dinner or enjoyed on its own, this heavenly treat is sure to delight your senses. From the first luscious bite, you'll be captivated by the silky smooth consistency and the deep, complex flavors of premium chocolate.

Creating this decadent dessert at home is a true joy, allowing you to customize it to your personal preferences. Experiment with different types of chocolate, liqueurs, or even fruit purees to find your perfect combination. The possibilities are endless, making chocolate mousse a timeless classic that you can enjoy again and again.

Advertisement

As you savor the last spoonful, let the flavors linger, and bask in the sheer indulgence of this remarkable dessert. Chocolate mousse is a testament to the power of simplicity and the beauty of well-executed technique.

Embrace this culinary delight, and let it transport you to a world of pure chocolate bliss.

Frequently Asked Questions

How Long Does Chocolate Mousse Keep in the Refrigerator?

You can typically keep chocolate mousse in the fridge for 3-5 days. The exact shelf life depends on the recipe and how it was prepared, but it's generally best to consume it within a week.

Can Chocolate Mousse Be Frozen for Later Use?

Yes, you can freeze chocolate mousse for later use. The key is to store it in an airtight container and consume it within 2-3 months for best quality and texture. Just be sure to thaw it in the fridge before serving.

What Is the Difference Between Chocolate Mousse and Chocolate Pudding?

The key difference is that chocolate mousse is a light, airy dessert made with whipped cream or egg whites, while chocolate pudding is a dense, creamy custard-based dessert. Mousse has a more delicate texture than the thicker, richer pudding.

Advertisement

Can I Use Dark Chocolate Instead of Milk Chocolate in the Recipe?

You can certainly use dark chocolate instead of milk chocolate in your recipe. Dark chocolate will provide a richer, more intense chocolate flavor compared to the creamier, sweeter taste of milk chocolate.

How Many Calories Are in a Serving of Chocolate Mousse?

The amount of calories in a serving of chocolate mousse can vary, but it's generally high in calories due to the rich, creamy ingredients like chocolate, cream, and sugar. You'll want to check the specific recipe or nutrition facts to determine the exact calorie count.

Conclusion

You've got to try this luscious chocolate mousse! It's the perfect blend of richness and lightness, with a silky smooth texture that simply melts in your mouth. The combination of chocolate, cream, and a touch of sweetness creates a dessert that's utterly divine. One spoonful, and you'll be hooked! This classic recipe is easy to make, so you can enjoy its decadent goodness anytime. Dive in and savor every bite – it's a chocolate lover's dream come true!

Continue Reading
Advertisement

Graduations/Birthdays

Sprinkle-Rimmed Drinks

Whimsical and visually captivating, sprinkle-rimmed drinks transport you to a world of playful flavors and enchanting presentations that will leave you craving more.

Published

on

colorful rimmed beverages

You'll be delighted to discover the vibrant world of sprinkle-rimmed drinks! These colorful creations originated in the early 1900s, when creative bartenders began enhancing cocktails with decorative toppings. Today, the trend remains popular for parties and gatherings, with endless possibilities for rimming glasses with an array of sprinkles and candies. Whether you're mixing up a classic margarita or a refreshing mocktail, a sprinkle-rimmed glass adds a playful touch that captivates the senses. The key is balancing the sweetness of the sprinkles with the boldness of your chosen spirit or mixer. Prepare to be enchanted as you explore the delightful flavor and visual appeal of these festive drinks.

Key Takeaways

  • Sprinkle-rimmed drinks originated in the early 20th century as a creative bartender technique to enhance cocktail presentation and add textural interest.
  • Rimming glasses with assorted sprinkles, like nonpareils or crushed candies, provides a festive and visually appealing touch to both alcoholic and non-alcoholic beverages.
  • The balance between the sweetness of the sprinkles and the boldness of the liquor is crucial for achieving a harmonious flavor profile in sprinkle-rimmed drinks.
  • Sprinkle-rimmed drinks are versatile and suitable for a variety of occasions, from casual gatherings to themed parties and celebrations.
  • The creative customization of sprinkle combinations and garnishes allows for unique and personalized drink presentations that can elevate the overall drinking experience.

History

According to historical accounts, the concept of rimming drinks with sprinkles or other decorative toppings can be traced back to the early 20th century. During this time, creative bartenders began experimenting with unique ways to enhance the presentation of their cocktails.

They discovered that adding a colorful, crunchy rim couldn't only make drinks more visually appealing but also add a delightful textural contrast.

The trend quickly caught on, and soon sprinkle-rimmed drinks became a staple at parties and social gatherings. People loved the playful, whimsical touch it added to their beverages.

Over the decades, the practice evolved, with bartenders and home mixologists trying out different types of sprinkles, sugars, and even crushed cookies or candies to rim their drinks.

Today, sprinkle-rimmed drinks remain a popular way to add a touch of fun and flair to any occasion, from casual get-togethers to elegant celebrations.

Advertisement

Recipe

Sprinkle-Rimmed Drinks are a fun and festive way to add a touch of whimsy to any occasion. Whether you're hosting a party or simply treating yourself, these colorful and flavorful drinks are sure to delight.

The rimming of the glass with a variety of sprinkles not only adds a visually appealing element but also provides a delightful textural contrast to the smooth and refreshing drink within. The possibilities are endless when it comes to the sprinkle combinations, allowing you to tailor the drink to your personal taste or the theme of the event.

  • Assorted sprinkles (such as nonpareils, sanding sugar, or crushed candy)
  • Cocktail or mocktail of your choice (e.g., margarita, mojito, lemonade)
  • Lime wedges (optional)

Begin by preparing the sprinkle rim. Pour the desired sprinkles onto a shallow plate or saucer. Wet the rim of the glass with a lime wedge or a small amount of water. Carefully dip the rim of the glass into the sprinkles, gently twisting to ensure even coverage. Set the prepared glass aside.

Next, prepare your cocktail or mocktail according to the recipe. Once the drink is ready, carefully pour it into the sprinkle-rimmed glass. The sprinkles will cling to the sides, creating a festive and eye-catching presentation.

For an extra touch of flair, consider garnishing the drink with a lime wedge or a complementary fruit slice. The sprinkle-rimmed glasses can be made in advance, allowing you to quickly assemble your drinks when guests arrive.

Enjoy your Sprinkle-Rimmed Drinks and let the celebration begin!

Advertisement

Cooking Steps

First, rim the glass with colorful sprinkles to add a fun and festive touch.

Next, pour in your favorite liquor and mix in the remaining drink components.

Step 1. Rim Glass With Colored Sprinkles

rim glass colorful sprinkles

Prepare your glasses by lightly wetting the rim with a damp cloth or paper towel. This will help the sprinkles stick to the edge.

Next, choose your favorite colored sprinkles. Maybe you want to use rainbow sprinkles for a fun, festive look, or opt for subtle metallic sprinkles for a sophisticated touch.

Carefully pour a small amount of sprinkles onto a plate or shallow bowl. Gently dip the wet rim of the glass into the sprinkles, rolling it around to coat the edge evenly.

Tap off any excess sprinkles, then fill your glass with your desired beverage. The colorful, sprinkle-rimmed glass will instantly brighten up your drink and add a playful, decorative element.

Advertisement

Get creative and try different sprinkle colors and patterns to complement the drink inside. This simple technique is a great way to elevate your cocktails, mocktails, or even non-alcoholic beverages for any occasion.

Step 2. Add Liquor

incorporate alcohol into mixture

Now that you've created a whimsical sprinkle-rimmed glass, it's time to add the liquor.

Grab your favorite spirit, whether it's vodka, gin, or rum. Carefully pour it into the prepared glass, being mindful of the sprinkle rim.

The colorful sprinkles will dance and swirl as the liquor hits them, creating a mesmerizing display.

Don't be afraid to experiment with different spirits – each one will interact with the sprinkles in a unique way.

For a refreshing twist, you can even try adding a splash of soda or juice to the mix.

Advertisement

The key is to find the perfect balance between the sweetness of the sprinkles and the boldness of the liquor.

As you sip your creation, enjoy the playful interplay of flavors and textures.

Get ready to delight your senses and impress your guests with these sprinkle-rimmed cocktails.

Step 3. Add Drink Components

incorporate beverage ingredients

Once you've rimmed the glass with the colorful sprinkles, you'll want to start adding the drink components.

Begin by pouring in your favorite liquor. This could be vodka, gin, or even a flavored rum – the choice is yours! Did you know that some studies suggest coffee can enhance cognitive function? Coffee's health benefits can make for an interesting addition to your drink if you choose to incorporate coffee liqueurs.

Next, add a splash of sour mix or lemon juice to balance the sweetness. Don't be afraid to experiment with different juice combinations, like orange or pineapple, to create unique flavor profiles.

Advertisement

Now it's time to sweeten things up. A touch of simple syrup or honey can do the trick, but you can also get creative with flavored syrups, like raspberry or vanilla.

Stir everything together until it's well-combined.

Step 4. Stir in Desired Ingredients

mix in chosen ingredients

How about you stir in your desired ingredients next? This is where you can get creative and customize your sprinkle-rimmed drink to your own taste.

First, add any syrups, juices, or other liquids you'd like. Give it a gentle stir to combine everything.

Next, you can sprinkle in some spices, herbs, or even a bit of zest from a citrus fruit. Maybe a dash of cinnamon or a pinch of ginger would be nice. Don't be afraid to experiment! Just be sure to stir it all together well so the flavors meld.

Finally, you can top it off with a fun garnish, like a slice of fruit or a sprig of mint. This helps bring all the flavors together in a visually appealing way.

Advertisement

Once you've stirred in your desired ingredients, your sprinkle-rimmed drink is ready to enjoy. Sip and savor the unique flavors you've created.

Step 5. Garnish With Edible Flowers

garnish using edible flowers

Why not take your sprinkle-rimmed drink to the next level by garnishing it with edible flowers? These vibrant and whimsical additions can instantly elevate the presentation of your beverage. Carefully select complementary flowers that not only look beautiful, but also offer a subtle, natural flavor to enhance your drink.

Consider using delicate, petite blooms like pansies, violets, or nasturtiums. Their delicate, sweet flavors pair beautifully with many cocktails and mocktails. Arrange the flowers around the rim of the glass, letting them dangle gracefully over the edge. You can even float a few petals directly in the drink for a stunning visual effect.

Edible flowers add a touch of elegance and sophistication to your sprinkle-rimmed creations. Plus, they're a fun way to get creative and make your drinks truly one-of-a-kind.

Final Thoughts

While sprinkle-rimmed drinks may not be for everyone, they can add a delightful and whimsical touch to any gathering. Whether you're hosting a party, celebrating a special occasion, or simply looking to add a bit of fun to your everyday, these playful drinks are sure to bring smiles to your guests' faces.

The vibrant colors and unexpected texture of the sprinkles can transform a simple cocktail or mocktail into a true work of art.

Advertisement

Of course, the key to successful sprinkle-rimmed drinks is finding the right balance. You'll want to choose sprinkles that complement the flavors of your drink, and be careful not to overdo it.

A light dusting around the rim can go a long way in adding visual appeal and a touch of whimsy. So why not give it a try? Embrace your inner child and let your creativity shine through with these delightful, sprinkle-topped creations.

Frequently Asked Questions

What Is the Purpose of the Sprinkle Rim?

The purpose of the sprinkle rim is to add a decorative touch and enhance the flavour of the drink. It catches the eye, creating an enticing visual appeal, while also complementing the drink's overall taste and aroma.

How Long Will the Sprinkle Rim Last on the Drink?

The sprinkle rim won't last too long on your drink. The moisture from the liquid and agitation will cause the sprinkles to dissolve and disperse within a short time, usually less than 10 minutes.

Can I Use Any Type of Sprinkle for the Rim?

You can use a variety of sprinkles for the rim, but some may work better than others. Consider factors like moisture, texture, and adhesion to find the perfect sprinkle for your drink.

Advertisement

How Do I Get the Sprinkles to Stick to the Glass?

To get sprinkles to stick to the glass, you'll need a sticky surface. Moisten the rim with a bit of water, juice, or syrup, then dip it in the sprinkles. The moisture will help them adhere.

Can I Make the Sprinkle Rim in Advance?

You can make the sprinkle rim in advance. Simply apply the sprinkles to a moistened glass rim and allow it to dry completely. Then, when you're ready to serve, the sprinkles will still be firmly in place.

Conclusion

Whoa, you're really gonna love these sprinkle-rimmed drinks! They're a blast to make and even more fun to drink. Grab your favorite colorful sprinkles, rim those glasses, and get ready for a party in your mouth. These drinks are sure to put a smile on your face and bring out the kid in you. So, what are you waiting for? Let's get sprinkling!

Continue Reading

Graduations/Birthdays

Birthday Cake Puppy Chow

Uncover the captivating blend of crunchy Chex, creamy white chocolate, and vibrant sprinkles that make Birthday Cake Puppy Chow an irresistible treat for any celebration.

Published

on

festive puppy chow treats

Get ready to dive into the delightful world of Birthday Cake Puppy Chow! This festive twist on the classic Chex cereal treat combines the crunchy texture of Chex with the rich sweetness of white chocolate and the vibrant colors of rainbow sprinkles. It's the perfect treat for birthdays, parties, or any special occasion. You'll love how the irresistible flavors and textures come together to create a snack that's both visually appealing and utterly delicious. With just a few simple steps, you can whip up a batch and start celebrating in style. Let's explore the details that make this birthday-themed treat so irresistible.

Key Takeaways

  • Birthday Cake Puppy Chow is a sweet and crunchy treat that combines Chex cereal, white chocolate, and colorful sprinkles for a festive twist on traditional puppy chow.
  • The recipe originated in the 1950s and gained popularity as a party food for birthdays and special occasions, appealing to all ages.
  • The combination of the crunchy cereal, rich chocolate, and vibrant sprinkles creates an irresistible snack that is easy to prepare and perfect for sharing.
  • Birthday Cake Puppy Chow can be stored in an airtight container for up to a week, making it a convenient and enjoyable treat for various celebrations.
  • The festive appearance and sweet flavors of Birthday Cake Puppy Chow help create a joyful and celebratory atmosphere, making it an ideal addition to any birthday party or gathering.

History

The origins of Birthday Cake Puppy Chow can be traced back to the 1950s when resourceful home cooks began experimenting with traditional Puppy Chow recipes.

They wanted to create a fun, festive twist on the classic snack mix. By adding colorful sprinkles, vanilla flavoring, and a sweet coating, these innovative bakers transformed the traditional savory Puppy Chow into a delightful treat perfect for celebrations.

As the popularity of this birthday-themed variation grew, recipes were shared and refined, with bakers often using white chocolate or powdered sugar to achieve the desired birthday cake flavor and appearance.

Today, Birthday Cake Puppy Chow has become a beloved party food, brightening up birthdays, sleepovers, and other special occasions.

Its vibrant colors, sweet taste, and crunchy texture make it an irresistible snack that both kids and adults can't get enough of.

Advertisement

Whether homemade or store-bought, this festive twist on a classic favorite is sure to delight anyone with a sweet tooth.

Recipe

Birthday Cake Puppy Chow

Recipe

Puppy chow, also known as muddy buddies, is a classic and delicious snack. This birthday cake version takes the beloved treat and adds a festive twist. Coated in a sweet white chocolate and sprinkled with colorful sprinkles, this puppy chow is the perfect party food or sweet treat.

For those who enjoy a fun and easy dessert, this recipe fits right into that category! Whether you're celebrating a birthday or just looking for a fun and easy snack, this birthday cake puppy chow is sure to be a hit. The combination of crunchy Chex cereal, rich white chocolate, and festive sprinkles creates a flavor and texture that's utterly irresistible.

Advertisement

Ingredients:

  • 9 cups Chex cereal (any variety)
  • 1 cup white chocolate chips
  • 1/4 cup butter
  • 1 cup powdered sugar
  • 1/2 cup rainbow sprinkles

Instructions:

In a large microwave-safe bowl, melt the white chocolate chips and butter together in 30-second intervals, stirring between each, until smooth and fully melted.

Add the Chex cereal to the bowl and gently stir until the cereal is fully coated. Sift the powdered sugar over the coated cereal and fold gently to combine, ensuring all pieces are evenly coated.

Lastly, sprinkle the rainbow sprinkles over the puppy chow and toss gently to distribute.

Tips:

Advertisement

For best results, work in batches when coating the cereal to ensure even coverage.

Store the birthday cake puppy chow in an airtight container at room temperature for up to 1 week. The sprinkles may bleed color slightly over time, but the flavor will remain delicious.

Enjoy this treat as a party snack, gift, or simply as a sweet indulgence.

Cooking Steps

Measure out the Chex cereal into a large bowl.

Melt the butter and marshmallows in the microwave, then stir in the sprinkles.

Advertisement

Pour the melted mixture over the cereal and stir gently to coat each piece evenly.

Step 1. Measure Chex Cereal

measure chex cereal accurately

Carefully measure the crisp, golden Chex cereal, ensuring each piece is evenly distributed. You'll need 9 cups of the delightful, toasted corn squares.

Pour them into a large mixing bowl, ready to be transformed into a delectable birthday treat. Measure precisely to get the right balance – too little and you won't have enough, too much and the coating mightn't cover everything evenly.

Take your time and double-check the amount. With the Chex ready, you're one step closer to creating a crave-worthy birthday cake puppy chow.

The next stage is to blend in the other tasty ingredients that will give this snack its festive flair. Stay focused and enjoy this creative process – the end result will be worth it when you see the joy on everyone's faces as they dive into this homemade delight.

Step 2. Melt Butter and Marshmallows

melt butter and marshmallows

Next, you'll melt the butter and marshmallows together in a saucepan over medium heat. Stir the mixture constantly until it's smooth and fully combined. This should only take a couple of minutes. The butter will melt quickly, and the marshmallows will soften and blend in.

Once the butter and marshmallows are melted, remove the saucepan from the heat. Be careful, as the mixture will be hot.

Advertisement

You'll want to work quickly from this point on. Quickly pour the melted butter and marshmallow mixture over the Chex cereal in a large bowl. Use a spatula to gently fold and coat the cereal evenly. Work carefully to ensure all the pieces are coated.

After the cereal is fully coated, you're ready to move on to the next step of adding the birthday cake-flavored ingredients. This is where the fun really begins!

Step 3. Add Sprinkles to Melted Mixture

add sprinkles to mixture

After coating the Chex cereal in the melted butter and marshmallow mixture, it's time to add the birthday cake-flavored fun.

To ensure that your puppy chow is safe and enjoyable for everyone, be mindful of the ingredients, just like how it's important to offer your pets safe snacks safe snacks for hamsters.

Grab a handful of colorful sprinkles and start sprinkling them generously over the coated cereal. The sprinkles will add a festive touch, making your birthday cake puppy chow look like a true celebration.

Gently stir the sprinkles into the mixture, ensuring they're evenly distributed. You'll see the vibrant colors of the sprinkles pop against the gooey, marshmallow-y cereal. The sprinkles not only add a fun visual element but also provide a burst of sweetness in each bite.

Advertisement

Keep adding sprinkles until the entire batch is coated and the colors are vibrant. The more sprinkles, the better!

Once you're satisfied with the amount, give the mixture one final stir to make sure everything is well combined. Your birthday cake puppy chow is now ready for the next step, and you can't wait to see the delighted faces of your friends and family when they try it.

Step 4. Pour Cereal Mixture

pouring cereal mixture carefully

Once the sprinkles are evenly distributed, pour the coated Chex cereal mixture onto a large baking sheet or into a large bowl. This will allow the cereal pieces to spread out and cool down. You want to make sure they're not piled up on top of each other, so take your time and gently pour the mixture, spreading it out as you go.

Now, you'll want to let the cereal cool completely before moving on to the next step. This usually takes about 15-20 minutes. As it cools, the melted chocolate and peanut butter will harden, creating that classic puppy chow texture.

Keep an eye on it and stir the mixture occasionally to help it cool evenly.

Once the cereal is cooled and hardened, you're ready to enjoy your delicious birthday cake puppy chow! Feel free to sneak a few pieces as a reward for all your hard work. Just don't eat it all before you get to share it with your friends and family!

Advertisement

Step 5. Stir to Coat Cereal Evenly

coat cereal by stirring

With a gentle hand, stir the cereal mixture until every piece is thoroughly coated in the chocolatey-peanut butter goodness.

Don't be too vigorous – you want to ensure the coating spreads evenly without breaking the cereal.

Take your time, moving the spoon in slow, circular motions. As you stir, you'll notice the mixture start to thicken and the color deepen.

Keep going until there's no dry cereal left. You'll know it's ready when the whole batch looks rich and decadent, like a birthday cake batter.

Once it's fully coated, you're almost done! Just a few more steps before you can dive in and enjoy this delightful treat.

Final Thoughts

This Birthday Cake Puppy Chow recipe is a delightful treat that can brighten up any occasion. The final result is a scrumptious and visually appealing snack that's sure to put a smile on everyone's face. The blend of sweet and crunchy textures creates a truly irresistible experience.

Advertisement

For a festive gathering, consider pairing this tasty snack with some stylish home decor solutions like GEEORY Fall Pillow Covers to enhance the atmosphere.

Whether you're celebrating a special birthday or simply looking for a fun and festive snack, this puppy chow is the perfect choice. The vibrant colors and festive sprinkles make it an eye-catching addition to any party or gathering.

It's easy to prepare, and the hands-on process of mixing and coating the cereal can be an enjoyable activity for both kids and adults.

Once you've tried this Birthday Cake Puppy Chow, you'll find yourself craving it again and again. It's a delightful treat that's sure to become a new favorite in your household. Enjoy the sweet, satisfying flavors and the joy of sharing this delicious creation with your loved ones.

Frequently Asked Questions

How Do I Make Birthday Cake Puppy Chow Nut-Free?

To make the recipe nut-free, simply replace the nuts with an equal amount of seeds or a seed-based alternative, like sunflower or pumpkin seeds. This will provide the same crunchy texture without the nut allergens.

Advertisement

What Is the Shelf Life of Birthday Cake Puppy Chow?

The shelf life of homemade snack mixes can vary, but you can typically expect them to last 1-2 weeks when stored in an airtight container at room temperature. Be sure to check for signs of spoilage before enjoying.

Can I Use a Different Type of Cereal for the Recipe?

You can absolutely use a different type of cereal for the recipe. As long as the cereal is dry and crunchy, it should work well. Feel free to experiment with different flavors to suit your taste.

How Do I Adjust the Recipe for a Larger or Smaller Batch?

To adjust the recipe for a larger or smaller batch, you'll need to scale the ingredient amounts up or down proportionately. Start by determining the desired yield, then modify the quantities accordingly to achieve the preferred portion size.

Is Birthday Cake Puppy Chow Suitable for Dogs With Allergies?

While birthday cake puppy chow may contain ingredients that could be unsuitable for dogs with allergies, it's best to check the specific recipe and ingredients to ensure it's safe for your pup. Consult your veterinarian if you have any concerns.

Conclusion

You'll be amazed at how quickly and easily you can whip up this delightful birthday cake puppy chow! The combination of sweet and crunchy textures is simply irresistible. Whether you're baking for a party or just treating yourself, this recipe is sure to put a smile on everyone's face. So, what are you waiting for? Get in the kitchen and start mixing up this tasty birthday treat today!

Advertisement
Continue Reading

Graduations/Birthdays

Unicorn Hot Chocolate

Otherworldly and whimsical, unicorn hot chocolate transports you to a realm of vibrant colors and sweet indulgence, where the possibilities are as limitless as your imagination.

Published

on

magical colorful chocolate beverage

Unicorn hot chocolate is a whimsical treat that'll transport you to a world of vibrant colors and sweet indulgence. Its origins date back to the late 1800s when European confectioners first experimented with natural dyes to create these magical drinks. Today, you can make your own by combining whole milk, heavy cream, and white chocolate chips for the base, then adding vanilla and food coloring to achieve those dreamy blue, pink, and purple hues. Top it off with sweetened whipped cream, rainbow sprinkles, and even edible glitter for a truly enchanting sip. Crafting this one-of-a-kind treat is a delightful journey that celebrates the joy of creativity in the kitchen.

Key Takeaways

  • Unicorn hot chocolate is a whimsical and colorful treat with a history dating back to the late 19th century in Europe.
  • The key ingredients include whole milk, heavy cream, white chocolate chips, and food coloring to create vibrant hues.
  • The preparation involves combining the base ingredients, adding color, incorporating toppings like whipped cream and sprinkles, and serving in a themed mug.
  • Creative presentation techniques, such as using edible glitter and iridescent mugs, can enhance the visual appeal of the drink.
  • Sipping unicorn hot chocolate evokes a sense of nostalgia, celebration, and playfulness, making it an enjoyable experience for special occasions or festive gatherings.

History

The origins of unicorn hot chocolate can be traced back to the late 19th century, when European confectioners began experimenting with food coloring and whimsical flavors.

These early pioneers wanted to create something truly magical, something that would capture the imagination of children and adults alike. They started by infusing their hot chocolate with natural dyes, transforming the rich, creamy beverage into a rainbow of colors.

Soon, the idea of a "unicorn" hot chocolate took hold, as the confectioners added edible glitters, swirls of whipped cream, and even edible flowers to create a truly enchanting experience.

The popularity of this colorful concoction quickly spread, with cafes and bakeries across the continent offering their own unique takes on the unicorn-inspired drink.

Today, unicorn hot chocolate remains a beloved treat, a delightful fusion of nostalgia, whimsy, and the timeless appeal of hot chocolate.

Advertisement

Whether enjoyed on a cozy winter day or as a festive treat, this magical beverage continues to bring joy and wonder to all who sip it.

Recipe

Unicorn Hot Chocolate is a delightful and whimsical treat that will transport you to a world of enchantment. This vibrant and creamy concoction is perfect for those who love to infuse a bit of magic into their daily lives. Whether you're sipping it by the fire on a chilly evening or sharing it with friends, this unicorn-inspired hot chocolate is sure to delight the senses.

The secret to this mesmerizing beverage lies in the careful balance of bold flavors and a touch of playful creativity. With its vibrant hues and sprinkle of edible glitter, Unicorn Hot Chocolate is a visual feast that will have your guests marveling at its sheer beauty.

  • Whole milk
  • Heavy cream
  • White chocolate chips
  • Vanilla extract
  • Food coloring (blue, pink, and purple)
  • Edible glitter (optional)

To create this enchanting Unicorn Hot Chocolate, begin by heating the milk and cream together in a saucepan over medium heat, stirring occasionally until the mixture is steaming hot.

Gently stir in the white chocolate chips and vanilla extract, allowing the chocolate to melt and incorporate into the liquid. Once the mixture is smooth and creamy, divide it evenly into three separate bowls.

In each bowl, stir in a few drops of the desired food coloring (blue, pink, and purple) until the desired shade is achieved.

Advertisement

For the final touch, carefully pour the colored hot chocolate into a serving mug, layering the different hues to create a mesmerizing ombre effect.

Finish with a sprinkle of edible glitter, if desired, and serve immediately. Embrace the whimsical and embrace the magic of Unicorn Hot Chocolate.

Cooking Steps

First, combine the milk, sugar, and cocoa in a saucepan.

Next, add a few drops of your favorite food coloring to transform the hot chocolate into a vibrant, magical hue.

Once it's the perfect color, sprinkle in some rainbow sprinkles for a fun, festive touch.

Advertisement

Top it all off with a dollop of whipped cream and serve it in a unicorn-themed mug for a delightful unicorn-inspired treat.

Step 1. Combine Milk, Sugar, and Cocoa

mix milk sugar cocoa

In a small saucepan, combine the milk, sugar, and cocoa powder. Whisk the ingredients together over medium heat until the mixture is smooth and hot. Be sure to stir constantly to prevent the cocoa from burning or sticking to the bottom of the pan.

Interestingly, many people enjoy pairing sweet treats like hot chocolate with ice cream, especially during the summer months when ice cream consumption peaks in the U.S. ice cream consumption.

As the hot chocolate heats up, you'll start to see small bubbles forming around the edges. That's a good sign! Keep whisking until the sugar has fully dissolved and the whole mixture is steaming. You want it to be hot, but not boiling.

Now, the fun part! Once the hot chocolate is ready, you can start adding in the magical unicorn touches.

Sprinkle in a pinch of edible glitter or a few drops of food coloring to turn your drink into a vibrant, rainbow-hued delight. Top it off with a generous dollop of whipped cream and a sprinkle of colorful sprinkles.

Advertisement

Get creative and make your unicorn hot chocolate as whimsical as can be!

Step 2. Add Food Coloring

incorporate vibrant colorants

Once the hot chocolate is ready, you can add a few drops of food coloring to turn your drink into a vibrant, rainbow-hued delight.

Start with just a drop or two of each color, and then give your mug a gentle stir to blend the colors together. You'll see the hot cocoa transform into a mesmerizing swirl of different hues.

Don't be afraid to get creative with your color combinations! Try mixing red and blue for a purple hue, or yellow and green for a sunny, lime-like shade. The possibilities are endless.

Just remember to add the colors one at a time and stir well in between to achieve your desired effect.

As the food coloring blends with the hot chocolate, you'll notice the drink taking on a whole new look. It's like magic unfolding right before your eyes!

Advertisement

Take a moment to admire your handiwork before taking that first sip of your vibrant, unicorn-inspired hot chocolate.

Step 3. Add Sprinkles

add sprinkles for decoration

Why not add a sprinkle of magic to your unicorn hot chocolate? Sprinkles are the perfect finishing touch, adding a burst of color and a whimsical charm to your dreamy beverage.

Choose from a rainbow of options – vibrant pink, shimmering purple, or perhaps a mix of all the colors of the rainbow. Gently shake the sprinkles over the top of your hot chocolate, allowing them to cascade down and settle on the surface.

As you sip your creation, the sprinkles will melt into the warm, creamy liquid, infusing each sip with a touch of sweetness. The textural contrast between the smooth hot chocolate and the crunchy sprinkles creates a delightful sensory experience.

Get creative and experiment with different sprinkle combinations – maybe even add a few edible glitter flakes for an extra-magical touch. Savor each magical moment as you indulge in your whimsical unicorn hot chocolate masterpiece.

Step 4. Top With Whipped Cream

finish with whipped cream

After adding the sprinkles, top your unicorn hot chocolate with a fluffy cloud of whipped cream.

Grab the can of whipped topping and give it a good shake. Gently press the nozzle, letting the creamy white topping slowly rise above the rim of the mug. Swirl it around in a circular motion, building up a tall, swirly pile.

Advertisement

Don't be shy – pile it high! The more whipped cream, the better. The sweet, airy topping will contrast perfectly with the rich, chocolatey drink below. Plus, it'll make your creation look even more magical and Instagram-worthy.

Once you've reached your desired height, take a step back and admire your masterpiece. The vibrant sprinkles peeking through the fluffy white clouds create a stunning visual.

Now, grab a spoon and dig in! The whipped cream will melt into the hot chocolate, making each sip extra creamy and indulgent. Enjoy every last sweet, frothy bite of your unicorn-inspired treat.

Step 5. Serve in Unicorn-Themed Mug

serve in unicorn mug

For the final touch, serve your unicorn hot chocolate in a fun, unicorn-themed mug. These whimsical mugs often feature vibrant colors, shimmery accents, and a playful horn on top to capture the magical essence of a unicorn.

Sipping your delightful drink from this charming vessel will really bring the unicorn experience to life. You can find unicorn mugs in a variety of styles, from ceramic to insulated travel mugs.

Some designs even have an iridescent finish that sparkles under the light, making them extra special. Choose a mug that speaks to your personal style and complements the colorful hues of your unicorn hot chocolate.

Advertisement

When serving, be sure to add a generous dollop of sweetened whipped cream on top. The creamy topping not only looks beautiful, but it also adds a luxurious texture that pairs perfectly with the rich, velvety chocolate.

Finish it off with a light dusting of edible glitter or rainbow sprinkles for the ultimate unicorn-themed presentation.

Final Thoughts

Crafting the perfect unicorn hot chocolate can be a delightful journey, leaving you with a sense of whimsy and wonder.

As you sip this magical concoction, you'll be transported to a realm of enchantment, where every sip is a celebration of color and imagination.

While the preparation may seem intricate, the joy you'll experience in creating this one-of-a-kind treat is well worth the effort.

Advertisement

From swirling the vibrant hues to topping it with an array of playful garnishes, you'll find yourself immersed in a world of pure delight.

Frequently Asked Questions

Is Unicorn Hot Chocolate Suitable for Vegans or Vegetarians?

You'll need to check the ingredients carefully to determine if a unicorn hot chocolate is suitable for vegans or vegetarians. Some may contain dairy or other non-vegan/vegetarian components, so it's best to review the specifics before consuming it.

How Can I Make Unicorn Hot Chocolate Dairy-Free?

To make your hot chocolate dairy-free, you can use plant-based milk like almond, soy, or coconut milk. You can also add vegan-friendly food coloring or powdered food dyes to achieve that vibrant, unicorn-inspired hue.

Does Unicorn Hot Chocolate Contain Any Artificial Colors or Flavors?

Unicorn hot chocolate may contain artificial colors or flavors to achieve its vibrant and whimsical appearance. However, you can find dairy-free and natural alternatives that use plant-based milks and natural food coloring for a healthier, more wholesome version.

Where Can I Purchase the Ingredients for Unicorn Hot Chocolate?

You can purchase the ingredients for unicorn hot chocolate at specialty or gourmet food stores, or online from retailers that sell baking and specialty ingredients. Look for natural food coloring, edible glitter, and flavored syrups to create the whimsical drink.

Advertisement

How Long Does Unicorn Hot Chocolate Stay Fresh After Preparation?

How long your homemade hot chocolate stays fresh depends on the ingredients you use. Generally, it'll remain tasty for 3-4 days when stored in an airtight container in the refrigerator. Enjoy it while it's at its best!

Conclusion

You'll love whipping up a batch of this vibrant and whimsical unicorn hot chocolate! The bright colors and magical flavor make it a true delight. Enjoy this enchanting treat on a cozy winter day, or serve it at your next party for a fun and festive experience. It's sure to put a smile on everyone's face – so what are you waiting for? Give this recipe a try and let the unicorn magic begin!

Continue Reading
Advertisement

Affiliate Disclaimer
As an affiliate, we may earn a commission from qualifying purchases. We get commissions for purchases made through links on this website from Amazon and other third parties.

Advertisement

Latest

colorful rimmed beverages colorful rimmed beverages
Graduations/Birthdays3 mins ago

Sprinkle-Rimmed Drinks

Whimsical and visually captivating, sprinkle-rimmed drinks transport you to a world of playful flavors and enchanting presentations that will leave...

festive puppy chow treats festive puppy chow treats
Graduations/Birthdays8 mins ago

Birthday Cake Puppy Chow

Uncover the captivating blend of crunchy Chex, creamy white chocolate, and vibrant sprinkles that make Birthday Cake Puppy Chow an...

magical colorful chocolate beverage magical colorful chocolate beverage
Graduations/Birthdays14 mins ago

Unicorn Hot Chocolate

Otherworldly and whimsical, unicorn hot chocolate transports you to a realm of vibrant colors and sweet indulgence, where the possibilities...

colorful skewered fruit delights colorful skewered fruit delights
Graduations/Birthdays20 mins ago

Rainbow Fruit Kebabs

Tantalizing and refreshing, these rainbow fruit kebabs offer a delightful twist on a classic snack, with a vibrant array of...

colorful cheese filled tortillas colorful cheese filled tortillas
Graduations/Birthdays25 mins ago

Confetti Quesadillas

Heighten your taste buds with the vibrant burst of color and flavor in confetti quesadillas, a fusion of Mexican cuisine...

celebratory dessert beverage fusion celebratory dessert beverage fusion
Graduations/Birthdays31 mins ago

Birthday Cake Milkshake

Fulfill your childhood nostalgia with the irresistible Birthday Cake Milkshake, a creamy, indulgent treat that's a celebration in every sip....

colorful cake batter dip colorful cake batter dip
Graduations/Birthdays37 mins ago

Funfetti Dip

Celebrate the vibrant and creamy delight of Funfetti Dip, the ultimate party treat that will captivate your taste buds and...

celebratory sweet snack treat celebratory sweet snack treat
Graduations/Birthdays42 mins ago

Birthday Cake Flavored Popcorn

Outrageous and irresistibly sweet, this birthday cake flavored popcorn promises a flavor explosion that will leave you craving more. Discover...

graduation jewelry and snacks graduation jewelry and snacks
Graduations/Birthdays48 mins ago

Class Ring Onion Rings

Feast on the nostalgic delight of Class Ring Onion Rings, a crispy, golden-brown treat that will transport you back to...

breadsticks resembling pencils breadsticks resembling pencils
Graduations/Birthdays54 mins ago

Pencil-Shaped Breadsticks

Harnessing the rich history and versatility of pencil-shaped breadsticks, explore how to craft these unique and captivating snacks that will...

colorful candy dessert layers colorful candy dessert layers
Graduations/Birthdays60 mins ago

Smarties Candy Parfaits

Observe the vibrant layers of creamy yogurt, pudding, and whipped cream, elevated by the delightful crunch of classic Smarties candies...

noodle shaped letter pasta noodle shaped letter pasta
Graduations/Birthdays1 hour ago

Alphabet Soup

Alphabet soup, a whimsical culinary delight that transports you back to childhood, boasts a rich history and a community-fostering experience...

Advertisement

Trending