Connect with us

Christmas Recipes

Prime Rib Roast With Au Jus

You’ll be swept away by the mouthwatering prime rib roast with its irresistible au jus, a savory and tender masterpiece that’s sure to impress.

Published

on

tender prime rib delight

Treat yourself to a mouthwatering masterpiece with this prime rib roast recipe that'll have your taste buds dancing with delight, thanks to the irresistible au jus that perfectly complements the tender, flavorful meat. This iconic dish has a rich history, originating in England and gaining popularity in the US as a high-end restaurant staple. With its succulent texture, savory aroma, and beautiful presentation, it's no wonder this prime rib roast has remained a beloved favorite for generations. Let's dive into the essential steps to create this unforgettable culinary experience in your own home.

Key Takeaways

  • Prepare a prime rib roast by seasoning it generously with salt and pepper, then sear it on all sides to create a flavorful crust.
  • Roast the seasoned prime rib at a high temperature initially to achieve a brown exterior, then lower the temperature for gentle cooking until desired doneness.
  • Let the roasted prime rib rest for 15-20 minutes before slicing to allow the juices to redistribute, enhancing the meat's tenderness and flavor.
  • Serve the prime rib with a rich, savory au jus sauce to complement the roast's natural flavors and provide a delightful dipping experience.
  • Prime rib roast is an impressive and memorable dish, often associated with special occasions and celebrations, that can be enjoyed by both casual and formal dining experiences.

History

Prime rib roast has a long and illustrious history. This mouthwatering dish has been delighting people for centuries, starting with its humble beginnings in England. Back then, it was often served at grand feasts and celebrations, where the tender, juicy meat would melt in your mouth.

Over time, the popularity of prime rib roast spread to the United States, where it became a staple of high-end restaurants and holiday meals.

Today, prime rib roast is still considered a special treat, thanks to its rich, beefy flavor and impressive presentation. Whether you're hosting a fancy dinner party or just want to treat yourself, this classic dish is sure to impress.

With its tender texture and savory seasoning, it's no wonder prime rib roast has remained a beloved favorite for generations. So why not give it a try and see for yourself why this timeless recipe has stood the test of time?

Recipe

Prime Rib Roast

Advertisement

Recipe

Prime rib roast is a classic and delicious dish that makes for an impressive centerpiece at any gathering. The rich, tender meat paired with a flavorful crust creates an unbeatable combination.

Whether you're hosting a holiday dinner or a special occasion, this prime rib recipe is sure to impress your guests.

The key to a perfect prime rib roast is to start with a high-quality cut of meat and to cook it with care. With the right techniques, you can achieve a roast that's perfectly cooked from edge to edge, with a beautiful caramelized exterior.

Ingredients:

Advertisement
  • 6-8 lb prime rib roast, at room temperature
  • Kosher salt
  • Freshly ground black pepper
  • 2 tbsp olive oil

Cooking Instructions:

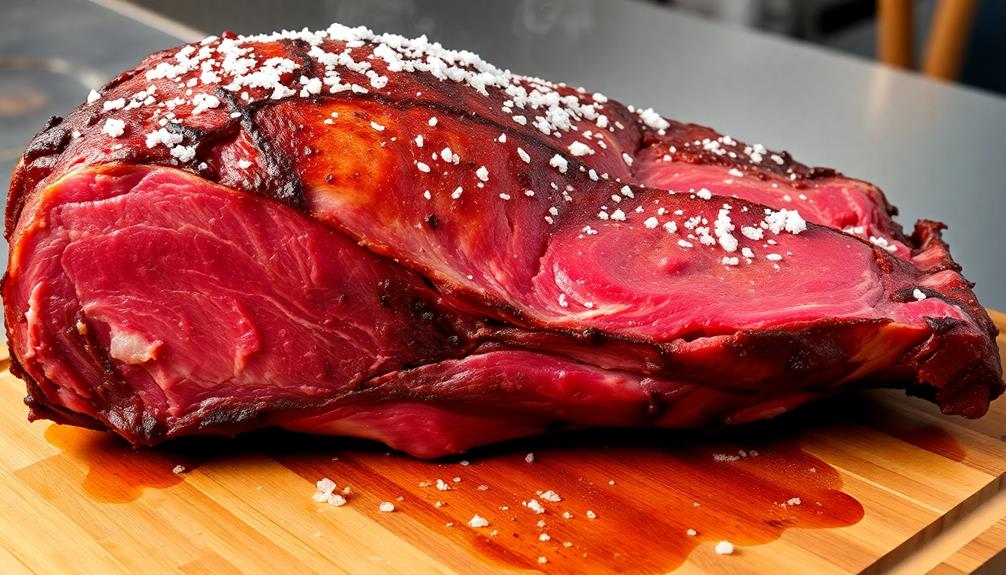
Preheat your oven to 500°F. Pat the prime rib roast dry with paper towels and generously season all over with salt and pepper.

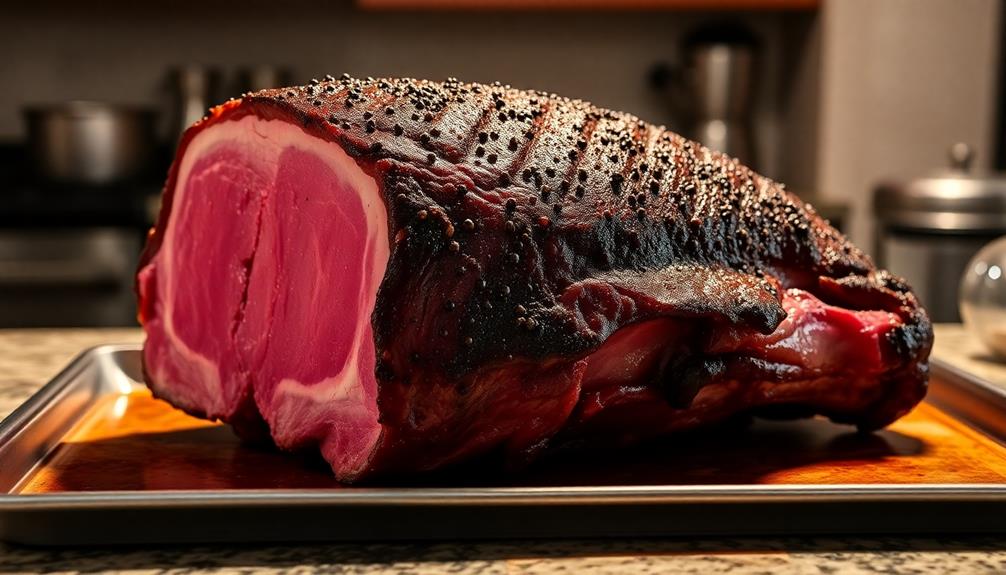
Heat the olive oil in a large oven-safe skillet or roasting pan over high heat. Sear the roast on all sides until a deep brown crust forms, about 2-3 minutes per side.

Transfer the pan to the preheated oven and roast for 15 minutes. Then reduce the oven temperature to 250°F and continue roasting until the desired doneness is reached, approximately 2-4 hours.

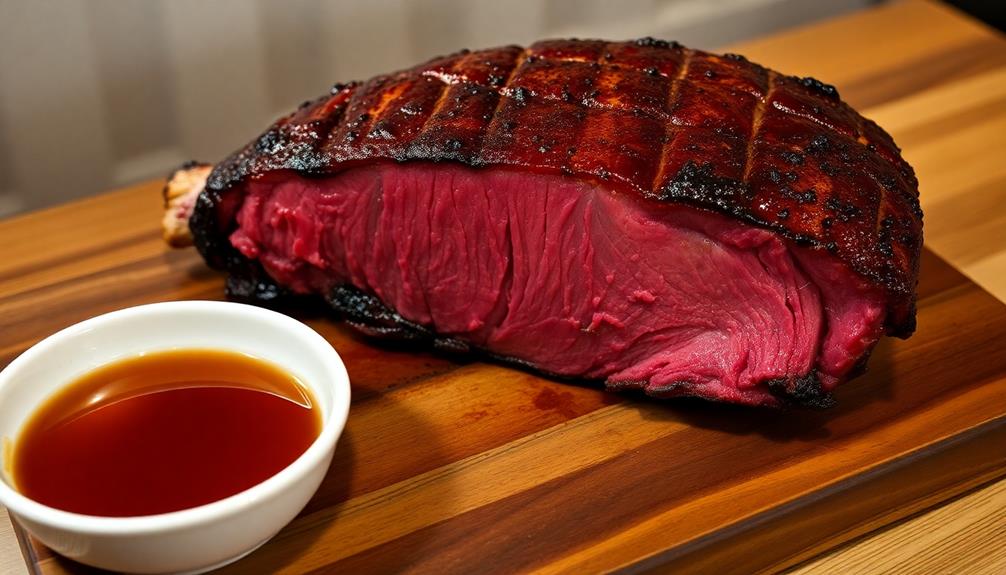
Use a meat thermometer to monitor the internal temperature, which should reach 120-125°F for medium-rare. Allow the roast to rest for 20-30 minutes before slicing and serving.

For the best results, be sure to let the prime rib come to room temperature before cooking, and use a meat thermometer to ensure it reaches the perfect level of doneness.

Advertisement

With a little care and attention, you can create a prime rib roast that's sure to impress.

Cooking Steps

Preheat your oven to a toasty 500°F, then give your prime rib a generous seasoning.

Next, sear the roast to lock in those delicious juices.

Finally, pop it in the oven and let it roast until it's perfectly cooked.

Don't forget to let it rest before slicing into this tender, mouthwatering masterpiece!

Advertisement

Step 1. Preheat Oven to 500°F

preheat oven to 500 f

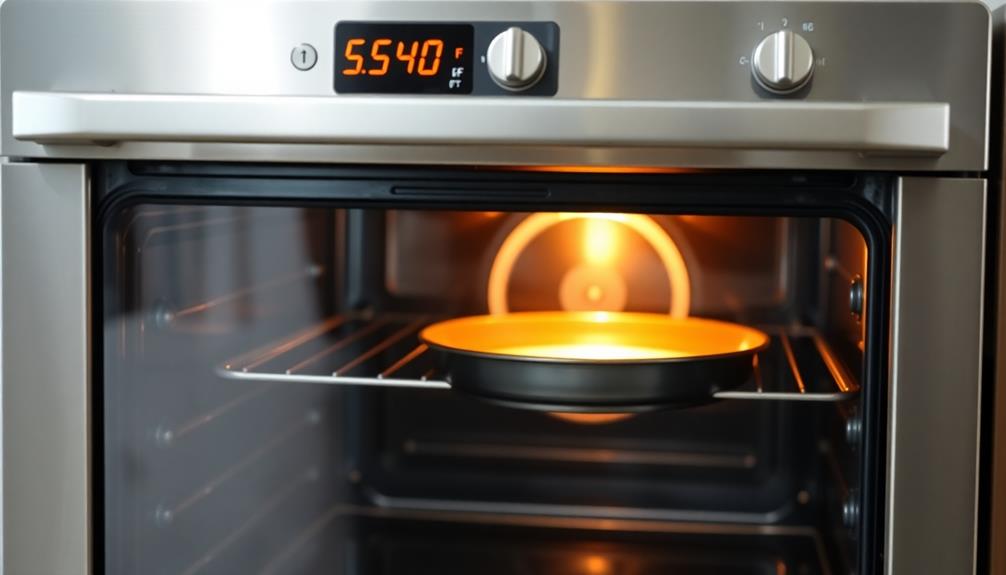
Once the oven is preheated to a scorching 500°F, you can begin the roasting process. Crank up that heat – you want the outside of your prime rib to sear and develop a delicious, crusty exterior. This high-temp start will help lock in all the juices and flavors.

Make sure your oven is thoroughly heated before sliding that impressive roast inside. You'll hear it sizzle as it hits the hot oven – that's music to a home cook's ears! Set a timer for 15 minutes. This initial high-heat blast will give your prime rib a gorgeous brown crust.

After the 15 minutes are up, reduce the oven temperature to 250°F. This lower heat will gently finish cooking the inside to your desired doneness, whether you love it rare, medium-rare, or well-done.

Just keep a close eye on the internal temperature and pull it out when it reaches your preferred level of doneness. Get ready for the most tender, juicy prime rib ever!

Step 2. Season the Prime Rib

seasoning the prime rib

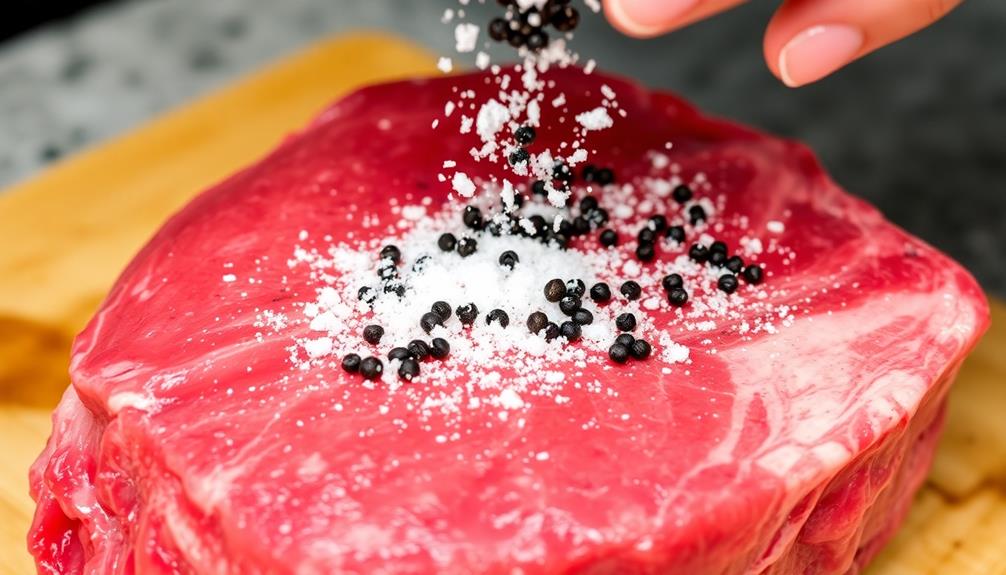
With the oven preheated, season the prime rib generously with salt and pepper. You can't have a delicious prime rib without the perfect seasoning!

Make sure to rub the salt and pepper all over the meat, covering every inch. This will create a mouthwatering crust as it roasts. Don't be shy – use a heavy hand when sprinkling on the seasonings. You want that prime rib to be packed with flavor in every bite.

Once it's nicely coated, you're ready to pop that beauty in the oven. The high heat will sear the outside, locking in all those juices.

Advertisement

As it roasts, the aroma will fill your kitchen and have your stomach rumbling. Just wait until you slice into that perfectly medium-rare prime rib. The tender, juicy meat will practically melt in your mouth.

With just a little seasoning, you're well on your way to a restaurant-worthy prime rib roast that's sure to impress everyone at the table.

Step 3. Sear the Prime Rib

sear prime rib perfectly

First, sear the prime rib on all sides to create a beautiful caramelized crust.

You'll want to get your pan or oven super hot, so it's ready to work its magic. Carefully place the seasoned prime rib in the pan and let it sizzle away.

The key is to not move it too much – you want those tasty brown bits to form! Once the first side is nicely seared, use tongs to flip and sear the other sides.

The wonderful aroma will start to fill your kitchen, making your mouth water in anticipation.

Advertisement

Keep a close eye to make sure the outside doesn't burn before the inside is cooked to perfection.

When all sides are wonderfully caramelized, you're ready for the next step.

Transfer the seared prime rib to the oven to finish roasting.

Get ready for the most juicy, tender, and flavorful prime rib you've ever had!

Step 4. Roast the Prime Rib

roast the prime rib

After searing the prime rib to perfection, it's time to roast it in the oven. Preheat your oven to a nice, toasty 500°F.

Carefully place the seared prime rib into a roasting pan, making sure the fatty side is facing up. This will allow that delicious fat to baste the roast as it cooks, keeping it juicy and flavorful.

Advertisement

Now, pop that bad boy into the oven and let it go for about 15 minutes. This high-heat searing will create a beautiful, crusty exterior.

Then, reduce the oven temperature to 250°F and continue roasting until it reaches your desired doneness, about 2-4 hours. Use a meat thermometer to check the internal temperature – you're aiming for 120°F for medium-rare, or 130°F for medium.

Once it's reached the perfect temp, take the roast out and let it rest for 15-20 minutes. This allows the juices to redistribute, making every bite mouthwatering.

Grab your sharpest knife and start slicing into that perfectly cooked prime rib. It's time to dig in!

Step 5. Let the Prime Rib Rest

allow prime rib resting

Once the prime rib has finished roasting, it's crucial to let it rest before slicing. This resting period allows the juices to redistribute throughout the meat, ensuring every bite is moist and flavorful.

Imagine the savory aromas wafting through the air as the prime rib sits on the counter, just waiting to be sliced.

Advertisement

During the 15-20 minute rest, the internal temperature of the prime rib will continue to rise slightly, reaching the perfect level of doneness. You can almost hear the sizzle as the meat relaxes and the juices settle.

Be patient, my friend, for this is a crucial step in achieving prime rib perfection.

Once the timer goes off, it's time to slice into the juicy, tender roast. The wait will have been well worth it, as each slice reveals a mouth-watering display of pink, succulent meat.

Serve the prime rib with the delectable au jus sauce, and get ready to savor every bite of this magnificent dish.

Final Thoughts

A perfectly cooked prime rib roast is a true culinary delight, one that you can be proud to serve to your family and guests. The succulent, juicy meat, the savory aroma, and the beautiful presentation all come together to create a memorable dining experience.

Advertisement

As you carved the roast and watched the rich, flavorful au jus flow, you couldn't help but feel a sense of accomplishment.

Now that the roast has had a chance to rest and the final touches have been added, it's time to sit back, relax, and enjoy the fruits of your labor. The careful preparation and attention to detail have paid off, and you can bask in the satisfaction of a job well done.

Whether you're serving this masterpiece for a special occasion or a casual family meal, your guests are sure to be impressed and delighted. Savor every bite and cherish the moments spent around the table, creating lasting memories with loved ones.

Frequently Asked Questions

How Long Can Leftover Prime Rib Roast Be Stored?

Leftover prime rib roast can be stored in the refrigerator for 3-4 days or in the freezer for 2-3 months. Be sure to wrap it tightly to prevent drying out and maintain quality.

Can Prime Rib Roast Be Cooked From Frozen?

Yes, you can cook prime rib roast from frozen. Just be sure to increase the cooking time to ensure it's cooked through. This method can help preserve the flavor and tenderness of the meat.

Advertisement

What Is the Ideal Internal Temperature for Medium-Rare Prime Rib?

The ideal internal temperature for a medium-rare prime rib is 130-135°F. This will give you a warm, red center with a nice sear on the outside. Remember to let the roast rest for at least 15 minutes before slicing.

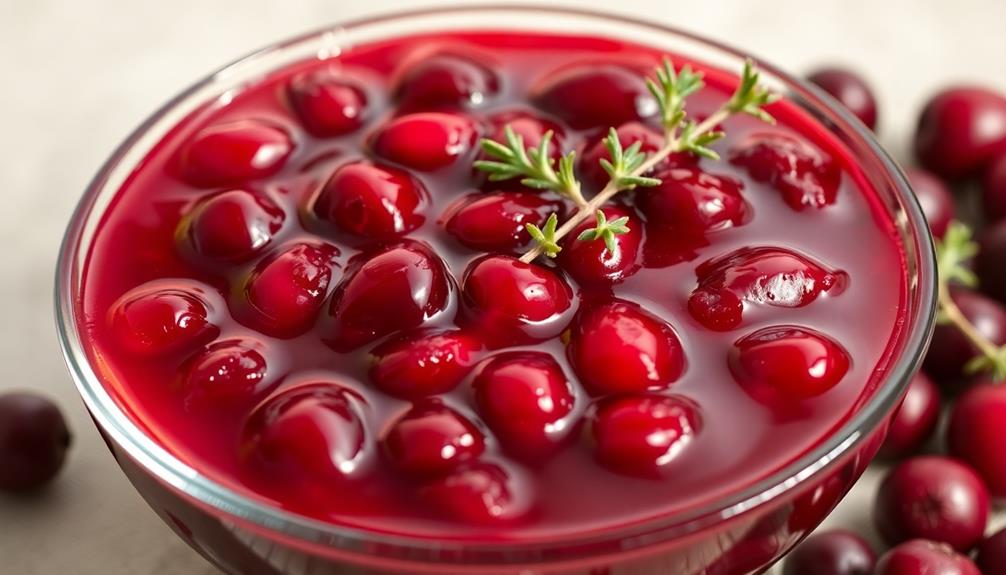
Can the Au Jus Be Made in Advance?

Yes, you can make the au jus in advance. It's a great time-saver and won't sacrifice any flavor. Just store it in the fridge until you're ready to reheat and serve it alongside your prime rib.

How Should Leftover Au Jus Be Reheated?

To reheat the leftover au jus, you can simply place it in a saucepan over medium heat, stirring occasionally until it's warmed through. Avoid boiling it, as that can cause the flavors to become too intense.

Continue Reading
Advertisement

Christmas Recipes

Honey Glazed Ham

Joyfully elevate your holiday meal with a honey-glazed ham that promises a mouthwatering fusion of sweet and savory flavors. Continue reading to unveil the secrets to this irresistible centerpiece.

Published

on

sweet and savory delight

Dive into the mouthwatering world of honey glazed ham! This classic centerpiece adds a touch of sweetness and elegance to any gathering, from festive holidays to cozy family dinners. The salty, smoke-cured ham pairs beautifully with a sticky-sweet honey glaze that caramelizes to perfection in the oven. With minimal hands-on time, you'll be rewarded with a golden exterior and succulent interior that'll have your guests reaching for seconds. Aromatic spices like cinnamon and cloves heighten the flavors, creating an irresistible aroma that fills the room. Keep reading to uncover the simple steps for crafting this showstopping dish.

Key Takeaways

  • Honey glazed ham is a classic dish with origins tracing back to ancient civilizations, known for its sweet, caramelized exterior and juicy, tender interior.
  • The dish is a popular centerpiece for gatherings, especially during holidays like Easter, featuring a combination of salty, smoke-cured ham and a sticky-sweet honey glaze.
  • The recipe requires minimal hands-on time, with slow baking enhancing the flavor and aroma, and essential ingredients including honey, brown sugar, Dijon mustard, and aromatic spices.
  • Proper preparation techniques, such as scoring the ham and basting the glaze, are crucial for achieving the desired appearance and taste.
  • Honey glazed ham pairs well with various side dishes and can be enjoyed as a main course or used in leftover dishes, with tips for storing and reheating the leftovers.

History

The origins of honey glazed ham can be traced back to ancient civilizations, where curing and smoking meats were common practices. Back then, people would coat the meat in a sweet, sticky glaze made from honey, which not only added a delicious flavor but also helped preserve the ham.

As the centuries passed, this technique became a beloved tradition, passed down from generation to generation.

Today, honey glazed ham is a beloved dish enjoyed around the world. The sweet, caramelized exterior gives way to a juicy, tender interior, making it a true delight for the senses.

Whether you're serving it at a holiday feast or enjoying a slice as a snack, the rich, honey-infused flavor is sure to satisfy.

Recipe

A honey-glazed ham is a classic Easter or holiday centerpiece that's both sweet and savory. The combination of the salty, smoke-cured ham and the sticky-sweet honey glaze creates a mouthwatering dish that's sure to impress your guests.

Advertisement

To enhance your gathering, consider incorporating calming scents through aromatherapy benefits to create a soothing atmosphere while you prepare this delightful dish.

Preparing a honey-glazed ham is a straightforward process that requires minimal hands-on time. The key is to allow the ham to bake slowly, basting it regularly with the glaze to create a beautiful caramelized exterior.

Ingredients:

  • 1 (8-10 lb) fully cooked, bone-in ham
  • 1 cup honey
  • 1/4 cup Dijon mustard
  • 2 tablespoons brown sugar
  • 1 teaspoon ground cloves
  • 1/2 teaspoon ground cinnamon

Instructions:

Preheat your oven to 325°F (165°C). Place the ham in a large roasting pan and score the surface in a diamond pattern, cutting through the rind but not too deep into the meat.

In a small bowl, whisk together the honey, Dijon mustard, brown sugar, cloves, and cinnamon to create the glaze. Brush the ham generously with the glaze, making sure to get it into the scored lines.

Advertisement

Bake the ham for 2 to 2 1/2 hours, basting it every 30 minutes with the glaze, until the internal temperature reaches 140°F (60°C).

When cooking a honey-glazed ham, be mindful that the sugary glaze can burn easily. Keep a close eye on the ham during the last 30 minutes of baking and tent it with foil if the glaze starts to darken too quickly.

Allow the ham to rest for 15-20 minutes before slicing and serving, as this will help the juices redistribute throughout the meat.

Cooking Steps

First, preheat your oven to 325°F.

Next, use a sharp knife to score the surface of the ham in a crisscross pattern.

Advertisement

Then, brush the ham all over with the delicious honey glaze mixture.

Pop that ham in the oven and bake it for a full hour, remembering to baste it with the glaze every so often.

Step 1. Preheat Oven to 325°F

preheat oven to 325 f

Preheat your oven to 325°F.

You'll want to make sure your oven is nice and toasty before you start baking that delicious honey-glazed ham. This important first step ensures your ham will cook evenly and develop that mouth-watering caramelized glaze.

As the oven heats up, you can start preparing the rest of your ingredients. Gather your honey, spices, and any other tasty additions you plan to use.

Feel the warmth radiating from the oven as it reaches the perfect temperature. Doesn't that make your mouth water just thinking about the savory aroma that's about to fill your kitchen?

Advertisement

Once your oven is preheated, you'll be ready to slide that ham right in and let the magic happen. Just be careful when you open that oven door – the heat will be intense!

With your oven preheated and your ingredients ready, you're one step closer to enjoying a delectable honey-glazed ham.

Step 2. Score the Ham

score the ham carefully

With your oven preheated and ready to go, it's time to score the ham. Grab a sharp knife and get to work!

Lightly score the surface of the ham in a crosshatch pattern, creating shallow cuts about an inch apart. This helps the flavors of the glaze soak in and allows the ham to cook more evenly. Be careful not to cut too deep, you don't want to damage the meat.

As you work, you'll hear the satisfying sound of the knife slicing through the ham's exterior. It's like music to a chef's ears!

The scoring also creates a beautiful presentation, with the criss-crossing lines adding visual appeal.

Advertisement

Now that your ham is all scored up, it's ready for the sweet and sticky glaze. Get excited, because the best part is yet to come!

Step 3. Brush Ham With Glaze Mixture

glaze ham with brush

Once the ham is scored, it's time to start brushing on the delightful glaze mixture. This sweet and sticky glaze will transform your ham into a mouthwatering masterpiece!

Gather your brush and the prepared glaze. Dip the brush into the glaze, making sure to coat it evenly. Then, start brushing the glaze all over the surface of the ham, covering every nook and cranny.

Don't be shy – really slather it on! As the glaze heats up in the oven, it will create a beautiful, shiny coating that will make your guests' mouths water.

Keep brushing on more glaze every 10-15 minutes during the baking process to build up that delectable layer. The sugary sweetness of the honey combined with the savory saltiness of the ham is an unbeatable flavor combination.

Get ready for compliments galore when you serve up this honey-glazed ham!

Advertisement

Step 4. Bake Ham for 1 Hour

bake ham one hour

After brushing on the delightful glaze, pop the ham into the preheated oven and let it bake for about an hour. Set that oven to 350°F, and you'll soon have a mouthwatering ham that's hot, juicy, and full of flavor.

As the ham bakes, your kitchen will fill with the most amazing aroma – sweet and savory, making your stomach rumble with anticipation. Keep a close eye on it, checking every now and then to make sure the glaze doesn't burn.

About halfway through, you might want to baste the ham with the pan juices to keep it extra moist and shiny. When the timer dings, use oven mitts to carefully remove the ham from the oven. It should have a gorgeous, glistening exterior that's just begging to be sliced into.

Let it rest for 10-15 minutes before carving, so the juices have a chance to settle. Then get ready to enjoy every bite of your perfectly baked, honey-kissed ham!

Step 5. Baste Ham With Glaze Mixture

baste ham with glaze

About halfway through the baking time, take the ham out of the oven and use a basting brush to apply the glaze mixture all over the surface. The sweet, sticky glaze will drip down the sides, creating a mouthwatering caramelized crust.

Mmm, can you just smell that delicious aroma filling the kitchen? Baste the ham every 15 minutes, making sure to get into all the nooks and crannies. As the glaze bubbles and caramelizes, it'll turn a beautiful golden-brown color.

Keep a close eye so it doesn't burn! The sugar in the glaze will give the ham an irresistible sheen and flavor. When the ham is done, the glaze should be thick and glossy.

Advertisement

Let it rest for 10-15 minutes before slicing into it. Your friends and family are going to love this honey-kissed ham! Get ready for lots of "ooh's" and "ahh's" around the dinner table.

Final Thoughts

The honey-glazed ham you've prepared is a true delight that's sure to impress your guests. The glistening, golden exterior and the melt-in-your-mouth texture will have everyone reaching for seconds.

The sweet and savory flavors of the honey glaze perfectly complement the salty, juicy meat, creating a harmonious balance that'll have your taste buds singing.

As you slice into the ham, the aroma of cinnamon and cloves will fill the air, whetting everyone's appetite.

Serve it up with your favorite sides, and watch as your family and friends savor every bite, praising your culinary prowess.

Advertisement

This honey-glazed masterpiece is the perfect centerpiece for any gathering, whether it's a holiday feast or a casual family dinner.

Enjoy the accolades and the satisfied smiles, knowing that you've created a dish that's not only delicious but also a true showstopper.

With this recipe in your arsenal, you're sure to become the talk of the town and the envy of all your friends.

Frequently Asked Questions

How Long Does Honey Glazed Ham Last After Cooking?

You can typically keep cooked ham in the refrigerator for 3-5 days. The exact shelf life depends on factors like the cooking method and storage conditions. Be sure to check for any signs of spoilage before consuming the ham.

Can Honey Glazed Ham Be Frozen for Later Use?

Yes, you can freeze honey glazed ham for later use. Freeze it in an airtight container or wrap it tightly in plastic wrap or aluminum foil. It'll keep in the freezer for 2-3 months.

Advertisement

How to Reheat Honey Glazed Ham Without Drying It Out?

To reheat the ham without drying it out, place it in a baking dish, cover it with foil, and warm it in a 325°F oven until heated through. Baste occasionally with the pan juices to keep it moist.

What Side Dishes Pair Well With Honey Glazed Ham?

When serving a main dish, you'll want complementary side dishes that enhance the flavors. For a honey-glazed ham, consider roasted vegetables, scalloped potatoes, and a fresh salad to create a well-balanced and delicious meal.

Can Honey Glazed Ham Be Made With a Different Type of Ham?

You can absolutely make honey glazed ham using a different type of ham. The key is to choose a ham that will complement the sweet honey glaze, such as a smoked or spiral-cut ham.

Continue Reading

Christmas Recipes

Classic Roast Turkey With Herb Stuffing

Yielding a centerpiece bursting with aromatic herbs and perfectly crisp skin, this classic roast turkey with stuffing is the ultimate Thanksgiving showstopper.

Published

on

herb stuffed roast turkey recipe

Roasting a classic turkey with fragrant herb stuffing is a time-honored Thanksgiving tradition that'll transform your kitchen into a warm, inviting haven. The scent of the seasoned bird will fill the air, ushering in a season of gratitude, abundance, and shared moments around the table. With techniques like proper seasoning, regular basting, and carefully monitoring the internal temperature, you'll achieve a golden-brown skin and tender, juicy meat. This iconic dish serves as the centerpiece of the feast, representing family values and cherished memories – plus, there's more to discover about its fascinating history and preparation.

Key Takeaways

  • Prepare a 12-15 lb turkey by rinsing, patting dry, and rubbing with herb-infused butter under the skin and on the outside.
  • Stuff the turkey cavity with a mixture of fresh herbs, lemon wedges, and onion to enhance the overall flavor.
  • Truss the turkey securely to ensure even cooking of white and dark meat, preventing dry breast meat.
  • Roast the turkey at 325°F, monitoring the internal temperature to reach 165°F in the breast and 180°F in the thigh.
  • Allow the roasted turkey to rest for 20 minutes before slicing, allowing the juices to redistribute for a tender and flavorful result.

History

Although the origins of roast turkey can be traced back to the 16th century, it wasn't until the 19th century that the dish became a staple of Thanksgiving celebrations in the United States.

You see, back in the day, turkeys were quite rare and expensive, making them a luxurious treat reserved for only the wealthiest of families.

But as time passed and turkeys became more widely available, this majestic bird became the centerpiece of the Thanksgiving feast.

Imagine the aroma of a golden-brown turkey straight out of the oven, its crispy skin glistening and the savory scent wafting through the air.

It was a true symbol of abundance and gratitude, bringing families and communities together to celebrate the bountiful harvest.

Advertisement

Today, roast turkey remains a beloved tradition, a delicious way to honor the history and spirit of Thanksgiving.

Whether you stuff it with herbs or serve it plain, this classic dish is sure to delight your taste buds and warm your heart.

Recipe

Roasting a turkey can be a daunting task, but with the right techniques and a bit of preparation, you can create a classic, mouthwatering roast turkey that will be the centerpiece of your holiday feast. This recipe will guide you through the process step-by-step, ensuring a juicy, golden-brown bird that your guests will rave about.

The key to a successful roast turkey is paying attention to the details. From properly seasoning the bird to basting it regularly, every step plays a crucial role in the final outcome. With a little care and attention, you'll be rewarded with a turkey that's crisp on the outside and tender and flavorful on the inside.

Ingredients:

Advertisement
  • 1 (12-15 lb) whole turkey, thawed if frozen
  • 1 cup unsalted butter, softened
  • 2 tablespoons poultry seasoning
  • 1 tablespoon salt
  • 1 teaspoon ground black pepper
  • 1 large onion, quartered
  • 4 sprigs fresh thyme
  • 4 sprigs fresh rosemary
  • 2 cups low-sodium chicken or turkey broth

Instructions:

Preheat your oven to 325°F. Remove the turkey from its packaging and pat it dry with paper towels. In a small bowl, mix together the softened butter, poultry seasoning, salt, and pepper.

Carefully loosen the skin of the turkey and spread half of the seasoned butter underneath, then spread the remaining butter over the outside of the skin. Place the onion, thyme, and rosemary inside the turkey cavity.

Transfer the turkey to a roasting rack set in a large roasting pan and pour the broth into the bottom of the pan.

Roast the turkey for 2.5 to 3 hours, basting it every 30 minutes with the juices from the bottom of the pan, until the internal temperature reaches 165°F in the thickest part of the breast and 180°F in the thigh.

If the skin starts to brown too quickly, cover the turkey loosely with foil. Once the turkey is cooked through, let it rest for 30 minutes before carving and serving.

Advertisement

When it comes to roasting the perfect turkey, patience and attention to detail are key. Basting the bird regularly helps to keep it moist and ensures an even, golden-brown color.

Additionally, using a meat thermometer to monitor the internal temperature is crucial to avoid overcooking. With a little practice, you'll be able to master the art of the classic roast turkey and impress your guests year after year.

Cooking Steps

First, rinse the turkey and pat it dry with paper towels.

Next, rub the turkey all over with a delicious herb butter mixture.

Then, stuff the turkey's cavity with a fragrant herb blend to infuse it with mouthwatering flavors.

Advertisement

Truss the turkey securely to ensure even cooking, and pop it in the oven until the internal temperature reaches the perfect doneness.

Step 1. Rinse Turkey and Pat Dry

rinse turkey pat dry

Before roasting, thoroughly rinse the turkey under cold running water. This important step helps remove any lingering dirt, feathers, or other unwanted bits from the bird's surface.

Gently pat the turkey dry with paper towels or a clean cloth. Make sure to dry both the inside and outside of the turkey to prepare it for seasoning and cooking. Removing excess moisture will help the skin get nice and crispy in the oven.

Once your turkey is all dried off, you're ready to move on to the next step – seasoning the turkey with herbs, spices, and butter or oil. This will infuse the meat with delicious flavors that will have your guests' mouths watering.

With the turkey rinsed and patted dry, you're one step closer to serving up a classic, juicy roast that will be the centerpiece of your Thanksgiving feast. Get ready to baste, bake, and enjoy!

Step 2. Rub Turkey With Herb Butter

rub turkey with butter

To infuse your turkey with incredible flavor, prepare an herb-infused butter to gently rub all over the bird. In a small bowl, combine softened butter, fresh thyme, rosemary, sage, and a pinch of salt and pepper. Stir the mixture until it's well blended.

Carefully loosen the skin of the turkey, being careful not to tear it. Gently slide your fingers between the skin and the meat, creating a pocket. Scoop up heaping spoonfuls of the herb butter and slide them under the skin, spreading it evenly over the breasts and legs.

Advertisement

Any leftover butter can be rubbed directly onto the outside of the skin. This flavorful butter will baste the turkey as it roasts, resulting in a crispy, golden-brown skin and juicy, aromatic meat.

Your family and friends will be amazed by the delicious aroma that fills your kitchen and the incredible flavor of your classic roast turkey.

Step 3. Stuff Turkey Cavity With Herb Mixture

herb stuffed turkey preparation

After rubbing the herb butter over the turkey, it's time to stuff the cavity with an aromatic mixture. Grab a big ol' handful of the fragrant herbs – rosemary, thyme, and sage – and gently stuff them into the turkey's belly.

Don't be afraid to really pack it in there! This'll give your turkey such an incredible flavor.

Next, grab a few lemon wedges and an onion, and toss those in too. The citrus and onion will mingle with the herbs, creating a mouthwatering aroma as your turkey roasts.

Make sure to tuck the wing tips under the bird so they don't burn. Now you're all set – just pop that stuffed turkey into the oven and get ready for the most delicious Thanksgiving feast ever!

Advertisement

Your guests are gonna be amazed by how juicy and flavorful this classic roast turkey turns out.

Step 4. Truss Turkey for Even Cooking

truss turkey for cooking

Truss the turkey to ensure even cooking. First, tuck the wings behind the turkey's back. This helps the breast and legs cook at the same pace.

Next, cross the legs and tie them together with kitchen string. This holds the shape of the turkey as it roasts. Lastly, tie the ends of the legs to the body, making a neat package.

When trussing, be gentle but firm. You don't want to squish the turkey, just hold it neatly in place. The tight trussing helps the turkey cook evenly, so the white and dark meats finish at the same time. No more dry breast meat!

With the turkey all tied up, it's ready for the oven. The herbs and aromatics inside will infuse the meat with amazing flavor as it roasts to golden-brown perfection. Get ready for the most delicious, juicy Thanksgiving turkey ever!

Step 5. Roast Turkey Until Internal Temperature Reaches

roast turkey internal temperature

Preheat your oven to 325°F. Once your oven is nice and toasty, it's time to pop that turkey right in!

You'll want to roast your turkey until the internal temperature reaches a juicy 165°F. Stick a meat thermometer into the thickest part of the breast and the thigh to keep an eye on the temperature.

Advertisement

As the turkey cooks, the delicious aroma will fill your kitchen, making your mouth water. You can baste the turkey every 30 minutes with the pan juices to help keep it moist and flavorful.

When the timer goes off and that thermometer reads 165°F, you'll know your turkey is perfectly cooked.

Now, carefully remove the turkey from the oven and let it rest for about 20 minutes before carving. This allows the juices to redistribute, ensuring every bite is bursting with flavor.

Get ready for a Classic Roast Turkey that's tender, juicy, and oh-so-tasty!

Final Thoughts

With the turkey now resting and the aroma wafting through the kitchen, it's time to reflect on the classic roast turkey.

Advertisement

You've come so far, from selecting the perfect bird to carefully basting and monitoring its progress in the oven.

Now, as you gather your family around the table, you can feel a true sense of accomplishment.

The golden-brown skin, the juicy meat, and the delightful blend of herbs and seasonings – it's a feast fit for a king (or queen)!

As you slice into the turkey, you know that all your hard work and attention to detail have paid off.

The smiles on your loved ones' faces as they savor each bite are the greatest reward.

Advertisement

This classic roast turkey isn't just a meal; it's a cherished tradition, a labor of love that brings everyone together.

Enjoy this moment, for it's one you'll remember for years to come.

Frequently Asked Questions

Can I Use Chicken or Duck Instead of Turkey?

You can absolutely substitute chicken or duck for turkey in this recipe. The cooking method and herbs would work well with either poultry, though you may need to adjust the cooking time. Give it a try and see what you prefer!

How Long Can I Keep the Cooked Turkey Refrigerated?

You can typically keep cooked turkey refrigerated for 3-4 days. Be sure to store it in an airtight container and consume it within this timeframe for optimal freshness and food safety.

Can I Stuff the Turkey a Day in Advance?

You can stuff the turkey a day in advance, but it's best to refrigerate the stuffed turkey and cook it the same day for food safety reasons. Stuffing the turkey ahead of time can increase the risk of bacterial growth.

Advertisement

What Sides Pair Well With Classic Roast Turkey?

When pairing sides with roast turkey, consider classic options like mashed potatoes, cranberry sauce, green bean casserole, and dinner rolls. These complement the savory flavors and create a well-rounded, traditional Thanksgiving meal.

How Do I Carve the Turkey for Serving?

To carve the turkey, first let it rest for 20-30 minutes. Then, use a sharp carving knife to slice the breast meat off the bone in even slices. Carve the legs and thighs, and serve the turkey parts on a platter.

Continue Reading
Advertisement

Affiliate Disclaimer
As an affiliate, we may earn a commission from qualifying purchases. We get commissions for purchases made through links on this website from Amazon and other third parties.

Advertisement

Latest

tender prime rib delight tender prime rib delight
Christmas Recipes2 hours ago

Prime Rib Roast With Au Jus

You'll be swept away by the mouthwatering prime rib roast with its irresistible au jus, a savory and tender masterpiece...

refreshing flavored hydration drink refreshing flavored hydration drink
Graduations/Birthdays5 hours ago

Fruit-Infused Water

Alluring and hydrating, fruit-infused water offers a refreshing twist on plain H2O, providing a delightful blend of flavors and health...

crispy flavorful roasted legumes crispy flavorful roasted legumes
Graduations/Birthdays5 hours ago

Roasted Chickpeas

Nutritious and delightfully crunchy, roasted chickpeas are a must-try snack that'll leave you craving more. Discover the endless possibilities of...

delicate cucumber finger sandwiches delicate cucumber finger sandwiches
Graduations/Birthdays5 hours ago

Cucumber Sandwiches

Timeless and sophisticated, cucumber sandwiches have graced the tables of the British elite for generations, offering a delightful and refreshing...

nutritious vegetable muffins recipe nutritious vegetable muffins recipe
Graduations/Birthdays5 hours ago

Veggie-Packed Muffins

Yield to the temptation of these nutrient-dense veggie-packed muffins, a delightful way to sneak more greens and goodness into your...

layered greek yogurt dessert layered greek yogurt dessert
Graduations/Birthdays5 hours ago

Greek Yogurt Parfaits

Your taste buds will be tantalized by the layers of creamy Greek yogurt, sweet berries, and crunchy granola in these...

crispy oven baked sweet potatoes crispy oven baked sweet potatoes
Graduations/Birthdays5 hours ago

Baked Sweet Potato Chips

Guilt-free and nutritious, baked sweet potato chips trace their roots back over 5,000 years and offer a mouthwatering alternative to...

healthy turkey lettuce wraps healthy turkey lettuce wraps
Graduations/Birthdays5 hours ago

Turkey Lettuce Wraps

Mouth-watering turkey lettuce wraps are a delightful dish that's both healthy and customizable, perfect for...

spicy cauliflower chicken alternative spicy cauliflower chicken alternative
Graduations/Birthdays6 hours ago

Cauliflower Buffalo “Wings”

Savor the spicy, crispy cauliflower "wings" that deliver big on flavor while keeping things guilt-free. Discover this modern take on...

healthy zucchini pizza bites healthy zucchini pizza bites
Graduations/Birthdays6 hours ago

Zucchini Pizza Bites

Nourish your pizza cravings guilt-free with zucchini pizza bites - a low-carb, veggie-packed twist on a classic that will have...

vegetarian sushi roll delights vegetarian sushi roll delights
Graduations/Birthdays6 hours ago

Veggie Sushi Rolls

Achieving sushi heaven with crunchy, colorful veggies in these homemade veggie sushi rolls - a delightful twist on traditional Japanese...

sweet dessert hummus recipe sweet dessert hummus recipe
Graduations/Birthdays6 hours ago

Birthday Cake Batter Hummus

Knowing the secret behind this one-of-a-kind birthday cake-inspired hummus will have your taste buds doing cartwheels.

Advertisement

Trending