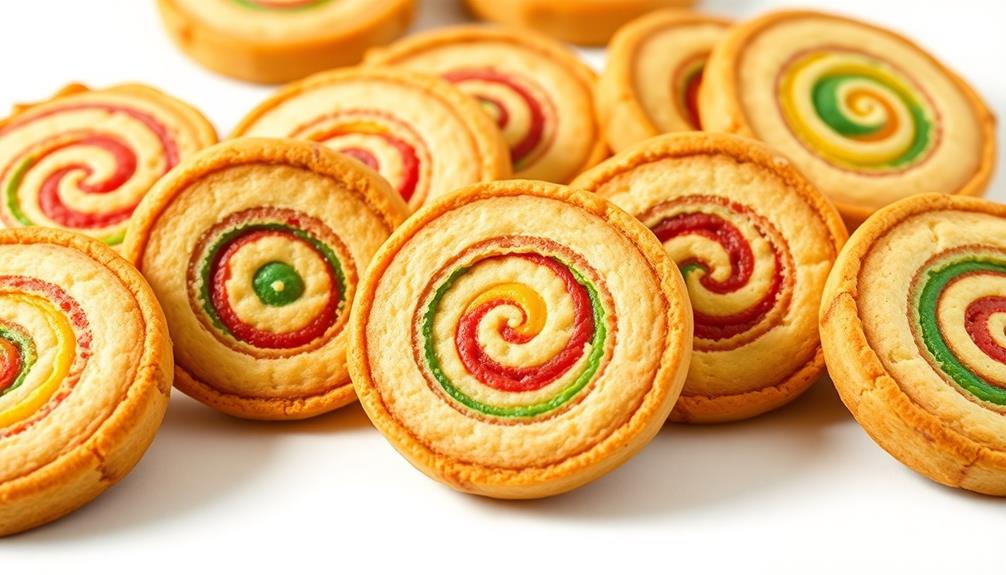

Pinwheel cookies are a true delight! These visually stunning treats originated in the early 1900s when bakers started experimenting with layered dough. Each bite reveals a mesmerizing spiral pattern that tantalizes your taste buds. The key is carefully crafting the dough, chilling it just right, and slicing the log into perfect rounds. Bake them up to a light golden brown, and you'll have melt-in-your-mouth cookies that captivate both kids and adults. Explore endless flavor combinations, like rich chocolate and peanut butter or refreshing raspberry and lemon. Once you master the art of pinwheel cookies, you'll discover an entire world of baking possibilities.
Key Takeaways
- Pinwheel cookies are visually stunning confections with a mesmerizing spiral pattern that reveals new flavors with each bite.
- The baking process involves chilling the dough, rolling it into a log, and slicing it into uniform rounds for consistent baking.
- Proper chilling of the dough is essential for achieving a defined pinwheel shape and enhancing the dough's texture and flavor.
- Pinwheel cookies offer opportunities for creativity and flavor experimentation, with various combinations like chocolate and peanut butter or raspberry and lemon.
- The preparation effort required for pinwheel cookies is rewarded by the cookies' visual appeal and the lasting impression they leave on friends and family.
Top picks for "pinwheel cooky"
Open Amazon search results for this keyword.
As an affiliate, we earn on qualifying purchases.
History
Pinwheel cookies can be traced back to the early 20th century, when bakers began experimenting with layered dough to create visually stunning confections. These whimsical treats quickly became a beloved staple, enchanting both children and adults with their colorful pinwheel design.
Imagine slicing through the tender, buttery layers to unveil a mesmerizing spiral pattern, each bite revealing a new burst of flavor.
The process of making pinwheel cookies is a true labor of love, requiring patience and precision. First, the dough is carefully rolled out and layered with vibrant fillings, such as fruit preserves or chocolate.
Then, the dough is tightly rolled into a log, chilled, and sliced into delicate discs. As the cookies bake, the layers melt together, creating a swirling kaleidoscope of color and texture.
The result is a delightful treat that captures the spirit of childhood wonder and the joy of sharing homemade baked goods with loved ones.
Recipe
Pinwheel cookies are a delightful and visually appealing treat that combine a flaky pastry with a delicious swirled filling. These cookies are perfect for any occasion, from holiday gatherings to afternoon tea.
The key to achieving the perfect pinwheel cookie lies in the careful preparation of the dough and the filling. With a few simple steps, you can create these stunning cookies that will impress your friends and family.
Ingredients:
- 2 cups all-purpose flour
- 1/2 teaspoon salt
- 1 cup unsalted butter, softened
- 1 cup granulated sugar
- 2 eggs
- 1 teaspoon vanilla extract
- 1/2 cup cocoa powder
- 1/4 cup milk
Directions:
In a large bowl, cream together the butter and sugar until light and fluffy. Beat in the eggs one at a time, then stir in the vanilla extract. Gradually add the flour and salt, mixing until a dough forms.
Divide the dough in half and wrap one half in plastic wrap. To the remaining half, add the cocoa powder and milk, mixing until well combined. Chill both doughs for at least 30 minutes.
On a lightly floured surface, roll out the plain dough and the chocolate dough into rectangles of the same size. Place the chocolate dough on top of the plain dough and gently roll them together.
Cut the rolled dough into 1/4-inch slices and place them on a parchment-lined baking sheet. Bake at 375°F for 12-15 minutes, or until the cookies are lightly golden. Allow the cookies to cool on the baking sheet for 5 minutes before transferring them to a wire rack to cool completely.
To achieve the perfect swirl, it's important to work with chilled dough and to roll the doughs together gently. Additionally, be sure to slice the dough into even pieces to ensure consistent baking.
These pinwheel cookies can be stored in an airtight container for up to 1 week, making them a convenient and delicious treat to share with loved ones.
Cooking Steps
Okay, let's get baking! First, you'll need to chill the dough for at least 2 hours – this helps the flavors meld and makes the dough easier to work with.
Next, roll the dough into a nice, even log. Slice the log into 1/4-inch rounds and bake them at 350°F for 10 minutes until they're lightly golden.
Let the cookies cool, then enjoy their swirly, buttery goodness!
Step 1. Chill Dough for at Least 2 Hours
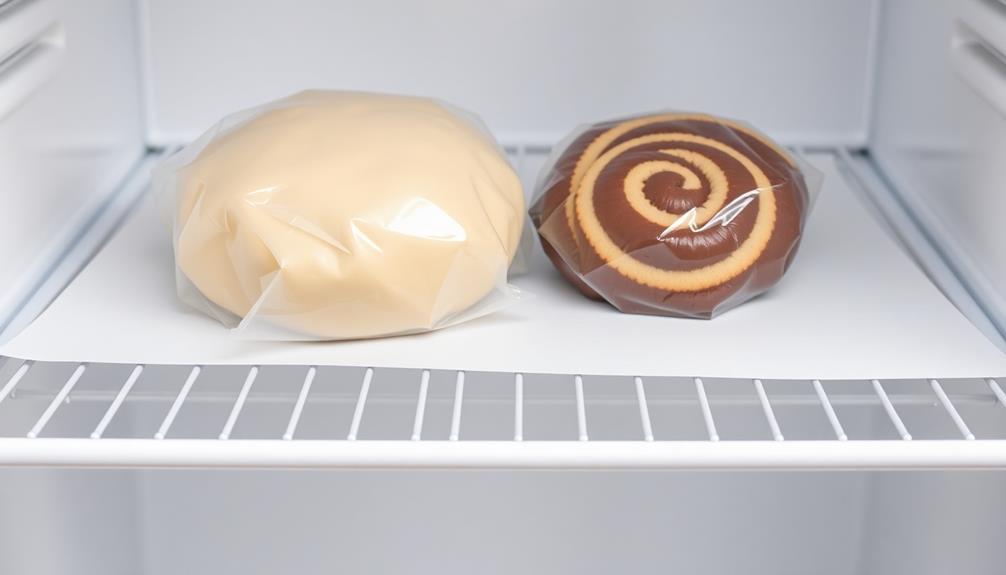
After you've completed the initial mixing and rolling of the dough, it's essential to chill it for at least 2 hours. This resting period allows the gluten in the flour to relax, making the dough easier to work with.
Chilling the dough also helps the flavors meld together, creating that delicious pinwheel taste you crave. Wrap the dough tightly in plastic wrap and pop it in the fridge. As it chills, the butter will firm up, giving the pinwheels their perfect spiral shape.
You'll be tempted to dive in right away, but resist the urge! The patience will pay off when you slice into those beautifully swirled cookies.
Once the 2 hours are up, your dough will be ready to roll. Grab it from the fridge and get ready to create your tasty pinwheel masterpieces. With the dough properly chilled, the cutting and shaping will be a breeze.
Step 2. Roll Dough Into Log

With the dough properly chilled, it's time to roll it into a log. Dust your clean, flat surface with a bit of flour to prevent sticking. Gently place the dough onto the floured surface and use your hands to shape it into a long, even cylinder.
Roll the dough back and forth, applying gentle pressure, until it forms a smooth, even log about 2 inches in diameter.
Now, use a sharp knife to slice the log into 1/4-inch thick rounds. Place each round, cut side up, onto a parchment-lined baking sheet, spacing them about an inch apart.
Once all the slices are arranged, you're ready to pop the tray into the oven and bake your delicious pinwheel cookies! The dough may have softened a bit during rolling, so be sure to return it to the fridge for 15 minutes before slicing if needed.
With a little patience and attention to detail, you'll have beautifully swirled cookies in no time.
Step 3. Slice Log Into 1/4-Inch Rounds
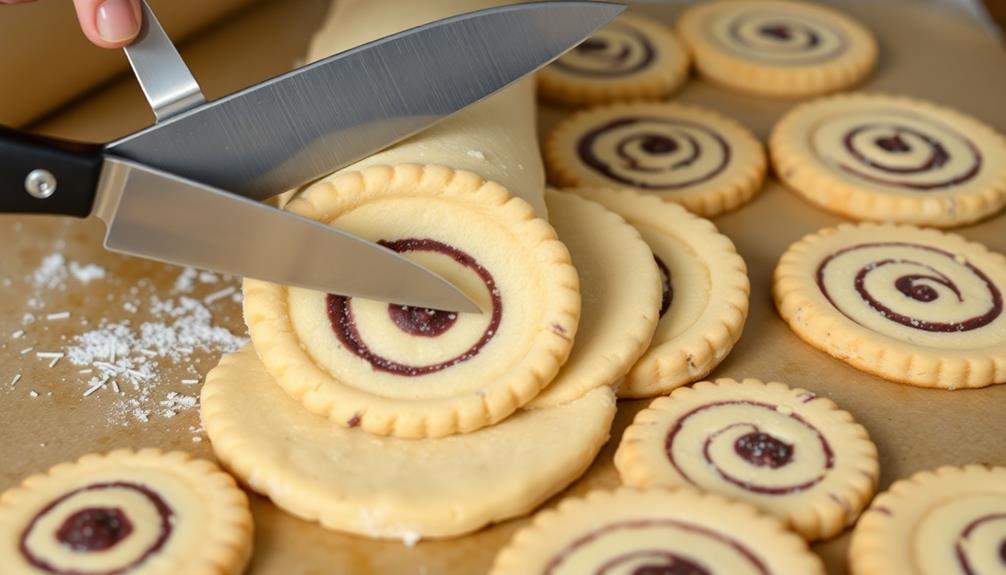
With the dough now properly chilled, use a sharp knife to slice the log into 1/4-inch thick rounds. Go slowly and carefully, applying even pressure as you glide the blade through the dense, colorful dough. Each slice should be uniform in thickness, creating a lovely pattern of swirling pinks, greens, and whites.
As you work, your kitchen will fill with the enticing aroma of vanilla and spices.
Place the circular slices onto your prepared baking sheets, spacing them about an inch apart. This will give the cookies room to expand as they bake without bumping into each other.
Once all the slices are neatly arranged, pop the trays into your preheated oven. In just 8-10 minutes, the pinwheels will emerge, golden-brown and delightfully crisp around the edges.
Allow them to cool for a minute or two before transferring to a wire rack. Now you're ready to enjoy your stunning homemade pinwheel cookies!
Step 4. Bake at 350°F for 10 Minutes

Preheat your oven to 350°F. This is an important first step – you want to make sure your oven is nice and toasty before popping in those delightful pinwheel cookies.
Once your oven is ready, grab your baking sheet and line it with some parchment paper. This will help ensure your cookies don't stick and make for easy cleanup later on.
Now, take those lovely sliced cookies and arrange them on the baking sheet, leaving a bit of space between each one. You don't want them to run into each other and lose their beautiful pinwheel shape!
Pop the tray in the oven and set a timer for 10 minutes. Mmm, can you already smell the buttery, vanilla-y goodness wafting through the air?
Keep an eye on the cookies as they bake. You're looking for them to turn a light golden brown around the edges.
When the timer goes off, carefully remove the tray from the oven. Let the cookies cool for a few minutes before transferring them to a wire rack. Yum, they're ready to enjoy!
Step 5. Allow Cookies to Cool

After removing the pinwheel cookies from the oven, let them cool on the baking sheet for a few minutes.
You don't want to rush this step – it's important to give the cookies time to firm up and set. As they cool, you'll start to see the beautiful spiral design emerge even more. Isn't it wonderful?
Take a deep breath and enjoy the delightful aroma filling the air.
Once the cookies have had a chance to rest, use a spatula to carefully transfer them to a wire rack. This will allow air to circulate all around the cookies, helping them cool evenly.
Be gentle – you don't want to disturb that lovely pinwheel shape!
As the cookies reach room temperature, you'll notice their texture transforming from soft and pillowy to delightfully crisp on the edges.
Now they're ready to be enjoyed or packaged up for sharing.
Mmm, can you almost taste them already?
Final Thoughts
Although pinwheel cookies may require a bit more effort to prepare, the end result is well worth it. The colorful spiral design is sure to delight your friends and family, and the combination of buttery dough and sweet filling is simply divine.
Plus, the process of rolling and slicing the dough is actually quite fun and satisfying. Once you've mastered the technique, you can experiment with different flavor combinations, like chocolate and peanut butter or raspberry and lemon.
Imagine the joy on your loved ones' faces as they take that first bite and discover the delightful surprise inside. These cookies are the perfect treat for any occasion, whether you're hosting a party or just enjoying a quiet afternoon snack. And with our traditional linzer cookies, you can be sure to impress your guests with their classic, sweet taste and beautiful presentation. The combination of buttery, crumbly cookies and the sweet, tangy filling is sure to make them a favorite among friends and family. So go ahead, indulge in these delectable treats and bring some joy to those you love with our delightful surprise inside.
Frequently Asked Questions
How Long Do Pinwheel Cookies Typically Last?
Typically, pinwheel cookies can last for up to a week when stored properly in an airtight container at room temperature. However, their freshness and texture may start to diminish after a few days.
Can I Use a Different Type of Dough?
You can certainly use a different type of dough for your cookies. Many recipes work well, from classic sugar cookie dough to shortbread. Just be mindful of the texture and how it handles rolling and shaping.
How Do I Achieve Perfect Spiral Patterns?
To achieve perfect spiral patterns, roll the dough into a tight, even log. Slice it thinly and arrange the slices with care, ensuring they're evenly spaced. Bake at the right temperature to preserve the spiral's shape.
Can I Freeze the Dough Before Baking?
You can absolutely freeze the dough before baking. Freezing the dough won't affect the final spiral pattern – it'll still bake up beautifully. Just be sure to thaw it completely before slicing and baking.
Are Pinwheel Cookies Suitable for Dietary Restrictions?
Pinwheel cookies can be suitable for certain dietary restrictions. You'll need to consider ingredients like flour, sugar, and butter. Consult recipes designed for dietary needs to ensure the dough and fillings meet your specific requirements.