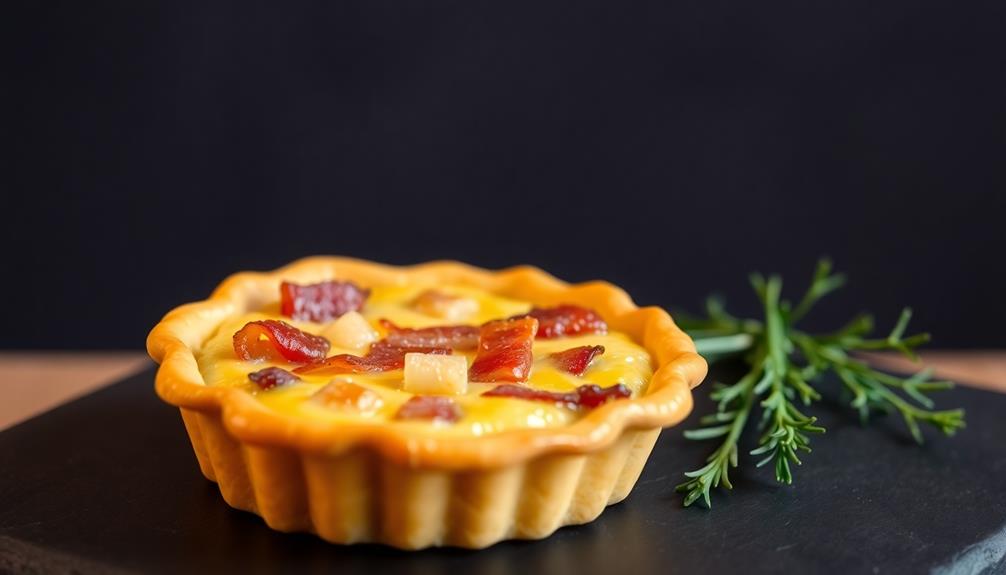
Mini quiches are simply delightful! These bite-sized pastry cups with creamy fillings originated in 16th-century France and have since charmed people across Europe as a popular party snack. You can customize them with all sorts of tasty toppings, from savory bacon and cheese to colorful veggies. They're perfect for any occasion, whether you're hosting a fancy brunch or a casual family gathering. Baking these mini quiches is a breeze, and they're great for grabbing on the go. Their elegant presentation and satisfying flavors will surely impress your guests. Want to learn more about these delectable delights?
Key Takeaways
- Mini quiches originated in 16th century Lorraine, France, and have since become a popular party snack and appetizer enjoyed by diverse demographics.
- The recipe essentials for mini quiches include a pie crust, eggs, heavy cream, shredded cheese, and various toppings like ham, mushrooms, and caramelized onions.
- The cooking steps involve preparing the pie crust shells, filling them with the egg mixture and toppings, baking, and allowing the mini quiches to cool before serving.
- Mini quiches are versatile, suitable for any meal, including snacks, appetizers, and brunch items, and can be served chilled or at room temperature.
- Customizable fillings and easy preparation make mini quiches a go-to for gatherings, providing a delightful texture and flavor combination.
History
According to culinary historians, the origins of mini quiches can be traced back to the 16th century in the Lorraine region of France. Back then, these bite-sized tarts were a favorite among the aristocracy, who loved their rich, creamy fillings and flaky crusts.
Over time, the recipe for mini quiches spread throughout Europe, becoming a popular party snack and tea-time treat.
Today, mini quiches are enjoyed by people of all ages and backgrounds. Whether you prefer classic Lorraine-style with bacon and cheese or get creative with fun fillings like spinach and feta, these delightful little pies are sure to delight your taste buds.
Plus, they're perfect for entertaining, as you can make a big batch and serve them up with ease. So why not give mini quiches a try? You're sure to fall in love with their timeless charm and delectable flavor.
Recipe
Mini Quiches are a delightful and versatile bite-sized treat that can be enjoyed at any time of the day. Whether served as a quick snack, an appetizer, or part of a larger brunch spread, these mini quiches are sure to impress your guests with their delicious flavor and beautiful presentation.
The key to making the perfect mini quiches is to strike the right balance between the flaky, buttery pastry and the creamy, savory filling. With a few simple ingredients and a little bit of preparation, you can create a batch of these mini masterpieces that will have everyone coming back for more.
- Pie crust (homemade or store-bought)
- Eggs
- Heavy cream
- Shredded cheese (such as cheddar or Swiss)
- Toppings of your choice (e.g., diced ham, sautéed mushrooms, caramelized onions)
- Salt and pepper to taste
Preheat your oven to 375°F (190°C). Grease a mini muffin tin and line each cup with a small piece of pie crust, pressing it firmly into the sides and bottom.
In a mixing bowl, whisk together the eggs and heavy cream, then stir in the shredded cheese and your desired toppings. Season with salt and pepper.
Carefully spoon the egg mixture into the prepared pastry cups, filling them almost to the top. Bake for 18-22 minutes, or until the quiches are set and the pastry is golden brown.
Cooking Steps
First, you'll need to prepare the pie crust shells.
Then, fill those shells with your favorite quiche ingredients.
Finally, bake the filled shells until they're golden brown and delicious.
Let them cool a bit, then serve them chilled or at room temperature – whichever you prefer!
Step 1. Prepare Pie Crust Shells
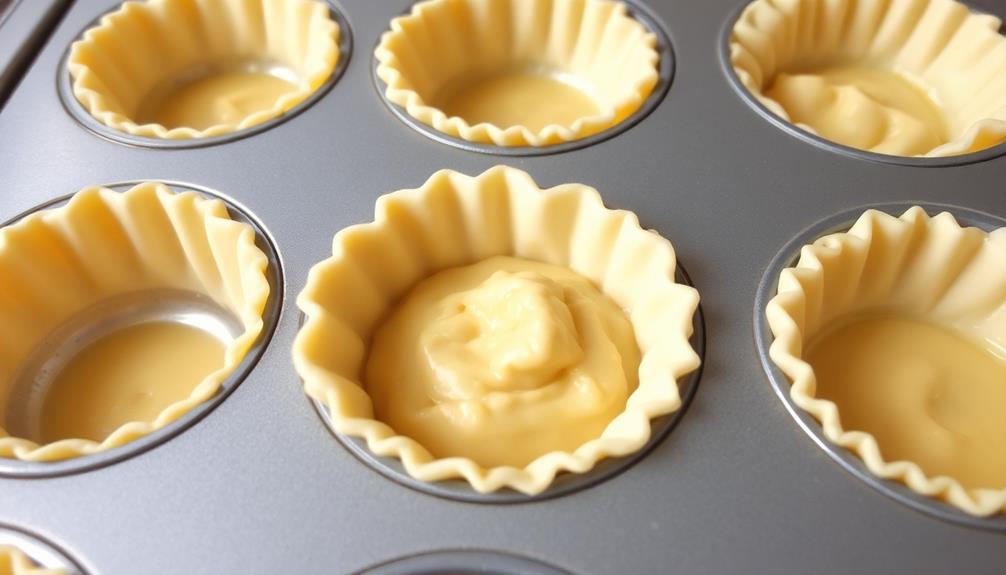
To prepare the pie crust shells, simply roll out the dough and press it into your greased mini muffin tins.
Make sure to press the dough firmly into the sides and bottom of each cup, creating a nice, even layer. This will ensure your mini quiches have a sturdy, flaky crust.
Once the dough is in place, use a fork to prick the bottom of each shell. This will help prevent the crust from bubbling up during baking.
Bake the shells in a preheated oven until they're lightly golden, about 10-12 minutes. Be careful not to overbake them, as you don't want the crust to become too crisp.
After the shells have cooled, you're ready to fill them with your delicious quiche mixture.
Get creative with your fillings, like sautéed vegetables, crumbled bacon, or a blend of cheeses. The possibilities are endless!
Just be sure to not overfill the shells, as you want to leave room for the egg mixture to puff up.
Step 2. Fill the Pie Crust Shells
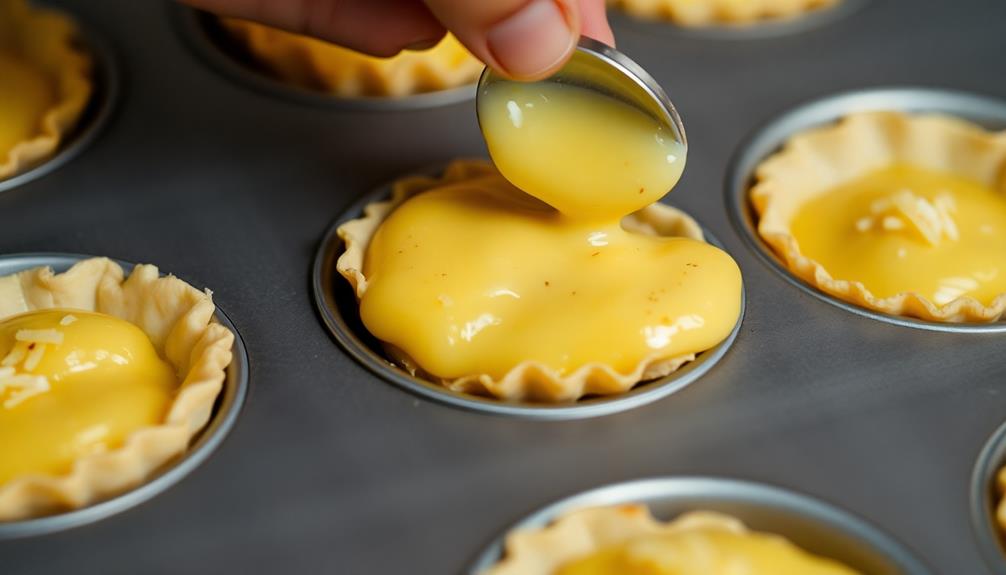
Now that you have the flaky pie crust shells ready, it's time to fill them with your desired quiche fillings. Get ready to create some delicious mini quiches!
First, gather your favorite ingredients like eggs, cheese, vegetables, and meats. Crack the eggs into a bowl, and give them a good whisk until they're nice and smooth.
Then, spoon the egg mixture into the prepared pie crust shells, filling them about three-quarters of the way up. Sprinkle in your choice of tasty toppings – maybe some crumbled bacon, diced onions, or shredded cheddar cheese. Mmm, can you just imagine the savory aroma already?
Pop the mini quiches into the oven and bake until the centers are set and the tops are lightly golden brown.
Once they're fresh out of the oven, let them cool for a few minutes. Then, grab a napkin and enjoy your warm, flavorful mini quiches! Yum! If you’re looking for something sweet to enjoy with your mini quiches, try serving them with a side of traditional shortbread cookies. The buttery, crumbly texture of the shortbread complements the savory flavor of the quiches perfectly. Plus, you can impress your guests with your homemade traditional shortbread recipe!
Step 3. Bake the Filled Shells
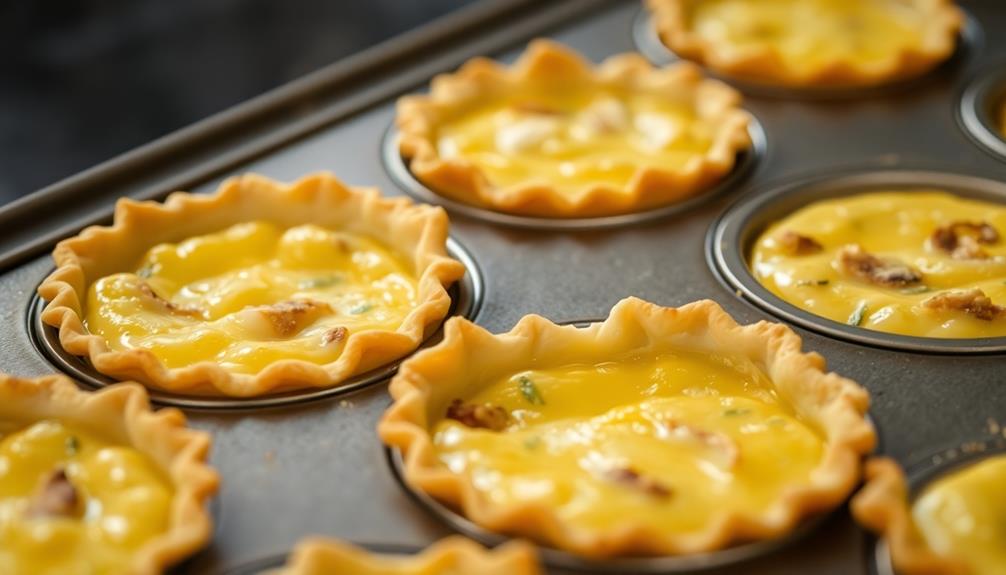
Preheat your oven to 375°F (190°C). Get ready to bake those delicious mini quiche shells!
Carefully place the filled pie crust shells onto a baking sheet. Make sure they're spaced out evenly so they can cook properly. Now, pop them into the preheated oven.
As they bake, your kitchen will start to fill with a mouthwatering aroma. The crust will turn a lovely golden brown, and the fillings will set up perfectly.
Keep an eye on them, but resist the urge to open the oven too often – you don't want to let all that heat escape!
After about 20-25 minutes, your mini quiches will be ready. They should look puffed up and irresistible.
Carefully remove the baking sheet from the oven, and let the quiches cool for a few minutes before serving. Mmm, can you just imagine how delicious they'll taste?
Step 4. Allow to Cool

Once the mini quiches have finished baking, you'll want to let them cool for a few minutes before serving. This gives the fillings a chance to set up and the shells a moment to firm up.
You can leave them right in the muffin tin, or carefully transfer them to a wire rack to cool. The aroma wafting through the kitchen will have your mouth watering, but be patient! Letting them cool a bit ensures the quiches hold their shape when you take that first delightful bite.
As the mini quiches cool, you can start planning how to present them. Will you serve them on a platter, or arrange them on individual plates?
Maybe you'll top them with a sprinkle of herbs or a dollop of sour cream. Once they've had a few minutes to set, they'll be ready to enjoy! The anticipation will only make that first savory taste even more delightful.
Step 5. Serve Chilled or at Room Temperature
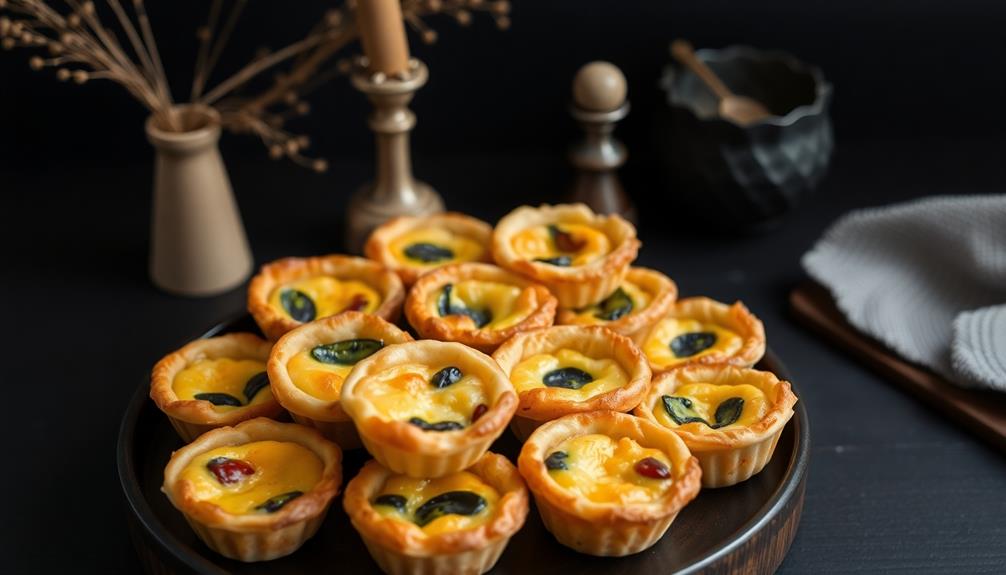
Flexibility in serving temperature allows you to adapt the mini quiches to your event or meal. Serve them chilled for a refreshing appetizer on a hot day or at room temperature for a cozy brunch. The delicate custard and buttery crust will delight your guests either way.
Chilling the quiches brings out their cool, creamy texture, perfect for summer gatherings. The flavors will mingle and meld, creating a burst of savory goodness in every bite.
For a room temperature presentation, the warm, flaky pastry and rich fillings will satisfy hearty appetites. The quiches' portability also makes them ideal for picnics and potlucks.
No matter if you chill or serve at room temp, these mini quiches are sure to impress. Their elegant yet easy-to-eat size allows your guests to mingle and munch.
With endless flavor possibilities, you can satisfy every palate at your next event.
Final Thoughts
Overall, mini quiches make a delightful appetizer or light meal. You can serve them chilled or at room temperature, making them a versatile choice for any gathering.
Their bite-sized portions are perfect for popping into your mouth, and the flaky crust and creamy filling create a satisfying texture. Plus, you can customize the fillings to suit your tastes, from classic cheese and bacon to adventurous combinations like spinach and feta.
Whether you're hosting a party or looking for a quick and easy snack, mini quiches are sure to impress. Their elegant presentation and delicious flavors will have your guests raving.
And the best part? They're easy to make, so you can whip up a batch in no time. So why not give mini quiches a try? They're sure to become a new favorite in your recipe repertoire.
Frequently Asked Questions
Can Mini Quiches Be Frozen for Later Use?
Yes, you can freeze mini quiches for later use. They'll preserve their flavor and texture, and you can simply reheat them when you're ready to enjoy them. Just be sure to wrap them well before freezing.
What Is the Best Way to Reheat Mini Quiches?
To reheat mini quiches, you can either bake them in the oven at 350°F for 10-15 minutes or place them in the microwave for 1-2 minutes, ensuring they're heated through. Adjust the time as needed for your desired temperature.
Can Mini Quiches Be Made With a Pre-Made Pie Crust?
You can definitely use a pre-made pie crust to make mini quiches. The crust will provide a crisp, flaky base for your quiche filling, making them a quick and easy option for a delicious breakfast or snack.
How Long Do Mini Quiches Typically Last in the Refrigerator?
Mini quiches typically last 3-4 days in the refrigerator when stored properly in an airtight container. This allows you to enjoy their delicious flavors for several days after preparing them.
Can Mini Quiches Be Made in Advance for a Party?
Yes, you can make mini quiches in advance for a party. They'll stay fresh in the fridge for 3-4 days, and you can reheat them before serving to retain their flavor and texture.