Connect with us

Polish Comfort Food

Krupnik (Barley Soup)

Grab a spoon and dive into the comforting depths of Krupnik, a beloved Polish barley soup that’s been warming hearts for centuries.

Published

on

hearty barley soup recipe

Krupnik, the beloved Polish barley soup, is a comforting delight that's been warming hearts for centuries. This hearty dish blends tender barley, aromatic veggies, and a rich, flavorful broth – it's the perfect nourishment for cold winter days. Originating from humble peasant roots, Krupnik has evolved with regional variations, but its essence remains the same: a soul-soothing bowl that connects you to Eastern European culinary heritage. Whether served as a main course or a starter, Krupnik's versatility shines through, with endless possibilities for garnishes and accompaniments. Keep reading to uncover the full story behind this beloved soup and learn how to craft it yourself.

Key Takeaways

  • Krupnik is a traditional Polish and Lithuanian barley soup that originated in the 16th century as a hearty dish for nourishment during harsh winters.
  • The core ingredients of Krupnik include pearl barley, broth, and root vegetables like onions and carrots, which provide essential nutrients and flavor.
  • Krupnik is a beloved staple in Eastern European cuisines, often served during family gatherings or festive occasions, and represents comfort food and cultural heritage.
  • Barley in Krupnik is rich in fiber, promoting digestive health, while the vegetables contribute essential vitamins and minerals for overall well-being.
  • The preparation of Krupnik involves soaking the barley overnight, simmering the ingredients to develop flavors, and garnishing with fresh herbs like dill for a complete and satisfying dish.

History

Krupnik's origins can be traced back to the 16th century, when Polish and Lithuanian peasants first crafted this hearty barley soup as a way to nourish themselves during the long, harsh winters.

Over the centuries, the recipe has evolved, with each region and household putting their own spin on the classic dish. Some added carrots or onions for extra flavor, while others incorporated potatoes or beans for heartiness.

Despite these variations, the core ingredients – barley, broth, and a selection of root vegetables – have remained the same.

Krupnik became a beloved staple, passed down through generations and celebrated as a comforting taste of home.

Today, this traditional soup continues to be enjoyed across Eastern Europe, a cherished connection to the past and a testament to the enduring power of simple, wholesome ingredients.

Advertisement

Whether served piping hot on a chilly day or savored as a nostalgic reminder of childhood, Krupnik's history is as rich and fulfilling as the soup itself.

Recipe

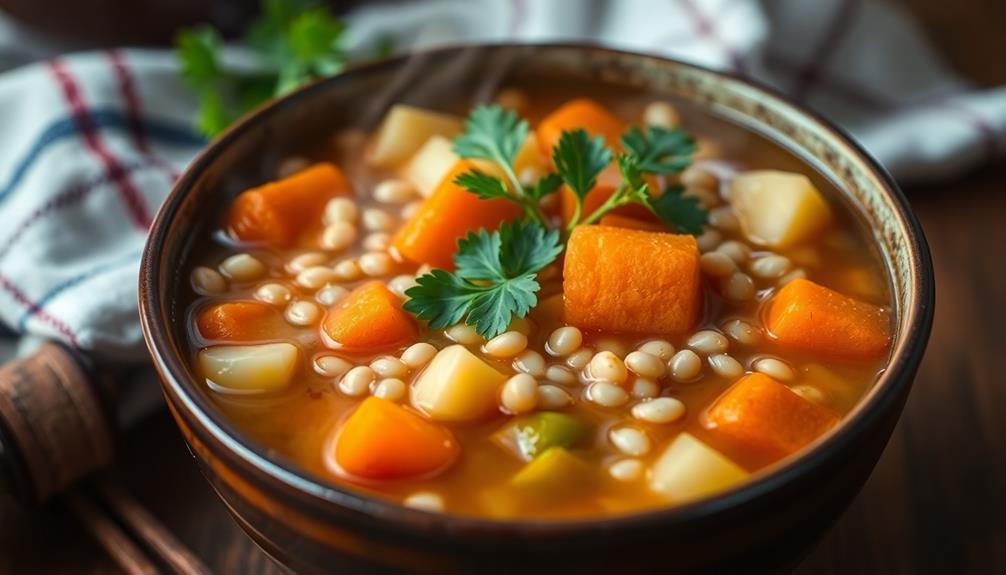
Krupnik, a traditional Polish barley soup, is a comforting and nutritious dish that has been enjoyed for generations. This versatile soup can be a hearty meal on its own or a flavorful accompaniment to a variety of dishes.

The key to a delicious Krupnik lies in the careful selection and preparation of the ingredients. The soup's rich, savory broth is the foundation, while the tender barley and an array of aromatic vegetables create a harmonious blend of flavors and textures.

Ingredients:

  • 1 cup pearl barley
  • 8 cups beef or chicken broth
  • 1 onion, diced
  • 2 carrots, peeled and sliced
  • 2 celery stalks, sliced
  • 2 potatoes, peeled and cubed
  • 2 bay leaves
  • 1 teaspoon dried marjoram
  • Salt and pepper to taste

Instructions:

In a large pot, bring the broth to a boil over high heat. Add the barley, reduce the heat to medium-low, and simmer for 30-40 minutes, or until the barley is tender.

Advertisement

Add the onion, carrots, celery, and potatoes, and continue simmering for an additional 20-25 minutes, or until the vegetables are tender. Stir in the bay leaves and dried marjoram, and season with salt and pepper to taste.

Tips:

For a heartier soup, consider adding diced ham, sausage, or shredded chicken to the mix.

Garnish the Krupnik with a sprinkle of fresh parsley or dill for an extra touch of freshness. The longer the soup simmers, the more the flavors will meld, so feel free to let it simmer for up to an hour to achieve your desired level of richness and depth.

Cooking Steps

First, you'll want to soak the barley overnight, then drain and rinse it thoroughly.

Advertisement

Next, add the carrots and onions and let the mixture simmer until the barley is tender.

Step 1. Soak Barley Overnight

soak barley overnight preparation

Soaking the barley overnight is a crucial first step in preparing the traditional Polish soup, Krupnik. This simple yet essential technique allows the barley to soften and plump up, creating a heartier, more satisfying texture in the final dish.

Start by placing the barley in a large bowl and covering it with at least 2 inches of cool water. Cover the bowl and let it sit on the counter for 8-12 hours, or overnight. You'll know the barley is ready when it has absorbed most of the water and expanded in size.

Drain the barley in a colander, then give it a quick rinse under cool running water. This step removes any excess starch, ensuring the grains don't become too sticky or gloppy.

With the barley prepped and ready, you're one step closer to enjoying the rich, comforting flavors of traditional Krupnik soup.

Step 2. Drain and Rinse Soaked Barley

drain and rinse barley

After letting the barley soak overnight, you'll want to drain and rinse it before proceeding with the recipe.

Grab a colander and place it in the sink. Carefully pour the soaked barley into the colander, allowing the water to drain out. Once drained, give the barley a gentle rinse under cool running water. This helps remove any residual starch or impurities from the grains.

Advertisement

With the barley now clean and ready to go, you can move on to the next step.

Give the barley a few shakes to remove excess water, then transfer it to a large pot. It's time to start building the flavorful broth that will make this krupnik (barley soup) so delicious.

Add your aromatic vegetables, herbs, and seasonings, and let the soup simmer away, filling your kitchen with mouthwatering aromas. Before you know it, you'll have a hearty, nourishing soup ready to enjoy.

Step 3. Add Carrots and Onions

add carrots and onions

To begin, add the diced carrots and onions to the pot with the soaked barley. The colorful carrots and aromatic onions will add delightful flavors and textures to your hearty soup.

As the vegetables sizzle in the pot, their natural sugars will caramelize, creating a rich, complex base for the broth.

Stir the carrots and onions occasionally, allowing them to soften and blend seamlessly with the barley. The carrots will lend a subtle sweetness, while the onions will provide a savory depth.

Advertisement

Together, they'll enhance the overall heartiness of the soup, making each spoonful even more satisfying.

Remember to adjust the heat as needed, ensuring the vegetables cook through without burning. The perfect balance of tender-crisp carrots and melt-in-your-mouth onions will elevate the krupnik, transforming it into a truly comforting and nourishing meal.

Step 4. Simmer Until Barley Is Tender

simmer barley until tender

Once the carrots and onions have had a chance to cook, it's time to let the barley simmer until it's tender.

You'll want to turn the heat down to low and let the soup gently bubble away, stirring occasionally. The barley will slowly break down, releasing its starch and creating a wonderfully creamy texture in the broth.

As it simmers, you'll notice the grains softening and expanding, transforming the soup into a heartwarming and satisfying meal. Be patient – it may take 30 to 45 minutes for the barley to become fully tender.

Breathe in the comforting aroma as the soup simmers, and get ready to enjoy a bowl of delicious, nourishing krupnik.

Advertisement

Step 5. Garnish With Fresh Dill

garnish using fresh dill

Just before serving, chop up some fresh dill. The vibrant green leaves will add a burst of flavor and aroma to your homemade krupnik.

Gently tear or snip the dill fronds with your fingers, releasing their herbal scent. Sprinkle the fragrant dill over the top of your steaming bowl of barley soup, letting the delicate fronds float on the surface.

The dill's slight licorice note perfectly complements the earthy, nutty taste of the barley. Its delicate fronds also add a beautiful visual touch, making your krupnik look as appetizing as it tastes.

Feel free to use as much or as little dill as you prefer – a little goes a long way in enhancing the overall flavor.

Garnishing with fresh dill is the final step in bringing this comforting, homemade soup together. Enjoy the bright, herbaceous notes in every spoonful.

Final Thoughts

As you've now learned, creating a hearty and flavorful Krupnik, or barley soup, is a rewarding culinary endeavor. The satisfying blend of tender barley, savory broth, and aromatic herbs makes for a comforting and nourishing meal.

Advertisement

While the recipe may seem simple, the attention to detail in each step is what elevates this traditional dish to new heights.

Don't be afraid to experiment with different garnishes or accompaniments to suit your personal taste. A sprinkle of fresh dill, a dollop of sour cream, or a side of crusty bread can all enhance the flavors.

The beauty of Krupnik lies in its versatility – it can be enjoyed as a hearty main course or as a soothing starter.

As you continue to hone your soup-making skills, remember that the process is just as important as the final product. Embrace the therapeutic nature of chopping, simmering, and stirring, and let the aromas fill your kitchen.

Krupnik isn't just a dish, but a culinary experience to be savored and shared.

Advertisement

Frequently Asked Questions

What Is the Origin of the Name "Krupnik"?

You know, the name "krupnik" has an interesting origin!

It actually comes from the Polish word "krup," which refers to a type of coarsely ground grain or groats.

So, the name "krupnik" essentially means "soup made with krup."

Isn't that neat? It's a perfect way to describe this hearty, traditional barley soup.

I bet just thinking about the savory flavors and comforting warmth of krupnik makes your mouth water!

Advertisement

Can Krupnik Be Made With Other Grains Besides Barley?

You bet, krupnik can absolutely be made with other grains besides just barley!

In fact, the name "krupnik" actually refers to the thick, hearty soup itself, not the specific ingredients.

So feel free to experiment and try making krupnik with different whole grains like buckwheat, millet, or even oats.

The end result will have a slightly different flavor, but it'll still be that warm, comforting soup you know and love.

Get creative in the kitchen and see what delicious variations you can come up with!

Advertisement

How Long Does Krupnik Typically Take to Prepare?

Typically, preparing a hearty krupnik soup takes around 1-2 hours. The key is simmering the grains until they become tender and the flavors meld.

You'll start by sautéing aromatic veggies like onions and carrots, then adding your choice of grains – maybe barley, millet, or even buckwheat.

Patience is key as the soup slowly develops its rich, comforting taste. The end result is a warming, nourishing bowl that's well worth the wait!

Is Krupnik a Traditional Dish in Other Countries?

You might be surprised to learn that krupnik, the hearty barley soup, isn't just a traditional dish in Poland.

In fact, similar versions of this comforting soup can be found across Eastern Europe and the Balkans, each with its own unique twist.

Advertisement

From Lithuania's kruopa to Ukraine's hrechana, these warming broths often feature grains, vegetables, and sometimes meat, reflecting the rich culinary heritage of the region.

Can Krupnik Be Frozen for Later Use?

Absolutely! Krupnik, or any hearty soup, can be easily frozen for later enjoyment.

Just let it cool completely, then pour into airtight containers or freezer bags.

When you're ready to savor it again, simply thaw in the fridge overnight and reheat on the stovetop.

The flavors will stay fresh, and you'll have a delicious, homemade meal ready in no time.

Advertisement

Freezing is a fantastic way to extend the life of your favorite soups and stews, so you can enjoy them anytime.

Continue Reading
Advertisement

Polish Comfort Food

Kutia (Wheat Berry Pudding)

Once a ceremonial dish, Kutia’s comforting flavors and time-honored recipes offer a delightful culinary journey through Eastern European cuisine.

Published

on

wheat berry pudding delight

Kutia, a traditional Eastern European wheat berry pudding, connects generations through its time-honored recipes and wholesome ingredients. This ceremonial dish was once reserved for festive occasions, but now you can savor its comforting flavors anytime. Imagine the satisfying chew of plump wheat berries, the natural sweetness of honey, and the crunch of walnuts – it's a symphony of textures and tastes. Whether served warm or at room temperature, Kutia offers a delightful culinary experience that invites you to explore the rich tapestry of Eastern European cuisine. Keep reading to uncover the captivating history and step-by-step instructions for creating this beloved treat.

Key Takeaways

  • Kutia is a traditional sweet dish with roots in Eastern European culture, often served during holiday seasons and family gatherings.
  • The dish is made from wheat berries or other grains, sweetened with honey and enhanced with raisins, walnuts, and spices.
  • The cooking process involves soaking, boiling, and sweetening the grains, resulting in a unique blend of textures and flavors.
  • Kutia serves as a reminder to savor cultural roots and traditions, reflecting the rich diversity of culinary practices worldwide.
  • The dish promotes the importance of preserving culinary heritage and fosters community bonds through the sharing of recipes and stories across generations.

History

Kutia, a traditional sweet dish, has its roots deeply entrenched in the cultural tapestry of Eastern European countries. This ancient recipe, passed down through generations, is a testament to the region's rich culinary heritage.

Originating as a ceremonial dish, kutia was often served during important religious and cultural events, such as Christmas Eve and weddings. The dish's very name, derived from the Slavic word for "pot," hints at its long-standing tradition.

Over time, the recipe has evolved, with each family and region putting their own unique spin on the classic. Some versions feature a blend of cooked wheat berries, honey, and poppy seeds, while others incorporate nuts, dried fruits, or even spices.

Regardless of the specific ingredients, the essence of kutia remains the same – a comforting, sweet treat that brings people together and celebrates the flavors of the past.

Today, this cherished dish continues to hold a special place in the hearts and homes of those who embrace their Eastern European heritage.

Advertisement

Recipe

Kutia is a traditional Eastern European grain dish that's often served as a dessert or a sweet side dish. It's made from wheat or other grains, such as barley or millet, that are soaked, boiled, and then sweetened with honey or other sweet ingredients.

The origins of kutia can be traced back to ancient times, where it was a staple food for many cultures in the region. Over the centuries, the recipe has evolved, with different regions and households developing their own unique variations of the dish.

Ingredients:

  • 1 cup of wheat berries (or other grains, such as barley or millet)
  • 4 cups of water
  • 1/2 cup of honey
  • 1/2 cup of raisins
  • 1/4 cup of chopped walnuts
  • 1 teaspoon of ground cinnamon
  • 1/2 teaspoon of ground cloves

Cooking Instructions:

Soak the wheat berries (or other grains) in water for at least 6 hours, or overnight. Drain the grains and place them in a large pot with the 4 cups of fresh water. Bring the mixture to a boil, then reduce the heat and simmer for 1-2 hours, or until the grains are tender and the liquid has been absorbed.

Remove the pot from the heat and stir in the honey, raisins, walnuts, cinnamon, and cloves until well combined.

Advertisement

Tips:

Kutia can be served warm or chilled, depending on personal preference. If you prefer a thicker consistency, you can simmer the mixture for a bit longer. You can also experiment with different types of dried fruits, nuts, and spices to customize the flavor to your liking.

Cooking Steps

First, you'll want to soak the wheat berries overnight to soften them up.

Drain and rinse the berries, then cook them until they're nice and tender.

Finally, stir in some honey and poppy seeds to add a touch of sweetness and crunch.

Advertisement

Serve the kutia warm or at room temperature – it's sure to be a hit!

Step 1. Soak Wheat Berries Overnight

soak wheat berries overnight

To prepare the wheat berries, you'll want to soak them overnight. This simple step helps soften the grains, ensuring they'll cook up tender and plump.

Start by rinsing the wheat berries under cool running water. Then, transfer them to a large bowl and cover with at least 3 inches of water. Let the berries soak for 8-12 hours, or even overnight. This long soak time is key, as it allows the wheat to fully hydrate and become more pliable.

Once the soaking is complete, drain the wheat berries in a colander. They should have expanded in size and feel pleasantly soft to the touch.

At this point, they're ready to be cooked into the signature Kutia dish. The soaked wheat will simmer on the stovetop until tender, creating the perfect base for the rich, sweet flavors to come.

With this simple overnight prep, you're one step closer to enjoying the comforting, traditional taste of Kutia.

Advertisement

Step 2. Drain and Rinse Wheat Berries

drain and rinse wheat

After soaking the wheat berries overnight, the next step is to drain and rinse them.

Grab a colander and place it in the sink. Carefully pour the soaked wheat berries into the colander, allowing the water to drain out.

Once drained, turn on the faucet and gently rinse the wheat berries under cool, running water. Swish them around with your hand to remove any remaining debris or impurities.

The rinsing process helps to clean the wheat berries, preparing them for the next steps of the recipe.

You'll want to ensure they're free of any dirt, dust, or other unwanted materials.

After rinsing, give the colander a gentle shake to remove excess water.

Advertisement

The clean, rinsed wheat berries are now ready to be used in the Kutia recipe.

This simple yet essential step sets you up for success as you continue crafting your delicious wheat berry pudding.

Step 3. Cook Wheat Berries

prepare and cook berries

Next, add the rinsed wheat berries to a large pot and cover them with fresh, cold water.

Bring the pot to a boil over high heat, then reduce the heat to medium-low and let the wheat simmer for about 45 minutes to an hour, until they're tender but still have a slight bite.

You'll know they're ready when you can easily squish one between your fingers.

Drain the cooked wheat berries in a colander, then return them to the pot.

Advertisement

Add in your desired sweeteners, like honey or brown sugar, along with a pinch of salt to enhance the flavors.

Stir everything together until the sweetener is fully dissolved.

If the mixture seems a bit dry, you can add a splash of milk or cream to reach your desired consistency.

Now your wheat berries are ready to be transformed into the classic Ukrainian dessert, kutia!

Step 4. Add Honey and Poppy Seeds

add honey poppy seeds

With your cooked and seasoned wheat berries ready, it's time to add the signature ingredients that transform them into traditional Ukrainian kutia.

Drizzle in a generous amount of golden honey, its sweet, floral notes complementing the nutty, earthy wheat.

Advertisement

Sprinkle in a handful of poppy seeds, their tiny black specks adding a delightful crunch and subtle, nutty flavor.

Stir the honey and poppy seeds into the wheat berries until everything is evenly distributed.

The honey will coat each grain, lending a glistening sheen, while the poppy seeds weave throughout, creating a visually stunning contrast.

Take a deep breath and savor the aroma – the fragrance of the honey and the warm, toasted notes of the poppy seeds intertwine, transporting you to a cozy Ukrainian kitchen.

With the signature ingredients incorporated, your kutia is now ready to serve.

Advertisement

Scoop the sweet, aromatic mixture into bowls and prepare to indulge in a taste of traditional Ukrainian hospitality.

Step 5. Serve Warm or at Room Temperature

serve warm or room temperature

You can serve the kutia warm or at room temperature, whichever you prefer. Warm kutia is a cozy, comforting treat, with the wheat berries and poppy seeds gently heated through. The honey and spices will release their aromas, filling the air with a welcoming scent.

If you enjoy a more refreshing dessert, letting the kutia come to room temperature allows the flavors to mingle and the texture to become more cohesive.

Regardless of temperature, the kutia should be smooth, creamy, and slightly thick. The wheat berries should be soft, yet retain a pleasantly chewy bite. Sprinkle some additional poppy seeds on top for a beautiful presentation. You can also drizzle a bit of extra honey over the top, if desired.

Serve the kutia in small bowls or cups, as it's quite rich and filling. Savor each spoonful, letting the comforting flavors and textures transport you. Whether warm or at room temperature, kutia is a delightful traditional delight.

Final Thoughts

The centuries-old tradition of Kutia serves as a cherished reminder of the enduring significance of cultural heritage. As you've now discovered, this wheat berry pudding isn't merely a dish – it's a time-honored practice that connects generations and celebrates the resilience of communities.

Advertisement

Whether enjoyed during the holiday season or as a comforting treat any time of year, Kutia invites you to slow down, savor the flavors, and reflect on the rich tapestry of your own cultural roots.

As you continue your culinary journey, remember that Kutia is more than just a recipe – it's a gateway to understanding the traditions and values that shape the lives of people around the world.

By embracing this delightful dessert, you honor the hard work, ingenuity, and resilience of those who've kept this tradition alive.

Frequently Asked Questions

How Long Can Kutia Be Stored After Preparation?

You can typically store freshly made kutia in the fridge for 3-5 days after preparing it.

Just make sure to keep it in an airtight container to lock in the flavors and prevent it from drying out.

Advertisement

The cooked wheat berries and creamy texture will hold up well during this time, so you can enjoy your tasty pudding for several days.

Just be sure to give it a good stir before serving to recombine any separated ingredients.

Can Kutia Be Frozen for Later Use?

Absolutely, you can freeze kutia for later enjoyment!

Once the wheat berry pudding has cooled completely, simply portion it out into airtight containers or freezer-safe bags. It'll keep in the freezer for 2-3 months.

When you're ready to savor it again, just thaw it in the fridge overnight. The texture and flavor will stay fresh, so you can relish that delightful, comforting dessert anytime.

Advertisement

Freezing is a fantastic way to extend the life of your homemade kutia and enjoy it for weeks or months to come.

What Are Some Common Variations of Kutia?

There are lots of fun and tasty variations of kutia that you can try!

Some folks like to add dried fruits like raisins or cranberries, while others enjoy a sprinkle of cinnamon or nutmeg on top.

You can even make it with different grains like barley or buckwheat for a new twist.

The best part is you can get creative and make it your own.

Advertisement

What kind of flavors would you want to try in your kutia?

Is Kutia Suitable for Those With Dietary Restrictions?

Absolutely! Kutia can be a great option for those with dietary restrictions.

Depending on the ingredients used, it can be gluten-free, vegan, or dairy-free. You can make it with different grains like barley, millet, or quinoa instead of wheat.

And you can get creative with toppings like dried fruit, nuts, or spices to suit your tastes and needs.

Just be sure to check the recipe and adjust as needed to accommodate your dietary preferences.

Advertisement

Give it a try – you might discover a new favorite!

How Does the Taste of Kutia Compare to Other Traditional Desserts?

Compared to other traditional desserts, kutia has a unique and delightful taste.

It's a bit like a warm, creamy rice pudding, but with a lovely nutty flavor from the wheat berries. The texture is pleasantly chewy, almost like tapioca pearls.

You'll also notice subtle sweetness from the honey or sugar. It's a comforting and satisfying treat that's different from your typical cakes or cookies.

If you're looking to try something new, kutia is definitely worth a taste!

Advertisement
Continue Reading

Polish Comfort Food

Vegetable Salad

Discover the secret to crafting the ultimate vegetable salad that will leave you feeling satisfied and craving more. Keep reading to uncover the vibrant and refreshing details.

Published

on

fresh mixed vegetable salad

Vegetable salad is the perfect dish to brighten up your day! You'll love the vibrant colors, refreshing crunch, and harmonious flavors that come together in each bite. Start with a base of crisp greens, then add juicy tomatoes, crisp cucumbers, and crunchy bell peppers. Toss it all in a tangy-sweet dressing, and you've got a nourishing meal that'll leave you feeling satisfied. The best part? You can get creative and experiment with all sorts of tasty ingredients to find your new favorite combo. Intrigued? Keep reading to uncover even more tips for crafting the ultimate vegetable salad.

Key Takeaways

  • Vegetable salad is a refreshing, nutritious dish that can be served as a light meal, side, or starter, featuring a variety of crisp, seasonal produce.
  • The base of a vegetable salad typically includes mixed greens, cucumber, tomatoes, bell peppers, and onions, with options to add feta cheese and sunflower seeds.
  • A simple vinaigrette dressing, made with olive oil, balsamic vinegar, Dijon mustard, honey, and garlic, harmonizes the flavors and textures of the salad.
  • Vegetable salads offer versatility, as they can be customized with various seasonal ingredients, classic flavor combinations, and creative twists.
  • Proper presentation, with vibrant colors and diverse textures, enhances the visual appeal of vegetable salads, encouraging their consumption.

History

Salads have been a part of human cuisine for centuries, with evidence of vegetable-based dishes dating back to ancient civilizations. The earliest known salads were simple affairs, featuring locally-sourced greens, herbs, and whatever other fresh produce was available.

As trade routes expanded, salads evolved to incorporate a wider variety of ingredients, from exotic fruits to fragrant spices. This evolution is a testament to the power of imagination, which allows for profound personal change and creativity in culinary practices enhances creativity.

In medieval Europe, salads were often served as a course before the main meal, with nobles and royalty enjoying elaborately-presented dishes.

By the 18th century, the concept of the "mixed salad" gained popularity, allowing home cooks to experiment with different combinations of greens, vegetables, and dressings. This paved the way for the vibrant, diverse salads we know and love today.

Salads have long been a healthy and delicious way to enjoy the bounty of the seasons. Whether you prefer a simple green salad or a more complex creation, the history of this versatile dish is full of culinary innovation and cultural traditions.

Advertisement

Recipe

Vegetable Salad is a refreshing and nutritious dish that can be enjoyed as a light meal or a side. The combination of crisp vegetables and a tangy dressing makes it a versatile option for any occasion.

Incorporating seasonal produce can elevate your salad's flavor profile and nutritional value, similar to the benefits of a fermented vegetable plate. To prepare this delightful salad, you'll need to gather a few simple ingredients and follow a straightforward cooking method. The result is a vibrant and flavorful dish that's sure to impress your family and friends.

Ingredients:

  • 2 cups mixed greens (such as spinach, arugula, and kale)
  • 1 cup sliced cucumber
  • 1 cup cherry tomatoes, halved
  • 1/2 cup diced red bell pepper
  • 1/4 cup thinly sliced red onion
  • 2 tablespoons crumbled feta cheese
  • 2 tablespoons toasted sunflower seeds

Dressing:

  • 2 tablespoons olive oil
  • 1 tablespoon balsamic vinegar
  • 1 teaspoon Dijon mustard
  • 1 teaspoon honey
  • 1 clove garlic, minced
  • Salt and pepper to taste

Instructions:

In a large salad bowl, combine the mixed greens, cucumber, cherry tomatoes, red bell pepper, and red onion.

In a separate small bowl, whisk together the olive oil, balsamic vinegar, Dijon mustard, honey, and minced garlic. Season the dressing with salt and pepper to taste.

Advertisement

Pour the dressing over the salad and toss gently to coat. Sprinkle the crumbled feta cheese and toasted sunflower seeds on top.

Tips:

For best results, let the salad sit for a few minutes after tossing to allow the flavors to meld.

You can also experiment with different vegetables, such as shredded carrots, chopped avocado, or roasted beets, to customize the salad to your liking.

Additionally, you can add cooked grains, such as quinoa or bulgur, to make it a more substantial meal.

Advertisement

Cooking Steps

First, chop the vegetables into bite-sized pieces to create a visually appealing salad.

Next, gently mix the prepared veggies in a large bowl.

Step 1. Chop Vegetables Into Small Pieces

chop vegetables into pieces

Next, chop the vegetables into small, even pieces. This step is crucial for creating a harmonious salad. Use a sharp knife and cutting board to dice the carrots, celery, and bell peppers into bite-sized cubes. Aim for pieces that are approximately 1/2 inch in size – this will ensure a consistent texture throughout the salad.

Slice the cucumbers into thin rounds, then cut each round in half. Mince the onion into fine pieces, releasing its aromatic flavors. Finally, roughly chop the parsley, dill, and any other herbs you're using.

The key is to cut everything to a similar size, so each forkful contains a delightful mix of textures and tastes. Take your time and focus on uniform, neat cuts. Properly chopping the vegetables is the foundation for a delicious and visually appealing vegetable salad.

Step 2. Mix Vegetables

combine assorted fresh vegetables

With the vegetables chopped into uniform pieces, it's time to bring them together. In a large salad bowl, gently mix the crisp carrots, the tender zucchini, the crunchy bell peppers, and the fresh parsley.

Combine them with a light touch, ensuring each ingredient is evenly distributed throughout the bowl.

Advertisement

Next, add a drizzle of olive oil and a splash of red wine vinegar. Use your hands or a large spoon to toss the salad, coating the vegetables evenly with the flavorful dressing.

Sprinkle in a pinch of salt and a dash of black pepper, adjusting the seasoning to your taste.

Resist the urge to overmix, as you want to maintain the distinct textures and flavors of each vegetable.

Gently fold the salad until the dressing is thoroughly incorporated. Your vibrant, nutrient-packed vegetable salad is now ready to be served and enjoyed.

Step 3. Add Dressing

add dressing to salad

With the vegetables now perfectly chopped, it's time to dress the salad. In a small bowl, whisk together a simple dressing of olive oil, lemon juice, and a pinch of salt and pepper. The bright, tangy flavors will complement the crisp, fresh veggies beautifully.

To enhance the health benefits of your salad, consider adding a few drops of peppermint oil, known for its refreshing properties, to invigorate your dish.

Advertisement

Drizzle the dressing over the salad and use your hands or tongs to gently toss everything together until each piece is lightly coated. Be careful not to overmix, as you want to preserve the integrity of the ingredients. The salad should glisten with the dressing, not be drenched in it.

Once the salad is dressed, give it a final taste and adjust the seasonings as needed. A sprinkle of fresh herbs, such as parsley or dill, can also add a lovely finishing touch.

Now your vegetable salad is ready to serve and enjoy! The vibrant colors and flavors will surely delight your senses.

Step 4. Refrigerate Before Serving

chill prior to serving

After tossing the salad with the dressing, it's time to let the flavors meld. Cover the bowl or container and pop it in the fridge for at least 30 minutes. This chilling time allows the dressing to soak into the veggies, making every bite more delicious.

As the salad chills, the ingredients will firm up a bit, creating the perfect texture. The cool temperature also helps the flavors come together, so you'll get a harmonious blend in every forkful. Don't skip this important step! Refrigerating the salad before serving ensures the perfect taste and consistency.

When you're ready to enjoy, give the salad a gentle stir and serve it up. The vibrant colors and enticing aromas will have everyone's mouths watering.

Advertisement

This vegetable salad is best served chilled, so make sure to let it chill out in the fridge for a bit before digging in. Your taste buds will thank you!

Step 5. Garnish With Fresh Parsley

garnish with fresh parsley

To finish off the vegetable salad, garnish it with some fresh, vibrant parsley. The herb's bright green leaves and delicate, lacy texture will add a lovely pop of color and a burst of flavor to your creation.

Simply pluck a few sprigs from the bunch, gently rinse them under cool water, and pat them dry with a paper towel. Then, use your fingers to tear the leaves into smaller, bite-sized pieces and sprinkle them evenly over the top of the salad.

The parsley won't only enhance the visual appeal of your dish but also complement the other vegetables with its subtly sweet, grassy notes. Feel free to be generous with the garnish – a little goes a long way in brightening up the flavors and making your vegetable salad shine.

The fresh parsley will add the perfect finishing touch, inviting your guests to dig in and enjoy every last bite.

Final Thoughts

Ultimately, a well-constructed vegetable salad can elevate any meal, providing a burst of vibrant colors, flavors, and textures that perfectly complement the main dish. When crafting your own salad masterpiece, don't be afraid to get creative and experiment with various combinations of fresh, seasonal produce.

Advertisement

For instance, you might consider incorporating elements inspired by classic dishes, such as the comforting indulgence of bread pudding for a unique flavor twist. Perhaps you'll discover a new favorite pairing, like the refreshing crunch of crisp cucumber and the earthy sweetness of roasted beets. Or maybe you'll find that a drizzle of tangy vinaigrette brings all the flavors together in perfect harmony.

The true beauty of a vegetable salad lies in its versatility. It can be a light and refreshing starter, a nourishing side, or even the star of the show as a main course.

Frequently Asked Questions

How Long Does the Salad Last in the Refrigerator?

You'll be pleased to know that your tasty vegetable salad can last up to 5 days in the fridge!

Just be sure to store it in an airtight container. The cool, refreshing flavors will stay crisp and vibrant, making it the perfect side dish or snack.

Enjoy the fresh veggies for several days – it's a great way to stretch out your meal prep.

Advertisement

With proper storage, this salad will keep you satisfied and nourished all week long!

Can I Substitute Any of the Vegetables in the Recipe?

Absolutely! You can totally substitute different veggies in this salad.

Get creative and use whatever fresh, crunchy vegetables you've got on hand. Carrots, celery, bell peppers, radishes – the possibilities are endless.

Just make sure to chop everything up into bite-size pieces so it mixes together nicely. Feel free to experiment and find your perfect veggie combo.

The key is to have fun and make it your own!

Advertisement

Is the Salad Suitable for a Vegetarian or Vegan Diet?

Absolutely! The vegetable salad is an excellent choice for vegetarians and vegans.

Since it's made entirely of plant-based ingredients, it's a delightfully wholesome and nutritious option. You can enjoy this colorful, crunchy salad without any worries, as it's free from meat, dairy, and other animal-derived products.

The combination of fresh veggies makes it a versatile and satisfying dish that everyone can savor. Go ahead and dig in – this salad is a wonderful way to get your daily dose of vitamins and minerals!

Can I Make the Salad in Advance for a Party?

Absolutely! Making the salad ahead of time is a great way to save time and stress on the day of your party.

Simply prepare the ingredients, combine them in a large bowl, and store it in the fridge until you're ready to serve. The flavors will have a chance to meld together, making the salad even more delicious.

Advertisement

Just don't forget to give it a quick toss before setting it out for your guests to enjoy!

What Are Some Serving Suggestions for This Salad?

When serving this tasty vegetable salad, you've got plenty of options! You can spoon it atop crisp lettuce leaves for a fresh and crunchy presentation.

Or, scoop it into small bowls or cups for individual servings at a party. Serve it alongside crusty bread or rolls to soak up the flavorful dressing.

You could even use it as a topping for baked potatoes or grilled meats. Get creative and have fun with how you showcase this colorful, nutrient-packed salad!

Advertisement
Continue Reading

Polish Comfort Food

Kisiel (Fruit Pudding)

Prepare to indulge in the creamy, subtly sweet delight of Kisiel, a traditional Polish fruit pudding that has captivated taste buds for generations.

Published

on

fruit based pudding dessert

Kisiel, a beloved Polish fruit pudding, has delighted taste buds for centuries. This creamy yet slightly gelatinous dessert combines the natural sweetness of fresh or frozen fruit with a velvety, starch-thickened texture. Chilled or at room temperature, kisiel makes for a refreshing and comforting treat. Simply simmer fruit, sugar, and water, then thicken with cornstarch for a silky consistency. Top with nuts, whipped cream, or berries for an extra special presentation. Versatile and showcasing seasonal ingredients, kisiel is a true taste of Polish culinary heritage that you'll surely want to explore further.

Key Takeaways

  • Kisiel is a traditional Polish dessert with a history dating back to the 14th century, reflecting regional flavors and seasonal ingredients.
  • The basic kisiel recipe combines the sweetness of cooked fruit with a creamy, slightly gelatinous pudding-like texture.
  • Kisiel can be served chilled or at room temperature and is often garnished with nuts, whipped cream, or fresh berries.
  • Kisiel is known for its vibrant colors, natural sweetness, and comforting mouthfeel, making it a versatile and accessible dessert.
  • The simplicity of the kisiel recipe, along with its ability to utilize seasonal fruits, contributes to its enduring popularity in Polish households.

History

According to culinary historians, the origins of kisiel, a traditional Polish fruit pudding, can be traced back to the 14th century. This delightful dessert has been a beloved part of Polish culture for centuries, evolving over time to reflect the regional flavors and seasonal ingredients available throughout the country.

In the early days, kisiel was often made with foraged berries, fruits, and even certain roots, cooked down into a thick, jiggly consistency. As the dish gained popularity, home cooks began experimenting with a wider variety of fruits, including apples, pears, plums, and cherries.

The addition of milk, cream, or even sour cream helped to create a richer, creamier texture, while a touch of honey or sugar added a delicate sweetness.

Today, kisiel remains a staple in Polish households, served as a comforting dessert or even enjoyed as a refreshing chilled treat on warm summer days. Its enduring popularity is a testament to the timeless appeal of this simple, yet delicious, fruit pudding.

Recipe

Kisiel, also known as fruit pudding, is a traditional Polish dessert that combines the sweetness of cooked fruit with the creamy texture of a pudding. This delightful treat is a perfect way to celebrate the abundance of seasonal fruits.

Advertisement

The key to a successful kisiel is the perfect balance between the fruit's natural sweetness and the thickening properties of the starch used in the recipe. The result is a velvety, slightly gelatinous dessert that's both comforting and refreshing.

Ingredients:

  • 3 cups fresh or frozen fruit (such as apples, pears, or berries)
  • 1/2 cup granulated sugar
  • 2 tablespoons cornstarch
  • 1 cup water
  • 1 teaspoon vanilla extract

Instructions:

In a saucepan, combine the fruit, sugar, and water. Bring the mixture to a boil, then reduce the heat and simmer for 10-15 minutes, or until the fruit is soft and the liquid is syrupy.

In a small bowl, whisk the cornstarch with a tablespoon of water to create a slurry. Slowly pour the slurry into the simmering fruit mixture, stirring constantly, until the mixture thickens to a pudding-like consistency. Remove from heat and stir in the vanilla extract.

Tips:

Advertisement

For a creamier consistency, you can substitute half of the water with milk or cream.

You can also experiment with different fruit combinations to create unique flavor profiles. Serve the kisiel chilled or at room temperature, and garnish with a dollop of whipped cream or a sprinkle of cinnamon for an extra touch of indulgence.

Cooking Steps

First, in a saucepan, combine the fruit, sugar, and water.

Bring the mixture to a boil, then let it simmer until the fruit is tender.

For added nutrition, consider incorporating ingredients like high protein and fiber to enhance the dish.

Advertisement

Step 1. Combine Fruit, Sugar, and Water

mix fruit sugar water

With the fruit, sugar, and water ready, you can now combine these key ingredients to start the cooking process.

Gently pour the fruit into a saucepan, making sure to include any juices that have accumulated. Sprinkle the sugar over the top, letting it settle evenly throughout the fruit.

Now, slowly pour in the measured water, being careful not to disturb the delicate fruit pieces.

Place the saucepan on the stovetop and turn the heat to medium. As the mixture begins to warm, you'll notice the sugar dissolving and the fruit softening.

Stir the kisiel gently with a wooden spoon, ensuring all the ingredients are well incorporated. Allow the mixture to simmer, stirring occasionally, until it thickens to your desired consistency, about 10-15 minutes.

The kisiel should have a smooth, pudding-like texture when ready. Remove from heat and let cool slightly before serving or chilling.

Advertisement

Step 2. Bring Mixture to a Boil

bring mixture to boil

Once the fruit, sugar, and water are combined, place the saucepan on the stovetop over medium heat.

Let's bring this delightful mixture to a boil! You'll notice the liquid start to shimmer and bubble as it heats up. Keep a close eye on it, stirring occasionally, until it reaches a full, rolling boil. The sound of the bubbles popping and the steam rising will let you know it's ready.

Now, don't be tempted to crank up the heat – that could cause the mixture to boil over and make a mess. Maintain that medium heat setting, allowing the ingredients to slowly come together.

As the sugar dissolves, the liquid will become thicker and more syrupy. This is exactly what you want for the perfect kisiel texture. Once it reaches a full boil, let it continue cooking for about 5 minutes, stirring occasionally, until the mixture has thickened to your desired consistency.

Get ready for the next step!

Step 3. Simmer Until Fruit Is Tender

simmer fruit until tender

Now that the mixture has reached a boil, reduce the heat to low and let it simmer gently.

This slower cooking process will allow the fruit to become tender and release its natural sweetness. As the pot bubbles away, you'll start to notice the colors of the fruit deepening and the liquid thickening into a luscious, syrupy consistency.

Advertisement

Stir the mixture occasionally to prevent any sticking or burning on the bottom of the pan. Depending on the type of fruit you're using, the simmering may take anywhere from 10 to 20 minutes.

Keep a close eye on it, tasting the fruit periodically to check for doneness. You'll know it's ready when the fruit easily mashes against the side of the pot with the back of your spoon.

The kisiel should have a smooth, velvety texture at this stage. Once the fruit is perfectly tender, remove the pot from the heat and get ready to move on to the next step.

Step 4. Thicken With Cornstarch Slurry

thicken with cornstarch slurry

To thicken the kisiel, you'll need to create a cornstarch slurry. In a small bowl, whisk together a couple of tablespoons of cornstarch with an equal amount of cold water until smooth and lump-free.

Slowly pour the slurry into the simmering fruit mixture, stirring constantly. As the slurry heats up, it will thicken the kisiel to your desired consistency. Keep stirring until the pudding has reached your preferred thickness.

The cornstarch will transform the thin, watery fruit juice into a delightfully creamy, velvety texture. You'll know it's ready when the kisiel coats the back of a spoon.

Advertisement

Adjust the amount of cornstarch slurry as needed to reach your ideal thickness. With a little patience and gentle stirring, you'll have a wonderfully smooth and pudding-like kisiel in no time.

Step 5. Serve Chilled or at Room Temperature

serve chilled or room temperature

Once the kisiel has reached your desired thickness, you have a few options for serving it. You can serve the chilled fruit pudding straight from the refrigerator, allowing the cool, creamy texture to refresh and delight your taste buds.

Alternatively, you can let the kisiel come to room temperature, which will soften the consistency and allow the flavors to open up more fully.

Whether chilled or at room temperature, the kisiel is sure to be a hit. Scoop it into small bowls and garnish with a sprinkle of chopped nuts, a dollop of whipped cream, or a few fresh berries for a visually appealing presentation.

The cool, silky pudding pairs beautifully with the crunch of nuts or the burst of juicy berries. Serve the kisiel as a light and satisfying dessert, or enjoy it as a midday snack to fuel your day.

No matter how you choose to serve it, this classic Polish treat is sure to leave you feeling comforted and content.

Advertisement

Final Thoughts

Kisiel, a traditional Polish fruit pudding, offers a delightful and versatile dessert option. Whether you serve it chilled on a hot summer day or at room temperature during a cozy gathering, this simple yet satisfying treat is sure to delight.

The natural sweetness and vibrant colors of the fruit make it a visually appealing and healthy choice, while the creamy consistency provides a comforting texture. Experiment with different seasonal fruits to discover your favorite variations, or try topping it with a dollop of whipped cream, a sprinkle of cinnamon, or a handful of toasted nuts for an extra touch of elegance.

Kisiel's versatility allows you to adapt it to your personal taste and preferences, making it a crowd-pleasing dessert that can be enjoyed year-round. So, embrace the simplicity and charm of this traditional Polish delicacy and indulge in the delightful flavors of Kisiel.

Frequently Asked Questions

What Is the Origin of the Name "Kisiel"?

You know, the name "kisiel" has a really interesting origin!

It's believed to have come from the Slavic word "kisnuty," which means "to sour." This makes sense when you consider that traditional kisiel is a tart, thickened fruit drink.

Advertisement

The name likely evolved over time as the dish became more popular across Eastern Europe.

Isn't it cool how food names can give you a glimpse into the history and culture of a region? I find that kind of thing really fascinating.

What do you think about the origins of "kisiel"?

How Long Does Kisiel Typically Take to Prepare?

Preparing kisiel typically takes around 30 minutes to an hour, depending on the ingredients and method.

The active process is relatively straightforward, involving simmering a flavorful liquid and thickening it with a starch.

Advertisement

Once the base is ready, you'll simply need to let it cool and set before enjoying this delightful sweet pudding.

With a little hands-on time and minimal effort, you can whip up a batch of homemade kisiel in no time!

Is Kisiel a Traditional Polish Dessert or a Modern Creation?

Kisiel, a beloved Polish dessert, has been a part of the country's culinary tradition for centuries.

This sweet treat originated long ago, evolving over time to become a beloved classic.

With its unique blend of flavors and textures, kisiel has stood the test of time, remaining a cherished part of Polish culture.

Advertisement

Whether you're new to this delightful dessert or a lifelong fan, you're sure to appreciate its rich history and delicious taste.

Can Kisiel Be Made With Different Types of Fruit?

Absolutely! Kisiel can be made with all sorts of delicious fruits. You can use strawberries, blueberries, raspberries, apples, or even a mix of different fruits.

The possibilities are endless! The great thing about kisiel is that it's so versatile. You can get creative and experiment with different flavor combinations to find your personal favorite.

Why not try making it with a mix of berries for a vibrant, colorful treat?

How Long Does Kisiel Keep After It's Been Made?

You can keep homemade kisiel, or fruit pudding, in the fridge for 3-5 days after you make it.

Advertisement

The exact shelf life depends on the ingredients used and how you store it.

Make sure to keep it covered and chilled to maintain its fresh, jiggly texture.

With its vibrant color and sweet, fruity flavor, you'll want to enjoy your homemade kisiel quickly before it goes bad!

Just be mindful of the expiration date, and your tasty treat will be good to go.

Advertisement
Continue Reading
Advertisement

Affiliate Disclaimer
As an affiliate, we may earn a commission from qualifying purchases. We get commissions for purchases made through links on this website from Amazon and other third parties.

Advertisement

Latest

delicious chocolate dessert squares delicious chocolate dessert squares
Graduations/Birthdays5 mins ago

Brownies

Joyful and decadent, the story of brownies dates back to a historic culinary mishap, unveiling a rich legacy of chocolate-infused...

delicious homemade chocolate treats delicious homemade chocolate treats
Graduations/Birthdays10 mins ago

Chocolate Chip Cookies

Homemade chocolate chip cookies with their buttery, crispy edges and soft, chewy centers have captivated taste buds for generations, but...

celebratory dessert for gatherings celebratory dessert for gatherings
Graduations/Birthdays17 mins ago

Sheet Cake

Discover the delectable world of sheet cake, a versatile and crowd-pleasing dessert that has captured the hearts of celebrations for...

delicious baked sweet treats delicious baked sweet treats
Graduations/Birthdays22 mins ago

Cupcakes

Baking cupcakes is a delightful endeavor that unveils a world of endless possibilities, from classic flavors to imaginative creations.

creamy egg salad delight creamy egg salad delight
Graduations/Birthdays27 mins ago

Egg Salad Sandwiches

Unlock the secrets to crafting the perfect egg salad sandwich, a timeless classic that delights the senses and satisfies the...

fresh mozzarella tomato basil fresh mozzarella tomato basil
Graduations/Birthdays32 mins ago

Caprese Sandwiches

Indulge in the irresistible blend of creamy mozzarella, juicy tomatoes, and fragrant basil that makes the Caprese sandwich a beloved...

turkey avocado wrap recipe turkey avocado wrap recipe
Graduations/Birthdays37 mins ago

Turkey and Avocado Wraps

Craving a quick, nutritious, and delicious lunch that satisfies your taste buds? Discover the irresistible combination of Turkey and Avocado...

stuffed flatbread delights stuffed flatbread delights
Graduations/Birthdays43 mins ago

Pita Pockets

Juicy fillings, crisp veggies, and savory grilled meats come together in these versatile pita pockets that are easy to prepare...

bacon lettuce tomato delight bacon lettuce tomato delight
Graduations/Birthdays48 mins ago

BLT Sandwiches

A timeless classic, the BLT sandwich captivates with its harmonious blend of crisp bacon, fresh lettuce, and juicy tomatoes, leaving...

artisanal melted cheese delight artisanal melted cheese delight
Graduations/Birthdays54 mins ago

Gourmet Grilled Cheese

Mouth-watering gourmet grilled cheese sandwiches with artisanal breads and premium cheeses that transform this lunchtime classic into an indulgent culinary...

delicious italian sub sandwiches delicious italian sub sandwiches
Graduations/Birthdays59 mins ago

Italian Sub Sandwiches

Perennially popular for their blend of savory Italian cured meats, creamy cheeses, and crisp veggies, Italian sub sandwiches are a...

delicious chicken caesar wraps delicious chicken caesar wraps
Graduations/Birthdays1 hour ago

Chicken Caesar Wraps

Lively and portable, these Chicken Caesar Wraps elevate the classic salad to a whole new level, promising a burst of...

Advertisement

Trending