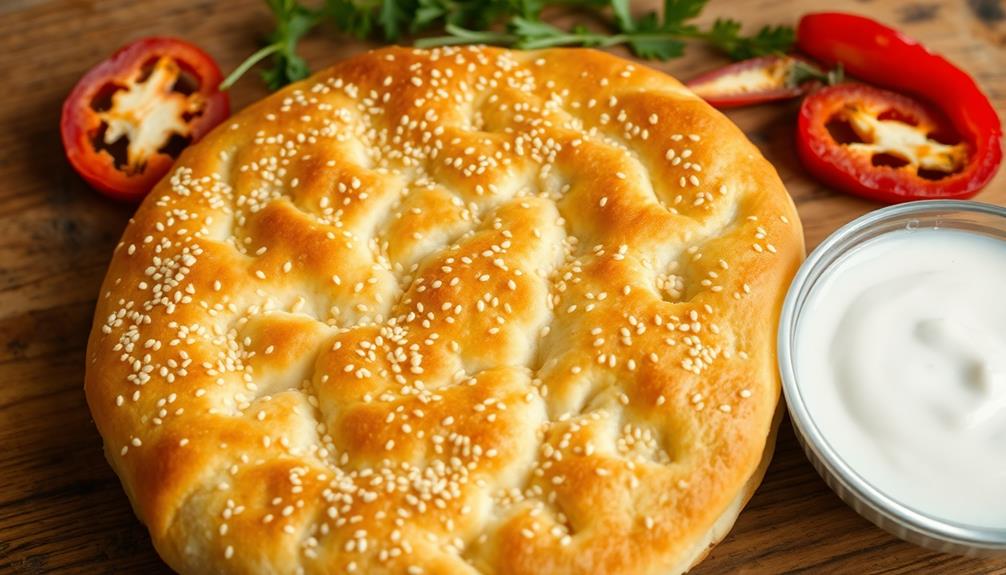
Kaak is the iconic street bread of the Middle East, tracing its roots to ancient civilizations. This distinctive circular loaf evolved for efficient baking in wood-fired ovens, and nomadic tribes carried it as portable, long-lasting sustenance. The process of making kaak requires skill and patience – you'll knead the dough thoroughly, let it proof for an hour, shape it into circles, and bake it to perfection. The result is a crisp exterior and chewy interior that captures the resilience and culinary ingenuity of the region's people. Kaak remains a cherished part of the Middle East's vibrant culinary heritage, and there's more to discover about this remarkable bread.
Key Takeaways
- Kaak is an ancient Middle Eastern street bread with a distinctive circular shape that evolved for efficient baking in wood-fired ovens.
- Nomadic tribes carried kaak as portable, long-lasting sustenance, reflecting the resilience and culinary ingenuity of the region's people.
- Proper kneading and proofing techniques are crucial for kaak's chewy texture and flavor, requiring patience and skill from the baker.
- The baking process at high heat, around 450°F, creates a crisp exterior and soft, chewy interior, making kaak a satisfying culinary experience.
- Kaak remains a cherished part of the Middle East's culinary heritage, representing the enduring spirit and vibrant culture of the region.
Top picks for "kaak street bread"
Open Amazon search results for this keyword.
As an affiliate, we earn on qualifying purchases.
History
The origins of kaak, the iconic street bread of the region, can be traced back to ancient civilizations. For centuries, bakers have been crafting this beloved treat using time-honored techniques passed down through generations.
Kaak's distinctive shape, with its circular form and signature hole in the center, evolved from the need to bake bread efficiently in wood-fired ovens.
As nomadic tribes traversed the deserts, they carried kaak as a portable, long-lasting sustenance. The bread's sturdy construction and ability to withstand the elements made it an essential companion on their journeys.
Over time, kaak became intertwined with the rich cultural tapestry of the region, representing the resilience and culinary ingenuity of its people.
Today, the aroma of freshly baked kaak still wafts through the bustling streets, inviting passersby to indulge in this beloved tradition.
Whether enjoyed as a snack, a meal accompaniment, or a symbol of cultural identity, kaak remains a cherished part of the region's culinary heritage.
Cooking Steps
Ready to start cooking the Kaak? First, gather your ingredients – flour, yeast, salt, and warm water.
In a large bowl, mix the flour and salt. Then, sprinkle the yeast on top and slowly pour in the warm water, mixing until a sticky dough forms.
Knead the dough for about 10 minutes, until it becomes smooth and elastic. Divide the dough into smaller pieces and roll each one into a ball.
Using your hands, gently stretch and shape the balls into round, flat discs, about 1/2 inch thick.
Place the shaped kaak on a greased baking sheet and let them rise for 30 minutes. Preheat your oven to 400°F.
Once the kaak have risen, bake them for 15-20 minutes, until golden brown. Serve the freshly baked kaak warm, and enjoy the delicious, chewy texture!
Step 1. Knead Dough Thoroughly for 10 Minutes
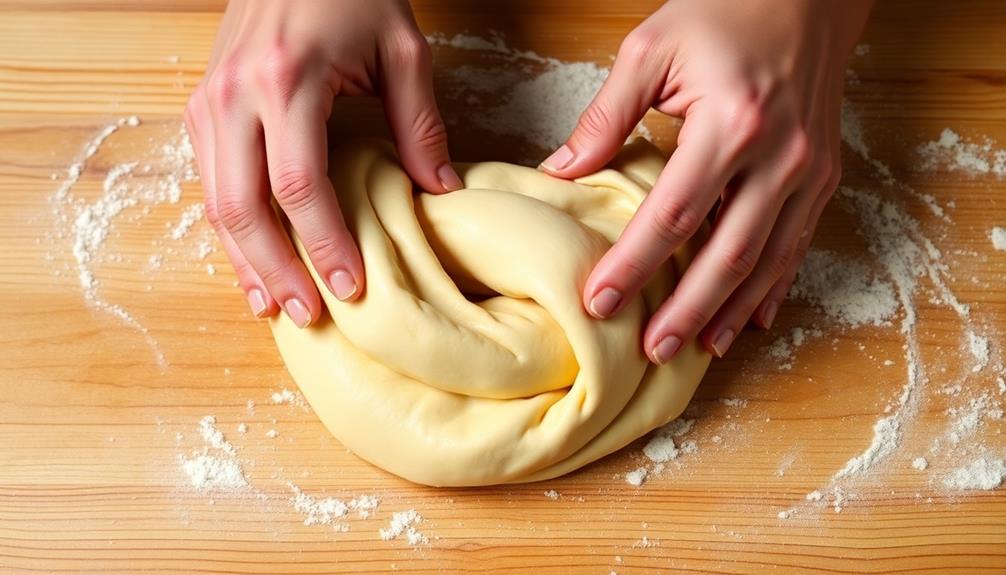
Next, you'll want to knead the dough thoroughly for around 10 minutes. This step is crucial for developing the gluten structure and creating a smooth, elastic texture.
Start by pushing the heel of your hand into the dough, then fold the dough over and push again. Continue this motion, working the dough from the center outward. As you knead, you'll feel the dough become less sticky and more cohesive.
If the dough starts to stick to your hands, lightly flour your work surface and keep going. Remember to be patient and let the dough do its thing – the more you knead, the better the final texture will be.
Once the dough is smooth and springy, you'll know it's ready for the next step. Keep in mind that proper kneading takes time, but the effort will be well worth it when you bite into that perfectly chewy and flavorful kaak.
Step 2. Proof Dough for 1 Hour
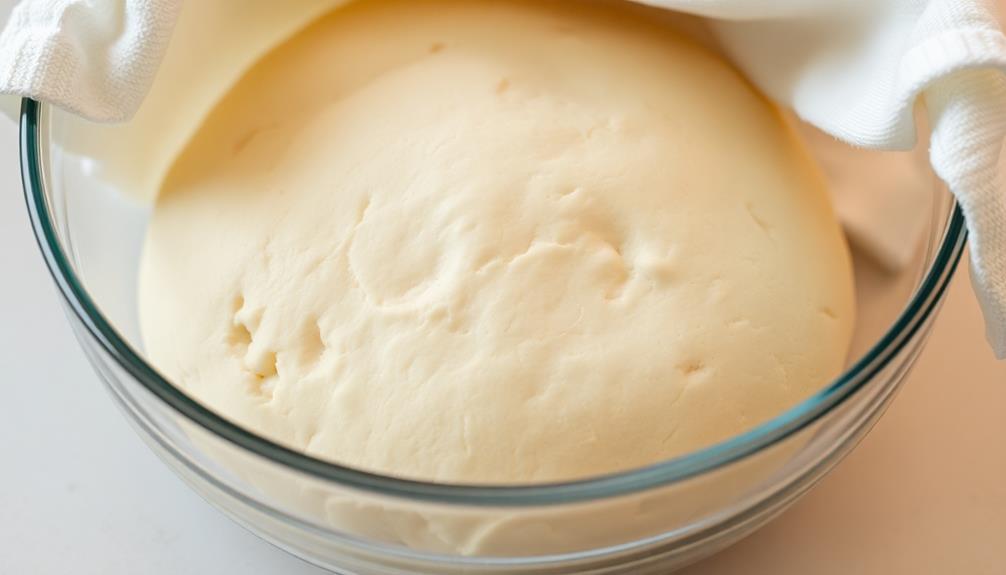
After thoroughly kneading the dough, you'll want to let it proof for about an hour. This means the dough will sit and rise, getting all puffy and airy.
Find a nice warm spot in your kitchen, like near a sunny window or by the oven. Cover the dough with a clean, damp towel to keep it from drying out. As the dough proofs, the yeast will eat the sugars and release carbon dioxide, causing the dough to expand.
You'll know it's ready when the dough has doubled in size and feels light and springy to the touch.
Once the hour is up, gently punch down the dough to release any big air bubbles. This will help the bread bake evenly.
Now you're ready to shape the dough into the classic kaak rings! Pinch off a golf ball-sized piece, roll it into a smooth ball, then poke a hole in the center and gently stretch the dough to form a ring.
Place the shaped dough onto a baking sheet and let it proof for 30 more minutes before baking.
Step 3. Divide Dough Into Individual Portions
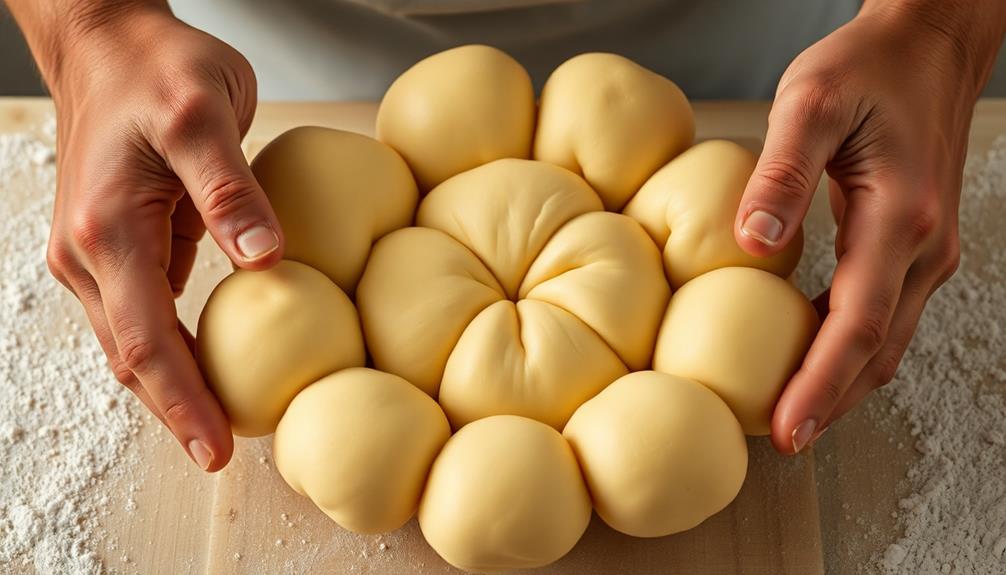
With the dough proofed and ready, it's time to divide it into individual portions for shaping.
Grab the dough and gently turn it out onto a lightly floured surface. Using a sharp knife or dough cutter, slice the dough into equal pieces. Aim for about 8 to 10 portions – this will give you perfectly sized kaak buns.
Be gentle as you handle the dough; you don't want to knock out all that beautiful air that's developed during proofing.
Lightly flour your hands and gently roll each piece into a smooth ball. Place the dough balls onto a parchment-lined baking sheet, spacing them apart so they've room to expand.
Cover the tray with a clean kitchen towel and let the portions rest for 10-15 minutes. This short rest will relax the gluten, making the dough easier to shape.
Now you're ready to transform these plain dough balls into the iconic kaak shape.
Grab a portion and let's get shaping!
Step 4. Shape Dough Into Circles
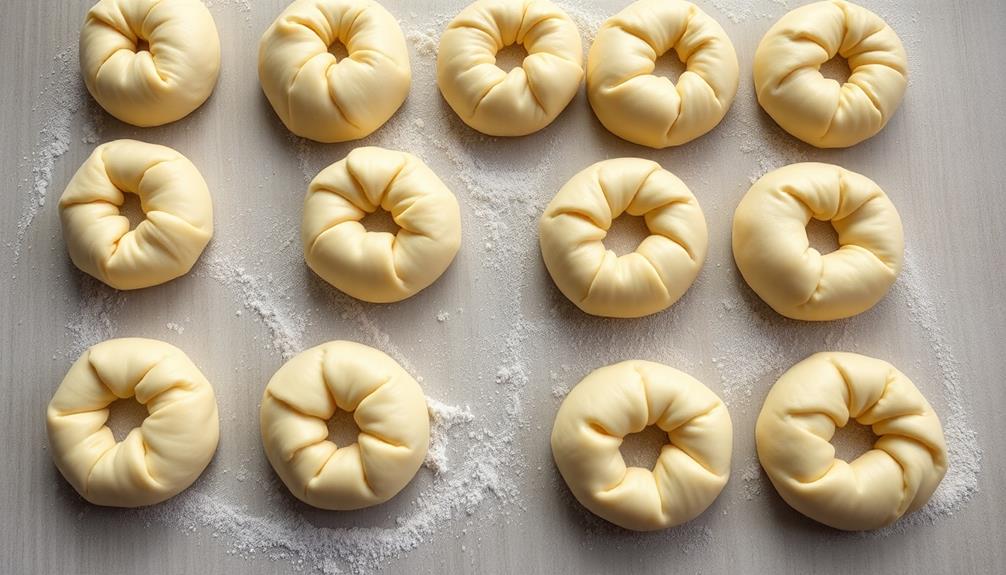
To shape the dough into the classic kaak circles, gently roll each dough ball between your palms to form a smooth, round shape. Be careful not to overwork the dough – you want it to maintain its soft and pliable texture.
Once the dough is nicely rounded, use your fingertips to gently press the center, creating a small indentation. Continue pressing and shaping the dough, working your way around the circle until you have a uniform, flattened disk about 1/2 inch thick. Make sure the edges are slightly thinner than the center to achieve the classic kaak look.
As you shape each piece, place it on a lightly floured surface. This will prevent the dough from sticking. Repeat this process with the remaining dough balls, working quickly to keep the dough from drying out.
Step 5. Bake Kaak at 450°F
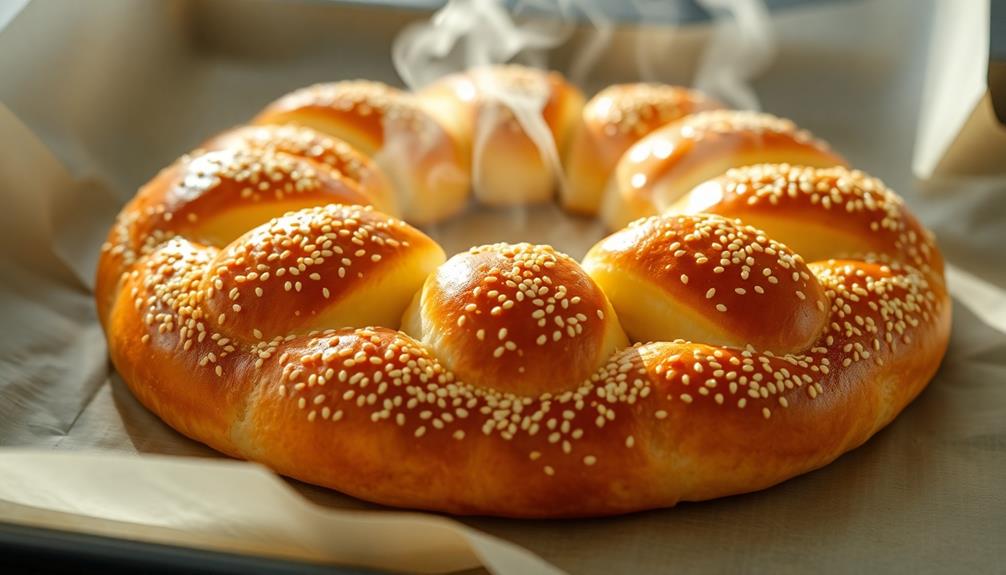
Now that you've perfectly shaped your kaak dough, it's time to bake them. Preheat your oven to a toasty 450°F.
Carefully transfer the kaak circles onto a greased baking sheet, making sure they're spaced apart. This'll give them room to puff up and get that classic street bread shape.
Once the oven's ready, slide the baking sheet in and set the timer for 10-12 minutes. Keep an eye on them – you want the kaak to turn a beautiful golden brown. The edges should be crisp, while the centers stay soft and pillowy.
When the timer goes off, use a spatula to gently transfer the freshly baked kaak to a cooling rack. Let them sit for a few minutes before serving. This allows the insides to fully cook through.
Now you've got piping hot, homemade kaak – the perfect street food straight from your own oven! Enjoy your delicious handiwork.
Final Thoughts
Ultimately, kaak is a beloved street bread that has endured the test of time, reflecting the rich cultural heritage of the Middle East.
As you've learned, baking this traditional treat takes skill and patience, but the result is well worth the effort. Imagine the aroma of freshly baked kaak wafting through the bustling streets, enticing passersby with its irresistible scent. For those who have never experienced the joy of savoring a warm piece of kaak, it’s definitely a taste worth trying. And for those who want to experience making this delicacy firsthand, they can learn how to make kashta, the creamy filling that adds the finishing touch to these delightful pastries. With a little guidance and practice, anyone can master the art of creating these delicious treats at home.
Whether you're enjoying a warm kaak with a cup of strong, aromatic coffee or sharing it with friends and family, this delightful bread is sure to bring a smile to your face.
Its crisp, golden exterior and soft, chewy interior make it a truly satisfying experience. Beyond its delicious taste, kaak also represents the rich tapestry of Middle Eastern culture, preserving age-old recipes and techniques that have been passed down through generations.
As you continue your culinary adventures, remember the joy and tradition embodied in every bite of this beloved street bread.
Kaak is more than just a snack – it's a testament to the enduring spirit of the region and a delicious way to connect with its vibrant heritage.
Frequently Asked Questions
What Is the Nutritional Value of Kaak?
You'll be amazed by the nutritional value of kaak! This tasty street bread is packed with essential nutrients that'll keep you feeling energized and healthy.
It's a great source of carbohydrates, providing fuel for your body. Plus, it contains fiber to aid digestion and protein to support muscle growth.
Kaak's also rich in vitamins and minerals, like iron and B vitamins. Enjoying this delicious bread is a great way to nourish your body and taste buds!
How Long Does It Take to Make Kaak at Home?
Making homemade kaak is a fun, hands-on activity that can bring your family together.
It may take a bit of time, but the end result is worth it! You'll need about 2-3 hours to mix the dough, shape the loaves, and bake them to perfection.
Don't worry, the steps are easy to follow, and you'll be enjoying freshly-baked kaak in no time.
Gather your ingredients, clear some counter space, and get ready to create a delicious masterpiece!
Can I Freeze or Store Kaak for Later Use?
Absolutely! You can definitely freeze and store kaak for later use.
Just let the freshly baked kaak cool completely, then wrap it tightly in plastic or foil.
Pop it in the freezer, and it'll stay fresh for up to 3 months.
When you're ready to enjoy it, simply thaw it at room temperature or reheat it in the oven.
Easy-peasy! Your homemade kaak will be just as delicious, no matter when you decide to savor it.
Are There Any Variations or Regional Differences in Kaak?
Absolutely! Kaak, the beloved street bread, comes in all sorts of exciting variations across the world.
In the Middle East, you might find fluffy, ring-shaped kaak with a sprinkle of sesame seeds.
Over in Turkey, they make delicious simit, a circular bread coated in sesame.
And in Greece, you can try koulouria, a twisted kaak-like bread that's perfect for dunking in your morning coffee.
No matter where you go, there's always a new kaak adventure waiting!
Where Can I Purchase High-Quality Kaak in My Area?
Searching for top-notch kaak in your area? You're in luck!
Local bakeries and specialty shops are your best bet. Keep an eye out for family-owned spots that have been perfecting their recipes for generations.
Don't be afraid to ask around – the locals will know where to find the tastiest kaak.
With a little detective work, you're sure to uncover some real hidden gems.
Happy hunting!