Korean Cuisine
Injeolmi (Korean Rice Cake)
Discover the delightful world of Injeolmi, a chewy Korean rice cake that promises sweetness and tradition—learn how to make it at home!
Injeolmi is a fun and chewy Korean rice cake that you've got to try! This yummy treat, made from glutinous rice flour, is often enjoyed during celebrations like the Korean New Year. It's easy to make: just soak the rice, steam it, then pound it into a smooth dough. Shape it into little squares and coat them with soybean powder for a tasty twist! Not only does it taste delicious, but it also brings families together, sharing smiles and treats. So, are you ready to explore how to whip up this delightful dessert that everyone loves?
Key Takeaways
- Injeolmi is a traditional Korean rice cake, originating from the Goryeo Dynasty, symbolizing good fortune and community bonding.
- It is made from glutinous rice flour, sugar, water, and soybean powder, resulting in a chewy texture.
- The preparation involves soaking, steaming, pounding, and shaping the rice dough, followed by coating with soybean powder.
- Injeolmi is typically enjoyed during special occasions like Korean New Year and birthdays, appealing to all ages.
- It can be customized with various toppings and fillings, making it a versatile dessert for different tastes.
History
Injeolmi, a beloved traditional Korean rice cake, has a rich history that dates back centuries. It's not just a sweet treat; it's a part of Korean culture! You might be surprised to learn that people have enjoyed Injeolmi for over a thousand years.
It's believed to have originated during the Goryeo Dynasty, when rice was a staple food in Korea. Back then, families would celebrate special occasions with this delicious cake.
You'll find that Injeolmi is made from glutinous rice, which gives it a unique chewy texture. Once the rice is steamed and pounded, it's coated in finely ground soybean powder, giving it a nutty flavor that's simply irresistible.
Isn't it amazing how food can connect you to history?
Injeolmi isn't just a snack; it's often served during celebrations, like the Korean New Year or birthdays. Imagine gathering with friends and family, sharing stories and laughter while enjoying this delightful rice cake.
It's a tasty way to celebrate your heritage! So, the next time you take a bite of Injeolmi, remember you're savoring a piece of history that's been cherished for generations. How cool is that?
Recipe
Injeolmi is a beloved Korean rice cake known for its chewy texture and delightful flavors. Made from glutinous rice flour, this dish is traditionally enjoyed during celebrations and holidays, but it's also a fantastic treat to make at home. The subtle sweetness combined with the nutty flavor of the soybean powder gives Injeolmi its unique taste, making it a popular choice for both young and old alike.
This recipe will guide you through the process of creating this delicious treat from scratch, ensuring that you can enjoy the authentic taste of Korea right in your kitchen. Once you have mastered the art of making these Korean pancakes, you can impress your friends and family with your newfound culinary skills. This Korean savory pancakes recipe is perfect for any occasion, whether it’s a casual weekend brunch or a special celebration. With just a few simple ingredients and a little bit of patience, you can create a dish that will transport your taste buds to the bustling streets of Seoul.
To make Injeolmi, you'll need to prepare the glutinous rice flour dough first, which is then shaped and coated in a mixture of finely ground soybean powder. The process can be a bit labor-intensive, but the results are well worth the effort. Once you master the technique, you can get creative by adding your favorite fillings or experimenting with different coatings, making it a versatile dessert for any occasion.
Ingredients:
- 1 cup glutinous rice flour
- 1/4 cup sugar
- 3/4 cup water
- 1/2 cup soybean powder (roasted and finely ground)
- Cornstarch (for dusting)
Instructions:
In a microwave-safe bowl, combine the glutinous rice flour, sugar, and water. Mix well until there are no lumps, then cover the bowl with plastic wrap. Microwave the mixture for 2-3 minutes, stirring every minute until the dough becomes thick and translucent.
Once ready, let it cool slightly before kneading it on a cornstarch-dusted surface. Divide the dough into small pieces, shape them into small discs or squares, and then coat each piece generously with the soybean powder, ensuring they're well covered.
Extra Tips:
When making Injeolmi, it's essential to use glutinous rice flour specifically, as regular rice flour won't yield the desired chewy texture. If you prefer a sweeter version, you can adjust the sugar content to your taste.
Additionally, if the dough is too sticky, dust it with more cornstarch to make it easier to handle. Store the finished rice cakes in an airtight container at room temperature for a few days or refrigerate them to keep them fresh longer. Enjoy your homemade Injeolmi as a delightful snack or dessert!
Cooking Steps
Now that you've got your ingredients ready, it's time to jump into the fun cooking steps for making delicious injeolmi!
First, you'll soak the glutinous rice overnight, which is like giving it a cozy bath, so it's nice and soft for cooking.
After that, you'll steam the rice, pound it, shape it, and finally cut it into bite-sized pieces that are just perfect for munching!
Step 1. Soak Glutinous Rice Overnight
Soaking glutinous rice overnight is a crucial step in making Injeolmi, as it ensures the grains absorb enough water for optimal texture.
You'll want to start by measuring out the right amount of glutinous rice. Typically, about two cups will do for a nice batch. Rinse the rice under cold water to remove any dust or extra starch, which can make your rice too sticky.
Once it's nice and clean, place the rice in a bowl and cover it with water. Make sure the water level is a few inches above the rice, as it will soak up quite a bit.
Now, this is the fun part—let it sit and soak overnight! You can imagine the rice happily swimming in its cozy water bed, getting plump and ready for the next step.
Step 2. Steam the Soaked Rice
Once the rice has soaked and absorbed all that water, it's time to bring it to life by steaming it.
First, grab your steamer basket or a heatproof dish and line it with cheesecloth or a clean kitchen towel to prevent the rice from sticking.
Now, take your soaked glutinous rice and drain off any excess water. Spread the rice evenly in the lined basket or dish, making sure it's not too thick; about an inch or so will do!
Next, fill your pot or steamer with water and bring it to a gentle boil. Carefully place the basket or dish over the boiling water, making sure it doesn't touch the water itself. Cover it tightly with a lid, so the steam stays trapped inside.
Let the rice steam for about 30 to 40 minutes. You might want to peek occasionally to ensure everything's going smoothly, but avoid lifting the lid too often, or you'll let all that lovely steam escape!
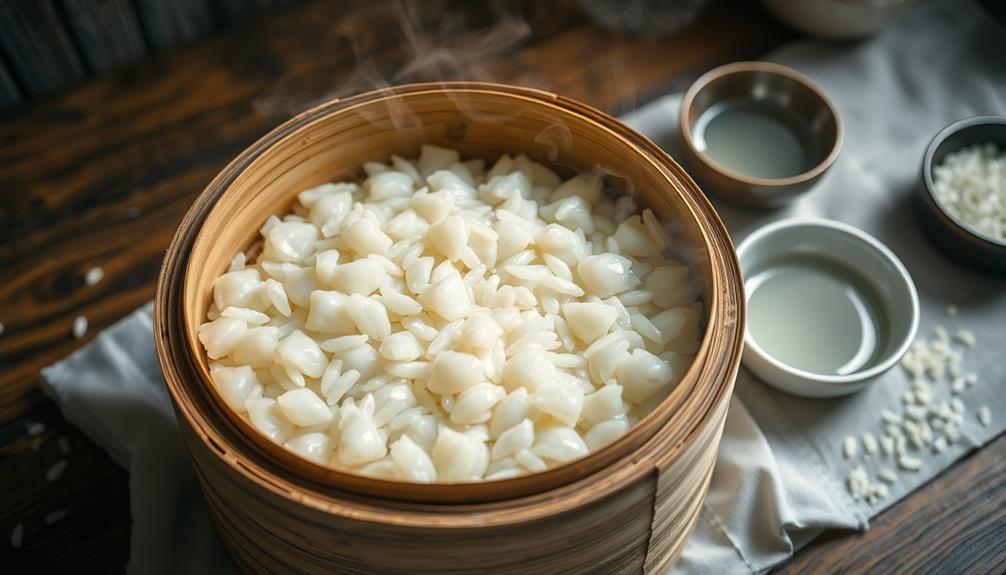
When the rice is done, it should look translucent and have a sticky texture. Get ready, because you're just a few steps away from making delicious Injeolmi!
Step 3. Pound the Steamed Rice
Pounding the steamed rice is where the magic really happens! Once your rice is perfectly steamed and soft, it's time to unleash your inner chef. Grab a sturdy pestle or a heavy wooden spoon—this part can be a bit of an arm workout!
Place the hot rice into a large, flat bowl or a traditional mortar. Now, start pounding the rice with firm, rhythmic movements. You want to break down those grains until they become a sticky, smooth dough. Don't worry if it's a little messy; that's all part of the fun!
As you pound, you might feel tempted to add a pinch of salt or sugar for flavor, but hold off for just a moment! Keep going until the rice is fully transformed, and it starts to stick together. This can take about 10 to 15 minutes, so put on some upbeat music to keep your energy up!
If the rice feels too stiff, you can sprinkle a tiny bit of water to help it along. Once it reaches that perfect chewy consistency, you're ready to move on to the next step. Your hard work is about to pay off, and you'll be enjoying delicious Injeolmi soon!
Step 4. Shape the Rice Cake
With that perfectly pounded rice dough in hand, it's time to shape your Injeolmi!
First, sprinkle a little cornstarch on your clean countertop to keep the dough from sticking. Then, grab a handful of the warm dough, about the size of a small baseball. Roll it between your palms to form a smooth ball, feeling the soft texture as you go.
Next, flatten the ball gently with your fingers, creating a small disc. You want it to be about half an inch thick, so don't make it too thin! If you like, you can also shape it into a rectangle or even a cute little triangle—get creative!
Once you've shaped a few pieces, lay them carefully on the cornstarch-dusted surface. It's important to keep them separated so they won't stick together later.
If you're feeling extra adventurous, you can even sprinkle some finely chopped nuts or powdered soybean flour on top for added flavor.
Keep shaping until you've used all the dough. Now, look at those beautiful pieces of Injeolmi! You're one step closer to enjoying this delicious treat. Keep it up!
Step 5. Cut Into Bite-Sized Pieces
How do you transform your beautifully shaped Injeolmi into bite-sized pieces? It's easier than you think!
First, grab a sharp knife and lightly grease it with some oil. This'll help stop the Injeolmi from sticking to the blade, making your job a lot smoother.
Next, place your rice cake on a cutting board, and make sure it's stable.
Now, it's time to slice! Cut your Injeolmi into strips about one inch wide. If you want to make sure each piece is perfectly uniform, you can measure with a ruler or just eyeball it—whatever feels right!
Once you have your strips, chop them into squares or triangles. You can even get creative and make fun shapes if you're feeling adventurous.
After you've cut everything up, give each piece a little dusting of powdered soybean flour or sesame powder. This not only adds flavor but keeps the pieces from sticking together.
And voilà! You've got a delightful tray of bite-sized Injeolmi, ready to be enjoyed by family and friends.
Just remember, sharing is caring—so don't forget to save some for others!
Final Thoughts
As you wrap up your exploration of Injeolmi, it's clear that this beloved Korean rice cake holds a special place in the hearts of many. From its chewy texture to its delicious coating of powdered soybean flour, Injeolmi is more than just a treat; it's a delightful experience!
You've learned how it's made, the significance it carries in Korean culture, and the joy it brings during celebrations, like birthdays or holidays.
Imagine sharing a plate of Injeolmi with friends and family, each piece bringing smiles and happy memories. You might even be inspired to try making it yourself! While it can seem a bit tricky, remember that practice makes perfect. Plus, you'll impress everyone with your cooking skills!
Don't forget, Injeolmi can be enjoyed in many ways—whether plain, with different toppings, or even combined with fruits.
Frequently Asked Questions
What Are the Health Benefits of Injeolmi?
You'll find various health benefits in traditional snacks. They often provide energy, essential nutrients, and can support digestive health. Plus, many contain natural ingredients that promote overall wellness, making them a tasty, nutritious choice for you.
Can I Freeze Injeolmi for Later Use?
Yes, you can freeze it for later use. Just wrap it tightly in plastic wrap or an airtight container. When you're ready to enjoy, thaw it in the refrigerator for the best texture.
Is Injeolmi Gluten-Free?
You'll find that many rice cakes are gluten-free since they're typically made from glutinous rice flour. However, always check the specific ingredients, as some varieties might contain gluten or be processed in facilities with gluten.
What Are Common Variations of Injeolmi?
You'll find various delicious variations, like those made with different fillings, toppings like soybean powder or nuts, and flavors such as matcha or chocolate. Each adds a unique twist, enhancing the overall experience.
Where Can I Buy Injeolmi Outside Korea?
You can find injeolmi outside Korea at local Asian grocery stores or specialty markets. Online retailers like Amazon and food delivery apps might also offer it, so check those options for convenient purchases.
Ji-hoon is a skilled chef specializing in traditional and modern Korean cuisine. From savory bulgogi and kimchi to hearty stews and sizzling bibimbap, Ji-hoon’s recipes bring Korea’s bold, spicy, and umami-rich flavors to your kitchen. He focuses on authentic techniques and fresh ingredients that make Korean food so vibrant and flavorful.
Korean Cuisine
Korean Fusion Delight: Why Menbosha Is a Must-Try Snack
Curious about the captivating cultural fusion that is Menbosha? Discover why this Korean delicacy is a must-try snack that’ll delight your taste buds.
You've gotta try Menbosha – it's a Korean fusion delight that'll delight your tastebuds! This crispy fried treat blends the best of Korean and Western flavors, with a savory pork and veggie filling wrapped in a fluffy rice flour dough. It's like a cultural celebration in every bite! The contrast of the crisp exterior and the umami-rich filling is simply divine. Menbosha's versatility means you can enjoy it as a snack, appetizer, or even part of a larger meal. Impress your friends and family with this tasty fusion – it's sure to be the talk of your next gathering! Want to dive deeper into the story behind this Korean delicacy?
Key Takeaways
- Menbosha's unique fusion of Korean and Western flavors creates a delightful culinary experience that celebrates the richness of Korean culinary traditions.
- The crispy fried exterior and savory pork and vegetable filling of Menbosha offer an irresistible contrast of textures and flavors.
- Menbosha's adaptability to low-carb diets and versatility in serving as a snack or part of a meal make it a versatile and appealing option.
- The harmonious balance of flavors and textures in Menbosha, combined with the option to personalize it with dipping sauces, provide a satisfying and engaging dining experience.
- Menbosha's portable and shareable nature make it an ideal choice for various social gatherings, from casual snacks to festive celebrations.
History
It's believed that the Korean fusion snack known as Menbosha originated in the early 20th century, when Korean entrepreneurs sought to blend traditional Korean flavors with Western-style baked goods.
These visionary chefs combined the savory, umami-rich tastes of Korean cuisine with the buttery, flaky textures of pastries, creating a truly unique and delightful treat.
The name "Menbosha" is a playful fusion of the Korean word "meon" meaning "soft" and the Japanese word "bosha" meaning "bread."
This clever name perfectly captures the snack's irresistible character – soft, pillowy dough encasing a flavorful filling.
Over the decades, Menbosha has evolved, with fillings ranging from sweet red bean paste to savory ham and cheese.
No matter the flavor, each bite delivers a harmonious dance of textures and tastes that celebrate the richness of Korean culinary traditions.
Recipe
Menbosha is a beloved Korean fusion snack, blending the savory delights of Japan's tempura with the vibrant flavors of Korean cuisine. This unique treat features a crispy fried exterior encasing a tantalizing filling of seasoned pork and vegetables. Preparing Menbosha at home allows you to savor this gastronomic delight in the comfort of your own kitchen.
For those looking to enjoy a low carb diet while indulging in tasty snacks, Menbosha can be adapted by using alternative flours or minimizing the filling's carb content.
The key to achieving the perfect Menbosha lies in the balance of the dough and the careful selection of ingredients. The dough, made with a blend of wheat flour, water, and a touch of salt, must be kneaded to the right consistency, allowing for a light and airy texture once fried.
- 2 cups all-purpose flour
- 1 cup water
- 1 teaspoon salt
- 1 pound ground pork
- 1 carrot, grated
- 2 green onions, finely chopped
- 2 tablespoons soy sauce
- 1 teaspoon sesame oil
- 1/2 teaspoon ground black pepper
- Vegetable oil for frying
To prepare the Menbosha, begin by mixing the ground pork, grated carrot, chopped green onions, soy sauce, sesame oil, and black pepper in a bowl until well combined.
Next, roll the dough into small balls and flatten them into discs. Place a spoonful of the pork mixture in the center of each disc, then carefully fold the dough over the filling and pinch the edges to seal.
When ready to fry, heat the vegetable oil in a deep-fryer or heavy-bottomed pot to 350°F (175°C). Gently lower the Menbosha into the hot oil and fry until golden brown, about 2-3 minutes per batch.
Drain the fried Menbosha on a paper towel-lined plate, and serve hot, accompanied by your favorite dipping sauce. Enjoy the delightful contrast of the crispy exterior and the savory, flavorful filling in every bite of this Korean fusion delight.
Cooking Steps
Slice the cabbage and carrots thinly, then combine them with the savory sauce.
Next, fold the veggie mixture into the dough and fry the dumplings until they're golden brown.
Serve these tasty treats while they're still piping hot for maximum enjoyment!
Step 1. Slice Cabbage and Carrots Thinly
Begin by slicing the cabbage and carrots thinly. Use a sharp knife to create thin, even strips. This will ensure the vegetables cook quickly and evenly in the pan. Additionally, using fresh, high-quality ingredients can significantly enhance the overall flavor of your dish, making it a truly delightful experience.
Energy-saving features reduce overall energy consumption significantly, similar to how using the right techniques can optimize your cooking.
Go slowly and be careful, as you don't want any accidents. Next, try to make the slices as thin as possible, around 1/4 inch thick. The thinner the better, as this will help the veggies absorb all the delicious flavors. Gather the sliced cabbage and carrots in a bowl, ready to add to the pan.
Now, you're ready to move on to the next step – sautéing the vegetables! This will bring out their natural sweetness and make them tender and crisp. Get excited, because the aromas are about to fill your kitchen.
Just wait until you take that first bite of the finished Menbosha snack. Mmm, it's going to be absolutely scrumptious!
Step 2. Combine Vegetables and Sauce
Once you've sliced the cabbage and carrots, it's time to combine them with the savory sauce. In a large bowl, gently toss the vegetables with the delicious sauce until they're evenly coated. The tangy, sweet, and umami flavors of the sauce will really make the veggies pop!
The addition of chia seeds can also enhance the dish, as they're a rich source of dietary fiber, aiding digestion and promoting satiety aiding digestion.
Now, here's the fun part – you get to add the crispy fried batter to the mix. Carefully fold in the golden-brown menbosha pieces, making sure they're distributed throughout the salad. This adds an amazing crunch that contrasts perfectly with the tender vegetables.
Don't be afraid to get in there with your hands and give everything a good mix. You want to ensure the sauce and menbosha are thoroughly incorporated. The result should be a vibrant, flavorful blend that's sure to tantalize your taste buds.
With the vegetables and sauce combined, you're well on your way to creating a truly mouthwatering Korean fusion delight. Get ready for an explosion of flavors in every bite!
Step 3. Fold Vegetable Mixture Into Dough
After combining the vegetables and sauce, gently fold the vibrant mixture into the prepared menbosha dough. This step is crucial for creating the perfect pockets of flavor in your tasty snack.
First, take a spoonful of the veggie goodness and place it in the center of a dough round. Fold the dough over to form a half-moon shape, then use your fingers to gently pinch and seal the edges.
Repeat this process with the remaining dough and veggie filling. Be careful not to overstuff the dough – you want just the right amount of filling to create a delicious balance.
Once all the pockets are formed, you're ready to cook your menbosha to golden-brown perfection. The dough will puff up, encasing the flavorful veggies inside. Get ready for an explosion of Korean fusion delight in every bite!
Step 4. Fry the Dumplings Until Golden
Heat a generous amount of oil in a large skillet or wok over medium-high heat.
Once the oil is hot and shimmering, carefully add the prepared dumplings to the pan. Fry them until they're a beautiful golden brown, about 2-3 minutes per side. Be sure to flip them gently with a slotted spoon to avoid breaking them.
As the dumplings sizzle and crisp up, the aroma will fill your kitchen, making your mouth water in anticipation.
When they're perfectly fried, transfer them to a paper towel-lined plate to drain any excess oil. Serve the crispy, golden-brown menbosha dumplings hot, garnished with a sprinkle of toasted sesame seeds and a drizzle of your favorite dipping sauce.
The contrast of the crunchy exterior and the tender, flavorful filling is simply irresistible.
Get ready to savor the delightful fusion of Korean and Japanese influences in every bite!
Step 5. Serve Immediately, While Hot
As soon as the menbosha dumplings have reached that gorgeous golden-brown hue, transfer them from the pan to a paper towel-lined plate.
Don't forget – you'll want to serve these piping hot for the full flavor experience! The crispy exteriors and warm, gooey centers are an absolute delight.
Now, gather your friends and family around the table. Quickly place the steaming menbosha onto a serving platter, and watch their faces light up with joy.
Encourage everyone to grab a dumpling (or two!) and dive in. The combination of savory and slightly sweet flavors is sure to have them coming back for more.
Don't be shy about dipping the menbosha in the accompanying dipping sauce. The tangy, slightly spicy notes perfectly complement the rich, satisfying filling.
Savor every bite, savoring the perfect fusion of Korean and international influences.
Enjoy this moment of deliciousness, and don't forget to share your thoughts on this incredible snack with your loved ones. Menbosha is a true taste of Korean fusion delight!
Final Thoughts
Overall, the Menbosha snack is a delightful fusion of Korean and Japanese influences. This unique treat offers a sensational explosion of flavors and textures that'll leave you craving more.
From the crisp, golden exterior to the fluffy, savory interior, every bite is a culinary adventure. The subtle sweetness of the rice flour dough perfectly complements the umami-rich fillings, creating a harmonious balance that'll captivate your taste buds.
Whether you're enjoying Menbosha as an afternoon snack or a festive party treat, it's sure to be a hit. The portability and easy-to-share nature of this delicacy make it a fantastic option for gatherings, picnics, or simply indulging in some "me-time."
Frequently Asked Questions
Where Can I Purchase Menbosha Snacks in My Local Area?
To find menbosha snacks in your local area, you'll need to check at Asian grocery stores or specialty food markets. Many international supermarkets and online retailers may also carry this unique Korean fusion snack.
What Are the Nutritional Benefits of Menbosha?
Menbosha is a nutritious snack that packs a punch. It's high in protein, fiber, and healthy fats, keeping you fuller for longer. Plus, it's a great source of essential vitamins and minerals. Give it a try for a guilt-free treat.
How Long Can Menbosha Snacks Be Stored After Opening?
After you open a pack of menbosha snacks, they'll stay fresh for up to 2 weeks when stored properly in an airtight container at room temperature. Be sure to consume them within that timeframe to enjoy their full flavor and crispiness.
Are There Any Vegan or Gluten-Free Options for Menbosha?
Yes, there are vegan and gluten-free options for menbosha snacks. You'll find plant-based versions made without any animal products, as well as gluten-free recipes that cater to dietary restrictions. Just be sure to check the packaging carefully.
Can Menbosha Be Incorporated Into Other Dishes or Recipes?
Absolutely! Menbosha can be incorporated into other dishes and recipes. You can use it as a topping for salads, add it to stir-fries, or even bake it into breads and pastries for a unique flavor and texture.
Ji-hoon is a skilled chef specializing in traditional and modern Korean cuisine. From savory bulgogi and kimchi to hearty stews and sizzling bibimbap, Ji-hoon’s recipes bring Korea’s bold, spicy, and umami-rich flavors to your kitchen. He focuses on authentic techniques and fresh ingredients that make Korean food so vibrant and flavorful.
Korean Cuisine
Budae Jeongol: The Korean Army Stew That Packs a Punch
Weaving together a rich tapestry of flavors, Budae Jeongol, the iconic Korean army stew, captivates the senses and reflects the resilience of the Korean people.
Budae jeongol, the iconic Korean army stew, blends savory, spicy, and hearty flavors that have captivated taste buds for generations. During the Korean War, locals used leftover military rations to create this resourceful dish. Today, it features a rich, umami-packed base with Spam, hot dogs, and kimchi. You'll sauté the meats, then add broth, seasonings, and an array of veggies for layers of texture and flavor. The longer you simmer, the more the ingredients meld into a comforting, deeply satisfying meal. Budae jeongol embodies the resilience and ingenuity of the Korean people – and if you continue reading, you'll uncover the full history and cooking process.
Key Takeaways
- Budae Jeongol, or "army base stew," originated during the Korean War when locals used leftover military rations to create flavorful stews.
- The dish has evolved over time, incorporating ingredients like Spam and hot dogs, becoming a beloved Korean comfort food with regional variations.
- Budae Jeongol features a robust broth, a variety of meats, and an array of vegetables, creating a hearty and flavor-packed culinary experience.
- The dish's unique blend of Eastern and Western flavors reflects the resourcefulness and resilience of Korean culture in the face of wartime scarcity.
- Budae Jeongol offers a delicious and historical connection to Korean cuisine, making it a must-try for both enthusiasts and newcomers to the cuisine.
History
Budae Jeongol's origins trace back to the Korean War, when food scarcity compelled locals to make the most of limited resources.
With shortages of fresh meat and vegetables, resourceful cooks began incorporating leftover military rations into their stews, creating a savory blend of flavors. The name "Budae Jeongol" literally means "army base stew," reflecting its humble beginnings on the fringes of military camps.
Over time, this ingenious dish evolved, as home cooks experimented with new ingredients.
Spam, hot dogs, and other canned meats became staples, along with gochujang (Korean chili paste) and assorted vegetables. The result was a robust, spicy concoction that nourished families and became a beloved comfort food.
Today, budae jeongol remains a popular menu item, with each region and restaurant putting its own unique spin on the recipe.
From its wartime origins to its enduring legacy, this dish embodies the resilience and culinary creativity of the Korean people.
Cooking Steps
To prepare the delectable Budae Jeongol, you'll want to start by gathering all the necessary ingredients. This includes staples like spam, hot dogs, bacon, and kimchi, as well as gochujang (Korean chili paste), soy sauce, and garlic.
Once you've rounded up everything, it's time to get cooking!
Begin by sautéing the spam, hot dogs, and bacon in a large pot or Dutch oven. This will create a flavorful base for the stew.
Next, add the kimchi, gochujang, soy sauce, and garlic. Stir everything together and let it simmer for a bit, allowing the flavors to meld.
Now, it's time to add the broth. You can use a pre-made beef or vegetable broth, or even some water. Bring the mixture to a boil, then reduce the heat and let it simmer until the flavors are fully developed, about 20-30 minutes.
Step 1. Gather Ingredients and Equipment
Assembling the necessary components is the initial step in crafting the flavorful Korean army stew.
You'll need a large pot or Dutch oven to accommodate all the delicious ingredients. A sturdy ladle will come in handy for serving up generous portions. Don't forget to grab a sharp knife for chopping the vegetables.
For the stew itself, you'll need ground pork, spicy sausage, Spam, hot dogs, and a variety of veggies like onions, carrots, cabbage, and mushrooms.
Gochujang, a Korean chili paste, provides the signature heat, while soy sauce, garlic, and ginger add depth of flavor. Tofu, ramen noodles, and instant tteokbokki rice cakes are optional additions that can take this dish to the next level.
With all your tools and ingredients assembled, you're ready to start cooking up a storm in the kitchen.
Get ready to experience the bold, comforting flavors of this iconic Korean dish!
Step 2. Add Vegetables
With your prep work complete, it's time to start cooking! Grab those sliced and diced veggies and let's get them into the pot.
First, toss in the mushrooms. They'll add an earthy, savory depth to the stew. Next, go for the onions – their sweetness will balance out the other flavors.
Don't forget the cabbage! It'll bring a lovely crunch and fresh element to the dish.
Now, let's get those carrots in there. They'll add a pop of color and natural sweetness.
And the green onions? They'll lend a delightful aromatic touch.
Finally, add the bean sprouts. Their crunchy texture will be the perfect contrast to the tender meats.
As the vegetables simmer, you'll start to smell the aromas wafting through your kitchen. Get ready for a flavor explosion!
The stew is really coming together now. Keep an eye on it and adjust the seasoning as needed. Soon, you'll have a hearty, comforting bowl of Budae Jeongol ready to enjoy.
Step 3. Add Broth and Seasonings
Now, pour in the broth to get the party started. You'll want to add enough to cover all the ingredients, about 4 cups of beef or chicken broth. Stir it up and let the flavors mingle.
Next, it's time to season this stew to perfection. A couple tablespoons of soy sauce will give it a savory umami boost. Don't forget a teaspoon of sesame oil – it adds a lovely nutty aroma. For a little heat, sprinkle in some crushed red pepper flakes. Lastly, a pinch of sugar will balance out the bold flavors.
Give it all a good stir and let the stew simmer until the vegetables are tender and the flavors have melded, about 10-15 minutes. Taste and adjust the seasoning as needed.
The broth and seasonings are the glue that hold this hearty stew together, making each bite a delicious adventure.
Step 4. Add Meat
Once the broth and seasonings have melded, it's time to add the protein that gives this stew its hearty, satisfying core.
You'll want to include a variety of meats – the more, the merrier! Start with some sliced spam or hot dogs, which are classic additions.
Then, toss in a few pieces of juicy, tender beef or pork. Don't forget the chicken, either! Shredded or cubed, it'll add a delightful texture.
Finally, for a real flavor explosion, sprinkle in some crumbled bacon. The smoky, savory notes will tie everything together perfectly.
As the meats simmer in the flavorful broth, they'll become infused with all those wonderful Korean seasonings.
Get ready for a mouthwatering mélange of textures and tastes! With the protein added, this budae jjigae is truly becoming a complete, satisfying meal.
Keep a close eye as it all cooks together, and get ready to dive in once it's ready.
Step 5. Simmer Until Flavors Meld
After you've added all the delightful meats, let the stew simmer gently on the stovetop. This allows the flavors to meld together, creating a harmonious blend that'll tantalize your taste buds.
As the pot bubbles away, the aromas will fill your kitchen, making your mouth water in anticipation. Stir the stew occasionally, ensuring the ingredients cook evenly and nothing sticks to the bottom.
The longer you let it simmer, the more intense the flavors will become. Give it at least 20 minutes, but up to an hour for the ultimate flavor experience. Don't be tempted to rush this step – patience is key!
Once the time is up, take a deep breath and savor the enticing aroma. Your Budae Jeongol is now ready to be served, bursting with a symphony of flavors that'll transport you straight to the heart of Korea.
Get ready for a culinary adventure like no other!
Final Thoughts
Budae jeongol, the unique Korean army stew, offers a captivating culinary experience that blends the flavors of the East and West. As you delve into this hearty dish, you'll be amazed by the depth of flavor and the way it brings together an array of unexpected ingredients. From the savory sausages to the tangy kimchi, each element plays a crucial role in creating the perfect balance of sweet, salty, and spicy.
What makes budae jeongol so special is its ability to transport you to a different time and place. It's a dish that was born out of necessity, a testament to the resourcefulness and resilience of the Korean people.
As you savor each bite, you can't help but feel a sense of connection to the history and culture that shaped this incredible recipe.
Whether you're a seasoned Korean food enthusiast or a newcomer to the cuisine, budae jeongol is a must-try dish that will leave a lasting impression on your taste buds and your heart.
Frequently Asked Questions
What Is the Origin of the Name "Budae Jeongol"?
The name "budae jeongol" comes from the Korean words for "army base" (budae) and "stew" (jeongol). It reflects the dish's origins, which were created by Koreans near US military bases after the Korean War using leftover American ingredients.
Are There Any Vegetarian or Vegan Versions of Budae Jeongol?
While traditional budae jeongol features meats, you can find vegetarian or vegan versions that swap in plant-based protein sources like tofu, mushrooms, or soy-based meat alternatives to create a meatless take on this popular Korean dish.
Can Budae Jeongol Be Made With Different Types of Meat?
Absolutely! You can make budae jeongol with different types of meat. Whether it's beef, pork, or even chicken, the stew's flavors will adapt to the protein you choose. Get creative and experiment to find your perfect version.
How Long Can Leftover Budae Jeongol Be Stored?
You can store leftover budae jeongol in the fridge for up to 4 days or in the freezer for 2-3 months. Make sure to let it cool completely before refrigerating or freezing.
Are There Any Unique Serving Traditions for Budae Jeongol?
When serving budae jeongol, you'll often find it's customized to individual tastes. Some may top it with a fried egg or kimchi, while others enjoy it straight from the communal pot. It's a shared experience, perfect for gathering with friends and family.
Ji-hoon is a skilled chef specializing in traditional and modern Korean cuisine. From savory bulgogi and kimchi to hearty stews and sizzling bibimbap, Ji-hoon’s recipes bring Korea’s bold, spicy, and umami-rich flavors to your kitchen. He focuses on authentic techniques and fresh ingredients that make Korean food so vibrant and flavorful.
Korean Cuisine
Menbosha Recipe: Korean Shrimp Toast You’ll Love
Create delicious Menbosha, a Korean shrimp toast that’s crispy and flavorful—discover the secret to this mouthwatering snack that everyone will enjoy!
You're going to love making Menbosha, a tasty Korean shrimp toast! Start by mixing fresh shrimp with chopped green onions, garlic, and some zesty seasonings. Spread this shrimp mixture on slices of bread, and fry them in hot oil until they turn golden brown and crispy. Once they're ready, let them drain on paper towels to get rid of any extra oil. Menbosha makes for a fun snack or appetizer, perfect for sharing with family and friends. Each bite is a delightful mix of flavors! Keep exploring, and you'll discover even more tasty tips and tricks!
Key Takeaways
- Menbosha is a delightful Korean shrimp toast combining crispy bread and seasoned shrimp, perfect as an appetizer or snack.
- The dish features fresh shrimp mixed with garlic, green onion, and sesame oil for a unique flavor profile.
- Fry the prepared shrimp toast in oil until golden brown for optimal crispiness, about 2-3 minutes per side.
- Serve Menbosha with dipping sauces like soy sauce or spicy mayo to enhance the taste experience.
- Enjoy making Menbosha with family and friends, fostering creativity and creating memorable culinary moments.
History
Menbosha, a delightful dish originating from Chinese cuisine, has a rich history that reflects its cultural significance. This tasty treat is often made with shrimp, bread, and spices, creating a crispy snack that's loved by many.
You might be surprised to learn that Menbosha has roots in Chinese culinary traditions, where it was enjoyed by families for generations. It's believed that this dish spread to other parts of Asia, adapting along the way to include different flavors and ingredients.
When you bite into Menbosha, you're tasting a blend of cultures and histories, as it combines elements from various regions. The dish gained popularity in places like Korea, where it became a beloved street food.
People of all ages enjoy Menbosha, making it not just a meal, but a fun social experience. Whether you're at a bustling market or enjoying it at home, each crispy piece tells a story of connection and community.
Ingredients:
- 500g ground meat (beef, lamb, or chicken)
- 1 medium onion, finely chopped
- 2 cloves garlic, minced
- 1 teaspoon ground cumin
- 1 teaspoon ground coriander
- 1 teaspoon paprika
- 1/2 teaspoon salt
- 1/2 teaspoon black pepper
- 1/4 teaspoon cayenne pepper (optional for heat)
- 1 cup breadcrumbs
- 2 large eggs
- 4 slices of bread
- Vegetable oil for frying
Cooking Instructions:
In a large bowl, combine the ground meat with the chopped onion, minced garlic, cumin, coriander, paprika, salt, black pepper, and cayenne pepper (if using). Mix well until all ingredients are evenly incorporated.
Take a slice of bread, dip it in water briefly, and then remove excess moisture. Place a spoonful of the meat mixture in the center of the bread and fold it over, pressing the edges to seal. Repeat this process with the remaining slices of bread and meat mixture.
In a shallow dish, whisk the eggs and then dip each bread-wrapped meat patty into the egg mixture, ensuring thorough coverage. Heat vegetable oil in a frying pan over medium heat and fry the Menbosha until golden brown on both sides, about 3-4 minutes per side. Remove and drain on paper towels.
Extra Tips:
When preparing Menbosha, ensure that the meat mixture is well-seasoned to enhance the flavors. You can also experiment with different spices or add chopped herbs like parsley or mint for a fresh touch.
If you prefer a healthier version, consider baking the Menbosha in the oven at 180°C (350°F) for about 20-25 minutes until golden brown, turning halfway through. Serve the dish warm for the best flavor, and don't forget to pair it with a delicious dipping sauce, such as tahini or a spicy yogurt dip, to elevate your Menbosha experience.
Cooking Steps
To make delicious Menbosha, you'll follow a straightforward series of cooking steps that ensure perfect results.
First, start by peeling and deveining your shrimp. Rinse them under cold water, then chop them finely. Next, mix the shrimp with a little salt, pepper, and your choice of garlic or ginger for extra flavor.
Now, grab your bread! You can use white or whole wheat slices. Cut off the crusts and flatten each slice with a rolling pin. Spread the shrimp mixture evenly on one side of each slice, then press another slice on top to make a sandwich.
Heat some oil in a frying pan over medium heat. While it's heating, beat an egg in a bowl. Dip each sandwich into the egg, coating it well.
Once the oil is hot, carefully place the sandwiches in the pan. Cook them for about 3-4 minutes on each side until they're golden brown and crispy.
Step 1. Prepare Shrimp Mixture
Creating a flavorful shrimp mixture is essential for achieving the perfect Menbosha. First, you'll want to gather fresh shrimp—make sure they're peeled and deveined. If you can, use medium-sized shrimp, as they'll give you a nice bite.
Next, chop the shrimp into small pieces. You can use a knife or a food processor, but be careful not to over-process them; you want some texture!
Once your shrimp is ready, transfer them to a mixing bowl. It's time to bring in some friends to the party! You can add a bit of finely chopped green onion for a pop of color and flavor. Some people like to include a splash of sesame oil to enhance the richness. If you want a touch of sweetness, try adding a pinch of sugar too!
Now, mix everything together gently with a spatula or your hands. It's important to combine all the ingredients well, but you don't want to mash the shrimp.
You're aiming for a nice, chunky mixture that will spread beautifully on your bread later. With this shrimp mixture prepped, you're one step closer to making delicious Menbosha!
Step 2. Add Seasoning to Shrimp
Now that you've prepared your shrimp mixture, it's time to add some seasoning to elevate the flavors. This step is super important because it makes your Menbosha taste amazing!
Start by grabbing some salt. Just a pinch will do, but don't be shy—taste as you go! Next, add some pepper for a little kick. It's like giving your shrimp a friendly nudge!
For a zesty twist, squeeze in some fresh lemon juice. It brightens the whole flavor and makes your shrimp sing! If you like a hint of sweetness, a dash of sugar can balance everything out.
Now, let's talk about garlic! Minced garlic adds a yummy aroma that everyone will love. You can also sprinkle in some sesame oil for that authentic Korean flavor. It's rich and nutty, making your dish extra special.
Once you've added your seasonings, gently mix everything together. You want all those flavors to hug each other!
Take a moment to taste the mixture. If it needs a little more seasoning, don't hesitate to add it. Trust your taste buds! You're almost ready for the next exciting step!
Step 3. Spread on Bread Slices
With your seasoned shrimp mixture ready, it's time to spread it onto your bread slices. Grab your favorite bread; white or whole grain works great! Lay out the slices on a clean cutting board or a plate.
Using a butter knife or a small spatula, scoop up some of that delicious shrimp mixture. You want to spread it evenly across each slice, covering the entire surface. Make sure you get a nice, thick layer. This will help create a tasty toast!
As you spread, think about how yummy each bite will be. You might even want to hum a little tune as you work! It's all about having fun in the kitchen. If you have extra shrimp mixture, don't worry; you can always save it for later or use it to make more toast!
Once you've spread the shrimp mixture on all your slices, take a moment to admire your creation. Each slice is now a little masterpiece, ready for its next big adventure!
Don't forget to clean up your workspace; we want to keep everything neat and tidy. You're doing an amazing job, and soon you'll have a delicious treat to share with family and friends!
Step 4. Fry Until Golden Brown
How do you know when your shrimp toast is ready to fry? First, you'll want to heat your oil in a pan over medium heat. A good rule of thumb is to test the oil by dropping a tiny bit of bread in. If it sizzles and bubbles, you're all set!
Now, carefully place your shrimp toast into the hot oil, making sure not to overcrowd the pan. This way, each piece gets enough space to cook evenly.
As your toast fries, keep an eye on it. You want that beautiful golden brown color! It usually takes about 2 to 3 minutes on each side. Use a spatula to gently flip the toast, but be careful not to splash the hot oil. You'll know it's time to flip when the bottom is crispy and a lovely shade of gold.
When both sides are perfectly browned, it's a sign that your shrimp toast is ready to come out. The aroma will fill your kitchen, making everyone eager to taste!
Step 5. Drain on Paper Towels
Once your shrimp toast has reached that perfect golden brown, it's time to remove it from the oil. Carefully lift each piece using a slotted spoon or tongs, letting the excess oil drip off. This step is super important because it helps keep your menbosha crunchy, and nobody likes soggy toast!
Now, grab a plate and lay down some paper towels. Place each piece of shrimp toast on the towels, giving them a little space. The towels will soak up any leftover oil, leaving your delicious menbosha light and crispy. You might want to pat the tops gently with another paper towel to get rid of even more oil.
While your shrimp toast is cooling, you can start thinking about dipping sauces. You could whip up some soy sauce or even a spicy mayo! Just imagine dipping that golden piece of toast into your favorite sauce—yum!
After a few minutes, once they're cool enough to handle, it's time to dig in. Your menbosha is ready to be enjoyed by family and friends. So gather around, share some smiles, and savor every bite!
Final Thoughts
As you wrap up your culinary adventure with menbosha, remember that this delightful dish isn't just about the taste but also the experience of making it. Cooking can be so much fun, especially when you get to try new flavors and techniques.
You've turned simple ingredients into something special, and that's something to be proud of!
Now that you've mastered menbosha, think about how you can share it with family and friends. Imagine their smiles when they bite into that crispy, shrimp-filled toast.
You've created a little piece of Korean delight that's perfect for snacking or serving at gatherings. Plus, it's a great way to introduce others to new foods.
Don't forget to experiment! You can add your favorite spices or try different types of bread.
Each time you make menbosha, you can discover something new. So, roll up your sleeves and get ready to whip up another batch.
With every toast you make, you're not just cooking—you're creating memories. Enjoy every bite, and happy cooking!
Frequently Asked Questions
Can I Use Frozen Shrimp for Menbosha?
Yes, you can use frozen shrimp for menbosha. Just make sure to thaw them thoroughly before cooking. This'll ensure they're tender and flavorful, giving you the delicious results you're aiming for in your dish.
What Bread Types Are Best for Making Menbosha?
For making menbosha, you'll want to choose soft white bread or brioche. These types absorb flavors well, creating a delicious contrast to the shrimp filling, enhancing the overall taste and texture of the dish.
How Do I Store Leftover Menbosha?
To store leftover menbosha, let them cool completely, then place them in an airtight container. Refrigerate for up to three days or freeze for longer storage. Reheat in the oven for best texture. Enjoy!
Can I Make Menbosha Gluten-Free?
Yes, you can definitely make menbosha gluten-free! Just swap regular bread with gluten-free options, like rice bread or gluten-free flour. Ensure all other ingredients are also gluten-free to enjoy this delicious treat without any worries.
What Dipping Sauces Pair Well With Menbosha?
When enjoying menbosha, you'll love dipping them in spicy mayo, sweet chili sauce, or soy sauce. Each adds a unique flavor that complements the shrimp toast perfectly, enhancing your overall tasting experience. Enjoy experimenting!
Ji-hoon is a skilled chef specializing in traditional and modern Korean cuisine. From savory bulgogi and kimchi to hearty stews and sizzling bibimbap, Ji-hoon’s recipes bring Korea’s bold, spicy, and umami-rich flavors to your kitchen. He focuses on authentic techniques and fresh ingredients that make Korean food so vibrant and flavorful.
-
Brazilian Cuisine3 months ago
Tacacá
-
Polish Comfort Food3 months ago
Krupnik (Barley Soup)
-
Brazilian Cuisine3 months ago
Caldeirada
-
Brazilian Cuisine3 months ago
Chicken in Brown Sauce
-
Southern Comfort Food3 months ago
Cheese Straws
-
African Cuisine3 months ago
Kedjenou (Ivory Coast)
-
Polish Comfort Food3 months ago
Vegetable Salad
-
American Diner Classics3 months ago
The Maillard Reaction: Understanding the Chemistry of Browning {Food Science and Cooking}