Connect with us

Kitchen Hacks and Tips

Knife Sharpening: Maintaining Your Most Important Tool

Blades that are razor-sharp unlock a world of culinary possibilities, transforming even the simplest tasks into a delightful experience. Discover the secrets of effortless knife sharpening.

Published

on

essential knife maintenance techniques

Knife sharpening's been around forever – even ancient Egyptians knew how important it was! Your knives are your most crucial kitchen tools, so you'll want to keep them in tip-top shape. Whetstones, gentle pressure, and a consistent angle are the keys to sharpening like a pro. After, clean off any metal bits, wipe it down with oil, and you're all set. Regular honing and maintenance mean your knives will last for years. Taking good care of your blades makes cooking a breeze and way more fun. Ready to take your skills to the next level?

Key Takeaways

  • Proper knife sharpening techniques, including the use of whetstones, ensure professional-level blade edges and reliable cutting performance.
  • Regular honing and cleaning after each use prolong the lifespan of kitchen knives and maintain their sharpness.
  • Consistent sharpening angle and the absence of burrs on the blade are crucial for maintaining optimal edge sharpness.
  • Quality knives, when properly maintained, serve as essential and trustworthy kitchen tools that enhance cooking efficiency and enjoyment.
  • Committing to basic knife care practices, such as proper storage and periodic professional sharpening, results in reliable and long-lasting kitchen companions.
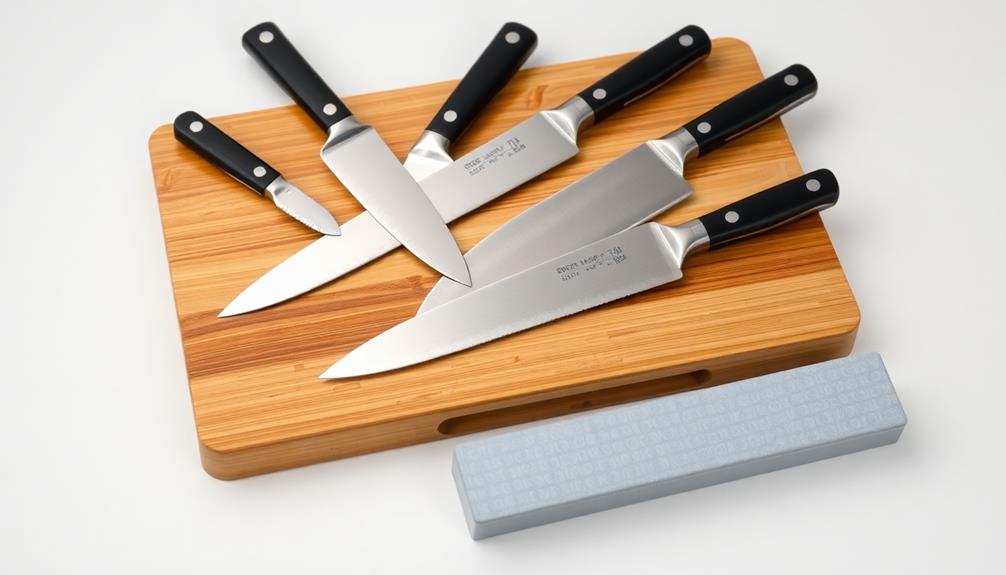
History

Knife sharpening has, for centuries, been an essential skill in both culinary and industrial domains. From the ancient Egyptians who used sharpening stones to keep their blades keen, to the skilled blacksmiths of medieval Europe who forged and honed the weapons of knights, the art of sharpening has a rich and fascinating history.

In the kitchen, chefs have long relied on sharp knives to efficiently slice, dice, and chop their ingredients. A well-sharpened blade not only makes food preparation faster and easier, but it also helps to preserve the delicate flavors and textures of the ingredients.

Outside the kitchen, sharpening has been crucial for tradespeople, from carpenters and woodworkers to landscapers and mechanics, who rely on sharp tools to get the job done right.

Today, the tradition of knife sharpening lives on, with a variety of techniques and tools available to help keep your blades in top condition. Whether you prefer the classic whetstone or the convenience of an electric sharpener, the art of sharpening remains an essential skill for anyone who values a sharp, reliable edge.

Recipe

Knife sharpening is an essential skill for any home cook or professional chef. A sharp knife not only makes food preparation easier and more efficient, but it also improves safety by reducing the risk of slips and cuts. In this recipe, we'll guide you through the process of sharpening a knife using a whetstone, a time-honored method that ensures a razor-sharp edge.

Advertisement

Whetstones, also known as sharpening stones, are the preferred tool for serious knife enthusiasts. These natural or synthetic stones come in a variety of grits, from coarse to fine, allowing you to both sharpen and hone your blade. The process may take some practice, but with the right technique, you can achieve a professional-level edge on your knives.

Ingredients:

  • Whetstone (preferably a combination stone with coarse and fine grits)
  • Knife to be sharpened
  • Water for lubricating the stone

Instructions:

Soak the whetstone in water for about 10-15 minutes before use. This helps to create a slurry that aids the sharpening process.

Place the stone on a stable surface, such as a damp towel or non-slip mat, to prevent it from moving during sharpening. Hold the knife at a consistent 20-30-degree angle to the stone and apply gentle pressure as you move the blade across the surface, alternating between the left and right sides.

Repeat this process, moving from the coarse to the fine grit, until you achieve the desired sharpness.

Advertisement

When sharpening, it's important to maintain a consistent angle and apply even pressure throughout the stroke. Take your time and avoid rushing the process, as this can lead to an uneven edge.

After sharpening, be sure to clean and dry your knife thoroughly to prevent rust. With regular maintenance using a whetstone, your knives will stay sharp and reliable for years to come.

Cooking Steps

Before you start cooking, you'll want to make sure your knife is razor-sharp.

First, carefully clean the blade to get rid of any food or debris.

Then, use a sharpening stone to hone the edge, keeping the angle consistent as you work.

Advertisement

Remember to hone the blade gently – you don't want to damage the metal.

With a little care, your knife will be slicing and dicing like a pro in no time!

Step 1. Carefully Clean the Knife Blade

clean knife blade thoroughly

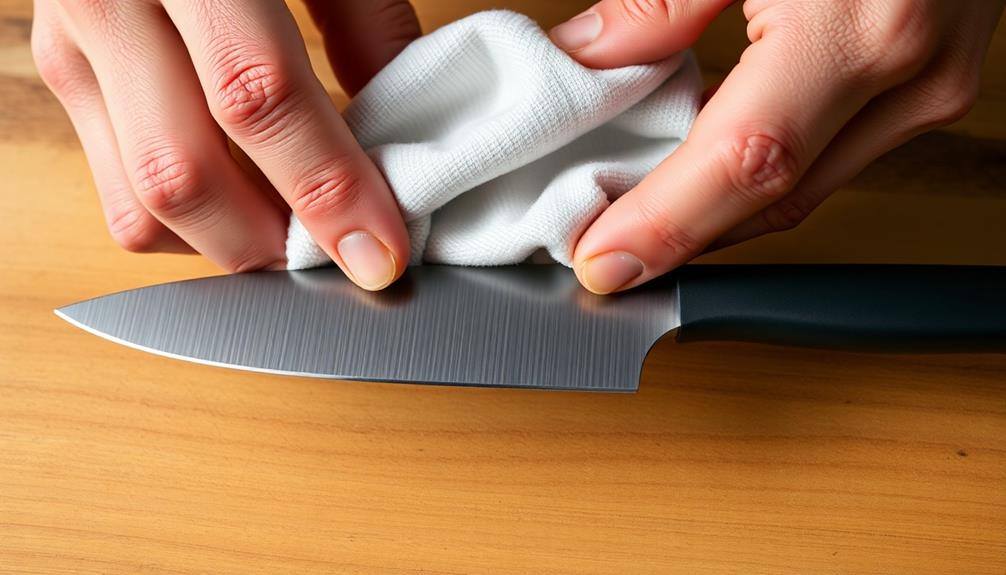
Once you've finished sharpening your knife, it's important to carefully clean the blade. Start by rinsing the knife under warm, soapy water. This will remove any metal filings or debris left over from the sharpening process.

Gently scrub the blade with a soft-bristled brush, making sure to get into all the nooks and crannies. Rinse the blade thoroughly until the water runs clear, then dry it completely with a clean, lint-free cloth.

Next, use a small amount of food-safe mineral oil or knife polish to wipe down the entire blade. This will help protect the metal and keep it from rusting. Be sure to get the oil or polish into the joints and along the spine of the blade.

Once you're done, give the knife a final wipe-down with a clean cloth to remove any excess.

Advertisement

Cleaning your knife properly after sharpening is crucial for maintaining its razor-sharp edge and ensuring it's ready for your next culinary adventure. With a little care, your knife will stay in tip-top shape for years to come.

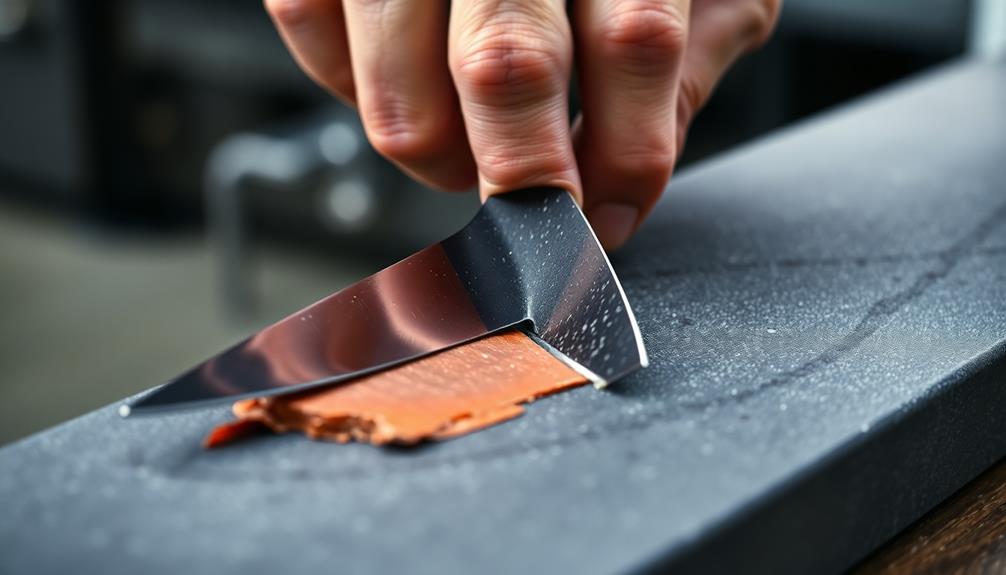
Step 2. Use a Sharpening Stone

sharpening stone usage step

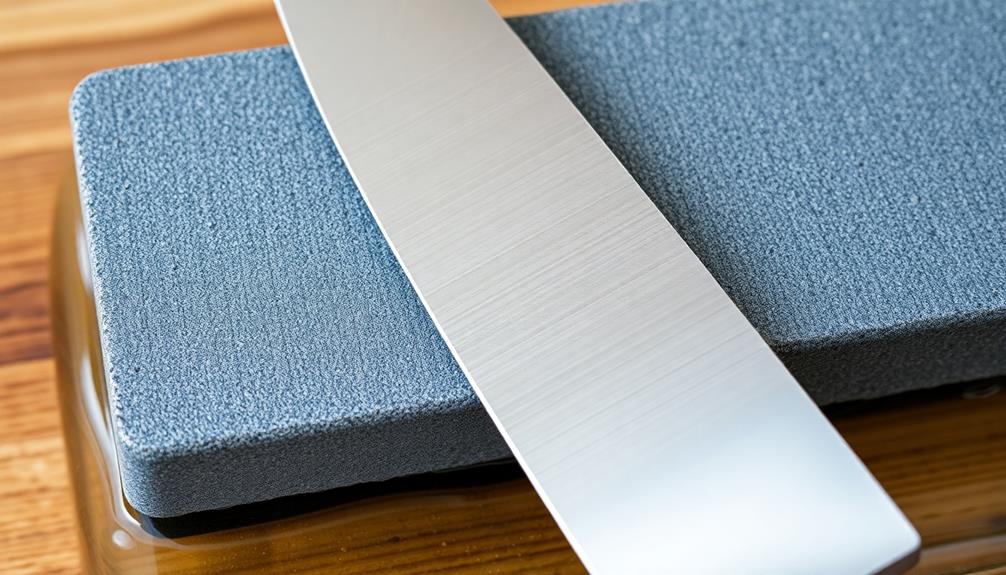
To sharpen your knife, you'll need a sharpening stone. This special stone will help you get that blade razor-sharp again!

First, soak the stone in water for 5-10 minutes. This will help the stone glide smoothly across the knife.

Place the stone on a stable surface, then run the blade along the stone at a 20-30 degree angle. Apply gentle pressure and move the knife in short, forward strokes.

Flip the knife and repeat on the other side. Keep alternating until you feel that the edge is nice and sharp. Remember to sharpen both sides evenly for the best results.

Rinse the knife when you're done to remove any metal filings. Be careful – the blade will be extremely sharp!

Advertisement

Now your knife is ready to slice, chop, and dice with ease. Sharpening takes some practice, but it's a great skill to have. Your trusty kitchen knife will thank you!

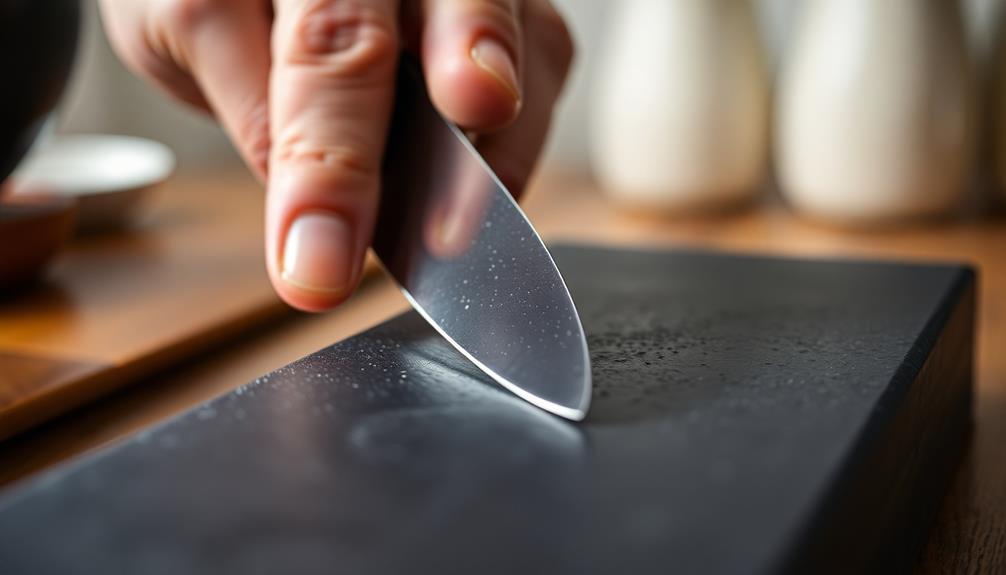
Step 3. Inspect the Sharpening Angle

check sharpening angle carefully

After sharpening your knife, it's important to inspect the angle. You'll want to make sure the blade is nice and sharp, so hold it up to the light. See how the edge reflects the light? That's a good sign it's been sharpened properly.

Next, run your finger gently along the edge. It should feel smooth and burr-free. If you feel any little bumps or rough spots, you may need to go back and sharpen it some more.

The sharpening angle is key – you're aiming for around 20 to 25 degrees. Any steeper and the blade might be too fragile. Any less and it won't cut as well. Use your eyes and fingers to check that the angle looks right.

If it's a bit off, you can carefully adjust your sharpening technique next time. With a little practice, you'll get the hang of it and have super sharp knives that'll make cooking a breeze!

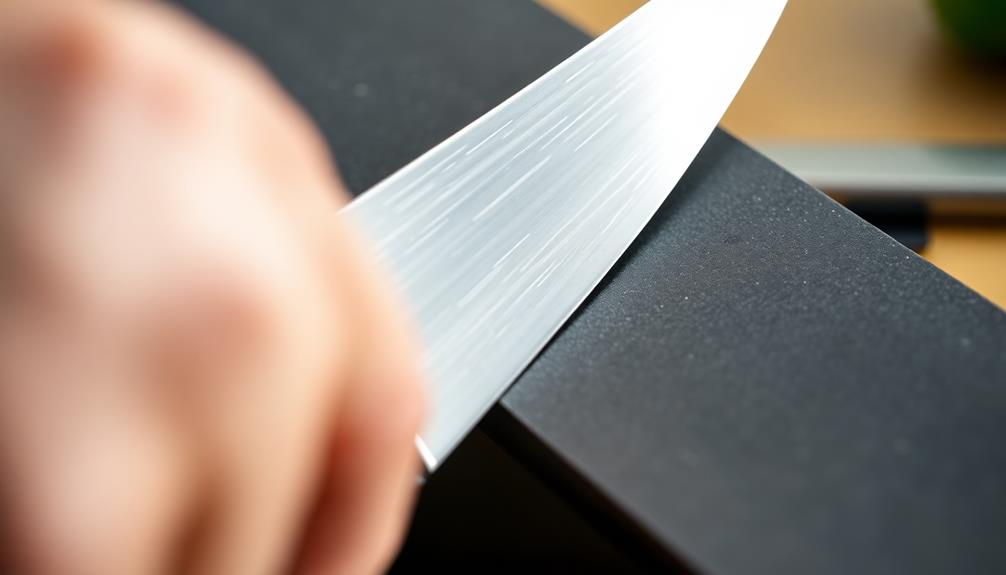
Step 4. Maintain Consistent Sharpening Angle

consistent sharpening angle maintenance

By maintaining a consistent sharpening angle, you'll ensure your knife's edge remains keen and effective. When you sharpen your knife, it's crucial to keep the blade at the same angle every time. This helps the edge stay nice and sharp, making your knife a joy to use in the kitchen.

Picture yourself gliding the blade along the sharpening stone at a perfect 20-degree angle. Feel the smooth, rhythmic motion as you carefully work the edge. It's important to keep the angle consistent, moving the knife in long, even strokes. This way, you'll gradually refine the edge, sharpening it to perfection.

Advertisement

Staying focused on that consistent angle takes some practice, but it's well worth the effort. Your knife will slice and chop with ease, making food prep a breeze.

Plus, a consistently sharp blade is safer to use – it'll glide through ingredients without slipping or skipping. So, keep that angle true, and enjoy the convenience of a super-sharp knife!

Step 5. Hone the Blade Gently

gently sharpen the blade

Gently hone the blade of your knife after each use to maintain its sharp edge. Use a honing steel – that's the long, skinny metal rod you might've seen chefs using.

Carefully draw the blade along the honing steel at a 20-degree angle, making 10-15 strokes on each side. You'll feel the blade gliding smoothly across the steel, almost like it's dancing! This realigns the edge of your knife, keeping it razor-sharp and ready for your next cooking adventure.

Be gentle, move slowly, and keep the angle consistent. You don't want to damage the blade.

After honing, give the knife a quick wipe down to remove any metal filings. Then it's ready to slice, chop, and dice with ease! Honing only takes a minute, but it makes a big difference. Your knife will feel brand new every time you use it.

Advertisement

Get in the habit of honing after each use, and your trusty blade will last for years to come.

Final Thoughts

Knife sharpening is an essential skill that can elevate your culinary experience.

With a sharp knife, you'll find chopping, slicing, and dicing a breeze. Imagine the satisfaction of gliding through thick-skinned vegetables or tender meats with ease, rather than struggling with a dull blade.

Remember, a well-cared-for knife is a joy to use.

It's like having a trusty sidekick in the kitchen, ready to assist you in creating delicious meals. Maintain your knives, and they'll reward you with years of faithful service. With sharp knives and the right tools at hand, meal prep becomes smoother and more enjoyable, allowing you to focus on creativity in the kitchen. Whether you’re chopping ingredients for a fresh salad or preparing vegetables for slow cooker meal ideas, the quality of your knife can make all the difference. A little maintenance today can save you time and frustration down the road, ensuring your cooking experience stays enjoyable.

Advertisement

Frequently Asked Questions

How Often Should I Sharpen My Kitchen Knives?

You should sharpen your kitchen knives every 6-12 months, depending on how frequently you use them. Regular sharpening will keep your blades sharp and help them last longer, ensuring they're always ready for your cooking tasks.

What Are the Best Tools to Sharpen Knives?

The best tools to sharpen your knives include manual knife sharpeners, electric knife sharpeners, whet stones, and professional sharpening services. Consider your budget, skill level, and the frequency of sharpening when choosing the right tool for your needs.

Can I Sharpen My Knives With a Grinder or Power Tool?

You can sharpen your knives with a grinder or power tool, but it requires skill and care to avoid damaging the blade. It's generally better to use a manual sharpener or have your knives professionally sharpened.

How Do I Sharpen Serrated Knives?

To sharpen serrated knives, you'll need a specialty sharpener or a small file. Carefully run the tool along the serrated edges, following the existing angle. Take your time and don't apply too much pressure to avoid damaging the blade.

What Should I Do if My Knife Is Damaged?

If your knife is damaged, don't try to sharpen it. Instead, you should take it to a professional knife sharpener who can properly assess the damage and repair or replace the blade as needed.

Advertisement

Advertisement

Kitchen Hacks and Tips

Maximizing Fridge Space: Organization Tips for Small Kitchens

Discover the secret to transforming your cluttered fridge into an organized storage system that streamlines meal prep and cooking. There’s more where that came from.

Published

on

efficient fridge organization strategies

In a small kitchen, you can maximize your fridge space by following a few simple organization tips. Start with a deep clean – remove everything, wipe down the shelves, and eliminate stubborn stains. Group similar items together, like condiments, produce, and leftovers, for easy access. Label containers clearly to avoid mystery foods. Utilize vertical space by adding adjustable shelves or stackable bins. Rotate items regularly to ensure freshness and minimize waste. With a little time and effort, you'll transform your cramped refrigerator into an organized storage system that streamlines meal prep and cooking. And there's more where that came from.

Key Takeaways

  • Regularly clean the fridge and organize items into designated groups to maximize storage space and accessibility.
  • Label containers and shelves clearly to quickly identify contents and avoid food waste.
  • Utilize vertical space efficiently with adjustable shelves, stackable bins, and door organizers.
  • Rotate items regularly to ensure freshness and minimize spoilage.
  • Customize the fridge layout based on personal cooking habits and seasonal inventory changes.

History

Organizing the fridge has been a household chore for centuries. Ancient Egyptians used simple shelving to keep perishable foods separated and easily accessible.

In the Middle Ages, the wealthy stored their foods in cold storage rooms, while the less fortunate relied on icy streams and underground cellars. The invention of the mechanical refrigerator in the late 19th century revolutionized food storage, allowing families to preserve more items for longer periods.

As kitchens grew smaller in the 20th century, clever organization became crucial, as efficient storage strategies were essential for maximizing limited space. Homemakers experimented with stacking, labeling, and compartmentalizing their fridges.

The rise of plastics and organizational products in the 1950s further enabled fridge optimization. Today, smart fridges and apps provide digital solutions to maximize available space.

Though the methods have evolved, the timeless goal remains – to keep your kitchen well-stocked and your fridge running efficiently.

Advertisement

Recipe

Roasted Chicken with Vegetables

A perfectly roasted chicken with a variety of roasted vegetables is a classic and comforting dish. The rich, juicy meat paired with the caramelized, flavorful vegetables makes for a satisfying and nourishing meal. This recipe is easy to prepare and versatile, allowing you to customize the vegetable selection to your liking.

Roasting the chicken and vegetables together in the oven creates a delicious synergy of flavors, as the chicken juices baste the vegetables while they cook. The high heat caramelizes the natural sugars in the vegetables, resulting in a lovely golden-brown exterior and a tender, flavorful interior.

  • 1 whole chicken, 3-4 lbs
  • 3 medium potatoes, cubed
  • 2 carrots, peeled and cut into 1-inch pieces
  • 1 onion, sliced
  • 2 cloves garlic, minced
  • 2 tablespoons olive oil
  • 1 teaspoon dried thyme
  • Salt and pepper to taste

Preheat the oven to 400°F. Pat the chicken dry and season the inside and outside with salt and pepper. Place the chicken in a large roasting pan. Arrange the potatoes, carrots, onion, and garlic around the chicken. Drizzle the vegetables with olive oil and sprinkle with thyme, salt, and pepper.

Roast for 60-75 minutes, or until the chicken is cooked through and the vegetables are tender. Let the chicken rest for 10 minutes before carving and serving.

For best results, baste the chicken and vegetables with the pan juices a few times during the cooking process. This helps to keep the chicken moist and infuses the vegetables with even more flavor. Serve the roasted chicken and vegetables immediately, garnished with fresh herbs if desired.

Advertisement

Cooking Steps

Keep your fridge organized by cleaning the shelves regularly.

Group similar items together to find what you need quickly.

Be sure to label containers clearly and rotate items to ensure freshness.

Step 1. Clean the Refrigerator Shelves

clean refrigerator shelves thoroughly

Before you can begin reorganizing your fridge, it's crucial to ensure the shelves are clean and free of any spills or residue.

Start by removing all the items from the shelves, then use a mild detergent and warm water to wipe down the surfaces. Don't forget to pay extra attention to the corners and edges, where grime can accumulate.

Once the shelves are clean, dry them thoroughly with a clean cloth or paper towels. This will help prevent any leftover moisture from causing new stains or odors.

Advertisement

If you notice any stubborn stains, consider using a baking soda and water solution or a small amount of white vinegar to help lift them.

Step 2. Group Similar Items

organize related items together

With the shelves sparkling clean, it's time to group your fridge items by category. Grouping similar items together makes it easier to find what you need and reduces the chances of things getting lost in the back.

Start by gathering all your condiments and sauces in one area, then group your dairy products, produce, and leftovers.

Designate specific spots for frequently used items, like milk and eggs, so you don't have to hunt for them every time. Arrange taller items like jugs and pitchers on the top shelf, leaving the lower shelves for shorter items. This helps maximize vertical space and keeps commonly used items at eye level.

Don't forget to label and date any homemade items or leftovers. This prevents food from getting lost and spoiling.

With a well-organized fridge, you can see exactly what you have and grab what you need quickly, streamlining your meal prep and reducing food waste.

Advertisement

Step 3. Label Containers Clearly

clearly label your containers

Why not make the most of your organized fridge by clearly labeling all stored items? Labeling your containers is a game-changer when it comes to fridge organization. It'll save you time and reduce food waste by ensuring you always know what's lurking in the back.

Start by gathering some labels, whether that's stickers, chalkboard labels, or even just a permanent marker. Then, take a few minutes to label each item with the contents and the date it was stored. This way, you'll always be able to quickly identify what's inside and when it needs to be used.

Don't forget to label leftovers, too. Nothing's worse than discovering a mystery container a month later.

Labeling is especially crucial for items with similar packaging, like sauces or jams. With clear labels, you'll never again wonder which condiment is which.

Spend a few minutes labeling your fridge, and you'll be amazed at how much smoother your meal prep and grocery runs will be.

Step 4. Utilize Vertical Space Efficiently

maximize vertical storage solutions

One of the best ways to maximize your fridge's storage capacity is to utilize the vertical space efficiently. By keeping your fridge organized, you not only improve its functionality but also promote a healthier lifestyle by reducing food waste and ensuring that items are easily accessible.

Start by adding adjustable shelves or stackable containers to create multiple levels of storage. This allows you to neatly arrange taller items, like juice cartons or large bowls, on the lower shelves, while reserving the upper areas for shorter items like condiments or small snacks.

Advertisement

Consider using door organizers as well. These handy compartments attach to the inside of your fridge door, giving you easy access to frequently used items. You can sort items by category, such as keeping all your condiments in one section and your drinks in another.

Regular home cleaning is essential to maintain a fresh environment, which contributes to a better organization of your fridge. Vertical storage solutions like these ensure you're making the most of every square inch, so you can fit more in your fridge without things getting lost or buried.

Step 5. Rotate Items Regularly for Freshness

rotate items for freshness

Regularly rotating items in your fridge ensures their freshness and prevents spoilage. Prioritize moving older items to the front and placing newer ones in the back. This simple habit helps you consume food before it goes bad.

Start by categorizing your fridge contents – group similar items together for easy access.

Next, check expiration dates and move the oldest items to the front. Produce, dairy, and meats are especially perishable, so keep a close eye on them. Whenever you open the fridge, quickly scan the shelves and pull any items that need to be used soon.

Designate a "use first" area for these quick-to-spoil foods. Regularly rearranging your fridge also allows you to see what you have, reducing unnecessary purchases.

Advertisement

Remain vigilant about rotation, and you'll minimize food waste and ensure your fridge is stocked with fresh, flavorful ingredients.

Final Thoughts

Organizing your fridge doesn't have to be a daunting task. With a few simple strategies, you can maximize your storage space and keep your fridge organized for optimal freshness and efficiency.

Remember, consistency is key – stick to your new routines, and you'll soon find that maintaining an organized fridge becomes second nature.

Don't be afraid to experiment and find what works best for your needs. Maybe you'll discover that clear containers or labeled shelves make all the difference.

Or perhaps rearranging items by category proves more helpful than chronological order. The beauty of fridge organization lies in its flexibility – there's no one-size-fits-all solution, so feel free to tailor your approach.

Advertisement

Above all, stay vigilant. Regularly purge expired items, and make a habit of rotating your stock.

With a little time and effort, you can transform your fridge into a well-oiled machine, ensuring your ingredients stay fresh and your kitchen runs smoothly. With thoughtful organization and the right tools, you’ll not only minimize food waste but also make meal prep a breeze. While you’re upgrading your kitchen game, consider incorporating the best highend espresso machines to elevate your morning routine and keep your culinary energy high. A well-organized fridge paired with premium appliances can truly streamline your daily tasks and enhance your cooking experience.

Frequently Asked Questions

How Can I Adjust the Temperature Settings in My Fridge?

To adjust your fridge's temperature settings, look for the temperature controls, which are usually located inside or on the exterior of the appliance. Experiment with different settings to find the optimal temperature that keeps your food fresh.

What Are the Best Methods for Keeping Food Fresh Longer?

To keep your food fresh longer, use airtight containers, store items properly, and avoid overstuffing your fridge. Regularly check expiration dates and rotate your stock to prevent waste. Proper fridge organization is key to maximizing freshness.

How Can I Prevent Odors From Spreading in My Small Fridge?

To prevent odors from spreading in your small fridge, use airtight containers, baking soda, and charcoal bags. Regularly clean the fridge, and avoid storing strong-smelling foods together. These simple steps will keep your fridge fresh and your kitchen smelling great.

Advertisement

Can I Store Certain Items Outside of the Fridge to Save Space?

Yes, you can definitely store certain items outside of the fridge to save space. Items like potatoes, onions, and garlic often do better at room temperature and won't take up precious fridge real estate.

What Are the Most Efficient Ways to Organize My Fridge Shelves?

You can maximize your fridge space by using adjustable shelves, baskets, and bins to organize items. Label and group similar items together, and store frequently used items at eye level for easy access.

Continue Reading

Kitchen Hacks and Tips

Casserole Creations: Comforting One-Dish Meals

Timeless and versatile, these comforting casserole creations offer a delightful blend of flavors and textures, making them a family-friendly favorite. Discover more about these one-dish wonders.

Published

on

comforting one dish casserole meals

Casserole dishes are timeless classics that continue to delight home cooks. These comforting one-dish meals have come a long way from their early 1900s origins, evolving into diverse and creative creations. You'll find tender chicken, sautéed veggies, and creamy sauces blending with classic Italian flavors for a hearty, satisfying meal. The best part? Casserole recipes are easy to assemble, with minimal prep and hands-off oven cooking. Plus, they're wonderfully versatile – easily adaptable to dietary needs and seasonal ingredients. Whether you're feeding a crowd or craving leftovers, these casserole creations are sure to become new family favorites. Uncover more delightful details about these comforting classics.

Key Takeaways

  • Casserole dishes are versatile, offering convenience and ease of preparation for busy weeknights and special occasions.
  • Casseroles blend traditional ingredients, such as chicken, vegetables, and creamy sauces, to create hearty and comforting one-dish meals.
  • The baking process allows for hands-off meal preparation and enhances the flavors of the ingredients.
  • Casseroles can be customized with a variety of ingredients, catering to diverse dietary preferences and personal tastes.
  • Casserole recipes encourage culinary creativity, allowing for experimentation with different flavors, textures, and presentation styles.

History

Casseroles have long been a staple in many households, dating back to the early 1900s. These one-dish meals gained popularity as they provided a convenient and hearty way to feed families. Back then, home cooks would often use leftovers and inexpensive ingredients to create comforting casseroles.

As time passed, casseroles evolved, with recipes becoming more diverse and creative. Casserole dishes allowed for experimentation, as cooks could easily adjust the flavors and ingredients to suit their tastes. From classic tuna and green bean casserole to modern vegetable-packed options, the versatility of casseroles has made them a go-to choice for busy weeknights and special occasions alike.

Today, casseroles remain a beloved comfort food, reminding many of warm, homemade meals shared with loved ones.

Whether baked in the oven or slow-cooked, these one-dish wonders continue to bring families together around the table, creating memories and satisfying cravings for delicious, hearty meals.

Recipe

Casserole dishes are a beloved comfort food, offering a hearty and satisfying meal with minimal effort. This particular recipe for Casserole Creations showcases a delectable blend of flavors that will delight your taste buds. Incorporating elements of traditional Italian cuisine can elevate your casserole game, making it even more comforting and delicious.

Advertisement

At the heart of this dish lies a combination of tender chicken, sautéed vegetables, and a creamy sauce that ties everything together. The use of classic casserole ingredients, such as rice or pasta, creates a filling and balanced meal that can easily feed a crowd or provide leftovers for the week.

  • Boneless, skinless chicken breasts
  • Cream of mushroom soup
  • Frozen mixed vegetables
  • Cooked rice or pasta
  • Shredded cheddar cheese
  • Breadcrumbs or crushed crackers

Preheat your oven to 375°F (190°C). In a large mixing bowl, combine the diced chicken, cream of mushroom soup, and frozen mixed vegetables. Spread the mixture into a greased 9×13 inch baking dish.

Top with cooked rice or pasta, shredded cheddar cheese, and a sprinkle of breadcrumbs or crushed crackers. Bake for 30-40 minutes, or until the chicken is cooked through and the cheese is melted and bubbly.

For best results, be sure to adjust the cooking time based on the size of your chicken pieces and the specific oven temperature. Additionally, consider adding a side salad or steamed vegetables to round out the meal and provide a balanced nutritional profile.

Cooking Steps

Preheat your oven to a toasty 375°F.

Next, grab a mixing bowl and toss all the ingredients together until they're perfectly blended.

Advertisement

Now, transfer the mixture to a baking dish and pop it in the oven.

Bake for 45 to 60 minutes, then carefully remove the dish from the oven.

Get ready to dive into a delicious homemade casserole!

Step 1. Preheat Oven to 375°F

preheat oven to 375 f

Preheating the oven to the optimal temperature is a crucial step in ensuring your casserole's success. Setting the oven to 375°F allows for even cooking and helps the ingredients meld together into a delicious, harmonious dish. This temperature is perfect for most casserole recipes, as it's hot enough to cook the food thoroughly, but not so high that it'll burn the top or dry out the interior.

Once you've located the dial or digital controls, simply turn the oven to 375°F and let it preheat. This usually takes around 10-15 minutes, so use this time to gather your other ingredients and prepare the casserole dish.

When the oven is ready, you'll hear a chime or see a light indicating it's preheated and you can safely place your casserole inside. Keeping a close eye on the temperature ensures your casserole bakes to perfection, resulting in a comforting, homemade meal your family is sure to enjoy.

Advertisement

Step 2. Mix All Ingredients

combine ingredients thoroughly together

Once the oven is preheated, gather all your ingredients and begin mixing them together. In a large bowl, combine the ground beef, chopped onion, garlic, diced tomatoes, tomato paste, and your favorite seasonings. Stir these ingredients until they're well-incorporated.

Next, add the cooked pasta and grated cheese, mixing everything together until it's nicely blended. Be gentle but thorough to ensure all the flavors meld.

Now, transfer the mixture to a greased casserole dish. Spread it out evenly, then top it with more cheese, breadcrumbs, or any other desired toppings. This step adds texture and a delicious crispy layer on top.

Once your casserole is assembled, it's ready to bake. Pop it in the preheated oven and let the magic happen! In about 30-40 minutes, you'll have a bubbly, golden-brown masterpiece ready to serve. Pair it with a fresh salad or steamed veggies for a complete, comforting meal.

Step 3. Transfer Mixture to Baking Dish

transfer mixture to dish

After mixing all the ingredients together, transfer the savory mixture into a greased casserole dish. Be sure to use a dish that's large enough to hold everything comfortably.

Gently scoop and pour the mixture into the dish, taking care not to spill or make a mess. Spread it out evenly, so the ingredients are distributed nicely. This will help the casserole cook through properly.

Once the mixture is in the dish, you're ready for the next step. Preheat your oven to the temperature specified in the recipe. This is usually between 350°F and 400°F.

Advertisement

While the oven heats up, you can add any toppings or extra ingredients the recipe calls for. Maybe some shredded cheese, breadcrumbs, or a drizzle of sauce. These finishing touches will make your casserole extra delicious.

When the oven is ready, carefully place the dish inside and let the magic happen. Soon, your kitchen will be filled with mouthwatering aromas!

Step 4. Bake for 45-60 Minutes

bake for 45 60 minutes

Once the oven is preheated, you can go ahead and bake the casserole. Simply slide the dish into the hot oven and set the timer for 45 to 60 minutes. The exact baking time may vary depending on your oven and the size of the casserole, so keep an eye on it.

You'll know it's done when the edges are golden brown and the center is bubbling.

As the casserole bakes, your kitchen will be filled with the most amazing aroma. It's sure to make your mouth water!

Be careful when you remove the hot dish from the oven – use oven mitts to protect your hands. Once it's out, let the casserole rest for a few minutes before serving. This allows the flavors to meld together and the dish to set up nicely.

Advertisement

Now you're ready to scoop up big, delicious servings and enjoy your homemade casserole creation. Yum!

Step 5. Remove Baking Dish

remove baking dish carefully

Removing the baking dish from the oven requires care and caution.

Carefully grab the sides of the hot dish using oven mitts or a towel. Slowly and steadily, pull the dish out of the oven, being mindful of any steam that may escape. Place the dish on a heat-resistant surface, such as a trivet or a wooden cutting board.

Take a moment to admire your creation. The rich, bubbly casserole you've prepared is sure to be a hit with your family and friends.

Resist the temptation to dive in right away, as the dish will be extremely hot. Give it a few minutes to cool before serving. This will allow the flavors to meld and the casserole to set, making it easier to scoop and serve.

Final Thoughts

As you put the finishing touches on your culinary masterpiece, consider the versatility of casserole dishes. These one-pan wonders offer endless possibilities for delicious and satisfying meals.

Advertisement

Whether you're feeding a crowd or whipping up a cozy dinner for two, casseroles are the ultimate comfort food.

Casseroles allow you to get creative with your favorite ingredients, from hearty meats and fresh veggies to cheesy goodness and flavorful sauces.

The best part? They're typically easy to assemble, making them a go-to option for busy weeknights or lazy weekends. Simply layer your ingredients, pop it in the oven, and let the magic happen. Plus, many of these recipes allow you to use up leftovers, maximizing fridge space effectively and reducing food waste at the same time. Whether you’re working with odds and ends from last night’s dinner or prepping ahead for the week, these dishes are incredibly versatile. The result is a delicious, no-fuss meal that saves you time and keeps your kitchen organized.

As you savor the aroma and flavor of your casserole creation, take a moment to appreciate the convenience and versatility of this beloved dish.

With a little imagination, you can craft endless variations to suit any taste or dietary preference. So, don't be afraid to experiment and let your culinary skills shine!

Advertisement

Frequently Asked Questions

Can Casseroles Be Frozen for Later Use?

Yes, you can freeze casseroles for later use. They're great make-ahead meals that reheat well. Just be sure to cool the casserole completely before freezing, and use airtight containers to prevent freezer burn.

How Can I Make My Casserole More Nutritious?

To make your casserole more nutritious, you can add more vegetables, use lean protein, and swap out white rice or pasta for whole grains. You can also incorporate beans, lentils, or tofu to boost the fiber and protein content.

What Are Some Vegetarian Casserole Options?

To make your casserole more nutritious, you can incorporate vegetarian ingredients like beans, lentils, tofu, or a variety of colorful vegetables. These options not only add nutrients but also provide satisfying textures and flavors to your casserole.

Can I Use a Slow Cooker to Make a Casserole?

You can absolutely use a slow cooker to make a casserole. The slow cooker's gentle heat and moist environment are perfect for creating flavorful, one-dish meals. Just assemble the ingredients, set it, and let the slow cooker do the work.

How Can I Adjust a Casserole Recipe to Serve Fewer People?

To adjust a casserole recipe for fewer people, simply reduce the ingredient quantities proportionally. Start by halving the amounts, then adjust as needed to fit your desired serving size. This ensures the flavors and cooking time remain balanced.

Advertisement

Continue Reading

Kitchen Hacks and Tips

Wok Cooking: Stir-Fry Dishes for Quick and Healthy Meals

Stir-fry your way to quick and healthy meals with this guide to the history, benefits, and versatile flavor combinations of wok cooking.

Published

on

quick healthy stir fry recipes

Stir-frying is a quick, healthy, and incredibly versatile way to cook that originated in China and spread across Asia, adapting to local flavors. You'll love how it preserves nutrients while infusing bold tastes. It's perfect for busy weeknights – you can whip up a delicious meal in minutes! Just heat a wok, add some essential oil, proteins, aromatics, and fresh veggies, then toss everything together. Stir-fry is highly customizable, so you can experiment with different flavor combinations to suit your preferences. Want to learn more about the history and benefits of this amazing cooking technique?

Key Takeaways

  • Stir-frying originated in China and utilizes high-heat cooking in a wok to preserve nutrients and allow for ingredient experimentation.
  • Stir-fry meals are a quick and healthy cooking method that incorporate a variety of fresh vegetables and proteins.
  • Essential ingredients for stir-fry include high-heat cooking oils, proteins, aromatics, fresh vegetables, and flavor enhancers.
  • Proper stir-fry techniques, such as maintaining high heat, avoiding overcrowding, and serving immediately, are crucial for optimal texture and flavor.
  • Stir-fry dishes offer numerous nutritional benefits, are highly customizable, and encourage creative exploration of flavors and ingredients.

History

Stir-frying has a long and storied history, dating back centuries in Asian cuisines. This popular cooking technique originated in China, where woks – those distinctive round-bottomed pans – were used to quickly cook small pieces of meat and veggies over high heat.

As trade and travel increased across Asia, stir-fry dishes spread to other regions, each putting their own spin on the method. For example, in Japan, you might find stir-fried noodle dishes like yakisoba.

And in Thailand, the iconic pad thai features a flavorful blend of rice noodles, egg, bean sprouts, and crushed peanuts. No matter where you go, stir-frying remains a fast, healthy way to get a delicious meal on the table.

The high heat seals in nutrients while allowing you to experiment with endless ingredient combinations. From classics like beef and broccoli to creative veggie-forward dishes, stir-fries are truly a global culinary treasure. Quick to prepare and endlessly versatile, stir-fries can be tailored to suit a variety of tastes and dietary needs. To master this method, having essential kitchen tools for cooking, such as a sturdy wok and a quality spatula, ensures an even heat distribution and effortless tossing. Whether you’re whipping up a weeknight dinner or impressing guests with bold flavors, stir-frying offers a perfect balance of simplicity and sophistication.

Recipe

Stir-fry dishes are a fantastic way to create quick and healthy meals. They allow you to incorporate a variety of fresh vegetables, proteins, and flavors into a single dish. The process of stir-frying helps to retain the nutrients in the ingredients while also infusing them with delicious, bold flavors.

Advertisement

Historically, similar cooking methods have been utilized by various cultures to maximize the nutritional benefits of their ingredients, such as with ancient nutritional uses of Salvia Hispanica, where chia seeds were incorporated for their health benefits.

One of the key benefits of stir-fry meals is their versatility. You can easily customize the recipe to suit your dietary preferences or what you have on hand in your pantry and refrigerator. Stir-fries are also an excellent option for busy weeknights, as they can be prepared in a matter of minutes.

  • 2 tablespoons vegetable oil
  • 1 pound boneless, skinless chicken breasts, cut into 1-inch pieces
  • 3 cloves garlic, minced
  • 1 tablespoon grated fresh ginger
  • 1 red bell pepper, sliced
  • 1 cup broccoli florets
  • 1 cup sliced mushrooms
  • 2 cups baby spinach
  • 2 tablespoons soy sauce
  • 1 tablespoon rice vinegar
  • 1 teaspoon sesame oil
  • 1/4 teaspoon crushed red pepper flakes (optional)
  • 2 cups cooked brown rice, for serving

In a large skillet or wok, heat the vegetable oil over high heat. Add the chicken and stir-fry until cooked through, about 5-7 minutes. Add the garlic and ginger and cook for an additional 1 minute, until fragrant.

Stir in the bell pepper, broccoli, and mushrooms, and continue to stir-fry for 3-4 minutes, until the vegetables are tender-crisp. Add the spinach, soy sauce, rice vinegar, sesame oil, and red pepper flakes (if using). Toss everything together until the spinach is wilted, about 1 minute more.

Serve the stir-fry immediately over the cooked brown rice.

Cooking Steps

Get your wok nice and hot over a high flame.

Advertisement

Once it's ready, add a splash of oil and your favorite aromatics like garlic and ginger, which can enhance the dish's flavor profile.

As you cook, consider pairing your stir-fry with a refreshing beverage like health benefits of ginger lemon tea to complement the meal.

Next, toss in your protein and let it sizzle.

Finally, add your veggies and give everything a good stir to combine all the flavors.

Easy peasy!

Advertisement

Step 1. Heat Wok Over High Flame

heat wok on high

To begin, crank up the heat on your wok until it's raging hot. You want that metal surface sizzling and ready to work its magic.

Once the wok is screaming, you can start adding your ingredients. But hold on – don't just dump everything in at once! Take your time and add each item one by one, letting each piece sizzle and caramelize before adding the next.

As the wok heats up, you'll notice the metal starting to shimmer. That's a sure sign it's ready for action.

Carefully add a splash of oil, swirling it around to coat the surface. The oil should dance and ripple, indicating the perfect temperature.

Now you can start building your flavor by tossing in aromatics like garlic, ginger, or scallions. Their savory aroma will fill the air, making your mouth water in anticipation.

Keep the heat high and the action fast-paced. Stir-frying is all about speed and precision, so stay focused and let the wok work its magic.

Advertisement

Step 2. Add Oil and Aromatics

incorporate oil and aromatics

With the wok sizzling hot, it's time to add a splash of oil. A good stir-fry requires the right amount of oil to coat the surface, allowing the ingredients to move freely and sear evenly.

Opt for a high-heat oil like peanut or sesame oil, which can withstand the intense temperature without burning.

Next, toss in your aromatic ingredients. Minced garlic, ginger, and shallots are classic choices that will infuse your dish with bold, fragrant flavors.

Sauté these for 30 seconds, allowing their aroma to bloom. Be careful not to let them burn, as that can create a bitter taste.

Once the oil is shimmering and the aromatics are fragrant, it's time to add your main ingredients.

Whether you're using thinly sliced meats, crisp vegetables, or a combination, they should go into the wok in the order they take the longest to cook.

Advertisement

This ensures everything finishes at the same time for a perfectly cooked stir-fry.

Step 3. Add Protein

incorporate protein source

Begin by tossing your protein into the hot wok. Whether you choose chicken, beef, shrimp, or tofu, it's time to bring that extra burst of flavor and nutrition. Quick cooking methods like stir-frying can help maintain the nutrients in your ingredients, making it a healthy option for busy lifestyles.

Credit card debt insights show that many consumers are looking for efficient meal solutions to manage their finances better. Quickly stir-fry the protein, allowing it to sear and caramelize on the edges. This seals in the juices and gives your dish a delightful texture.

Don't overcrowd the wok – work in batches if needed to ensure even cooking. Once the protein is almost cooked through, push it to the sides of the wok, creating a well in the center. This allows the remaining ingredients to cook evenly without the protein steaming.

Adjust the heat as necessary to prevent burning. The key is to move quickly, keeping everything in constant motion for that classic stir-fry sizzle. With the protein nicely browned, you're ready to move on to the next tasty step!

Step 4. Add Vegetables

incorporate fresh vegetables now

Next, start adding your vegetables to the wok. Choose a variety of fresh, crunchy veggies like broccoli, bell peppers, and snow peas. Slice them into bite-sized pieces so they cook quickly and evenly. Toss the vegetables into the hot wok and stir-fry them for a few minutes. This will help them retain their vibrant colors and firm texture.

Keep the vegetables moving by stirring and tossing them constantly. You want to cook them until they're tender-crisp, not mushy. The quick stir-frying method helps the veggies stay fresh and flavorful.

Advertisement

Feel free to experiment with different vegetable combinations to find your favorite. Carrots, mushrooms, and water chestnuts also work well in stir-fries. The key is to choose a variety of colors and textures to make your dish visually appealing and nutritious.

Step 5. Toss and Combine Ingredients

mix and blend ingredients

Once the vegetables are tender-crisp, push them to the side of the wok. This creates a space in the center to add the protein. Toss in the chicken, beef, or tofu and let it sizzle for a minute or two until it's lightly browned.

Now, it's time to combine everything! Use your spatula to gently toss the protein and vegetables together. Be sure to scrape up any bits stuck to the bottom of the wok. This helps the ingredients mingle and ensures even cooking.

As you toss, drizzle in the sauce. Stir-fry for another minute or two until the sauce thickens and coats everything evenly. The key is to keep the ingredients moving, so they don't overcook. You want the vegetables to stay crisp and the protein to be tender.

Serve your delicious stir-fry immediately over steamed rice or noodles. The vibrant colors and flavors will have your family coming back for seconds!

Final Thoughts

Stir-fry dishes can be a fantastic way to whip up a quick and nutritious meal. The best part? They're incredibly versatile, allowing you to experiment with different flavors and ingredients. Whether you prefer chicken, beef, or tofu, you can easily customize your stir-fry to suit your taste buds.

Advertisement

One of the great things about stir-fries is that they come together in a flash. With just a few simple steps, you can have a delicious and satisfying meal on the table in no time.

Plus, by packing in plenty of fresh veggies, you're getting a nutritious boost that will leave you feeling energized and satisfied.

As you continue to explore the world of stir-fry cooking, don't be afraid to get creative. Try new spice blends, switch up the protein, or add a variety of crunchy toppings.

The possibilities are endless, and the joy of experimenting in the kitchen is half the fun. So, dive in and enjoy the delicious and healthy world of stir-fry dishes!

Frequently Asked Questions

What Is the Ideal Wok Material for Stir-Frying?

The ideal wok material for stir-frying is carbon steel. It heats up quickly, distributes heat evenly, and provides a naturally nonstick surface. Carbon steel woks are durable, affordable, and give you the best results for quick and flavorful stir-fries.

Advertisement

Can I Use a Regular Skillet Instead of a Wok?

You can use a regular skillet instead of a wok, but it won't deliver the same high heat and quick cooking that makes stir-fries so flavorful. The curved shape of a wok is ideal for tossing ingredients.

How Do I Prevent My Stir-Fry From Becoming Soggy?

To prevent your stir-fry from becoming soggy, start by ensuring your wok or skillet is hot enough before adding the ingredients. Don't overcrowd the pan, and stir-fry the vegetables in batches to allow them to sear and caramelize rather than steam.

What Are the Best Vegetables for a Stir-Fry Dish?

The best vegetables for a stir-fry dish are those that hold their texture and flavor well when cooked quickly. Try using crunchy vegetables like broccoli, bell peppers, snow peas, and carrots for a vibrant and delicious stir-fry.

How Do I Properly Clean and Maintain a Wok?

To properly clean and maintain your wok, first hand-wash it with warm, soapy water. Dry it thoroughly and rub a thin layer of cooking oil over the surface to prevent rusting. Store it in a cool, dry place.

Advertisement

Continue Reading

Affiliate Disclaimer
As an affiliate, we may earn a commission from qualifying purchases. We get commissions for purchases made through links on this website from Amazon and other third parties.

Advertisement

Vetted

top local car washes top local car washes
Vetted2 months ago

14 Best Car Washes Near You for a Sparkling Clean Ride

I discovered the 14 best car washes near you that promise a sparkling clean ride, and you won't want to...

top mops for 2024 top mops for 2024
Vetted2 months ago

The 15 Best Mops of 2025 – Your Ultimate Guide to a Spotless Home

Find the perfect mop for your cleaning needs in 2025, and discover how these top choices can revolutionize your home...

top women s fragrances 2024 top women s fragrances 2024
Vetted2 months ago

15 Best Perfumes for Women in 2025 – A Fragrance Guide You Can’t Miss

Keen to discover the top 15 perfumes for women in 2025? Uncover unique scents that will elevate your fragrance game!

top local bars guide top local bars guide
Vetted2 months ago

14 Best Bars Near You for an Unforgettable Night Out

Looking for the perfect bar to elevate your night out? Discover the 14 best spots that promise unforgettable experiences!

luxurious beard oil selection luxurious beard oil selection
Vetted2 months ago

15 Best Beard Oils for a Luxurious Grooming Experience in 2025

Shop the 15 best beard oils for a luxurious grooming experience in 2025 and discover which ones will elevate your...

top college laptops 2024 top college laptops 2024
Vetted2 months ago

15 Best College Laptops of 2025: The Ultimate Guide for Students

With our guide to the 15 best college laptops of 2025, discover which powerful models will elevate your academic experience...

waterproof mascaras for tears waterproof mascaras for tears
Vetted2 months ago

15 Best Waterproof Mascaras That Will Survive Any Tear-Jerker

Outstanding waterproof mascaras await to keep your lashes flawless through any emotional moment; discover which ones made the top 15...

top flavorful disposable vapes top flavorful disposable vapes
Vetted2 months ago

15 Best Disposable Vapes of 2025: Top Picks for Flavor and Convenience

Prepare to discover the 15 best disposable vapes of 2025 that blend exceptional flavor and convenience, but which ones truly...

refreshing lunch salad ideas refreshing lunch salad ideas
Vetted2 months ago

15 Best Salads Near You That Will Freshen Up Your Lunch Routine

Transform your lunch with the 15 best salads nearby that will tantalize your taste buds and leave you craving more...

top convertible car seats top convertible car seats
Vetted2 months ago

15 Best Convertible Car Seats of 2025 – Safety and Comfort for Your Little One

Get ready to discover the top 15 convertible car seats of 2025 that blend safety and comfort—find out which models...

delicious fast food breakfast delicious fast food breakfast
Vetted2 months ago

15 Best Fast Food Breakfast Options That Will Make Your Mornings Delicious

Uncover the 15 best fast food breakfast options that will transform your mornings into a delicious experience you won't want...

stylish contacts for vision stylish contacts for vision
Vetted2 months ago

14 Best America’s Contacts for Clear Vision and Style

Browse through the 14 best contact lenses in America for clear vision and style, and discover which one perfectly complements...

Trending