Connect with us

Indian Meals

Mushroom Masala

Offering a harmonious blend of earthy mushrooms and vibrant spices, Mushroom Masala is a captivating Indian dish that transports your taste buds on a flavorful journey. Discover the secrets behind its rich and comforting appeal.

Published

on

spicy mushroom curry dish

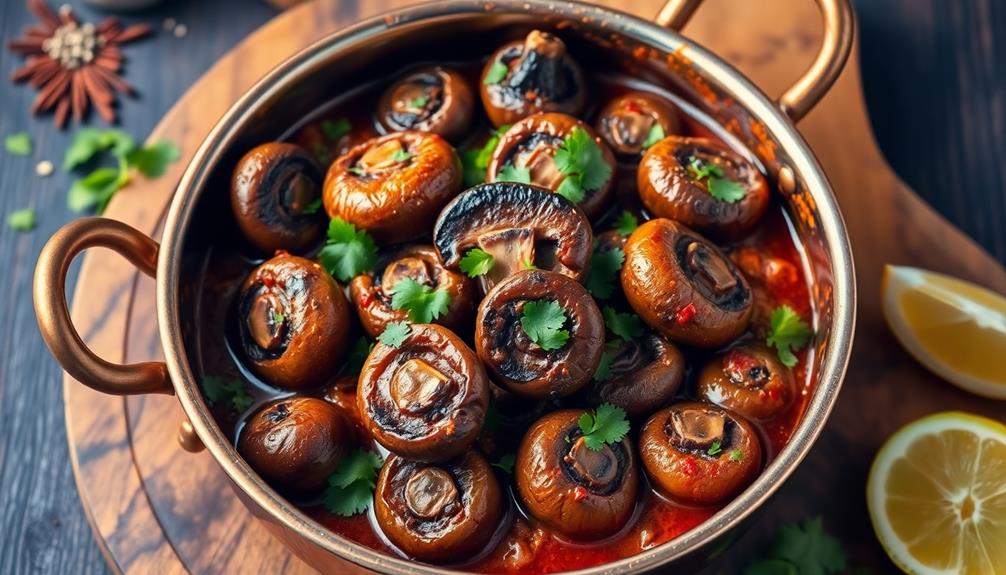
Hey there! Have you heard about mushroom masala? It's a tasty Indian dish that's been around for centuries. The earthy mushrooms team up with warm spices like cumin and coriander to create a comforting and satisfying meal. You can enjoy it on its own or serve it with rice or naan bread. To make it, you'll slice up some mushrooms, sauté them in spiced oil, and then let them simmer in a flavorful tomato-based sauce. Don't forget to garnish it with fresh coriander leaves – it really makes the dish pop. If you're curious to learn more about the history and cooking process, keep reading!

Key Takeaways

  • Mushroom Masala is a staple Indian dish that combines earthy mushroom flavors with an aromatic spice blend, making it a versatile vegetarian option.
  • The dish's history dates back centuries, as ancient foragers recognized the unique taste and nutritional benefits of mushrooms in Indian cuisine.
  • The cooking process involves sautéing sliced mushrooms in spiced oil, adding tomatoes and spices, and simmering until the mushrooms are tender and the flavors have melded.
  • Mushroom Masala is often paired with rice or naan, and herbal teas complement the dish, offering health benefits such as aiding digestion.
  • The recipe's key lies in the careful preparation and balance of spices, creating a memorable, flavorful dish that showcases the harmony of simple ingredients in vibrant Indian cuisine.

History

Mushrooms have been a part of Indian cuisine for centuries. They've been treasured for their earthy, savory flavors and used in all sorts of delicious dishes. In fact, you can find mushrooms in curries, stir-fries, and even biryani recipes dating back hundreds of years!

The versatility of mushrooms allows them to be paired with various ingredients, making them a favorite in both traditional and modern cuisine. Additionally, their nutritional value can be enhanced through methods like fermentation, which is a popular practice in other culinary traditions, such as a fermented vegetable plate.

The history of mushrooms in India is really fascinating. Mushrooms were likely first gathered and enjoyed by ancient foragers, who recognized their unique taste and nutritional benefits.

Over time, clever cooks began experimenting with different ways to prepare them, blending mushrooms with aromatic spices like cumin, coriander, and turmeric. This created the flavorful mushroom masala that we know and love today.

As Indian cuisine evolved, mushroom masala became a staple in households across the country. It's a comforting, satisfying dish that's easy to make and packed with umami goodness.

Advertisement

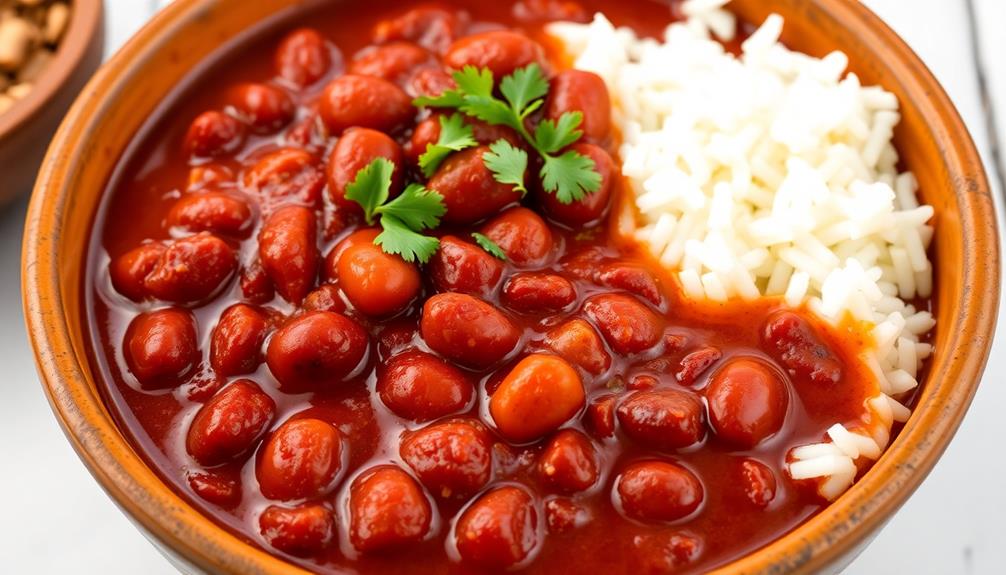
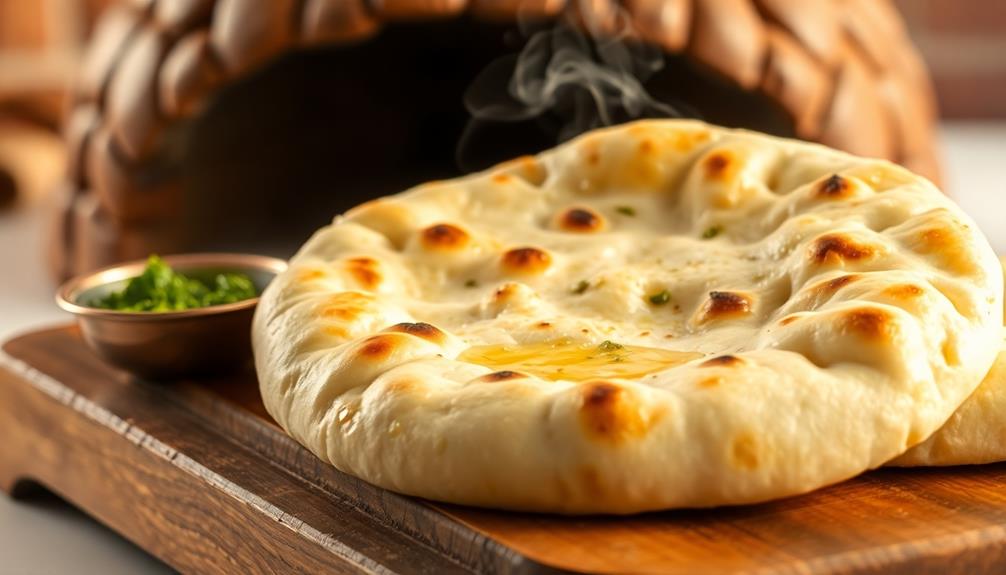
Whether you enjoy it with rice, naan, or all on its own, mushroom masala is a true taste of India's rich culinary heritage.

Recipe

Mushroom Masala is a delectable Indian dish that combines the earthy flavors of mushrooms with an aromatic blend of spices. This vegetarian delight isn't only a treat for the taste buds but also a versatile meal that can be enjoyed with rice, naan, or as a standalone dish. Herbal teas, often enjoyed after a meal, can complement the flavors of this dish perfectly, providing health benefits such as aiding digestion.

Originating from the vibrant cuisine of India, Mushroom Masala is a perfect example of how simple ingredients can come together to create a complex and flavorful dish. The key to this recipe lies in the careful preparation of the spices and the balance of flavors that create a harmonious symphony on the palate.

  • 500g button mushrooms, cleaned and sliced
  • 2 onions, finely chopped
  • 3 cloves of garlic, minced
  • 1 inch ginger, grated
  • 2 tomatoes, diced
  • 1 teaspoon coriander powder
  • 1 teaspoon cumin powder
  • 1 teaspoon garam masala
  • 1/2 teaspoon red chili powder
  • 1/2 teaspoon turmeric powder
  • Salt to taste
  • 2 tablespoons oil
  • 2 tablespoons chopped cilantro for garnish

In a large skillet, heat the oil over medium-high heat. Add the chopped onions and sauté until they're translucent. Then, add the minced garlic and grated ginger, and sauté for another minute until fragrant.

Next, add the sliced mushrooms and continue to sauté for 5-7 minutes, or until the mushrooms are lightly browned. Add the diced tomatoes, coriander powder, cumin powder, garam masala, red chili powder, and turmeric powder. Stir well and let the mixture simmer for 10-15 minutes, or until the tomatoes have broken down and the flavors have blended together. Season with salt to taste.

To enhance the flavors of this dish, it's recommended to use fresh, high-quality mushrooms and spices. Additionally, you can adjust the spice level to your preference by adding more or less chili powder.

Advertisement

Garnish the Mushroom Masala with chopped cilantro and serve hot with steamed rice, naan, or any other preferred accompaniment.

Cooking Steps

First, clean and slice those mushrooms to get them ready to cook. Mushrooms aren't only delicious but also offer health benefits such as supporting immune system function.

Next, sauté the mushrooms in some flavorful spiced oil – this'll give them a nice kick.

Step 1. Clean and Slice Mushrooms

clean and slice mushrooms

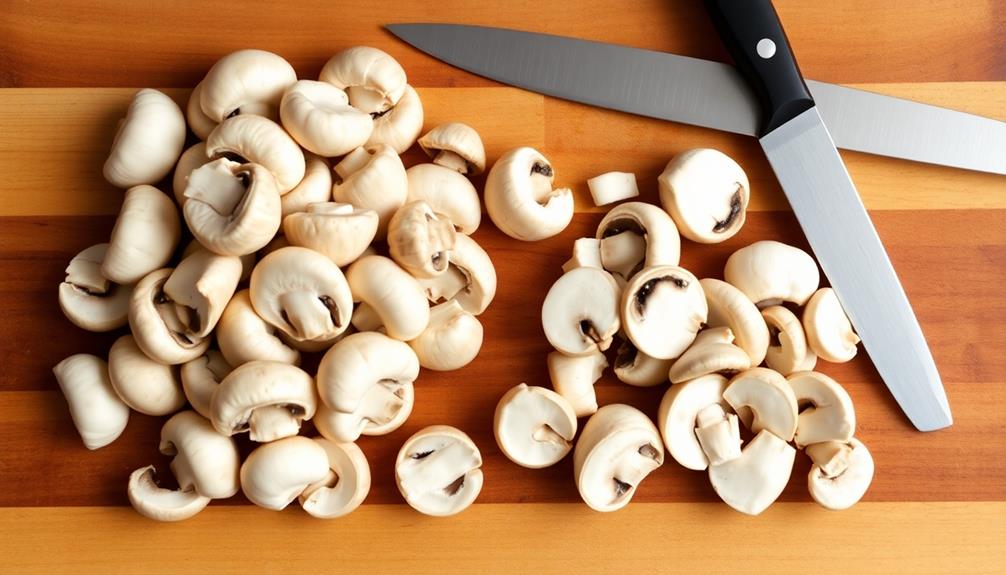
With a damp cloth, gently wipe any dirt or debris from the mushrooms. You don't want any of those little critters tainting your delicious Mushroom Masala!

Mushrooms aren't only flavorful but also pack a nutritional punch, being rich in vitamins and antioxidants that can contribute to a healthy diet nutritional advantages of green juice.

Once the mushrooms are nice and clean, it's time to slice them up. Grab a sharp knife and carefully slice the mushrooms about 1/4 inch thick. Try to make the slices even so they'll cook at the same rate.

Advertisement

If you've got different types of mushrooms, you can slice them all together – the more variety, the merrier! As you slice, make sure to discard any mushroom stems that look tough or woody. You only want the nice, tender caps in your dish.

Once all the mushrooms are sliced, give them a quick rinse under cool water to remove any remaining dirt or debris. Pat them dry with a paper towel, and you're ready to move on to the next step!

Step 2. Saute Mushrooms in Spiced Oil

saut mushrooms in oil

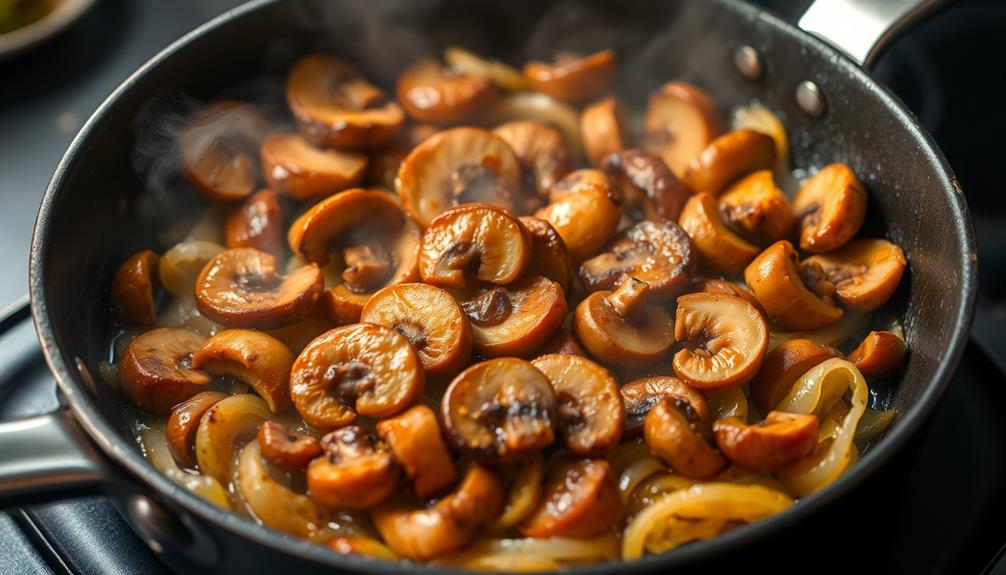
Now that the mushrooms are prepped and ready, let's get cooking! In a large skillet, heat up a couple of tablespoons of oil over medium-high heat. Once the oil is shimmering, it's time to add the sliced mushrooms. Give them a stir to make sure they're in a single layer, then let them sizzle for a minute or two. This will help them get a nice golden-brown color on the edges.

Mushrooms aren't only delicious but also packed with nutrients that can support overall health, similar to the benefits of high antioxidant content found in other vegetables.

Next, sprinkle in your spice blend. A teaspoon each of cumin, coriander, and garam masala will do the trick. Stir everything together and let the spices toast for about 30 seconds, until they become fragrant.

Then, pour in a splash of water or broth to deglaze the pan, scraping up any browned bits on the bottom. Let the mushrooms simmer for 5-7 minutes, until they're tender and the sauce has thickened. Season with salt and pepper to taste.

Advertisement

Now your mushrooms are ready to be the star of your Mushroom Masala!

Step 3. Add Tomatoes and Spices

incorporate tomatoes and spices

After sautéing the mushrooms, add the diced tomatoes to the skillet. The juicy tomatoes will help create a delightful sauce that'll bring all the flavors together.

Stir in the cumin, coriander, and chili powder. These aromatic spices will add a wonderful depth of flavor to the dish. Additionally, as you cook, consider how certain ingredients can provide stability and protect your budget, much like inflation-protected annuities do for retirement income.

Now, don't be afraid to give the tomatoes a good mash with your spoon as they cook. This will help them break down and thicken the sauce. Let the mixture simmer for about 5 minutes, allowing the flavors to meld.

Next, toss in the garam masala and salt. The garam masala, a fragrant blend of spices, will make your kitchen smell divine.

Stir everything together until well combined. Your mushroom masala is really starting to come together now! Keep simmering for another 2-3 minutes, then it'll be ready to serve over rice or with naan bread. Yum!

Advertisement

Step 4. Simmer Until Mushrooms Are Tender

simmer mushrooms until tender

Reduce the heat to medium-low and let the mushroom mixture simmer.

You'll want to let it gently bubble away for about 15-20 minutes, stirring occasionally, until the mushrooms are nice and tender.

As the flavors meld together, the sauce will thicken up and become rich and fragrant.

For a nutritious addition, consider pairing your Mushroom Masala with some cooked red lentils to boost the protein content of your meal.

Keep an eye on it, and if the mixture starts to look too dry, you can add a splash of water or vegetable broth to keep it from sticking.

You'll know the mushrooms are done when they're soft and have absorbed all those delicious spices.

Advertisement

Breathe in that amazing aroma – your kitchen is going to smell incredible!

Once the mushrooms are perfectly tender, you're ready for the next step.

Grab a spoon and give the masala a taste.

Adjust any seasonings to suit your preference.

Now you can move on to serving up this flavorful dish.

Advertisement

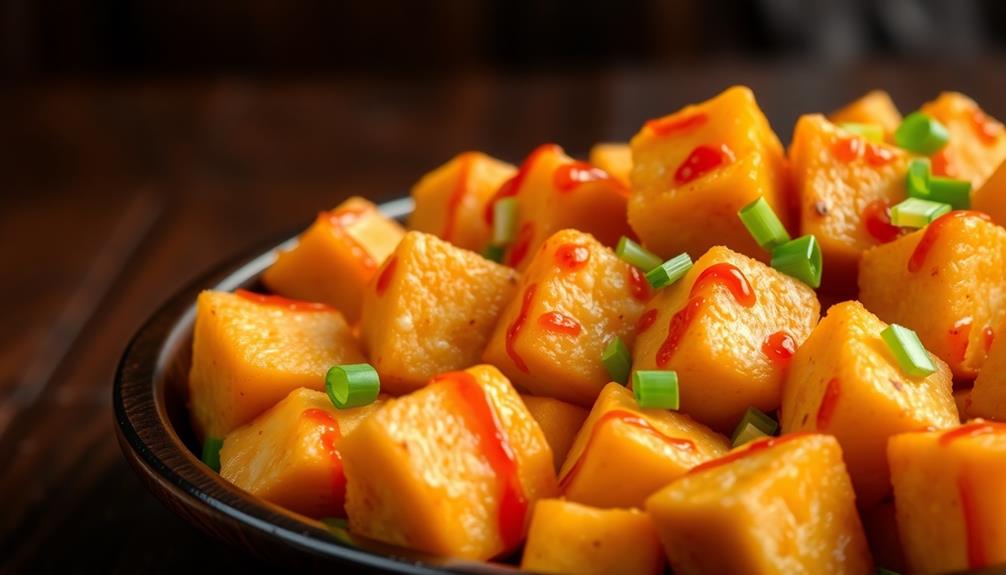
Step 5. Garnish With Fresh Coriander

garnish using fresh coriander

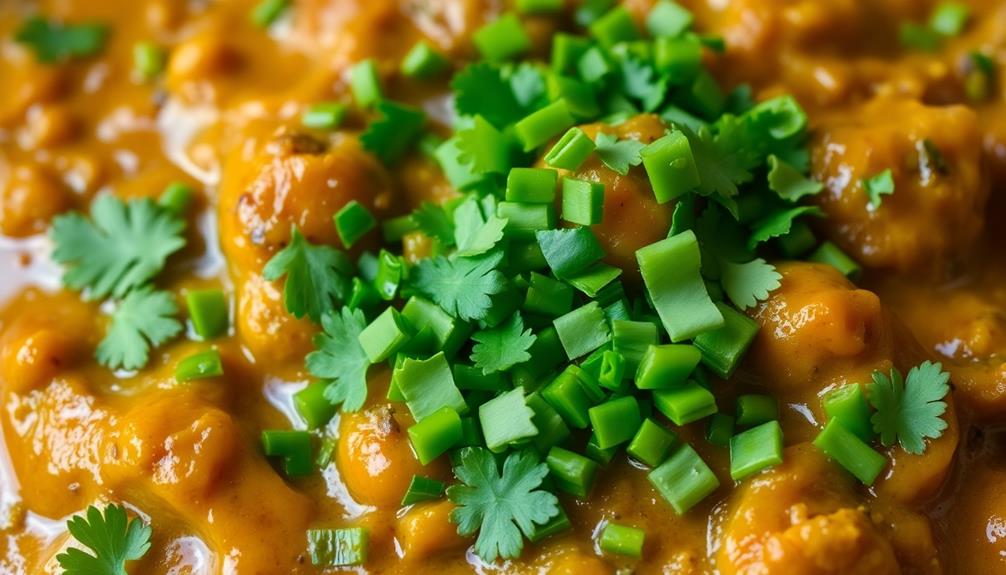
Generously garnish the fragrant mushroom masala with fresh coriander leaves. The vibrant green herb adds a burst of flavor and a touch of elegance to the dish. Pluck the delicate leaves from their stems and sprinkle them all over the simmered mushrooms. The coriander's earthy, slightly lemony taste perfectly complements the rich, spiced masala.

To enhance your dining experience, consider pairing your meal with a cruise that offers all-inclusive dining options, perfect for enjoying flavorful dishes while on vacation frequently asked questions.

Don't be shy – load up those mushrooms with as much fresh coriander as you'd like! The more the merrier. The crunchy leaves will create a lovely contrast to the tender mushrooms. Plus, the bright green color will make your mushroom masala look absolutely stunning on the plate.

When you're ready to serve, make sure each portion gets a generous helping of the fresh coriander garnish. The fragrant herb will elevate the entire dish, adding a burst of flavor and a touch of elegance. Enjoy your mushroom masala with the vibrant coriander topping!

Final Thoughts

Mushroom masala's flavors linger, inviting you to savor each bite thoroughly. The earthy aroma and robust spices create a truly satisfying meal that will leave you craving more.

The dish can be complemented by a delightful dessert, such as Dirt Cups, which adds a playful touch to your meal. Take a moment to appreciate the harmonious blend of textures – the tender mushrooms, the creamy sauce, and the fragrant rice or naan.

Advertisement

As you enjoy the final bites, reflect on the care and attention that went into preparing this dish. Mushroom masala isn't just a meal, but a culinary journey that transports you to the vibrant flavors of India.

Consider sharing this recipe with family and friends, spreading the joy of this delightful dish.

DIRECTIONS:

Frequently Asked Questions

Is Mushroom Masala Vegetarian or Non-Vegetarian?

When considering a dish, you'll want to determine if it's vegetarian or non-vegetarian. The specific ingredients used will dictate whether the dish is suitable for a vegetarian diet or contains animal-based products.

Can Mushroom Masala Be Frozen for Later Use?

Yes, you can freeze mushroom masala for later use. The dish freezes well and will retain its flavor and texture, allowing you to enjoy it long after you've prepared it.

Advertisement

How Long Can Leftover Mushroom Masala Be Stored?

Leftover dishes can generally be stored for a few days in the fridge or up to 3 months in the freezer. Check the dish's ingredients and your own food safety practices to determine the best storage time for your leftovers.

What Type of Mushrooms Are Best for This Dish?

Choosing the right mushrooms is key for your dish's success. Opt for cremini, portobello, or shiitake mushrooms – their robust flavors and meaty textures will shine in your masala. Avoid delicate varieties that may get lost in the spices.

Is Mushroom Masala Spicy, and Can the Spice Level Be Adjusted?

Yes, mushroom masala is typically a spicy dish. You can adjust the spice level by adding more or less of the spices used, like chili powder or cayenne pepper. This allows you to tailor the heat to your preference.

Continue Reading
Advertisement

Indian Meals

Egg Curry

Luscious and aromatic, this egg curry dish is a delightful fusion of Indian flavors that will leave you craving more. Discover the secrets to this captivating recipe.

Published

on

spiced egg dish recipe

Egg curry is a delightful Indian dish that'll transport your tastebuds on a flavorful journey. Perfectly hard-boiled eggs simmered in a rich, spiced tomato-based sauce – it's a comforting and nutritious meal perfect for breakfast, lunch, or dinner. You'll love the creamy texture of the eggs paired with the bold spices that create an unforgettable culinary experience. Serve it over basmati rice or with fluffy naan bread to soak up all that incredible sauce. Experiment with bolder spices or even add a touch of dark chocolate for extra depth – the possibilities are endless! There's so much more to discover about this beloved dish.

Key Takeaways

  • Egg curry is a popular Indian dish with a history dating back to ancient times, known for its rich, flavorful sauce and perfectly cooked eggs.
  • Eggs in egg curry provide a protein-packed component, and the dish can be optionally enhanced with dark chocolate for its antioxidants and mood-boosting properties.
  • The classic preparation involves hard-boiling the eggs, creating a spice mix, and simmering tomatoes and onions to develop a cohesive, aromatic curry sauce.
  • Egg curry is commonly served over basmati rice or with naan bread, as the creamy eggs and bold spices create a delightful culinary experience.
  • Egg curry offers versatility, allowing for customization with different egg types and spices to suit individual preferences and create a quick, satisfying meal.

History

Egg curry has been a staple dish in many parts of the world for centuries. This beloved recipe has roots tracing back to ancient India, where it was a favorite among the diverse cultures and communities.

The dish not only satisfies hunger but also provides a sensory experience, much like Montessori toys promote sensory development through tactile experiences. Over time, the dish has evolved, with different regions and households putting their own unique spin on the classic preparation.

Today, egg curry is enjoyed in households and restaurants across the globe, from the bustling streets of Mumbai to the quaint villages of South India. Its popularity has spread far and wide, delighting palates with its rich, flavorful sauce and perfectly cooked eggs.

Whether you're a long-time fan or new to the dish, egg curry is sure to become a family favorite. So why not give it a try and see for yourself the magic of this timeless culinary delight?

Recipe

Egg Curry is a flavorful and easy-to-prepare Indian dish that combines hard-boiled eggs in a rich, aromatic tomato-based curry sauce. This dish is a popular comfort food that can be enjoyed with warm naan, rice, or other Indian breads.

Advertisement

Incorporating protein-rich ingredients like eggs not only enhances the dish's nutritional value but also makes it a great option for a Low Carb High Protein Breakfast to start your day right.

The versatility of Egg Curry makes it a great option for a quick and satisfying meal. The combination of the creamy eggs and the bold, spicy curry sauce creates a truly delightful culinary experience.

Ingredients:

  • 6 hard-boiled eggs, peeled and halved
  • 2 tablespoons vegetable oil
  • 1 onion, finely chopped
  • 3 cloves garlic, minced
  • 1 tablespoon grated ginger
  • 1 teaspoon ground cumin
  • 1 teaspoon ground coriander
  • 1 teaspoon garam masala
  • 1 teaspoon red chili powder
  • 1 can (14.5 oz) diced tomatoes
  • 1 cup water or chicken/vegetable broth
  • Salt to taste
  • Chopped cilantro for garnish

In a large skillet or saucepan, heat the vegetable oil over medium heat. Add the chopped onion and sauté until it becomes translucent and lightly golden, about 5-7 minutes.

Next, add the minced garlic and grated ginger, and cook for an additional 2 minutes, stirring frequently to prevent burning.

Stir in the ground cumin, coriander, garam masala, and red chili powder. Let the spices bloom for about a minute, then pour in the diced tomatoes and water or broth.

Advertisement

Bring the mixture to a simmer and let it cook for 10-15 minutes, allowing the flavors to meld and the sauce to thicken slightly.

Gently add the hard-boiled egg halves to the curry sauce, being careful not to break them. Simmer for an additional 5-7 minutes, allowing the eggs to heat through and absorb the flavors of the curry.

Season with salt to taste.

To serve, garnish the Egg Curry with freshly chopped cilantro. This dish can be enjoyed immediately, or the flavors will continue to develop if allowed to sit for a bit.

Serve with warm naan, basmati rice, or your choice of Indian accompaniments.

Advertisement

Cooking Steps

First, you'll need to hard-boil the eggs to get them nice and tender.

While the eggs are cooking, consider preparing a fun dessert like Dirt Cups to enjoy after your meal.

Next, prepare the spice mix that'll give your curry that delightful kick.

Then, add some chopped onions and garlic to build up the flavors before tossing in the juicy tomatoes.

Step 1. Hard Boil the Eggs

hard boil the eggs

To hard boil the eggs, begin by placing them in a single layer in a saucepan. Fill the pan with enough cold water to cover the eggs by about an inch. Bring the water to a boil over high heat.

Once the water is boiling, reduce the heat to low and let the eggs simmer for 12 minutes. A well-prepared dish, like egg curry, can greatly benefit from the addition of vibrant colors and deep flavors, which are reminiscent of the importance of color accuracy in home cinema projectors.

Advertisement

After the time is up, remove the pan from the heat and drain the hot water. Gently shake the pan to crack the shells, then place the eggs under cold running water. This will help the shells peel off easily.

Once the eggs are cool enough to handle, peel off the shells. Voila! Your hard-boiled eggs are ready to use in the egg curry.

Step 2. Prepare the Spice Mix

prepare your spice mixture

Begin by gathering the spices for the curry. You'll need cumin, coriander, turmeric, and red chili powder. Measure out a teaspoon of each spice and place them in a small bowl. This spice mix will give your egg curry that classic Indian flavor.

As you prepare, consider pairing your dish with a calming beverage, such as green tea, which is known for its health benefits and rich antioxidants unique qualities of different teas.

Next, grab a small skillet and toast the spices over medium heat. Stir them constantly for about a minute, until they become fragrant and start to sizzle. Be careful not to let them burn!

Once the spices are nicely toasted, transfer them to a mortar and pestle. Grind the spices into a fine powder. This will help them blend seamlessly into the curry.

Advertisement

Now that your spice mix is ready, you can start cooking the egg curry. Heat some oil in a pan and add the ground spices. Sauté for a minute to let the flavors bloom.

Then, pour in your tomato sauce and let it simmer. It's time to add the hard-boiled eggs and let them soak up all that delicious curry goodness!

Step 3. Add Chopped Onions and Garlic

add onions and garlic

Next, add the chopped onions and garlic to the pan. Sizzle them up over medium heat, stirring frequently, until they become nice and fragrant.

The onions should start to turn a lovely golden brown, and the garlic will release its delicious aroma, filling your kitchen with mouthwatering scents. Interestingly, cooking with garlic not only enhances flavor but may also come with health benefits such as supporting immune function.

Be sure to keep a close eye on the pan, as you don't want the onions and garlic to burn. They should soften and become translucent, about 5-7 minutes.

Adjust the heat as needed to prevent any charring. Once they're perfectly cooked, they'll add wonderful flavor and texture to your egg curry.

Advertisement

Now that the aromatic base is ready, you can move on to the next step. Get ready to stir in the spices and tomatoes, bringing all the flavors together in a harmonious curry dish.

Your kitchen is about to be filled with the most amazing smells!

Step 4. Add Chopped Tomatoes

incorporate diced tomatoes now

With the aromatic onions and garlic sizzling away, it's now time to stir in the chopped tomatoes.

These juicy, vibrant tomatoes will add a lovely acidity and brightness to the dish, balancing out the richness of the spices. Similar to how the molokhia stew incorporates fresh ingredients for added flavor, the tomatoes will elevate your egg curry.

Grab a couple of ripe, juicy tomatoes and dice them up into bite-sized pieces.

Don't be afraid to get a little messy – the more rustic the tomato chunks, the better! Toss them right into the pan with the onions and garlic, and give everything a good stir. The tomatoes will start to break down, releasing their juices and mingling with the other flavors.

Advertisement

Let the tomatoes cook for a few minutes, stirring occasionally, until they've softened and the mixture has thickened slightly.

This will help the flavors meld together and create a smooth, cohesive sauce. Now, you're ready to move on to the next step in your delicious egg curry adventure!

Step 5. Add Spices and Simmer

season and cook gently

Add the spices to the simmering tomatoes and onions. Give them a good stir to coat everything evenly. You'll want to add in the coriander, cumin, turmeric, and garam masala.

Don't be shy with the spices – the more you use, the more flavor you'll get. Additionally, consider enhancing the dish with a touch of dark chocolate, as cocoa can add a rich depth to savory dishes and has unique health benefits, including antioxidants and mood enhancement Cacao's health benefits.

Let the mixture simmer for 5-7 minutes, stirring occasionally, until the flavors have melded together and the sauce has thickened up nicely.

Now it's time to add the hard boiled eggs. Gently lower them into the curry, being careful not to break them. Let the eggs warm through for a couple of minutes.

Advertisement

Taste the curry and add a pinch of salt if needed. You can also add a splash of water if it seems too thick.

Serve the egg curry over basmati rice or with some warm naan bread. The rich, aromatic sauce pairs perfectly with the creamy hard boiled eggs. Get ready for your taste buds to dance!

Final Thoughts

Considering the simplicity and versatility of egg curry, it makes a fantastic addition to any meal. You can whip it up in a flash, yet the flavors meld together in a delightfully complex way. The creamy, savory sauce complements the protein-packed eggs perfectly, creating a satisfying and nourishing dish.

Don't be afraid to get creative with your egg curry. Try swapping out the basic spices for bolder flavors, like cumin, coriander, or even a touch of heat from chili powder. You can also experiment with different types of eggs, such as hard-boiled or soft-poached, to change up the texture.

And don't forget the accompaniments – a fluffy bed of basmati rice or some warm naan bread are the perfect complements to soak up every last bit of that flavorful sauce.

Advertisement

Whether you're looking for a quick weeknight meal or a comforting weekend indulgence, egg curry is sure to hit the spot. So go ahead and give this versatile dish a try – your taste buds will thank you!

Frequently Asked Questions

What Is the Best Type of Egg to Use for Egg Curry?

You'll want to use large, fresh eggs for the best egg curry. The yolks should be bright and vibrant, and the whites should be firm but tender. Avoid older or overcooked eggs, as they won't give you the ideal texture.

How Long Can Leftover Egg Curry Be Stored in the Refrigerator?

Leftover egg curry can be stored in the refrigerator for up to 3-4 days. Make sure to store it in an airtight container and reheat thoroughly before serving. Proper storage will help preserve the flavor and texture of the dish.

Is It Possible to Make Egg Curry With Hard-Boiled Eggs?

You can absolutely make egg curry with hard-boiled eggs. The eggs will hold their shape and provide a delicious, protein-packed addition to the flavorful curry sauce. Give it a try for a satisfying and convenient meal.

Can You Substitute Yogurt for Cream in the Recipe?

You can substitute yogurt for cream in the recipe. The yogurt will provide a similar creamy texture and tangy flavor. Just be sure to adjust the amount to achieve the desired consistency.

Advertisement

How Can I Make the Egg Curry Spicier?

To make your dish spicier, try adding more chili peppers, cayenne pepper, or red pepper flakes. You can also experiment with different spices like cumin, coriander, or garam masala to amp up the heat and flavor.

Continue Reading

Indian Meals

Chicken Chettinad

Immerse yourself in the bold flavors of Chicken Chettinad, a beloved Tamil Nadu dish that tantalizes the senses with its aromatic spices and fiery chilies. Discover more.

Published

on

spicy south indian curry

Chicken Chettinad is a beloved and deeply flavorful dish that'll transport you straight to the bustling streets of Tamil Nadu, India. This vibrant curry features tender chicken simmered in a bold blend of aromatic spices, tangy tomatoes, and fiery chilies. The signature Chettinad spice mix lends a complex depth of flavor, while creamy coconut milk rounds out the dish. Garnished with fresh coriander leaves, each bite offers an explosion of tastes and textures. Whether you're an experienced cook or just starting your culinary journey, Chicken Chettinad is sure to impress. And if you'd like to learn more about the rich cultural heritage behind this dish, keep reading!

Key Takeaways

  • Chicken Chettinad is a spicy and flavorful Tamil Nadu-style chicken curry that originated from the Chettinad region and reflects the rich culinary traditions of South India.
  • The dish is characterized by a complex blend of aromatic spices, tender chicken, and fiery chili peppers, which create a tangy and rich flavor profile.
  • The recipe involves marinating the chicken in a spice mix, sautéing onions and tomatoes with the spices, and then simmering the chicken in coconut milk to achieve a velvety texture.
  • Garnishing the dish with fresh coriander leaves adds a refreshing contrast to the warm spices and complements the overall flavor balance.
  • Chicken Chettinad is a popular dish across India, showcasing the culinary expertise of the Chettinad region and providing a flavorful and satisfying dining experience.

History

The Chicken Chettinad dish has its origins in the Chettinad region of Tamil Nadu, a state in southern India. This vibrant and flavorful recipe has been passed down through generations, reflecting the rich cultural heritage of the region.

The culinary landscape of India is diverse, much like Brazilian cuisine, which also showcases a variety of regional influences and traditional ingredients, such as Indigenous Ingredients like cassava and corn in Brazil's traditional dishes.

Chettinad is known for its unique spice blends and bold, aromatic dishes. The Chicken Chettinad recipe showcases the local culinary expertise, featuring a delightful combination of spices, including black pepper, cumin, coriander, and the signature Chettinad spice mix. These flavors come together to create a truly authentic and mouthwatering dish.

The cooking techniques used in Chicken Chettinad also have a long history. The meat is slow-cooked to perfection, allowing the flavors to meld and the chicken to become incredibly tender.

This traditional method ensures that every bite is bursting with the rich, complex flavors that make Chicken Chettinad a beloved dish throughout India.

Advertisement

Recipe

Chicken Chettinad is a spicy and flavorful Tamil Nadu-style chicken curry. It's known for its robust spices and aromatic flavors. This dish is a staple in South Indian cuisine and is often served with rice or Indian flatbreads.

The use of freshly ground spices, reminiscent of a fermented vegetable plate, enhances the dish's complexity and nutritional value, making it not just delicious but also health-conscious.

The key to an authentic Chicken Chettinad is the blend of freshly ground spices, which gives the dish its signature taste. The combination of aromatic whole spices, chilies, and freshly grated coconut creates a complex and deeply satisfying flavor profile.

  • 1 kg chicken, cut into pieces
  • 2 onions, finely chopped
  • 4 tomatoes, diced
  • 6 cloves garlic, minced
  • 2-inch piece ginger, grated
  • 2 tablespoons chettinad spice mix
  • 1 teaspoon turmeric powder
  • 1 teaspoon red chili powder
  • 2 tablespoons vegetable oil
  • Salt to taste
  • Chopped coriander leaves for garnish

In a large pan, heat the oil over medium heat. Add the onions and sauté until golden brown. Add the garlic and ginger and sauté for another minute.

Add the tomatoes and cook until they soften and release their juices. Stir in the chettinad spice mix, turmeric, and chili powder. Add the chicken pieces and season with salt.

Cover and cook for 20-25 minutes, stirring occasionally, until the chicken is cooked through and the gravy has thickened.

Advertisement

Garnish the Chicken Chettinad with chopped coriander leaves and serve hot with steamed rice or Indian flatbreads. The longer the dish simmers, the more pronounced the flavors will become. Adjust the spice level to your preference by adding more or less chili powder.

Cooking Steps

First, you'll need to marinate the chicken in a delightful blend of spices, which can include a hint of sweetness found in treats like Birthday Cake Ice Cream.

Then, sauté the onions, tomatoes, and more spices until they're fragrant and sizzling.

Next, add the marinated chicken and let it simmer until tender and flavorful.

Step 1. Marinate Chicken in Spice Mix

marinate chicken with spices

To begin the marinating process, combine the spices, yogurt, and lemon juice in a large bowl. You'll need ground coriander, cumin, chili powder, turmeric, and salt. Stir these together until they're well-mixed.

Now, add in the yogurt and the juice of one lemon. Give it all a good stir to create a thick, flavorful marinade. For a cozy home atmosphere while cooking, consider using seasonal decor like GEEORY Fall Pillow Covers to enhance your kitchen space.

Advertisement

Next, add the chicken pieces to the bowl and use your hands to make sure each piece is coated evenly with the marinade. Cover the bowl and let it rest in the fridge for at least 30 minutes, or up to 2 hours. This allows the chicken to soak up all those delicious spices.

When you're ready to cook, you'll have chicken that's full of flavor and ready to be transformed into an authentic Chicken Chettinad dish. The marinating step is key, so don't skip it!

Take the time to let those flavors meld and you'll be rewarded with a truly tasty meal.

Step 2. Sauté Onions, Tomatoes, and Spices

saut onions tomatoes spices

With the chicken marinated to perfection, it's time to start sautéing the base flavors.

In a large skillet, heat a generous amount of oil over medium heat. Once the oil is shimmering, add the sliced onions and sauté them until they're golden brown and caramelized, about 8 to 10 minutes.

A clean and organized kitchen can enhance your cooking experience, promoting a sense of control and reducing stress levels, which is essential for any culinary endeavor health and wellness benefits.

Advertisement

Next, toss in the chopped tomatoes and let them cook down, stirring occasionally, until they've softened and released their juices, around 5 minutes.

Now, it's time to add the aromatic spices. Sprinkle in the coriander, cumin, and chili powder, and give everything a good stir to coat the vegetables.

Let the spices toast and release their fragrance, about 2 minutes.

Step 3. Add Chicken and Simmer

simmer chicken addition step

Add the marinated chicken pieces to the aromatic skillet, making sure they're evenly distributed. Gently lower them in, sizzling as they hit the hot oil.

Now, it's time to let the chicken simmer and soak up all those incredible flavors you've created. This dish isn't only delicious but also packed with spices that can offer various health benefits, including anti-inflammatory properties that may support overall wellness health benefits of spices.

Give the pot a stir, coating the chicken in the fragrant spices and tomato mixture. Reduce the heat to medium-low and let the whole thing bubble away for about 20 minutes.

Advertisement

You'll know it's ready when the chicken is cooked through and the sauce has thickened up nicely.

Don't forget to stir occasionally, so everything cooks evenly. You want the chicken to be tender and juicy, infused with the bold Chettinad spices.

As it simmers, the aromas will fill your kitchen – get ready for an amazing meal! When the time's up, your delicious Chicken Chettinad is ready to serve. Mmm, can you almost taste it?

Step 4. Add Coconut Milk

incorporate coconut milk thoroughly

Next, you'll stir in the coconut milk. This creamy addition will lend a lovely richness and subtle sweetness to the dish.

Slowly pour in the coconut milk, gently incorporating it into the simmering chicken and spices. The coconut milk will help balance the bold flavors, creating a harmonious blend, much like how essential oils for toothache relief can soothe discomfort.

As it heats through, the coconut milk will thicken the sauce, making it deliciously velvety. Be sure to taste and adjust the seasoning as needed, adding more salt or spices to suit your preferences.

Advertisement

The coconut milk should meld seamlessly with the other ingredients, enhancing the overall flavor profile.

Now, let the dish continue to simmer for a few more minutes, allowing the coconut milk to fully incorporate. This final step will result in a wonderfully aromatic and flavorful Chicken Chettinad that's sure to delight your senses.

Step 5. Garnish With Coriander Leaves

garnish with coriander leaves

The aromatic blend of chicken, spices, and coconut milk is now ready to be elevated with a fresh garnish. Grab a handful of vibrant coriander leaves and gently sprinkle them over the simmering chicken Chettinad. The fragrant leaves will add a burst of flavor and a pop of color, making your dish even more appetizing. For a well-rounded meal, consider pairing it with high-quality protein sources that support overall health.

Carefully pluck the leaves from the stems, ensuring you get the most flavorful parts. Don't be shy – generously cover the surface of the chicken with the coriander. The bright green leaves will contrast beautifully with the rich, creamy sauce, creating a visually stunning presentation.

As you take your first bite, the crunchy leaves will provide a delightful textural contrast, while their herbaceous notes complement the warm spices of the Chettinad. The coriander's refreshing flavor will help balance the dish, leaving you with a perfectly balanced and mouthwatering meal.

Enjoy the explosion of tastes and aromas in every bite!

Advertisement

Final Thoughts

Ultimately, you'll find that Chicken Chettinad is a delectable dish that perfectly encapsulates the vibrant flavors of South Indian cuisine. The dish's complexity, with its blend of aromatic spices and tangy notes, is sure to delight your taste buds.

As you explore new culinary adventures, remember that maintaining a balanced diet is a crucial strategy for breast cancer prevention. Don't be intimidated by the lengthy list of ingredients – the preparation process is straightforward, and the results are well worth the effort.

As you savor each bite, you'll be transported to the bustling streets of Chettinad, where the aroma of this signature dish wafts through the air. The combination of tender chicken, fiery chili peppers, and fragrant coconut is a true celebration of the region's culinary heritage.

Whether you're an experienced home cook or new to South Indian cuisine, Chicken Chettinad is a dish that's sure to impress your family and friends.

Frequently Asked Questions

Is Chicken Chettinad Suitable for Vegans?

No, chicken chettinad wouldn't be suitable for vegans as it's a meat-based dish. Vegans avoid consuming any animal products, including meat, so this spicy South Indian chicken curry wouldn't align with a vegan diet.

Advertisement

What Is the Best Way to Store Leftover Chicken Chettinad?

To store your leftover dish, you should place it in an airtight container and refrigerate it for up to 4 days. This will help preserve the flavors and prevent the food from spoiling.

Can I Use Boneless Chicken in Chicken Chettinad?

Absolutely, you can use boneless chicken in your dish. Boneless chicken is a versatile option that can work well in many recipes, including Chicken Chettinad. The lack of bones will make the dish easier to prepare and serve.

How Long Does Chicken Chettinad Last in the Refrigerator?

Typically, cooked chicken dishes can last 3-4 days in the refrigerator when stored properly. However, the exact shelf life of your chicken Chettinad will depend on factors like the freshness of the ingredients and how you've stored it. Be sure to check for any signs of spoilage before consuming.

Is Chicken Chettinad Gluten-Free?

Yes, chicken chettinad is typically gluten-free. The dish is made with spices, coconut, and chicken, without any gluten-containing ingredients. As long as you don't add any breading or thickeners with gluten, you can enjoy this flavorful dish.

Advertisement
Continue Reading

Indian Meals

Gobi Manchurian

Flavorful and fragrant, Gobi Manchurian is an Indo-Chinese delight that tantalizes the taste buds, leaving you craving more of its irresistible blend of sweet, spicy, and tangy notes.

Published

on

spicy cauliflower appetizer dish

Craving a taste of the exotic? Gobi Manchurian is the indulgent Indo-Chinese dish you need to try! This crispy cauliflower delight whisks you away to the Manchu region of China, where it was lovingly crafted. The secret? A harmonious blend of sweet, spicy, and tangy flavors that'll have your taste buds dancing. Fry up those florets to perfection, then toss 'em in the irresistible sauce. Top it off with fresh spring onions for a pop of color and extra flavor. Whether as an appetizer or a main course, Gobi Manchurian is sure to impress. Let's dive deeper into this remarkable dish!

Key Takeaways

  • Gobi Manchurian is a vegetarian dish of crispy fried cauliflower in a savory-sweet Manchurian sauce, originating from the Manchurian region of China.
  • The dish combines the flavors and techniques of Indo-Chinese cuisine, featuring a harmony of sweet, spicy, and tangy notes.
  • Key ingredients include cauliflower, cornflour, soy sauce, chili sauce, ginger-garlic paste, and spring onions for garnish.
  • Gobi Manchurian is suitable as an appetizer or main course, often paired with steamed rice, and is visually appealing with its vibrant colors.
  • The recipe is easy to follow and encourages experimentation with spice levels, making it suitable for home cooks of all levels.

History

The origins of Gobi Manchurian can be traced back to the Manchurian region of China. This delightful dish developed as local cooks experimented with the abundant cauliflower-like Gobi vegetable, native to the Gobi Desert.

They blended Gobi with spices and sauces, creating a unique and flavorful meal. Interestingly, the Gobi vegetable is known for its high nutritional content, making it a great addition to a balanced diet high fiber and vitamin content.

Over time, the recipe spread throughout China, finding its way into the kitchens of the Manchu people. As trade and travel increased, Gobi Manchurian eventually reached the rest of the world, delighting taste buds everywhere.

Today, this dish remains a beloved classic, enjoyed for its savory-sweet balance and tender vegetable texture. Whether you're new to Gobi Manchurian or a lifelong fan, you're sure to appreciate the rich cultural history behind this delicious dish.

Recipe

Gobi Manchurian is a popular Indo-Chinese dish that combines the earthy flavors of cauliflower with the bold spices of Manchurian cuisine. This dish is a perfect balance of crunchiness and tanginess, making it a favorite among foodies.

Advertisement

It's worth noting that just like creating a personal budget, the key to a delicious Gobi Manchurian is in the preparation and attention to detail financial health.

By following a few simple steps, you can create a dish that will tantalize your taste buds and leave you craving more.

  • Cauliflower florets
  • Cornflour
  • All-purpose flour
  • Ginger-garlic paste
  • Soy sauce
  • Chili sauce
  • Vinegar
  • Spring onions
  • Salt
  • Oil for frying

Begin by cutting the cauliflower into bite-sized florets. In a bowl, mix the cornflour, all-purpose flour, ginger-garlic paste, soy sauce, chili sauce, vinegar, and salt.

Add the cauliflower florets and toss to coat them evenly. Heat oil in a deep-frying pan or wok, and fry the coated cauliflower until golden brown and crispy. Drain the fried cauliflower on a paper towel-lined plate.

For the final touch, in a separate pan, sauté the spring onions in a small amount of oil. Add the fried cauliflower, and toss everything together.

Serve hot, garnished with additional spring onions if desired. Remember, the key to a perfect Gobi Manchurian is to ensure the cauliflower is crispy and the flavors are well-balanced. Enjoy your homemade masterpiece!

Advertisement

Cooking Steps

First, soak the cauliflower florets in water, then drain and pat them dry. This step ensures that the florets are clean and ready for frying, helping to retain their essential nutrients during cooking.

Next, prepare the batter and coat the florets before frying them.

Step 1. Soak Cauliflower Florets in Water

soak cauliflower in water

Firstly, soak the cauliflower florets in a bowl of water for about 15-20 minutes. This helps to remove any dirt or impurities from the cauliflower, and it also softens the florets a bit, making them easier to cook.

Be sure to use cold water for this step – the cool temperature will help the cauliflower retain its crisp texture. Additionally, using cookies for enhanced experience can make your cooking journey smoother by tracking preferences.

After the cauliflower has had a chance to soak, you'll want to drain the water and give the florets a gentle rinse. This ensures that any lingering dirt or debris is washed away.

Once they're rinsed, you can pat the cauliflower dry with a clean kitchen towel or paper towels. Getting the florets as dry as possible will help them brown and crisp up nicely when you start cooking.

Advertisement

Now you're ready to move on to the next step in your Gobi Manchurian preparation! With the cauliflower soaked and dried, you can start cooking the flavorful dish.

Step 2. Drain and Pat Dry Cauliflower

drain and pat dry

After soaking the cauliflower florets, you'll want to drain them thoroughly. Grab a colander and carefully pour the cauliflower into it, letting the excess water drip away. Don't be too hasty – take your time and make sure to get rid of as much water as possible.

A clean and organized kitchen can enhance your cooking experience, contributing to a more mindful approach in the kitchen, similar to the mental and emotional benefits of decluttering spaces. You don't want any soggy bits in your final dish!

Once the cauliflower is nicely drained, it's time to pat it dry. Grab a clean kitchen towel or some paper towels and gently dab the florets, absorbing any remaining moisture.

Be gentle, but firm – you don't want to crush the delicate cauliflower. Keep patting and blotting until the florets feel nice and dry to the touch. This extra step will help ensure your Gobi Manchurian turns out crispy and delicious.

Now that your cauliflower is all prepped, you're ready to move on to the next part of the recipe. Get excited – the best is yet to come!

Advertisement

Step 3. Prepare Batter and Coat Florets

prepare batter coat florets

Next, prepare the batter by combining the all-purpose flour, corn flour, red chili powder, garlic powder, ginger-garlic paste, salt, and water in a mixing bowl. Whisk the ingredients together until you have a smooth, lump-free batter. The consistency should be thick enough to coat the cauliflower florets, but not too runny.

For an extra flavor boost, consider adding some freshly chopped herbs or spices to the batter, similar to how you'd enhance a dish with simple homemade recipe for garlic herb butter.

Now, take the drained and patted dry cauliflower florets and gently toss them in the prepared batter, making sure each piece is evenly coated. Work in batches if needed to ensure the florets are properly covered.

Once they're all coated, it's time to fry them to golden perfection. Heat oil in a pan or wok over medium-high heat. When the oil is hot, carefully add the battered cauliflower florets, a few at a time, and fry them until they're crispy and golden brown on all sides.

Drain the fried florets on a paper towel-lined plate before serving hot.

Step 4. Fry Coated Cauliflower Florets

fry coated cauliflower florets

With the battered cauliflower florets ready, it's time to start frying them. Gather your trusty skillet and heat up some oil over medium-high heat.

You'll want the oil to be nice and hot, shimmering even, before you gently lower those florets in. As you prepare to fry, remember that this process can be likened to unlocking your potential, much like how imagination mobilizes mental potential, leading to transformative possibilities.

Advertisement

Carefully place the battered florets into the sizzling oil, making sure not to overcrowd the pan. Fry them for about 2-3 minutes per side, flipping gently, until they're golden brown and crispy.

The batter should create a delightful crunch that you can't wait to sink your teeth into.

Once they're beautifully fried, transfer the florets to a paper towel-lined plate to drain off any excess oil.

Don't they look amazing? Now you're ready to toss them in the delicious Manchurian sauce. Get ready for an explosion of flavors in every bite!

Step 5. Prepare Sauce and Toss Fried Cauliflower

prepare sauce toss cauliflower

To prepare the Manchurian sauce, gather the necessary ingredients – soy sauce, vinegar, chili sauce, and a few other key seasonings.

In a bowl, combine the soy sauce, rice vinegar, chili sauce, garlic, ginger, and a pinch of sugar. Whisk the ingredients together until the sugar dissolves, creating a flavorful sauce that could pair well with Fried Catfish, showcasing the versatility of Southern-inspired dishes.

Advertisement

Now, it's time to toss the fried cauliflower florets in the Manchurian sauce. Gently transfer the crispy cauliflower into the bowl with the sauce.

Use a spatula to carefully coat each piece, ensuring the sauce evenly covers the florets. Toss the cauliflower until it's fully glazed and the sauce has thickened slightly.

Serve the Gobi Manchurian hot, garnished with chopped scallions or cilantro, if desired.

The sweet, spicy, and tangy flavors of the sauce complement the crispy cauliflower perfectly. Enjoy this delightful dish as a tasty appetizer or a main course with steamed rice.

Final Thoughts

Gobi Manchurian is a delightful vegetarian dish that's sure to satisfy your cravings. The combination of crispy fried cauliflower and the flavorful Manchurian sauce is a match made in heaven.

Advertisement

This dish, much like bread pudding, transforms simple ingredients into something truly comforting and enjoyable. Don't hesitate to give this recipe a try – it's easy to make and packed with delicious flavors.

Once you've tasted Gobi Manchurian, you'll wonder why you didn't try it sooner. It's a perfect dish for a casual dinner, a party, or even a potluck.

The vibrant colors and inviting aroma will draw everyone in, and the satisfying taste will have them coming back for more.

Frequently Asked Questions

What Is the Origin of Gobi Manchurian?

You're asking about the origin of this dish, aren't you? Well, the Gobi Manchurian is a popular Indo-Chinese dish that blends Chinese cooking techniques with Indian spices, creating a unique and flavorful culinary fusion.

How Long Does It Take to Prepare Gobi Manchurian?

It typically takes 30-45 minutes to prepare this dish. You'll need to marinate the cauliflower, coat it in a batter, and then deep-fry or sauté it before tossing it in a savory, flavorful sauce.

Advertisement

Can Gobi Manchurian Be Made Vegetarian?

Yes, you can make a vegetarian version of this dish. Simply replace the traditional meat-based ingredients with plant-based alternatives to create a delightful meatless meal that's just as flavorful and satisfying.

What Are the Health Benefits of Gobi Manchurian?

Eating a veggie-packed dish can provide a range of health benefits. It'll boost your fiber intake, supply antioxidants, and support your immune system. Plus, it's a tasty way to get more veggies into your diet.

Where Can I Find the Best Gobi Manchurian in My City?

To find the best Gobi Manchurian in your city, you'll need to do some research. Check online reviews, ask locals for recommendations, and try a few different restaurants to see which one serves the tastiest and most authentic version.

Continue Reading
Advertisement

Affiliate Disclaimer
As an affiliate, we may earn a commission from qualifying purchases. We get commissions for purchases made through links on this website from Amazon and other third parties.

Advertisement

Latest

tangy citrus dessert squares tangy citrus dessert squares
Graduations/Birthdays1 min ago

Lemon Bars

Unlock the secrets to making the perfect lemon bars, a classic American dessert that combines a buttery crust with a...

delicious chocolate dessert squares delicious chocolate dessert squares
Graduations/Birthdays7 mins ago

Brownies

Joyful and decadent, the story of brownies dates back to a historic culinary mishap, unveiling a rich legacy of chocolate-infused...

delicious homemade chocolate treats delicious homemade chocolate treats
Graduations/Birthdays12 mins ago

Chocolate Chip Cookies

Homemade chocolate chip cookies with their buttery, crispy edges and soft, chewy centers have captivated taste buds for generations, but...

celebratory dessert for gatherings celebratory dessert for gatherings
Graduations/Birthdays18 mins ago

Sheet Cake

Discover the delectable world of sheet cake, a versatile and crowd-pleasing dessert that has captured the hearts of celebrations for...

delicious baked sweet treats delicious baked sweet treats
Graduations/Birthdays24 mins ago

Cupcakes

Baking cupcakes is a delightful endeavor that unveils a world of endless possibilities, from classic flavors to imaginative creations.

creamy egg salad delight creamy egg salad delight
Graduations/Birthdays29 mins ago

Egg Salad Sandwiches

Unlock the secrets to crafting the perfect egg salad sandwich, a timeless classic that delights the senses and satisfies the...

fresh mozzarella tomato basil fresh mozzarella tomato basil
Graduations/Birthdays34 mins ago

Caprese Sandwiches

Indulge in the irresistible blend of creamy mozzarella, juicy tomatoes, and fragrant basil that makes the Caprese sandwich a beloved...

turkey avocado wrap recipe turkey avocado wrap recipe
Graduations/Birthdays39 mins ago

Turkey and Avocado Wraps

Craving a quick, nutritious, and delicious lunch that satisfies your taste buds? Discover the irresistible combination of Turkey and Avocado...

stuffed flatbread delights stuffed flatbread delights
Graduations/Birthdays44 mins ago

Pita Pockets

Juicy fillings, crisp veggies, and savory grilled meats come together in these versatile pita pockets that are easy to prepare...

bacon lettuce tomato delight bacon lettuce tomato delight
Graduations/Birthdays50 mins ago

BLT Sandwiches

A timeless classic, the BLT sandwich captivates with its harmonious blend of crisp bacon, fresh lettuce, and juicy tomatoes, leaving...

artisanal melted cheese delight artisanal melted cheese delight
Graduations/Birthdays55 mins ago

Gourmet Grilled Cheese

Mouth-watering gourmet grilled cheese sandwiches with artisanal breads and premium cheeses that transform this lunchtime classic into an indulgent culinary...

delicious italian sub sandwiches delicious italian sub sandwiches
Graduations/Birthdays1 hour ago

Italian Sub Sandwiches

Perennially popular for their blend of savory Italian cured meats, creamy cheeses, and crisp veggies, Italian sub sandwiches are a...

Advertisement

Trending