Connect with us

Indian Meals

Gulab Jamun

Nestled in the heart of Indian cuisine, gulab jamun is a captivating dessert that has enchanted taste buds for generations – discover its timeless allure.

Published

on

sweet indian dessert balls

Gulab jamun is a beloved Indian dessert that's been enchanting taste buds for centuries! This spongy, syrupy treat originated in the Mughal royal kitchens, and today it's a cherished part of Indian culture. The key is the perfect blend of milk solids, flour, and semolina – when fried to a golden brown and soaked in a fragrant rose-scented syrup, the result is pure indulgence. With its contrasting textures and harmonious flavors, it's no wonder gulab jamun is a staple at celebrations and festivals. Want to learn more about this timeless delight and how to make it yourself?

Key Takeaways

  • Gulab Jamun is a popular Indian dessert that originated in the 16th century Mughal kitchens, made from khoya or paneer and deep-fried into spongy, syrupy balls.
  • The recipe has evolved over time, with variations using milk powder or paneer, and it remains a cherished part of Indian cuisine, often served at celebrations and festivals.
  • The cooking process involves kneading the dough, rolling it into balls, deep-frying, and soaking the fried balls in a sugar syrup, resulting in a delightful combination of textures and flavors.
  • Gulab Jamun is known for its soft, spongy interior and sweet, aromatic syrup, and it represents hospitality and warmth in Indian culture, evoking nostalgia for the bustling streets of India.
  • Gulab Jamun can be served warm or chilled, and it is often garnished with chopped pistachios, rose petals, or cardamom for added flavor and visual appeal.

History

Gulab jamun's origins can be traced back to the 16th century, when it was first prepared in the royal kitchens of the Mughal Empire. This beloved Indian dessert has a rich history that's intertwined with the opulent courts of the Mughals, similar to the way unique culinary experiences are celebrated today.

Back then, these delectable dumplings were made from a mixture of khoya (reduced milk solids) and flour, then deep-fried and soaked in a fragrant rose-scented syrup. Over the centuries, the recipe has evolved, with variations using milk powder or paneer (fresh cheese) instead of khoya.

Today, gulab jamun remains a cherished part of Indian cuisine, served at celebrations, festivals, and special occasions. Whether you enjoy them warm or at room temperature, the irresistible combination of spongy, syrupy goodness is sure to delight your taste buds. If you’re looking to add a modern twist to this classic dessert, consider pairing gulab jamun with a refreshing Stgermain spritz recipe. The floral notes of the Stgermain liqueur complement the sweetness of the gulab jamun, creating a delightful contrast of flavors. Whether enjoyed on its own or as part of a creative dessert pairing, gulab jamun continues to be a beloved treat in Indian cuisine.

Indulge in the rich history and timeless flavors of this iconic Indian dessert.

Recipe

Gulab Jamun is a beloved and delectable Indian dessert that has captivated the hearts and taste buds of many around the world. This decadent treat, made from milk solids kneaded into a dough, then shaped and deep-fried to perfection, is a true delight for the senses.

Advertisement

The joy of discovering new flavors and culinary traditions is akin to the thrill of exploration, where each bite offers a taste of the passion for discovery. The origins of Gulab Jamun can be traced back to the royal kitchens of the Indian subcontinent, where skilled chefs perfected the art of creating this indulgent confection.

It's a testament to the rich culinary heritage of the region and the ingenuity of its people.

Ingredients:

  • 1 cup milk solids (khoya or paneer)
  • 1/2 cup all-purpose flour
  • 1 tablespoon semolina (suji)
  • 1/4 teaspoon baking soda
  • 2 tablespoons sugar
  • 1/2 cup warm milk
  • Oil for deep-frying
  • Syrup:
  • 1 cup water
  • 1 cup sugar
  • 1/2 teaspoon rose water (optional)

Cooking Instructions:

In a mixing bowl, combine the milk solids, all-purpose flour, semolina, baking soda, and sugar. Gradually add the warm milk and knead to form a smooth, pliable dough. Cover the dough and let it rest for 30 minutes.

Divide the dough into lemon-sized balls and gently roll them between your palms to shape them. Heat oil in a deep-frying pan or wok and carefully drop the dough balls into the hot oil. Fry the Gulab Jamun until they turn golden brown, then drain them on a paper towel-lined plate.

Advertisement

For the syrup, in a saucepan, combine the water and sugar. Bring the mixture to a boil, stirring occasionally, until the sugar dissolves completely. Remove from heat and stir in the rose water (if using).

Add the fried Gulab Jamun to the warm syrup and let them soak for at least 30 minutes, turning them occasionally, to allow the flavors to meld and the Gulab Jamun to absorb the syrup.

Serve the delectable Gulab Jamun warm or chilled, and enjoy the burst of sweetness in every bite.

Cooking Steps

Knead the dough until it's nice and smooth – you want it to be just right. A well-prepared dough can make a significant difference in the final texture of your gulab jamun, much like how understanding the mechanics of different brewing methods affects your coffee experience.

Then, roll the dough into small, even balls. Next, carefully fry those balls until they're golden brown.

Advertisement

Step 1. Knead the Dough Thoroughly

knead dough until smooth

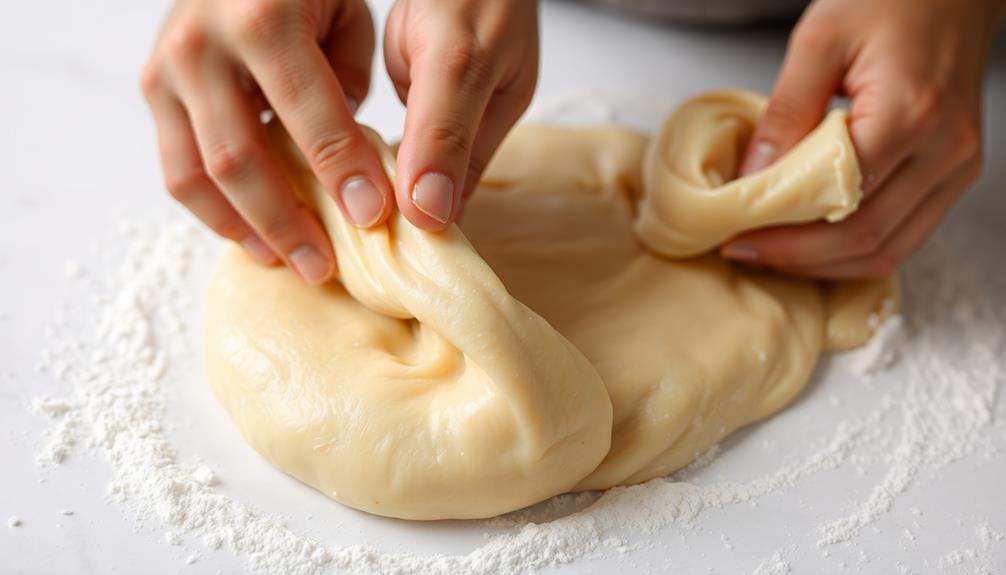
After mixing the ingredients together, it's crucial to knead the dough thoroughly. This step helps develop the gluten, which gives the gulab jamun its signature chewy texture.

It's important to manage your kitchen budget effectively while cooking, as tracking expenses can help you enjoy delicious treats without overspending budgeting essentials. Don't be shy – get in there with both hands and really work the dough. Knead it for about 5-7 minutes, pressing, folding, and turning the dough until it becomes smooth and elastic. You'll know it's ready when the dough springs back when you poke it.

Be sure to knead on a clean, lightly floured surface to prevent sticking. If the dough feels too dry, add a teaspoon of milk at a time until it reaches the right consistency. On the other hand, if it's too sticky, sprinkle in a bit more flour.

The goal is a soft, pliable dough that's easy to shape. Thorough kneading is key for achieving the perfect gulab jamun texture, so don't skimp on this step. Get ready to roll up your sleeves and get to work!

Step 2. Roll Dough Into Small Balls

roll dough into balls

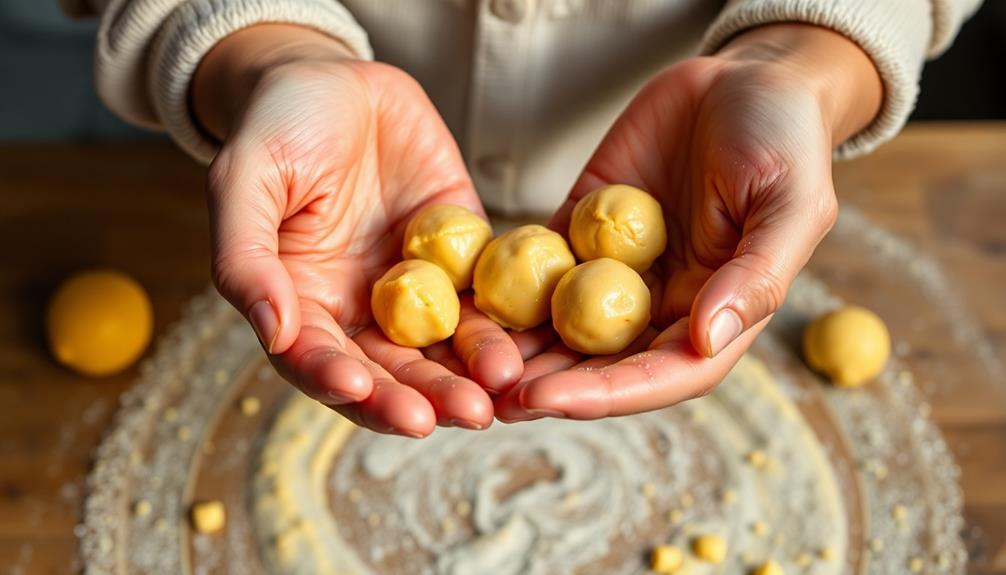
Once the dough has been thoroughly kneaded, you'll want to roll it into small, even balls. This is an important step in creating the perfect gulab jamun.

Chia seeds, known for their high nutritional value and versatility, can inspire creativity in your cooking process. Start by taking a small piece of the dough, about the size of a walnut, and gently roll it between your palms.

Roll it back and forth until it forms a smooth, round ball. The key is to use a light touch and avoid overworking the dough. As you roll, apply just enough pressure to shape the ball without compacting the dough too much.

Advertisement

Aim for balls that are roughly the same size so they'll cook evenly. Once you've rolled all the dough into balls, place them on a clean surface and get ready for the next step.

With a little practice, you'll be rolling out perfect gulab jamun balls in no time!

Step 3. Fry the Dough Balls

fry the dough balls

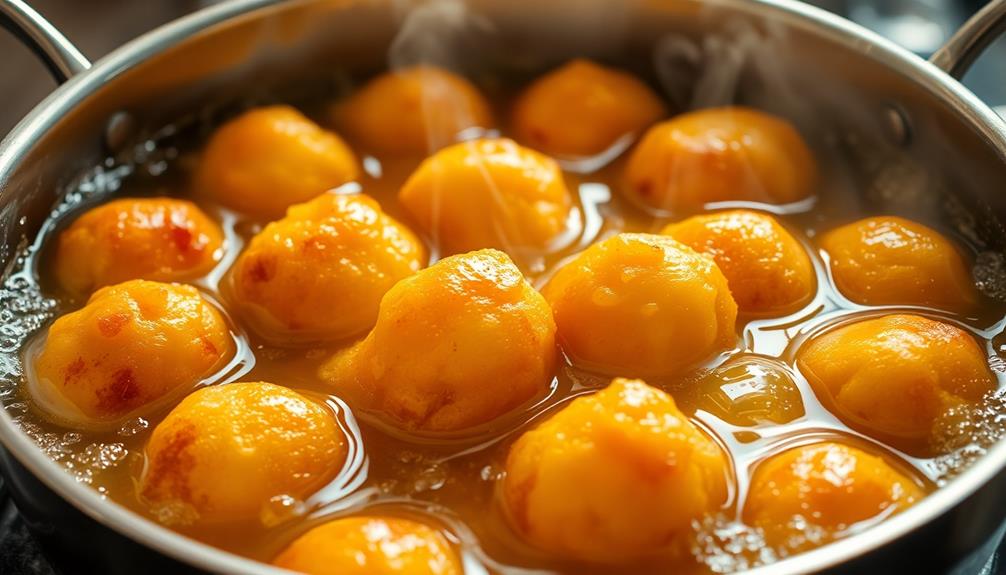
With your perfectly formed dough balls ready, you can now move on to frying them. Grab a heavy-bottomed pan and pour in enough oil to comfortably submerge the dough balls. Heat the oil over medium-high heat until it's shimmering and ready for frying.

For a delightful twist, consider serving your gulab jamun alongside a creamy pasta dish like roasted red pepper rose pasta, which complements the sweetness beautifully.

Gently drop the dough balls into the hot oil, being careful not to overcrowd the pan. Fry them for a few minutes, turning them occasionally, until they're a beautiful golden-brown all over. The outside should be crispy and the inside soft and delicious.

Once the dough balls are perfectly fried, use a slotted spoon to transfer them to a plate lined with paper towels. This will help absorb any excess oil.

Advertisement

Let them cool slightly before serving, as the insides will still be hot. Now you can enjoy your freshly fried gulab jamun, savoring the sweet and indulgent flavors in every bite.

Step 4. Soak Balls in Sugar Syrup

soak balls in syrup

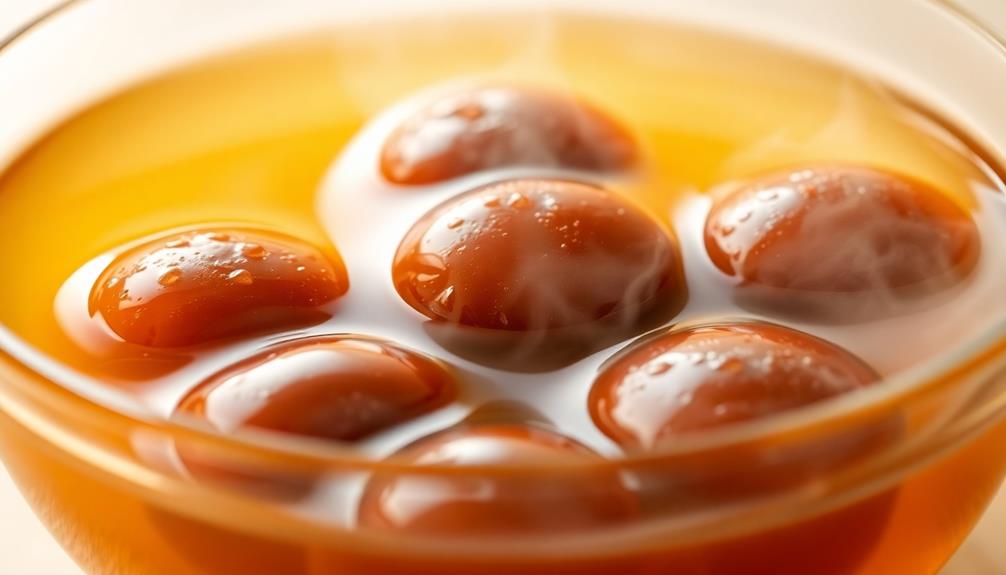
Next, you'll want to soak the fried dough balls in a sweet sugar syrup. This is a crucial step that brings the gulab jamun to life!

In a saucepan, combine water, sugar, and a few cardamom pods. Bring this mixture to a boil, then reduce the heat and let it simmer for about 10 minutes. The sugar will dissolve, creating a rich, fragrant syrup.

Gently add the fried dough balls to the syrup. Let them soak for 30 minutes, turning occasionally, until they've plumped up and absorbed the sweet flavor. The balls should be glossy and a deeper shade of brown when ready.

Carefully remove them from the syrup using a slotted spoon, letting any excess drip back into the pan.

Arrange the soaked gulab jamun on a serving plate. Garnish with a sprinkle of chopped pistachios or a light dusting of rose petals, if desired.
For an extra decadent touch, drizzle a spoonful of warm saffron-infused syrup over the gulab jamun just before serving. This traditional Indian dessert is the perfect ending to any meal, especially when paired with a refreshing glass of lassi. Looking for more delicious recipes to try? Check out our chicken jalfrezi recipe for a flavorful and satisfying dinner option.

Advertisement

Serve warm or at room temperature, and enjoy the delightful combination of soft, spongy dough and aromatic sugar syrup!

Step 5. Serve Warm and Garnished

serve warm with garnish

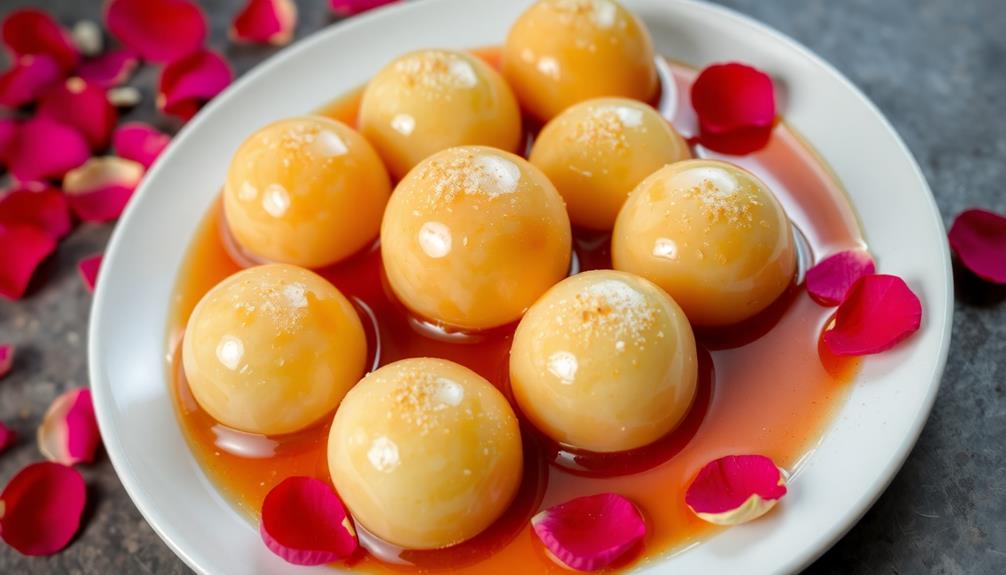
Arrange the soaked gulab jamun on a serving plate. The warm, golden-brown orbs should be glistening with the sweet syrup. Carefully place them in an appealing pattern, allowing their smooth, round shapes to shine.

To elevate the presentation, consider pairing them with a fermented vegetable plate for a delightful contrast of flavors and textures. Sprinkle a light dusting of ground cardamom over the top, adding a fragrant touch. If you'd like, you can also garnish the plate with a few fresh mint leaves or slivered pistachios for a pop of color and crunch.

Now, it's time to serve these delectable treats. Grab a spoon and scoop up a gulab jamun, ensuring you get a bit of the syrup as well. Savor the explosion of flavors – the soft, spongy interior contrasting with the outer crust, all enveloped in the sweet, aromatic syrup.

Encourage your guests to dig in and enjoy the warm, comforting goodness of these traditional Indian sweets. The combination of textures and the harmony of spices will delight the senses and leave everyone craving more.

Final Thoughts

A delightful finish to any meal, Gulab Jamun is a true indulgence. Whether enjoyed as a special treat or a comforting dessert, this classic Indian sweet is sure to delight your taste buds. The combination of soft, spongy dumplings soaked in a fragrant rose-scented syrup is simply divine.

Advertisement

Additionally, the use of natural ingredients in desserts like these can complement a balanced diet, similar to how juice diets require careful planning to avoid deficiencies.

As you savor each bite, you'll be transported to the bustling streets of India, where the aroma of freshly fried Gulab Jamun fills the air. Ensure to serve these delectable morsels warm, allowing the syrup to soak in and the flavors to meld together perfectly.

Garnish with a sprinkle of chopped pistachios or a delicate rose petal for an extra touch of elegance.

Gulab Jamun is a timeless delight that can be enjoyed year-round, whether as a special occasion dessert or a comforting treat on a cozy evening. Indulge in the rich, indulgent flavors and create lasting memories with every spoonful.

Frequently Asked Questions

How Long Does Gulab Jamun Last Once Prepared?

Freshly prepared, it'll stay fresh for 3-4 days when stored in the fridge. But beware – the texture and flavor start deteriorating after a day or two. So it's best enjoyed soon after making.

Advertisement

Is Gulab Jamun Vegan or Gluten-Free?

Gulab jamun is not typically vegan or gluten-free. It contains dairy products like milk and ghee, and its main ingredient is khoya, which is made from reduced milk. To enjoy a vegan or gluten-free version, you'd need to find a specialized recipe.

Can Gulab Jamun Be Frozen for Later Use?

Yes, you can freeze gulab jamun for later use. Simply place the cooked dumplings in an airtight container or freezer bag and store them in the freezer for up to 3 months. When ready to serve, thaw and reheat.

What Is the Best Way to Store Leftover Gulab Jamun?

The best way to store leftover gulab jamun is to keep them in an airtight container in the refrigerator. This will help them stay fresh for up to a week, so you can enjoy them later.

Can Gulab Jamun Be Made in Advance Before an Event?

Yes, you can make gulab jamun in advance before an event. Store them in an airtight container in the refrigerator, and they'll stay fresh for up to 5 days. Just reheat them before serving for the best texture and flavor.

Advertisement

Advertisement

Indian Meals

Tandoori Chicken Pizza: Indian-Italian Fusion

Indulge in a tantalizing fusion of smoky tandoori chicken and melted mozzarella on a crisp, golden-brown crust for a savory delight that’ll leave you craving more.

Published

on

indian italian tandoori pizza fusion

Get ready to embark on a delicious fusion journey! Tandoori Chicken Pizza brings together the smoky, spicy flavors of Indian tandoori chicken and the comforting delight of classic Italian pizza. You'll start by marinating juicy chicken in a blend of aromatic spices, then layer it onto a crisp, golden-brown pizza crust. Top it off with melty mozzarella cheese for a creamy finish that'll make your taste buds dance. This unique dish combines the best of both culinary worlds, offering a satisfying crunch and a burst of flavors that'll leave you craving more. Intrigued? There's much more to discover about this captivating fusion creation.

Key Takeaways

  • Tandoori Chicken Pizza combines the smoky, aromatic spices of Indian cuisine with the cheesy, crisp base of classic Italian pizza.
  • The dish features tandoori-marinated chicken as the primary topping, providing a unique blend of flavors and textures.
  • The fusion of Indian and Italian culinary traditions showcases the growing trend of cross-cultural culinary creativity and exploration.
  • Preparation involves marinating the chicken in a blend of yogurt, lemon juice, and tandoori spices before baking the pizza.
  • The combination of the spicy tandoori chicken, melted mozzarella cheese, and crispy pizza crust offers a satisfying and flavorful dining experience.

History

Tandoori chicken has been a beloved dish in India for centuries, originating from the northern region where the distinctive tandoor oven is commonly used. This traditional clay oven, heated with charcoal or wood, cooks the chicken to perfection, giving it a unique smoky flavor and juicy tenderness.

Over time, the popularity of tandoori chicken grew, and it became a staple in Indian cuisine.

As the world becomes more connected, the delicious flavors of tandoori chicken have found their way into an unexpected fusion – the tandoori chicken pizza! By combining the spices and cooking method of this iconic Indian dish with the classic Italian pizza, a delightful culinary collaboration was born.

The result is a harmonious blend of cultures, where the heat and complexity of tandoori chicken perfectly complements the crispy crust and melted cheese of the pizza. This innovative creation has captured the hearts and taste buds of people around the globe, proving that culinary boundaries can be beautifully blurred.

Recipe

Tandoori Chicken Pizza is a delightful fusion of Indian and Italian cuisine. The spicy and flavorful tandoori chicken is the perfect topping for a crisp and cheesy pizza base. This dish combines the rich, aromatic spices of tandoori with the comforting familiarity of a classic pizza.

Advertisement

To create this masterpiece, you'll need to prepare the tandoori chicken first, then assemble and bake the pizza. The result is a unique and satisfying meal that will impress your taste buds and your guests.

Ingredients:

  • Boneless, skinless chicken thighs
  • Yogurt
  • Lemon juice
  • Garlic cloves
  • Ginger
  • Garam masala
  • Chili powder
  • Salt
  • Pizza dough
  • Mozzarella cheese
  • Tomato sauce
  • Cilantro (for garnish)

Instructions:

Marinate the chicken in a mixture of yogurt, lemon juice, garlic, ginger, garam masala, chili powder, and salt. Refrigerate for at least 30 minutes or up to 24 hours.

Preheat your oven to 400°F (200°C). Roll out the pizza dough and spread the tomato sauce over the surface. Arrange the marinated tandoori chicken on top, followed by shredded mozzarella cheese.

Bake the pizza for 15-20 minutes, or until the crust is golden brown and the cheese is melted and bubbly.

Advertisement

To ensure the best results, make sure to marinate the chicken thoroughly and allow the flavors to meld. For an extra burst of flavor, garnish the pizza with fresh cilantro before serving. Enjoy your Tandoori Chicken Pizza!

Cooking Steps

First, you'll need to marinate the chicken in a blend of tantalizing tandoori spices.

Next, bake the pizza crust until it's perfectly crispy.

Then, spread the flavorful tandoori chicken on the crust and top it with melty mozzarella cheese.

Step 1. Marinate Chicken in Tandoori Spices

tandoori spiced chicken marinade

To begin the marinating process, gather the necessary tandoori spices. You'll need some zesty ginger, fragrant garlic, and a sprinkle of spicy cayenne pepper.

Don't forget the vibrant paprika, earthy cumin, and aromatic coriander. Combine these flavorful ingredients in a bowl, then add a dollop of tangy yogurt. Stir everything together until it forms a smooth, fragrant paste.

Advertisement

Next, place your chicken pieces in a shallow dish and generously coat them with the tandoori marinade. Make sure each piece is evenly covered, so the flavors can really soak in.

Cover the dish and pop it in the fridge for at least an hour, or up to overnight. The longer you let the chicken marinate, the more intense the tandoori flavor will be.

When you're ready to bake, preheat your oven and get ready to enjoy the delicious aromas of your tandoori-marinated chicken.

Soon, you'll have juicy, flavorful chicken ready to top your homemade Tandoori Chicken Pizza!

Step 2. Bake Pizza Crust Until Crispy

crispy pizza crust baking

With the flavorful tandoori-marinated chicken ready, it's time to turn your attention to the pizza crust. Preheat your oven to a toasty 450°F (230°C) and let's get baking!

Spread the pizza dough out on a lightly floured surface, using your hands to stretch and shape it into a large, thin circle. Transfer the dough to a baking sheet or pizza pan, being careful not to tear it.

Advertisement

Pop the crust into the oven and let it bake for 8-10 minutes, until it's golden brown and crispy around the edges. You'll know it's ready when you can smell the delicious aroma of freshly baked bread wafting through your kitchen.

Once the crust is perfectly crispy, it's time to top it with the tandoori chicken and other tasty ingredients. Get ready to enjoy a mouthwatering fusion of Indian and Italian flavors in every bite!

Step 3. Spread Tandoori Chicken on Pizza Crust

tandoori chicken pizza assembly

Take the crispy pizza crust and evenly spread the flavorful tandoori-marinated chicken over the top.

The rich, reddish-orange hue of the spiced chicken creates a vibrant contrast against the golden-brown crust. Inhale the tantalizing aromas of ginger, garlic, and warm spices as you layer the chicken across the surface.

Be sure to cover the entire crust, leaving no bare spots, so each bite will be bursting with flavor. The tender, juicy chunks of chicken will add a satisfying texture and heartiness to the pizza.

Imagine how the savory, slightly smoky tandoori seasoning will complement the gooey mozzarella cheese and fresh toppings you’ll add next. Once the tandoori seasoning is sprinkled over the mozzarella and toppings, the flavors will meld together perfectly, creating a truly delicious and unique dish. You can then pair this with some freshly baked bread or a side of french stuffed tomatoes for a complete and satisfying meal. The tandoori seasoning will add an extra depth of flavor to the tomatoes, making them an irresistible accompaniment to your cheesy, savory creation.

Advertisement

With the foundation of the crisp crust and the fragrant tandoori chicken, you're well on your way to creating an incredible fusion of Indian and Italian flavors in every slice.

Step 4. Top With Mozzarella Cheese

top with mozzarella cheese

Next, generously sprinkle the shredded mozzarella cheese over the tandoori chicken. You'll love how the creamy, melted cheese perfectly complements the bold, spicy flavors of the tandoori chicken. As the cheese melts, it forms a delightful, gooey layer that binds everything together.

Can you already imagine the aroma wafting through your kitchen? The blend of savory spices and the comforting scent of melted cheese is simply mouthwatering. Be sure to cover the entire surface of the pizza, leaving no bare spots. The more cheese, the better!

Once the cheese is evenly distributed, your pizza is ready for the oven. As it bakes, the cheese will bubble and brown, creating a beautiful, golden crust. You'll know it's done when the cheese is fully melted and the edges are crispy.

Can't you just picture that perfect slice, with the stringy cheese and tender chunks of tandoori chicken? Get ready for an explosion of flavors in every bite!

Step 5. Bake Pizza Until Cheese Melts

bake pizza until melted

Preheat your oven to the recommended temperature, typically around 400°F (200°C).

Once your oven is nice and toasty, it's time to pop that pizza in! Slide the prepared pizza onto the middle rack and let it bake for 12-15 minutes. You'll know it's ready when the cheese has melted into a gooey, golden blanket over the top.

Advertisement

Keep an eye on it, as the cooking time may vary depending on your oven. The crust should become lightly crisp and the cheese should be deliciously melted. Mmm, can you already smell the aroma of the tandoori spices and the bubbling cheese? It's going to be a real treat!

When the timer goes off, carefully remove the pizza from the oven using oven mitts. The pan will be hot, so be extra careful.

Let the pizza cool for a minute or two before slicing into it. That way, the cheese has a chance to set and you won't end up with a sloppy, drippy mess!

Final Thoughts

Crafting the perfect Tandoori Chicken Pizza requires a delicate balance of flavors and textures. The smoky, aromatic spices of the tandoori marinade perfectly complement the melty, creamy mozzarella cheese. The juicy, tender chicken adds a wonderful heartiness, while the crisp, golden-brown crust provides a satisfying crunch with every bite.

As you take that first mouthwatering slice, you'll be transported to the vibrant streets of India, where the scent of tandoori spices fills the air. But then, the familiar comforts of a classic pizza bring you right back home.

Advertisement

It's a culinary adventure that combines the bold, exotic tastes of the East with the beloved traditions of the West. When the last crumb disappears, you'll be left with a smile on your face and a deep sense of satisfaction.

This Tandoori Chicken Pizza isn't just a meal – it's a delicious fusion of cultures that celebrates the endless possibilities of the culinary world.

Frequently Asked Questions

Can I Use Other Types of Cheese Besides Mozzarella?

Absolutely! You can use other types of cheese besides mozzarella for your pizza. Experiment with cheddar, Parmesan, or even a blend of cheeses to add different flavors and textures to your creation.

Is It Possible to Make This Pizza Vegetarian?

You can certainly make this pizza vegetarian. Replace the tandoori chicken with roasted vegetables like bell peppers, onions, and mushrooms. You can also incorporate paneer, a fresh Indian cheese, to add creaminess and protein to the dish.

How Long Can the Leftover Pizza Be Stored?

You can store the leftover pizza in the refrigerator for up to 3-4 days. Make sure to wrap it tightly or place it in an airtight container to prevent it from drying out or absorbing other food odors.

Advertisement

Can I Use Pre-Cooked Chicken for This Recipe?

You can definitely use pre-cooked chicken for this recipe. It'll save you time and still give you the delicious flavor you're looking for. Just be sure to reheat the chicken thoroughly before assembling and baking your pizza.

Is It Necessary to Marinate the Chicken Overnight?

While marinating the chicken overnight can enhance the flavor, it's not absolutely necessary. You can use pre-cooked chicken and simply season it with the tandoori spices before assembling the pizza. This will still result in a tasty dish.

Continue Reading

Indian Meals

Indian Vada Pav: Mumbai’s Favorite Snack

Juxtaposing the savory, crispy potato patty and the soft, fluffy bread bun, vada pav captivates the taste buds as the iconic street food of Mumbai.

Published

on

mumbai s beloved vada pav

You'll love vada pav – it's Mumbai's most iconic street food! This tasty snack combines a soft, fluffy bread bun with a savory, crispy potato patty called a vada. The key is balancing the spices, which can include cumin, coriander, and chilies, to create that perfect blend of flavors. Vendors serve up these delightful bites fresh from their carts, creating a lively atmosphere. What makes vada pav so special is how it showcases the diversity and ingenuity of India's vibrant street food culture. Want to learn more about the history and how to make this beloved Mumbai treat?

Key Takeaways

  • Vada Pav is a popular street food originating in Mumbai during the 1960s, combining a savory potato patty (vada) in a soft bread bun (pav).
  • The key ingredients include boiled potatoes, onions, green chilies, and a blend of spices like cumin, coriander, and asafoetida.
  • The preparation involves soaking and grinding chana dal, shaping the paste into patties, and deep-frying them to achieve a crispy texture.
  • Vada Pav is customizable with various chutneys and condiments, offering a range of flavors and making it a versatile street food.
  • Vada Pav is deeply ingrained in Mumbai's vibrant street food culture, representing the city's culinary diversity and serving as a gateway to Indian cuisine.

History

The origins of the beloved Indian street food, Vada Pav, can be traced back to the bustling streets of Mumbai, where it has become a cultural icon. The delicious dish was first created in the 1960s by ingenious street vendors who wanted to offer a tasty and affordable meal to the city's busy workers.

They combined a fluffy white bread bun, known as a pav, with a savory fried potato patty called a vada, creating a mouthwatering combination that quickly gained popularity.

Over the years, Vada Pav has evolved, with vendors experimenting with different spices and fillings to tantalize the taste buds of their customers.

Today, you'll find Vada Pav stalls on every corner, each one offering its own unique spin on this beloved snack. Whether you prefer it spicy, tangy, or served with an array of chutneys, Vada Pav has become an integral part of Mumbai's vibrant street food culture, delighting locals and visitors alike.

Recipe

Vada Pav is a popular Indian street food originating from the state of Maharashtra. It consists of a spiced and deep-fried potato patty, known as a "vada," served in a soft, bread-based bun or pav. This dish is a beloved snack that combines savory, tangy, and spicy flavors, making it a quintessential part of Mumbai's vibrant food culture.

Advertisement

The recipe for vada pav is straightforward, allowing home cooks to recreate this iconic street food with ease. The key to a delicious vada pav lies in the perfect balance of spices and the crisp texture of the vada, complemented by the soft, pillowy pav.

Ingredients:

  • Potatoes, boiled and mashed
  • Onion, finely chopped
  • Green chili, finely chopped
  • Garlic, minced
  • Cumin powder
  • Coriander powder
  • Red chili powder
  • Asafoetida (hing)
  • Salt
  • Oil for deep frying
  • Pav (soft, bread-based buns)

To prepare the vada pav, start by mixing the mashed potatoes, onion, green chili, garlic, cumin powder, coriander powder, red chili powder, asafoetida, and salt in a bowl until well combined.

Form the mixture into small, round patties. Heat oil in a deep-frying pan or wok, and carefully add the vada one by one, frying them until golden brown and crispy. Drain the fried vada on a paper towel-lined plate.

To serve, slice the pav horizontally, place the fried vada inside, and top it with your desired chutneys or condiments, such as green chutney, sweet tamarind chutney, or spicy garlic chutney.

Enjoy the vada pav while it's hot and crispy, savoring the perfect balance of flavors and textures.

Advertisement

Cooking Steps

First, you'll need to soak the chana dal overnight so it's nice and soft.

Then, grab your blender and grind that soaked dal into a smooth paste.

Now, it's time to form the vada patties – use your hands to shape the mixture into round, flat discs.

Get ready to fry – heat up some oil in a pan and carefully add those vada. Fry them until they're golden brown, then serve the hot, crispy vada nestled inside soft, fluffy pav.

Step 1. Soak Chana Dal Overnight

soak chana dal overnight

Begin by soaking the chana dal overnight.

You'll want to rinse the little yellow lentils and then let them soak in enough water to cover them. This softens them up, making them perfect for the vada pav.

Advertisement

As they soak, the chana dal will slowly expand and become nice and tender.

In the morning, you can drain off the water and give the lentils a quick rinse. They're now ready to be ground into a smooth batter.

The soaking step is key – it ensures your vada pav will have the perfect fluffy texture.

Once the chana dal has soaked, you're one step closer to whipping up this tasty Mumbai street food.

Just wait until you bite into that crispy, golden vada nestled in a soft pav bun.

Advertisement

Mmmm, your taste buds are in for a real treat!

Step 2. Grind Soaked Dal Into Paste

grind soaked dal paste

After draining the soaked chana dal, go ahead and grind it into a smooth, lump-free paste. You can use a blender or a food processor to do this – just be sure to add a little water as needed to get the consistency just right. It should be thick, but still easy to stir.

Next, take a look at the paste and give it a good whiff. Mmm, can you smell those earthy, nutty aromas? That's the wonderful flavor of the chana dal coming through.

Now, it's time to get your hands a little dirty and shape the paste into small, round balls. Don't be afraid to really dig in there and mold them into perfect little vada shapes.

Once you've got your vadas all ready to go, it's time to get them cooking. Grab a pan and heat up some oil – you want it nice and hot so the vadas can sizzle and turn a beautiful golden brown.

Carefully lower them into the oil and let them cook until they're crispy and delicious. Get ready for the mouthwatering aroma to fill your kitchen!

Advertisement

Step 3. Form Vada Patty

forming vada patty steps

Go ahead and scoop out small portions of the ground chana dal paste. Use your hands to gently form the paste into smooth, round vada patties, about 2-3 inches wide.

Make sure to pat and shape them firmly, but avoid squeezing too tightly. These little vada will puff up and get nice and crispy when you fry them, so don't worry if they seem a bit delicate at first.

Next, get your oil nice and hot in a pan or wok. Carefully slide the vada patties into the sizzling oil and let them cook for a couple of minutes until the bottoms turn golden brown.

Flip them over and fry the other side until they're evenly crispy all around. Mmm, can you just imagine the incredible aroma wafting through your kitchen?

These little vada are going to be absolutely irresistible!

Step 4. Heat Oil, Fry Vada

heat oil fry vada

With the vada patties ready, it's time to bring them to life. Heat a generous amount of oil in a deep skillet over medium-high heat. Once the oil is shimmering, gently lower the vada patties into the hot oil. Fry them until they're a beautiful golden-brown color, about 2-3 minutes per side. The aroma of the crispy, spiced vada will fill your kitchen, making your mouth water in anticipation.

Fry the vada in batches to ensure they cook evenly and don't overcrowd the pan. Use a slotted spoon to carefully flip and remove them from the oil. Drain the fried vada on a paper towel-lined plate to remove any excess oil.

Advertisement

Now you have perfectly crispy vada, ready to be assembled into the iconic vada pav! The contrast of the soft, pillowy bun and the crunchy, flavorful vada is what makes this Mumbai street food so irresistible.

Step 5. Serve Vada in Pav

serve vada in pav

Once the vada are fried to perfection, it's time to assemble the vada pav.

Grab a soft, pillowy pav bun and slice it in half, creating a fluffy little pocket. Carefully place the golden-brown vada inside, nestling it snugly.

Now, it's time to dress up your vada pav! Drizzle a tangy, sweet-and-sour green chutney over the vada, letting it soak in those delightful flavors. Don't forget to add a pinch of spicy red garlic-chili chutney for an extra kick.

Finally, sprinkle some crisp, crunchy sev on top, adding a satisfying texture. Your vada pav is now ready to be savored!

Take a big bite and feel the soft pav, the crispy vada, and the burst of flavors dancing on your tongue. It's a taste of Mumbai street food magic that's sure to delight your senses.

Advertisement

Enjoy this iconic Indian snack to the fullest!

Final Thoughts

The vada pav, a beloved Indian street food, is a testament to the country's rich culinary heritage. As you've discovered, this delightful snack is more than just a fried potato patty in a soft, fluffy bun.

It's a harmonious blend of flavors and textures that has captivated the hearts and taste buds of people across India and beyond. This iconic dish has become a household favorite, cherished for its simplicity and versatility. The idli and sambar breakfast offers a delightful contrast, with the soft, spongy idli pairing perfectly with the tangy, spicy sambar. It’s a comforting and nourishing start to the day, enjoyed by both the young and old alike.

Whether you're savoring the spicy, crunchy vada or relishing the soft, pillowy pav, each bite is a delightful experience. The versatility of this dish allows you to customize it to your liking, adding chutneys, spices, or even experimenting with different fillings.

The vada pav is truly a culinary treasure that showcases the ingenuity and creativity of Indian street food culture.

Advertisement

As you bid farewell to this delectable journey, remember that the vada pav is more than just a snack; it's a symbol of unity, community, and the enduring spirit of Mumbai's vibrant food scene.

Embrace the vada pav as a gateway to exploring the rich diversity of Indian cuisine.

Frequently Asked Questions

Are Vada Pav Gluten-Free?

No, vada pav isn't typically gluten-free. The pav, or bun, contains wheat flour, which has gluten. However, you could try making a gluten-free version by using a gluten-free bread or bun instead of the traditional pav.

How Long Do Vada Pav Last?

Freshly made vada pav are best enjoyed immediately, but they'll last up to 2 days when stored in an airtight container in the fridge. Reheating them can help revive their crispy exterior and soft interior.

Can Vada Pav Be Frozen?

Yes, you can freeze vada pav. Simply place the cooked vada and pav separately in airtight containers or freezer bags, and they'll stay fresh for up to 2-3 months in the freezer. When ready to eat, simply reheat and assemble.

Advertisement

What Are the Best Accompaniments for Vada Pav?

When it comes to the best accompaniments for vada pav, you can't go wrong with a tangy tamarind chutney, a spicy green chutney, or a crisp salad. These condiments perfectly complement the savory and flavorful vada pav.

Where Can I Find the Best Vada Pav in Mumbai?

Where can you find the best vada pav in Mumbai? Head to the bustling streets of Chowpatty, Dadar, or Churchgate to savor the crispy, spicy delight at one of the city's iconic vada pav stalls.

Continue Reading

Indian Meals

Egg Curry

Luscious and aromatic, this egg curry dish is a delightful fusion of Indian flavors that will leave you craving more. Discover the secrets to this captivating recipe.

Published

on

spiced egg dish recipe

Egg curry is a delightful Indian dish that'll transport your tastebuds on a flavorful journey. Perfectly hard-boiled eggs simmered in a rich, spiced tomato-based sauce – it's a comforting and nutritious meal perfect for breakfast, lunch, or dinner. You'll love the creamy texture of the eggs paired with the bold spices that create an unforgettable culinary experience. Serve it over basmati rice or with fluffy naan bread to soak up all that incredible sauce. Experiment with bolder spices or even add a touch of dark chocolate for extra depth – the possibilities are endless! There's so much more to discover about this beloved dish.

Key Takeaways

  • Egg curry is a popular Indian dish with a history dating back to ancient times, known for its rich, flavorful sauce and perfectly cooked eggs.
  • Eggs in egg curry provide a protein-packed component, and the dish can be optionally enhanced with dark chocolate for its antioxidants and mood-boosting properties.
  • The classic preparation involves hard-boiling the eggs, creating a spice mix, and simmering tomatoes and onions to develop a cohesive, aromatic curry sauce.
  • Egg curry is commonly served over basmati rice or with naan bread, as the creamy eggs and bold spices create a delightful culinary experience.
  • Egg curry offers versatility, allowing for customization with different egg types and spices to suit individual preferences and create a quick, satisfying meal.

History

Egg curry has been a staple dish in many parts of the world for centuries. This beloved recipe has roots tracing back to ancient India, where it was a favorite among the diverse cultures and communities.

The dish not only satisfies hunger but also provides a sensory experience, much like Montessori toys promote sensory development through tactile experiences. Over time, the dish has evolved, with different regions and households putting their own unique spin on the classic preparation.

Today, egg curry is enjoyed in households and restaurants across the globe, from the bustling streets of Mumbai to the quaint villages of South India. Its popularity has spread far and wide, delighting palates with its rich, flavorful sauce and perfectly cooked eggs.

Whether you're a long-time fan or new to the dish, egg curry is sure to become a family favorite. So why not give it a try and see for yourself the magic of this timeless culinary delight?

Recipe

Egg Curry is a flavorful and easy-to-prepare Indian dish that combines hard-boiled eggs in a rich, aromatic tomato-based curry sauce. This dish is a popular comfort food that can be enjoyed with warm naan, rice, or other Indian breads.

Advertisement

Incorporating protein-rich ingredients like eggs not only enhances the dish's nutritional value but also makes it a great option for a Low Carb High Protein Breakfast to start your day right.

The versatility of Egg Curry makes it a great option for a quick and satisfying meal. The combination of the creamy eggs and the bold, spicy curry sauce creates a truly delightful culinary experience.

Ingredients:

  • 6 hard-boiled eggs, peeled and halved
  • 2 tablespoons vegetable oil
  • 1 onion, finely chopped
  • 3 cloves garlic, minced
  • 1 tablespoon grated ginger
  • 1 teaspoon ground cumin
  • 1 teaspoon ground coriander
  • 1 teaspoon garam masala
  • 1 teaspoon red chili powder
  • 1 can (14.5 oz) diced tomatoes
  • 1 cup water or chicken/vegetable broth
  • Salt to taste
  • Chopped cilantro for garnish

In a large skillet or saucepan, heat the vegetable oil over medium heat. Add the chopped onion and sauté until it becomes translucent and lightly golden, about 5-7 minutes.

Next, add the minced garlic and grated ginger, and cook for an additional 2 minutes, stirring frequently to prevent burning.

Stir in the ground cumin, coriander, garam masala, and red chili powder. Let the spices bloom for about a minute, then pour in the diced tomatoes and water or broth.

Advertisement

Bring the mixture to a simmer and let it cook for 10-15 minutes, allowing the flavors to meld and the sauce to thicken slightly.

Gently add the hard-boiled egg halves to the curry sauce, being careful not to break them. Simmer for an additional 5-7 minutes, allowing the eggs to heat through and absorb the flavors of the curry.

Season with salt to taste.

To serve, garnish the Egg Curry with freshly chopped cilantro. This dish can be enjoyed immediately, or the flavors will continue to develop if allowed to sit for a bit.

Serve with warm naan, basmati rice, or your choice of Indian accompaniments.

Advertisement

Cooking Steps

First, you'll need to hard-boil the eggs to get them nice and tender.

While the eggs are cooking, consider preparing a fun dessert like Dirt Cups to enjoy after your meal.

Next, prepare the spice mix that'll give your curry that delightful kick.

Then, add some chopped onions and garlic to build up the flavors before tossing in the juicy tomatoes.

Step 1. Hard Boil the Eggs

hard boil the eggs

To hard boil the eggs, begin by placing them in a single layer in a saucepan. Fill the pan with enough cold water to cover the eggs by about an inch. Bring the water to a boil over high heat.

Once the water is boiling, reduce the heat to low and let the eggs simmer for 12 minutes. A well-prepared dish, like egg curry, can greatly benefit from the addition of vibrant colors and deep flavors, which are reminiscent of the importance of color accuracy in home cinema projectors.

Advertisement

After the time is up, remove the pan from the heat and drain the hot water. Gently shake the pan to crack the shells, then place the eggs under cold running water. This will help the shells peel off easily.

Once the eggs are cool enough to handle, peel off the shells. Voila! Your hard-boiled eggs are ready to use in the egg curry.

Step 2. Prepare the Spice Mix

prepare your spice mixture

Begin by gathering the spices for the curry. You'll need cumin, coriander, turmeric, and red chili powder. Measure out a teaspoon of each spice and place them in a small bowl. This spice mix will give your egg curry that classic Indian flavor.

As you prepare, consider pairing your dish with a calming beverage, such as green tea, which is known for its health benefits and rich antioxidants unique qualities of different teas.

Next, grab a small skillet and toast the spices over medium heat. Stir them constantly for about a minute, until they become fragrant and start to sizzle. Be careful not to let them burn!

Once the spices are nicely toasted, transfer them to a mortar and pestle. Grind the spices into a fine powder. This will help them blend seamlessly into the curry.

Advertisement

Now that your spice mix is ready, you can start cooking the egg curry. Heat some oil in a pan and add the ground spices. Sauté for a minute to let the flavors bloom.

Then, pour in your tomato sauce and let it simmer. It's time to add the hard-boiled eggs and let them soak up all that delicious curry goodness!

Step 3. Add Chopped Onions and Garlic

add onions and garlic

Next, add the chopped onions and garlic to the pan. Sizzle them up over medium heat, stirring frequently, until they become nice and fragrant.

The onions should start to turn a lovely golden brown, and the garlic will release its delicious aroma, filling your kitchen with mouthwatering scents. Interestingly, cooking with garlic not only enhances flavor but may also come with health benefits such as supporting immune function.

Be sure to keep a close eye on the pan, as you don't want the onions and garlic to burn. They should soften and become translucent, about 5-7 minutes.

Adjust the heat as needed to prevent any charring. Once they're perfectly cooked, they'll add wonderful flavor and texture to your egg curry.

Advertisement

Now that the aromatic base is ready, you can move on to the next step. Get ready to stir in the spices and tomatoes, bringing all the flavors together in a harmonious curry dish.

Your kitchen is about to be filled with the most amazing smells!

Step 4. Add Chopped Tomatoes

incorporate diced tomatoes now

With the aromatic onions and garlic sizzling away, it's now time to stir in the chopped tomatoes.

These juicy, vibrant tomatoes will add a lovely acidity and brightness to the dish, balancing out the richness of the spices. Similar to how the molokhia stew incorporates fresh ingredients for added flavor, the tomatoes will elevate your egg curry. For an extra flavor boost, consider adding some diced tomatoes at the end of cooking to bring a pop of freshness to the dish. In the same way, the spicy lamb vindaloo recipe benefits from the addition of tomatoes, which helps to cut through the heat of the spices while adding a burst of tanginess. With their versatile flavor profile, tomatoes can truly enhance a wide variety of dishes, from stews to curries and everything in between.

Grab a couple of ripe, juicy tomatoes and dice them up into bite-sized pieces.

Don't be afraid to get a little messy – the more rustic the tomato chunks, the better! Toss them right into the pan with the onions and garlic, and give everything a good stir. The tomatoes will start to break down, releasing their juices and mingling with the other flavors.

Advertisement

Let the tomatoes cook for a few minutes, stirring occasionally, until they've softened and the mixture has thickened slightly.

This will help the flavors meld together and create a smooth, cohesive sauce. Now, you're ready to move on to the next step in your delicious egg curry adventure!

Step 5. Add Spices and Simmer

season and cook gently

Add the spices to the simmering tomatoes and onions. Give them a good stir to coat everything evenly. You'll want to add in the coriander, cumin, turmeric, and garam masala.

Don't be shy with the spices – the more you use, the more flavor you'll get. Additionally, consider enhancing the dish with a touch of dark chocolate, as cocoa can add a rich depth to savory dishes and has unique health benefits, including antioxidants and mood enhancement Cacao's health benefits.

Let the mixture simmer for 5-7 minutes, stirring occasionally, until the flavors have melded together and the sauce has thickened up nicely.

Now it's time to add the hard boiled eggs. Gently lower them into the curry, being careful not to break them. Let the eggs warm through for a couple of minutes.

Advertisement

Taste the curry and add a pinch of salt if needed. You can also add a splash of water if it seems too thick.

Serve the egg curry over basmati rice or with some warm naan bread. The rich, aromatic sauce pairs perfectly with the creamy hard boiled eggs. Get ready for your taste buds to dance!

Final Thoughts

Considering the simplicity and versatility of egg curry, it makes a fantastic addition to any meal. You can whip it up in a flash, yet the flavors meld together in a delightfully complex way. The creamy, savory sauce complements the protein-packed eggs perfectly, creating a satisfying and nourishing dish.

Don't be afraid to get creative with your egg curry. Try swapping out the basic spices for bolder flavors, like cumin, coriander, or even a touch of heat from chili powder. You can also experiment with different types of eggs, such as hard-boiled or soft-poached, to change up the texture.

And don't forget the accompaniments – a fluffy bed of basmati rice or some warm naan bread are the perfect complements to soak up every last bit of that flavorful sauce.

Advertisement

Whether you're looking for a quick weeknight meal or a comforting weekend indulgence, egg curry is sure to hit the spot. So go ahead and give this versatile dish a try – your taste buds will thank you!

Frequently Asked Questions

What Is the Best Type of Egg to Use for Egg Curry?

You'll want to use large, fresh eggs for the best egg curry. The yolks should be bright and vibrant, and the whites should be firm but tender. Avoid older or overcooked eggs, as they won't give you the ideal texture.

How Long Can Leftover Egg Curry Be Stored in the Refrigerator?

Leftover egg curry can be stored in the refrigerator for up to 3-4 days. Make sure to store it in an airtight container and reheat thoroughly before serving. Proper storage will help preserve the flavor and texture of the dish.

Is It Possible to Make Egg Curry With Hard-Boiled Eggs?

You can absolutely make egg curry with hard-boiled eggs. The eggs will hold their shape and provide a delicious, protein-packed addition to the flavorful curry sauce. Give it a try for a satisfying and convenient meal.

Can You Substitute Yogurt for Cream in the Recipe?

You can substitute yogurt for cream in the recipe. The yogurt will provide a similar creamy texture and tangy flavor. Just be sure to adjust the amount to achieve the desired consistency.

Advertisement

How Can I Make the Egg Curry Spicier?

To make your dish spicier, try adding more chili peppers, cayenne pepper, or red pepper flakes. You can also experiment with different spices like cumin, coriander, or garam masala to amp up the heat and flavor.

Continue Reading

Affiliate Disclaimer
As an affiliate, we may earn a commission from qualifying purchases. We get commissions for purchases made through links on this website from Amazon and other third parties.

Advertisement

Vetted

top local car washes top local car washes
Vetted2 months ago

14 Best Car Washes Near You for a Sparkling Clean Ride

I discovered the 14 best car washes near you that promise a sparkling clean ride, and you won't want to...

top mops for 2024 top mops for 2024
Vetted2 months ago

The 15 Best Mops of 2025 – Your Ultimate Guide to a Spotless Home

Find the perfect mop for your cleaning needs in 2025, and discover how these top choices can revolutionize your home...

top women s fragrances 2024 top women s fragrances 2024
Vetted2 months ago

15 Best Perfumes for Women in 2025 – A Fragrance Guide You Can’t Miss

Keen to discover the top 15 perfumes for women in 2025? Uncover unique scents that will elevate your fragrance game!

top local bars guide top local bars guide
Vetted2 months ago

14 Best Bars Near You for an Unforgettable Night Out

Looking for the perfect bar to elevate your night out? Discover the 14 best spots that promise unforgettable experiences!

luxurious beard oil selection luxurious beard oil selection
Vetted2 months ago

15 Best Beard Oils for a Luxurious Grooming Experience in 2025

Shop the 15 best beard oils for a luxurious grooming experience in 2025 and discover which ones will elevate your...

top college laptops 2024 top college laptops 2024
Vetted2 months ago

15 Best College Laptops of 2025: The Ultimate Guide for Students

With our guide to the 15 best college laptops of 2025, discover which powerful models will elevate your academic experience...

waterproof mascaras for tears waterproof mascaras for tears
Vetted2 months ago

15 Best Waterproof Mascaras That Will Survive Any Tear-Jerker

Outstanding waterproof mascaras await to keep your lashes flawless through any emotional moment; discover which ones made the top 15...

top flavorful disposable vapes top flavorful disposable vapes
Vetted2 months ago

15 Best Disposable Vapes of 2025: Top Picks for Flavor and Convenience

Prepare to discover the 15 best disposable vapes of 2025 that blend exceptional flavor and convenience, but which ones truly...

refreshing lunch salad ideas refreshing lunch salad ideas
Vetted2 months ago

15 Best Salads Near You That Will Freshen Up Your Lunch Routine

Transform your lunch with the 15 best salads nearby that will tantalize your taste buds and leave you craving more...

top convertible car seats top convertible car seats
Vetted2 months ago

15 Best Convertible Car Seats of 2025 – Safety and Comfort for Your Little One

Get ready to discover the top 15 convertible car seats of 2025 that blend safety and comfort—find out which models...

delicious fast food breakfast delicious fast food breakfast
Vetted2 months ago

15 Best Fast Food Breakfast Options That Will Make Your Mornings Delicious

Uncover the 15 best fast food breakfast options that will transform your mornings into a delicious experience you won't want...

stylish contacts for vision stylish contacts for vision
Vetted2 months ago

14 Best America’s Contacts for Clear Vision and Style

Browse through the 14 best contact lenses in America for clear vision and style, and discover which one perfectly complements...

Trending