Connect with us

French Cuisine

Pasta Alla Norma

Brimming with the rich flavors of Sicily, Pasta Alla Norma is a delightful dish that will leave you craving more. Discover the secrets behind this beloved culinary masterpiece.

Published

on

sicilian eggplant pasta dish

Pasta Alla Norma is a beloved Sicilian dish that'll transport you right to the heart of Italy! This vibrant pasta features creamy eggplant, a zesty tomato sauce, and a sprinkle of salty pecorino cheese. It's named after the famous opera 'Norma,' capturing the rich cultural heritage and passion of Sicily. With its harmonious flavors and comforting texture, you'll understand why this dish is a beloved staple for families and friends gathering around the table. You'll want to dive right in – but first, let's explore the history and cooking tips that make Pasta Alla Norma truly special.

Key Takeaways

  • Pasta Alla Norma is a traditional Sicilian dish featuring creamy eggplant, tangy tomato sauce, and fragrant basil, often garnished with grated pecorino cheese.
  • The dish's name is a tribute to Vincenzo Bellini's opera "Norma," reflecting the dish's cultural significance and beauty in Sicilian cuisine.
  • The recipe showcases local Sicilian produce, including the primary ingredient, eggplant, and highlights the region's vibrant history and culinary traditions.
  • Pasta Alla Norma is known for its harmonious blend of flavors, creating a satisfying and comforting dining experience that encourages gathering and sharing among family and friends.
  • The dish is typically served hot, allowing the cheese to melt into the dish and enhance the overall flavor profile, making it a popular choice for special occasions and family gatherings.

History

The origins of Pasta Alla Norma can be traced back to the island of Sicily, where it has been a beloved dish for centuries. This regional specialty is named after Vincenzo Bellini's opera "Norma," which was set in ancient Sicily. The story goes that the dish's creator was so impressed by the opera's beauty and passion that they decided to name their culinary masterpiece in its honor.

Pasta Alla Norma is a true celebration of Sicilian flavors. Fresh, ripe tomatoes, fragrant basil, and creamy ricotta salata cheese come together in a harmonious dance, delivering a burst of Mediterranean delight with every bite.

This dish has become a beloved part of Sicilian culture, shared among families and friends during festive gatherings. Whether you're enjoying it on a sunny terrace or in the comfort of your own home, Pasta Alla Norma is sure to transport you to the heart of this enchanting island.

Recipe

Pasta Alla Norma is a classic Sicilian dish that showcases the vibrant flavors of the region. This eggplant-based pasta dish is a celebration of the local produce and is a beloved staple in many Italian households.

The combination of the rich, creamy eggplant, the tangy tomato sauce, and the fragrant basil creates a harmonious blend that's both comforting and refined. The dish is named after the opera "Norma" by the Sicilian composer Vincenzo Bellini, as the flavors are said to be as rich and passionate as the music.

Advertisement

Ingredients:

  • 1 large eggplant, cut into 1-inch cubes
  • 1/4 cup olive oil
  • 1 onion, diced
  • 3 garlic cloves, minced
  • 1 (28-ounce) can diced tomatoes
  • 1 teaspoon dried oregano
  • Salt and freshly ground black pepper, to taste
  • 1 pound penne or rigatoni pasta
  • 1/2 cup freshly grated Ricotta Salata or Pecorino Romano cheese
  • 1/4 cup fresh basil leaves, thinly sliced

Instructions:

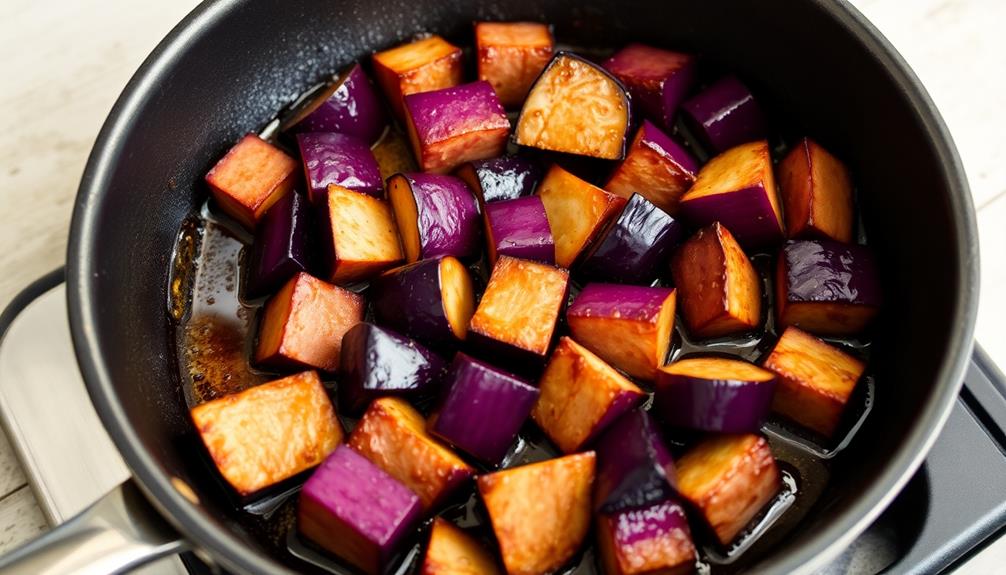
In a large skillet, heat the olive oil over medium-high heat. Add the eggplant cubes and sauté until golden brown, about 8-10 minutes. Remove the eggplant from the skillet and set aside.

In the same skillet, sauté the onion until translucent, about 5 minutes. Add the garlic and cook for an additional minute. Pour in the canned diced tomatoes and stir in the dried oregano. Season with salt and pepper to taste. Bring the sauce to a simmer and let it cook for 15-20 minutes, stirring occasionally, until thickened.

Meanwhile, bring a large pot of salted water to a boil and cook the pasta according to the package instructions. Drain the pasta and return it to the pot. Add the sautéed eggplant and the tomato sauce, tossing to combine.

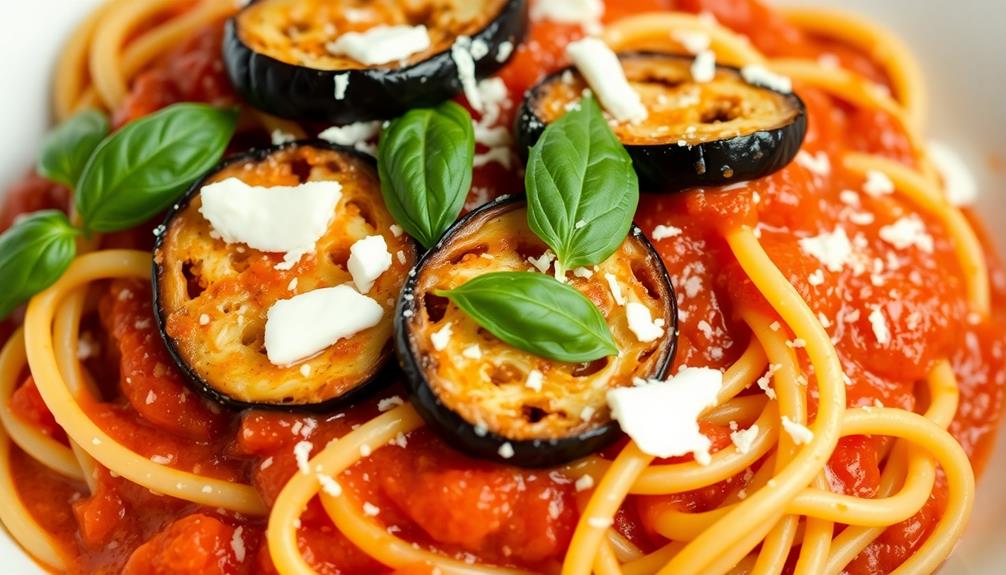
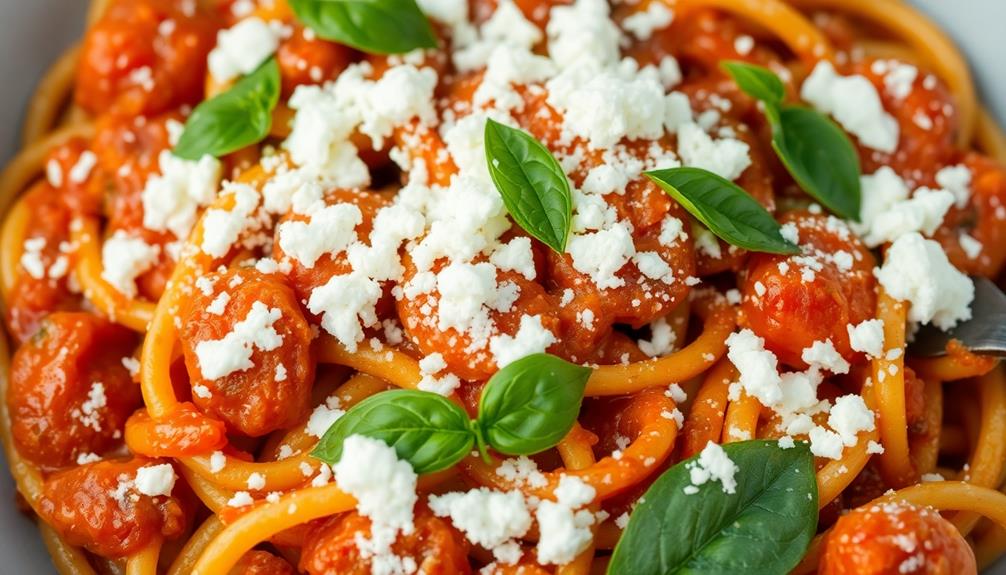
Serve the Pasta Alla Norma hot, garnished with the grated Ricotta Salata or Pecorino Romano cheese and the fresh basil leaves.

Advertisement

When cooking this dish, be sure to use a high-quality, firm eggplant for the best texture. You can also experiment with different types of pasta, such as linguine or spaghetti, to change up the presentation. The key is to let the tomato sauce simmer until it develops a rich, concentrated flavor that complements the eggplant perfectly.

Cooking Steps

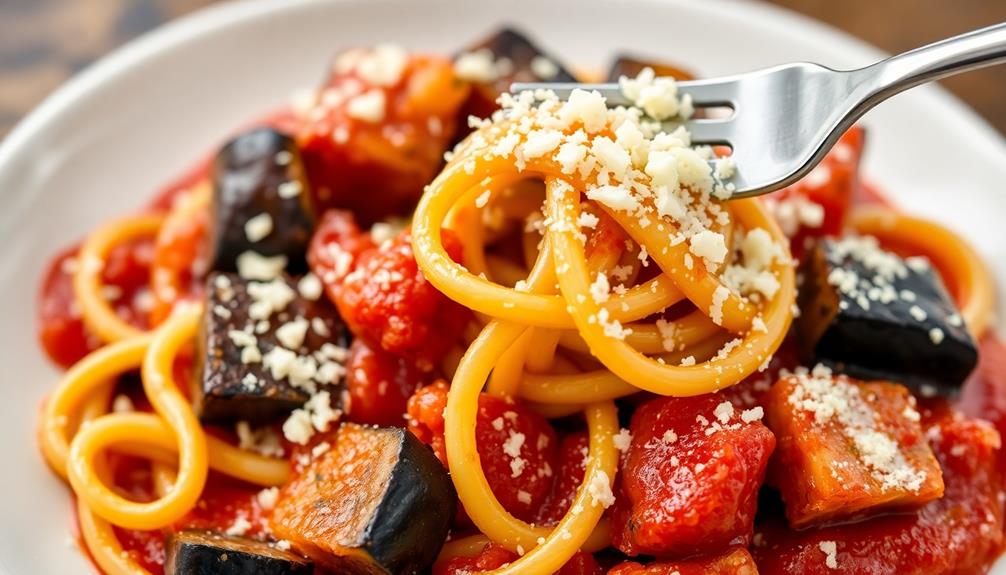
Slice the eggplant into 1/2-inch rounds and fry them until they're golden brown.

Next, combine the fried eggplant with your delectable tomato sauce and fresh basil.

Finally, toss everything together with some grated ricotta salata and serve it up immediately with a sprinkle of tangy pecorino cheese.

Buon appetito!

Advertisement

Step 1. Slice Eggplant Into 1/2-Inch Rounds

slice eggplant into rounds

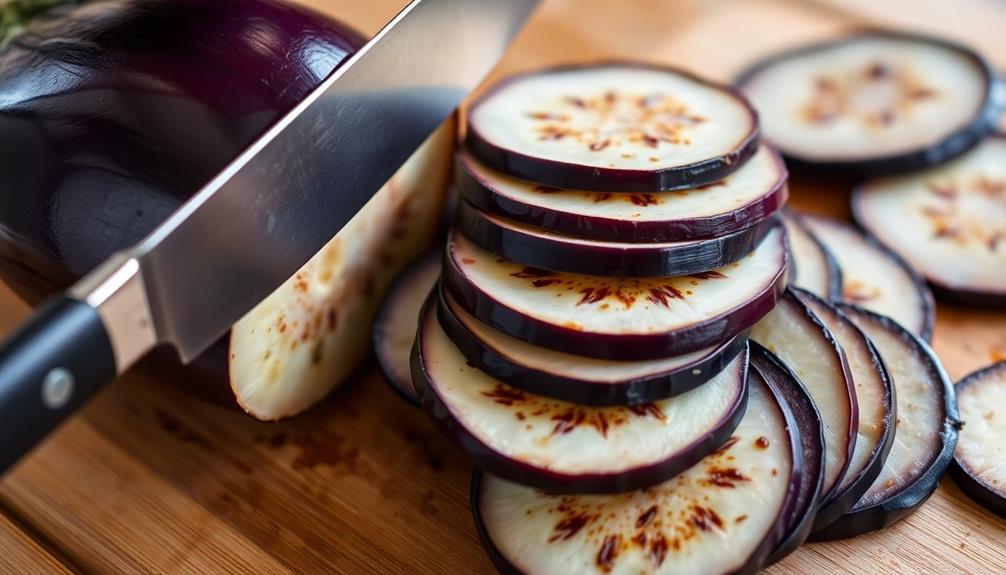
Eggplant-slicing commences with a sharp knife and a steady hand. Carefully place the eggplant on a sturdy cutting board, then slice it into rounds about 1/2-inch thick. This even thickness ensures the eggplant cooks evenly, so every bite is perfectly tender and delicious.

Now, give the knife a few practice swings to get a feel for it. Grip the eggplant firmly, then glide the blade through, creating perfect round slices. Impressed with your knife skills? You should be! Slicing the eggplant just right is a critical step in making this classic Sicilian dish.

Once you've transformed the eggplant into a stack of lovely rounds, it's time to move on to the next step. Get ready to fry those beauties up until they're golden brown and utterly irresistible. Your taste buds are already tingling, aren't they?

Step 2. Fry Eggplant Rounds Until Golden

golden fried eggplant rounds

With your skill-honed knife work, the round eggplant slices await their turn to sizzle.

Heat a generous amount of olive oil in a large skillet over medium-high heat. Gently lower the eggplant rounds into the sizzling oil, being careful not to overcrowd the pan. For a delightful addition to your meal, consider serving these crispy rounds alongside some Cheesy Polenta, which complements the eggplant beautifully.

Fry the eggplant for 2-3 minutes per side, or until golden brown and crispy. Use a spatula to flip the slices, ensuring even cooking. The eggplant should develop a delightful crunch on the outside while remaining tender within.

As each batch finishes, transfer the fried eggplant rounds to a paper towel-lined plate to drain excess oil. Season with a sprinkle of salt while they're still hot.

Advertisement

Continue frying the remaining eggplant in batches, replenishing the oil as needed to maintain the ideal frying temperature.

Perfectly fried, the eggplant rounds are now ready to be layered into the Pasta alla Norma, adding their signature flavor and texture to this classic Italian dish.

Step 3. Combine Eggplant, Tomato Sauce, and Basil

combine eggplant tomato sauce

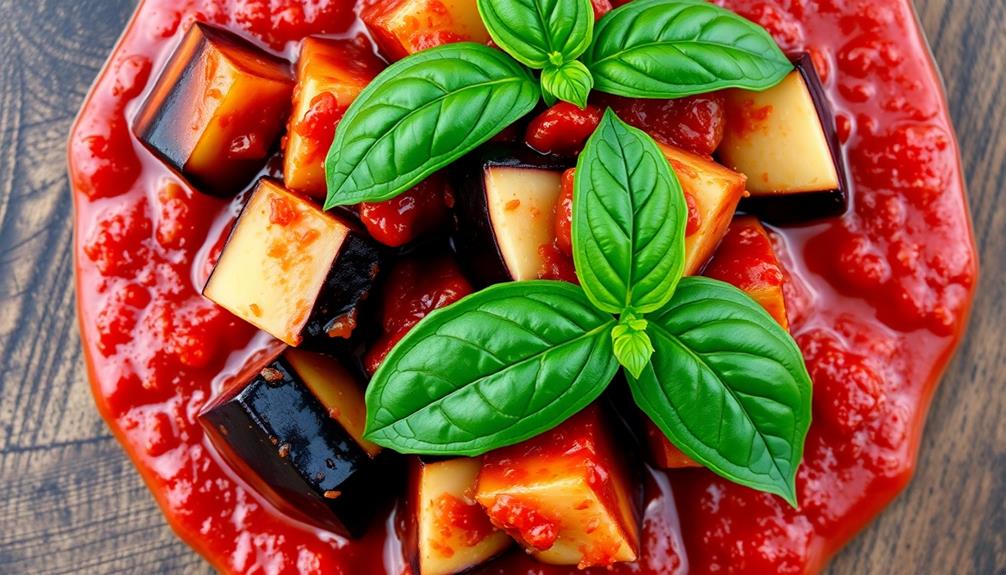
With the fried eggplant rounds ready, you can now combine them with the aromatic tomato sauce and fresh basil to create the signature Pasta alla Norma.

First, gently place the golden-brown eggplant slices into the warm, vibrant tomato sauce. Stir everything together, ensuring the eggplant is evenly coated.

Now, tear the fragrant basil leaves and sprinkle them over the top, letting their herbaceous aroma fill the air.

The combination of the soft, savory eggplant, the tangy tomato sauce, and the bright, fresh basil is truly a match made in heaven.

Advertisement

Serve this delightful dish over your favorite pasta, and enjoy the harmonious flavors that make Pasta alla Norma a true Italian classic.

Get ready to savor the delicious blend of textures and tastes in every bite!

Step 4. Toss With Grated Ricotta Salata

toss with grated ricotta

To finish the dish, grate a generous amount of ricotta salata over the saucy eggplant mixture. The sharp, salty cheese provides a delightful contrast to the rich, creamy eggplant and vibrant tomato sauce. Sprinkle it liberally, ensuring each bite is perfectly balanced.

Next, toss everything together gently, allowing the cheese to melt and coat the pasta. The ricotta salata will melt into the sauce, creating a harmonious blend of flavors. Be careful not to over-mix, as you want to maintain the integrity of the eggplant pieces.

Once the pasta is well-coated, serve it immediately. The warm dish is sure to delight your family and friends.

The combination of the tender eggplant, tangy tomato sauce, and salty, crumbly ricotta salata is simply divine. Enjoy this authentic taste of Sicily, and savor every bite!

Advertisement

Step 5. Serve Immediately With Grated Pecorino

serve with grated pecorino

Once the pasta is beautifully coated with the ricotta salata, it's ready to serve. Grab your plates and get ready for an amazing dish!

Sprinkle the grated pecorino all over the top of the pasta. The salty, tangy flavor of the pecorino will complement the creamy ricotta salata perfectly. Don't be shy – pile on that cheese! The more, the merrier.

Now, it's time to dig in. Twirl your fork and take that first delicious bite. Mmm, the flavors will dance on your tongue. The pasta is perfectly al dente, the ricotta salata is smooth and rich, and the pecorino adds a lovely salty kick. This dish is a true celebration of Italian cuisine.

Serve it immediately while it's hot and the cheese is melty. Your family and friends will be thrilled. They'll be asking for seconds, maybe even thirds!

Pasta Alla Norma is a true crowd-pleaser. Enjoy every last bite – this meal is sure to leave you feeling satisfied and happy. This dish is a traditional Italian pasta dish that originated in Sicily. Its combination of tender eggplant, rich tomato sauce, and savory cheese creates a delicious and comforting meal that is beloved by many. Whether you’re serving it to family or friends, Pasta Alla Norma is always a hit.

Final Thoughts

Pasta Alla Norma is a delectable Sicilian dish that encapsulates the rich culinary heritage of the region. As you savor the last bite, you can't help but feel a sense of satisfaction and joy. The interplay of the creamy eggplant, tangy tomato sauce, and fragrant basil leaves is simply divine.

Advertisement

What makes this dish truly special is the way it brings people together. Imagine gathering around the table with your loved ones, sharing stories and laughter as you indulge in this flavorful creation. The aroma alone can transport you to the sun-drenched streets of Sicily, where the warmth of the people is as palpable as the vibrant flavors.

Pasta Alla Norma is more than just a meal; it's a celebration of the rich tapestry of Sicilian culture. So, the next time you have the chance to enjoy this remarkable dish, embrace it with open arms and let the flavors dance on your tongue, creating a memory that will linger long after the last plate is cleared.

Frequently Asked Questions

What Is the Best Type of Pasta to Use for Pasta Alla Norma?

When making this dish, you'll want to choose a short, sturdy pasta like penne, rigatoni, or eggplant-shaped pasta. This will help the sauce cling to the nooks and crannies, creating a delicious, authentic experience.

Can I Substitute Eggplant With Zucchini in the Recipe?

You can substitute eggplant with zucchini in the recipe, though the flavor profile will be slightly different. Zucchini has a milder taste, so you may need to adjust the seasonings to achieve the desired taste.

How Can I Make Pasta Alla Norma More or Less Spicy?

To make your dish more or less spicy, you can adjust the amount of chili peppers or red pepper flakes. Add more for a spicier kick, or use less for a milder flavor. Play around with the spice levels to suit your taste.

Advertisement

Is Pasta Alla Norma Vegetarian-Friendly?

Yes, pasta alla norma is vegetarian-friendly. The dish is made with eggplant, tomatoes, basil, and ricotta salata, which are all vegetarian ingredients. You can easily enjoy this classic Italian pasta dish without any meat or animal products.

Can I Add Other Vegetables to the Dish Besides Eggplant?

Absolutely! You can add other vegetables to the dish besides eggplant. The great thing about this recipe is its versatility – you can customize it to your taste by incorporating your favorite veggies.

Advertisement

French Cuisine

Bibeleskäs: Alsatian Herb Cheese Dip for Bread and Potatoes

Indulge in the creamy goodness of Bibeleskäs, an Alsatian herb cheese dip perfect for bread and potatoes—discover its delightful secrets!

Published

on

alsatian herb cheese dip

Bibeleskäs is a tasty Alsatian herb cheese dip that you'll love for bread and potatoes! This creamy dip mixes soft cheese, fresh herbs like chives and parsley, and a hint of garlic. First, you soften cream cheese, then blend it with sour cream and herbs, creating a smooth mixture. Bake it in the oven until it's golden and bubbly, then top it with more fresh herbs for a pop of color. Serve it warm with crusty bread or crispy potatoes, and your friends and family will be asking for seconds. Stick around and discover all the fun ways to enjoy this delightful dish!

Key Takeaways

  • Bibeleskäs is a creamy Alsatian dip made with soft cheese, fresh herbs, and garlic, perfect for pairing with bread and potatoes.
  • The dish reflects the cultural fusion of French and German culinary traditions from the Alsace region.
  • Key ingredients include cream cheese, sour cream, grated cheese, and fresh herbs like chives, parsley, and thyme.
  • The dip is easy to prepare, requiring simple steps like mixing, baking, and garnishing with fresh herbs.
  • Serve Bibeleskäs warm for a flavorful addition to festive gatherings or casual snacks.

History

Originating from the Alsace region of France, Alsatian herb cheese dip has a rich culinary history that reflects the area's unique blend of German and French influences. This delicious dip, known as Bibeleskäs, has roots stretching back centuries, making it a beloved dish among locals and visitors alike.

You might imagine families gathering around a table, sharing stories while enjoying freshly baked bread dipped in this creamy delight.

The recipe has evolved over time, but the core ingredients often include soft cheese, fresh herbs, and a hint of garlic. These ingredients highlight the area's abundance of dairy farms and fragrant herbs, which thrive in the region's climate.

As Alsace changed hands between Germany and France, so did the flavors of the dish, making it a symbol of cultural fusion.

Today, you'll find Alsatian herb cheese dip served at festive gatherings, picnics, and cozy dinners. It's not just a tasty treat; it's a connection to the past that brings people together.

Advertisement

Cooking Steps

To create a delicious Alsatian herb cheese dip, you'll first need to gather your ingredients and prepare your workspace. Start by collecting cream cheese, sour cream, grated cheese, and fresh herbs like chives, parsley, and thyme. Having everything ready makes cooking easier and more fun!

Next, grab a mixing bowl. You'll want to soften the cream cheese a bit, so let it sit at room temperature for a few minutes. Once it's soft, add the sour cream and mix them together until they're smooth.

Now, add in the grated cheese and chopped herbs, stirring everything until it's well combined. Don't forget to season with salt and pepper to taste!

After mixing, cover your bowl with plastic wrap and let the dip chill in the fridge for at least an hour. This helps the flavors blend together beautifully.

When you're ready to serve, scoop the dip into a nice bowl and enjoy it with warm bread or crispy potatoes.

Advertisement

Now, you're all set to impress your friends and family with this tasty Alsatian herb cheese dip. Dig in and enjoy!

Step 1. Preheat Oven to 350°F

preheat oven to 350 f

Preheating the oven to 350°F sets the stage for creating a delicious Alsatian herb cheese dip. This step is super important because it ensures your dip cooks evenly and reaches that perfect gooey texture. So, let's get started!

First, you'll want to locate your oven's temperature dial or control panel. It's often found on the front or top of the oven. Turn it to 350°F—this is the ideal temperature for baking and warming many tasty dishes. As the oven heats up, you'll hear a little click or beep, letting you know it's working.

Maintaining a clean cooking environment, much like air purifier maintenance dos and don'ts, can also enhance your overall cooking experience.

While you're waiting, it's a great time to gather your ingredients and tools! Look for a baking dish or oven-safe bowl that's big enough to hold all the cheesy goodness you're about to create.

Make sure you've got everything ready, so you can dive right into mixing your cheese and herbs once the oven is hot.

Advertisement

Step 2. Mix Cheese and Herbs

combine cheese with herbs

Once your oven hits 350°F, it's time to mix your cheese and herbs.

Grab a large bowl and add your favorite cheese. You can use creamy cheeses like cream cheese or ricotta, or even something tangy like goat cheese. The choice is yours!

Next, it's time to add in the herbs. Fresh herbs like chives, parsley, and thyme work wonderfully. If you don't have fresh herbs, dried ones can be used too, but remember to use less since they're stronger in flavor.

Now, it's time to get your hands in there! Use a spatula or wooden spoon to combine the cheese and herbs. You want everything to blend together nicely, creating a colorful mixture that smells amazing.

If you're feeling adventurous, you can even add a pinch of garlic powder or a dash of red pepper flakes for an extra kick!

Keep mixing until you see no more clumps of cheese, and everything looks smooth and inviting. This mixture is going to be the base of your delicious dip.

Advertisement

You're doing great, and soon you'll be ready for the next step! Enjoy the process!

Step 3. Add Cream for Smoothness

add cream for smoothness

Adding cream to your cheese and herb mixture will take your dip to the next level of creaminess. Cream brings a delightful richness that makes the dip smooth and easy to spread.

To start, measure out about half a cup of heavy cream. You want enough to blend well with your cheese and herbs, but not so much that it overpowers the flavors.

Next, pour the cream into your mixing bowl with the cheese and herbs. Grab a whisk or a sturdy spoon and mix everything together until it's well combined. The cream will help soften the cheese, making it easier to blend into a delicious, velvety dip.

Don't be afraid to get in there and really mix it up! You want to achieve a smooth consistency without any lumps.

If the mixture seems too thick, feel free to add a little more cream until you reach your desired texture. Keep tasting as you mix, so you can adjust the flavors if needed.

Advertisement

Once you're happy with the creaminess, you're ready to move on to the next step in making your tasty Alsatian herb cheese dip! Enjoy every moment of this creamy adventure!

Step 4. Bake for 20 Minutes

bake for twenty minutes

Now it's time to bake your dip to perfection. Preheat your oven to 350°F (175°C). Grab a baking dish and pour your creamy herb cheese mixture into it. Spread it out evenly, making sure every corner is covered. This will help the dip cook evenly and get nice and bubbly.

Once your oven is ready, place the dish inside. Set a timer for 20 minutes and let the magic happen! While it bakes, you might notice a delicious aroma filling your kitchen. That's the smell of cheesy goodness, and it's going to make everyone excited to dig in!

Keep an eye on it as it cooks. You want the top to turn a lovely golden brown. If you see it bubbling, that's a great sign!

When the timer goes off, carefully take the dish out of the oven. Remember, it'll be hot, so use oven mitts to protect your hands. Let it cool for a few minutes before serving. This short wait will make sure you don't burn your mouth on that tasty dip!

You're almost ready to enjoy your homemade Alsatian herb cheese dip with friends or family.

Advertisement

Step 5. Garnish With Fresh Herbs

garnish with fresh herbs

To elevate your Alsatian herb cheese dip, garnish it with fresh herbs just before serving. This simple step makes your dip look vibrant and inviting. You can use fresh parsley, chives, or even dill for a pop of color and flavor. Additionally, incorporating various payment options can enhance your business's credibility, similar to how a colorful garnish enhances a dish's presentation benefits of merchant account credit processing.

First, wash your herbs under cool water to remove any dirt. Pat them dry with a clean towel. Next, chop them finely. You don't want huge pieces, just tiny bits to sprinkle on top. This way, everyone gets a taste of those yummy herbs in every bite!

Once your cheese dip is ready and bubbling, take a moment to admire it. Then, grab your chopped herbs and sprinkle them generously over the dip. You'll notice how the bright green herbs contrast beautifully with the creamy cheese.

Not only does it look great, but it also adds a fresh taste that balances the richness of the cheese. Your family and friends will be so impressed!

Serve it warm with some crusty bread or crispy potatoes, and watch everyone dive in. Enjoy every cheesy, herby bite, and share your tasty creation with the world!

Final Thoughts

When you savor Alsatian Herb Cheese Dip, it's hard not to appreciate how the blend of flavors elevates any gathering. This creamy dip is a fantastic way to bring friends and family together, whether you're sharing it at a party or enjoying a cozy night in. The combination of herbs and cheese makes it special, and it pairs wonderfully with crusty bread or crispy potatoes.

Advertisement

Engaging in cooking together can spark curiosity and exploration of new recipes, much like how Join My Quiz.com transforms learning into an interactive experience.

You'll find that making this dip is simple and fun. With just a few ingredients, you can create something delicious that everyone will love. Plus, it's a great conversation starter! As you dip your bread or potatoes into the cheesy goodness, you'll find smiles all around.

Don't forget the fresh herbs on top; they add a lovely touch that makes the dip even more inviting. So, whether it's a festive occasion or just a casual snack, Alsatian Herb Cheese Dip is sure to impress.

Next time you're planning a gathering, remember this delightful recipe. It'll become a favorite that you'll want to share again and again. Enjoy every cheesy bite, and happy dipping!

Frequently Asked Questions

What Type of Bread Pairs Best With Bibeleskäs?

When you're choosing bread, crusty baguettes or rustic sourdough work wonderfully. Their textures complement creamy dips perfectly, enhancing your tasting experience. Don't hesitate to explore different varieties; you might discover a delightful new favorite!

Advertisement

Can I Use Low-Fat Cheese for This Dip?

You can definitely use low-fat cheese for the dip! Just keep in mind it might alter the texture and flavor a bit, but it'll still be creamy and delicious. Enjoy your healthier version!

Is Bibeleskäs Suitable for Vegetarians?

Yes, Bibeleskäs is suitable for vegetarians. It typically contains cheese, herbs, and spices, with no meat products involved. Just double-check the ingredients to ensure it meets your dietary preferences. Enjoy your dip!

How Long Does Bibeleskäs Last in the Fridge?

If you store it properly in an airtight container, it'll last about a week in the fridge. Just make sure to check for any changes in smell or texture before using it.

Can I Freeze Leftover Bibeleskäs?

Yes, you can freeze leftover dip. Just place it in an airtight container, leaving some space for expansion. When you're ready to enjoy it again, thaw it in the fridge for best results.

Advertisement

Continue Reading

French Cuisine

Baguettine: The Mini French Baguette for Perfect Sandwiches

Find out how Baguettines can elevate your sandwich game with their perfect size and flavor—discover the secrets to making these delightful mini baguettes!

Published

on

mini french baguette sandwiches

Baguettines are the mini French baguettes that'll make your sandwiches amazing! Their delightful texture and flavor are perfect for holding all your favorite fillings, like meats and veggies. Plus, they're easy to eat and share, making them a hit at lunches or picnics. To make them, you mix flour, water, yeast, and salt, then knead and shape the dough into little baguettes. After letting them rise for about an hour, bake them at 450°F until golden brown. You'll love how fun and customizable they are, adding excitement to every bite! There's so much more to discover about these tasty treats!

Key Takeaways

  • Baguettines are mini French baguettes, approximately 6 inches long, perfect for creating delicious and easily manageable sandwiches.
  • Their crusty exterior and soft interior provide an ideal texture for holding various fillings like meats, veggies, and spreads.
  • Baguettines are convenient for lunches, picnics, and casual gatherings, making them a versatile choice for sharing.
  • Easy to customize, these mini baguettes allow for creative sandwich combinations, enhancing the dining experience.
  • Baking baguettines at a high temperature ensures a delightful crust, elevating the quality of any sandwich.

History

When you think about the baguette, you might picture a crusty loaf gracing the tables of French bakeries, but its history is as rich as its flavor.

The baguette we know today actually traces back to the 19th century, around the time of the Industrial Revolution. Bakers started using new techniques and equipment, which made it easier to create these long, thin loaves.

Did you know that the word "baguette" means "stick" in French? That's fitting because these loaves are long and narrow, almost like a stick!

In France, people began to enjoy baguettes not just for their taste but also for their convenience. They were easy to carry and perfect for sharing.

Cooking Steps

To create the perfect Baguettine, you'll want to gather a few essential ingredients and tools before diving into the cooking steps. Start with flour, water, yeast, and salt. These are your building blocks for a delicious mini baguette!

Advertisement

You'll also need a mixing bowl, a baking sheet, and a sharp knife.

First, mix the flour, water, yeast, and salt in your bowl until it forms a dough. Knead it on a floured surface for about 10 minutes until it's smooth and elastic.

Next, let the dough rise in a warm spot for about an hour, or until it doubles in size. This is when the magic happens!

Once it's risen, punch it down and divide it into smaller pieces. Shape each piece into a mini baguette, about 6 inches long.

Place them on your baking sheet and let them rise for another 30 minutes. Preheat your oven to 425°F (220°C).

Advertisement

Just before baking, make a couple of slashes on top of each baguettine with your sharp knife. Bake for 15-20 minutes until golden brown.

Let them cool, and enjoy your perfect Baguettine sandwiches!

Step 1. Mix Warm Water and Yeast

combine yeast with warm water

Start by combining warm water with yeast in a mixing bowl. It's important that the water is just the right temperature, about 100 to 110 degrees Fahrenheit. If it's too hot, it can kill the yeast, and if it's too cold, the yeast won't wake up. So, make sure to check!

Once the warm water is ready, sprinkle the yeast on top. Give it a gentle stir to mix everything together, and then let it sit for about five to ten minutes. During this time, you'll notice the mixture getting bubbly and frothy. This means the yeast is coming to life, which is super exciting!

You're creating a little magical potion that'll help your baguettine rise beautifully. While you wait, feel free to gather your other ingredients, like flour and salt. This little break is a great time to clean up your workspace too.

When the yeast is all frothy, you'll know it's time to move on to the next step. Mixing warm water with yeast is an essential beginning to making delicious baguettine sandwiches, and you're already on your way to something wonderful!

Advertisement

Step 2. Knead Dough Until Smooth

knead dough until smooth

Once your yeast mixture is bubbly and ready, it's time to knead the dough until it's smooth and elastic. This step is super important because it helps develop the gluten, which gives your Baguettine that amazing chewy texture.

Start by sprinkling a little flour on your clean countertop. Then, pour your dough onto the floured surface.

Now, you'll want to push the dough down with the palm of your hand, fold it over, and give it a good stretch. Repeat this process, turning the dough a quarter turn each time. Keep kneading for about 8 to 10 minutes. You'll notice the dough changing; it should become smoother and springy.

If it's too sticky, don't be afraid to add a little more flour, but try not to add too much!

Make sure you're having fun while kneading. It's like giving your dough a little workout!

When you've finished, you should have a beautiful ball of dough that feels soft and elastic. It's now ready for the next exciting step in your Baguettine adventure!

Advertisement

Step 3. Let Dough Rise for 1 Hour

let dough rise hourly

After kneading your dough to perfection, the next crucial step is letting it rise for about 1 hour. This process is super important because it helps the dough become fluffy and light. When you give the dough time to rise, the yeast gets to work, creating tiny bubbles that make your baguettines soft and airy.

To get started, find a warm spot in your kitchen. This could be near the oven or in a sunny window. Place your dough in a bowl and cover it with a clean kitchen towel. This keeps the dough cozy and helps it rise even better.

While you wait, you can clean up your workspace or gather your favorite sandwich fillings.

After an hour, check your dough. It should have doubled in size, looking all puffy and inviting! If it hasn't risen enough, don't worry—just give it a little more time. Remember, patience is key in baking.

Once your dough has risen, you'll be ready to shape it into those delightful mini baguettes. Get excited, because delicious sandwiches are just around the corner!

Step 4. Shape Dough Into Mini Baguettes

form mini baguette shapes

Now that your dough has risen beautifully, it's time to shape it into mini baguettes. Start by gently punching down the dough to release any air bubbles.

Grab a clean surface and sprinkle a little flour to prevent sticking. Roll the dough into a log shape, about 10 to 12 inches long. Make sure it's even all the way down so your baguettes will bake uniformly.

Advertisement

Next, take each log and fold the ends in slightly, then pinch them together to form a tapered point. This gives your baguettes that classic shape! If you want to get fancy, you can gently roll the dough back and forth under your palms to create a smoother surface.

Once you've shaped all your mini baguettes, place them on a floured baking sheet. Make sure to leave some space between each one, as they'll puff up while baking.

Cover them with a clean kitchen towel for about 30 minutes. This'll give them a little more time to rise. You're almost there! Just a few more steps, and you'll have delicious baguettines ready to bake. Enjoy the process; it's all part of the fun!

Step 5. Preheat Oven to 450°F

preheat oven to 450 f

Preheating your oven to 450°F is a crucial step in achieving perfectly baked baguettines. When you set your oven to this high temperature, you're creating the ideal environment for those mini baguettes to rise and get that delightful crust. So, go ahead and turn on your oven now!

While your oven is heating up, you can feel the excitement building. Imagine the smell of fresh bread wafting through your kitchen. It's hard to resist! Make sure to give yourself about 20 to 30 minutes for the oven to reach that perfect temperature. If you skip this step, your baguettines mightn't turn out as fluffy and golden as you'd like.

Once the oven reaches 450°F, it's time to be careful. Use oven mitts to handle the hot oven door, and place your shaped baguettines on a baking sheet lined with parchment paper. This way, they won't stick, and cleanup will be easy!

Advertisement

Final Thoughts

When it comes to crafting the perfect sandwich, the right baguettine can make all the difference. Imagine holding a mini French baguette, its crust golden and inviting, ready to be filled with your favorite toppings.

You'll find that these little delights aren't just adorable; they're the secret weapon to making your lunch truly special!

Using baguettines lets you create a delightful balance of flavors. You can pile on fresh veggies, savory meats, or creamy spreads, and the baguettine will hold everything together without falling apart.

Plus, they're easy to eat, which makes lunchtime even more fun!

Whether you're packing a school lunch or hosting a picnic, these mini baguettes will surely impress your friends and family.

Advertisement

They're perfect for sharing, and you can even let everyone customize their own!

Frequently Asked Questions

Where Can I Buy Baguettine Bread?

You can buy baguettine bread at local bakeries, specialty grocery stores, or online retailers. Check their websites or call ahead to ensure they have it in stock, as availability may vary by location.

Can I Freeze Baguettine for Later Use?

Yes, you can freeze baguettine for later use. Just wrap it tightly in plastic wrap or aluminum foil, then place it in an airtight container. When you're ready, thaw it at room temperature before enjoying!

What Are Popular Fillings for Baguettine Sandwiches?

When you think about popular fillings for sandwiches, consider classics like ham and cheese, turkey with avocado, or a fresh veggie mix. Don't forget spreads like mustard or pesto to elevate your flavors!

How Long Does Baguettine Stay Fresh?

It typically stays fresh for about two to three days when stored properly in a paper bag at room temperature. If you want to extend freshness, consider freezing it and toasting when ready to enjoy.

Advertisement

Is Baguettine Gluten-Free or Vegan?

You'll find that baguettine typically isn't gluten-free, as it's made from wheat flour. Additionally, it may not be vegan due to possible dairy or other animal-derived ingredients, so always check the label for specifics.

Continue Reading

French Cuisine

Tarte Alsacienne: A Classic Alsatian Custard Tart

Get ready to indulge in the rich flavors of Tarte Alsacienne, a classic Alsatian custard tart that will leave you craving more delightful secrets!

Published

on

classic alsatian custard tart

Tarte Alsacienne is a delightful dessert from the Alsace region of France. It features a buttery crust filled with creamy custard, making it the perfect treat for family gatherings and celebrations. You can top it with fresh fruits like apples or pears for added sweetness and flavor. Baking this tart involves mixing simple ingredients, preheating your oven to 375°F, and ensuring everything bakes evenly. After about 30 minutes, you'll have a golden, delicious tart ready to cool. It's a wonderful way to bring joy to any occasion, and there's so much more to discover about this comforting dessert!

Key Takeaways

  • Tarte Alsacienne is a traditional Alsatian custard tart featuring a buttery crust and creamy filling, often topped with seasonal fruits.
  • The tart reflects the region's culinary heritage, influenced by both French and German cooking traditions.
  • Key ingredients include flour, butter, sugar, eggs, and heavy cream, with optional flavors like vanilla.
  • It is typically baked at 375°F (190°C) for about 30 minutes until golden brown and set.
  • Tarte Alsacienne is perfect for gatherings, served warm or chilled, and can be enhanced with whipped cream or powdered sugar.

History

The history of Tarte Alsacienne is as rich and layered as the dish itself. Originating from the Alsace region of France, this delicious tart dates back centuries.

You'll find that Alsace has a unique blend of French and German influences, which makes the tart even more special. Its roots can be traced to peasant cooking, where simple ingredients were transformed into delightful meals.

People in Alsace loved to bake with local fruits, especially apples and pears, which often found their way into tarts. Over time, the addition of creamy custard made it an irresistible dessert.

This tart wasn't just a dish for special occasions; it became a beloved staple in many homes.

As you explore its history, you'll see how Tarte Alsacienne grew in popularity, becoming a favorite in bakeries and restaurants.

Advertisement

It's often enjoyed during celebrations or family gatherings, bringing people together over its sweet, creamy goodness.

Ingredients:

  • 1 pre-made or homemade pie crust
  • 200g bacon lardons
  • 200ml crème fraîche
  • 3 large eggs
  • 1 small onion, finely chopped
  • 100g grated Gruyère cheese
  • Salt and pepper to taste
  • A pinch of nutmeg (optional)

Cooking Instructions:

Preheat your oven to 180°C (350°F). In a skillet over medium heat, cook the bacon lardons until they're crispy; remove them and set aside.

In the same skillet, sauté the chopped onion until translucent. In a mixing bowl, whisk together the eggs, crème fraîche, salt, pepper, and nutmeg until smooth. Stir in the crispy bacon, sautéed onions, and grated Gruyère cheese.

Roll out the pie crust and place it in a tart pan, pouring the filling over it. Bake in the preheated oven for 30-35 minutes or until the filling is set and the top is lightly golden.

Extra Tips:

For an extra layer of flavor, consider adding fresh herbs such as chives or thyme to the filling. If you prefer a lighter version, substitute the crème fraîche with Greek yogurt or a low-fat alternative.

Additionally, letting the tart cool for a few minutes before slicing can help the filling set further, making it easier to serve. You can also serve it warm or at room temperature, making it a versatile dish for any occasion.

Advertisement

Enjoy your Tarte Alsacienne with a simple green salad and a glass of crisp white wine for a complete meal.

Cooking Steps

To create a delicious Tarte Alsacienne, you'll want to start by preparing your ingredients and dough. First, gather your flour, butter, sugar, and eggs. Mix the flour and butter until you get a crumbly texture. Then, add sugar and one egg, mixing until it forms a dough. Wrap it in plastic wrap and let it chill in the fridge for about 30 minutes.

While the dough cools, preheat your oven to 375°F (190°C). Next, roll out the dough on a floured surface and fit it into a tart pan. Trim the edges and prick the bottom with a fork. This helps it bake evenly.

Now, blind bake the crust for 15 minutes, covering it with parchment paper and adding pie weights or dried beans.

After baking, it's time to make the custard! Mix cream, eggs, sugar, and vanilla in a bowl until it's smooth. Pour this mixture into the pre-baked crust.

Advertisement

Bake the tart for another 30-35 minutes, or until the custard is set and lightly golden. Let it cool, and enjoy your tasty Tarte Alsacienne with family or friends!

Step 1. Preheat Oven to 375°F

preheat oven to 375 f

Before diving into the delicious process of making Tarte Alsacienne, you'll want to preheat your oven to 375°F. This step is super important because a properly heated oven helps your tart cook evenly, ensuring a perfectly golden crust and creamy filling.

To preheat your oven, simply turn the temperature dial or press the buttons until it reaches 375°F. If you're using a conventional oven, it might take a few minutes to warm up, so be patient!

You can even use this time to gather your ingredients and get excited about the yummy tart you're about to create.

Once your oven beeps or the indicator light shows it's ready, you'll know it's time to start baking. This preheating process is like giving your oven a warm-up before the big event!

Just think about how delicious your Tarte Alsacienne will taste with that perfect, golden crust.

Advertisement

Step 2. Prepare the Tart Crust

prepare tart crust now

Making the tart crust is a crucial step in creating a delicious Tarte Alsacienne. You'll start by gathering your ingredients: flour, butter, sugar, salt, and an egg.

First, in a large mixing bowl, whisk together the flour, sugar, and salt. It's important to mix them well, so everything is combined evenly.

Next, cut the cold butter into small pieces and add it to the dry ingredients. Use your fingers or a pastry cutter to work the butter into the flour until it looks like coarse crumbs.

Now, add the egg and mix gently until the dough starts to come together. If it seems too dry, you can add a tiny bit of cold water, but be careful not to use too much!

Once your dough is formed, shape it into a flat disc, wrap it in plastic wrap, and pop it into the fridge for about 30 minutes. Chilling the dough helps it hold its shape while baking.

When you're ready, roll out the dough on a floured surface until it's about ¼ inch thick. Carefully transfer it to your tart pan, pressing it into the corners.

Advertisement

Now, you're all set for the next delicious step!

Step 3. Add the Custard Mixture

incorporate custard mixture carefully

Once the tart crust has cooled and set, it's time to prepare the custard mixture that will bring your Tarte Alsacienne to life. Start by gathering your ingredients: eggs, sugar, heavy cream, and a pinch of salt.

In a large mixing bowl, crack the eggs and whisk them together until they're nice and frothy. This is where the magic begins!

Next, add in the sugar and salt, whisking until everything is well combined. The sugar should dissolve, creating a smooth mixture.

Slowly pour in the heavy cream while continuing to whisk. This step adds richness and creaminess to your tart. You'll want to mix until the custard is smooth and velvety, with no lumps left behind.

Now, here's a little tip: if you want an extra touch of flavor, consider adding a splash of vanilla extract! It'll make your custard pop with sweetness.

Advertisement

Once your custard is ready, carefully pour it into the cooled tart crust. Make sure to fill it evenly so every slice has that yummy custard goodness. You're one step closer to enjoying this delicious tart!

Step 4. Bake for 30 Minutes

bake for thirty minutes

How do you know when your Tarte Alsacienne is perfectly baked? After you've poured in the custard mixture, it's time to pop your tart into the oven! Set your timer for 30 minutes and keep an eye on it. The edges should turn a lovely golden brown, and the center will slightly puff up. You might even see a few bubbles on top, which is a good sign!

As it bakes, the delicious aroma will fill your kitchen, making it hard to wait. You'll want to resist the urge to open the oven door too soon, as this can let out heat and affect how your tart rises. Instead, trust the timer and your nose!

When the 30 minutes are up, carefully open the oven and check your tart. A toothpick inserted in the center should come out clean or with just a few moist crumbs attached. If it's still too liquid, give it a few more minutes.

Step 5. Cool Before Serving

allow to cool first

After your Tarte Alsacienne has finished baking and you've confirmed it's perfectly cooked, the next important step is to let it cool before serving. This cooling time is crucial because it helps the custard set properly. If you slice it too soon, it mightn't hold its shape, and you want those beautiful, clean slices!

Start by removing the tart from the oven and letting it sit on a wire rack. This allows air to circulate around it, helping it cool evenly. You'll need to wait for about 30 minutes to an hour. It's hard to resist the delicious smell, but patience is key!

Once it's cooled down to room temperature, you can cover it and place it in the refrigerator for an hour or two if you prefer it chilled. A cold slice of Tarte Alsacienne is refreshing and perfect for warm days.

Advertisement

When you're ready to serve, you might sprinkle a little powdered sugar on top for an extra touch of sweetness. Your friends and family will be so excited to try this delightful treat. Enjoy every delicious bite!

Final Thoughts

Tarte Alsacienne is a delightful dish that captures the essence of Alsace's culinary heritage.

It's more than just a dessert; it's a warm hug for your taste buds! When you take a bite, you'll experience the creamy custard filling and the buttery crust blending perfectly together.

It's a dish that can make any occasion special, whether it's a family gathering or a simple weeknight treat.

Making Tarte Alsacienne in your own kitchen can be a fun adventure. You'll get to mix, pour, and create something delicious from scratch.

Advertisement

Plus, the sweet aroma wafting through your home while it bakes is simply irresistible!

Don't forget to share it with friends and family. Watching their faces light up with joy as they taste your creation is one of the best feelings ever.

You can even add toppings like fresh fruit or a sprinkle of powdered sugar to make it extra special.

Frequently Asked Questions

Can Tarte Alsacienne Be Made Gluten-Free?

Yes, you can make tarte alsacienne gluten-free by substituting regular flour with a gluten-free blend. Just ensure your other ingredients are also gluten-free, and you'll enjoy a delicious, safe dessert for everyone.

What Is the Best Way to Store Leftovers?

To store leftovers, let them cool completely, then cover them tightly with plastic wrap or place in an airtight container. Refrigerate for up to three days, or freeze for longer-lasting freshness. Enjoy them later!

Advertisement

Can I Use a Different Fruit Filling?

Absolutely, you can use different fruit fillings! Just make sure the fruit complements the flavors you're aiming for. Adjust the sweetness if needed, and experiment with textures to create a delicious, unique dessert. Enjoy!

How Long Does Tarte Alsacienne Last in the Fridge?

It typically lasts about three to four days in the fridge. Make sure you store it in an airtight container to keep it fresh. Just remember to check for any signs of spoilage before eating!

What Beverages Pair Well With This Tart?

When enjoying this delicious tart, you'll find that sweet dessert wines, like Sauternes or late harvest Riesling, complement its flavors beautifully. Alternatively, a cup of coffee or tea can enhance your overall experience.

Continue Reading

Affiliate Disclaimer
As an affiliate, we may earn a commission from qualifying purchases. We get commissions for purchases made through links on this website from Amazon and other third parties.

Advertisement

Vetted

top local car washes top local car washes
Vetted2 months ago

14 Best Car Washes Near You for a Sparkling Clean Ride

I discovered the 14 best car washes near you that promise a sparkling clean ride, and you won't want to...

top mops for 2024 top mops for 2024
Vetted2 months ago

The 15 Best Mops of 2025 – Your Ultimate Guide to a Spotless Home

Find the perfect mop for your cleaning needs in 2025, and discover how these top choices can revolutionize your home...

top women s fragrances 2024 top women s fragrances 2024
Vetted2 months ago

15 Best Perfumes for Women in 2025 – A Fragrance Guide You Can’t Miss

Keen to discover the top 15 perfumes for women in 2025? Uncover unique scents that will elevate your fragrance game!

top local bars guide top local bars guide
Vetted2 months ago

14 Best Bars Near You for an Unforgettable Night Out

Looking for the perfect bar to elevate your night out? Discover the 14 best spots that promise unforgettable experiences!

luxurious beard oil selection luxurious beard oil selection
Vetted2 months ago

15 Best Beard Oils for a Luxurious Grooming Experience in 2025

Shop the 15 best beard oils for a luxurious grooming experience in 2025 and discover which ones will elevate your...

top college laptops 2024 top college laptops 2024
Vetted2 months ago

15 Best College Laptops of 2025: The Ultimate Guide for Students

With our guide to the 15 best college laptops of 2025, discover which powerful models will elevate your academic experience...

waterproof mascaras for tears waterproof mascaras for tears
Vetted2 months ago

15 Best Waterproof Mascaras That Will Survive Any Tear-Jerker

Outstanding waterproof mascaras await to keep your lashes flawless through any emotional moment; discover which ones made the top 15...

top flavorful disposable vapes top flavorful disposable vapes
Vetted2 months ago

15 Best Disposable Vapes of 2025: Top Picks for Flavor and Convenience

Prepare to discover the 15 best disposable vapes of 2025 that blend exceptional flavor and convenience, but which ones truly...

refreshing lunch salad ideas refreshing lunch salad ideas
Vetted2 months ago

15 Best Salads Near You That Will Freshen Up Your Lunch Routine

Transform your lunch with the 15 best salads nearby that will tantalize your taste buds and leave you craving more...

top convertible car seats top convertible car seats
Vetted2 months ago

15 Best Convertible Car Seats of 2025 – Safety and Comfort for Your Little One

Get ready to discover the top 15 convertible car seats of 2025 that blend safety and comfort—find out which models...

delicious fast food breakfast delicious fast food breakfast
Vetted2 months ago

15 Best Fast Food Breakfast Options That Will Make Your Mornings Delicious

Uncover the 15 best fast food breakfast options that will transform your mornings into a delicious experience you won't want...

stylish contacts for vision stylish contacts for vision
Vetted2 months ago

14 Best America’s Contacts for Clear Vision and Style

Browse through the 14 best contact lenses in America for clear vision and style, and discover which one perfectly complements...

Trending