Baguettines are the mini French baguettes that'll make your sandwiches amazing! Their delightful texture and flavor are perfect for holding all your favorite fillings, like meats and veggies. Plus, they're easy to eat and share, making them a hit at lunches or picnics. To make them, you mix flour, water, yeast, and salt, then knead and shape the dough into little baguettes. After letting them rise for about an hour, bake them at 450°F until golden brown. You'll love how fun and customizable they are, adding excitement to every bite! There's so much more to discover about these tasty treats!
Key Takeaways
- Baguettines are mini French baguettes, approximately 6 inches long, perfect for creating delicious and easily manageable sandwiches.
- Their crusty exterior and soft interior provide an ideal texture for holding various fillings like meats, veggies, and spreads.
- Baguettines are convenient for lunches, picnics, and casual gatherings, making them a versatile choice for sharing.
- Easy to customize, these mini baguettes allow for creative sandwich combinations, enhancing the dining experience.
- Baking baguettines at a high temperature ensures a delightful crust, elevating the quality of any sandwich.

International Snack Box, Unique Experience with Universal Exotic Candies and Treats from around the World, Gift-Ready Foreign Foods in Packages Inspired by European, Japanese and Korean Cultures
Unique Gift: A hilariously unexpected treasure chest of global snacks that instantly makes you the most interesting gift...
As an affiliate, we earn on qualifying purchases.
History
When you think about the baguette, you might picture a crusty loaf gracing the tables of French bakeries, but its history is as rich as its flavor.
The baguette we know today actually traces back to the 19th century, around the time of the Industrial Revolution. Bakers started using new techniques and equipment, which made it easier to create these long, thin loaves.
Did you know that the word "baguette" means "stick" in French? That's fitting because these loaves are long and narrow, almost like a stick!
In France, people began to enjoy baguettes not just for their taste but also for their convenience. They were easy to carry and perfect for sharing.

deReuze Dutch Snack Box from Netherlands Gourmet Cookies Pack - 8 Assorted Treats in a Flip-Top Box Stroopwafel Ginger Snaps Shortbread Chocolate Graham Crackers Gift for Men & Women
Authentic European Cookies: Enjoy 8 treats in this deReuze cookies variety pack, stroopwafel, ginger snaps, butter and windmill...
As an affiliate, we earn on qualifying purchases.
Cooking Steps
To create the perfect Baguettine, you'll want to gather a few essential ingredients and tools before diving into the cooking steps. Start with flour, water, yeast, and salt. These are your building blocks for a delicious mini baguette!
You'll also need a mixing bowl, a baking sheet, and a sharp knife.
First, mix the flour, water, yeast, and salt in your bowl until it forms a dough. Knead it on a floured surface for about 10 minutes until it's smooth and elastic.
Next, let the dough rise in a warm spot for about an hour, or until it doubles in size. This is when the magic happens!
Once it's risen, punch it down and divide it into smaller pieces. Shape each piece into a mini baguette, about 6 inches long.
Place them on your baking sheet and let them rise for another 30 minutes. Preheat your oven to 425°F (220°C).
Just before baking, make a couple of slashes on top of each baguettine with your sharp knife. Bake for 15-20 minutes until golden brown.
Let them cool, and enjoy your perfect Baguettine sandwiches!
Step 1. Mix Warm Water and Yeast

Start by combining warm water with yeast in a mixing bowl. It's important that the water is just the right temperature, about 100 to 110 degrees Fahrenheit. If it's too hot, it can kill the yeast, and if it's too cold, the yeast won't wake up. So, make sure to check!
Once the warm water is ready, sprinkle the yeast on top. Give it a gentle stir to mix everything together, and then let it sit for about five to ten minutes. During this time, you'll notice the mixture getting bubbly and frothy. This means the yeast is coming to life, which is super exciting!
You're creating a little magical potion that'll help your baguettine rise beautifully. While you wait, feel free to gather your other ingredients, like flour and salt. This little break is a great time to clean up your workspace too.
When the yeast is all frothy, you'll know it's time to move on to the next step. Mixing warm water with yeast is an essential beginning to making delicious baguettine sandwiches, and you're already on your way to something wonderful!
Step 2. Knead Dough Until Smooth
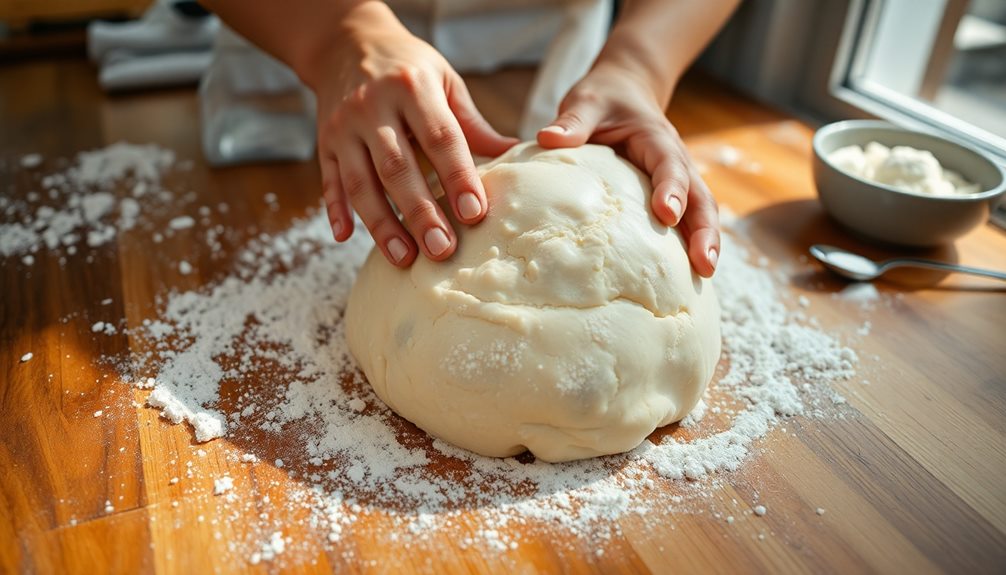
Once your yeast mixture is bubbly and ready, it's time to knead the dough until it's smooth and elastic. This step is super important because it helps develop the gluten, which gives your Baguettine that amazing chewy texture.
Start by sprinkling a little flour on your clean countertop. Then, pour your dough onto the floured surface.
Now, you'll want to push the dough down with the palm of your hand, fold it over, and give it a good stretch. Repeat this process, turning the dough a quarter turn each time. Keep kneading for about 8 to 10 minutes. You'll notice the dough changing; it should become smoother and springy.
If it's too sticky, don't be afraid to add a little more flour, but try not to add too much!
Make sure you're having fun while kneading. It's like giving your dough a little workout!
When you've finished, you should have a beautiful ball of dough that feels soft and elastic. It's now ready for the next exciting step in your Baguettine adventure!
Step 3. Let Dough Rise for 1 Hour
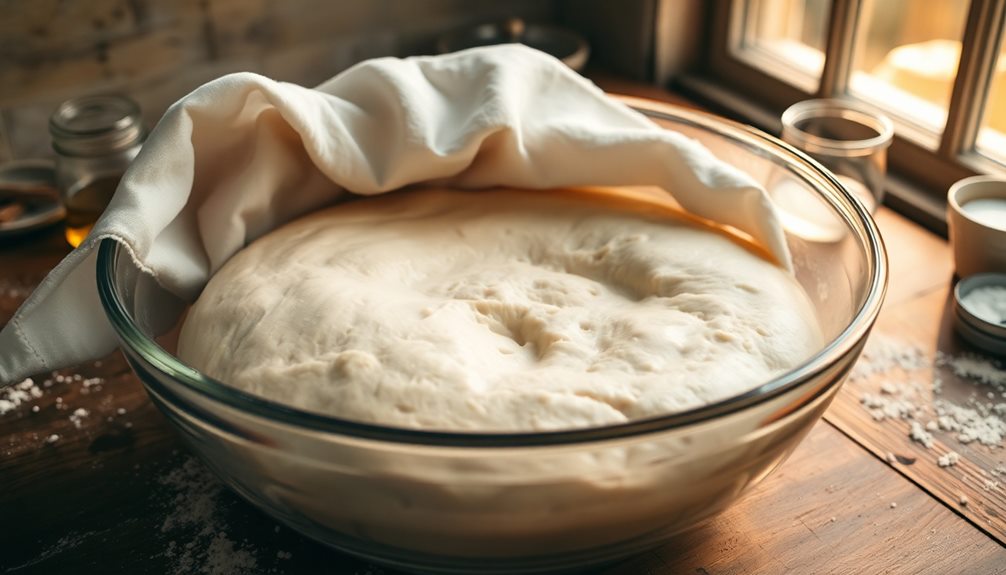
After kneading your dough to perfection, the next crucial step is letting it rise for about 1 hour. This process is super important because it helps the dough become fluffy and light. When you give the dough time to rise, the yeast gets to work, creating tiny bubbles that make your baguettines soft and airy.
To get started, find a warm spot in your kitchen. This could be near the oven or in a sunny window. Place your dough in a bowl and cover it with a clean kitchen towel. This keeps the dough cozy and helps it rise even better.
While you wait, you can clean up your workspace or gather your favorite sandwich fillings.
After an hour, check your dough. It should have doubled in size, looking all puffy and inviting! If it hasn't risen enough, don't worry—just give it a little more time. Remember, patience is key in baking.
Once your dough has risen, you'll be ready to shape it into those delightful mini baguettes. Get excited, because delicious sandwiches are just around the corner!
Step 4. Shape Dough Into Mini Baguettes
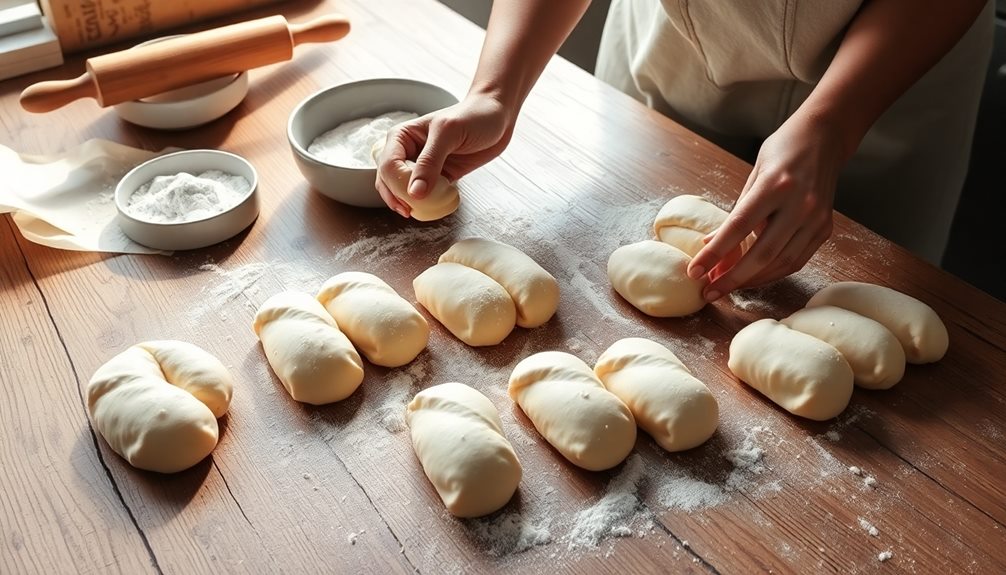
Now that your dough has risen beautifully, it's time to shape it into mini baguettes. Start by gently punching down the dough to release any air bubbles.
Grab a clean surface and sprinkle a little flour to prevent sticking. Roll the dough into a log shape, about 10 to 12 inches long. Make sure it's even all the way down so your baguettes will bake uniformly.
Next, take each log and fold the ends in slightly, then pinch them together to form a tapered point. This gives your baguettes that classic shape! If you want to get fancy, you can gently roll the dough back and forth under your palms to create a smoother surface.
Once you've shaped all your mini baguettes, place them on a floured baking sheet. Make sure to leave some space between each one, as they'll puff up while baking.
Cover them with a clean kitchen towel for about 30 minutes. This'll give them a little more time to rise. You're almost there! Just a few more steps, and you'll have delicious baguettines ready to bake. Enjoy the process; it's all part of the fun!
Step 5. Preheat Oven to 450°F
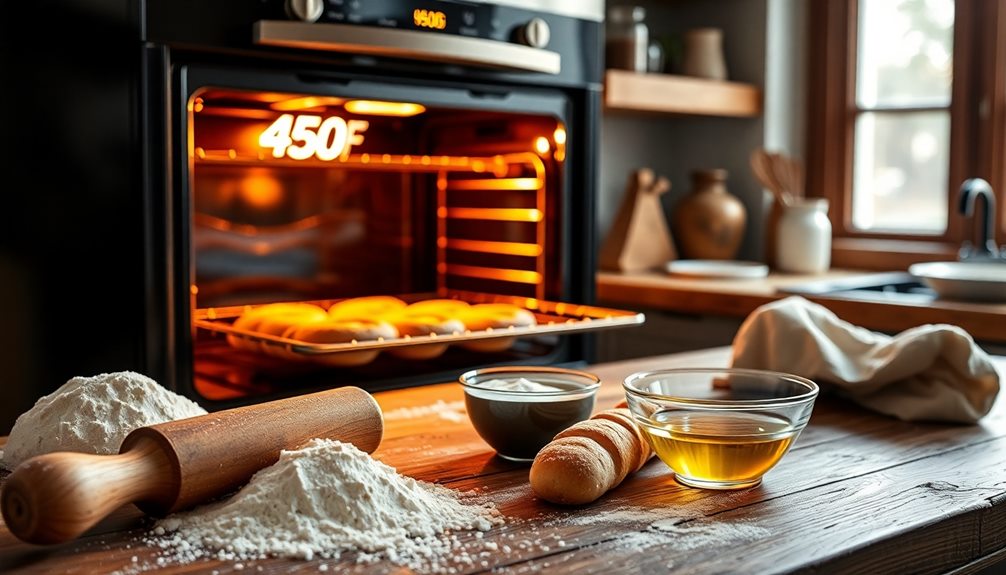
Preheating your oven to 450°F is a crucial step in achieving perfectly baked baguettines. When you set your oven to this high temperature, you're creating the ideal environment for those mini baguettes to rise and get that delightful crust. So, go ahead and turn on your oven now!
While your oven is heating up, you can feel the excitement building. Imagine the smell of fresh bread wafting through your kitchen. It's hard to resist! Make sure to give yourself about 20 to 30 minutes for the oven to reach that perfect temperature. If you skip this step, your baguettines mightn't turn out as fluffy and golden as you'd like.
Once the oven reaches 450°F, it's time to be careful. Use oven mitts to handle the hot oven door, and place your shaped baguettines on a baking sheet lined with parchment paper. This way, they won't stick, and cleanup will be easy!

International Snack Box, Giftable Exotic Universal Treats and Candies, Foreign Foods from around the World, Authentic Tasting Experience Inspired by European, Korean and Japanese Cultures
Surprise Treasure: A box full of snacks from around the world—like a tiny food adventure that lands right...
As an affiliate, we earn on qualifying purchases.
Final Thoughts
When it comes to crafting the perfect sandwich, the right baguettine can make all the difference. Imagine holding a mini French baguette, its crust golden and inviting, ready to be filled with your favorite toppings.
You'll find that these little delights aren't just adorable; they're the secret weapon to making your lunch truly special!
Using baguettines lets you create a delightful balance of flavors. You can pile on fresh veggies, savory meats, or creamy spreads, and the baguettine will hold everything together without falling apart.
Plus, they're easy to eat, which makes lunchtime even more fun!
Whether you're packing a school lunch or hosting a picnic, these mini baguettes will surely impress your friends and family.
They're perfect for sharing, and you can even let everyone customize their own!

Elite World Snack Sampler Box - 30+ Foreign snacks and global candies - Huge Assortment of Asian Snacks, European Treats, Central American Candy and more - Gift Care Package
Huge Assortment of Global Treats: Enjoy over 30 foreign snacks and samples from around the world, featuring a...
As an affiliate, we earn on qualifying purchases.
Frequently Asked Questions
Where Can I Buy Baguettine Bread?
You can buy baguettine bread at local bakeries, specialty grocery stores, or online retailers. Check their websites or call ahead to ensure they have it in stock, as availability may vary by location.
Can I Freeze Baguettine for Later Use?
Yes, you can freeze baguettine for later use. Just wrap it tightly in plastic wrap or aluminum foil, then place it in an airtight container. When you're ready, thaw it at room temperature before enjoying!
What Are Popular Fillings for Baguettine Sandwiches?
When you think about popular fillings for sandwiches, consider classics like ham and cheese, turkey with avocado, or a fresh veggie mix. Don't forget spreads like mustard or pesto to elevate your flavors!
How Long Does Baguettine Stay Fresh?
It typically stays fresh for about two to three days when stored properly in a paper bag at room temperature. If you want to extend freshness, consider freezing it and toasting when ready to enjoy.
Is Baguettine Gluten-Free or Vegan?
You'll find that baguettine typically isn't gluten-free, as it's made from wheat flour. Additionally, it may not be vegan due to possible dairy or other animal-derived ingredients, so always check the label for specifics.