Explore the rich history and creative potential of dairy-free desserts! From ancient roots in plant-based ingredients to modern vegan cakes and ice creams, you can indulge your sweet tooth without limits. Discover the magic of dairy alternatives like nut butters, plant-based milks, and innovative baking techniques. Whip up a delectable dairy-free treat, perfecting the balance of flavors and textures. Cool your creation completely to savor the full experience. Embrace the joy of satisfying your cravings while accommodating dietary needs – and if you keep reading, you'll uncover even more mouthwatering dairy-free dessert possibilities.
Key Takeaways
- Dairy-free desserts have a long history, dating back to ancient civilizations, and have gained popularity due to dietary restrictions and health-conscious trends.
- Variety of plant-based milk alternatives, nuts, and innovative ingredient combinations can provide similar textures and flavors to traditional dairy-based desserts.
- Proper preparation techniques, such as blending wet ingredients and gently incorporating dry ingredients, are crucial for achieving the desired consistency in dairy-free desserts.
- Allowing dairy-free desserts to cool completely before serving enhances the overall texture and flavor, as well as facilitates easier slicing and serving.
- Dairy-free desserts cater to diverse dietary needs, including veganism and lactose intolerance, and offer a satisfying way to indulge in sweet treats without compromising dietary choices.

Party Decorations for World Cup 2026, 82 PCS Soccer Theme Party Supplies with Thickened Plates, Napkins Set Tablecloth and Banner for Sports Birthday Party, Soccer Decor
【ALL-IN-ONE SOCCER PARTY SOLUTION】 Elevate your world cup 2026 gathering with this comprehensive 82-piece set. It includes 10...
As an affiliate, we earn on qualifying purchases.
History
While dairy-based desserts have long been a staple in many cultures, the history of dairy-free desserts dates back centuries. From ancient civilizations to modern times, people have found creative ways to satisfy their sweet tooth without relying on milk, butter, or cream.
Sorbets and sherbets, made from fruit juices and sweeteners, have been enjoyed since the days of ancient Greece and Rome. Similarly, Asian cuisines have long embraced desserts featuring plant-based ingredients like coconut, rice, and beans.
In the late 19th century, the rise of vegetarianism and concerns over animal welfare led to a growing demand for dairy-free options. This paved the way for innovative bakers and confectioners to experiment with nut milks, fruit purees, and other dairy alternatives.
Today, the diversity of dairy-free desserts continues to expand, catering to a wide range of dietary needs and preferences. From creamy vegan ice creams to decadent chocolate cakes, the possibilities for satisfying your sweet tooth without dairy are truly endless.

Soccer Party Supplies Decorations Kit for 24 Guests-The 23rd World Cup Design Dinnerware-Plates(9&7in) Napkins Cups Cutlery 2 Tablecloths & Soccer Pennant Flags Banner for Party, World Cup, Birthday
⚽Soccer Party Supplies Decorations Kit for 24 Guests - The 23rd World Cup Design Dinnerware- Plates(9in&7in), Napkins, Cups,...
As an affiliate, we earn on qualifying purchases.
Recipe
Dairy-free desserts offer a delightful alternative for those with dietary restrictions or personal preferences. By omitting dairy ingredients, these treats can be enjoyed by a wider range of individuals, including those who are lactose intolerant or vegan.
Exploring the world of dairy-free desserts can be a fun and rewarding culinary adventure, as you discover new flavors and textures that may surprise and delight your taste buds.
In this recipe, we'll showcase a delectable dairy-free option that's sure to satisfy your sweet cravings. Get ready to indulge in a delightful treat that isn't only dairy-free but also bursting with flavor.
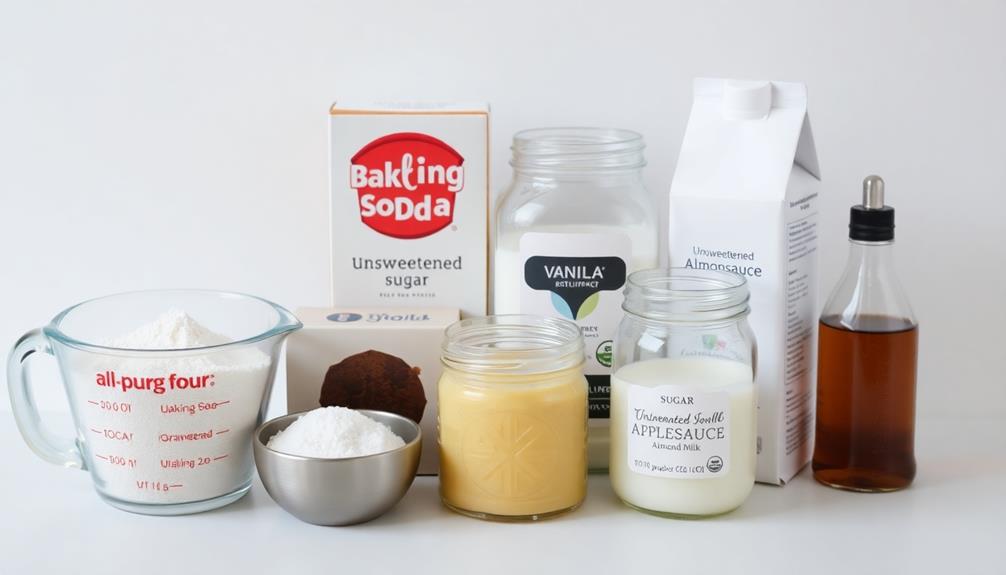
Ingredients:
- 1 cup all-purpose flour
- 1/2 cup unsweetened cocoa powder
- 1 teaspoon baking soda
- 1/4 teaspoon salt
- 1 cup granulated sugar
- 1/2 cup unsweetened applesauce
- 1/2 cup unsweetened almond milk
- 1 teaspoon vanilla extract
Instructions:
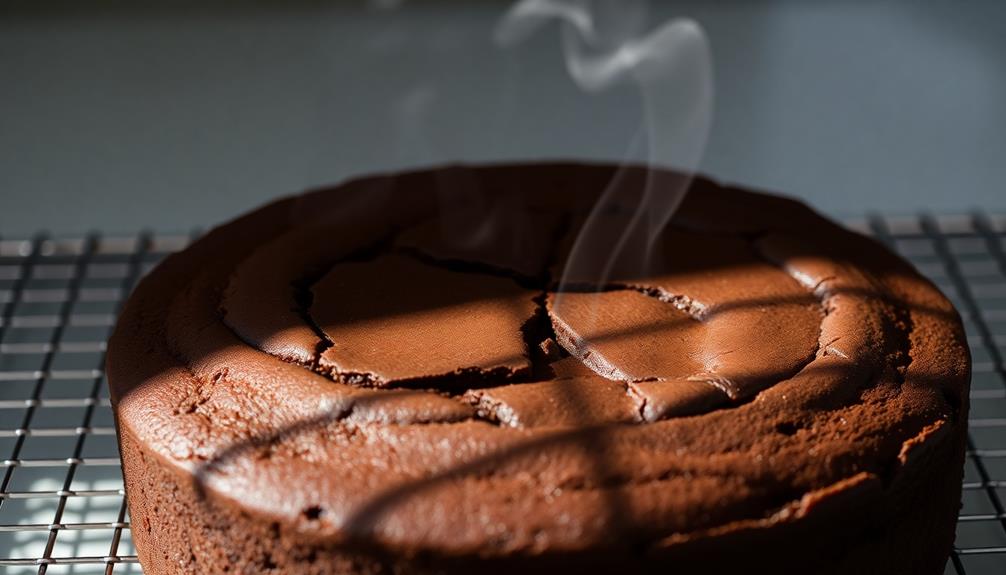
Preheat your oven to 350°F (175°C). Grease an 8-inch square baking pan or line it with parchment paper.
In a medium bowl, whisk together the flour, cocoa powder, baking soda, and salt. In a separate bowl, combine the sugar, applesauce, almond milk, and vanilla extract.
Gradually add the dry ingredients to the wet ingredients, mixing until just combined. Pour the batter into the prepared baking pan and smooth the top.
Bake for 25-30 minutes, or until a toothpick inserted into the center comes out clean. Allow the dessert to cool completely before cutting and serving.
When it comes to dairy-free desserts, the key is to experiment with different ingredients and techniques to achieve the desired texture and flavor.
Feel free to try various dairy-free milk alternatives, such as soy, coconut, or oat milk, to suit your preferences. Additionally, you can explore the use of healthy fats, like avocado or nut butters, to create a creamy and indulgent texture.
Enjoy your dairy-free creation and savor the delicious and guilt-free treat!

BOSINLONG World Cup Party Supplies, International Flags Theme Party Decorations, Serves 20, 114 Pieces with Plates, Cups, Napkins, Forks, Tablecloth, Banner
Complete 114-Piece Party Set: Includes 20 dinner plates (9 inches), 20 dessert plates (7 inches), 20 cups, 20...
As an affiliate, we earn on qualifying purchases.
Cooking Steps
First, gather all the ingredients you'll need for your delicious dairy-free dessert.
Next, blend the wet ingredients together until smooth.
Then, gently fold in the dry ingredients, being careful not to overmix.
Once everything's combined, pour the batter into a preheated oven and bake.
Step 1. Gather All Ingredients
To begin, gather all the necessary ingredients for your dairy-free dessert. This includes your base ingredients, such as milk alternatives like almond or coconut milk, and any sweeteners you'll be using, like maple syrup or agave nectar.
Don't forget your thickening agents, whether that's cornstarch, arrowroot powder, or chia seeds. If you're making a frozen dessert, you'll need an ice cream maker or at least a few sturdy mixing bowls.
For baked goods, have your gluten-free flour, baking soda, and vanilla extract at the ready. Gather any fresh fruits, nuts, or chocolate chips you plan to fold in for extra flavor and texture.
Finally, make sure you have the right baking pans, measuring cups and spoons, and mixing utensils. Having everything prepped and within reach will make the actual cooking process a breeze.
Once you've double-checked your ingredient list, you can dive right into the dairy-free dessert-making process.
Step 2. Blend All Wet Ingredients Together

Begin by blending together all the wet ingredients in your dairy-free dessert recipe. This is a crucial step that will help create a smooth, cohesive texture for your final treat.
Using a high-powered blender or food processor, combine the plant-based milk, any nut or seed butters, maple syrup or honey, and any other liquid ingredients called for in your recipe. Blend on high speed until the mixture is completely smooth and well-incorporated.
Proper blending ensures that the wet ingredients are evenly distributed throughout the batter, preventing any pockets of unblended ingredients. This will give your dairy-free dessert a consistent texture and flavor in every bite.
Once the wet ingredients are perfectly blended, you can move on to incorporating the dry ingredients and bringing your recipe together. Remember to scrape down the sides of the blender or food processor as needed to ensure all components are fully incorporated.
With this step complete, you'll be well on your way to creating a delicious, dairy-free dessert.
Step 3. Fold in Dry Ingredients Gently

After blending the wet ingredients, it's time to gently fold in the dry components. This step is crucial for maintaining the light, airy texture of your dairy-free dessert.
Using a rubber spatula, slowly incorporate the dry flour, baking powder, and any other dry ingredients into the wet mixture. Be careful not to overmix, as this can lead to a dense, tough final product.
Gently folding ensures the ingredients are evenly distributed without deflating the batter. Work in a circular motion, cutting through the center and lifting the spatula up and over the sides.
Continue this process until the dry ingredients are just combined, taking care not to over-agitate the mixture. The key is to handle the batter delicately, preserving those all-important air pockets that will result in a moist, fluffy dairy-free dessert.
Once the dry ingredients are folded in, your batter is ready to be poured into the prepared pan and baked to perfection.
Step 4. Bake in Preheated Oven

With the dry ingredients gently folded in, the next crucial step is to bake your dairy-free dessert in a preheated oven.
Preheat your oven to the temperature specified in the recipe, typically between 350°F and 375°F. This ensures the oven is hot enough to properly bake your creation.
Once the oven is preheated, carefully transfer your prepared batter or dough into the appropriate baking pan or dish. Make sure to grease the pan beforehand to prevent sticking.
Place the pan on the middle rack of the oven and bake for the recommended time, keeping a close eye to avoid over-baking. The dessert is done when a toothpick inserted into the center comes out clean.
After baking, let the dairy-free treat cool completely before handling or serving. This final step ensures the perfect texture and flavor.
With some patience and attention to detail, you'll have a delightful, dairy-free dessert ready to enjoy.
Step 5. Allow to Cool Completely
Once the dairy-free dessert has finished baking, let it cool completely on a wire rack or countertop before handling or serving. This step is crucial to ensure the perfect texture and consistency.
As the dessert cools, the flavors will meld together, and any remaining moisture will evaporate, preventing a soggy or heavy final product.
Depending on the size and complexity of your dairy-free creation, this cooling process can take anywhere from 15 minutes to an hour. Be patient and resist the temptation to cut into the dessert too soon.
Allowing it to cool fully will make it easier to slice, plate, or serve without falling apart. Additionally, the dessert may continue to firm up as it reaches room temperature, so be sure to give it ample time to reach the desired consistency.
Once cooled, your dairy-free dessert will be ready to enjoy. Savor the rich, satisfying flavors and the knowledge that you've created a delicious treat without relying on dairy.

World Soccer Cup 2026 Party Decoration, Complete Celebration Kit, Party Supplies for Football Fans, World Soccer 2026 Celebrations
【World Soccer Party Decoration】Bring vibrant energy to your celebration with our soccer party decorations! This high-quality collection, featuring...
As an affiliate, we earn on qualifying purchases.
Final Thoughts
Exploring the world of dairy-free desserts can open up a realm of delectable possibilities. From creamy cashew-based cheesecakes to rich chocolate mousse, the options are endless.
Additionally, pairing these desserts with a soothing cup of herbal tea can enhance your dining experience and offer various health benefits. As you've discovered, with a little creativity and the right ingredients, you can satisfy your sweet tooth without relying on dairy.
Remember, the key to successful dairy-free desserts is finding substitutes that mimic the texture and flavor of traditional recipes. Don't be afraid to experiment with different plant-based milks, nuts, and other dairy alternatives.
And don't forget to let your creations cool completely before serving, as this helps them set and come together perfectly.
Ultimately, the joy of dairy-free desserts lies in the ability to indulge in sweet treats while catering to dietary needs or preferences. Embrace the challenge, have fun, and savor every bite of your delicious dairy-free creations.
Frequently Asked Questions
How Long Do Dairy-Free Desserts Typically Last in the Refrigerator?
Typically, dairy-free desserts can last 3-5 days in the refrigerator. Their shelf life is similar to traditional desserts, but you'll want to check the specific recipe and storage instructions to ensure optimal freshness and food safety.
Are Dairy-Free Desserts More Expensive Than Traditional Desserts?
Generally, dairy-free desserts can be more expensive than traditional desserts. The specialized ingredients and production methods often drive up the cost, but the health benefits and dietary accommodations may make the added expense worthwhile for some consumers.
Can Dairy-Free Desserts Be Frozen for Later Use?
Yes, you can freeze most dairy-free desserts for later use. This helps preserve their texture and flavor, making them just as enjoyable when thawed. Just be sure to use proper freezing techniques to prevent freezer burn.
How Do Dairy-Free Desserts Compare in Taste to Traditional Desserts?
Dairy-free desserts don't always taste the same as traditional ones, but they can still be delicious. You'll find they often have unique flavors and textures that satisfy your sweet tooth in their own way.
Are There Any Common Substitutes Used in Dairy-Free Desserts?
In dairy-free desserts, common substitutes include plant-based milks like almond, coconut, or oat milk, as well as nut butters, avocado, and silken tofu. These ingredients can provide creaminess and richness without the use of traditional dairy products. For example, a cashew cream recipe can be used to create a luscious and velvety texture similar to heavy cream without any dairy at all. By soaking cashews and then blending them with water and a touch of sweetener, a creamy and versatile base can be created for desserts like cheesecakes, ice creams, and puddings. This method allows for a delicious and dairy-free alternative that is both satisfying and kind to the environment.