Connect with us

Chinese Cuisine

Eight Treasure Rice

Bursting with a symphony of flavors and textures, Eight Treasure Rice is a timeless Chinese dish that dates back to the Ming Dynasty. Learn more about this cherished culinary treasure.

Published

on

savory sweet rice dish

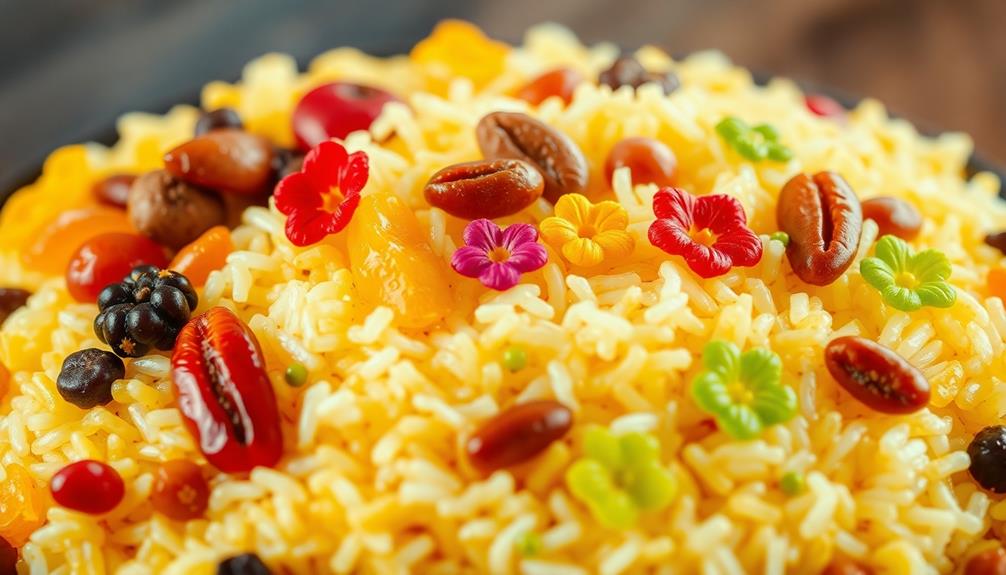
Eight Treasure Rice is a classic Chinese dish you'll absolutely adore! It dates back to the Ming Dynasty, when it was an imperial treat. Nowadays, it's a cherished part of Chinese cuisine, often served during festivals to symbolize prosperity. The "Eight Treasure" refers to the eight different ingredients, like dried fruits, nuts, and seeds, that create a symphony of flavors and textures. Cooking up this traditional recipe takes some skill, but the end result is worth it – a colorful, delicious dish that'll have you coming back for more. And if you keep reading, you'll discover the mouthwatering details behind this timeless culinary treasure.

Key Takeaways

  • Eight Treasure Rice is an iconic Chinese dish that originated during the Ming Dynasty as an imperial delicacy.
  • The dish's name symbolizes abundance and prosperity, and it is often served during festivals and special occasions.
  • The core ingredients include glutinous rice, dried fruits, nuts, and seeds, creating a harmonious balance of flavors and textures.
  • Proper cooking techniques, such as thorough rinsing and soaking of the rice, are essential for achieving the desired texture and flavor.
  • Eight Treasure Rice can be enjoyed as a dessert or a festive dish, often paired with tea for a balanced meal.

History

According to historical accounts, Eight Treasure Rice has been a beloved dish in Chinese cuisine for centuries. The origins of this delectable rice dish can be traced back to the Ming Dynasty, when imperial chefs would create elaborate rice concoctions fit for the Emperor's table.

Over time, the recipe evolved, and Eight Treasure Rice became a cherished part of Chinese culinary traditions.

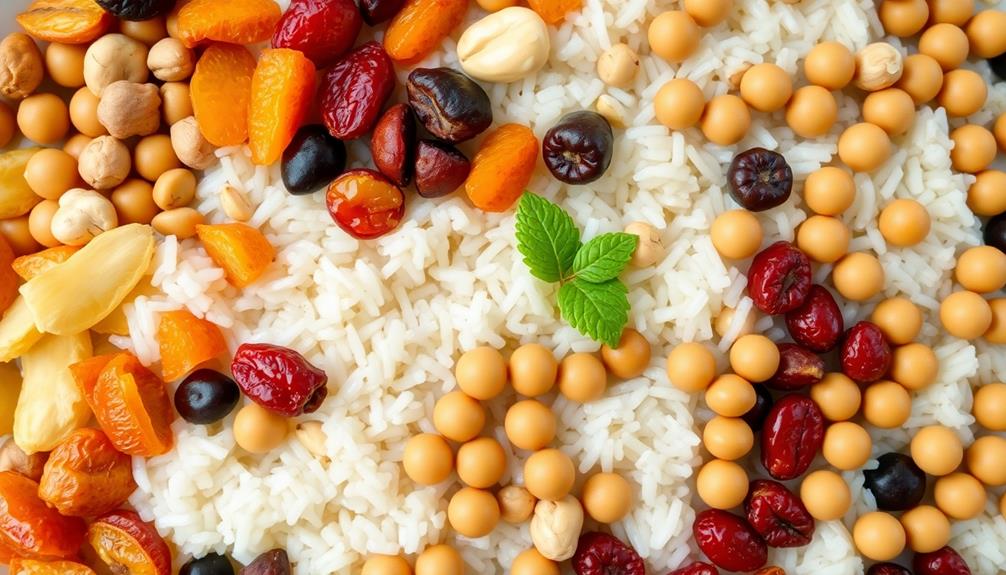
The name "Eight Treasure" refers to the eight different ingredients that are typically used in the dish, which can include dried fruits, nuts, seeds, and even candied melon. These vibrant components come together to form a harmonious and visually stunning rice creation.

Preparing Eight Treasure Rice was once a laborious task, but modern cooks have streamlined the process, making it easier for families to enjoy this timeless delicacy.

Today, Eight Treasure Rice remains a beloved dish, often served at special occasions and family gatherings. Its rich history and delightful flavors continue to captivate food enthusiasts around the world.

Advertisement

Recipe

Eight Treasure Rice is a classic Chinese dish that combines various ingredients to create a visually stunning and flavorful meal. This dish isn't only delicious but also represents the abundance and prosperity associated with the number eight.

The combination of glutinous rice, dried fruits, nuts, and other treasured ingredients makes this dish a centerpiece of many celebratory meals. Its vibrant colors and textures create a harmonious and satisfying dining experience.

  • 2 cups glutinous rice, soaked in water for at least 4 hours
  • 1/2 cup dried lotus seeds
  • 1/2 cup dried longan
  • 1/4 cup dried jujube (red dates)
  • 1/4 cup dried apricots, chopped
  • 1/4 cup roasted peanuts
  • 1/4 cup dried cranberries
  • 1/4 cup cooked chickpeas
  • 2 tablespoons sugar
  • 1 teaspoon salt
  • 1/4 cup water

Drain the soaked glutinous rice and transfer it to a steamer. Steam the rice for 30 minutes, or until cooked through.

In a separate bowl, combine the dried lotus seeds, longan, jujube, apricots, peanuts, cranberries, and chickpeas. Add the sugar and salt, and mix well.

Fluff the cooked glutinous rice and gently fold in the fruit and nut mixture, along with the 1/4 cup of water. Transfer the eight treasure rice to a serving dish and enjoy.

To ensure the best results, it's important to soak the glutinous rice for at least 4 hours to achieve the desired texture.

Advertisement

Additionally, feel free to adjust the quantities of the dried fruits and nuts to suit your personal preferences. This dish can be served warm or at room temperature, making it a versatile choice for various occasions.

Cooking Steps

Rinse that rice real good to get rid of any extra starch.

Let it soak for half an hour so it's nice and plump.

Then, crank up the heat and cook it until it's perfect!

Next, you'll add all sorts of tasty ingredients to make your eight treasure rice extra special.

Advertisement

Yum, can't wait to dig in while it's still hot!

Step 1. Rinse Rice Thoroughly

thoroughly rinse the rice

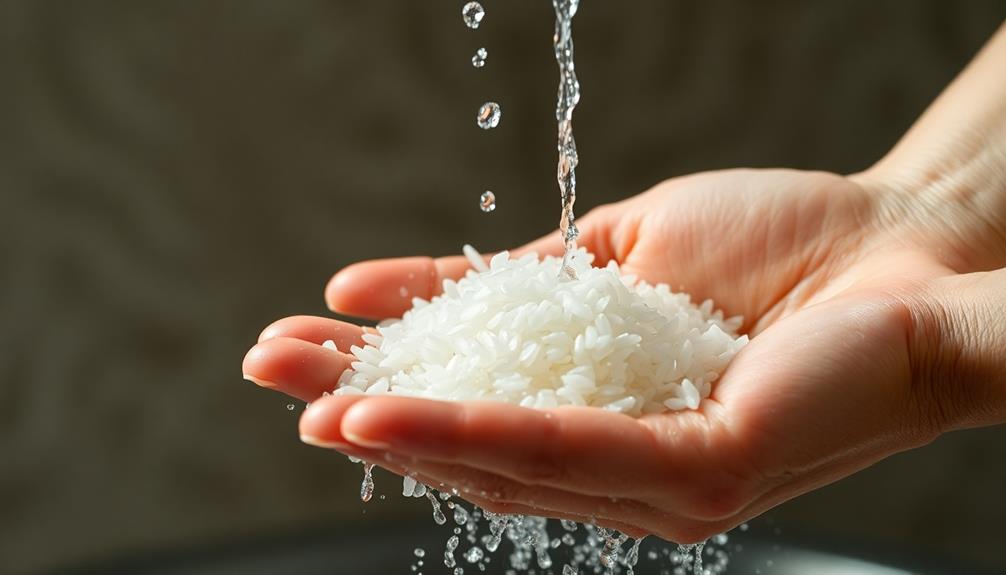
Before starting the cooking process, you'll want to thoroughly rinse the rice. This important step helps remove any excess starch and impurities, ensuring your eight treasure rice turns out perfectly.

To do this, place the rice in a fine-mesh strainer and run it under cool, clean water, gently stirring the grains with your fingers. You'll see the water become cloudy as the starch is released. Keep rinsing until the water runs clear – this typically takes 2-3 minutes.

Once the rice is clean, you're ready to move on to the next step. Rinsing the rice well gives it a better texture and helps the flavors meld together beautifully in the final dish. Plus, it's a simple task that only takes a minute, so don't skip this crucial part of the cooking process.

With the rice rinsed, you can now start assembling the eight treasure rice for an amazing flavor experience.

Step 2. Soak Rice for 30 Minutes

soak rice for thirty minutes

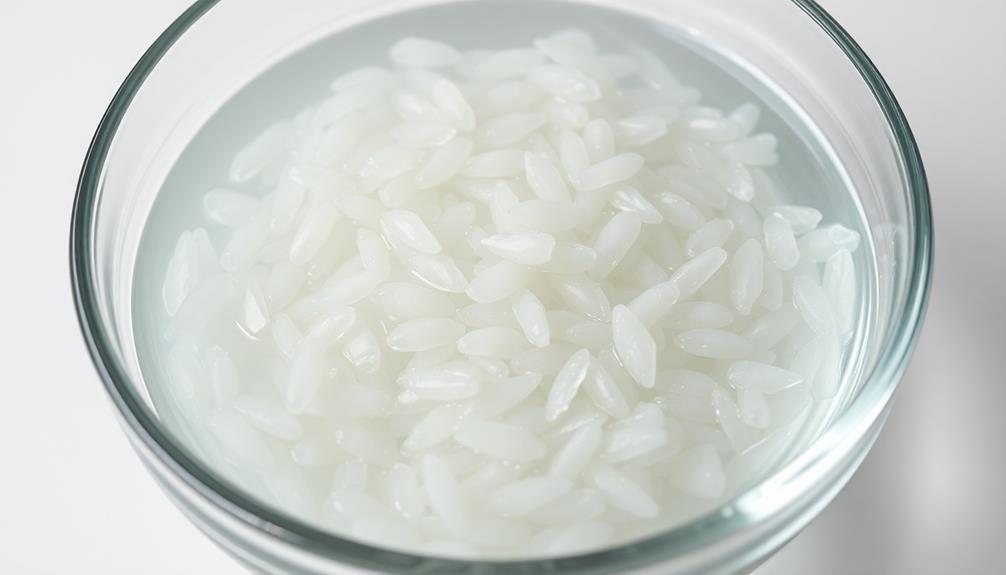
After rinsing the rice, you'll want to soak it for about 30 minutes. This step is crucial because it helps the grains become more tender and fluffy. Soaking also allows the rice to absorb more water, which means it'll cook more evenly.

Simply place the rinsed rice in a bowl and cover it with fresh, cool water. Let it sit for half an hour, giving the rice a chance to drink up all that lovely H2O. This extra hydration makes the rice easier to cook and prevents it from becoming dry or clumpy later on.

Advertisement

While the rice is soaking, you can start chopping up the other tasty ingredients that will go into your Eight Treasure Rice dish. This extra prep time will make the rest of the cooking process smooth sailing.

When the 30 minutes are up, drain the rice and you're ready for the next step. Get excited – your delicious rice medley is one step closer to completion!

Step 3. Cook Rice at High Heat

cook rice high heat

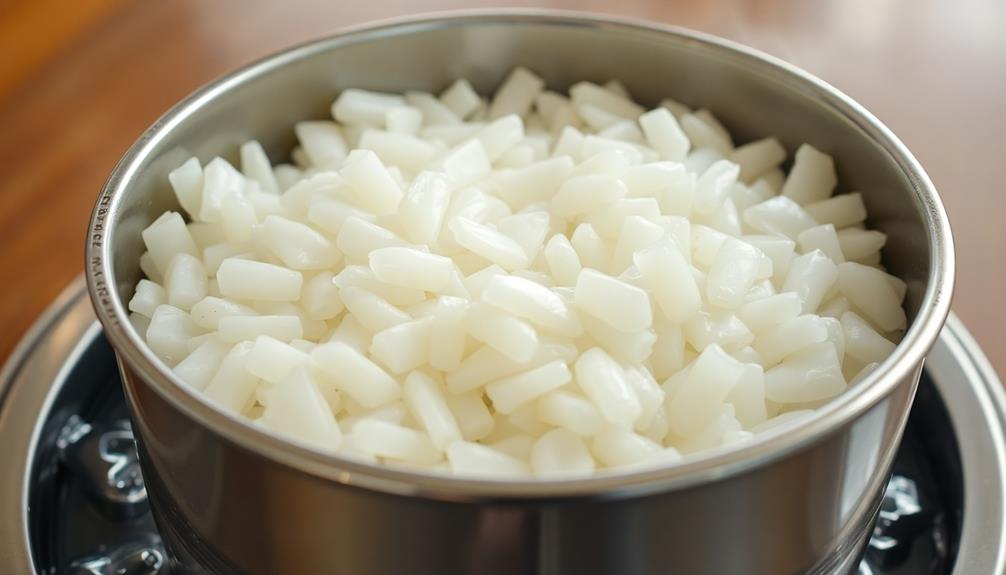
Once the rice has finished soaking, you'll want to drain it thoroughly. Grab a fine-mesh strainer and carefully pour the rice into it, making sure to get rid of all that excess water.

With the rice nice and dry, it's time to get cooking!

Grab your trusty pot and crank up the heat to high. That's right, we're going full-throttle today! Carefully pour the rice into the hot pot and let it sizzle. You'll want to stir the rice constantly with a wooden spoon to prevent any sticking or burning.

Keep that up for about 2-3 minutes, until the grains start to look a little translucent and toasty.

Advertisement

Now it's time to add the water. Carefully pour in the exact amount called for in the recipe – no more, no less! Bring the pot to a boil, then immediately reduce the heat to low, cover, and let the rice simmer away for about 15 minutes.

Resist the urge to peek, as you don't want to let all that precious steam escape!

Step 4. Add Flavorful Ingredients

incorporate delicious additional elements

With the rice simmering away, it's time to add the flavorful ingredients that will transform this dish into a true taste sensation.

First, grab a handful of dried fruits – maybe some raisins, chopped apricots, and a few dates. Chop them up and toss them into the pot. Their natural sweetness will complement the savory rice perfectly. Next, sprinkle in a pinch of cinnamon or cardamom to enhance the warm, spiced notes of the dish. As the fruits cook, they’ll soften and release their flavors, mingling beautifully with the other ingredients. Interestingly, while dishes like this have their roots in Middle Eastern cuisine, the combination of rice and beans can bring to mind the **Costa Rican Gallo Pinto origin**, a staple meal that also blends simple ingredients to create bold, comforting flavors.

Next, let's liven things up with some crunchy add-ins. Toasted almonds, chopped cashews, and a sprinkle of toasted sesame seeds will all do the trick. They'll add wonderful texture and nutty flavors to every bite.

Don't forget the fresh herbs! Finely chop some fragrant cilantro and green onions, then gently stir them into the rice. Their bright, vibrant flavors will really make the dish pop.

Advertisement

Step 5. Serve Immediately While Hot

serve hot immediately now

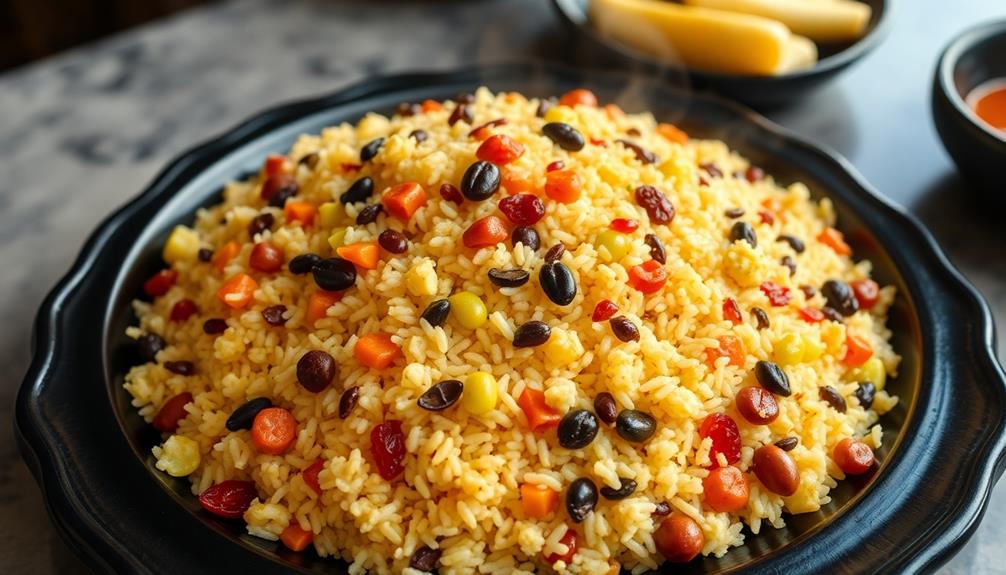
The moment has arrived to serve this aromatic and vibrant Eight Treasure Rice. Don't wait another minute – it's best enjoyed piping hot! Grab your bowls and spoons, and let's dive in.

First, use a large serving spoon to scoop generous portions of the rice into each bowl. Make sure to get a mix of all the colorful ingredients – the glistening raisins, the crunchy peanuts, the chewy dried apricots, and the vibrant green peas. Mmm, can you smell that heavenly aroma? Once the rice bowls are filled, top them with a generous drizzle of the aromatic curry sauce. The combination of flavors and textures is simply divine. As you take a deep breath and savor the heavenly aroma, you might catch a whiff of something else in the air – the distinct scent of stinky tofu. But don’t let that deter you from enjoying this delicious and satisfying meal. The stinky tofu adds a unique and savory element to the experience, making it a truly unforgettable dish.

Now, before you take your first bite, be careful – the rice is steaming hot! Gently blow on a spoonful to cool it down. Then, savor each mouthful, letting the flavors dance on your tongue. The sweet, the savory, the nutty – it's a flavor explosion in every bite!

Don't forget to share this delightful dish with your family and friends. They'll be amazed by the stunning presentation and delighted by the delicious taste. Enjoy!

Final Thoughts

As you savor the last few bites of this delightful Eight Treasure Rice, you can't help but reflect on the symphony of flavors that have danced across your palate. The mix of fragrant jasmine rice, chewy dried fruits, and crunchy nuts has created a truly unique and memorable dish. You feel a sense of satisfaction, knowing that you've mastered a traditional Chinese recipe that's bursting with personality.

Looking back, you're impressed by how the various ingredients came together seamlessly, each one complementing the others. The sweet and tart notes of the dried longans and lychees balance the earthy undertones of the lotus seeds and chestnuts.

Advertisement

The toasted peanuts and pine nuts add a delightful crunch, while the goji berries provide a pop of color and a subtle hint of tartness.

As you push your empty bowl aside, you can't wait to try your hand at creating this dish again, perhaps experimenting with different dried fruits or nuts to put your own spin on this time-honored classic.

Frequently Asked Questions

Is Eight Treasure Rice a Type of Chinese Cuisine?

Yes, eight treasure rice is a type of Chinese cuisine. It's a traditional rice dish that features a variety of ingredients like dried fruits, nuts, and other savory and sweet components.

What Are the Eight Treasures Used in the Dish?

The eight treasures used in the dish typically include a variety of dried fruits, nuts, and seeds. These treasures are carefully selected to create a harmonious blend of flavors and textures.

How Long Does It Take to Prepare Eight Treasure Rice?

Preparing this dish takes some time, but it's worth it. You'll need around 45 minutes to an hour to get everything chopped, cooked, and assembled. Don't be daunted – the end result is a delightful, flavorful rice dish.

Advertisement

Is Eight Treasure Rice Suitable for Vegetarians or Vegans?

Yes, eight treasure rice can be suitable for vegetarians or vegans, depending on the specific ingredients used. You'll want to carefully check the recipe to ensure it doesn't contain any animal-based products.

Can Eight Treasure Rice Be Served as a Main Dish or Dessert?

You can serve this dish as either a main course or a dessert, depending on your preferences and the other items in your meal. It's a versatile option that can be tailored to your needs.

Advertisement

Chinese Cuisine

Mian Bao Xia: Chinese Shrimp Toast You’ll Want to Try

With its irresistible crunch and tender shrimp filling, this authentic Chinese shrimp toast is a must-try delicacy that will transport your taste buds to the vibrant streets of Cantonese cuisine.

Published

on

delicious chinese shrimp toast

Get ready to indulge in a mouthwatering Chinese classic – mian bao xia, or shrimp toast! This crispy delight has graced Cantonese tables for centuries, and it's easy to see why. Start with fresh, finely chopped shrimp that's mixed with savory seasonings. Spread the mixture onto slices of bread, then fry them to golden-brown perfection. The result is a harmony of textures – the satisfying crunch of toast and the tender sweetness of shrimp. Serve these up hot, and you'll understand why this beloved snack has become a global favorite. Keep reading to discover the easy steps to recreate this authentic Chinese treat at home.

Key Takeaways

  • Shrimp toast is a classic Cantonese dish that has evolved over centuries, offering a delightful balance of flavors and textures.
  • Preparing shrimp toast involves finely chopping fresh shrimp, mixing it with seasonings, and coating bread slices before frying for a crispy exterior.
  • Spreading the shrimp mixture evenly on the bread and achieving the perfect golden-brown color are crucial steps for a successful shrimp toast.
  • Serving shrimp toast immediately after frying ensures the warmth and crunchiness are preserved, enhancing the overall eating experience.
  • Shrimp toast is a versatile and beloved snack that showcases the artistry of Cantonese cuisine and can be easily recreated at home.

History

historical events and contexts

Shrimp toast's origins can be traced back to the Cantonese cuisine of southern China. This tasty snack has been a beloved part of Chinese culinary tradition for centuries.

It's believed that shrimp toast first emerged during the Qing dynasty, when chefs experimented with creative ways to showcase the fresh seafood abundant in coastal regions.

Over time, the recipe evolved, with different variations developing across China. Some cooks added minced pork or other mix-ins to the shrimp filling, while others played with the shape and size of the toast.

Today, shrimp toast remains a staple in Cantonese restaurants and is cherished for its irresistible combination of crispy bread, savory shrimp, and aromatic seasonings.

Whether you're enjoying it as an appetizer or a snack, shrimp toast is a delightful taste of Chinese culinary history. Its popularity has even spread beyond China, making it a beloved dish around the world.

Advertisement

Cooking Steps

prepare measure cook serve

To begin the cooking process, gather all the necessary ingredients and equipment. You'll need shrimp, bread, egg, cornstarch, and oil for frying.

First, peel and devein the shrimp, then finely chop them into a paste. In a bowl, combine the shrimp, breadcrumbs, an egg, and a pinch of cornstarch. Mix everything together until it forms a sticky dough.

Next, take a slice of bread and spread the shrimp mixture evenly on one side. Gently press the mixture down to help it adhere.

In a skillet, heat up some oil over medium-high heat. Carefully place the shrimp toast, shrimp-side down, into the hot oil. Fry until golden brown, about 2-3 minutes per side. Drain the fried shrimp toast on a paper towel-lined plate.

Serve the crispy, golden shrimp toast warm, garnished with chopped scallions or sesame seeds if desired. Enjoy this delightful Chinese appetizer!

Step 1. Finely Chop Fresh Shrimp

chop fresh shrimp finely

First, take the fresh shrimp and finely chop them.

You'll want to make sure they're chopped into small, uniform pieces. Don't worry if it takes a little while – the key is to get them nice and fine so they'll blend perfectly into the toast mixture.

Advertisement

Use a sharp knife and take your time, making sure to mince the shrimp thoroughly.

Once they're all nicely chopped up, you can move on to the next step.

Don't be afraid to really get in there and chop away – the finer the shrimp, the better the toast will turn out.

Just be careful with your fingers!

With the shrimp all chopped up, you're one step closer to creating that delicious, authentic Chinese shrimp toast.

Advertisement

Keep going, you're doing great!

Step 2. Mix Shrimp With Seasonings

season shrimp with spices

With the shrimp finely chopped, you'll now want to mix them with a few key seasonings. In a medium bowl, combine the chopped shrimp with a teaspoon of soy sauce, a dash of toasted sesame oil, and a sprinkle of white pepper. Stir everything together until the shrimp is evenly coated.

Next, add a couple of tablespoons of cornstarch to the bowl. The cornstarch will help bind the shrimp mixture and create a lovely, creamy texture.

Using your clean hands, gently mix the cornstarch into the shrimp, being careful not to overmix and toughen the shrimp.

Step 3. Spread Shrimp Mixture on Bread

spread shrimp on bread

With the shrimp seasoning ready, you'll now want to spread it evenly atop slices of bread. Use a butter knife or the back of a spoon to gently distribute the savory mixture across the surface of each slice.

Make sure to cover the bread completely, getting those delightful shrimp bits all the way to the edges.

Once the shrimp is spread, you can start to get creative! Grab some sharp kitchen scissors and snip the bread into fun shapes – triangles, rectangles, or even little shrimp-inspired designs. This will make your finished shrimp toasts look extra appetizing.

Advertisement

Now, it's time to get those toasts into the oven. Bake them at a high temperature, around 400°F, for about 10-12 minutes.

Keep an eye on them, as you want the bread to turn golden brown and the shrimp to become lightly crispy. When they're done, you'll have a tray of perfectly toasted shrimp bites, ready to delight your family and friends.

Step 4. Fry Coated Bread Slices

fry coated bread slices

After spreading the shrimp mixture on the bread slices, you'll want to fry them to achieve that signature crispy texture.

Heat up a skillet or pan over medium-high heat and add a generous amount of oil. Carefully place the coated bread slices into the hot oil and let them sizzle for a minute or two on each side. Keep an eye on them, flipping gently, until they turn a beautiful golden-brown. The key is to fry them until they're crisp on the outside but still tender on the inside.

Once they're done, transfer the fried shrimp toast slices to a paper towel-lined plate to drain any excess oil. This helps create that delightful crunch that makes this dish so irresistible.

With the shrimp mixture sealed inside the crispy bread, you're well on your way to enjoying an authentic taste of Chinese cuisine right in your own kitchen. Get ready for the compliments to start rolling in!

Advertisement

Step 5. Serve Immediately While Hot

serve hot immediately enjoy

Once the shrimp toast slices have finished frying, don't let them sit around.

You'll want to serve them immediately while they're hot and crispy. The key is to enjoy these tasty bites at the peak of their flavor and texture.

As soon as they come out of the oil, transfer them to a paper towel-lined plate to drain off any excess grease. Then, waste no time getting them to the table.

Your guests will be eager to pop these little shrimp-filled toasts into their mouths. The combination of the crunchy bread, savory shrimp, and aromatic seasonings is simply irresistible when it's fresh off the stove.

Plus, the heat enhances the shrimp's natural sweetness and brings out the richness of the filling.

Don't let these shrimp toasts cool down – serve them up piping hot for the ultimate snacking experience.

Advertisement

Your family and friends will be delighted by this authentic Chinese appetizer.

Final Thoughts

concluding reflections and insights

Shrimp toast's timeless appeal lies in its perfect balance of flavors and textures.

Whether you're enjoying it as an appetizer or a snack, the warm, crispy bread combined with the savory, slightly sweet shrimp topping is simply irresistible.

What sets this dish apart is the care and attention to detail that goes into crafting it.

From the delicate shrimp mixture to the perfectly toasted bread, every component works together harmoniously.

And the best part? Shrimp toast is surprisingly easy to make at home, allowing you to savor its deliciousness anytime.

Advertisement

Frequently Asked Questions

What Is the Origin of the Name "Mian Bao Xia"?

The name "mian bao xia" refers to the Chinese dish of shrimp toast. It's a combination of the Mandarin words for "wheat bread" (mian bao) and "shrimp" (xia), reflecting the primary ingredients used in this popular snack.

Can I Use Other Types of Bread for the Toast?

You can certainly use other types of bread for the toast. White bread, sourdough, and even brioche would all work well. The key is to choose a bread that can hold up to the shrimp mixture.

How Long Can the Leftover Shrimp Toast Be Stored?

The leftover shrimp toast can be stored in the fridge for 2-3 days. Just make sure to keep it in an airtight container. You can reheat it in the oven or toaster before serving.

Can I Fry the Shrimp Toast Ahead of Time?

Yes, you can fry the shrimp toast ahead of time. Once fried, you can store it in the refrigerator for up to 3 days. Just reheat it in the oven or air fryer before serving to maintain its crispy texture.

Is There a Vegetarian or Vegan Version of This Dish?

You can easily make a vegetarian or vegan version of this dish by substituting the shrimp with finely chopped mushrooms, tofu, or a plant-based protein of your choice. Just follow the same cooking method for a delicious meatless alternative.

Advertisement

Continue Reading

Chinese Cuisine

Yunnan Cross-Bridge Rice Noodles

Nestled in the heart of Yunnan, China, Yunnan cross-bridge rice noodles offer a mouthwatering journey through the province’s rich culinary heritage, leaving you craving for more.

Published

on

yunnan rice noodle dish

Yunnan cross-bridge rice noodles are a mouthwatering dish hailing from the vibrant province of Yunnan, China. Tracing their roots to the late Qing dynasty, these noodles were accidentally created by Yunnanese scholars crossing the Long Bridge over the Yangtze River. Today, this UNESCO-recognized culinary treasure features a unique cooking method – you'll assemble the ingredients, then pour in hot, flavorful broth to create an unforgettable dining experience. Get ready to dive into tender rice noodles, fresh veggies, and succulent proteins, all expertly blended for a true taste of Yunnan's rich heritage. The versatility of Yunnan cross-bridge rice noodles reflects the region’s culinary diversity, with each bowl offering a comforting yet customizable experience. Much like **yangzhou fried rice ingredients**, which can vary but commonly include shrimp, char siu pork, peas, and eggs, the beauty of this dish lies in the freedom to choose your own medley of vegetables, meats, and toppings. Whether enjoyed in a local eatery or prepared at home, each bowl promises a delightful fusion of flavors, paying homage to Yunnan’s storied gastronomic traditions.

Key Takeaways

  • Yunnan Cross-Bridge Rice Noodles have their origins in the late Qing dynasty of Yunnan province, created by Yunnanese scholars crossing the Long Bridge over the Yangtze River.
  • This noodle dish is recognized as a UNESCO intangible cultural heritage, representing the rich heritage and culinary traditions of Yunnan province.
  • The unique cooking method involves assembling ingredients and pouring hot broth over them, creating a multi-textural dining experience with robust flavors.
  • Yunnan Cross-Bridge Rice Noodles are traditionally served at family gatherings and celebrations, reflecting the dish's cultural significance and symbolism of hospitality.
  • The dish features a flavorful broth, chewy rice noodles, fresh vegetables, and various proteins, offering a balanced and customizable nutritional profile.

History

The origins of Yunnan cross-bridge rice noodles can be traced back to the late Qing dynasty, when Yunnan province's diverse culinary traditions began to take shape.

This unique dish was created by a group of diligent Yunnanese scholars who'd often carry their lunch with them as they crossed the Long Bridge over the Yangtze River. One day, as they were eating, the noodles fell into the hot soup below – and a tasty new dish was born!

The scholars quickly realized that submerging the noodles in the hot broth was actually the key to the dish's delectable flavor. The heat softened the rice noodles while infusing them with the rich, aromatic broth.

Over time, cross-bridge noodles became a beloved specialty in Yunnan, known for their springy texture and mouthwatering savory notes.

Today, this centuries-old recipe is still prepared with care, using fresh regional ingredients that celebrate Yunnan's vibrant culinary heritage.

Advertisement

Recipe

Yunnan cross-bridge rice noodles, also known as "Crossing the Bridge" noodles, is a popular dish originating from the Yunnan province in China. This dish is renowned for its flavorful broth and chewy rice noodles. The unique cooking method involves carefully assembling the ingredients and pouring hot broth over them, creating a visually stunning and delicious meal.

The dish is typically served family-style, with the broth and noodles presented separately, allowing each diner to customize their bowl to their liking. The process of "crossing the bridge" refers to the tradition of the chef bringing the hot broth to the table, creating a sense of anticipation and theater.

Ingredients:

  • 8 oz rice noodles
  • 4 cups chicken or vegetable broth
  • 1 lb boneless, skinless chicken thighs, thinly sliced
  • 2 eggs, beaten
  • 1 cup thinly sliced cabbage
  • 1 cup bean sprouts
  • 1/2 cup thinly sliced green onions
  • 2 cloves garlic, minced
  • 1 tbsp soy sauce
  • 1 tsp sesame oil
  • 1/2 tsp white pepper

Cooking Instructions:

In a large pot, bring the broth to a boil. Reduce heat to low and keep the broth at a gentle simmer.

Arrange the chicken, eggs, cabbage, bean sprouts, and green onions on a serving platter. Serve the hot broth, noodles, and garnishes separately, allowing each diner to customize their bowl.

Advertisement

When cooking this dish, it's important to slice the ingredients thinly to ensure quick cooking and easy assembly. Additionally, make sure the broth is piping hot when served, as the contrast between the hot broth and the fresh, cool ingredients is a key part of the experience.

Enjoy your Yunnan cross-bridge rice noodles!

Cooking Steps

Soak those rice noodles in water until they're nice and soft.

Once the broth's bubbling away, you can start arranging everything – the noodles, the broth, and all the tasty toppings.

Don't forget to add your favorite fixings, then serve it up piping hot for the best slurping experience!

Advertisement

Step 1. Soak Rice Noodles in Water

soak rice noodles thoroughly

Grab a large bowl and fill it with lukewarm water. This is where you'll soak your rice noodles to get them nice and soft.

Make sure the water covers the noodles completely, as they'll expand as they soak. Give the noodles about 20-30 minutes to soak, stirring them occasionally to ensure even softening. You'll know they're ready when they've become pliable and easy to bend without breaking.

Once the noodles have soaked, drain them in a colander. Rinse them under cool running water to remove any excess starch.

This step helps prevent the noodles from sticking together later on. Gently squeeze out any excess water, being careful not to damage the delicate noodles.

Now they're all set to be added to your hot broth or stir-fried dishes! Get ready to enjoy the chewy, slurpable goodness of your Yunnan cross-bridge rice noodles.

Step 2. Bring Broth to a Boil

bring broth to boil

Next, bring a large pot of broth to a rolling boil. This'll be the key to unlocking the mouthwatering flavors of your Yunnan cross-bridge rice noodles.

Make sure to use a generous amount of broth – you want enough to fully submerge the noodles. As the broth heats up, you'll start to see those lively bubbles burst on the surface. That's your cue that it's ready!

Advertisement

Don't be afraid to crank up the heat to get it going. Once it's at a full boil, you can reduce the heat slightly to maintain that steady simmer.

Now, grab your soaked rice noodles and gently add them to the hot broth. Stir them around to make sure they're fully submerged and separated.

Let the noodles cook for just a minute or two until they're tender and pliable. You want them to have a nice bite, not be mushy.

With the broth boiling and the noodles ready, you're one step closer to slurping up a delicious bowl of Yunnan goodness!

Step 3. Arrange Noodles, Broth, and Toppings

arrange noodles broth toppings

With the broth at a rolling boil and the noodles ready, it's time to assemble your Yunnan cross-bridge rice noodle dish.

First, grab a large bowl and carefully pour in some of the steaming hot broth.

Advertisement

Now, use your chopsticks to gently lower the freshly cooked noodles into the broth. Arrange them neatly, making sure they're fully submerged.

Next, it's time for the fun part – adding your favorite toppings! You can load up your bowl with slices of tender beef, juicy chicken, or crisp veggies like baby bok choy.

Don't forget to sprinkle on some chopped scallions and cilantro for extra flavor and color.

Finally, give everything a gentle stir to combine the ingredients.

Your Yunnan cross-bridge rice noodle masterpiece is now ready to enjoy! The hot, fragrant broth, chewy noodles, and tasty toppings make for a truly delightful and satisfying meal.

Advertisement

Step 4. Add Desired Toppings

add toppings as desired

With the noodles and broth ready, you can now start adding your desired toppings. The fun part is choosing all the tasty treats to top off your bowl!

First, you'll want to add some fresh, crunchy vegetables like thinly sliced cabbage, carrot, and green onion. These add great texture and flavor.

Next, consider adding a protein like roasted chicken, beef, or even soft-boiled eggs for extra heartiness.

Don't forget the herbs – fresh cilantro, mint, and Thai basil will really make the dish pop with their aromatic flavors.

For a bit of crunch, try topping it off with crispy wonton strips or peanuts.

Finally, a drizzle of chili oil or sriracha will give it a delightful kick of heat.

Advertisement

Get creative and customize your bowl exactly how you like it! With all these amazing toppings, your Yunnan Cross-Bridge Rice Noodles are about to be taken to the next level of deliciousness.

Step 5. Serve Immediately, While Hot

serve hot immediately enjoy

Once the noodles and toppings are ready, serve the dish immediately while it's hot. The steaming broth, tender noodles, and aromatic toppings are at their best when enjoyed right away.

Don't let the food cool down – dive in and savor every delicious bite!

Transfer the noodles and toppings to a big bowl, then ladle the hot broth over the top. The noodles will soak up the flavorful liquid, creating a comforting and satisfying meal.

Make sure to include all your favorite toppings for the ultimate Cross-Bridge Rice Noodle experience.

As you take that first slurpy spoonful, you'll be transported to the bustling markets of Yunnan. The combination of textures and flavors is simply irresistible.

Advertisement

Final Thoughts

As you've explored the depths of Yunnan's renowned cross-bridge rice noodles, it's clear that this culinary delight offers a unique and captivating dining experience.

From the artful preparation to the robust flavors, every bite transports you to the heart of this vibrant region. What truly sets these noodles apart is the dedication and passion of the chefs who've perfected the craft over generations. The spicy dan dan noodles recipe is a shining example of their expertise, with its balance of heat and savory flavors. Each bowl is a homage to tradition, a testament to the artistry and skill passed down through the years. With every mouthful, you can taste the history and culture of this celebrated dish.

As you reflect on your journey through this culinary adventure, take a moment to savor the memories.

Picture the steaming bowls, the aromatic broth, and the interplay of textures that make each mouthful a delightful discovery.

This is more than just a meal – it's a cultural experience that celebrates the rich heritage of Yunnan and the enduring power of food to bring people together.

Advertisement

Frequently Asked Questions

Can the Noodles Be Made With Different Types of Rice?

You can certainly use different types of rice to make rice noodles. The choice of rice variety will affect the texture and flavor, so experiment to find the one that suits your preferences best.

How Long Do the Noodles Typically Last After Being Cooked?

How long do the cooked noodles typically last? Well, it depends on the type of noodles, but generally, they'll stay fresh for 3-5 days when stored properly in the fridge. Just be sure to keep 'em covered to prevent drying out.

Are There Any Dietary Restrictions Associated With This Dish?

Regarding dietary restrictions, the dish may not be suitable for individuals with gluten or nut allergies. It's always best to inquire about the specific ingredients used to ensure it aligns with your dietary needs.

Can the Toppings Be Customized to Individual Preferences?

You can customize the toppings to your individual preferences. The dish is highly versatile, allowing you to tailor the ingredients to your liking and dietary needs. You have the freedom to create a personalized version of this dish.

Are There Any Health Benefits to Consuming Yunnan Cross-Bridge Rice Noodles?

When you consume rice noodles, you can enjoy some health benefits. They're typically low in fat and calories, and provide complex carbs that can fuel your body. Plus, they're gluten-free, making them a great option for those with dietary restrictions.

Advertisement

Continue Reading

Chinese Cuisine

Red-Braised Pork Belly

A succulent Hunan classic, red-braised pork belly is a melt-in-your-mouth delight that has captivated generations, with its rich soy and brown sugar flavors. Discover the secrets behind this…

Published

on

savory chinese pork dish

Red-braised pork belly is a scrumptious Chinese dish from Hunan Province that's been passed down for generations. You'll start by searing the pork to get a mouthwatering crust, then simmer it in a rich soy and brown sugar sauce with fragrant spices like star anise and cinnamon. The long, slow cooking makes the pork belly melt-in-your-mouth tender. Garnish it with fresh green onions for a pop of color and crunch. Serve this comforting dish with steamed rice, and you'll see why it's considered a true culinary treasure. Want to learn more about the storied history and cooking techniques behind this irresistible dish?

Key Takeaways

  • Red-Braised Pork Belly is a traditional Chinese dish originating from Hunan province, known for its savory, sweet, and aromatic flavors.
  • The recipe features tender pork belly simmered in a rich sauce with key ingredients like soy sauce, rice wine, and brown sugar.
  • Cooking techniques such as blanching, searing, and long braising are essential for achieving the desired tenderness and flavor complexity.
  • The harmonious balance of flavors and textures, including the tender pork and the crunchy green onion garnish, creates an irresistible culinary experience.
  • Patience and skill development are crucial in preparing this dish, as it can be improved by allowing the flavors to meld over time.

History

The origins of red-braised pork belly can be traced back to the Hunan province of China, where this savory and aromatic dish has been a beloved regional delicacy for centuries.

The heart of this classic recipe lies in the slow-cooking process, which allows the pork's natural flavors to mingle with the rich, caramelized sauce. As the pork simmers away, the fat renders down, creating a melt-in-your-mouth texture that's simply irresistible.

Over time, the dish has become a beloved part of Chinese culinary heritage, with families passing down their cherished techniques and secret ingredients from generation to generation.

Whether enjoyed as a family meal or a special occasion feast, red-braised pork belly remains a beloved staple that continues to delight taste buds across China and beyond. Red-braised pork belly, also known as “hong shao rou” in Mandarin, is a classic Chinese cuisine delicacy that is characterized by its rich, savory flavor and melt-in-your-mouth tenderness. The dish is often prepared by braising thick slices of pork belly in a flavorful mixture of soy sauce, ginger, garlic, and spices until the meat is succulent and the sauce has thickened to a luxurious glaze. Its popularity extends beyond China, as food enthusiasts around the world are drawn to its irresistible combination of sweet, savory, and umami flavors.

Its captivating combination of savory, sweet, and aromatic notes makes it a true culinary treasure, steeped in the rich traditions of Chinese cuisine.

Advertisement

Recipe

Red-Braised Pork Belly is a classic Chinese dish that features tender, flavorful pork belly slowly simmered in a rich, savory sauce. The long braising time allows the pork to become meltingly tender, while the aromatic spices and soy sauce infuse the meat with deep, complex flavors.

The key to the perfect red-braised pork belly is patience. The dish requires a bit of time and attention, but the results are well worth it. The pork belly is first seared to create a golden-brown crust, then simmered in a mixture of soy sauce, rice wine, and spices until the meat is fall-apart tender.

  • 2 lbs pork belly, cut into 1-inch cubes
  • 3 cloves garlic, minced
  • 1 inch ginger, peeled and sliced
  • 1/2 cup soy sauce
  • 1/4 cup rice wine or Shaoxing wine
  • 2 tablespoons brown sugar
  • 2 star anise
  • 2 cinnamon sticks
  • 4 cups chicken or beef stock

In a large Dutch oven or heavy-bottomed pot, sear the pork belly over medium-high heat until golden brown on all sides, about 5-7 minutes. Remove the pork from the pot and set aside.

Reduce the heat to medium, add the garlic and ginger to the pot, and cook for 1-2 minutes until fragrant. Pour in the soy sauce, rice wine, brown sugar, star anise, and cinnamon sticks, and stir to combine.

Add the seared pork belly and stock, and bring the mixture to a boil. Reduce the heat to low, cover the pot, and simmer for 2-3 hours, or until the pork is tender and the sauce has thickened. Adjust the seasoning to taste, and serve the red-braised pork belly with steamed rice, a side of vegetables, and your favorite condiments.

For the best results, be patient and let the pork braise for as long as possible. The longer it cooks, the more tender and flavorful the pork will become.

Advertisement

Additionally, you can prepare the dish a day in advance and let the flavors meld together overnight before reheating and serving.

Cooking Steps

Slice that pork belly into chunky pieces, then blanch them in boiling water to get rid of any impurities.

Next, you'll caramelize the pork in a skillet to lock in the flavor.

Step 1. Slice Pork Belly Into Chunks

slice pork belly chunks

Before you can begin cooking the pork belly, you'll need to slice it into bite-sized chunks. First, grab a sharp knife and a sturdy cutting board.

Carefully place the pork belly on the board, then use the knife to cut the meat into 1-inch pieces. Don't worry if they're not perfectly uniform – the irregular shapes will add to the rustic charm of the dish.

As you work, try to keep the pieces evenly sized so they cook at the same rate. Once you've sliced the entire pork belly, you can give the chunks a quick rinse under cold water to remove any stray bits of fat or skin.

Advertisement

Dry them off with some paper towels, and you're ready to move on to the next step! Cooking the pork belly low and slow is the key to achieving that melt-in-your-mouth texture, so take your time and enjoy the process.

Your patience will definitely pay off in the end.

Step 2. Blanch Pork Belly in Boiling Water

blanch pork belly boiling

The first step in the cooking process is to blanch the pork belly chunks in boiling water. This important step helps to remove any impurities or excess fat from the meat, giving you a cleaner, more refined flavor in the final dish.

Simply fill a large pot with water and bring it to a rolling boil over high heat. Once the water is bubbling vigorously, carefully add the sliced pork belly pieces. Let them soak for about 2 to 3 minutes, then use a slotted spoon to scoop them out and transfer them to a clean bowl or plate.

Don't worry if the pork looks a bit pale and bland at this stage – the real magic will happen during the next steps of the cooking process. With the pork belly now prepped and ready, you can move on to the next exciting phase of this delicious recipe!

Step 3. Caramelize Pork Belly in Skillet

caramelize pork belly skillet

With the pork belly now prepped and ready, grab a large, heavy-bottomed skillet and place it over medium-high heat.

Once the skillet is nice and hot, add a generous drizzle of oil and let it heat up for a minute or two.

Advertisement

Now, carefully add the blanched pork belly slices to the pan, making sure they don't overlap.

You'll want to let them sizzle and brown for about 2-3 minutes per side, turning them occasionally with tongs.

As the pork sears, you'll start to see the edges turn golden and crispy – that's exactly what you're going for!

Keep an eye on them, adjusting the heat as needed to prevent burning.

Once both sides are beautifully caramelized, transfer the pork to a plate and set it aside.

Advertisement

Don't worry, we're not done yet – there are still a few steps to go before this delicious pork belly is ready to enjoy!

Step 4. Simmer Pork in Aromatic Liquid

pork simmered in aromatics

Next, add the caramelized pork belly slices to a Dutch oven or large, heavy-bottomed pot.

Pour in enough water or broth to just cover the pork. Toss in some fragrant ingredients like star anise, cinnamon sticks, cloves, and ginger slices. The pungent aroma will make your mouth water!

To complement your meal, consider serving it with a soothing cup of herbal tea, as many varieties can aid in digestion and enhance your dining experience, such as herbal teas with digestion benefits.

Bring the liquid to a boil, then reduce the heat to a gentle simmer. Let the pork slowly braise for about an hour, or until it's meltingly tender. The longer you simmer it, the more the flavors will blend together.

Be patient – it's well worth the wait! Occasionally, skim any foam or fat that rises to the surface. This will keep your dish nice and clean.

Advertisement

When the pork is super soft, you're ready for the next step. Get ready to experience the deep, rich flavors of this classic Chinese dish!

Step 5. Garnish With Green Onions

garnish dish with onions

Finely slice some green onions to garnish the tender, red-braised pork belly. You'll want those vibrant, green slices to create a colorful contrast against the rich, caramelized meat. Sprinkle them generously over the top – the fresh, oniony flavor will perfectly complement the savory-sweet pork.

Don't be shy with the green onions! The more, the merrier. They'll add a lovely crunch and brightness to each bite. Plus, the pop of green makes the dish look extra appetizing. Imagine how nice those slender green onion pieces will look, nestled among the shiny, reddish-brown pork cubes.

Once you've added the green onions, your red-braised pork belly is ready to serve. Scoop it up and enjoy the delightful interplay of flavors and textures. The tender pork, the aromatic cooking liquid, and the crisp green onions – it's a harmony of yum that's sure to delight your taste buds.

Final Thoughts

Ultimately, the essence of this red-braised pork belly dish lies in its harmonious balance of flavors and textures. The tender, melt-in-your-mouth pork, combined with the rich, caramelized sauce, creates a truly irresistible experience.

The vibrant green onions you sprinkled on top not only add a pop of color but also a delightful crunch, complementing the dish perfectly.

Advertisement

As you savor the final bites, you can't help but feel a sense of accomplishment. This recipe has allowed you to explore the depths of Chinese cuisine and expand your culinary horizons.

The techniques you've learned, from searing the pork to expertly reducing the sauce, will undoubtedly serve you well in future culinary adventures.

Frequently Asked Questions

Is Red-Braised Pork Belly Suitable for Vegetarians?

No, red-braised pork belly is not suitable for vegetarians. Pork belly is a type of meat, and the dish is prepared using animal-based ingredients, making it unsuitable for those following a vegetarian diet.

Can I Substitute the Pork Belly With Another Cut of Meat?

You can absolutely substitute the pork belly with another cut of meat. Try using chicken thighs, beef brisket, or even tofu for a vegetarian option. The key is to adjust the cooking time accordingly.

How Long Can the Dish Be Stored in the Refrigerator?

Stored leftovers can typically last 3-4 days in the refrigerator. Be sure to refrigerate the dish in an airtight container as soon as it's cooled down. This will help preserve the flavors and prevent spoilage.

Advertisement

Can I Use a Slow Cooker Instead of a Stovetop?

You can absolutely use a slow cooker instead of a stovetop. The slow cooking process will infuse the flavors and tenderize the meat, just like on the stovetop. Give it a try and see how it turns out!

Does the Dish Contain Any Gluten or Nut Ingredients?

The dish does not contain any gluten or nut ingredients. It's a gluten-free and nut-free recipe, so you don't have to worry about those dietary restrictions when preparing it.

Continue Reading

Affiliate Disclaimer
As an affiliate, we may earn a commission from qualifying purchases. We get commissions for purchases made through links on this website from Amazon and other third parties.

Advertisement

Vetted

top local car washes top local car washes
Vetted2 months ago

14 Best Car Washes Near You for a Sparkling Clean Ride

I discovered the 14 best car washes near you that promise a sparkling clean ride, and you won't want to...

top mops for 2024 top mops for 2024
Vetted2 months ago

The 15 Best Mops of 2025 – Your Ultimate Guide to a Spotless Home

Find the perfect mop for your cleaning needs in 2025, and discover how these top choices can revolutionize your home...

top women s fragrances 2024 top women s fragrances 2024
Vetted2 months ago

15 Best Perfumes for Women in 2025 – A Fragrance Guide You Can’t Miss

Keen to discover the top 15 perfumes for women in 2025? Uncover unique scents that will elevate your fragrance game!

top local bars guide top local bars guide
Vetted2 months ago

14 Best Bars Near You for an Unforgettable Night Out

Looking for the perfect bar to elevate your night out? Discover the 14 best spots that promise unforgettable experiences!

luxurious beard oil selection luxurious beard oil selection
Vetted2 months ago

15 Best Beard Oils for a Luxurious Grooming Experience in 2025

Shop the 15 best beard oils for a luxurious grooming experience in 2025 and discover which ones will elevate your...

top college laptops 2024 top college laptops 2024
Vetted2 months ago

15 Best College Laptops of 2025: The Ultimate Guide for Students

With our guide to the 15 best college laptops of 2025, discover which powerful models will elevate your academic experience...

waterproof mascaras for tears waterproof mascaras for tears
Vetted2 months ago

15 Best Waterproof Mascaras That Will Survive Any Tear-Jerker

Outstanding waterproof mascaras await to keep your lashes flawless through any emotional moment; discover which ones made the top 15...

top flavorful disposable vapes top flavorful disposable vapes
Vetted2 months ago

15 Best Disposable Vapes of 2025: Top Picks for Flavor and Convenience

Prepare to discover the 15 best disposable vapes of 2025 that blend exceptional flavor and convenience, but which ones truly...

refreshing lunch salad ideas refreshing lunch salad ideas
Vetted2 months ago

15 Best Salads Near You That Will Freshen Up Your Lunch Routine

Transform your lunch with the 15 best salads nearby that will tantalize your taste buds and leave you craving more...

top convertible car seats top convertible car seats
Vetted2 months ago

15 Best Convertible Car Seats of 2025 – Safety and Comfort for Your Little One

Get ready to discover the top 15 convertible car seats of 2025 that blend safety and comfort—find out which models...

delicious fast food breakfast delicious fast food breakfast
Vetted2 months ago

15 Best Fast Food Breakfast Options That Will Make Your Mornings Delicious

Uncover the 15 best fast food breakfast options that will transform your mornings into a delicious experience you won't want...

stylish contacts for vision stylish contacts for vision
Vetted2 months ago

14 Best America’s Contacts for Clear Vision and Style

Browse through the 14 best contact lenses in America for clear vision and style, and discover which one perfectly complements...

Trending